Join Us On Social Media!

|

|

|
Download The App!
Login To
Remove Ads
Remove Ads
Login To
Remove Ads
Remove Ads
Model Boats Website
 Master Seaman)

 Liked Re: Norman McLeod Rogers 2 years ago
 Liked New Glue on the Block 2 years ago
 Liked Re: Norman McLeod Rogers 2 years ago
 Liked Keel 2 years ago
 Liked Re: Norman McLeod Rogers 2 years ago
 Liked Re: Norman McLeod Rogers 2 years ago


United Kingdom
Recent Posts
💬 Re: Norman McLeod Rogers
2 years ago by 🇬🇧 Seaspray ( Warrant Officer)
Warrant Officer)✧ 17 Views · 0 Likes
Flag
💬 Add Comment
HI John I'll have a go at that thanks
▲
⟩⟩
No likes yet
This member will receive 1 point
for every like received
This member will receive 1 point
for every like received
Login To
Remove Ads
Remove Ads
📝 Norman McLeod Rogers
2 years ago by 🇬🇧 Seaspray ( Warrant Officer)
Warrant Officer)✧ 28 Views · 1 Like · 2 Comments
Flag
💬 Add Comment
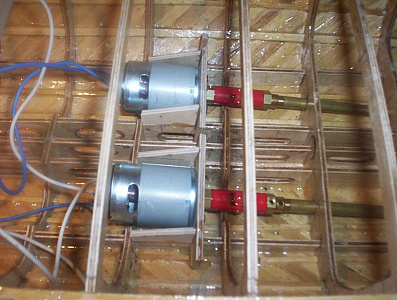
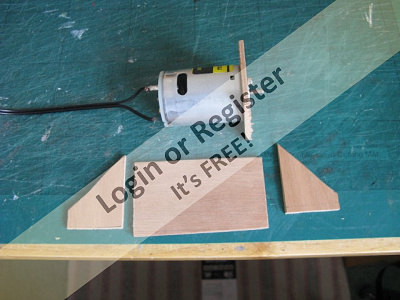
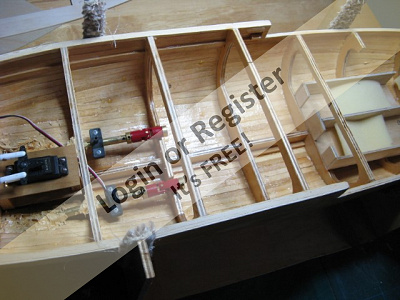
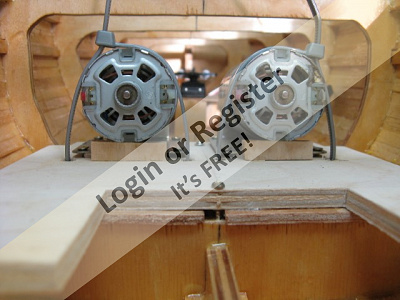
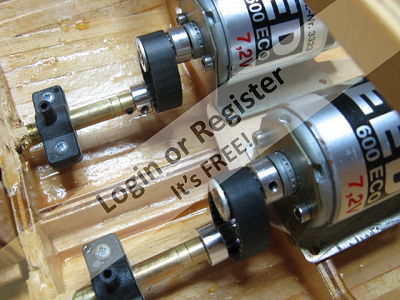
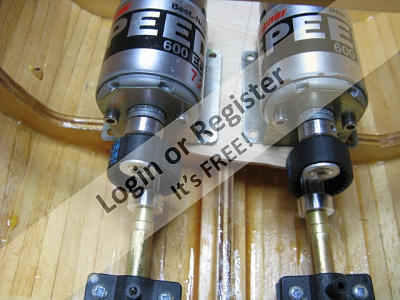
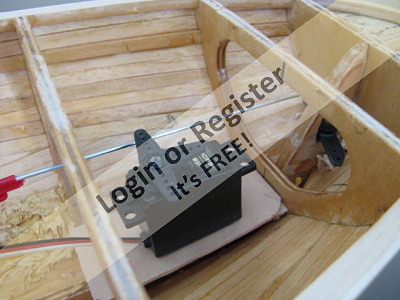
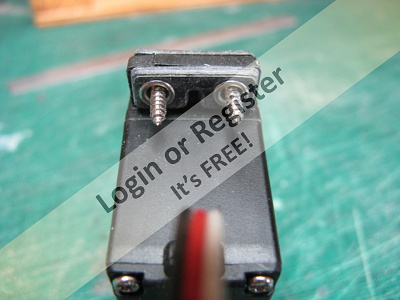
Had a choice of chain drive, 1to 1 gearbox drive, cog drive. and belt drive. Opted for belt drive ( not the teeth drive) Made a pair of engine mounts out of scrap ply. Mounted them on 12 mm ply to get the right tightness between the two pulleys. Using a 20mm diameter x 2.5 thick set of belts belts from Thernobotsonline.com Got the pulleys from Mobile Marine but their belts were too thick and long. Used their pulleys. Pic 2 is where I'll put holes in for motor to take air in. Pic 4 the three screws is to be able to remove motor/ mount quickly.


▲
⟩⟩
Colin H
💬 Re: Norman McLeod Rogers
2 years ago by 🇬🇧 Seaspray ( Warrant Officer)
Warrant Officer)✧ 33 Views · 0 Likes
Flag
💬 Add Comment
Hi John I'll switch to MFA Low drain 550s. See you have supports running parallel to support the mounts. Will copy that idea looks sound. Something in the back of my mind said to resin / fibreglass the inside of the hull. It may need it in future Will make them out of ply as it will make a strong mountings. Many thanks again 👍
▲
⟩⟩
No likes yet
This member will receive 1 point
for every like received
This member will receive 1 point
for every like received
💬 Re: Norman McLeod Rogers
2 years ago by 🇬🇧 Seaspray ( Warrant Officer)
Warrant Officer)✧ 52 Views · 0 Likes
Flag
💬 Add Comment
Rowen So am I and finding the problem it may help others Alignment, it was near enough spot on. When the Mtroniks and motors were set up on the work desk. There was no screaming, till I pressed down on the running motor. what a relieve I won't have to spent any more money well, for a wee while. Looking at two methods. Rubber belt drive and have ordered 3 sets different sizes, as suck it and see job. The brass coloured pulleys were bought from MFA. Other mount is on a rack of pieces of wood for a mount and the motor secured by elastic bands. This'll mean the motors will be in a upside down situation. Mean while doing some investigation on dumpy mounts to get an idea of things.
▲
⟩⟩
No likes yet
This member will receive 1 point
for every like received
This member will receive 1 point
for every like received
📝 Norman McLeod Rogers
2 years ago by 🇬🇧 Seaspray ( Warrant Officer)
Warrant Officer)✧ 58 Views · 3 Likes · 4 Comments
Flag
💬 Add Comment
Well I sussed it out, the motor were screaming because they were lashed down too tight to the wood. Must have taken more that usual power from the Mtroniks esc to have the motors run. Also the platform they were strapped to enhanced the scream. Both on the bench working now Also while passing the time I strengthen the below motor area and 2 section aft with fibreglass tissue. Looking into the possibility of changing the drive system to pulleys and rubber band system. Working out the belt diameter, done this with the Meteor and it worked. Many thanks to members for their help and assistance.
▲
⟩⟩
RonBMK2
Len1
Colin H
💬 Re: Norman McLeod Rogers
2 years ago by 🇬🇧 Seaspray ( Warrant Officer)
Warrant Officer)✧ 62 Views · 0 Likes
Flag
💬 Add Comment
Hi ToraDog Went on to the site you gave a link to and signed up. I'll look thru and see what is what. It'll depend on what motors I get and will put the Graupner motors to the back of the cupboard. Thanks again
▲
⟩⟩
No likes yet
This member will receive 1 point
for every like received
This member will receive 1 point
for every like received
💬 Re: Norman McLeod Rogers
2 years ago by 🇬🇧 Seaspray ( Warrant Officer)
Warrant Officer)✧ 63 Views · 0 Likes
Flag
💬 Add Comment
Thanks John I am open to the upside down motor idea. Meanwhile looking at alternative motors and size. Also I applied fibreglass to the hull around the prop ends and the further two compartment aft. Scrapping the belt system will try and have a direct coupling setup if possible. Took ages to line up the belts.
▲
⟩⟩
No likes yet
This member will receive 1 point
for every like received
This member will receive 1 point
for every like received
📝 Norman McLeod Rogers
2 years ago by 🇬🇧 Seaspray ( Warrant Officer)
Warrant Officer)✧ 70 Views · 1 Like · 5 Comments
Flag
💬 Add Comment
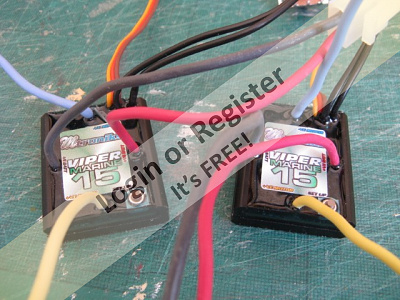
Have since discovered Electronize are closed for business totally.
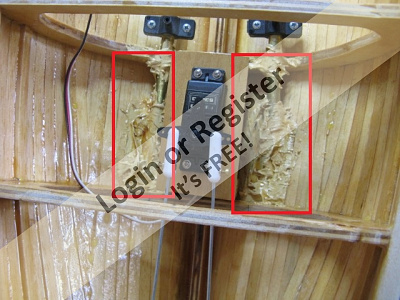
Pic 1 my two Mtroniks Viper esc they squeal / singed when operated. So its a bin job.
Pic 2 As the motors were a wee bit loud and the vibration from them echoed thru 6mm wooden platform. The hole lot was removed carefully and no damage to the hull.
Rework I like it .
Pic 1 my two Mtroniks Viper esc they squeal / singed when operated. So its a bin job.
Pic 2 As the motors were a wee bit loud and the vibration from them echoed thru 6mm wooden platform. The hole lot was removed carefully and no damage to the hull.
Rework I like it .
▲
⟩⟩
Colin H
📝 Norman McLeod Rogers
2 years ago by 🇬🇧 Seaspray ( Warrant Officer)
Warrant Officer)✧ 74 Views · 0 Likes
Flag
💬 Add Comment
Any member know if Dave at Electronize is still available on the phone.
▲
⟩⟩
No likes yet
This member will receive 1 point
for every like received
This member will receive 1 point
for every like received
📝 Norman McLeod Rogers
2 years ago by 🇬🇧 Seaspray ( Warrant Officer)
Warrant Officer)✧ 76 Views · 2 Likes
Flag
💬 Add Comment
Firstly removed the red wire on the esc wiring which makes it become the slave. Got all the running gear installed and the throttle stick travel set on the Tx/ Mtronices Viper 15 . Just these speed controllers are making a screaming noise when operating. any ideas what the problem could be ? Everything else is is running fine.
here is a link i was looking at


here is a link i was looking at

▲
⟩⟩
Julio
Colin H
📝 Norman McLeod Rogers
2 years ago by 🇬🇧 Seaspray ( Warrant Officer)
Warrant Officer)✧ 78 Views · 1 Like
Flag
💬 Add Comment
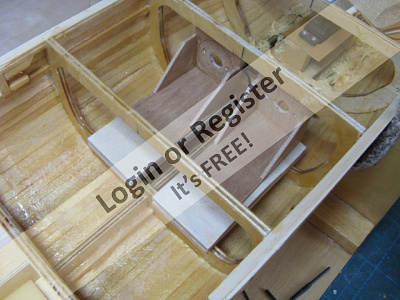
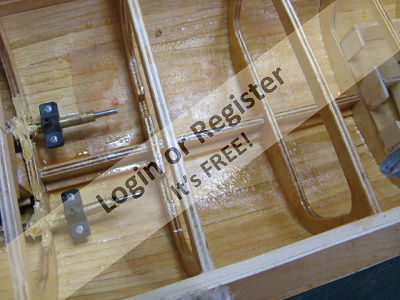
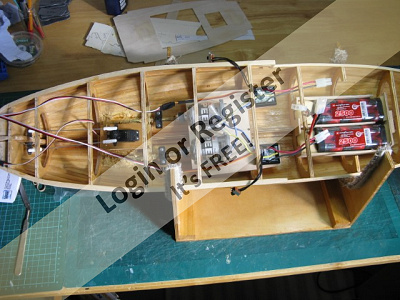
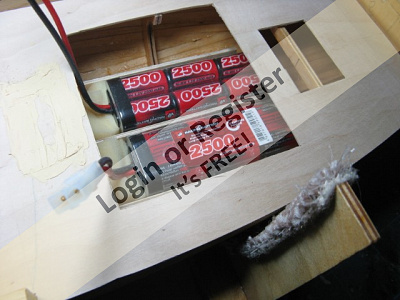
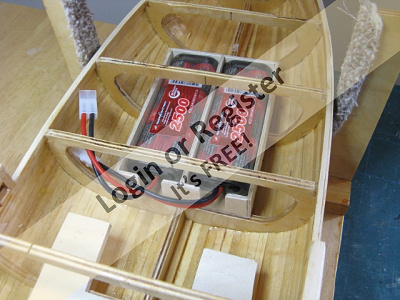
Sawed the top of the frame to allow better access to the batteries. Decided to removed the end of the battery box and put a stop glued to the frame with an added support bock with some foam as a buffer. Did insert the foam and glue it to the wooden base. After some thought of the batteries getting hot they might melt some foam. So it was all removed and cleaned with a chisel. With the buffer at the bottom and some foam packed at the top of the battery It does allow removal / inserting of the batteries


▲
⟩⟩
Colin H
Login To
Remove Ads
Remove Ads
📝 Norman McLeod Rogers
2 years ago by 🇬🇧 Seaspray ( Warrant Officer)
Warrant Officer)✧ 79 Views · 1 Like
Flag
💬 Add Comment
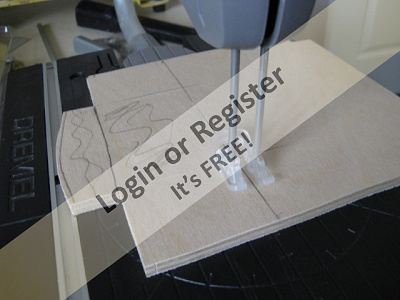
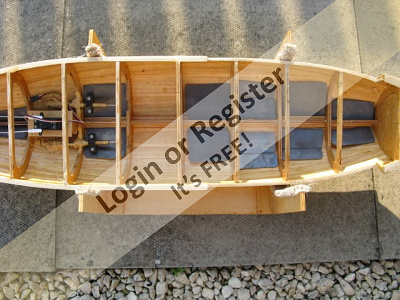
Built a battery box for the 2 power packs. I did think it would be tight getting them in and out of the model. Looking at cutting the (call it the work deck) around where the pencil line is. Tom made the hatches bigger, on his mode and that worked for him. Another thing I don't like cutting the top of the frames to gain easy access to the hull.


▲
⟩⟩
Colin H
💬 Re: Norman McLeod Rogers
2 years ago by 🇬🇧 Seaspray ( Warrant Officer)
Warrant Officer)✧ 83 Views · 1 Like
Flag
💬 Add Comment
Colin Just to make sure the motors are spot on with the propshafts as the mounting bracket are not the best as they won't keep the belts tight by them self. Belt and braces
▲
⟩⟩
Colin H
📝 Norman McLeod Rogers
2 years ago by 🇬🇧 Seaspray ( Warrant Officer)
Warrant Officer)✧ 85 Views · 1 Like · 2 Comments
Flag
💬 Add Comment
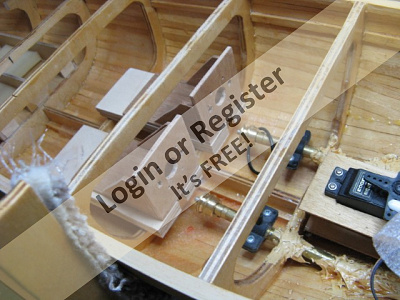
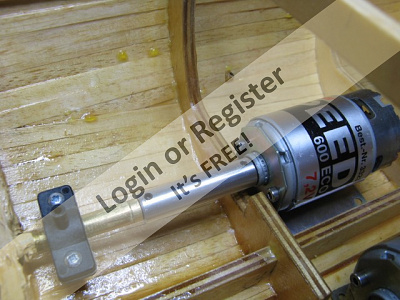
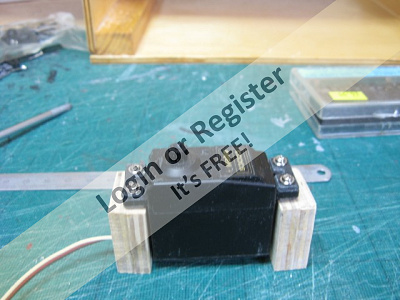
Finally the motors in position and secured. Bored 2 holes each side / rear of the motors. Before this I got the motors to the right height. ( see the thin ply below the mounts ) screwed motors down tight added a premeasured piece of scrap below rear of each motor to get the right angle in line with the propshafts. Threaded the plastic tie thru the hole and s a piece of thin wire thru the opposite hole. Bored a little hole in the tye threaded the wire thru it. This helped get the tie thru the hole from the bottom. Secured motor but haven't cut off the extra on the tye just in case need reworked.


▲
⟩⟩
Colin H
📝 Norman McLeod Rogers
2 years ago by 🇬🇧 Seaspray ( Warrant Officer)
Warrant Officer)✧ 93 Views · 1 Like
Flag
💬 Add Comment
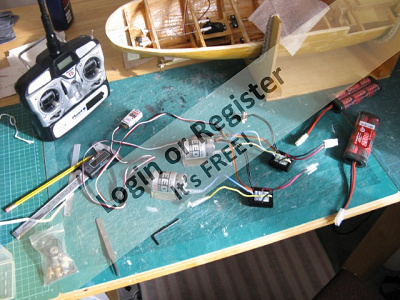
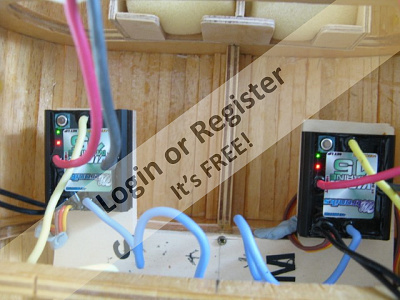
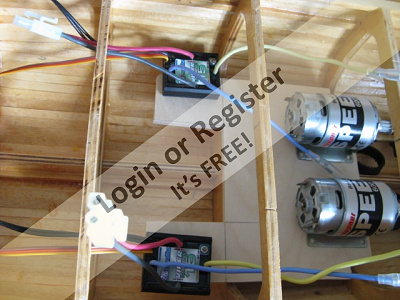
Had a relook and altered the motors mounting to cut down some weight and have the ESC moved out of the hot air from the motor fans. Not too happy with the layout of the wire on the ESA. Have to be careful not to touch the +ve or -ve wire on the battery connectors and motors to the Rx and on/off switch. I am I being a wee bit cautious.
▲
⟩⟩
Colin H
📝 Norman McLeod Rogers
2 years ago by 🇬🇧 Seaspray ( Warrant Officer)
Warrant Officer)✧ 97 Views · 1 Like
Flag
💬 Add Comment
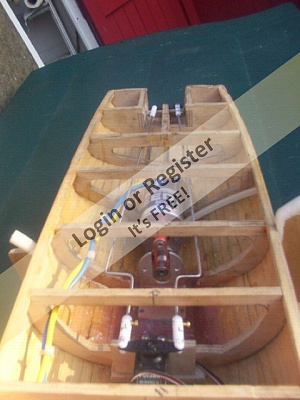
Here is a " See how it goes". Roughly laid out and haven't done the motor mounts. Cut a big area out of the rudder frame as I was havening trouble lining up the allen key that tightens the tiller arm. Thought I'd knocked a hole in the planking but it was a piece of stray harddrive I broke up yesterday and it flew into a hundred pieces.


▲
⟩⟩
Colin H
💬 Re: Norman McLeod Rogers
2 years ago by 🇬🇧 Seaspray ( Warrant Officer)
Warrant Officer)✧ 100 Views · 0 Likes
Flag
💬 Add Comment
mturpin013 Everything was offered in a "lets see how it goes" and I am happy with the belts size and thickness. These are HTD belts. "High Torque Drive" belts are suitable for more demanding applications than MXL drives. Engine mounts, will be made the saddle types out of 6mm.
ply. No tools now for metal work.
ply. No tools now for metal work.
▲
⟩⟩
No likes yet
This member will receive 1 point
for every like received
This member will receive 1 point
for every like received
💬 Re: Norman McLeod Rogers
2 years ago by 🇬🇧 Seaspray ( Warrant Officer)
Warrant Officer)✧ 105 Views · 2 Likes
Flag
💬 Add Comment
Hi Julio My experience with pulley and belt drive is the best way to go. Just that these belts are really think and strong. Nor do I want longer belts as it would raise the C of G higher. Want this as low as possible. Used the belt drive on the Research Vessel Meteor build. on Model Boat Mayhem Although the belt was of different material. No noise of juddering at all on a one to one drive. Gears are not for me.
▲
⟩⟩
Julio
Len1
💬 Re: Norman McLeod Rogers
2 years ago by 🇬🇧 Seaspray ( Warrant Officer)
Warrant Officer)✧ 107 Views · 1 Like
Flag
💬 Add Comment
Colin The teeth on the belts and pulleys would let me run them not too tight like an alternator belt on a car.
▲
⟩⟩
Colin H
💬 Re: Norman McLeod Rogers
2 years ago by 🇬🇧 Seaspray ( Warrant Officer)
Warrant Officer)✧ 107 Views · 0 Likes
Flag
💬 Add Comment
Rowen It was just these belt are thick ones. Maybe with wear they'll sort things out.
▲
⟩⟩
No likes yet
This member will receive 1 point
for every like received
This member will receive 1 point
for every like received
💬 Re: Norman McLeod Rogers
2 years ago by 🇬🇧 Seaspray ( Warrant Officer)
Warrant Officer)✧ 107 Views · 1 Like
Flag
💬 Add Comment
Cheers Colin Thinking would the pulleys cause extra wear on the top of the bearing on the propshaft also the motor's top bearing.
▲
⟩⟩
Colin H
Login To
Remove Ads
Remove Ads
📝 Norman McLeod Rogers
2 years ago by 🇬🇧 Seaspray ( Warrant Officer)
Warrant Officer)✧ 109 Views · 5 Likes · 10 Comments
Flag
💬 Add Comment
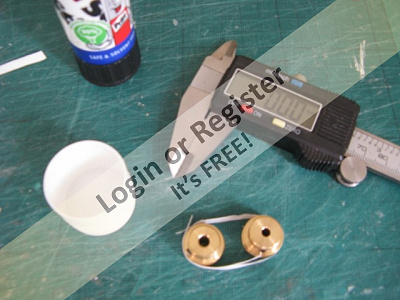
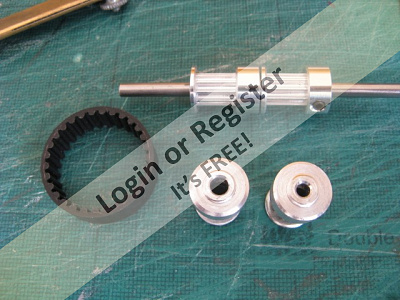
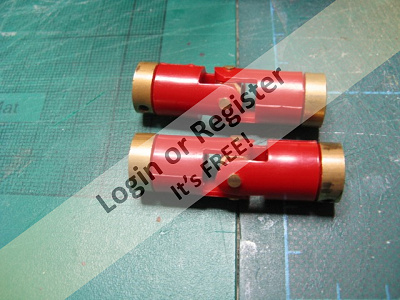
Second Idea was to use a pulley system. The pulleys I am considering using. Second from top packet wasn't 4mm inside diameter, so had to drill two of the pulleys to 4mm. As you can see they're a nice sliding fit. The bottom left one didn't did like the drilling the others came good. Next motors with pulleys on a nice fit as the shafts 4mm. on props and3.17 mm. on motors. Offered the full setup into position. Only problem is when tension is added to the belts. The motors bend their mounts with the back lifting away from the mount. Will look into this when I decide what method will use. I prefer the coupling method, never had any trouble with them even the I.C. days


▲
⟩⟩
stevedownunder
Julio
Madwelshman
RonBMK2
Colin H
📝 Norman McLeod Rogers
2 years ago by 🇬🇧 Seaspray ( Warrant Officer)
Warrant Officer)✧ 113 Views · 1 Like
Flag
💬 Add Comment
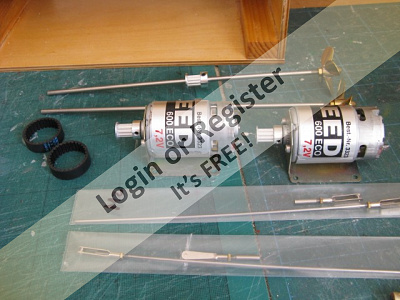
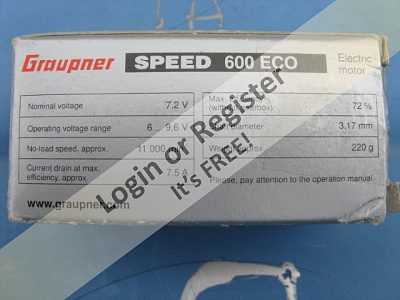
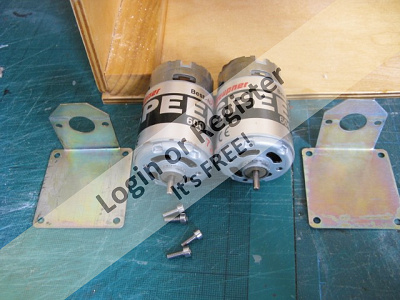
Motor installation. Will be using two Graupner 600 ECO motor. One turning clockwise the other anti clockwise. Firstly the spec of the motors. I will either run on 7.2v or 8.4v battery packs. Next is the two motors with their mounts and securing screws. Like to use these cheese head screws with allen key inserts. Was hoping to use the couplings but after fitting my alignment tool, there isn't much room under the motor even with the mounts removed also its sits above 1.5mm planking. Pause till I up load the second idea.
▲
⟩⟩
Colin H
💬 Re: Norman Mcleod Rogers
2 years ago by 🇬🇧 Seaspray ( Warrant Officer)
Warrant Officer)✧ 116 Views · 1 Like
Flag
💬 Add Comment
Hi ToraDog I seen it on the plan and was thinking of doing it. Wish I had just took the plunge and did it according to plan. Anyway don't think I can alter it now with all that filler in place. Motors are next
Cheers

Cheers
▲
⟩⟩
ToraDog
📝 Norman McLeod Rogers
2 years ago by 🇬🇧 Seaspray ( Warrant Officer)
Warrant Officer)✧ 119 Views · 1 Like
Flag
💬 Add Comment
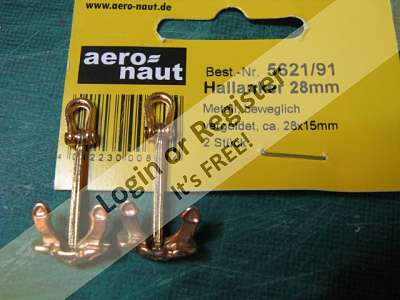
First pic. shows the angle the anchor sits in its compartment. Not having that room inside the hull I just made square boxes for them to sit inside. The box sides had to be at an angled to fit in this small area. Pic 2,3 the anchors are glued in place. This area is to be sprayed black and having lots of damaged the outer edge of the compartment, it will be cleaned up later. I might put an edging around the edge this'll make it better looking. Next pic. are the propshaft supports sanded and cleaned up. When spraying the hull I think it is a good idea not to spray the propshafts. Lastly the anchors bought from Hobbies a lot dearer than the last ones but good quality.


▲
⟩⟩
Colin H
💬 Re: Norman Mcleod Rogers
2 years ago by 🇬🇧 Seaspray ( Warrant Officer)
Warrant Officer)✧ 120 Views · 0 Likes
Flag
💬 Add Comment
It is a nice boat to model. Although it took a while to get the hull right we got it near enough right eventually . First time I've done a twin screw so hears hoping all goes good. Well laid out plan. 👍
▲
⟩⟩
No likes yet
This member will receive 1 point
for every like received
This member will receive 1 point
for every like received
📝 Norman Mcleod Rogers
2 years ago by 🇬🇧 Seaspray ( Warrant Officer)
Warrant Officer)✧ 123 Views · 1 Like
Flag
💬 Add Comment
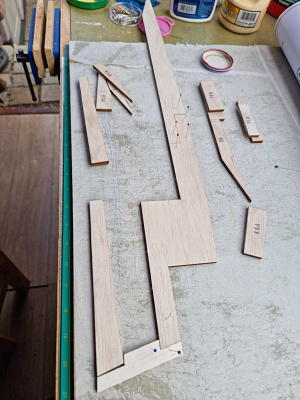
Cut the propshafts support from 2mm ply taken from a cardboard template. Iffy about the glue to use settle on Epoxy 5 minute curing time. First batch I used took 1 hour to cure so it was binned and new Epoxy use with a recut support. Hopefully I have came far enough down the prop tube to give a good support and will clean up the area add a little PVA to fill in gaps. Meantime have cut some lead (1.93 mm) to shape n size fitted it in the hull temporary. This will be adjusted when the model is complete as the superstructure and other things come into the overall weight of the model.

▲
⟩⟩
Colin H
💬 Re: Norman Mcleod Rogers
2 years ago by 🇬🇧 Seaspray ( Warrant Officer)
Warrant Officer)✧ 138 Views · 2 Likes
Flag
💬 Add Comment
Hi Len. Yes I thought of that but I haven't made up my mind yet. The plan doesn't include a support but that is a thick shaft to support the propeller and looking at Tom Gorman's model neither does it ( sorry for grainy image) have a support. But there is a little flexing on the shaft with a finger push. Its the type of support that would look right fitted. Meantime I am redoing the anchors they don't look right . Just a point icebreaker have a clean smooth hull not even Bilge Keels. Your comment is good idea many thanks. I just went over the build supplement and discovered the last image. There is a propshaft support, a piece of wood between the hull and shaft. I'll fit this before I fit the motors. Thanks Len.


▲
⟩⟩
Colin H
Len1
📝 Norman Mcleod Rogers
2 years ago by 🇬🇧 Seaspray ( Warrant Officer)
Warrant Officer)✧ 138 Views · 4 Likes · 8 Comments
Flag
💬 Add Comment
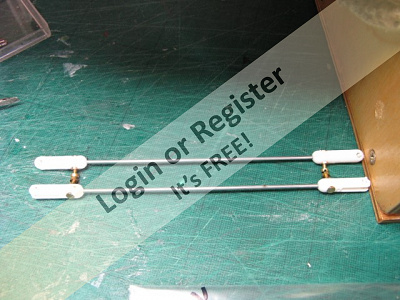
Propshafts. Had to retake these images this morning.
Props drilled out for oil feeders and a drill inserted to align the feeder with the oil hole and screws tightened. Completed props with propeller on and their lock nuts tightened. Slots drilled and filed in hull to take the shafts ( no images). Pic 3. Shafts aligned and secured in hull with filler. Next time I will use epoxy to secure shafts into the hull as I believe gives a smoother finish but this is good filler. This is a mess in Pic 4. Lastly 4 images of the propshafts outside the hull. The propellers are 4 bladed left and right with a width of 40 mm


Props drilled out for oil feeders and a drill inserted to align the feeder with the oil hole and screws tightened. Completed props with propeller on and their lock nuts tightened. Slots drilled and filed in hull to take the shafts ( no images). Pic 3. Shafts aligned and secured in hull with filler. Next time I will use epoxy to secure shafts into the hull as I believe gives a smoother finish but this is good filler. This is a mess in Pic 4. Lastly 4 images of the propshafts outside the hull. The propellers are 4 bladed left and right with a width of 40 mm
▲
⟩⟩
LaphonS
Colin H
jbkiwi
Len1
📝 Norman McLeod Rogers
2 years ago by 🇬🇧 Seaspray ( Warrant Officer)
Warrant Officer)✧ 141 Views · 1 Like
Flag
💬 Add Comment
Rudder/ servo Pic 1. Firstly had to find the height of the servo arm to the tiller arm. Made a support out of ply to mount the servo making sure the servo wires would go through it. Fitted the rubbers / screws / cups to servo lugs. Made blocks of wood to glue to the underside of the top plate with servo sitting on top for ground clearance. Ply with cut out for servo glued in place onto blocks and servo screwed into place making sure only the lugs were supporting the servo. Linages / rods cut to size and fitted to tiller / servo arms with a little backlash. Job done work fine. Next the props.


▲
⟩⟩
Colin H
Login To
Remove Ads
Remove Ads