Join Us On Social Media!

|

|

|
Download The App!
Login To
Remove Ads
Remove Ads
Login To
Remove Ads
Remove Ads
Model Boats Website
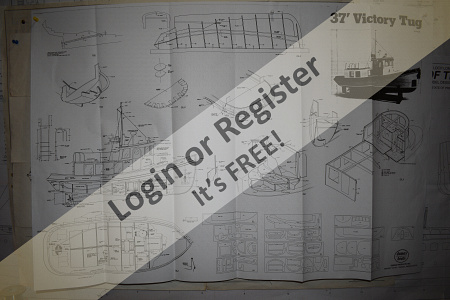
Dumas Victory tug
60 Posts · 14 Followers · 182 Photos · 289 Likes
Began 3 years ago by
 Canada
Follow This Thread
Not currently following
> Click to follow
> Click to follow
Latest Post 2 years ago by
| Oldest posts shown first (Show Newest First) | (Print Booklet) |
📝 Dumas Victory tug
3 years ago by 🇨🇦 Newby7 ( Fleet Admiral)
Fleet Admiral)✧ 135 Views · 4 Likes · 2 Comments
Flag
💬 Add Comment
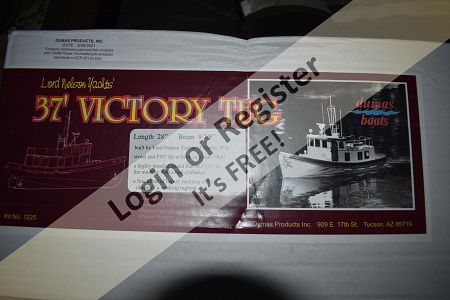
With I hate to say my golfing season slowly coming to an end and no project in mind for the cold months ahead a kit was looked at.
Having liked the look of this boat for a number of years finally decided to order the kit.
The notice came in that the parcel is ready for pick up.Will be picking up today.
My intent is to open and photograph the kit before I start the build.
As my last few builds have been scratch builds I didn't take photos of all aspects of the build.
More to come.
Rick
▲
⟩⟩
Martin555
MouldBuilder
Colin H
RNinMunich
|
💬 Re: Dumas Victory tug
3 years ago by 🇩🇪 RNinMunich (
Fleet Admiral)✧ 138 Views · 2 Likes
Flag
I guess Ed (Figtree) will be your No. 1. adviser for Dumas tugs Rick.
Look forward to your blog👍 Thanks for your support Rick 😀 Cheers, Doug 😎 ▲
⟩⟩
Martin555
Newby7
|

|
💬 Re: Dumas Victory tug
3 years ago by 🇨🇦 Ronald (
 Admiral) Admiral)✧ 138 Views · 1 Like
Flag
Aren’t you a cold weather golfer, like say into November? If the courses stay open, we will play as long as possible. We walk....
Nice building project. I have nothing planned, though considering designing and building a camper for two now that we have the Tacoma. Maybe I can get some tips from Alice and Neyrs? ▲
⟩⟩
RNinMunich
|
Login To
Remove Ads
Remove Ads
📝 Kit Check
3 years ago by 🇨🇦 Newby7 ( Fleet Admiral)
Fleet Admiral)✧ 134 Views · 6 Likes
Flag
💬 Add Comment
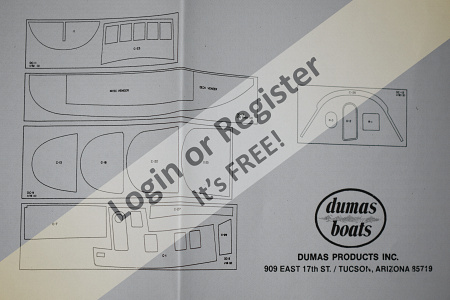
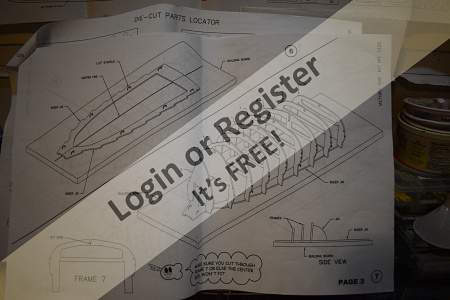
The parts list checked out. Will be looking through the manual and build pages just to get a view of how they set up the build,
Rick
Rick
▲
⟩⟩
stevedownunder
RNinMunich
Martin555
MouldBuilder
Colin H
GaryLC
📝 Keel
3 years ago by 🇨🇦 Newby7 ( Fleet Admiral)
Fleet Admiral)✧ 133 Views · 7 Likes · 2 Comments
Flag
💬 Add Comment
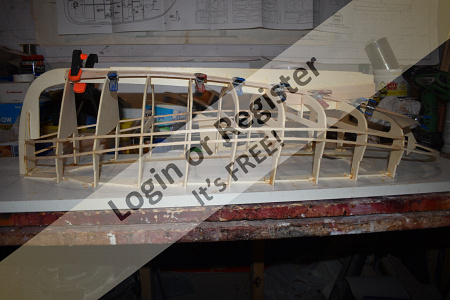
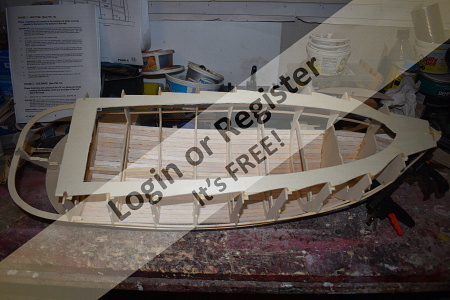
Located the keel and building frame. Built the keel and cut the shaft slot for the stuffing box. Nailed the building frame on to the my building board. Cut out the frames and test fit to the building frame and board. Glue to do yet.
Rick
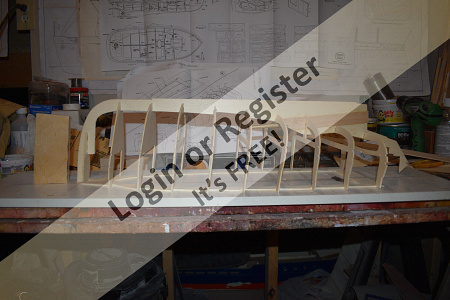


Rick
▲
⟩⟩
stevedownunder
RNinMunich
Martin555
MouldBuilder
Colin H
Mike Stoney
GaryLC
|
💬 Re: Keel
3 years ago by 🇨🇦 Newby7 (
Fleet Admiral)✧ 131 Views · 1 Like
Flag
Thanks JB I do believe so.
Rick ▲
⟩⟩
Martin555
|
|
💬 Re: Keel
3 years ago by 🇳🇿 jbkiwi (
Fleet Admiral)✧ 130 Views · 2 Likes
Flag
Should be a nice little model Rick
JB ▲
⟩⟩
Martin555
Newby7
|
📝 Frames and Planking
3 years ago by 🇨🇦 Newby7 ( Fleet Admiral)
Fleet Admiral)✧ 135 Views · 6 Likes
Flag
💬 Add Comment
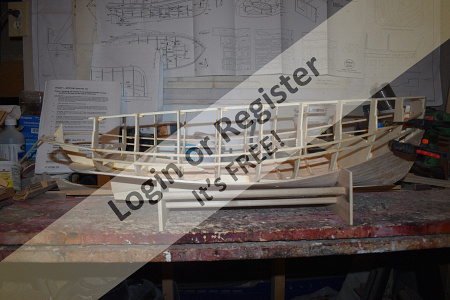
First part was to glue all the frames in place. After letting the glue set the chine strips were glued into place (deck edge stringer) and (rub rail stringer)
The first two planks were glue in on each side of the keel.
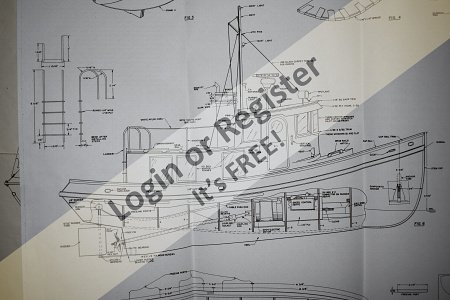
After reading more about the Lord Nelson (Yacht) Victory Tug. The boat's name is misleading because it is not a scruffy tug. The Victory is a beautiful appointed cruising yacht designed to look like a tug. Luxurious setup for a couple it will sleep five comfortable.
There are 76 Victory tug built at 37'
6 Victory tugs built at 41'and 9 Victory tugs built at 49'
From information I found most are still on the water
Rick

The first two planks were glue in on each side of the keel.
After reading more about the Lord Nelson (Yacht) Victory Tug. The boat's name is misleading because it is not a scruffy tug. The Victory is a beautiful appointed cruising yacht designed to look like a tug. Luxurious setup for a couple it will sleep five comfortable.
There are 76 Victory tug built at 37'
6 Victory tugs built at 41'and 9 Victory tugs built at 49'
From information I found most are still on the water
Rick
▲
⟩⟩
stevedownunder
RNinMunich
Martin555
MouldBuilder
jbkiwi
Colin H
📝 Planking
3 years ago by 🇨🇦 Newby7 ( Fleet Admiral)
Fleet Admiral)✧ 132 Views · 4 Likes
Flag
💬 Add Comment
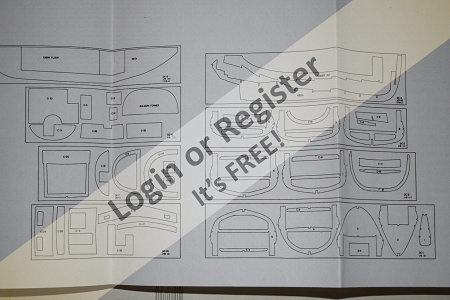
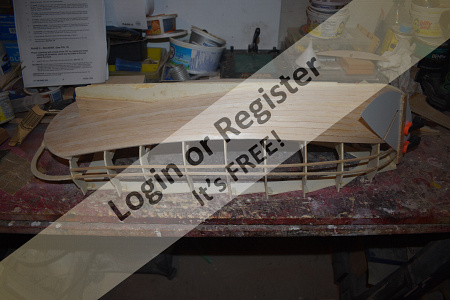
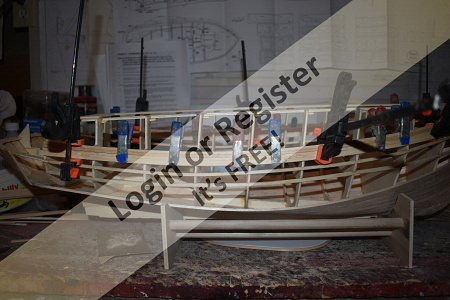
For the first part of the planking it says to have 10 planks from the keel on both sides.
The planking is going well as I have 6 rows on one side and 5 on the other.
I had started with one on each side and a second on one side letting all glue to set. I now do one each side to get to where I am now.
When the 10 rows are done the boat can be removed from the building board on to the next steps for the planking.
This method is not how I have planked my previous boats.
I will follow their write up to the next stage .
Rick
▲
⟩⟩
stevedownunder
Martin555
MouldBuilder
Colin H
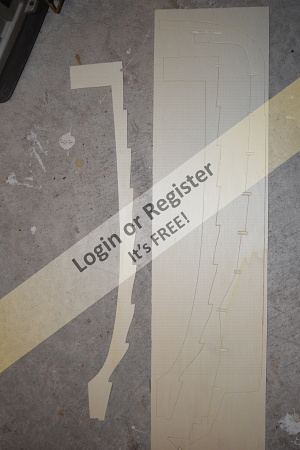
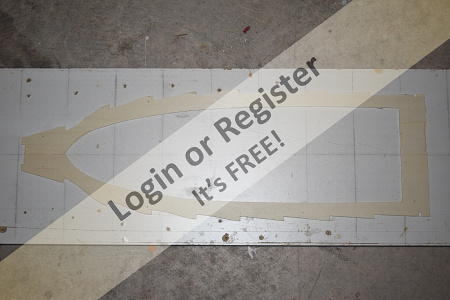
📝 Stand
3 years ago by 🇨🇦 Newby7 ( Fleet Admiral)
Fleet Admiral)✧ 131 Views · 4 Likes
Flag
💬 Add Comment
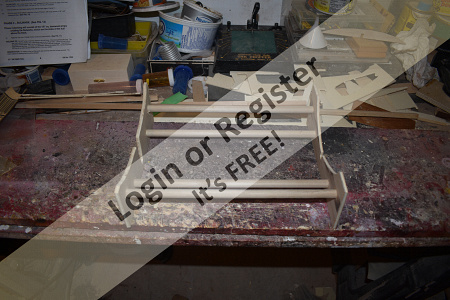
The write up for the stand in the kit was not to my liking so went to my way of building a stand.
Use two frames from the kit on 12" apart and drew them on to two pieces of 1/4 " ply. 4 pcs of 1/2" dowel to hold the frames
Drilled 4 holes and glued all together.
Rick
Use two frames from the kit on 12" apart and drew them on to two pieces of 1/4 " ply. 4 pcs of 1/2" dowel to hold the frames
Drilled 4 holes and glued all together.
Rick
▲
⟩⟩
Martin555
MouldBuilder
jbkiwi
Colin H
📝 First stage planking
3 years ago by 🇨🇦 Newby7 ( Fleet Admiral)
Fleet Admiral)✧ 131 Views · 5 Likes · 2 Comments
Flag
💬 Add Comment
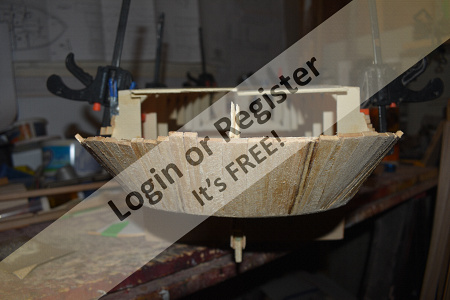
With the 10 pcs of planking done each side lifted the boat off of the building board. Ned to prepare the second areas for the next round of planking.
Rick
Rick
▲
⟩⟩
RNinMunich
Martin555
MouldBuilder
jbkiwi
Colin H
|
💬 Re: First stage planking
3 years ago by 🇬🇧 Martin555 (
Fleet Admiral)✧ 129 Views · 1 Like
Flag
Looking good Rick,
I will be following this build. Keep up the good work. Martin555. ▲
⟩⟩
Newby7
|
|
💬 Re: First stage planking
3 years ago by 🇳🇿 jbkiwi (
Fleet Admiral)✧ 131 Views · 2 Likes
Flag
You're getting on with that Rick, done by Xmas 😁
JB ▲
⟩⟩
Martin555
Newby7
|
📝 Second stage
3 years ago by 🇨🇦 Newby7 ( Fleet Admiral)
Fleet Admiral)✧ 130 Views · 1 Like
Flag
💬 Add Comment
The planking for the next stage uses 1/8 x 1/8 basswood my go to wood to build with.
I read the write up a few times as I had trouble with what it was saying to do.
Having the boat off the building board the first basswood piece starts at the top down to the keel.
The problem I had was it said to glue only on frame 1 and 10 if you don't glue on all frames how do you get the shape to stay in place.
I have glued on all frames now down to the third row and the shape is in place.
There are 8 rows will show photos in the next post.
Rick
▲
⟩⟩
Martin555
📝 Phase two
3 years ago by 🇨🇦 Newby7 ( Fleet Admiral)
Fleet Admiral)✧ 134 Views · 3 Likes
Flag
💬 Add Comment
Now have 5 rows on second phase. While doing the sides I found that I needed to do work on the transom. The ply used in the kit is 1/8 and breaks easily. I've done almost 90% of the work will fill-in the rest when finished planking the rest of the hull in phase three.
Rick

Rick
▲
⟩⟩
RNinMunich
Martin555
Colin H
📝 Phase Two
3 years ago by 🇨🇦 Newby7 ( Fleet Admiral)
Fleet Admiral)✧ 134 Views · 1 Like
Flag
💬 Add Comment
The eight rows for phase two are done will be filling in the side planking from phase one to two.
The hull is rounding into shape with phase three and four to come.
Pictures in next update.
Rick
The hull is rounding into shape with phase three and four to come.
Pictures in next update.
Rick
▲
⟩⟩
Martin555


Login To
Remove Ads
Remove Ads