Join Us On Social Media!

|

|

|
Download The App!
Login To
Remove Ads
Remove Ads
Login To
Remove Ads
Remove Ads
Model Boats Website
Model-Tech FINNMARKEN
9 Posts · 9 Followers · 52 Photos · 84 Likes
Began 2 years ago by
 Spain
SpainFollow This Thread
Not currently following
> Click to follow
> Click to follow
Latest Post 1 year ago by
| Oldest posts shown first (Show Newest First) | (Print Booklet) |
📝 Model-Tech FINNMARKEN
2 years ago by 🇪🇸 bombero ( Warrant Officer)
Warrant Officer)✧ 219 Views · 11 Likes · 6 Comments
Flag
💬 Add Comment
Friends who have helped ,and am helping me on this forum have shown interest in this project so am starting this Blog.
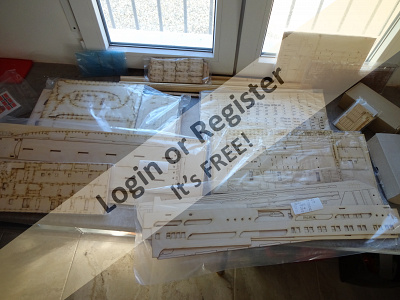
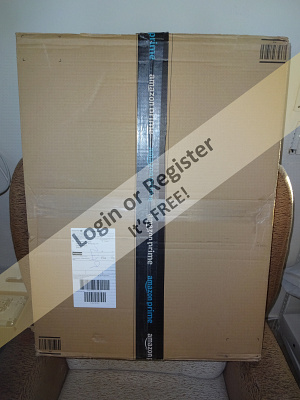
I received the kit on Wednesday, which was the first mystery as it was in an Amazon box, I had ordered it from G:K:Modellbau and only realised what it was when I saw the delivery instructions attached.
I had ordered other bits for this build from Krick`s (was going to get the boat kit as well but they did not have one in stock) fortunately it was €50 cheaper so postage was covered only to find the kit box marked Krick as was the build instructions and a catalogue!
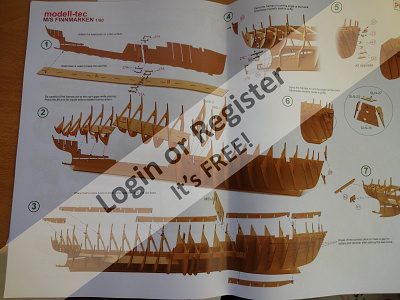
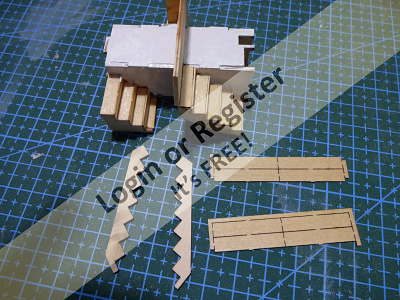
I started today and have completed step1(as the instructions are in picture format)and after gluing spent the rest of the day cutting out the 26 frames and two deckh and now will have to clean and adjust them before fitting:
This is the third Model I have attempted(see my Harbour)and the members are go great help with the electronics on the second boat "Dusseldorf" which was a nightmare for me,So "NEWBYS and OLDIES"" please note HELP IS HERE IN THIS WEBSITE!
I received the kit on Wednesday, which was the first mystery as it was in an Amazon box, I had ordered it from G:K:Modellbau and only realised what it was when I saw the delivery instructions attached.
I had ordered other bits for this build from Krick`s (was going to get the boat kit as well but they did not have one in stock) fortunately it was €50 cheaper so postage was covered only to find the kit box marked Krick as was the build instructions and a catalogue!
I started today and have completed step1(as the instructions are in picture format)and after gluing spent the rest of the day cutting out the 26 frames and two deckh and now will have to clean and adjust them before fitting:
This is the third Model I have attempted(see my Harbour)and the members are go great help with the electronics on the second boat "Dusseldorf" which was a nightmare for me,So "NEWBYS and OLDIES"" please note HELP IS HERE IN THIS WEBSITE!
▲
⟩⟩
EdW
MouldBuilder
Colin H
dave976
Rookysailor
jbkiwi
Martin555
TonyAsh
DWBrinkman
Newby7
fireboat
|
💬 Re: Model-Tech FINNMARKEN
2 years ago by 🇭🇺 MouldBuilder (
 Vice Admiral) Vice Admiral)✧ 175 Views · 0 Likes
Flag
This looks an interesting model Len. I bet we can’t get 16 channels working on this one. Might have to add a crane and some monitors.😬🤣
Good start. Peter. ▲
⟩⟩
No likes yet
This member will receive 1 point for every like received |
|
Login To
Remove Ads 💬 Re: Model-Tech FINNMARKEN
2 years ago by 🇬🇧 Rookysailor (
 Commodore) Commodore)✧ 210 Views · 1 Like
Flag
Looks like a really nice boat, quite fancy one myself as there are not a lot of liners about, checked CMB
but out of stock, but it does state that it can be r/c controlled, check link below. ▲
⟩⟩
Martin555
|

|
💬 Re: Model-Tech FINNMARKEN
2 years ago by 🇬🇧 Martin555 (
 Fleet Admiral) Fleet Admiral)✧ 208 Views · 1 Like
Flag
Hi Bombero,
This looks like a nice kit to make. I have never seen this kit before so i will be following with great interest. Good luck with the build. Martin555. ▲
⟩⟩
Rookysailor
|
|
💬 Re: Model-Tech FINNMARKEN
2 years ago by 🇪🇸 bombero (
Warrant Officer)✧ 208 Views · 1 Like
Flag
Gt108
Any advice is appreciated as I have got the recommended extras to make it a RC model as well as a static when not in water, I intend to go slowly to try to make this a quality boat! Bombero👍 ▲
⟩⟩
Martin555
|
|
💬 Re: Model-Tech FINNMARKEN
2 years ago by 🇦🇺 Gt108 (
 Master Seaman) Master Seaman)✧ 208 Views · 2 Likes
Flag
I have built this kit but had to do much modification to arrive at a good sailing rc model with good access to internals. if you want I can send pics of my model and construction details. This is really a static display model so if you want it as a good sailing rc model much modification is necessary.
▲
⟩⟩
bombero
Martin555
|
|
💬 Re: Model-Tech FINNMARKEN
2 years ago by 🇨🇦 Newby7 (
Fleet Admiral)✧ 215 Views · 1 Like
Flag
Looks to be a fine looking boat. Should keep you busy for a few hours LOL over the next while. Good that you will be doing a blog. Look to follow your build.
Rick ▲
⟩⟩
Martin555
|
Login To
Remove Ads
Remove Ads
📝 framework
2 years ago by 🇪🇸 bombero ( Warrant Officer)
Warrant Officer)✧ 202 Views · 9 Likes · 5 Comments
Flag
💬 Add Comment
Well,
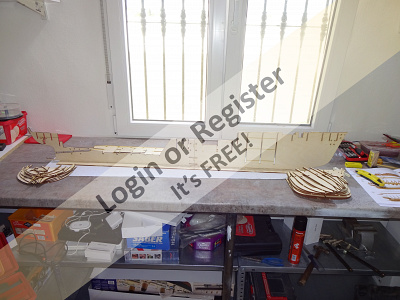
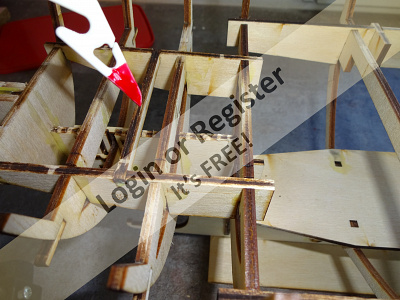
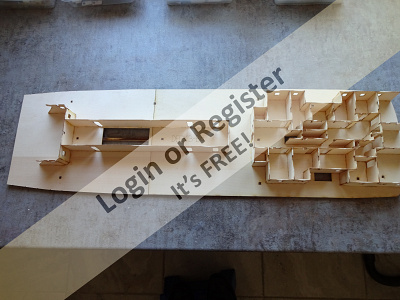
The frames and keel plates have been fitted and glued without problems
Tried fitting small bits to bow so that hull shaping can be achieved (not reached that part yet should be about step 20) only to find the anchor guides do not line up and will have to be modified and will deal with prior to step 20.
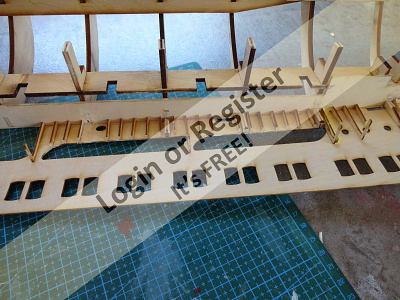
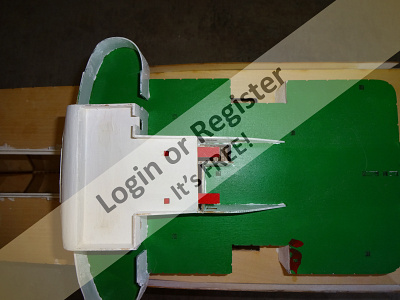
Started to dry fit decks to frame only to find frame work to be fitted to underside of rear deck 1-B do not line up so will have to modify, and some of the top of the rear of centre keel have to be remove to allow a cross support can be fitted and also gives access to the rudder mechanism (see picture)as is some more bits have to be removed for a space and access for recommended batteries(also a picture)
Next job is to glue decks but am dry fitting cabins etc to decks so any problems can be sorted prior to gluing!
Question?
As most of the construction is ply has anyone have advice as what I can use to protect the internal framework that is not painted!
The frames and keel plates have been fitted and glued without problems
Tried fitting small bits to bow so that hull shaping can be achieved (not reached that part yet should be about step 20) only to find the anchor guides do not line up and will have to be modified and will deal with prior to step 20.
Started to dry fit decks to frame only to find frame work to be fitted to underside of rear deck 1-B do not line up so will have to modify, and some of the top of the rear of centre keel have to be remove to allow a cross support can be fitted and also gives access to the rudder mechanism (see picture)as is some more bits have to be removed for a space and access for recommended batteries(also a picture)
Next job is to glue decks but am dry fitting cabins etc to decks so any problems can be sorted prior to gluing!
Question?
As most of the construction is ply has anyone have advice as what I can use to protect the internal framework that is not painted!
▲
⟩⟩
EdW
jbkiwi
MouldBuilder
RNinMunich
Colin H
mturpin013
Mike Stoney
Martin555
Newby7
|
💬 Re: framework
2 years ago by 🇪🇸 bombero (
Warrant Officer)✧ 155 Views · 0 Likes
Flag
With the quality of your workmanship shown on your blogs I am not surprised, wish my workmanship was as good as yours, but I am trying!
▲
⟩⟩
No likes yet
This member will receive 1 point for every like received |
|
Login To
Remove Ads 💬 Re: framework
2 years ago by 🇭🇺 MouldBuilder (
Vice Admiral)✧ 176 Views · 0 Likes
Flag
Moving along at quite a pace. This slow build wold be hyper speed if I were doing it. I am rather slow though. Great start.👍
Peter. ▲
⟩⟩
No likes yet
This member will receive 1 point for every like received |
|
💬 Re: framework
2 years ago by 🇦🇺 Gt108 (
Master Seaman)✧ 192 Views · 1 Like
Flag
First principle for RV is to build as light as possible above the water line. This kit uses quite thick ply so very heavy. After hull planked and internally coated with a strengthening resin like polyester I I cut away much of the internal ply structure to reduce weight and give better access to internals
▲
⟩⟩
Martin555
|
|
💬 Re: framework
2 years ago by 🇬🇧 Martin555 (
Fleet Admiral)✧ 208 Views · 1 Like
Flag
Hi Bonbero,
Great start to this project. I like the forward planning, it always pays off. Good luck with the rest of the build. Martin555. ▲
⟩⟩
bombero
|
|
💬 Re: framework
2 years ago by 🇨🇦 Newby7 (
Fleet Admiral)✧ 198 Views · 4 Likes
Flag
I use two part finishing resin epoxy to protect the inside and fiberglass cloth along with the finishing epoxy. This gives good protection both in and outside of the boat.
Another bonus of this is it strengthens along with protection. Rick ▲
⟩⟩
pressonreguardless
MouldBuilder
bombero
Martin555
|
📝 LOWEST DECK
2 years ago by 🇪🇸 bombero ( Warrant Officer)
Warrant Officer)✧ 196 Views · 7 Likes · 3 Comments
Flag
💬 Add Comment
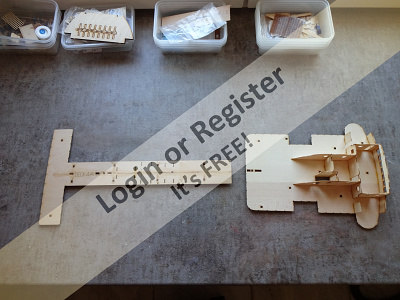
I have fitted and glued the foredeck in place(had to do it twice as one side lifted)and cut some of the frames to allow batteries to fit according to the plans but unable to put batteries in(hands to big),wife gave me some ribbons to make cradles for batteries!
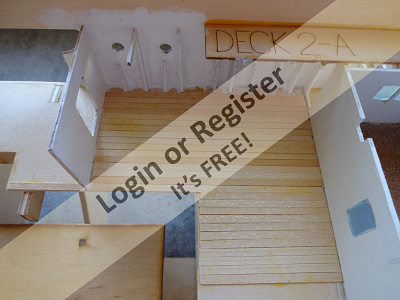
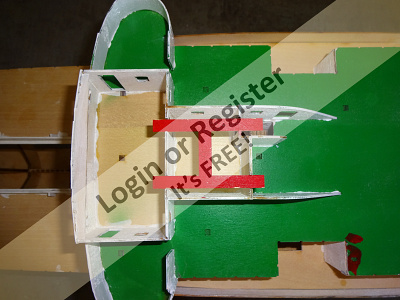
After dry fitting the cabins position( see picture showing locating slots) tacked with superglue removed the cabins, final glued and painted(want to keep deck brown)white, now got to fit to the deck but have gremlins who have moved some the locating slots! I have dry fitted cabins on rear deck, tacked and removed for painting, the cabins and part of the deck is removable give access to storage so batteries may go there, had to cut some of the ribs but as per the building plans!
A bit strange building a wooden boat as I have to make the staircases but I am enjoying it very much and using my fitting skills (apprenticed fitter and turner prior to fire service)
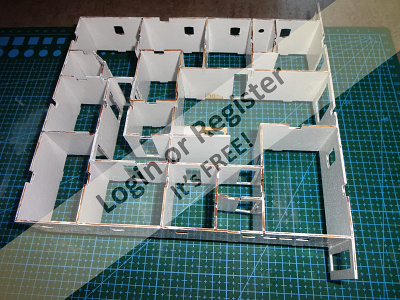
▲
⟩⟩
EdW
MouldBuilder
Martin555
sirscapa
RNinMunich
Graham93
Colin H
|
💬 Re: LOWEST DECK
2 years ago by 🇪🇸 bombero (
Warrant Officer)✧ 178 Views · 0 Likes
Flag
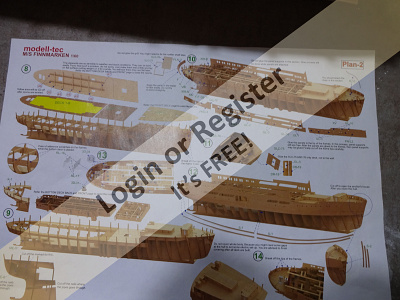
looking at the plans( which are available on line)half and half. looks like panels above the decks shown on the photos(before fitting cabins) and then thin planks below! but will have to angle the edges of the ribs to the shape of the hull before fitting any and they recommend fitting panels but not all the planks until all decks are fitted
▲
⟩⟩
No likes yet
This member will receive 1 point for every like received |
|
Login To
Remove Ads 💬 Re: LOWEST DECK
2 years ago by 🇭🇺 MouldBuilder (
Vice Admiral)✧ 176 Views · 0 Likes
Flag
Looking good Len.
Is the hull completed with ply skins or do you have to plank it all. Peter. ▲
⟩⟩
No likes yet
This member will receive 1 point for every like received |
|
💬 Re: LOWEST DECK
2 years ago by 🇬🇧 Martin555 (
Fleet Admiral)✧ 193 Views · 0 Likes
Flag
Great work Bombero,
Keep it up. Martin555. ▲
⟩⟩
No likes yet
This member will receive 1 point for every like received |
📝 LOWEST DECK
2 years ago by 🇪🇸 bombero ( Warrant Officer)
Warrant Officer)✧ 164 Views · 10 Likes · 3 Comments
Flag
💬 Add Comment
HAPPY NEW YEAR TO ALL!
Slowly progressing, nearly finished painting the bottom deck rear cabins after fitting to the removable part of the rear deck and refitting so it slots in properly back into the fixed part of the deck (I am sure somebody alters things after I have shut up for the night).
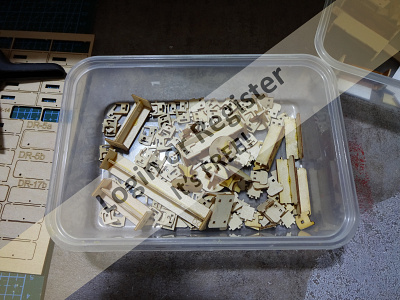
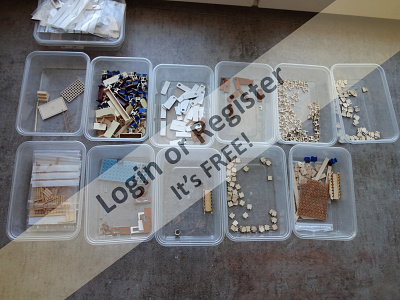
I have fitted windows in front cabin section and this is the next move for the rear cabins and sorting the doors(plans show them half open but as I hope to use in water will fix them shut)some of the single doors are made up of 8 bits, photo shows how I located the two blanks with a chippies pencil which have line up so the windows fit, which the have to be painted before fitting. Then have to make the furniture for rear cabins, see box of bits(32chairs,4 settees 6 tables) paint and install, they may have to be fixed but will decide later.
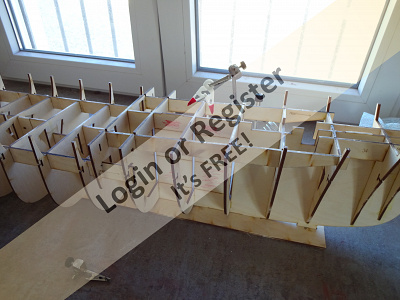
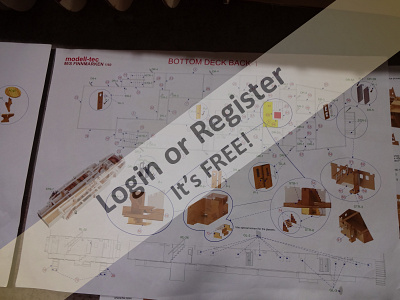
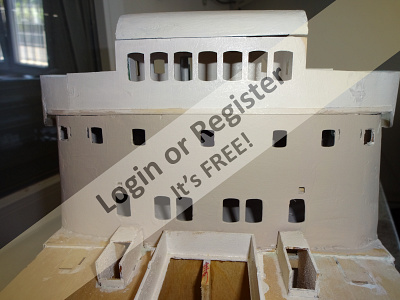
when the above is to my satisfaction the next stage is sorting the top of the sides(see photo and is step 10). the construction plans are available online
Slowly progressing, nearly finished painting the bottom deck rear cabins after fitting to the removable part of the rear deck and refitting so it slots in properly back into the fixed part of the deck (I am sure somebody alters things after I have shut up for the night).
I have fitted windows in front cabin section and this is the next move for the rear cabins and sorting the doors(plans show them half open but as I hope to use in water will fix them shut)some of the single doors are made up of 8 bits, photo shows how I located the two blanks with a chippies pencil which have line up so the windows fit, which the have to be painted before fitting. Then have to make the furniture for rear cabins, see box of bits(32chairs,4 settees 6 tables) paint and install, they may have to be fixed but will decide later.
when the above is to my satisfaction the next stage is sorting the top of the sides(see photo and is step 10). the construction plans are available online
▲
⟩⟩
EdW
Martin555
Colin H
jbkiwi
Julio
Rookysailor
pressonreguardless
Newby7
mturpin013
Mike Stoney
|
💬 Re: LOWEST DECK
2 years ago by 🇬🇧 Rookysailor (
Commodore)✧ 166 Views · 1 Like
Flag
That's one helluva complex build, looking forward to the next part.😊
Cheers, Pete ▲
⟩⟩
Martin555
|
|
Login To
Remove Ads 💬 Re: LOWEST DECK
2 years ago by 🇺🇸 pressonreguardless (
 Rear Admiral) Rear Admiral)✧ 158 Views · 1 Like
Flag
Quite the project!!
Looking Good !! ▲
⟩⟩
Martin555
|
|
💬 Re: LOWEST DECK
2 years ago by 🇨🇦 Newby7 (
Fleet Admiral)✧ 159 Views · 1 Like
Flag
Coming along nicely. My my those parts look small maybe its that my eyes don't work as well as they once did. LOL
Rick ▲
⟩⟩
Martin555
|
📝 General Construction
2 years ago by 🇪🇸 bombero ( Warrant Officer)
Warrant Officer)✧ 147 Views · 7 Likes · 2 Comments
Flag
💬 Add Comment
Latest Update
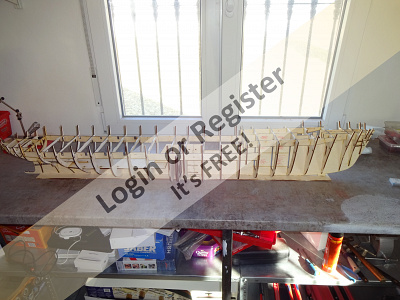
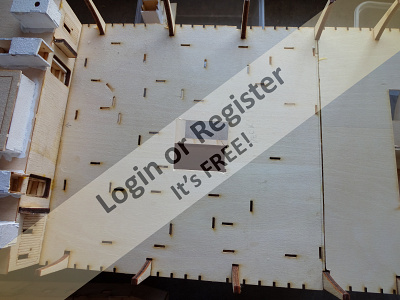
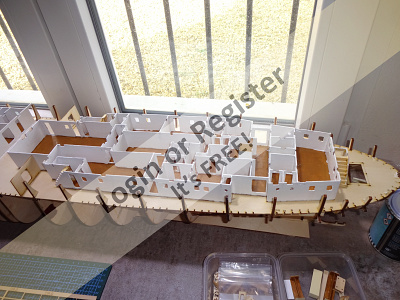
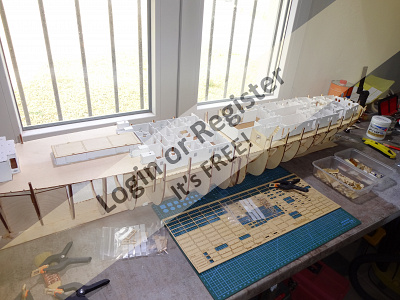
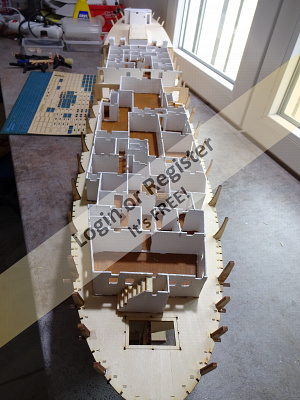
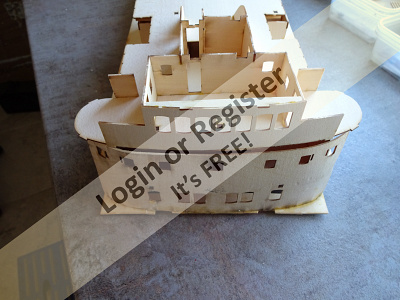
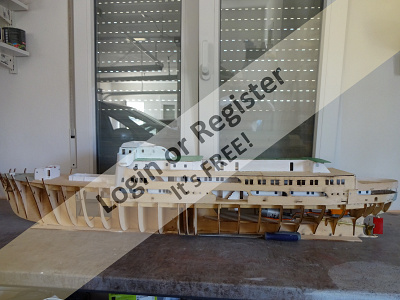
Having got bored building and painting doors chairs, settees and various tables( about 150 and at least another 300 to go) decided to have a change and have assembled the remaining decks and started fitting them together( can now get some idea of its finished size).This also reduces the amount of wood bits so less to look through if I need something! Not yet painted as I have to see if modifications are necessary !
I am a bit disappointed with the quality of some of the ply as although it is laser cut some tags tended to shatter rather than cut when cutting using a sharp modelling knife.
As the front of the upper deck is curved, I soaked in water (as advised in notes) before bending and not happy with the result (see photo)and repeated with a second shaped former and supporting the side edges (To keep them straight) by stripping one layer of ply back a little on some offcuts, it worked a treat.
Started assembling the rudder and found the shaft is a lot smaller than the wooden hole so will have to find some tubing for the shaft.
Not yet started on the hull, but there are sockets for supports for the upper outer panels which they say fit before working on the lower part of the hull
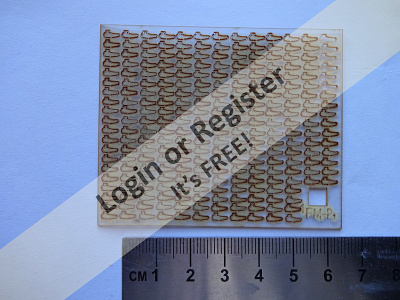
enclosed a picture of the door handles and our sky at night1!
Enjoy,
🙄Bombero

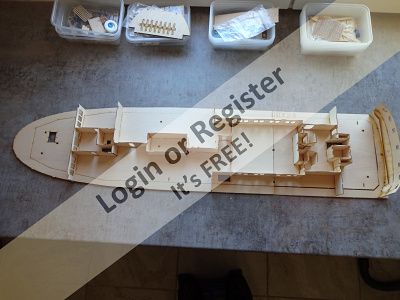
Having got bored building and painting doors chairs, settees and various tables( about 150 and at least another 300 to go) decided to have a change and have assembled the remaining decks and started fitting them together( can now get some idea of its finished size).This also reduces the amount of wood bits so less to look through if I need something! Not yet painted as I have to see if modifications are necessary !
I am a bit disappointed with the quality of some of the ply as although it is laser cut some tags tended to shatter rather than cut when cutting using a sharp modelling knife.
As the front of the upper deck is curved, I soaked in water (as advised in notes) before bending and not happy with the result (see photo)and repeated with a second shaped former and supporting the side edges (To keep them straight) by stripping one layer of ply back a little on some offcuts, it worked a treat.
Started assembling the rudder and found the shaft is a lot smaller than the wooden hole so will have to find some tubing for the shaft.
Not yet started on the hull, but there are sockets for supports for the upper outer panels which they say fit before working on the lower part of the hull
enclosed a picture of the door handles and our sky at night1!
Enjoy,
🙄Bombero
▲
⟩⟩
EdW
Martin555
Graham93
MouldBuilder
pressonreguardless
Rogal118
Colin H
|
💬 Re: General Construction
2 years ago by 🇪🇸 bombero (
Warrant Officer)✧ 141 Views · 2 Likes
Flag
Peter,
In answer to your question YES. All decks are removable except lowest front deck cabins! they supply 12 5mm square magnets to keep it together ,and it also answers the question re fixing the chairs etc( otherwise I would be spending a lot of time putting them in deck by deck)!🤑 ▲
⟩⟩
Martin555
MouldBuilder
|
|
💬 Re: General Construction
2 years ago by 🇭🇺 MouldBuilder (
Vice Admiral)✧ 145 Views · 1 Like
Flag
Wow. That is an incredible amount of small details to make. Do the decks detach so that you can see all of this detail Len.
▲
⟩⟩
Martin555
|
📝 General Construction 2
2 years ago by 🇪🇸 bombero ( Warrant Officer)
Warrant Officer)✧ 128 Views · 4 Likes
Flag
💬 Add Comment
Firstly I put a big eze cote over all areas that will be unacessable later in the build, whilst waiting cut out another 150 chair backs ( still 50+tables to go)!
located a brass tube in kit for the rudder shaft and put in (but not final height till later).
Still having trouble with the front to the upper deck (the curved one) It did not like its connection to the deck due to no shaping of it as it is curved with a slight sloping back, tried several options without success so will fit later on in the build when upper decks are completed.
I am still a novice boat builder so unsure of when do I paint and when do I fix the deck planking, the supplied building plans show both?
the top side deck panels are set level using supports fitted into precut frames which are a tight fit as I will have to remove them later and 120 top panel supports of which 74 (which block the views from the deck openings )have there tops removed later!
The questions above were then answered as when I put the outer frame of deck 2 was placed in position, it blocked the access to the external corridors was restricted to a single door and external openings! so now working on decking and internal painting, also are reducing the thickness of the mainframes so they do not project any further than the panel supports to make the decking easier
just to finish ,a question, how does a 7cm board block a 9cm gap, this is the current problem for making safe the access to the main hull via the midway entrance?
▲
⟩⟩
EdW
Martin555
MouldBuilder
Colin H
📝 NEXT STEP
2 years ago by 🇪🇸 bombero ( Warrant Officer)
Warrant Officer)✧ 119 Views · 9 Likes · 1 Comment
Flag
💬 Add Comment
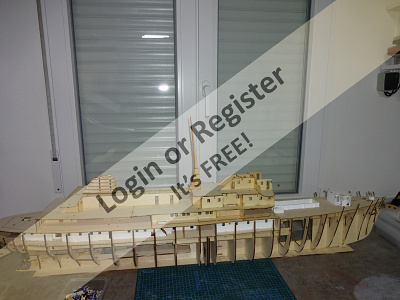
It has been a long time since I last reported on progress on the FINNMARKEN ( 4Months) this does not mean I have been sun bathing,I am still quite white and hiding from the heat and sun!
I am a bit surprised there was no answer to my question regarding the side entry port ! It is 9.4cms wide and the made to measure, laser cut “gate” is 7.2cms wide
Still ,back to my update
my main problem has been trying to fit the front panel between the foredeck to bridge level I have tried at least 4 times to get it to fit as the edges are curved quite sharply, my first attempt was as per the building instructions, and was a mess! Tried making formers to hold it in the correct place.My last attempt I soaked one end and using some 1/4 round a bench vice and some clamps to get the shape ,left it to dry on 40 degree temp for a day and then repeated for the other end and then whist assembling had to trim the ends to get the rake (it was supposedly precut by laser ).
At this stage the front panel was in such a condition it should have been replaced but as there are no suppliers locally finished up reinforcing it with EZEcote and fibre glass matting.
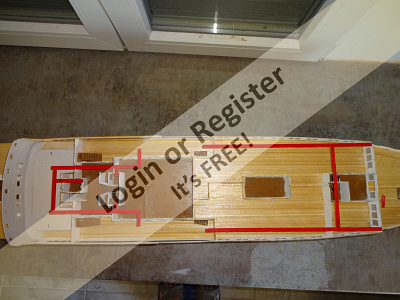
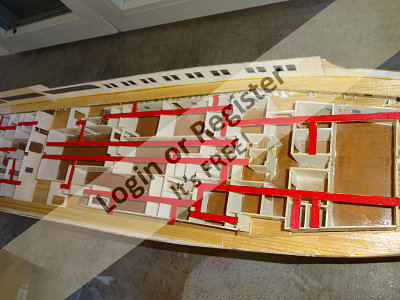
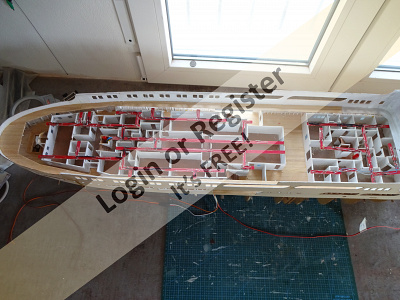
In between thinking of options I have been fitting the decking (150, 0.5*3*50mm) until I ran out, I need at least 50 more,( I am now making a list of errors a deficiencies to report and order) I butt joined the decking then varnished them using MONE MARTES iridescent clear varnish which when dry gives a sparkly finish (which may enhance the lighting effect, *an experiment,¨).
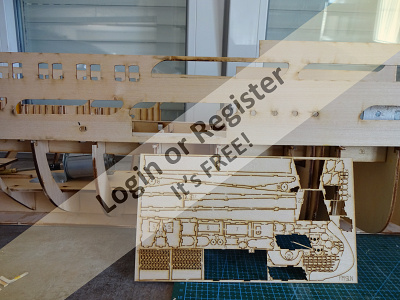
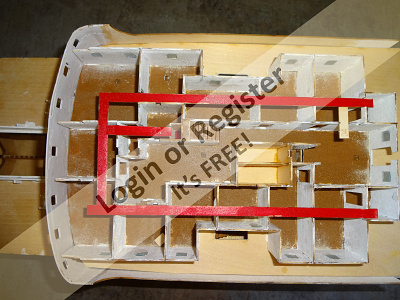
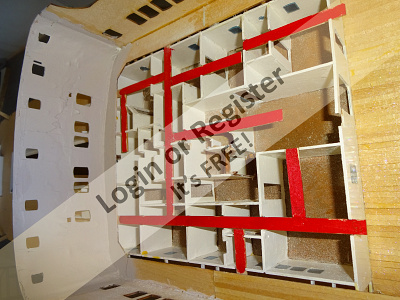
At this stage I decided to sort out the lighting by fitting the wood framework for the wiring on the four decks (red) which, after another fitting as some pieces the slots already cut out are in the wrong places and need yet more adjustment! this may have to be repeated when the lights and wiring is installed. the wiring supplied is coated copper but I may replace it with SWG26 as used for radio control wiring to give better insulation
I am a bit surprised there was no answer to my question regarding the side entry port ! It is 9.4cms wide and the made to measure, laser cut “gate” is 7.2cms wide
Still ,back to my update
my main problem has been trying to fit the front panel between the foredeck to bridge level I have tried at least 4 times to get it to fit as the edges are curved quite sharply, my first attempt was as per the building instructions, and was a mess! Tried making formers to hold it in the correct place.My last attempt I soaked one end and using some 1/4 round a bench vice and some clamps to get the shape ,left it to dry on 40 degree temp for a day and then repeated for the other end and then whist assembling had to trim the ends to get the rake (it was supposedly precut by laser ).
At this stage the front panel was in such a condition it should have been replaced but as there are no suppliers locally finished up reinforcing it with EZEcote and fibre glass matting.
In between thinking of options I have been fitting the decking (150, 0.5*3*50mm) until I ran out, I need at least 50 more,( I am now making a list of errors a deficiencies to report and order) I butt joined the decking then varnished them using MONE MARTES iridescent clear varnish which when dry gives a sparkly finish (which may enhance the lighting effect, *an experiment,¨).
At this stage I decided to sort out the lighting by fitting the wood framework for the wiring on the four decks (red) which, after another fitting as some pieces the slots already cut out are in the wrong places and need yet more adjustment! this may have to be repeated when the lights and wiring is installed. the wiring supplied is coated copper but I may replace it with SWG26 as used for radio control wiring to give better insulation
▲
⟩⟩
EdW
Mike Stoney
Cashrc
Martin555
StanC
Seaspray
jbkiwi
Colin H
MouldBuilder
|
💬 Re: NEXT STEP
2 years ago by 🇭🇺 MouldBuilder (
Vice Admiral)✧ 120 Views · 1 Like
Flag
Hi Len.
I haven’t been on the site for a long time as well. Your model is really looking nice. As for your question; easy. Make a bigger one.😁 I have always found Krick models very good with decent instructions. I am sure that they would be more than interested to hear about the difficulties you have faced. I have found that they respond to queries reasonably quickly. Hope to see further updates soon. Peter.👍😀 ▲
⟩⟩
Martin555
|
📝 lighting
1 year ago by 🇪🇸 bombero ( Warrant Officer)
Warrant Officer)✧ 95 Views · 16 Likes · 3 Comments
Flag
💬 Add Comment
Firstly I hope you had a happy xmas what ever your religion, and wish you a “prospero nueve ano” !
It has been several months since my last update so here goes.
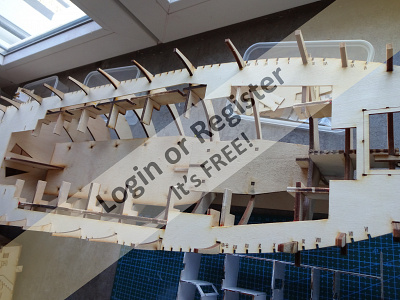
I have fitted all the llighting (except the running lights) 109 LEDS, which light up all decks, see photo taken in my darkened garage and workshop, I started with the copper wire supplied with the kit which I found would not accept solder, I tried all the recommendations from a lot of sources without success and even purchased a new temperature controlled fine point soldering iron. I then used some 26swg servo wiring but found it a bit bulky because of its insulation and the decks did not want to fit together. I tried stripping some coax cable and this seemed to work so bought some untreated copper wire ,only to find it was coated and difficult to solder( starting to get fed up). My other half Peggy suggested I try some of her craft wire used to repair jewellery (and surprise it worked perfectly and rewired some decks and some joints looked very professional and I had to replace said wire used. I then started to create connections so I could remove the deck using two core servo plugs and sockets which work a treat (Two per deck) my wring is in parallel (as suggested by Martin) and found I did not need so many resistors.
Seeing some comments from members who have built this boat suggesting the alterations necessary to get the boat radio controlled obtrusive and agree as as you separate the decks the framework for the lighting looks cumbersome and hides the tables, chairs, desks etc. I am now wondering if I can fit the lighting to the underside of the decks or after getting the boat radio control tested in my 8M*4M pool remove the lighting and reverting the boat to a static one after repairing the damage necessary for RC
My next job is to fit running lights and complete the radio controls before attempting the hull planking

It has been several months since my last update so here goes.
I have fitted all the llighting (except the running lights) 109 LEDS, which light up all decks, see photo taken in my darkened garage and workshop, I started with the copper wire supplied with the kit which I found would not accept solder, I tried all the recommendations from a lot of sources without success and even purchased a new temperature controlled fine point soldering iron. I then used some 26swg servo wiring but found it a bit bulky because of its insulation and the decks did not want to fit together. I tried stripping some coax cable and this seemed to work so bought some untreated copper wire ,only to find it was coated and difficult to solder( starting to get fed up). My other half Peggy suggested I try some of her craft wire used to repair jewellery (and surprise it worked perfectly and rewired some decks and some joints looked very professional and I had to replace said wire used. I then started to create connections so I could remove the deck using two core servo plugs and sockets which work a treat (Two per deck) my wring is in parallel (as suggested by Martin) and found I did not need so many resistors.
Seeing some comments from members who have built this boat suggesting the alterations necessary to get the boat radio controlled obtrusive and agree as as you separate the decks the framework for the lighting looks cumbersome and hides the tables, chairs, desks etc. I am now wondering if I can fit the lighting to the underside of the decks or after getting the boat radio control tested in my 8M*4M pool remove the lighting and reverting the boat to a static one after repairing the damage necessary for RC
My next job is to fit running lights and complete the radio controls before attempting the hull planking
▲
⟩⟩
hermank
flaxbybuck
EdW
Mike Stoney
AlessandroSPQR
figtree7nts
Len1
GaryLC
Cashrc
RNinMunich
Martin555
pressonreguardless
jbkiwi
fireboat
MouldBuilder
Colin H
|
💬 Re: lighting
1 year ago by 🇩🇪 RNinMunich (
Fleet Admiral)✧ 92 Views · 5 Likes
Flag
Hola Len (Bombero), (if your boats catch fire you're the right man for the job!)
Re "I started with the copper wire supplied with the kit which I found would not accept solder, ..." That copper wire would be coated with a hard varnish for insulation. Before you can solder it you have to burn it off, DON'T inhale the fumes!!!🙊 I sometimes use 1mm copper wire for a common negative return rail. I too have found the silver and brass wire, amongst many other things from the handiwork/crafts section of most garden centres extremely useful. And much cheaper than an equivalent from a model shop😀 Re Light wiring- To keep wiring out of the way, not visible from outside, - I use a common negative return wire to significantly reduce the number of wires needed. I run the wiring through a square section 'toob' conduit tucked away in a corner. Then run the wires across the ceiling to the lamps, attaching them with a blob of cyano gel. (Gluper Sue😁) Where several lamps are close together / on the same circuit another 'conduit' can be used on the ceiling (sorry Deck-head!) and a common ground wire. Dropping resistors can be added at each LED as required or, better, on a small distribution board down in the hull. A simple matrix board (e.g. Vero board) is ideal for that. Ref connecting plugs- Where many circuits/connections are needed you might consider using the multi-pin (from 9 upwards) Canon D shell type plugs and sockets from the computer industry. Suitably rigidly mounted they enable 'plug-in' superstructure/decks without fiddling with many small connectors. They also help to hold things together😉 Hope this helps others solve similar problems. Superb build, very well done👍 Looking muchly forward to seeing FINNMARKEN on a night sailing Len👍 Please DO NOT turn her into a static dust collector. I'm sure that you, me and our members, would ultimately deeply regret that🤔 Saludos y un año nuevo saludable. Doug😎 PS Any chance of a vid of your Düsseldorf in action??? ▲
⟩⟩
Cashrc
pressonreguardless
Martin555
Peejay
Colin H
|
|
Login To
Remove Ads 💬 Re: lighting
1 year ago by 🇬🇧 Martin555 (
Fleet Admiral)✧ 92 Views · 2 Likes
Flag
Hi Len,
Nice to see she is coming together. Well done. Martin. ▲
⟩⟩
Cashrc
pressonreguardless
|
|
💬 Re: lighting
1 year ago by 🇭🇺 MouldBuilder (
Vice Admiral)✧ 96 Views · 4 Likes
Flag
Great work Len.
Those lights really are bright. It would be a shame if the ship had to be a static model. Good luck with the planking. I have never done that but will give it a go one day. Peter.👍 ▲
⟩⟩
Cashrc
RNinMunich
pressonreguardless
Martin555
|
📝 PREPARATION FOR HULL
1 year ago by 🇪🇸 bombero ( Warrant Officer)
Warrant Officer)✧ 67 Views · 11 Likes · 4 Comments
Flag
💬 Add Comment
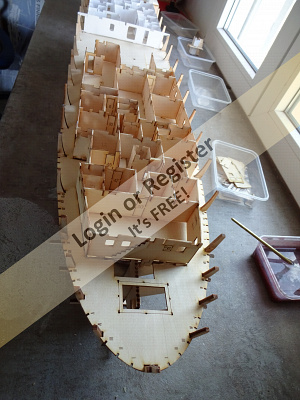
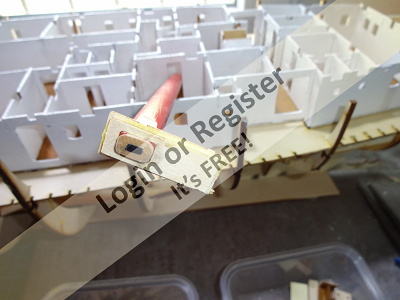
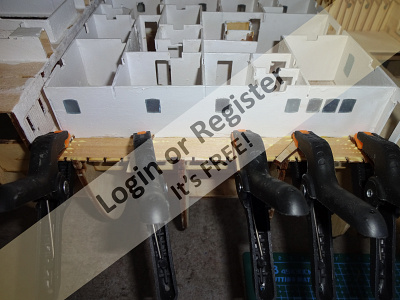
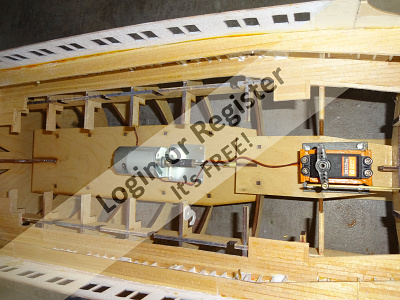
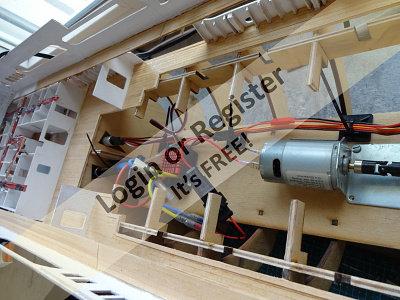
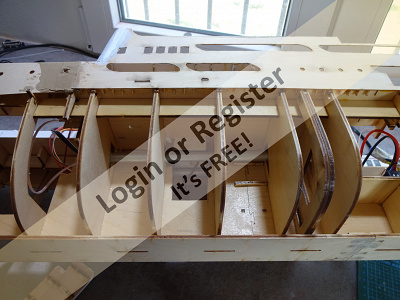
After experimenting on where the electrics go, I have decided to put the battery in the front hold And made up an open ended box for it!The rear end contains the ESC, servo for the rudder and a fuse. As there will not any access between the two ends I have inserted two short tubes( see Photos) through the cutouts of the hull framework for the wires so the wiring can easily accessed if there is any problems. the receiver will be in a space on the first floor deck as will the on/off switches. I have checked the system and can operate the propeller and the rudder, I will be putting in a duo switch so will be able to operate the running lights and lighting separately.
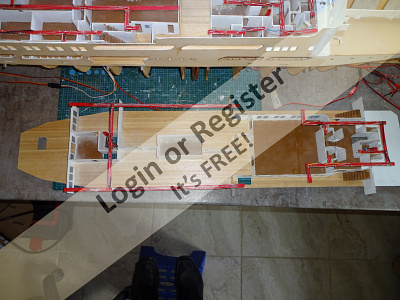
I am now in the process of planking the hull below the side panels(never done this before as previous boats had plastic of fibreglass hulls) and enclose photo’s of first attempt, I carefully built the bow up not only shaped where it fitted but also had to chamfer the cuts to get a close fit, minor errors will be covered before final painting.

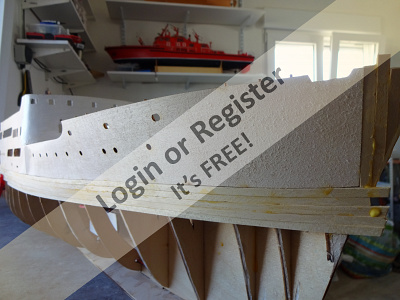
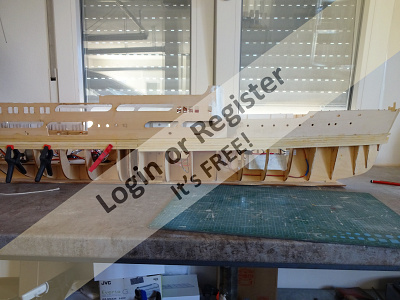
I am now in the process of planking the hull below the side panels(never done this before as previous boats had plastic of fibreglass hulls) and enclose photo’s of first attempt, I carefully built the bow up not only shaped where it fitted but also had to chamfer the cuts to get a close fit, minor errors will be covered before final painting.
▲
⟩⟩
hermank
SimpleSailor
flaxbybuck
EdW
Doogle
Mike Stoney
AlessandroSPQR
Martin555
pressonreguardless
Len1
Colin H
|
💬 Re: PREPARATION FOR HULL
2 months ago by 🇪🇸 bombero (
Warrant Officer)✧ 19 Views · 1 Like
Flag
I have planked the hull but am trying to improve the results by painting, rubbing down, filling and repeating until satisfied. and the lights are controlled by radio and multi switch to separate the running lights from the room lights
▲
⟩⟩
Colin H
|
|
Login To
Remove Ads 💬 Re: PREPARATION FOR HULL
2 months ago by 🇮🇹 AlessandroSPQR (
Commodore)✧ 34 Views · 1 Like
Flag
Hola Bombero.
Excellent work with the LEDs. How is the work progressing? Do you feel comfortable doing planking? I believe it is the most beautiful but most difficult thing to do in a scale model. One question: is the switching on and off of the LEDs radio controlled or is it just manual? ▲
⟩⟩
Len1
|
|
💬 Re: PREPARATION FOR HULL
1 year ago by 🇬🇧 AndyN (
Warrant Officer)✧ 63 Views · 2 Likes
Flag
That looks impressive sir. Can't wait to see it in action
▲
⟩⟩
Len1
AlessandroSPQR
|
|
💬 Re: PREPARATION FOR HULL
1 year ago by 🇬🇧 Martin555 (
Fleet Admiral)✧ 95 Views · 1 Like
Flag
Nice work Len.
Take your time doing the planking and you will get a better finish. Martin555. ▲
⟩⟩
Len1
|


Login To
Remove Ads
Remove Ads