Join Us On Social Media!

|

|

|
Download The App!
Login To
Remove Ads
Remove Ads
Login To
Remove Ads
Remove Ads
Model Boats Website
RRS Discovery
9 Posts · 7 Followers · 38 Photos · 50 Likes
Began 2 years ago by
 United Kingdom
Follow This Thread
Not currently following
> Click to follow
> Click to follow
Latest Post 2 years ago by
| Oldest posts shown first (Show Newest First) | (Print Booklet) |
📝 RRS Discovery
2 years ago by 🇬🇧 Hillro ( Lieutenant)
Lieutenant)✧ 133 Views · 10 Likes · 3 Comments
Flag
💬 Add Comment
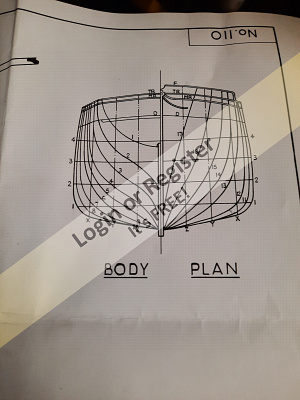
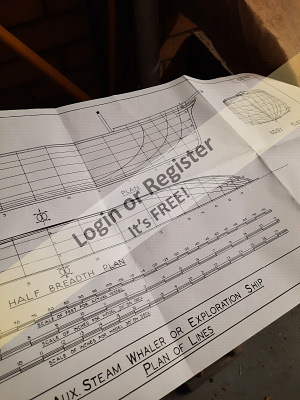
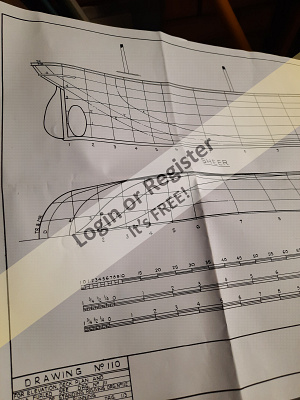
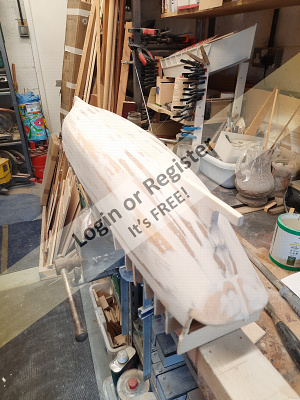
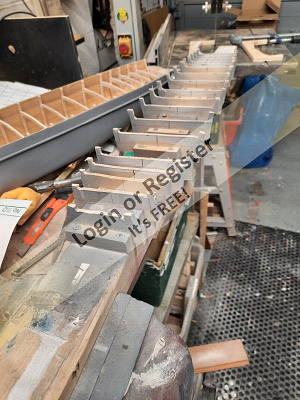
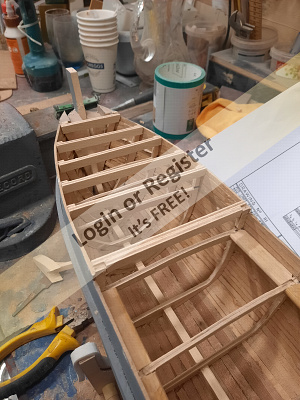
Started a new project, a scratch build of RRS Discovery.
The actual ship is in Dundee which is not far from me, so getting details from the ship is a bonus.
I located drawings for a steam whaler which the ship was derived from.
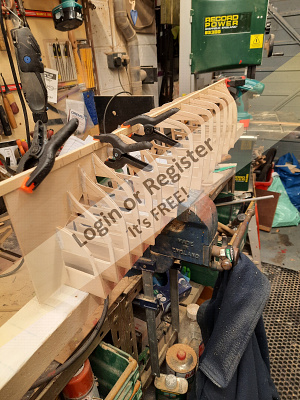
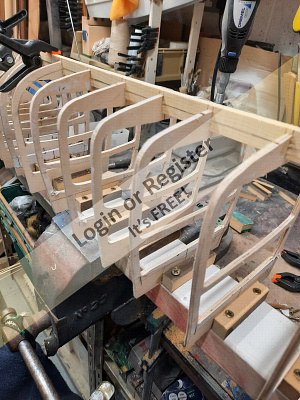
I decided to build it upside down. The frame profiles were cut out of 4mm birch ply using enlarged prints of the profiles, stuck to the ply and cut out using a scroll saw. They were then screwed to the base board.
Next step is start the Hull planking.

The actual ship is in Dundee which is not far from me, so getting details from the ship is a bonus.
I located drawings for a steam whaler which the ship was derived from.
I decided to build it upside down. The frame profiles were cut out of 4mm birch ply using enlarged prints of the profiles, stuck to the ply and cut out using a scroll saw. They were then screwed to the base board.
Next step is start the Hull planking.
▲
⟩⟩
AndyB
Peejay
Newby7
jbkiwi
Seanympth
Colin H
Rogal118
Mike Stoney
jacko
TonyAsh
|
💬 Re: RRS Discovery
2 years ago by 🇨🇦 Newby7 (
 Fleet Admiral) Fleet Admiral)✧ 124 Views · 0 Likes
Flag
Looks good. Hope planking goes well.
Rick ▲
⟩⟩
No likes yet
This member will receive 1 point for every like received |
|
Login To
Remove Ads 💬 Re: RRS Discovery
2 years ago by 🇬🇧 TonyAsh (
 Chief Petty Officer 2nd Class) Chief Petty Officer 2nd Class)✧ 139 Views · 2 Likes
Flag
Most interesting! I will follow your build. Are you planning to RC sail her?
Tony A....... ▲
⟩⟩
Peejay
Rowen
|
|
💬 Re: RRS Discovery
2 years ago by 🇺🇸 pressonreguardless (
 Rear Admiral) Rear Admiral)✧ 131 Views · 2 Likes
Flag
Looks like a great project.
What are her dimensions? Trev ▲
⟩⟩
Rowen
Mike Stoney
|
Login To
Remove Ads
Remove Ads
📝 Planking progress
2 years ago by 🇬🇧 Hillro ( Lieutenant)
Lieutenant)✧ 122 Views · 7 Likes · 4 Comments
Flag
💬 Add Comment
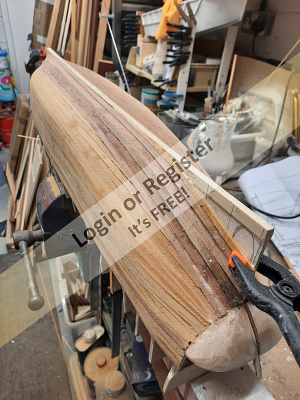
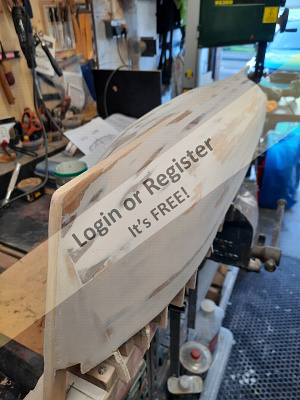
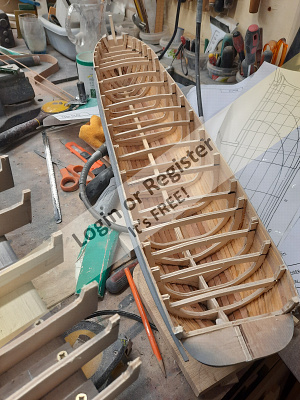
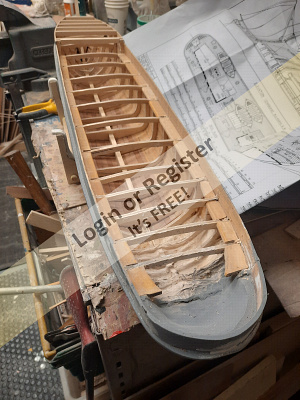
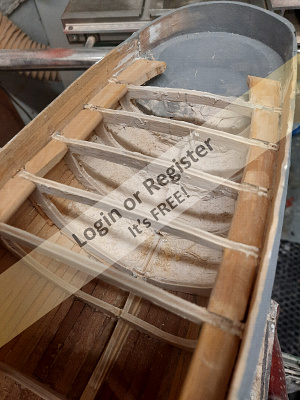
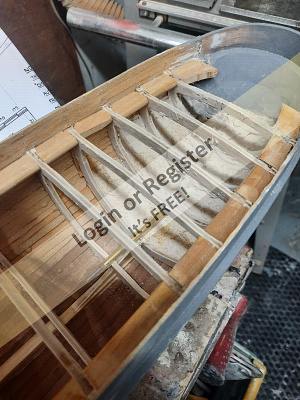
I am a great believer of using salvaged wood where possible.
I started using mahogany planks but found it too stiff without steaming or soaking. So I changed to parana pine (an staircase handrail) this bent more easily.
I was not too worried about the finish as I intend to fill with car body filler and maybe a glass top coat.
I found some errors with a couple of frames which needed packing strips.
The bow and stern were blocked out with lime wood blocks.
The Hull needs tidied up in a few areas.
Work in progress.
▲
⟩⟩
Colin H
ChrisG
jbkiwi
Ronald
pressonreguardless
AndyB
TonyAsh
|
💬 Re: Planking progress
2 years ago by 🇺🇸 pressonreguardless (
Rear Admiral)✧ 110 Views · 0 Likes
Flag
Unfortunately, Steam is very expensive, If I Steam the Mt Washington (if possible) it would be close to $900. Looking forward to your progress.
Trev ▲
⟩⟩
No likes yet
This member will receive 1 point for every like received |
|
Login To
Remove Ads 💬 Re: Planking progress
2 years ago by 🇬🇧 Hillro (
Lieutenant)✧ 118 Views · 1 Like
Flag
I am going to fit a drive motor, can't afford a steam plant.
It's interesting that the ship had a method of lifting the prop on board to reduce drag while under sail or in the ice. I still have to find out how this is possible. Not that I intend to do this on the model. I believe the rudder could be lifted on board as well. Sails were used because Discovery could not carry enough coal, and there was not any refuelling provisions. ▲
⟩⟩
pressonreguardless
|
|
💬 Re: Planking progress
2 years ago by 🇬🇧 hammer (
Lieutenant)✧ 120 Views · 1 Like
Flag
Looking good. I always plank on frames even my steam ships. 5ft model planked with 1/16 balsa Impregnated with resin. Built 2001 still going. Even dropped it twice so did have to repair. 1/16 is to thin use 1/8 now as I have a large supply. Bought 40 years ago when aero modelling. Boats don’t crash had 2 sink though 😂
▲
⟩⟩
Hillro
|
|
💬 Re: Planking progress
2 years ago by 🇺🇸 pressonreguardless (
Rear Admiral)✧ 113 Views · 1 Like
Flag
Will she be a steamer like the original Discovery?
Trev ▲
⟩⟩
Hillro
|
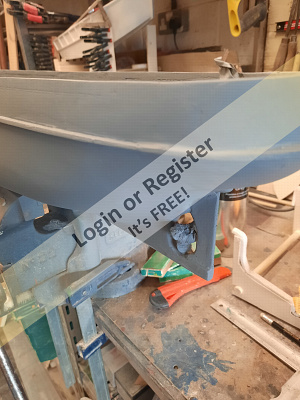
📝 Planking progress
2 years ago by 🇬🇧 Hillro ( Lieutenant)
Lieutenant)✧ 112 Views · 7 Likes
Flag
💬 Add Comment
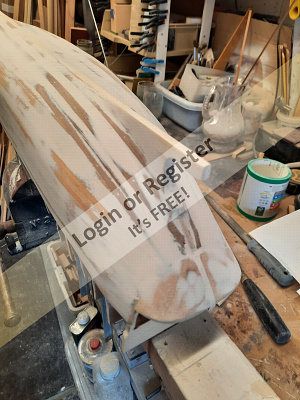
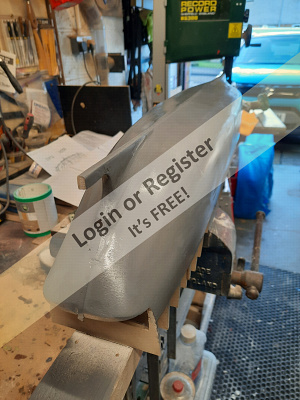
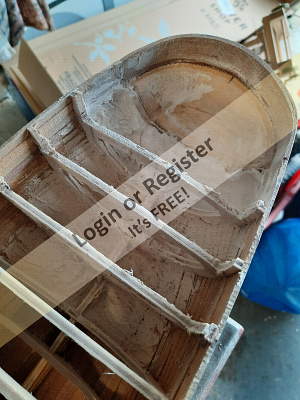
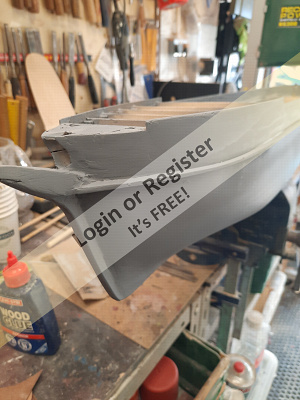
After a quick sand of the Hull to remove the obvious high point coated it with car filler. Once set, rubbed down to a smooth finish. Had to go over various low points with additional filler.
When reasonable happy give the Hull a coat of undercoat to highlight the small imperfections that can be rectified.
This sanding process is very dusty and some covid face masks came in very handy.🤣

When reasonable happy give the Hull a coat of undercoat to highlight the small imperfections that can be rectified.
This sanding process is very dusty and some covid face masks came in very handy.🤣
▲
⟩⟩
ChrisG
dave976
jbkiwi
Colin H
Graham93
TonyAsh
pressonreguardless
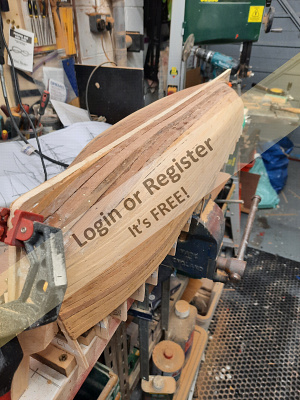
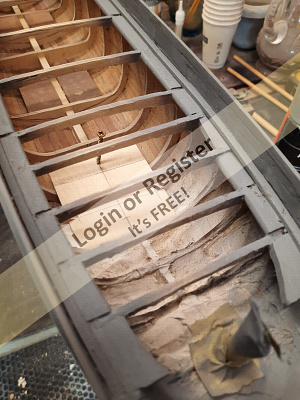
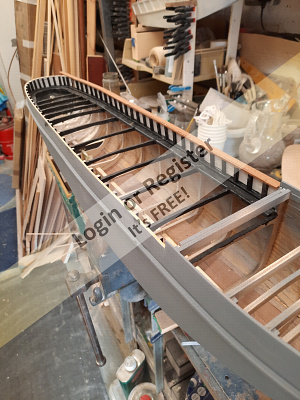
📝 Freeing the Hull from the base board
2 years ago by 🇬🇧 Hillro ( Lieutenant)
Lieutenant)✧ 106 Views · 5 Likes · 1 Comment
Flag
💬 Add Comment
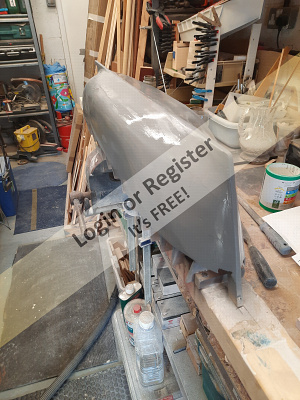
Using a Dremel fitted with a saw blade cut though the supports.
The Hull interior can now be examined .
I have noticed that the stern is not quite right. To get the rudder mounted in the correct location this needs to be modified. A bit of measuring and head scratching required.
The Hull interior can now be examined .
I have noticed that the stern is not quite right. To get the rudder mounted in the correct location this needs to be modified. A bit of measuring and head scratching required.
▲
⟩⟩
pressonreguardless
dave976
jbkiwi
TonyAsh
Colin H
|
💬 Re: Freeing the Hull from the base board
2 years ago by 🇬🇧 ChrisG (
 Lieutenant Commander) Lieutenant Commander)✧ 91 Views · 1 Like
Flag
Looks to be a beautifully built hull, lovely lines, that grey primer is great for showing the slightest imperfection. Look forward to more pictures.
ChrisG ▲
⟩⟩
Hillro
|
📝 Modified Stern, etc
2 years ago by 🇬🇧 Hillro ( Lieutenant)
Lieutenant)✧ 84 Views · 7 Likes · 2 Comments
Flag
💬 Add Comment
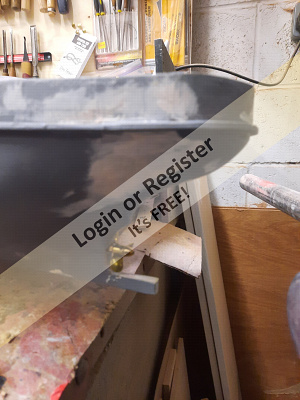
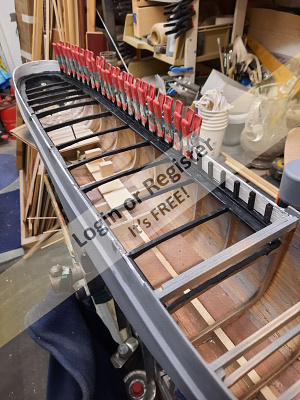
I cut off the stern at the last frame then carved another one out of lime wood, this time allowing room for the rudder arms ,etc.
Filled in between the last few stern frames with car filler. This is to beef up the stern to allow the prop shaft hole without weakening the stern.
To address the fitting of the deck I cut out the frames above the deck and fitting support for the deck edges.
Fitted supports for the forward deck.
I have researched what I need to fit under the deck.
Motor with associated esc.
Steering servo.
Two sail control servos fitted with arms.
Maybe a drum servo.
And a battery.
Hopefully being a sail driven model I will provide fixings for a removable drop keel.
The major issue for me to sort out is access to the Hull when the deck is on and to remain watertight.
Any ideas welcome.
▲
⟩⟩
mturpin013
Colin H
jbkiwi
TonyAsh
ChrisG
pressonreguardless
Newby7
|
💬 Re: Modified Stern, etc
2 years ago by 🇬🇧 hammer (
Lieutenant)✧ 83 Views · 1 Like
Flag
With few opportunities to cover openings on my pilot cutter. Had to make cutout in deck. Rubber seal & screwed down. Screws covered by lose plank, well not that lose a press fit holding them in place. Rubber I have used, window draft seal, also split worn out windscreen wipers.

▲
⟩⟩
Colin H
|
|
💬 Re: Modified Stern, etc
2 years ago by 🇨🇦 Newby7 (
Fleet Admiral)✧ 81 Views · 2 Likes
Flag
Would your deck be snug fit and screwed in place. Let a bead of silicon cure on the frames used as a gasket when the deck is in place.
Members of my club use clear tape to cover hatches and covers from water getting in. Rick ▲
⟩⟩
ChrisG
Hillro
|
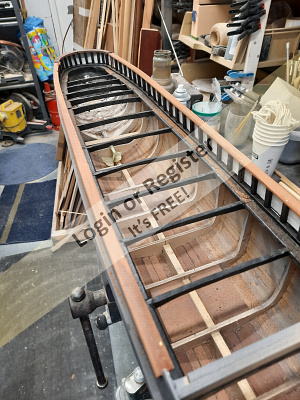
📝 Hull progress
2 years ago by 🇬🇧 Hillro ( Lieutenant)
Lieutenant)✧ 73 Views · 6 Likes · 1 Comment
Flag
💬 Add Comment
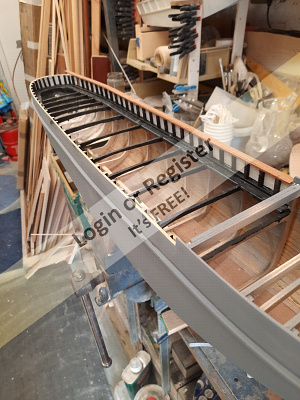
Having looked at photos of the ship , I realised that the bulwarks need to be higher. So I raised this by one plank.
This was just glued to the top of the bulwark using clamps to hold in place.
Made and fitted the bowsprit, again looking at photos.
The bow on the ship is reinforced using steel plates , thinking of using brass sheet and round head pins to simulate this.
The prop and rudder has been fitted. This required me purchasing a long 6mm twist drill.
I greased the shaft before fitting it as access is not possible after fitting the rudder assembly.
Now looking into the motor. I found a couple of meccano pulleys to make a belt drive. Using these I can mount it closer to the stern allowing more room in the Hull for the sail control servos.
I now intend to paint the inside using epoxy resin and secure some ballast lead sheet.
▲
⟩⟩
AndyB
TonyAsh
mturpin013
Colin H
jbkiwi
ChrisG
|
💬 Re: Hull progress
2 years ago by 🇬🇧 AndyB (
 Warrant Officer) Warrant Officer)✧ 69 Views · 0 Likes
Flag
This is looking impressive
Seeing it under sail will be a delight Good luck with it ▲
⟩⟩
No likes yet
This member will receive 1 point for every like received |
📝 Bulwark Construction
2 years ago by 🇬🇧 Hillro ( Lieutenant)
Lieutenant)✧ 67 Views · 5 Likes
Flag
💬 Add Comment
I fitted a board in the bottom , inside of the bulwarks, inside which will be mounted the deck. The bulwark inside was painted white and on it glued prepainted black uprights. I then sanded the bulwark sides down to the top of the uprights. Mahogany hand rail is pinned and glued to the top of the bulwark. A shaped handrail for the stern.
Now need to tidy up with a bit of sanding, etc.
Now need to tidy up with a bit of sanding, etc.
▲
⟩⟩
TonyAsh
GaryLC
Graham93
Colin H
AndyB
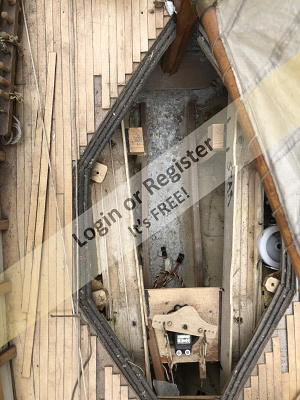
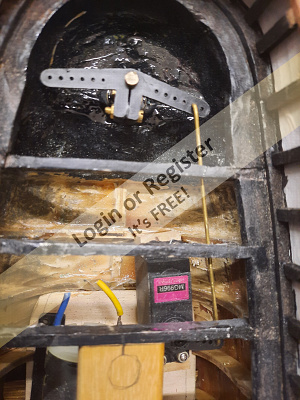
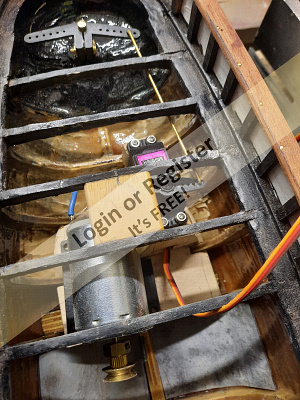
📝 Steering, etc
2 years ago by 🇬🇧 Hillro ( Lieutenant)
Lieutenant)✧ 62 Views · 3 Likes
Flag
💬 Add Comment
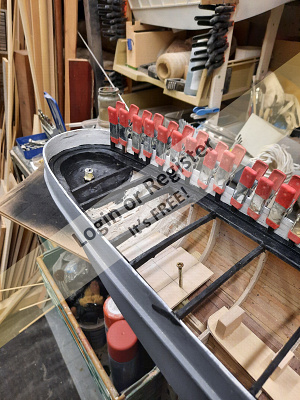
After a few different ideas for how to fit the steering servo, settled on the method in the photo. Also coated the inside of the Hull with fibre glass resin.
This helps with waterproofing and also strengths the Hull.
I am now going to glue in the lower Hull some lead ballast using sheet lead.
I intend to use sails to drive the boat but I am fitting a motor as a backup. I am using a belt drive, but may upgrade to a toothed belt drive.
I am doing this to keep the motor well into the stern thus keeping the main Hull clear for the sail control.
I have found info in the model boats mag how to do this using servos fitted with sail arms. Need to do a bit more research and head scratching how and where to fit the servos.
▲
⟩⟩
TonyAsh
ChrisG
Colin H
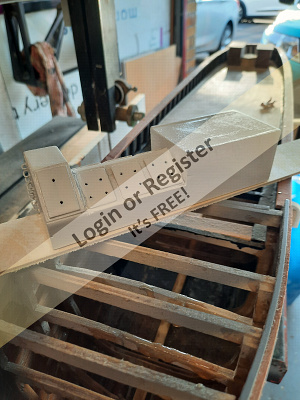
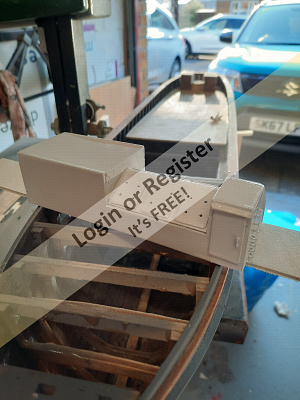
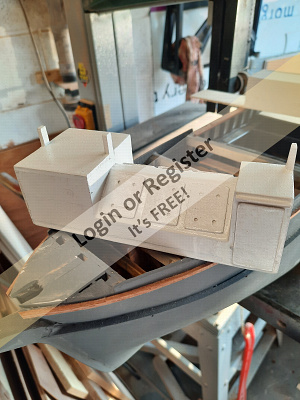
📝 Engine Room access
2 years ago by 🇬🇧 Hillro ( Lieutenant)
Lieutenant)✧ 37 Views · 0 Likes
Flag
💬 Add Comment
Decided to make the boiler room access so I could see how to make an removal access into the Hull.
This was made from scrap bits of birch ply.
The larger one was made first, but having a look at pics of the ship, online I could see it was the wrong scale.
So I made another at a smaller scale.
Happy with it now have to have a look for suitable pipe to make a funnel.
This was made from scrap bits of birch ply.
The larger one was made first, but having a look at pics of the ship, online I could see it was the wrong scale.
So I made another at a smaller scale.
Happy with it now have to have a look for suitable pipe to make a funnel.
▲
⟩⟩
No likes yet
This member will receive 1 point
for every like received
This member will receive 1 point
for every like received


Login To
Remove Ads
Remove Ads