Join Us On Social Media!

|

|

|
Download The App!
Login To
Remove Ads
Remove Ads
Login To
Remove Ads
Remove Ads
Model Boats Website
Thames Slipper Launch
11 Posts · 8 Followers · 29 Photos · 60 Likes
Began 2 years ago by
 United Kingdom
Follow This Thread
Not currently following
> Click to follow
> Click to follow
Latest Post 2 years ago by
| Oldest posts shown first (Show Newest First) | (Print Booklet) |
📝 Thames Slipper Launch
2 years ago by 🇬🇧 ChrisG ( Lieutenant Commander)
Lieutenant Commander)✧ 139 Views · 5 Likes · 7 Comments
Flag
💬 Add Comment
Thank you for the response to this build it is nice to know that others are interested in your models and thanks Doug for the pictures and links I had seen some of them but certainly not all, cant believe the £180,000 asking price for
"Baby Greyhound".
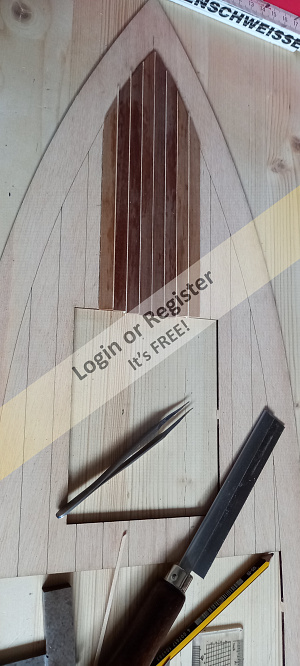
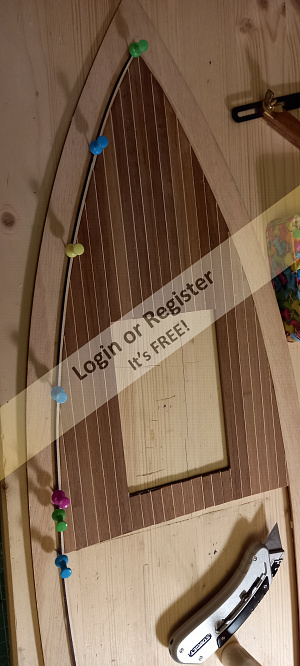
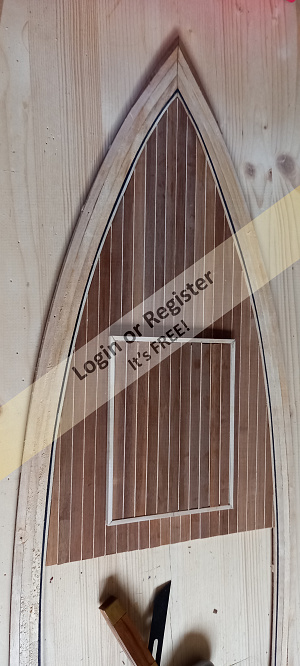
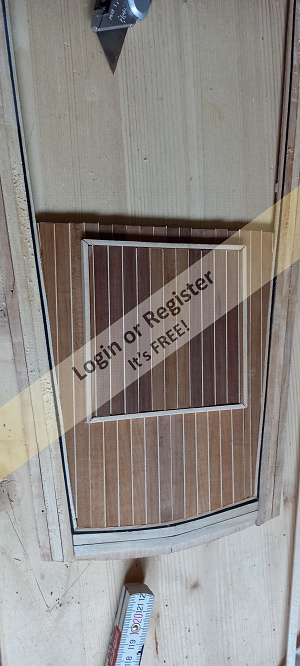
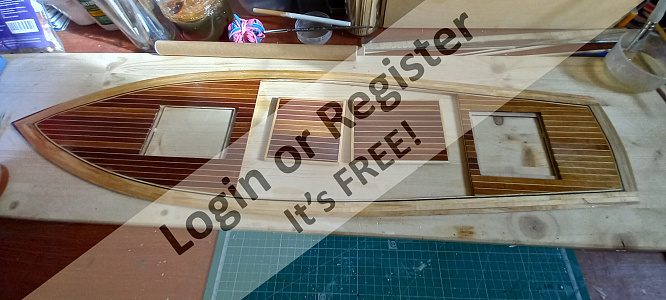
The decision had been made and I would put lots of effort into the deck and cockpit, I seem to have a thing about planks and intended to do an elaborate planked deck which hopefully will look super with a gloss finish. This is to be done before the laser cut deck is fixed to the frames to make it easier to cut, glue and sand. I have lots of planking in my workroom so the task was to ensure I had enough of each style for the job. As the laser cut deck is lined out it was easy to work out the planks needed and the .5mm inserts between the planks. The glue I always use is Evostick blue the waterproof one, it works for me.
I bought some veneer and some lined wood both pale and black to line the planking marquetry style, this is well worth the effort as it defines each section and seems to tidy the job, the difficult bit is to finish the bow and stern neatly which took lots of time and patience. Still had the locker lids which I would have liked inset into the deck to do but decided instead to raise them slightly and finish them in the same style as the deck.
"Baby Greyhound".
The decision had been made and I would put lots of effort into the deck and cockpit, I seem to have a thing about planks and intended to do an elaborate planked deck which hopefully will look super with a gloss finish. This is to be done before the laser cut deck is fixed to the frames to make it easier to cut, glue and sand. I have lots of planking in my workroom so the task was to ensure I had enough of each style for the job. As the laser cut deck is lined out it was easy to work out the planks needed and the .5mm inserts between the planks. The glue I always use is Evostick blue the waterproof one, it works for me.
I bought some veneer and some lined wood both pale and black to line the planking marquetry style, this is well worth the effort as it defines each section and seems to tidy the job, the difficult bit is to finish the bow and stern neatly which took lots of time and patience. Still had the locker lids which I would have liked inset into the deck to do but decided instead to raise them slightly and finish them in the same style as the deck.
▲
⟩⟩
MartinH2
jbkiwi
stevedownunder
pressonreguardless
RNinMunich
|
💬 Re: Thames Slipper Launch
2 years ago by 🇺🇸 pressonreguardless (
 Rear Admiral) Rear Admiral)✧ 137 Views · 0 Likes
Flag
It Does Look Great!
▲
⟩⟩
No likes yet
This member will receive 1 point for every like received |
|
Login To
Remove Ads 💬 Re: Thames Slipper Launch
2 years ago by 🇬🇧 ChrisG (
Lieutenant Commander)✧ 137 Views · 2 Likes
Flag
Hello Trev
In answer to your question I really dont know. Many moons ago I ordered I think 2mm x 2mm for a job and I got several lengths of 2mm x .5mm in error. I dont know whose error probably mine but working on the premise that it would come in useful I held onto it and sure enough it did. It was nothing very special or expensive but I am hoping when the deck is sanded and varnished it along with the dark wood it will look in keeping with the Slipper Launch image. Regards Chris ▲
⟩⟩
stevedownunder
pressonreguardless
|
|
💬 Re: Thames Slipper Launch
2 years ago by 🇺🇸 pressonreguardless (
Rear Admiral)✧ 137 Views · 0 Likes
Flag
Hi Chris,
Planking looks great.👍👍 What species wood is the strips between the Mahogany Decking? Trev ▲
⟩⟩
No likes yet
This member will receive 1 point for every like received |
|
💬 Re: Thames Slipper Launch
2 years ago by 🇬🇧 ChrisG (
Lieutenant Commander)✧ 137 Views · 0 Likes
Flag
I would like to join you but we have decided to chase each other down The Grand Canal in Venice.🤣🤣🤣🤣
Dream on if only 🤑 Cheers Chris ▲
⟩⟩
No likes yet
This member will receive 1 point for every like received |
|
💬 Re: Thames Slipper Launch
2 years ago by 🇩🇪 RNinMunich (
 Fleet Admiral) Fleet Admiral)✧ 141 Views · 0 Likes
Flag
I'm with you Chris👍
One for me and one for the GF😁😆 We'll race 'em through Munich on the Isar river! 😎 ▲
⟩⟩
No likes yet
This member will receive 1 point for every like received |
|
💬 Re: Thames Slipper Launch
2 years ago by 🇬🇧 ChrisG (
Lieutenant Commander)✧ 139 Views · 1 Like
Flag
Only 35k and me on a pension, I will buy two 🤣🤣🤣🤣
Regards Chris ▲
⟩⟩
RNinMunich
|
|
💬 Re: Thames Slipper Launch
2 years ago by 🇩🇪 RNinMunich (
Fleet Admiral)✧ 142 Views · 0 Likes
Flag
Yeah Greyhound is a bit pricy, but there were some nice examples for around 35 thou.
Cheap at arf the price - as me old granny would say.😉 You're off to a good start Chris👍 Looking forward to this. Cheers, Doug 😎 ▲
⟩⟩
No likes yet
This member will receive 1 point for every like received |
Login To
Remove Ads
Remove Ads
📝 Thames Slipper Launch
2 years ago by 🇬🇧 ChrisG ( Lieutenant Commander)
Lieutenant Commander)✧ 138 Views · 3 Likes
Flag
💬 Add Comment
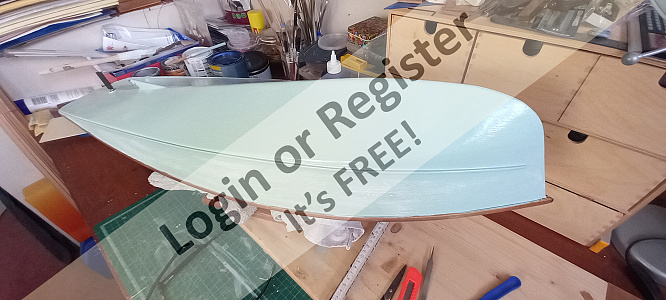
I have decided that my build will have to be out of the sequence of the plan and instructions.
The deck will take a lot of time to make it smooth enough to take several coats of varnish and I need to get outside in the garage to do that and the weather in Notts although not as bad as other parts of the country is damn nasty.
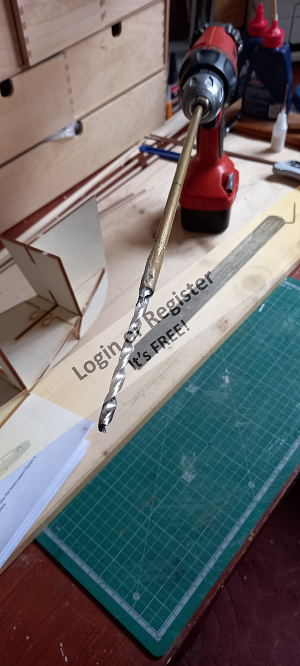
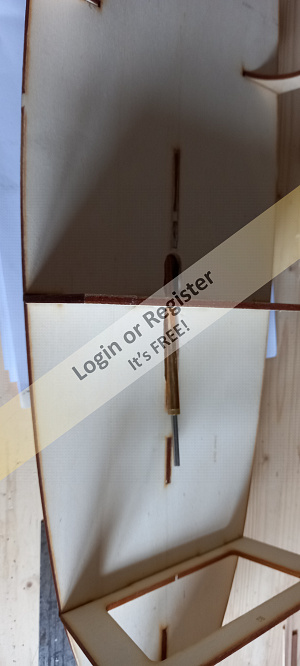
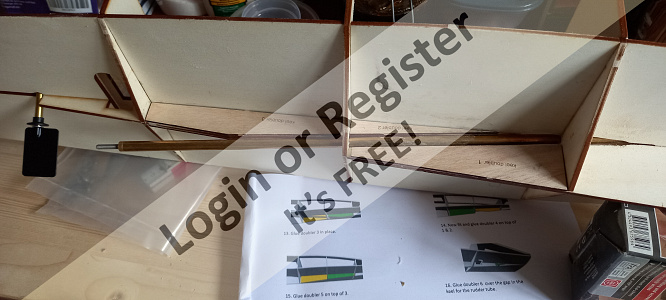
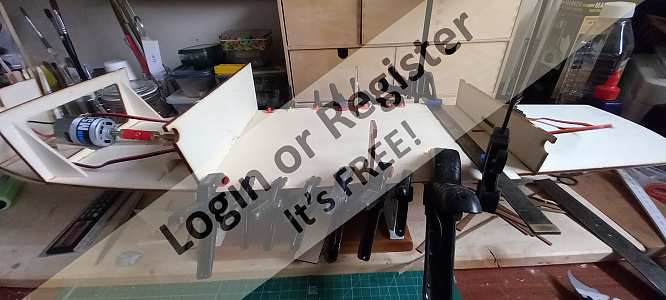
I have started to glue the sections to the hull bottom which form the keel to which the bottom skin will be attached. This also indicates the positioning of the rudder and the very long 18" prop shaft. I spent a great deal of time deciding how best to make holes in the correct place on the hull bottom the angle of which is dictated by the rear keel and forward keel.
I made a 380mm drill with a 6mm bit by glueing a long shank drill bit into a length of brass tube. By following the path of entry indicated by the keels I was able to drill a pilot hole of 6mm and then with files, Dremmel and lots of cussing and swearing got the prop shaft and tube in the correct position. The rudder in the photo is not at this stage fitted but just there to check distance between it and the prop. I have some tidying up to do around the position of the prop tube but am not going to push my luck by doing to much more today. I would like to suggest that HA Kits consider cutting appropriate holes in the hull bottom for the shaft, it would make no difference to the kit whether intended for display or working model. Just a suggestion.
The deck will take a lot of time to make it smooth enough to take several coats of varnish and I need to get outside in the garage to do that and the weather in Notts although not as bad as other parts of the country is damn nasty.
I have started to glue the sections to the hull bottom which form the keel to which the bottom skin will be attached. This also indicates the positioning of the rudder and the very long 18" prop shaft. I spent a great deal of time deciding how best to make holes in the correct place on the hull bottom the angle of which is dictated by the rear keel and forward keel.
I made a 380mm drill with a 6mm bit by glueing a long shank drill bit into a length of brass tube. By following the path of entry indicated by the keels I was able to drill a pilot hole of 6mm and then with files, Dremmel and lots of cussing and swearing got the prop shaft and tube in the correct position. The rudder in the photo is not at this stage fitted but just there to check distance between it and the prop. I have some tidying up to do around the position of the prop tube but am not going to push my luck by doing to much more today. I would like to suggest that HA Kits consider cutting appropriate holes in the hull bottom for the shaft, it would make no difference to the kit whether intended for display or working model. Just a suggestion.
▲
⟩⟩
MartinH2
stevedownunder
peterd
📝 Thames Slipper Launch
2 years ago by 🇬🇧 ChrisG ( Lieutenant Commander)
Lieutenant Commander)✧ 132 Views · 3 Likes · 1 Comment
Flag
💬 Add Comment
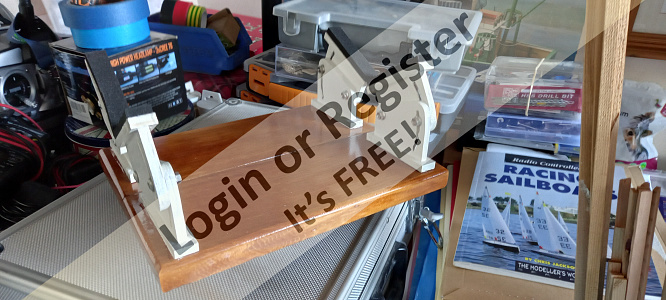
Progress halted on fitting the motor and prop. shaft as I am awaiting the new 500 motor and as the weather continued to be brass monkeys I decided to make the elaborate boat stand, this also from HA Kits. I am quite impressed with it, the parts again laser cut were easy to release from the ply sheet and needed little or no tidying up. The cradle is made up of 8 pieces which needed painting, fixing together with nuts and bolts supplied and mounted onto a base board of your choice. It is fully adjustable and will look good supporting the model.
I then managed to get the deck sanded which showed some areas where there were slight gaps in the planking of about 0.5mm. No good reaching for the P38, what to use?
I had some Cascamite used on a much earlier build this powder mixed to a smooth paste is a excellent glue although I think not much used today, I decided to add some sanding dust to the mix and used the paste as a filler for the gaps. When it was set and sanded I had the result I wished for with all the gaps filled.
I commenced varnishing the deck today, starting with 1 part varnish to 10 parts thinner, I will work up to varnish within about 10 coats each a little thicker than the previous one. Laborious but I hope worth the effort.
Best regards ChrisG
▲
⟩⟩
MartinH2
stevedownunder
pressonreguardless
|
💬 Re: Thames Slipper Launch
2 years ago by 🇺🇸 pressonreguardless (
Rear Admiral)✧ 133 Views · 0 Likes
Flag
👍👍👍
▲
⟩⟩
No likes yet
This member will receive 1 point for every like received |
📝 Thames Slipper Launch
2 years ago by 🇬🇧 ChrisG ( Lieutenant Commander)
Lieutenant Commander)✧ 124 Views · 8 Likes · 3 Comments
Flag
💬 Add Comment
I am stuck again, The 500 motor has been delivered and is fine, suitable battery ready to go and pleased that it will fit across the boat and just a little further forward than central so the heaviest bit of the mechanics will be in the correct place. Problems with the universal prop fitting as one of the brass inserts had a 2mm hole and I needed 3.2mm, stupid of me but I drilled it to 3.2mm and now everything wobbles and vibrates like a duck egg. I am now waiting for a replacement.
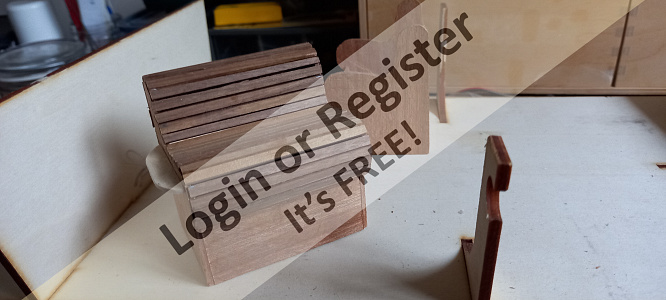
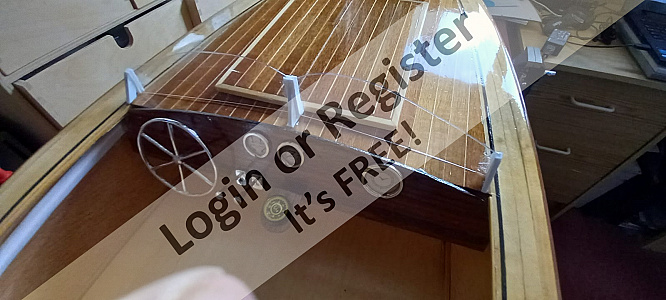
All of this excitement continues to prevents me from fitting the deck, so in an effort to keep from pruning and sowing flower seeds I have let it be known that it is essential for me to build the cockpit furniture. I wanted something really smart and the only cane type model furniture I could find was available from USA and priced above my budget, so I decided to have a go at making slatted hard wood seats which would be varnished and have scatter cushions strategically placed when finished. The furniture build turned out to be very labour intensive with several designs scrapped mainly due to problems with scale.
I have put a couple of photos on to show how the job is progressing.
Take care all ChrisG
▲
⟩⟩
MartinH2
jbkiwi
Rookysailor
stevedownunder
Newby7
pressonreguardless
Graham93
Rogal118
|
💬 Re: Thames Slipper Launch
2 years ago by 🇨🇦 Newby7 (
Fleet Admiral)✧ 120 Views · 1 Like
Flag
Chris I would say you are doing an excellent job. Would there be a doll house shop you could look at for furniture in the UK.
Rick ▲
⟩⟩
stevedownunder
|
|
Login To
Remove Ads 💬 Re: Thames Slipper Launch
2 years ago by 🇺🇸 pressonreguardless (
Rear Admiral)✧ 126 Views · 1 Like
Flag
Chris,
They look great with the rest of the woodwork👍👍 Trev ▲
⟩⟩
stevedownunder
|
|
💬 Re: Thames Slipper Launch
2 years ago by 🇬🇧 Rogal118 (
Lieutenant Commander)✧ 146 Views · 1 Like
Flag
wow, looks a great job, very neat. may take longer and lots of brain strain, but the satisfaction of making you own is well worth it.
▲
⟩⟩
stevedownunder
|
📝 Thames Slipper Launch
2 years ago by 🇬🇧 ChrisG ( Lieutenant Commander)
Lieutenant Commander)✧ 121 Views · 3 Likes
Flag
💬 Add Comment
Thanks for the comments and I am pleased that you like the build I must admit I am enjoying building it.
I have spent ages on Google and Ebay looking at dolls house furniture and apart from finding a lovely lady who makes beautiful scale cushions I struggled on the chair front. I really wanted at least two well made cane type chairs as seen on many slipper launches but with the exception of the American maker I mentioned who looks to be making and selling what I wanted at over £25 per chair plus p&p I found nothing suitable. What I have made and now finished except for the varnishing was a bit boring but I think worth the effort and cost me zip.
I will post some more photos over the weekend.
Best regards ChrisG
▲
⟩⟩
Rogal118
stevedownunder
pressonreguardless
📝 Thames Slipper Launch
2 years ago by 🇬🇧 ChrisG ( Lieutenant Commander)
Lieutenant Commander)✧ 117 Views · 3 Likes
Flag
💬 Add Comment
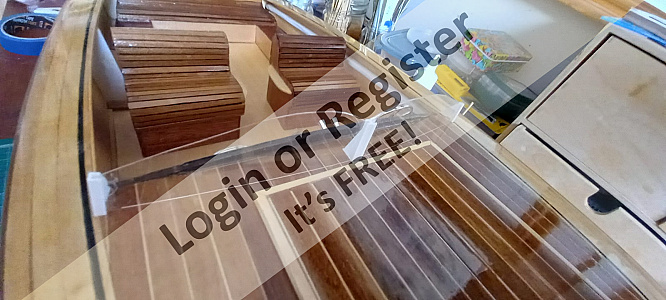
Furniture made finished and ready to fit at a later date. Seat cushions ordered. I thought it time to order speed controller and receiver, the ESP no real problem but the price of receivers surprised me and I cant remember paying that much in the past. I decided to build a transferable rig as I have several models knocking about that rarely see the water and are fully set up.
I now have an ESP and receiver that I can easily move from the launch to Doris and back when needed, I am sure many of you so the same thing.
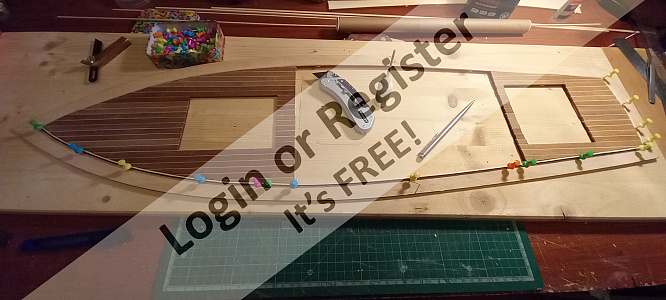
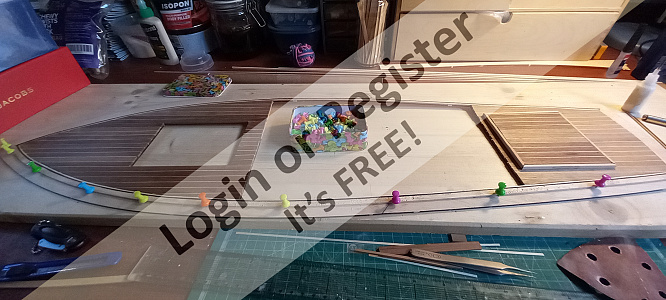
I have laid a veneer floor in the cockpit which will be varnished to give a better appearance than ply.
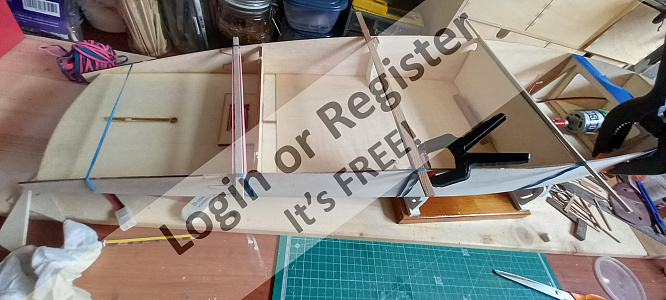
I offered up the port side panel to the frames last night and it seemed a good fit so decided to bight the bullet and glue it, I started with the first quarter of the boat from the bow and when that was fixed I glued the rest, I don`t think it sensible to try to do it in one go. There is a lot of overlap which will need careful trimming and sanding before glueing the hull bottom.
Later I trimmed the port side to the bow frame and then proceeded to fit the starboard side in the same way. I am quite pleased and am surprised at the size of the boat both length and beam are surprisingly large.
Now I have all of the bits and pieces that will be fitted below deck I am not far from fitting the actual deck.
Take care ChrisG

I now have an ESP and receiver that I can easily move from the launch to Doris and back when needed, I am sure many of you so the same thing.
I have laid a veneer floor in the cockpit which will be varnished to give a better appearance than ply.
I offered up the port side panel to the frames last night and it seemed a good fit so decided to bight the bullet and glue it, I started with the first quarter of the boat from the bow and when that was fixed I glued the rest, I don`t think it sensible to try to do it in one go. There is a lot of overlap which will need careful trimming and sanding before glueing the hull bottom.
Later I trimmed the port side to the bow frame and then proceeded to fit the starboard side in the same way. I am quite pleased and am surprised at the size of the boat both length and beam are surprisingly large.
Now I have all of the bits and pieces that will be fitted below deck I am not far from fitting the actual deck.
Take care ChrisG
▲
⟩⟩
MartinH2
stevedownunder
Rogal118
📝 Thames Slipper Launch
2 years ago by 🇬🇧 ChrisG ( Lieutenant Commander)
Lieutenant Commander)✧ 116 Views · 8 Likes · 8 Comments
Flag
💬 Add Comment
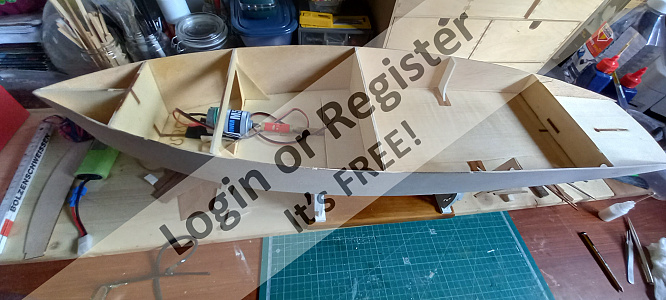
The hull of this model comprises of just four panels, two sides and two hull bottoms and of course no transom.
The two sides were relatively easy to fit and glue, they were then trimmed ready to take the hull bottoms.
After sanding an aperture for the prop shaft in both sides I glued and clamped the first bottom half to the keel and the side, this was quite straightforward. I then tidied and sanded the other bottom to fit, I glued it and positioned it and then realised there was really nothing to clamp it onto as all surfaces forward of half the boats length were very curved.
Having clamped the aft half of the second bottom I then resorted to the strongest industrial sticky tape I had and taped it up like an Egyptian mummy. It held for about 30 minutes and then sprang apart like something possessed. I tried again with more tape and after a similar time the same thing happened.
By this time I was becoming desperate apart from being covered in glue and bits of sticky tape. Out came the drill with a 3mm bit and I drilled two holes right through the hull and bolted the whole lot together until the glue dried.
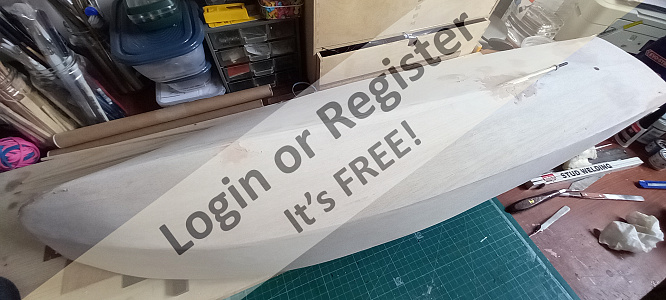
When the whole job was glued and stable and after sanding the whole thing down out came the P38 and as well as making good any small imperfections I filled four 3mm holes two in each side of the hull.
I am sure that any good model boat builders our there will be cringing and for that I apologise.
Best regards ChrisG

The two sides were relatively easy to fit and glue, they were then trimmed ready to take the hull bottoms.
After sanding an aperture for the prop shaft in both sides I glued and clamped the first bottom half to the keel and the side, this was quite straightforward. I then tidied and sanded the other bottom to fit, I glued it and positioned it and then realised there was really nothing to clamp it onto as all surfaces forward of half the boats length were very curved.
Having clamped the aft half of the second bottom I then resorted to the strongest industrial sticky tape I had and taped it up like an Egyptian mummy. It held for about 30 minutes and then sprang apart like something possessed. I tried again with more tape and after a similar time the same thing happened.
By this time I was becoming desperate apart from being covered in glue and bits of sticky tape. Out came the drill with a 3mm bit and I drilled two holes right through the hull and bolted the whole lot together until the glue dried.
When the whole job was glued and stable and after sanding the whole thing down out came the P38 and as well as making good any small imperfections I filled four 3mm holes two in each side of the hull.
I am sure that any good model boat builders our there will be cringing and for that I apologise.
Best regards ChrisG
▲
⟩⟩
MartinH2
mturpin013
AntonyB
Colin H
Rookysailor
stevedownunder
jimdogge
Rogal118
|
💬 Re: Thames Slipper Launch
2 years ago by 🇬🇧 ChrisG (
Lieutenant Commander)✧ 114 Views · 3 Likes
Flag
Thanks for the help and suggestions, really pleasing to receive positive feedback from other modelers.
As for the veneer, suffice it to say I veneered the dash board of the launch and given it is 19 x 4 cm +/- I had to employ 10 clamps to stop it from deciding that it was not going to lay flat. I think I will leave that level of veneering for another day🤣🤣🤣 I am afraid that I am not heavily into Victorian ladies and the decision of wether to offer tea and fruit cake or G&T and nibbles the latter won. There will no parasoles deployed on board as over recent years we do not get the sunshine to warrant them. Take care and thanks ChrisG ▲
⟩⟩
AntonyB
Colin H
RudyM
|
|
Login To
Remove Ads 💬 Re: Thames Slipper Launch
2 years ago by 🇿🇦 RudyM (
 Chief Petty Officer 2nd Class) Chief Petty Officer 2nd Class)✧ 113 Views · 1 Like
Flag
Chris I did some Googling (without a milkshake) 😂 and if I may make a suggestion...just to add to your mysery - get some mahogany vineer and give her one more layer. I saw some stunning slippers on the net, all in Venetian style Runabouts. Then seal her with clear epoxy to keep that wood finish.
I did it with my Juliana II (2 mast schooner) and it looks amazing. Your challenge will now be to find some Victorian ladies with umbrellas to sit at the back in their "high tea" outfits. Keep us warm now and remember to post a video when she's done!! ▲
⟩⟩
ChrisG
|
|
💬 Re: Thames Slipper Launch
2 years ago by 🇬🇧 ChrisG (
Lieutenant Commander)✧ 114 Views · 1 Like
Flag
Referring to P38 and expecting readers to immediately know what I meant perhaps maybe should indicate that most builders out there make a better job than I and need little use of fillers for the final finish. If that is the case then I must as my teachers used to say many many years ago Christopher must do better.
I do admit I find plank on frame easier than 4 pieces of nicely cut ply about 36" long that have to be formed in all sorts of shapes that they dont want to end up. Like you I do think it all worth the time and patience and I love the hobby. Thanks ChrisG ▲
⟩⟩
AntonyB
|
|
💬 Re: Thames Slipper Launch
2 years ago by 🇬🇧 ChrisG (
Lieutenant Commander)✧ 114 Views · 1 Like
Flag
Damn good idea, problem is finding a tame octopus.
▲
⟩⟩
stevedownunder
|
|
💬 Re: Thames Slipper Launch
2 years ago by 🇬🇧 ChrisG (
Lieutenant Commander)✧ 114 Views · 1 Like
Flag
I did it in pure desperation and was lucky, on reflection I could have ruined the whole piece.
Thanks for your support. ▲
⟩⟩
stevedownunder
|
|
💬 Re: Thames Slipper Launch
2 years ago by 🇿🇦 RudyM (
Chief Petty Officer 2nd Class)✧ 114 Views · 1 Like
Flag
When you said P38 I immediately thought of a firearm. If it is me at that point it certainly would have been. With my first plank on frame build I used clamps to twist the spruces to fit. And elastic bands helped a lot too. So we learn. Not only to build but also the real meaning of patience. And when you put her in water and realise she doesn’t leak or fall apart, it’s all worth the struggle. 👍
▲
⟩⟩
stevedownunder
|
|
💬 Re: Thames Slipper Launch
2 years ago by 🇬🇧 jimdogge (
 Warrant Officer) Warrant Officer)✧ 128 Views · 1 Like
Flag
Hi chris no i,m with you on the, if it gets the job done well hey ho away we go if lf we had a trained octopus to hold all the parts together
▲
⟩⟩
stevedownunder
|
|
💬 Re: Thames Slipper Launch
2 years ago by 🇬🇧 Rogal118 (
Lieutenant Commander)✧ 136 Views · 1 Like
Flag
If it gets the job done, go for it.
▲
⟩⟩
stevedownunder
|
📝 Thames Slipper Launch
2 years ago by 🇬🇧 ChrisG ( Lieutenant Commander)
Lieutenant Commander)✧ 103 Views · 4 Likes · 2 Comments
Flag
💬 Add Comment
Well the lid is on, well and truly glued so hopefully the limited access to the moving bits will not pose a problem.
It turned out a nice fit deck on hull sides with a minimum of sanding after which several coats of sanding sealer were applied and of course lots more sanding.
Filler applied where the exposed prop and hull meet and also around the rudder housing, all all of which was then rubbed down.
At around this point I got a promotion so thanks for that👍
The hull was then primed and undercoated and as I continue to have an issue with water based paints all paints were sample checked with each other before being applied in earnest to avoid incompatibility problems.
The only pale blue I could find that I liked was water based so after checks I painted the hull bottom with that, love the colour hate the paint. I intend to complete the hull sides with Sikkens dark blue of which I have a stock and hope I get the gloss and finish I expect from proper paint. Moaning over😠.
Next job is to design the windscreen as the one supplied looks to much like double glazed house windows, I am spoilt for choice after looking at various pictures online just have to get stuck in and have a go.
Nearly finished so hopefully more photo`s soon.
Regards ChrisG now CPO 1st class🤣🤣🤣
▲
⟩⟩
MartinH2
stevedownunder
mturpin013
Graham93
|
💬 Re: Thames Slipper Launch
2 years ago by 🇬🇧 ChrisG (
Lieutenant Commander)✧ 98 Views · 0 Likes
Flag
At my age I do not think I have much that could be described as nimble, but we have to try.
Regards ChrisG ▲
⟩⟩
No likes yet
This member will receive 1 point for every like received |
|
💬 Re: Thames Slipper Launch
2 years ago by 🇬🇧 mturpin013 (
 Admiral) Admiral)✧ 115 Views · 0 Likes
Flag
I hope you have nimble fingers😊
▲
⟩⟩
No likes yet
This member will receive 1 point for every like received |
📝 Thames Slipper Launch
2 years ago by 🇬🇧 ChrisG ( Lieutenant Commander)
Lieutenant Commander)✧ 99 Views · 6 Likes · 3 Comments
Flag
💬 Add Comment
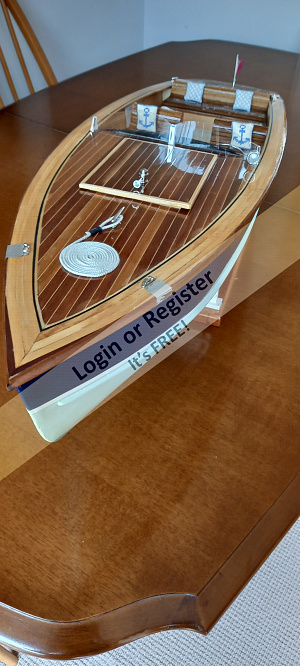
As it was a really unfriendly day weather wise I decided to crack the windscreen and design something that was in keeping with the Launch.
I used the clear perspex supplied and tried several materials for supports, wood, brass and finally extruded white plastic available for modellers.
I finally chose the white plastic and after modifying one of the lengths found it looked good. I shaped the perspex in line with one of the pictures of the launch on Google and glued it into the plastic. Success I think, after carefully glueing to the deck was very satisfied with the result.
Unless I have serious second thoughts now onward and upward to the finish.
Great day, regards ChrisG
▲
⟩⟩
MartinH2
jbkiwi
pressonreguardless
Rookysailor
AndyB
stevedownunder
|
💬 Re: Thames Slipper Launch
2 years ago by 🇺🇸 pressonreguardless (
Rear Admiral)✧ 90 Views · 0 Likes
Flag
Windscreen looks great, I should have done something similar on my Typhoon instead of what they supplied.
Trev ▲
⟩⟩
No likes yet
This member will receive 1 point for every like received |
|
Login To
Remove Ads 💬 Re: Thames Slipper Launch
2 years ago by 🇬🇧 AndyB (
Warrant Officer)✧ 100 Views · 0 Likes
Flag
Very, very impressive
The colour and finish are quite remarkable ▲
⟩⟩
No likes yet
This member will receive 1 point for every like received |
|
💬 Re: Thames Slipper Launch
2 years ago by 🇦🇺 stevedownunder (
 Captain) Captain)✧ 97 Views · 0 Likes
Flag
Beautiful work Chris.
Cheers, Stephen. ▲
⟩⟩
No likes yet
This member will receive 1 point for every like received |
📝 Thames Slipper Launch
2 years ago by 🇬🇧 ChrisG ( Lieutenant Commander)
Lieutenant Commander)✧ 93 Views · 9 Likes · 8 Comments
Flag
💬 Add Comment
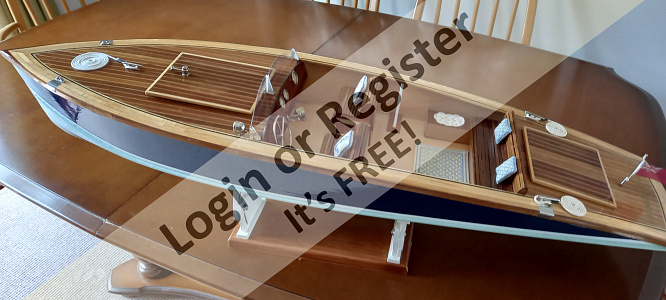
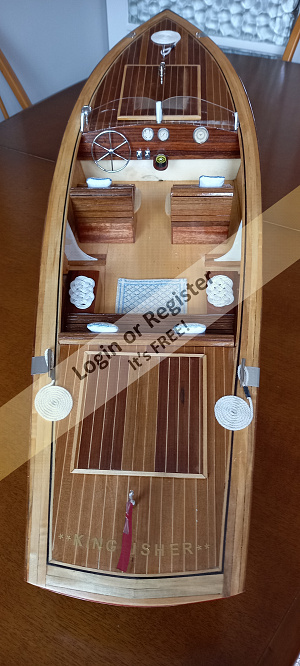
Sad day, I think the launch, now named Kingfisher is finished apart from the odd tweak in the future.
My overall view of the kit is that it is damn good value for money and anyone prepared to smarten up bits like the deck and cockpit will end up enjoying the build and have a lovely model either for display or on the water, I have that thrill awaiting me 🤞🤞
The last job was to finish the windscreen already described and today fixing mooring lines, ensign and sticking her name on the aft deck.
Now a much needed clear up in the workroom ready for the next project, hope those interested enjoyed the build and thanks for all of the kind words.
Best regards ChrisG
▲
⟩⟩
MartinH2
Commodore-H
jbkiwi
Rogal118
Rookysailor
stevedownunder
pressonreguardless
mturpin013
Graham93
|
💬 Re: Thames Slipper Launch
2 years ago by 🇬🇧 ChrisG (
Lieutenant Commander)✧ 84 Views · 0 Likes
Flag
Thank you, I am extremely pleased and although a relatively easy boat to build compared with many on this website it and the comments received have given me much pleasure.
Weather permitting it will have its maiden voyage later this month at my favourite lake. Best regards ChrisG ▲
⟩⟩
No likes yet
This member will receive 1 point for every like received |
|
Login To
Remove Ads 💬 Re: Thames Slipper Launch
2 years ago by 🇳🇿 jbkiwi (
Fleet Admiral)✧ 82 Views · 0 Likes
Flag
Excellent job Chris, looks fantastic. Looking forward to seeing it on the water.
JB ▲
⟩⟩
No likes yet
This member will receive 1 point for every like received |
|
💬 Re: Thames Slipper Launch
2 years ago by 🇺🇸 ChrisR (
 Master Seaman) Master Seaman)✧ 80 Views · 0 Likes
Flag
Look great!
▲
⟩⟩
No likes yet
This member will receive 1 point for every like received |
|
💬 Re: Thames Slipper Launch
2 years ago by 🇬🇧 ChrisG (
Lieutenant Commander)✧ 87 Views · 0 Likes
Flag
I have this morning messaged him and sent him some photo`s.
Regards ChrisG ▲
⟩⟩
No likes yet
This member will receive 1 point for every like received |
|
💬 Re: Thames Slipper Launch
2 years ago by 🇬🇧 Rookysailor (
 Commodore) Commodore)✧ 106 Views · 0 Likes
Flag
Lovely job Chris, I was with the owner of HA Kits on Sunday, you should send him a photo of your Slipper, he will be most impressed👍
Cheers Pete😊 ▲
⟩⟩
No likes yet
This member will receive 1 point for every like received |
|
💬 Re: Thames Slipper Launch
2 years ago by 🇦🇺 stevedownunder (
Captain)✧ 88 Views · 0 Likes
Flag
Hi Chris,
You have made a great looking boat, waiting for her maiden voyage photos now. 👍 Cheers, Stephen. ▲
⟩⟩
No likes yet
This member will receive 1 point for every like received |
|
💬 Re: Thames Slipper Launch
2 years ago by 🇺🇸 pressonreguardless (
Rear Admiral)✧ 90 Views · 1 Like
Flag
Chris,
You truly did a beautiful Job👍👍👍 Trev ▲
⟩⟩
stevedownunder
|
|
💬 Re: Thames Slipper Launch
2 years ago by 🇬🇧 mturpin013 (
Admiral)✧ 106 Views · 1 Like
Flag
That's a really nice looking boat you should be proud of your efforts, well done
▲
⟩⟩
stevedownunder
|


Login To
Remove Ads
Remove Ads