Join Us On Social Media!

|

|

|
Download The App!
Login To
Remove Ads
Remove Ads
Login To
Remove Ads
Remove Ads
Model Boats Website
MTINGA IV
16 Posts · 27 Followers · 123 Photos · 221 Likes
Began 2 years ago by
 United Kingdom
Follow This Thread
Not currently following
> Click to follow
> Click to follow
Latest Post 2 months ago by
| Oldest posts shown first (Show Newest First) | (Print Booklet) |
📝 MTINGA IV
2 years ago by 🇬🇧 mturpin013 ( Admiral)
Admiral)✧ 235 Views · 13 Likes · 4 Comments
Flag
💬 Add Comment
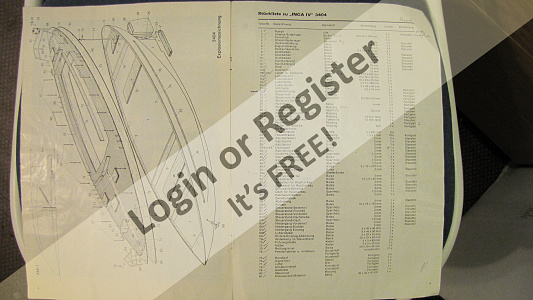
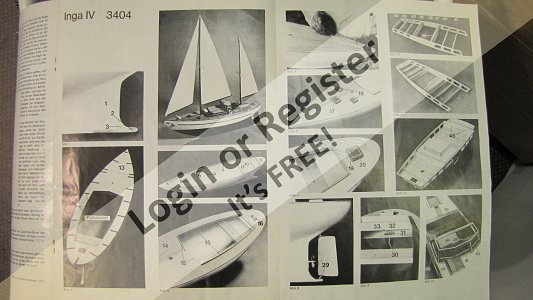
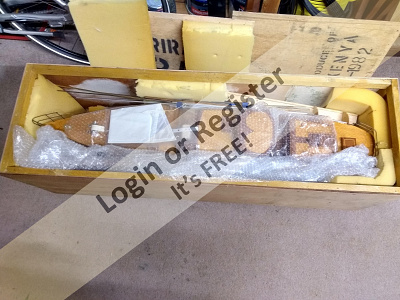
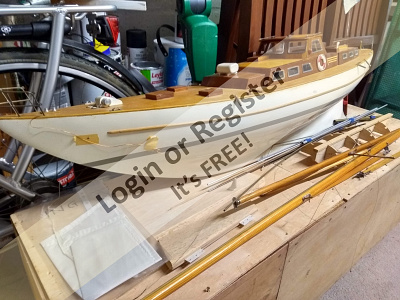
This is a sailing ketch called “Inga IV”. It is German kit of a sailing ketch which is now out of production. The model is approx 52″ in total height and 43″ from bow to stern. It has a traditional full length keel and almost sails itself when on the lake. All decks and superstructure are plywood with much of it being mahogany veneered and coated with many layers of varnish.”
I have just purchased an Inga IV which is in reasonable condition, however it looks as if its not been touched for a great number of years so I intend to repair and replace fittings and wood as required.
This is a picture from the web


I have just purchased an Inga IV which is in reasonable condition, however it looks as if its not been touched for a great number of years so I intend to repair and replace fittings and wood as required.
This is a picture from the web
▲
⟩⟩
PeterL3
ChrisG
Martin555
MouldBuilder
Nerys
stevedownunder
Ronald
Colin H
GaryLC
roycv
AndyB
Peejay
Mike Stoney
|
💬 Re: INGA IV
2 years ago by 🇬🇧 Nerys (
 Fleet Admiral) Fleet Admiral)✧ 218 Views · 4 Likes
Flag
Lovely looking model. I particularly like the canoe stern, not often we see that in a model.
Nerys ▲
⟩⟩
Martin555
jbkiwi
stevedownunder
pressonreguardless
|
|
Login To
Remove Ads 💬 Re: INGA IV
2 years ago by 🇬🇧 mturpin013 (
Admiral)✧ 226 Views · 3 Likes
Flag
Roy thank you so much for pointing me to this mine of information, it will be invaluable in my restoration it shows so many things that aren't on the kit version.
▲
⟩⟩
Martin555
stevedownunder
robbob
|
|
💬 Re: INGA IV
2 years ago by 🇬🇧 roycv (
 Rear Admiral) Rear Admiral)✧ 224 Views · 7 Likes
Flag
Hi good luck with the restoration. I restored my one maybe 15 years ago, it was a gift, and it took a while. I made sure the stanchions had a firm base to sit in with reinforcing the wood under the deck. I could not work out how to get inside the hull without taking the rear mast out, so left it as designed.
I have since by shear good fortune obtained an unused set of sails and these were installed 3 years ago. Sails as you say with very little help from the bank. Lovely boat the full size boat was up for sale maybe 2 years ago and the photos of the original are still there to see. ▲
⟩⟩
Mike Stoney
ChrisG
Martin555
stevedownunder
robbob
pressonreguardless
Colin H
|

|
💬 Re: INGA IV
2 years ago by 🇺🇸 pressonreguardless (
Rear Admiral)✧ 224 Views · 4 Likes
Flag
Beautiful Yacht,
Looking foward to seeing your restoration 👍👍 Trev ▲
⟩⟩
ChrisG
Martin555
stevedownunder
Peejay
|
Login To
Remove Ads
Remove Ads
📝 Inga IV
2 years ago by 🇬🇧 mturpin013 ( Admiral)
Admiral)✧ 229 Views · 14 Likes · 3 Comments
Flag
💬 Add Comment
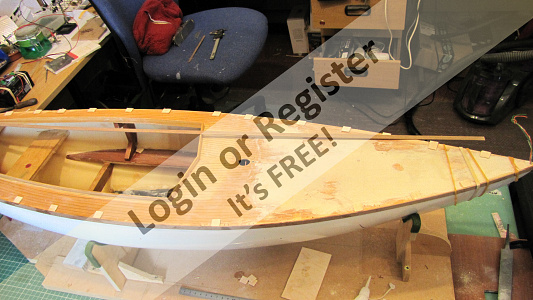
To start this restoration it may help to see what I was presented with when I first purchased the model. I have to say that the pictures make it look a lot better than it actually is and many may be horrified at what I have done in the next few posts but its all necessary to finish up with a structurally sound model.
The deck is discoloured and cracked and will have to be planked to strengthen it and make it look the correct colour, the cabin structures are all veneered and are unfortunately suffering from delamination so will have to be re veneered.
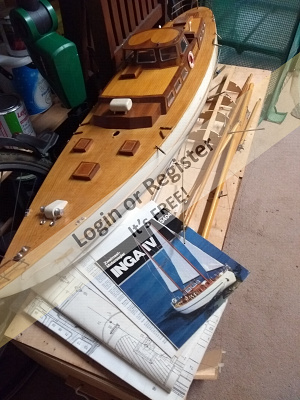
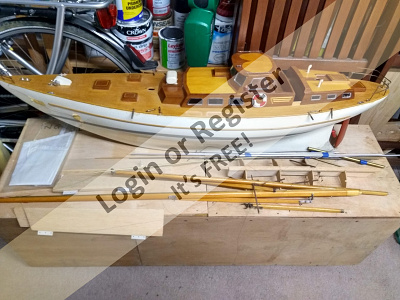
On the plus side the wooden parts of the masts are all in excellent condition and will need little attention, however all the metal (brass) fittings are in need of restoration, at some point they have been plated (nickel) so they will all have to be cleaned and old plating removed and re plated. The rigging wires are all in varying states of twist and kink so again will have to be replaced.
So there's a lot of work to be done over the coming months
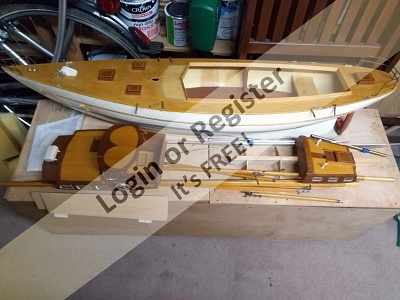

The deck is discoloured and cracked and will have to be planked to strengthen it and make it look the correct colour, the cabin structures are all veneered and are unfortunately suffering from delamination so will have to be re veneered.
On the plus side the wooden parts of the masts are all in excellent condition and will need little attention, however all the metal (brass) fittings are in need of restoration, at some point they have been plated (nickel) so they will all have to be cleaned and old plating removed and re plated. The rigging wires are all in varying states of twist and kink so again will have to be replaced.
So there's a lot of work to be done over the coming months
▲
⟩⟩
PeterL3
hermank
RNinMunich
Mike Stoney
ChrisG
Martin555
MouldBuilder
grim1
jbkiwi
Skydive130
Rookysailor
GaryLC
stevedownunder
pressonreguardless
|
💬 Re: Inga IV
4 months ago by 🇨🇭 Mike Stoney (
 Commander) Commander)✧ 32 Views · 0 Likes
Flag
Hello mturpin . .
Wow! I came across this page while browsing. . . I like the design very much, I will build it in the same way for my Optimist sailboat. Looks great. Hobbyist greetings, Michel-C. ▲
⟩⟩
No likes yet
This member will receive 1 point for every like received |
|
Login To
Remove Ads 💬 Re: Inga IV
2 years ago by 🇬🇧 DuncanP (
 Sub-Lieutenant) Sub-Lieutenant)✧ 220 Views · 1 Like
Flag
Fabulous yacht. I would like one myself! Looking forward to seeing the restored model and perhaps a video of it sailing. Good luck.
▲
⟩⟩
Martin555
|
|
💬 Re: Inga IV
2 years ago by 🇺🇸 pressonreguardless (
Rear Admiral)✧ 217 Views · 3 Likes
Flag
She looks like she has great potential👍
Good Luck😊 Trev ▲
⟩⟩
Martin555
jbkiwi
stevedownunder
|
📝 The strip down/dismantling
2 years ago by 🇬🇧 mturpin013 ( Admiral)
Admiral)✧ 216 Views · 9 Likes · 4 Comments
Flag
💬 Add Comment
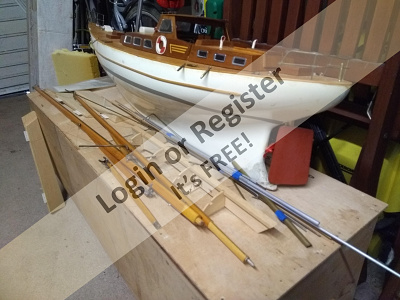
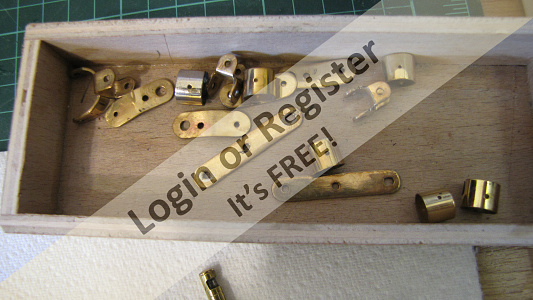
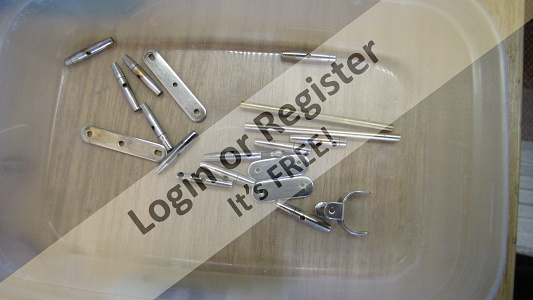
This is my way of starting a restoration by removing all the parts that will need attention and in particular the parts that are not firmly adhered in place
The two masts were removed and dismantled in terms of their brass/nickel fittings as they were all in various states of deterioration and would need to be cleaned and re plated.
Cabins are removable and would need quite some attention as the veneer was lifting in places and generally the glues used originally didn’t seem to be as solid/attached as they should be.
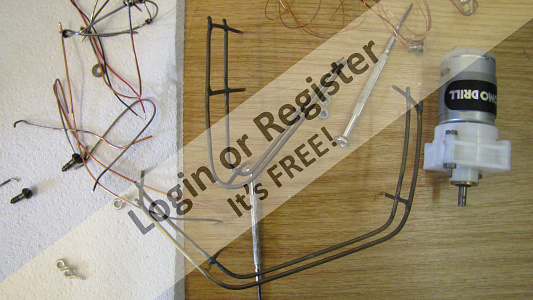
The rigging will all have to be replaced as will all the electrics, the motor drive system is still usable but will need an up to date control system and power packs.
The hull of the yacht is not the most rigid of structures so will need some attention in terms of some sort of internal structural framework to stop the possibility of it being pressed out of shape.


The two masts were removed and dismantled in terms of their brass/nickel fittings as they were all in various states of deterioration and would need to be cleaned and re plated.
Cabins are removable and would need quite some attention as the veneer was lifting in places and generally the glues used originally didn’t seem to be as solid/attached as they should be.
The rigging will all have to be replaced as will all the electrics, the motor drive system is still usable but will need an up to date control system and power packs.
The hull of the yacht is not the most rigid of structures so will need some attention in terms of some sort of internal structural framework to stop the possibility of it being pressed out of shape.
▲
⟩⟩
PeterL3
ChrisG
Martin555
MouldBuilder
Colin H
DWBrinkman
jbkiwi
stevedownunder
pressonreguardless
|
💬 Re: The strip down/dismantling
2 years ago by 🇬🇧 mturpin013 (
Admiral)✧ 211 Views · 2 Likes
Flag
Great suggestion JB Ill be ordering some a bit nearer completion
▲
⟩⟩
Martin555
jbkiwi
|
|
Login To
Remove Ads 💬 Re: The strip down/dismantling
2 years ago by 🇺🇸 pressonreguardless (
Rear Admiral)✧ 198 Views · 1 Like
Flag
Great idea, JB👍
Trev ▲
⟩⟩
Martin555
|
|
💬 Re: The strip down/dismantling
2 years ago by 🇳🇿 jbkiwi (
Fleet Admiral)✧ 200 Views · 5 Likes
Flag
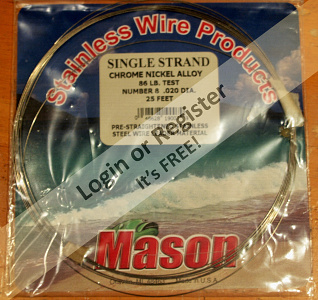
I'm sure this will be up to your usual fine standard Mike,- looking forward to the finished result. Just a suggestion for the rigging,- .020 stainless fishing trace is ideal for stays, - doesn't get tangled like multi strand wire never frays and lasts forever. Most of the racing guys here use it. Just go down through a short length of copper tube, around your chain-plate/turnbuckle, back up through the tube and turn the end over. Crimp copper tube and you'll never pull it out. I ran some solder through the tubes to seal them as well.
JB 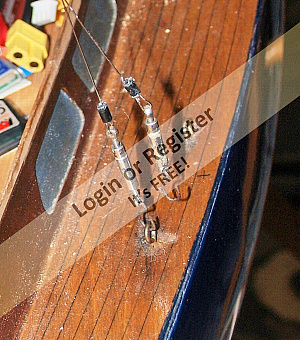
▲
⟩⟩
RNinMunich
ChrisG
Martin555
Colin H
pressonreguardless
|
|
💬 Re: The strip down/dismantling
2 years ago by 🇺🇸 pressonreguardless (
Rear Admiral)✧ 202 Views · 1 Like
Flag
I shall be interested in your progress.
She does have beautiful lines!! Trev ▲
⟩⟩
Martin555
|
📝 An experiment in nickel plating
2 years ago by 🇬🇧 mturpin013 ( Admiral)
Admiral)✧ 214 Views · 12 Likes · 4 Comments
Flag
💬 Add Comment
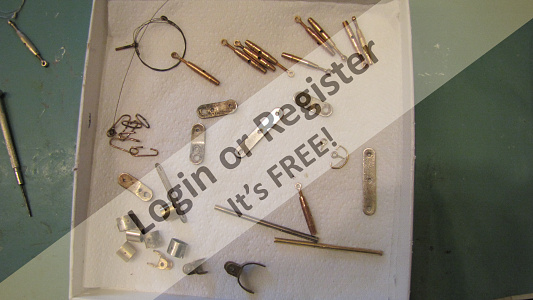
As I mentioned all the metal fittings are made of brass however some of them could be seen to be bright plated and some were just plain brass the railings being soft soldered were not plated (more later on that). The parts are for the most part in really good condition and only require some cleaning and polishing before plating.
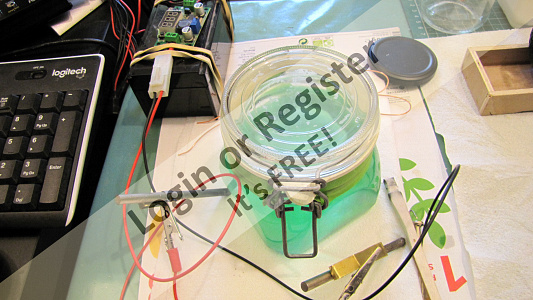
The plating process is something I had not done before so some research had to be done; I came up with the following process and equipment.
So with a glass jar two 6mm Nickle rods a bottle of white vinegar and some salt and finally a variable power source.
The initial solution is created by using two nickel rods in the solution one connected to the positive and one to the negative using a voltage of about 4.5 – 5 volts, its left for about 3 hours and the solution turns green and is ready to use.
Remove the negative nickel rod and connect the component to be plated to it, leave the other positive connection to the nickel rod and immerse both in the solution. Now connect the 4.5 V power to the circuit, bubbles will be seen on the component as the process starts, as for how long you leave it seems to depend on the size/surface area of your component.
I have had varying results so far but I need to do some more recorded tests to achieve the results I want so there will be an update further in the blog, however results are promising so far.
▲
⟩⟩
PeterL3
ChrisG
Mike Stoney
Martin555
MouldBuilder
Colin H
Graham93
jbkiwi
Newby7
pressonreguardless
DWBrinkman
stevedownunder
|
💬 Re: An experiment in nickel plating
2 years ago by 🇬🇧 camyaj (
 Petty Officer 2nd Class) Petty Officer 2nd Class)✧ 197 Views · 3 Likes
Flag
First job back in the 50's was electro plating only Anodes were in in the solution objects were suspended from external rods which completed the circuit either by wire or a jig you had to make instant connection as you attached least movement you could double plate. Everything from taps to Bumpers all were flash copper plated then either Bright Nickel which was then chromed or dull nickelled (Bumpers) which then went back to the polishing shop before chroming
▲
⟩⟩
Martin555
stevedownunder
jbkiwi
|
|
Login To
Remove Ads 💬 Re: An experiment in nickel plating
2 years ago by 🇨🇦 Newby7 (
Fleet Admiral)✧ 200 Views · 4 Likes
Flag
Wondeful👍👍👍👍👍Rick
▲
⟩⟩
Mike Stoney
Martin555
stevedownunder
pressonreguardless
|
|
💬 Re: An experiment in nickel plating
2 years ago by 🇺🇸 pressonreguardless (
Rear Admiral)✧ 199 Views · 3 Likes
Flag
Very interesting, Mike!
I shall be very interested in the final results, good progress so far!👍👍 Trev ▲
⟩⟩
Martin555
jbkiwi
stevedownunder
|
|
💬 Re: An experiment in nickel plating
2 years ago by 🇦🇺 stevedownunder (
 Captain) Captain)✧ 200 Views · 3 Likes
Flag
Great work Mike,
Interesting experiments and great resalts. Cheers, Stephen. ▲
⟩⟩
Martin555
jbkiwi
pressonreguardless
|
📝 Planking the main deck
2 years ago by 🇬🇧 mturpin013 ( Admiral)
Admiral)✧ 213 Views · 13 Likes · 4 Comments
Flag
💬 Add Comment
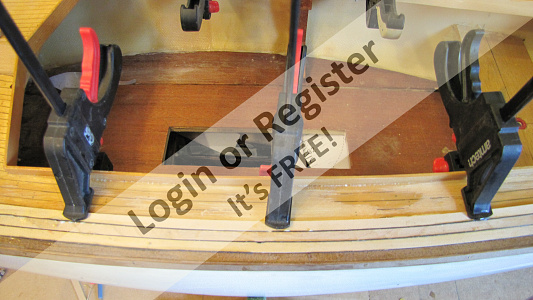
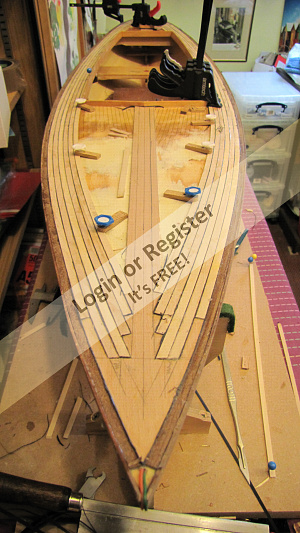
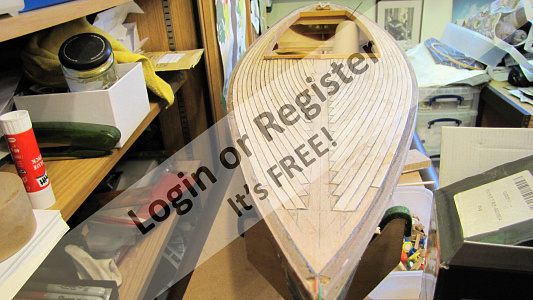
As I said in the introduction there is a lot of work to bring this craft back to an acceptable standard, a major job was to replace the deck as the original laser etched/marked deck had been damaged and worn in a lot of places.
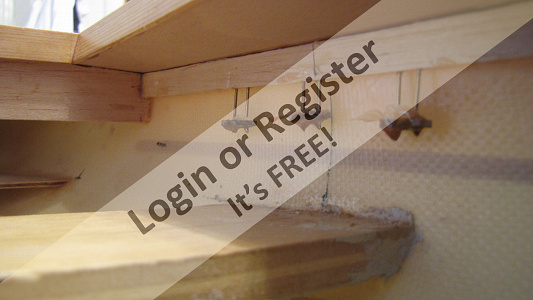
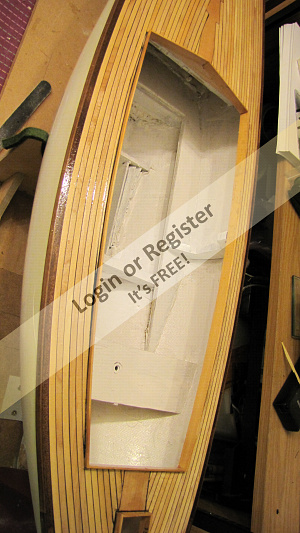
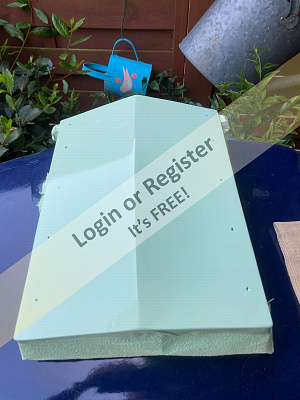
The first job was too stabilise the wooden structure as I was able to press and indent the ply and I also noticed that the whole hull structure was in a similar state again been able to flex the hull. It was obvious that in the initial build there had not been any structure in place to stop this happening. I first made a card template of the front part of the hull about half way down this was then transferred to a piece of 3mm marine ply and then epoxied in place, this enabled me to fill the bow lower half of the hull with expanding foam, this resulted in the hull becoming quite rigid.
Back to the deck I now needed to remove any fittings and wooden pieces that were not secure making it easier to plank the deck. Next I want to make sure the deck profile was even across its length and width, so some two part wood filler was applied where any low spots were found and then the whole deck was sanded to give a firm base for planking.
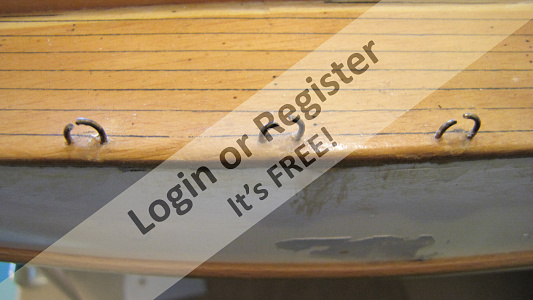
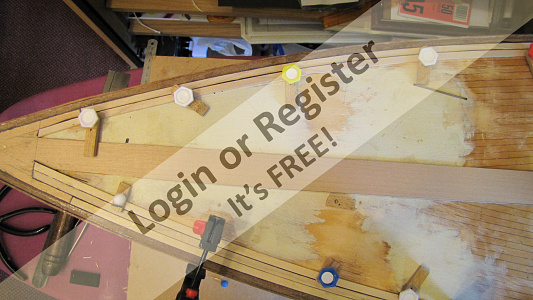
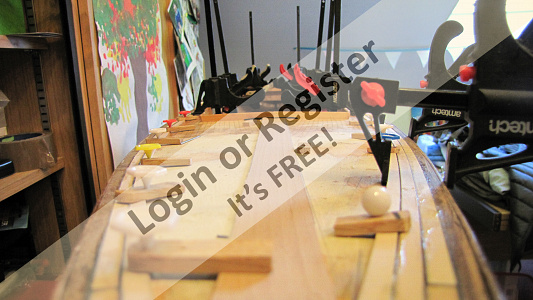
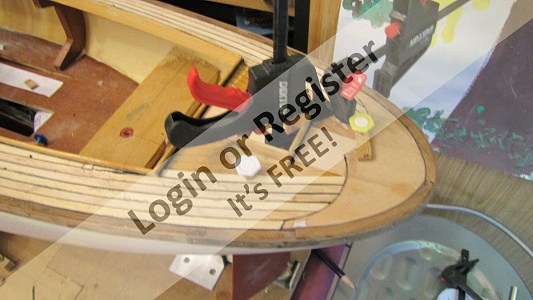
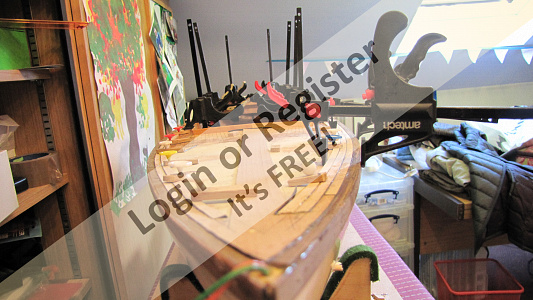
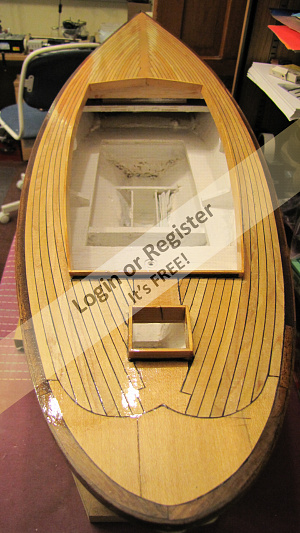
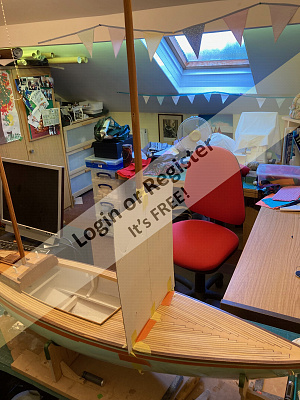
There wasn’t any gunwale on the boat so to enable planking and painting to be separated I decide to place a mahogany gunwale 6mm wide around the hull side and 6mm wide edging around the deck this was relatively easy apart from the stern which had some really tight curves.in order to replicate the original deck pattern I had to make a central piece so the longitudinal planks could be joggled as they are terminated, the cut-outs are made as each plank is laid along with its card caulking.
As the planks are curved I decided to steam enough planks and keep them in a jig until they were fully dried, this worked really well leaving very little force to secure each plank with wooden clamp with a pin holding each plank in place and flush with the deck base. All planks are secured using aliphatic wood glue. When all the planking is finished it will be sanded smooth and given a number of coats of varnish.


The first job was too stabilise the wooden structure as I was able to press and indent the ply and I also noticed that the whole hull structure was in a similar state again been able to flex the hull. It was obvious that in the initial build there had not been any structure in place to stop this happening. I first made a card template of the front part of the hull about half way down this was then transferred to a piece of 3mm marine ply and then epoxied in place, this enabled me to fill the bow lower half of the hull with expanding foam, this resulted in the hull becoming quite rigid.
Back to the deck I now needed to remove any fittings and wooden pieces that were not secure making it easier to plank the deck. Next I want to make sure the deck profile was even across its length and width, so some two part wood filler was applied where any low spots were found and then the whole deck was sanded to give a firm base for planking.
There wasn’t any gunwale on the boat so to enable planking and painting to be separated I decide to place a mahogany gunwale 6mm wide around the hull side and 6mm wide edging around the deck this was relatively easy apart from the stern which had some really tight curves.in order to replicate the original deck pattern I had to make a central piece so the longitudinal planks could be joggled as they are terminated, the cut-outs are made as each plank is laid along with its card caulking.
As the planks are curved I decided to steam enough planks and keep them in a jig until they were fully dried, this worked really well leaving very little force to secure each plank with wooden clamp with a pin holding each plank in place and flush with the deck base. All planks are secured using aliphatic wood glue. When all the planking is finished it will be sanded smooth and given a number of coats of varnish.
▲
⟩⟩
PeterL3
Mike Stoney
AndyN
ChrisG
Martin555
RNinMunich
MouldBuilder
Colin H
Graham93
jbkiwi
jacko
stevedownunder
pressonreguardless
|
💬 Re: Planking the main deck
1 year ago by 🇺🇸 Peejay (
 Midshipman) Midshipman)✧ 183 Views · 2 Likes
Flag
I have a couple of projects with planked decks to be worked on in the future, and I really like your work. I’m interested in the clamps you used with what I will call a ‘thumb button’ on one end. I read your description, and saw some general wording, but no specific description.
What are the ‘thumb buttons made of? Are they glued over the end of the clip after a pin has been driven through each end? I would find a rough sketch helpful. Looks like a great approach for curved planking. ▲
⟩⟩
pressonreguardless
Martin555
|
|
Login To
Remove Ads 💬 Re: Planking the main deck
1 year ago by 🇭🇺 MouldBuilder (
 Vice Admiral) Vice Admiral)✧ 185 Views · 2 Likes
Flag
Looks a super job as usual Mike. Must try planking one day.
Peter.👍 ▲
⟩⟩
Martin555
pressonreguardless
|
|
💬 Re: Planking the main deck
2 years ago by 🇦🇺 stevedownunder (
Captain)✧ 205 Views · 2 Likes
Flag
Great looking deck planking Mike,
Cheers, Stephen. ▲
⟩⟩
Martin555
pressonreguardless
|
|
💬 Re: Planking the main deck
2 years ago by 🇺🇸 pressonreguardless (
Rear Admiral)✧ 200 Views · 2 Likes
Flag
The planking is a, big improvement over what was existing, Mike
Looks Great👍👍 Great job with the king plank. Trev ▲
⟩⟩
Martin555
stevedownunder
|
📝 Planking the main deck (cont)
1 year ago by 🇬🇧 mturpin013 ( Admiral)
Admiral)✧ 198 Views · 19 Likes · 8 Comments
Flag
💬 Add Comment
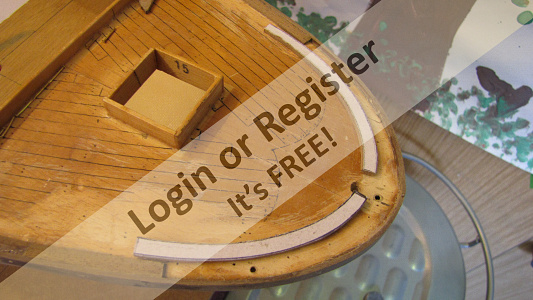
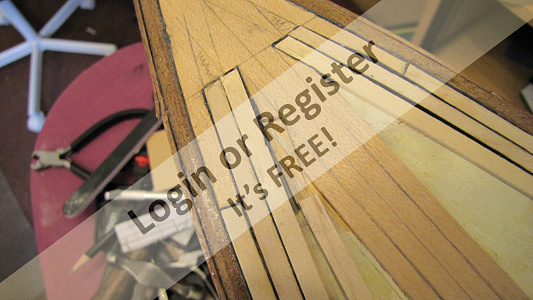
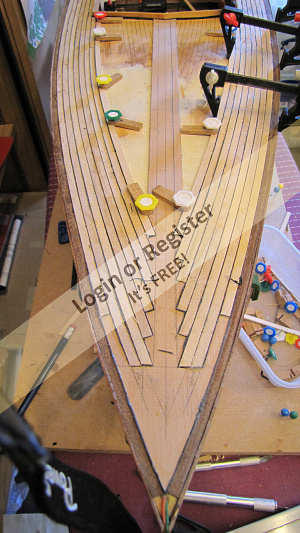
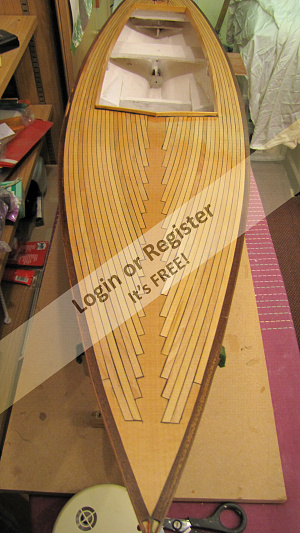
Doesn't planking take a long of time?; it has not been 6 months of no activity on Inga as I have been working on the Marlin Cabin Cruiser, which also has a planked deck. I’ve had to take this job very slowly as the planks are curved so you can only do 2 planks a day leaving them to set overnight whilst still clamped in position. Having finished the gluing stage it now needs sanding down to remove all the excess black card caulking and any uneven bits of plank. Next will come the final sanding before it’s sealed prior to varnishing. This sanding stage is the most satisfying as reveals the results of a lot of detailed work, It also shows any defects, for example a missing piece of caulking or a dent in the planking that you didn’t see on the construction stage, this gives the opportunity to correct any of these defects


▲
⟩⟩
PeterL3
AndyB
chugalone100
ChrisG
Scratchbuilder
hermank
jbkiwi
Len1
Martin555
cdnfurball
Graham93
Skippydrew
Peejay
RNinMunich
pressonreguardless
stevedownunder
Colin H
DuncanP
MouldBuilder
|
💬 Re: Planking the main deck (cont)
1 year ago by 🇬🇧 Martin555 (
Fleet Admiral)✧ 177 Views · 1 Like
Flag
Very nice work indeed Michael.
I know how tricky curved planking can be. That is already a great improvement, she is going to be a real beauty when she is completed. Martin. ▲
⟩⟩
Peejay
|
|
Login To
Remove Ads 💬 Re: Planking the main deck (cont)
1 year ago by 🇩🇪 RNinMunich (
Fleet Admiral)✧ 180 Views · 1 Like
Flag
I agree Stevedownunder👍
I too appreciate a 'curvy aft section' never mind the joggling😁😉 BTW It wasn't just your end, the pics are slightly fuzzy, bar one. 😎 ▲
⟩⟩
Martin555
|
|
💬 Re: Planking the main deck (cont)
1 year ago by 🇩🇪 RNinMunich (
Fleet Admiral)✧ 180 Views · 3 Likes
Flag
Meticulous work, as ever Michael 👍
Not particularly a 'yachet' man meself but I can appreciate the work that goes into them. Cheers, Doug😎 ▲
⟩⟩
Peejay
hermank
Martin555
|
|
💬 Re: Planking the main deck (cont)
1 year ago by 🇬🇧 mturpin013 (
Admiral)✧ 183 Views · 5 Likes
Flag
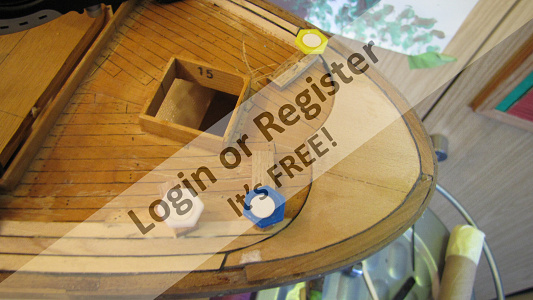
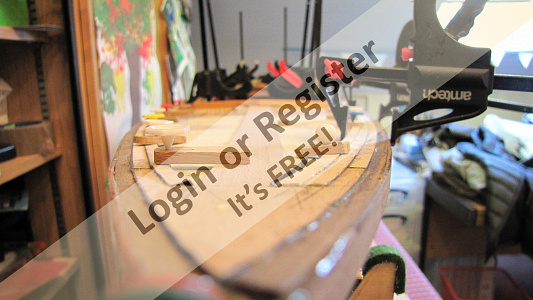
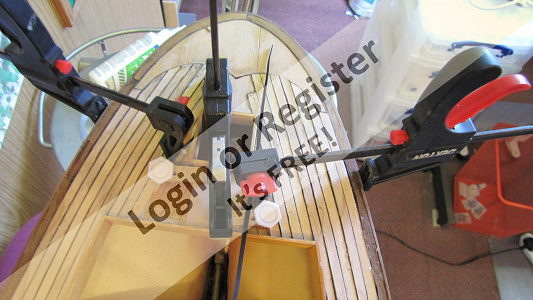
Hi there CDN the clamps are just scrap pieces of oak with a hole drilled through where I use a push pin (notice board type) to push directly into the deck.
The shaft of the pin holds the plank tight against the last plank whist the oak piece holds the new plank down, the hole made by the pin is subsequently covered by the next plank ▲
⟩⟩
Colin H
Peejay
Martin555
MouldBuilder
stevedownunder
|
|
💬 Re: Planking the main deck (cont)
1 year ago by 🇨🇦 cdnfurball (
 Warrant Officer) Warrant Officer)✧ 188 Views · 3 Likes
Flag
Mturpin013,
Could you please give us a picture of the clamps you are using on the planking. Thanks ▲
⟩⟩
Peejay
Martin555
stevedownunder
|
|
💬 Re: Planking the main deck (cont)
1 year ago by 🇬🇧 mturpin013 (
Admiral)✧ 189 Views · 2 Likes
Flag
Hi Steve, I have to agree not the best pictures Ill check my settings
▲
⟩⟩
Martin555
stevedownunder
|
|
💬 Re: Planking the main deck (cont)
1 year ago by 🇺🇸 pressonreguardless (
Rear Admiral)✧ 196 Views · 2 Likes
Flag
Great Job with the planking, Mike👍👍
When planking the Seguin and Lobster Boat I used thin CA. I held the plank in place and hit the edge with CA. Still, it was a slow process. I needed frequent breaks. 😴 Trev ▲
⟩⟩
Martin555
stevedownunder
|
|
💬 Re: Planking the main deck (cont)
1 year ago by 🇦🇺 stevedownunder (
Captain)✧ 203 Views · 4 Likes
Flag
Hi Mike,
Great looking work, I like the joggling of the king plank along with the curvy aft section, quite a bit of work has gone into that, beautiful. Not sure if it is a problem at my end, but the photos are out of focus. Cheers, Stephen. ▲
⟩⟩
Martin555
RNinMunich
MotoPilot
pressonreguardless
|
📝 7 Deck Varnishing
10 months ago by 🇬🇧 mturpin013 ( Admiral)
Admiral)✧ 177 Views · 15 Likes · 1 Comment
Flag
💬 Add Comment
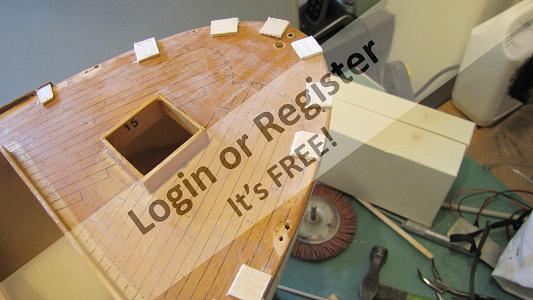
For me this is an important process that should not be done without thought, I often see model with insufficient attention to deck preparation resulting in the applied medium cracking /lifting.
So my recommendation is firstly to prepare the wood surface using reducing grades of abrasive paper, however this should only be done down to about 240 grade, a big mistake is to sand to a super smooth finish such as down to 600 grade. This has the effect of closing the pores of the wood, which limits the ability of the varnish to “KEY” to the wood pores, also being careful not to squash the grain of the wood by rubbing the surface after sanding with any hard tool.
Next, wipe the surface with a tack cloth to remove any remaining sawdust in the pores. Using a solution of appropriate varnish thinner (white spirit in this case) wipe the surface to clean away any remaining dust (you only have to look at your cloth after this process to see what you have removed).
I next use a 60 white spirit/40 varnish thinned solution to apply a first coat. After it’s dried then a light sanding before a second coat of 50/50. From this point, it is a personal choice as to how many more non-thinned coats you apply, but to get a gloss finish with that “depth” look then probably five or six coats will be required.
Finally, with the best will in the world you will get bits of dust land on your final coat. This is where I would leave the finish to harden for two/three weeks.
Then using a 1500 grit wet/dry with water and a dash of washing up liquid (to break the surface tension of the water), lightly sand the surface to remove any pips. The last process is to use a car rubbing compound followed by using a resin based polish (I use Autoglym Super Resin Polish) this polish has a very superfine abrasive in it, which will bring a super high gloss to your varnish with a silky feel to the touch.
This sounds a longwinded process but if you require this type of finish that will last then you have to invest the time and effort.
The pictures are at the 3 coats stage
▲
⟩⟩
Mike Stoney
Rogal118
ChrisG
chugalone100
DuncanP
jbkiwi
pressonreguardless
Homdadream67
Graham93
stevedownunder
RNinMunich
jacko
hermank
Colin H
Scratchbuilder
|
💬 Re: 7 Deck Varnishing
10 months ago by 🇬🇧 jacko (
 Lieutenant Commander) Lieutenant Commander)✧ 172 Views · 2 Likes
Flag
when varnishing deck do it upside down ie hull uppermost so dust will not settle on the deck
▲
⟩⟩
mturpin013
pressonreguardless
|
📝 8 Painting
10 months ago by 🇬🇧 mturpin013 ( Admiral)
Admiral)✧ 169 Views · 17 Likes · 7 Comments
Flag
💬 Add Comment
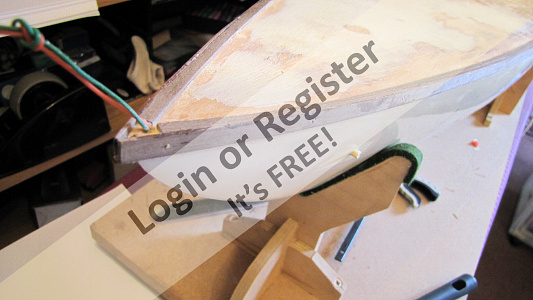
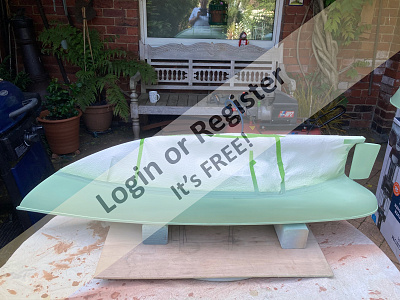
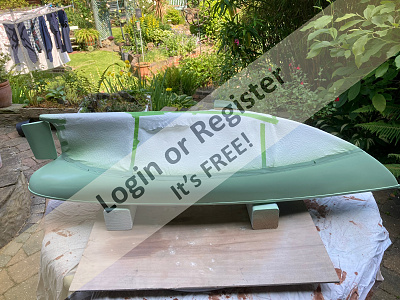
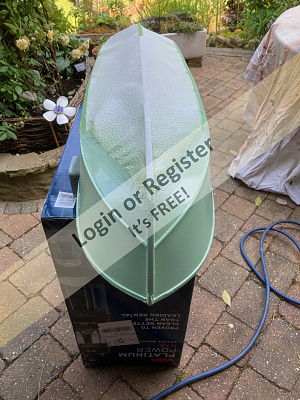
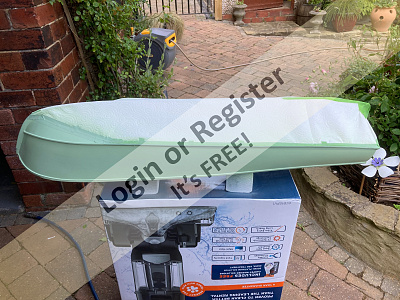
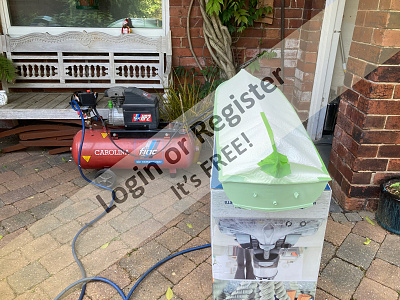
The hull when I got the yacht was still with its white GEL coat finish. However, I wanted to have a two-tone colour scheme, which was to be a lower hull in white and the above waterline in a pale green (this was a colour I had seen on a Fiat 500, so I looked up the code and had the paint mixed)
So a nice sunny day and the first 2 coats of etch primer are applied, a light sanding and its ready for some minor filling with grey stopper fine filler, this dries fairly quickly but it’s advisable to let it harden for a couple of days otherwise it tends to shrink, usually after you’ve applied the final top coat. A final light sanding and it’s time to give a final coat of grey primer again time to dry and a final sanding and its ready for the topcoat of white, I decided to paint the whole of the hull rather than just below the water line.
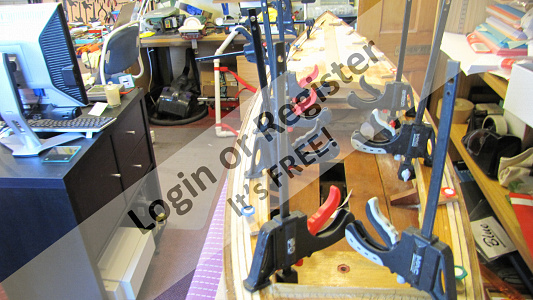
I am now ready to draw the water line, the plans give details of this, and dimensions so I level the hull as per plan and then using a Vernier height gauge with a pencil attached I can draw a line all around the hull. Now all I need to do is mask the lower hull, the top deck is still covered from priming, I now have to wait for favourable weather conditions to spray the green top coat.
Aside you will see in the pictures another hull, this is the Marlin Cabin Cruiser which has shared the same colour scheme and has gone through the same paint preparation as the yacht.
Another fine day and the top coat is applied it takes 5 coats before I’m satisfied that the depth of paint is right and the gloss acceptable, apart from final polishing.
I will leave the paint to properly harden before final polishing and then apply the dark green line around the water line.

So a nice sunny day and the first 2 coats of etch primer are applied, a light sanding and its ready for some minor filling with grey stopper fine filler, this dries fairly quickly but it’s advisable to let it harden for a couple of days otherwise it tends to shrink, usually after you’ve applied the final top coat. A final light sanding and it’s time to give a final coat of grey primer again time to dry and a final sanding and its ready for the topcoat of white, I decided to paint the whole of the hull rather than just below the water line.
I am now ready to draw the water line, the plans give details of this, and dimensions so I level the hull as per plan and then using a Vernier height gauge with a pencil attached I can draw a line all around the hull. Now all I need to do is mask the lower hull, the top deck is still covered from priming, I now have to wait for favourable weather conditions to spray the green top coat.
Aside you will see in the pictures another hull, this is the Marlin Cabin Cruiser which has shared the same colour scheme and has gone through the same paint preparation as the yacht.
Another fine day and the top coat is applied it takes 5 coats before I’m satisfied that the depth of paint is right and the gloss acceptable, apart from final polishing.
I will leave the paint to properly harden before final polishing and then apply the dark green line around the water line.
▲
⟩⟩
Mike Stoney
Rogal118
Commodore-H
AlessandroSPQR
RNinMunich
flaxbybuck
Fred
River Rat
boatmam
ChrisG
hermank
jbkiwi
Peejay
stevedownunder
chugalone100
Colin H
Scratchbuilder
|
💬 Re: 8 Painting
7 months ago by 🇮🇹 AlessandroSPQR (
 Commodore) Commodore)✧ 146 Views · 0 Likes
Flag
Hello Mike.
The work is precise and clean. ▲
⟩⟩
No likes yet
This member will receive 1 point for every like received |
|
Login To
Remove Ads 💬 Re: 8 Painting
10 months ago by 🇬🇧 flaxbybuck (
Captain)✧ 152 Views · 0 Likes
Flag
Nice work Mike. This stage is one where it does not pay to try and cut corners. The time and effort will pay off and you will have a finish you are proud of. It certainly looks impressive to me !😉
▲
⟩⟩
No likes yet
This member will receive 1 point for every like received |
|
💬 Re: 8 Painting
10 months ago by 🇬🇧 Colin H (
Fleet Admiral)✧ 157 Views · 1 Like
Flag
Mike, thanks for the link, I contacted them but they only supply cellulose primers and thinners.
They don't sell cellulose paint only acrylics and acrylic lacquer. Will have to keep looking, I found a vintage car restorer near Hereford that use cellulose paint, so I will ask them about suppliers. Cheers Colin. ▲
⟩⟩
stevedownunder
|
|
💬 Re: 8 Painting
10 months ago by 🇬🇧 mturpin013 (
Admiral)✧ 161 Views · 2 Likes
Flag
Hi Colin Cellulose is readily available around Leeds, my supplier is
There are many more who do it on line just search for "cellulose near me" ▲
⟩⟩
stevedownunder
Colin H
|

|
💬 Re: 8 Painting
10 months ago by 🇬🇧 ChrisG (
Lieutenant Commander)✧ 162 Views · 0 Likes
Flag
Great paint job, I have never been happy with my results at spraying, another skill out there that I have not got.
I painted my slipper launch in duck egg blue which is a similar colour and on the right hull looks really good. The work that you put into this model is to be admired both the hull and the deck are amazing. I follow your build with interest and envy. Regards ChrisG ▲
⟩⟩
No likes yet
This member will receive 1 point for every like received |
|
💬 Re: 8 Painting
10 months ago by 🇬🇧 Colin H (
Fleet Admiral)✧ 164 Views · 1 Like
Flag
Mike where do you get cellulose paint from, I've tried my local bodyshop suppliers but they don't stock it anymore.
Cheers Colin. ▲
⟩⟩
stevedownunder
|
|
💬 Re: 8 Painting
10 months ago by 🇬🇧 Scratchbuilder (
Vice Admiral)✧ 164 Views · 1 Like
Flag
Mike.
As always up to your normal high standards. Regards Bill. ▲
⟩⟩
stevedownunder
|
📝 Back to the deck
7 months ago by 🇬🇧 mturpin013 ( Admiral)
Admiral)✧ 145 Views · 14 Likes · 1 Comment
Flag
💬 Add Comment
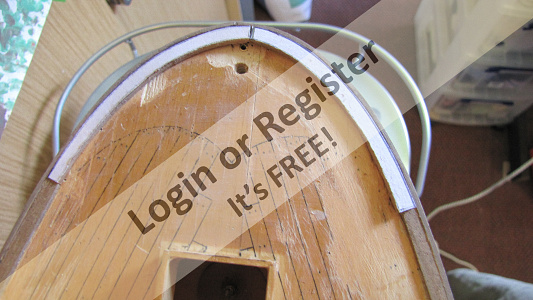
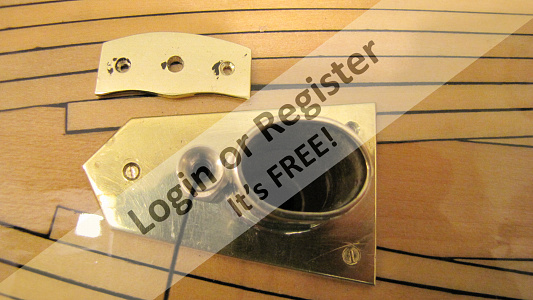
The deck has had some months to harden so I thought I would give it another rub down with wet and dry to remove any of the remaining low spots and in preparation for a final coat. I also thought it time to look at how the masts are secured; they seem to be poorly located allowing them to move from side to side. The masts themselves seemed to be in good repair however, the main mast had a brass square tube running its length, which I am assuming were to carry power to a mast light, again these were poorly fixed with small pins soldered to them. I have now machined a slot along the length of the mast to enable the brass tube to be sunk in flush to the mast. The rear mast also had a brass wire running up its length which according to the plan was an antenna, this is now not needed but I have sunk a brass tube up its length the same as the main mast to put a light at the top of the mast.
The securing of both masts needed a better location method, the mainmast has had a brass ferrule added to its bottom and I machined a socket to accept it which was epoxied into the original location. I used a card template with accurate vertical lines marked on it which I used to hold the mast in its true vertical position while the epoxy set


The securing of both masts needed a better location method, the mainmast has had a brass ferrule added to its bottom and I machined a socket to accept it which was epoxied into the original location. I used a card template with accurate vertical lines marked on it which I used to hold the mast in its true vertical position while the epoxy set
▲
⟩⟩
jbkiwi
Mike Stoney
Rogal118
hermank
roycv
tiggy_cat
Peejay
DuncanP
stevedownunder
AlessandroSPQR
Scratchbuilder
Colin H
ChrisG
RNinMunich
|
💬 Re: Back to the deck
7 months ago by 🇬🇧 ChrisG (
Lieutenant Commander)✧ 144 Views · 3 Likes
Flag
Very impressive work, I am envious of the build which will finish with one of the best Inga 4 around.
Watching with a great deal of interest and ready to copy as many bits as I am capable of. Excellent work. Regards ChrisG ▲
⟩⟩
Mike Stoney
tiggy_cat
Colin H
|
📝 Making the winch system
6 months ago by 🇬🇧 mturpin013 ( Admiral)
Admiral)✧ 141 Views · 19 Likes · 3 Comments
Flag
💬 Add Comment
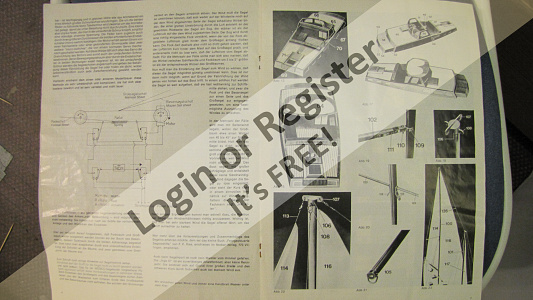
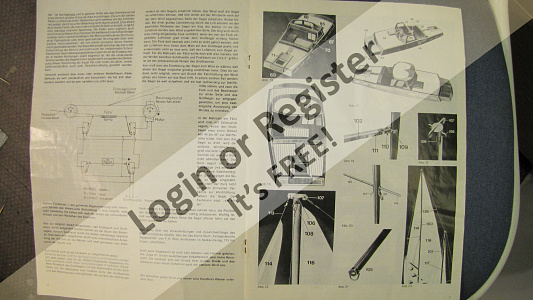
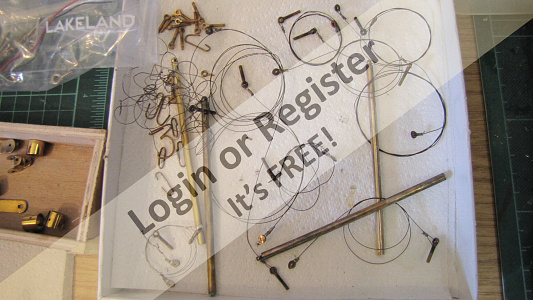
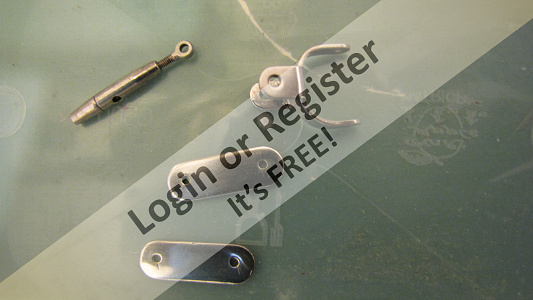
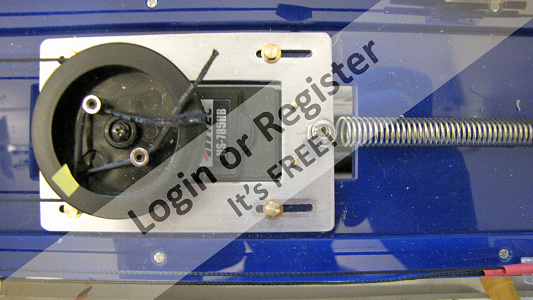
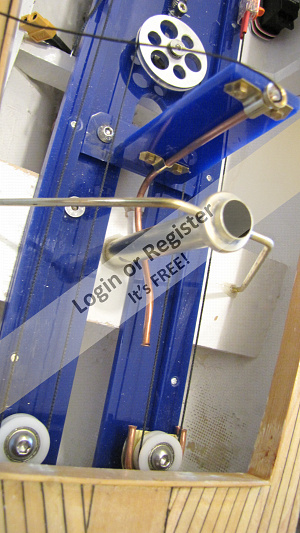
I have worked out that I need 390mm for the main sail to move a distance to bring it to 90 degrees to the hull. However the two other sails don’t need as much so I think the solution will be to attach each line to the appropriate point on each boom so the distance travelled will be the same for each sail.
The winch is a HiTec 785 HB, which with a drum that gives a cord pull of 390mm at 3.25 revolutions. The winch can be set to different revolutions by altering the end points on the transmitter which makes it easy to set the length of cord that is wound onto the drum.
I found in some early mock ups that as the cord is wound onto the drum and overlaps each previous revolution,the cord gets tighter which means some sort of tensioning system will be required to allow the tension to remain the same throughout the 3.25 revolutions. I think a spring which applies tension to the winch will allow it to move back and forth as the tension varies, A spring in the line is the easiest solution but it takes away some of the available travel distance.
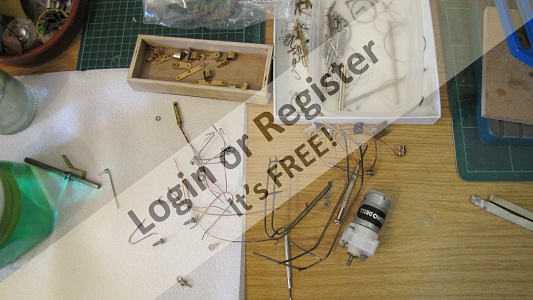
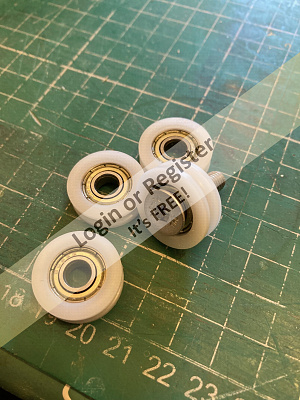
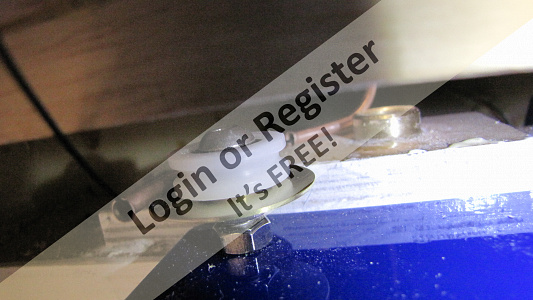
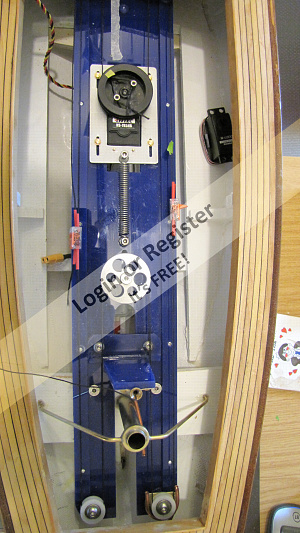
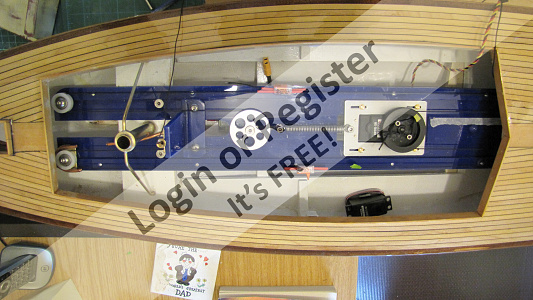
The size and shape of the hull means I will have to run the cord around a system of pulleys, which look a bit odd but is required to enable the unit to be removed from the hull in one piece making it easier to run the cord around the pulleys.
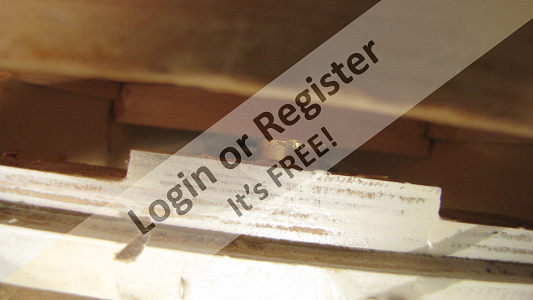
There will be three attachments to the cord run, two on the port side and one on the starboard, each then running into copper tubes, which ultimately end up on the deck. Each exit tube is anchored to the appropriate pulley leading the cord to the next tube that takes the cord to the deck.
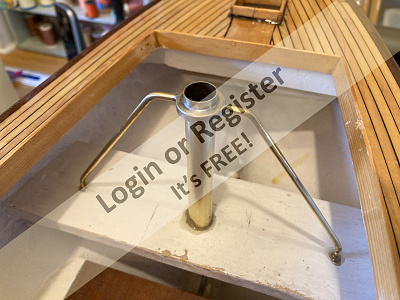
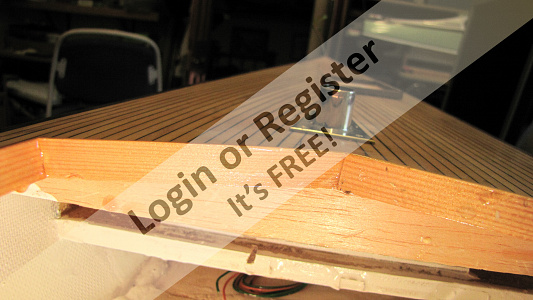
The Mizzen and Foremasts are relatively easy to guide the cord as they leave the pulley via a copper tube and then to another tube that goes up to the deck. The main mast is somewhat more difficult as it exits through the top of the cabin, so this cord leave the pulley and then goes up through a copper tube and exits through a brass ferrule on top of a pillar.
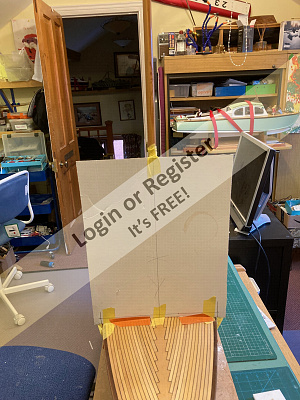
In the pictures you will see the trial system on plywood which demonstrates the general layout works , however as mentioned before about tension in the system it tended to bend the 4mm ply so a more substansial,6mm Perspex is being used in the final product.
I have looked at a number of different attachment options , being the Knot, the cable connecter, the Fishing snap Swivels which may be the best option, to be confirmed.


The winch is a HiTec 785 HB, which with a drum that gives a cord pull of 390mm at 3.25 revolutions. The winch can be set to different revolutions by altering the end points on the transmitter which makes it easy to set the length of cord that is wound onto the drum.
I found in some early mock ups that as the cord is wound onto the drum and overlaps each previous revolution,the cord gets tighter which means some sort of tensioning system will be required to allow the tension to remain the same throughout the 3.25 revolutions. I think a spring which applies tension to the winch will allow it to move back and forth as the tension varies, A spring in the line is the easiest solution but it takes away some of the available travel distance.
The size and shape of the hull means I will have to run the cord around a system of pulleys, which look a bit odd but is required to enable the unit to be removed from the hull in one piece making it easier to run the cord around the pulleys.
There will be three attachments to the cord run, two on the port side and one on the starboard, each then running into copper tubes, which ultimately end up on the deck. Each exit tube is anchored to the appropriate pulley leading the cord to the next tube that takes the cord to the deck.
The Mizzen and Foremasts are relatively easy to guide the cord as they leave the pulley via a copper tube and then to another tube that goes up to the deck. The main mast is somewhat more difficult as it exits through the top of the cabin, so this cord leave the pulley and then goes up through a copper tube and exits through a brass ferrule on top of a pillar.
In the pictures you will see the trial system on plywood which demonstrates the general layout works , however as mentioned before about tension in the system it tended to bend the 4mm ply so a more substansial,6mm Perspex is being used in the final product.
I have looked at a number of different attachment options , being the Knot, the cable connecter, the Fishing snap Swivels which may be the best option, to be confirmed.
▲
⟩⟩
jbkiwi
DuncanP
Ronald
AndyB
Mike Stoney
jumpugly
Rogal118
RNinMunich
GaryLC
vinnbim
Doogle
Len1
cenbeth
hermank
ChrisG
EdW
stevedownunder
AlessandroSPQR
Colin H
|
💬 Re: Making the winch system
4 months ago by 🇨🇭 Mike Stoney (
Commander)✧ 118 Views · 2 Likes
Flag
Wow!
These are beautiful brass works! You must be a precision mechanic by trade . . . 😳😳😳 Keep up the good work!!! Bb Michel-C. ▲
⟩⟩
DuncanP
ChrisG
|
|
Login To
Remove Ads 💬 Re: Making the winch system
5 months ago by 🇨🇭 Mike Stoney (
Commander)✧ 121 Views · 1 Like
Flag
Hi,
I've seen a few ideas that I still need to improve! Thanks for the top photos, of course I didn't use roller bearings for my „Reine des Vents“, but stoled some metal bobbins from my wife's sewing machine. I'm sure you can imagine: Noise pre-programmed. . Regards Michel-C. ▲
⟩⟩
ChrisG
|
|
💬 Re: Making the winch system
6 months ago by 🇮🇹 AlessandroSPQR (
Commodore)✧ 141 Views · 5 Likes
Flag
Hi mturpin013.
I assure you that this is one of the most interesting posts for me. I absolutely need to understand how you control the sails. I am very critical of the system I used, but I was unable, at the time, to think of something better. Thanks for the detailed explanation (I'm rereading it because I don't translate well in some places) but above all thanks so much for the many images. Please post a video as soon as you can. Excellent work, good continuation. ▲
⟩⟩
DuncanP
Mike Stoney
Doogle
ChrisG
hermank
|


Login To
Remove Ads
Remove Ads