Join Us On Social Media!

|

|

|
Download The App!
Login To
Remove Ads
Remove Ads
Login To
Remove Ads
Remove Ads
Model Boats Website
Kayak
36 Posts · 29 Followers · 235 Photos · 483 Likes
Began 2 years ago by
 United Kingdom
Follow This Thread
Not currently following
> Click to follow
> Click to follow
Latest Post 3 months ago by
| Oldest posts shown first (Show Newest First) | (Print Booklet) |
📝 Kayak
2 years ago by 🇬🇧 Graham93 ( Vice Admiral)
Vice Admiral)✧ 239 Views · 8 Likes · 10 Comments
Flag
💬 Add Comment
Time for a new scratch built boat.
A couple of years ago I built 'Scullduggery' a scratch built rowing boat manned by Bionic Bill and Ben.


A couple of years ago I built 'Scullduggery' a scratch built rowing boat manned by Bionic Bill and Ben.

▲
⟩⟩
Martin555
pressonreguardless
philcaretaker
jbkiwi
stevedownunder
Rookysailor
Colin H
Mark Woody
|
💬 Re: Kayak
2 years ago by 🇫🇷 stotty1111 (
 Chief Petty Officer 1st Class) Chief Petty Officer 1st Class)✧ 240 Views · 1 Like
Flag
Yes it is, with just forward reverse by paddle action, -- what else would you expect for something costing £15(almost 20 yrs ago)?
Keeps kids well occupied at model shows! The hull is sealed, by car tape along the hull and deck line, and the paddle action is sealed by a latex piece moulded using the wooden mould. There is a little water ingress via the rudder tube, normally coated with vaseline! ▲
⟩⟩
Graham93
|
|
Login To
Remove Ads 💬 Re: Kayak
2 years ago by 🇬🇧 Graham93 (
Vice Admiral)✧ 224 Views · 0 Likes
Flag
Stotty,
Thanks for posting the video clip. Interesting to see how it works. Steering looks to be controlled by a rudder. I hope to be able to steer with the paddle although I am planning to include a rudder just in case Graham93 ▲
⟩⟩
No likes yet
This member will receive 1 point for every like received |
|
💬 Re: Kayak
2 years ago by 🇬🇧 philcaretaker (
 Commodore) Commodore)✧ 227 Views · 0 Likes
Flag
Great Video clip !!👍
▲
⟩⟩
No likes yet
This member will receive 1 point for every like received |
|
💬 Re: Kayak
2 years ago by 🇫🇷 stotty1111 (
Chief Petty Officer 1st Class)✧ 241 Views · 3 Likes
Flag
video

▲
⟩⟩
Graham93
Colin H
philcaretaker
|
|
💬 Re: Kayak
2 years ago by 🇬🇧 philcaretaker (
Commodore)✧ 227 Views · 1 Like
Flag
Bring it on Graham !!! I am looking forward to following the progress ! 😎⛵
▲
⟩⟩
Colin H
|
|
💬 Re: Kayak
2 years ago by 🇫🇷 stotty1111 (
Chief Petty Officer 1st Class)✧ 243 Views · 2 Likes
Flag
some photos, camera battery needs charging
video mounting, same as with photos(there is a first time for everything, least that's my excuse!! :-() 


▲
⟩⟩
Colin H
philcaretaker
|
|
💬 Re: Kayak
2 years ago by 🇫🇷 stotty1111 (
Chief Petty Officer 1st Class)✧ 246 Views · 3 Likes
Flag
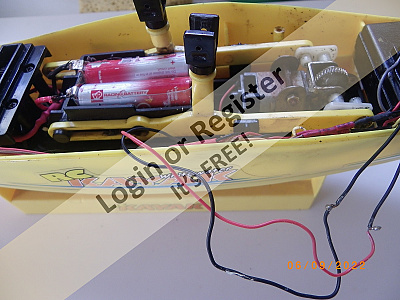
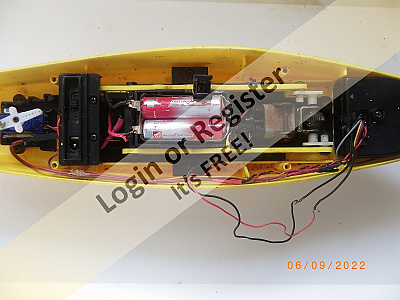
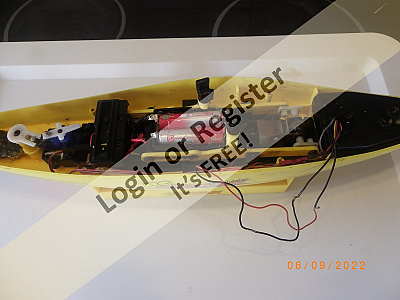
Basically a motor /g/box with 2 x cranks at 180', 2 x crankshafts run to 2 x fixed points, the cranks are slotted so that they can slide back/forward etc. There are also 2 x brackets mounted on the top edges of the crank on these flexible u's the paddle rests in these with 2 x small slots When te motor runs the paddle supports describe an oval movement as do the paddles to simulate real paddles.
A bit long winded, photos to come and possibly a video, I am currently repairing the paddle supports, broken in transit. More later! ▲
⟩⟩
Colin H
philcaretaker
Graham93
|
|
💬 Re: Kayak
2 years ago by 🇬🇧 Graham93 (
Vice Admiral)✧ 230 Views · 1 Like
Flag
Hi Stotty,
I don’t know what the limits are but I have loaded 10 or more at a time. I try to keep each photo to around 100kb in size. They look fine at that size, and don’t take up too much space on the server. It would be great to see some photos of the mechanism in your kayak. Graham93 ▲
⟩⟩
philcaretaker
|
|
💬 Re: Kayak
2 years ago by 🇫🇷 stotty1111 (
Chief Petty Officer 1st Class)✧ 247 Views · 1 Like
Flag
So, how many photos can i mount at 1 time and what size for the images ie mbs
▲
⟩⟩
philcaretaker
|
|
💬 Re: Kayak
2 years ago by 🇫🇷 stotty1111 (
Chief Petty Officer 1st Class)✧ 250 Views · 3 Likes
Flag
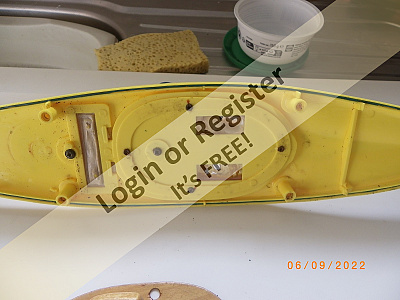
I have a child's toy kayak which is r/c, it was aimed at bath time use. Cost about £15 from Amazon!
I have had it for approaching 20 yrs, and it has been regularly used at model exhibitions where small man made ponds were available. It is about 18" long, I have photos somewhere of the mechanism, time allowing in the near future i will try to find them! 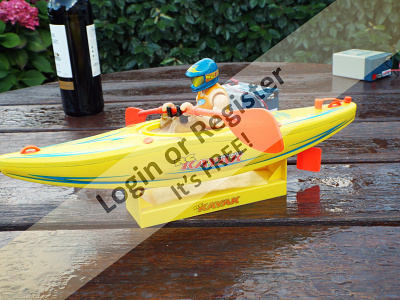


▲
⟩⟩
philcaretaker
Graham93
stevedownunder
|
Login To
Remove Ads
Remove Ads
📝 Mechanism
2 years ago by 🇬🇧 Graham93 ( Vice Admiral)
Vice Admiral)✧ 219 Views · 12 Likes · 11 Comments
Flag
💬 Add Comment
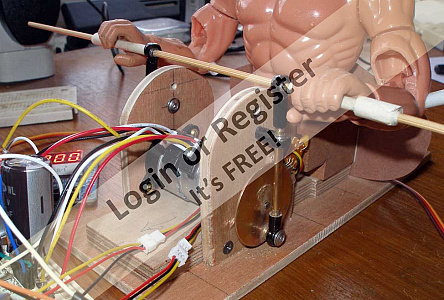
The aim is to achieve movement of the paddler that is as realistic as possible. Steering should also be by means of the paddle, rather than solely relying on a separate rudder.
The rowing boat uses simple mechanics with software programmed into a microchip to achieve the required motion. That way the mechanics are easier to build, and adjustments to the movements can mostly be made by editing the software. The same approach is planned for the kayak.
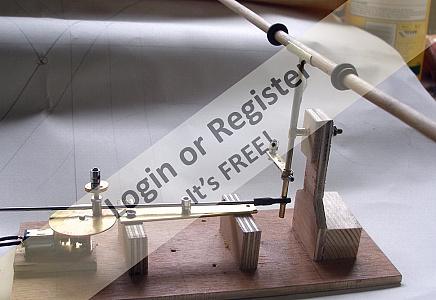
Two small stepper motors were purchased and a test rig assembled. The two motors can be seen, back to back in the first photo. They each have a brass disk mounted on the output shaft. Pushrods link the disks to the paddle via fixed pivots. The second photo shows the overall arrangement and the third gives an idea of how it will fit into the kayak with a cardboard template showing the internal cross section.
The software controls and syncronises the two stepper motors allowing the paddler to paddle forwards, backwards or to use just one blade in the water to steer the craft. A short video showing paddling forwards and backwards:


The rowing boat uses simple mechanics with software programmed into a microchip to achieve the required motion. That way the mechanics are easier to build, and adjustments to the movements can mostly be made by editing the software. The same approach is planned for the kayak.
Two small stepper motors were purchased and a test rig assembled. The two motors can be seen, back to back in the first photo. They each have a brass disk mounted on the output shaft. Pushrods link the disks to the paddle via fixed pivots. The second photo shows the overall arrangement and the third gives an idea of how it will fit into the kayak with a cardboard template showing the internal cross section.
The software controls and syncronises the two stepper motors allowing the paddler to paddle forwards, backwards or to use just one blade in the water to steer the craft. A short video showing paddling forwards and backwards:
▲
⟩⟩
Martin555
Cashrc
philcaretaker
dave976
GaryLC
jbkiwi
Brightwork
pressonreguardless
stevedownunder
Colin H
AndyB
robbob
|
💬 Re: Mechanism
2 years ago by 🇺🇸 Cashrc (
Vice Admiral)✧ 199 Views · 1 Like
Flag
So….very….COOL!!! Nice job of engineering!!
Cash ▲
⟩⟩
Graham93
|
|
Login To
Remove Ads 💬 Re: Mechanism
2 years ago by 🇬🇧 Graham93 (
Vice Admiral)✧ 214 Views · 4 Likes
Flag
Thanks Gary,
The head was being adapted When I filmed that. It will be attached to a servo in the body. That way, not only will he be able to see where he is going, he will also be able to look where he is going. 😉 Graham93 ▲
⟩⟩
Martin555
philcaretaker
stevedownunder
GaryLC
|
|
💬 Re: Mechanism
2 years ago by 🇬🇧 GaryLC (
 Captain) Captain)✧ 218 Views · 3 Likes
Flag
I really very much admire your patience and ability to fathom out the exact movement you are looking for, and not for the faint-hearted like myself. It seems to be going well in these early trials and looks very promising. As my electronic skill is zilch I am not in a position to offer advice or anything else, mind I am very interested in your project so please keep us all informed of your progress on this venture. (Please refit his head so he can see where he is going?) Regards,Gary.
▲
⟩⟩
stevedownunder
Graham93
Colin H
|
|
💬 Re: Mechanism
2 years ago by 🇬🇧 Graham93 (
Vice Admiral)✧ 214 Views · 4 Likes
Flag
Thanks everyone for the kind comments.
It was interesting to put together, but somehow it just didn’t feel right so I decided to explore an alternative approach.. Graham93 ▲
⟩⟩
Martin555
philcaretaker
stevedownunder
GaryLC
|
|
💬 Re: Mechanism
2 years ago by 🇨🇦 Brightwork (
Captain)✧ 223 Views · 3 Likes
Flag
Just genius!!
▲
⟩⟩
stevedownunder
GaryLC
Graham93
|
|
💬 Re: Mechanism
2 years ago by 🇦🇺 stevedownunder (
Captain)✧ 217 Views · 3 Likes
Flag
Fantastic work Graham, even if it didn't work to your expectations.
It is quite a challenge I am guessing, to mimic a person paddling. Looking forward to seeing version no2. Cheers, Stephen. ▲
⟩⟩
GaryLC
Graham93
pressonreguardless
|
|
💬 Re: Mechanism
2 years ago by 🇬🇧 mturpin013 (
 Admiral) Admiral)✧ 223 Views · 4 Likes
Flag
You never cease to amaze Graham, Oh to have your electronic knowledge along with your mechanical ability its truly a fantastic combination, I look forward to version 2
▲
⟩⟩
GaryLC
Graham93
pressonreguardless
stevedownunder
|
|
💬 Re: Mechanism
2 years ago by 🇬🇧 robbob (
Admiral)✧ 229 Views · 3 Likes
Flag
What you have done in your first attempt is possibly way beyond what most, if not all, of us could have hoped to achieve. That you are re-visiting the project would imply that you may have surmounted the initial problems.😀
▲
⟩⟩
GaryLC
Graham93
stevedownunder
|
|
💬 Re: Mechanism
2 years ago by 🇬🇧 Graham93 (
Vice Admiral)✧ 219 Views · 6 Likes
Flag
Hi Rob,
Yes, I suppose it was a success in demonstrating that it didn’t work!🤔 I should explain that I’m in ‘catch up’ mode with this blog as I’ve been working on this for almost a year. I scrapped the mechanism last December and the project then stalled until recently. Haven’t given up though🤞 Graham93 ▲
⟩⟩
Martin555
philcaretaker
pressonreguardless
stevedownunder
Norway
robbob
|
|
💬 Re: Mechanism
2 years ago by 🇬🇧 robbob (
Admiral)✧ 229 Views · 3 Likes
Flag
Hi Graham.
"Back to the drawing board"....yes perhaps. Still I would regard this as a successful 'proof of concept' that just requires a re-think on more suitable hardware to achieve the desired action. Good work nevertheless.👍😀 Rob. ▲
⟩⟩
pressonreguardless
stevedownunder
Graham93
|
|
💬 Re: Mechanism
2 years ago by 🇬🇧 AndyB (
 Warrant Officer) Warrant Officer)✧ 219 Views · 3 Likes
Flag
Fantastic
Just love it ! ▲
⟩⟩
stevedownunder
stotty1111
Graham93
|
📝 Mechanism Mk 2
2 years ago by 🇬🇧 Graham93 ( Vice Admiral)
Vice Admiral)✧ 214 Views · 11 Likes · 9 Comments
Flag
💬 Add Comment
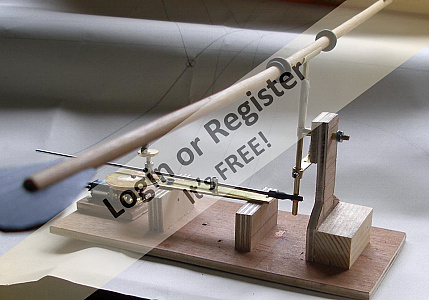
The project stalled for several months while I got on with the rest of my life! However I did find a short video clip on YouTube which looked promising so I had a go at building a replica.
A small geared motor at the left rotates a brass disk to which are attached two pushrods. The brass plate in the middle pivots on a screw. The other end of the plate will connect to a servo to move the plate from side to side. This movement of the plate will provide steering as it will tilt the vertical shaft on which the paddle is mounted.
A short video clip to show it in operation:
▲
⟩⟩
Martin555
RNinMunich
Len1
GaryLC
AndyB
pressonreguardless
Colin H
philcaretaker
stevedownunder
robbob
Brightwork
|
💬 Re: Mechanism Mk 2
2 years ago by 🇩🇪 RNinMunich (
 Fleet Admiral) Fleet Admiral)✧ 207 Views · 1 Like
Flag
Ref Name,
No contest! Continuing the 'Flower Pot Men' theme it has to be "(Little) Weed" 😁 'Loblob' job on the mechanism btw Graham👍 I was wondering; have you made Bill and Ben their 'Flobberpops' yet? 😂 No? 'FLOBABDOB'😠 "Babap ickle Weed" 😎 
▲
⟩⟩
Graham93
|
|
Login To
Remove Ads 💬 Re: Mechanism Mk 2
2 years ago by 🇬🇧 Graham93 (
Vice Admiral)✧ 208 Views · 3 Likes
Flag
Thanks Gary,
Kev is a possibility, together with Charlie as suggested by Rob. Plenty of time yet to decide on a name as the build has hardly started. Graham93 ▲
⟩⟩
Martin555
GaryLC
stevedownunder
|
|
💬 Re: Mechanism Mk 2
2 years ago by 🇬🇧 GaryLC (
Captain)✧ 216 Views · 2 Likes
Flag
Yes, Kayak Kevin sounds about right, and Kev for the shortened version. I think your mark 2 version is bordering on genius, all those different movements from one servo motor, I wouldn't have believed that was possible. Please keep up the good work on this very interesting project of yours. Regards, Gary.
▲
⟩⟩
Graham93
stevedownunder
|
|
💬 Re: Mechanism Mk 2
2 years ago by 🇬🇧 robbob (
Admiral)✧ 223 Views · 2 Likes
Flag
Charlie ?
▲
⟩⟩
stevedownunder
Graham93
|
|
💬 Re: Mechanism Mk 2
2 years ago by 🇬🇧 Graham93 (
Vice Admiral)✧ 213 Views · 3 Likes
Flag
Hi Phil,
I haven’t come up with a name for the rower yet. Any suggestions anyone? Graham93 ▲
⟩⟩
Martin555
stevedownunder
GaryLC
|
|
💬 Re: Mechanism Mk 2
2 years ago by 🇬🇧 Graham93 (
Vice Admiral)✧ 213 Views · 3 Likes
Flag
Hi Stephen,
Yes, I think it does look promising. A much simpler approach than the stepper motor mechanism, but it will depend on getting all the linkages to right length. Graham93 ▲
⟩⟩
Martin555
stevedownunder
robbob
|
|
💬 Re: Mechanism Mk 2
2 years ago by 🇺🇸 pressonreguardless (
 Rear Admiral) Rear Admiral)✧ 213 Views · 2 Likes
Flag
Excellent Engineering.
Trev ▲
⟩⟩
stevedownunder
Graham93
|
|
💬 Re: Mechanism Mk 2
2 years ago by 🇬🇧 philcaretaker (
Commodore)✧ 217 Views · 2 Likes
Flag
Awesome Graham !
What will you call kayak man ???? ▲
⟩⟩
stevedownunder
Graham93
|
|
💬 Re: Mechanism Mk 2
2 years ago by 🇦🇺 stevedownunder (
Captain)✧ 214 Views · 2 Likes
Flag
Great work Graham,
Looks very promising in my opinion. Cheers, Stephen. ▲
⟩⟩
GaryLC
Graham93
|
📝 Mechanism Mk 3
2 years ago by 🇬🇧 Graham93 ( Vice Admiral)
Vice Admiral)✧ 202 Views · 15 Likes · 13 Comments
Flag
💬 Add Comment
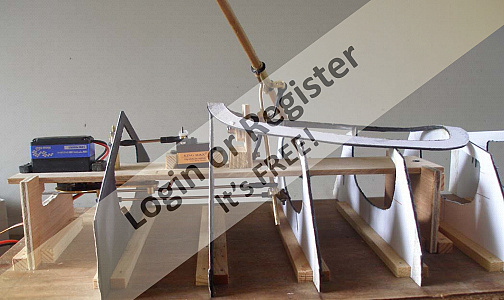
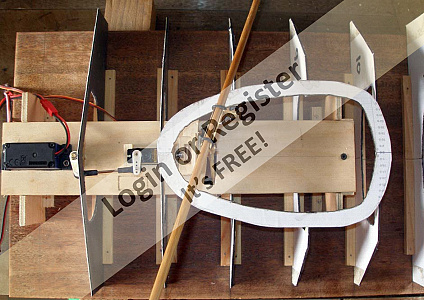
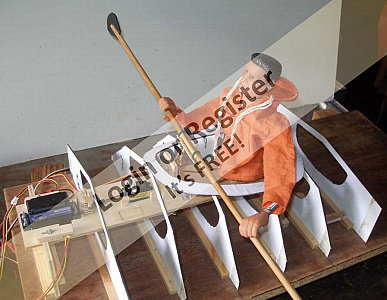
Before going any further, I needed to check that the mechanism will fit inside the proposed kayak as there isn't a lot of room. A test rig was set up by cutting cardboard frames with holes representing the internal size of the hull. This jig only represents the middle section of the kayak. A cardboard template to represent the cockpit was added as everything will have to be installed through the cockpit hole in the hull.
The Mk 2 mechanism just fitted in the planned position, but could not be fitted into that position through the cockpit. Based on the experience testing the Mk 2 I also had concerns that the geared motor I was using had limited torque and may prove to be inadequate to drive the craft. Hence, I decided to build the Mk 3 mechanism which is a rebuild of Mk2 with a different drive motor..
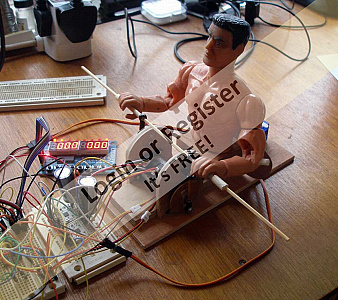
The geared motor was replaced with a metal geared servo. The servo was dismantled and the electronics removed. Wires were added to the motor so that it could be connected to a standard ESC. A metal pin fitted to the final gear was also removed to enable continuous rotation.
The Mk2 mechanism was rebuilt onto both sides of a plywood panel. Most of the mechanism was reused, although some parts were remade (several times!). The steering servo was also mounted onto the panel (a couple of times).
This new mechanism fits into the test rig through the cockpit.
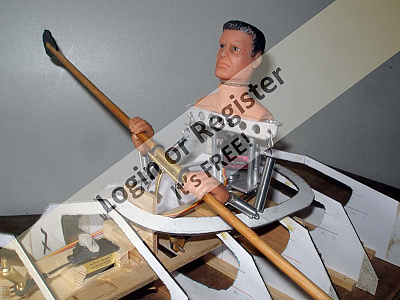
Wanting to keep the total weight down the rower underwent some drastic surgery. Action man figures are made from thick plastic so that they are very durable, but it also makes them relatively heavy. I found that the joints on the original arms were quite stiff, even after surgery, so the arms have been replaced with a couple of linked springs. A mini servo mounted in the 'abdomen' is linked to the head with a flexible drive shaft. This will enable the paddler to look where he is going! Once he has his waterproof on, he looks OK to me. The arms of his waterproof will be lightly stuffed with soft toy polyester stuffing to bulk them out a little.
A short video showing it in operation driven from an ESC which gives forward and backward paddling:


The Mk 2 mechanism just fitted in the planned position, but could not be fitted into that position through the cockpit. Based on the experience testing the Mk 2 I also had concerns that the geared motor I was using had limited torque and may prove to be inadequate to drive the craft. Hence, I decided to build the Mk 3 mechanism which is a rebuild of Mk2 with a different drive motor..
The geared motor was replaced with a metal geared servo. The servo was dismantled and the electronics removed. Wires were added to the motor so that it could be connected to a standard ESC. A metal pin fitted to the final gear was also removed to enable continuous rotation.
The Mk2 mechanism was rebuilt onto both sides of a plywood panel. Most of the mechanism was reused, although some parts were remade (several times!). The steering servo was also mounted onto the panel (a couple of times).
This new mechanism fits into the test rig through the cockpit.
Wanting to keep the total weight down the rower underwent some drastic surgery. Action man figures are made from thick plastic so that they are very durable, but it also makes them relatively heavy. I found that the joints on the original arms were quite stiff, even after surgery, so the arms have been replaced with a couple of linked springs. A mini servo mounted in the 'abdomen' is linked to the head with a flexible drive shaft. This will enable the paddler to look where he is going! Once he has his waterproof on, he looks OK to me. The arms of his waterproof will be lightly stuffed with soft toy polyester stuffing to bulk them out a little.
A short video showing it in operation driven from an ESC which gives forward and backward paddling:
▲
⟩⟩
Martin555
Colin H
AndyB
jbkiwi
Julio
pressonreguardless
River Rat
robbob
GaryLC
Dumaspittman
DWBrinkman
Rookysailor
stevedownunder
MouldBuilder
philcaretaker
|
💬 Re: Mechanism Mk 3
2 years ago by 🇬🇧 Graham93 (
Vice Admiral)✧ 187 Views · 5 Likes
Flag
Hi JB,
Can’t have the paddler eating too much honey, I’ve got to keep the total weight down. He’s already undergone some drastic weight reduction surgery 😂 Graham93 ▲
⟩⟩
Martin555
Julio
jbkiwi
pressonreguardless
stevedownunder
|
|
Login To
Remove Ads 💬 Re: Mechanism Mk 3
2 years ago by 🇳🇿 jbkiwi (
Fleet Admiral)✧ 189 Views · 4 Likes
Flag
Amazing and ingenious bit of mechanization, (I think it's all the honey he's been eating)😂
JB ▲
⟩⟩
Martin555
pressonreguardless
Graham93
stevedownunder
|
|
💬 Re: Mechanism Mk 3
2 years ago by 🇬🇧 mturpin013 (
Admiral)✧ 196 Views · 1 Like
Flag
Speechless.🤔
▲
⟩⟩
stevedownunder
|
|
💬 Re: Mechanism Mk 3
2 years ago by 🇬🇧 Graham93 (
Vice Admiral)✧ 191 Views · 4 Likes
Flag
Thanks everyone for the comments and encouragement. I’m just back from a weekend away attending my granddaughter’s third birthday 🎂.
It’s taken several weeks of making and remaking parts of the mechanism to get to this stage. I’ve just realised that the video clip is of an interim version without all the changes. I’ll make another video and post it later this week. Graham93 ▲
⟩⟩
Martin555
pressonreguardless
GaryLC
stevedownunder
|
|
💬 Re: Mechanism Mk 3
2 years ago by 🇪🇸 Julio (
 Petty Officer 1st Class) Petty Officer 1st Class)✧ 200 Views · 2 Likes
Flag
Hi, Graham:
Is amazing!! It is amazing to see the operation of this mechanism!! Thanks for sharing it with us ▲
⟩⟩
Graham93
stevedownunder
|
|
💬 Re: Mechanism Mk 3
2 years ago by 🇺🇸 pressonreguardless (
Rear Admiral)✧ 196 Views · 2 Likes
Flag
Truly Amazing, Graham!!!
Thanks for Sharing👍 Trev ▲
⟩⟩
Graham93
stevedownunder
|
|
💬 Re: Mechanism Mk 3
2 years ago by 🇺🇸 River Rat (
Captain)✧ 199 Views · 3 Likes
Flag
Wow! Just Wow! You are an Amazing man! Keep up the great work. Can't wait to see it underway. Thanks Dave
▲
⟩⟩
Graham93
stevedownunder
DWBrinkman
|
|
💬 Re: Mechanism Mk 3
2 years ago by 🇬🇧 mturpin013 (
Admiral)✧ 202 Views · 2 Likes
Flag
Fantastic Graham, I’m on holiday at the moment so can’t download the video but I’ll comment further on my return
▲
⟩⟩
Graham93
stevedownunder
|
|
💬 Re: Mechanism Mk 3
2 years ago by 🇬🇧 GaryLC (
Captain)✧ 204 Views · 2 Likes
Flag
Absolutely love this project along with the thought and sheer determination that went into it. I think your achievement is incredible bordering on genius. Your oarsman (Kev the kayak) has a very determined look about him and determination is what it is all about. Keep up the good work as a very interesting project if ever there was. Regards, Gary.
▲
⟩⟩
Graham93
stevedownunder
|
|
💬 Re: Mechanism Mk 3
2 years ago by 🇦🇺 stevedownunder (
Captain)✧ 201 Views · 2 Likes
Flag
Fantastic work Graham,
Cheers, Stephen. ▲
⟩⟩
GaryLC
Graham93
|
|
💬 Re: Mechanism Mk 3
2 years ago by 🇭🇺 MouldBuilder (
Vice Admiral)✧ 201 Views · 3 Likes
Flag
Superb Graham, as usual.
How about’ The bees knees’ for the name.😬 ▲
⟩⟩
Martin555
Graham93
stevedownunder
|
|
Login To
Remove Ads 💬 Re: Mechanism Mk 3
2 years ago by 🇬🇧 Colin H (
Fleet Admiral)✧ 200 Views · 4 Likes
Flag
It's amazing, I could do with your mechanical genius in full size to keep me moving.
Well done shipmate, cheers Colin. ▲
⟩⟩
GaryLC
Graham93
stevedownunder
MouldBuilder
|
|
💬 Re: Mechanism Mk 3
2 years ago by 🇬🇧 philcaretaker (
Commodore)✧ 204 Views · 2 Likes
Flag
Love it ,
Love it , Love it ! 🤟😎 Brilliant Graham !! ▲
⟩⟩
Graham93
stevedownunder
|
📝 Controls
2 years ago by 🇬🇧 Graham93 ( Vice Admiral)
Vice Admiral)✧ 193 Views · 13 Likes · 9 Comments
Flag
💬 Add Comment
I've ended up with four controls for the kayak:
1. Paddling - speed and fwd/reverse
2. Steering - tilting the paddle to port or starboard
3. Rudder - traditional rudder on the stern of the kayak
4. Paddler head turning - so he can see where he is going!
These could simply be allocated to separate channels on the transmitter with the paddling speed and head turning on the left stick, and the steering/rudder on the right stick. However, I like to add custom electronics to my builds where this helps with the realism of the model and/or it makes it easier to control.
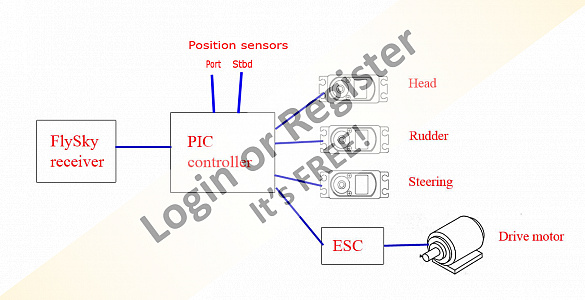
The first photo shows a block diagram of the controller. A single connection from the receiver carries all the channels received from the transmitter. The controller then processes these and feeds out separate signals to the ESC and the three servos. With suitable software programmed into to PIC microchip the controller will provide the following functions:
1. Pulse stretching for the head turning servo to give more rotation than the standard 90 degree servo output.
2. Driving both the steering and rudder servos from a single Tx channel as this is more logical. The range of movement of each servo can be independently set as they need to be different.
3. When stopping, automatically position the paddle horizontal with the blades out of the water. Tricky to achieve this manually from the Tx.
4. When turning, the paddle is tilted to one side, such that one blade is in use, and the other is held clear of the water. When the turn request from the Tx reaches maximum turn, the paddle stops moving and switches sides to place the opposite blade in the water thus acting as a pivot point for turning.
5. Using the rudder to compensate for the turning effect of the paddle stroke. On each stroke of the paddle, the kayak will tend to turn away from the stroke. On full sized kayaks, it is normal to use the rudder to correct for this turning movement on each stroke.
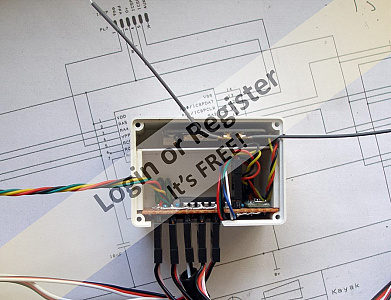
A lash up of the controller was put together to test the circuit and for initial software development. Once this was working, it was rebuilt in its final form and fitted into an ABS enclosure.
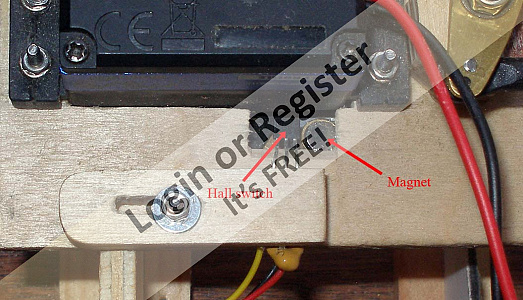
To sense the position of the drive motor (necessary for functions 3, 4 and 5 above) a small magnet is fitted to the brass disk on the drive motor shaft and two Hall effect magnetic sensors are mounted either side of the drive motor. These provide the controller with reference points for the paddle position.
The video shows the operation of different functions of the controller.


1. Paddling - speed and fwd/reverse
2. Steering - tilting the paddle to port or starboard
3. Rudder - traditional rudder on the stern of the kayak
4. Paddler head turning - so he can see where he is going!
These could simply be allocated to separate channels on the transmitter with the paddling speed and head turning on the left stick, and the steering/rudder on the right stick. However, I like to add custom electronics to my builds where this helps with the realism of the model and/or it makes it easier to control.
The first photo shows a block diagram of the controller. A single connection from the receiver carries all the channels received from the transmitter. The controller then processes these and feeds out separate signals to the ESC and the three servos. With suitable software programmed into to PIC microchip the controller will provide the following functions:
1. Pulse stretching for the head turning servo to give more rotation than the standard 90 degree servo output.
2. Driving both the steering and rudder servos from a single Tx channel as this is more logical. The range of movement of each servo can be independently set as they need to be different.
3. When stopping, automatically position the paddle horizontal with the blades out of the water. Tricky to achieve this manually from the Tx.
4. When turning, the paddle is tilted to one side, such that one blade is in use, and the other is held clear of the water. When the turn request from the Tx reaches maximum turn, the paddle stops moving and switches sides to place the opposite blade in the water thus acting as a pivot point for turning.
5. Using the rudder to compensate for the turning effect of the paddle stroke. On each stroke of the paddle, the kayak will tend to turn away from the stroke. On full sized kayaks, it is normal to use the rudder to correct for this turning movement on each stroke.
A lash up of the controller was put together to test the circuit and for initial software development. Once this was working, it was rebuilt in its final form and fitted into an ABS enclosure.
To sense the position of the drive motor (necessary for functions 3, 4 and 5 above) a small magnet is fitted to the brass disk on the drive motor shaft and two Hall effect magnetic sensors are mounted either side of the drive motor. These provide the controller with reference points for the paddle position.
The video shows the operation of different functions of the controller.
▲
⟩⟩
Martin555
GaryLC
Julio
robbob
Len1
Colin H
stevedownunder
RNinMunich
AndyB
jbkiwi
DWBrinkman
pressonreguardless
dave976
|
💬 Re: Controls
2 years ago by 🇬🇧 robbob (
Admiral)✧ 199 Views · 1 Like
Flag
Hi Graham.
A superb example of electro/mechanical design and prototyping. This project will be every bit as good a 'Bill & Ben' if not better. Great work! Rob. ▲
⟩⟩
Graham93
|
|
Login To
Remove Ads 💬 Re: Controls
2 years ago by 🇬🇧 Graham93 (
Vice Admiral)✧ 189 Views · 3 Likes
Flag
Hi Fleet,
“ Why is Kayak Ken so snooty?” - I have plans to improve his appearance..... all will be revealed. That is once I’ve made the changes 😁 ▲
⟩⟩
Martin555
pressonreguardless
robbob
|
|
💬 Re: Controls
2 years ago by 🇬🇧 Graham93 (
Vice Admiral)✧ 189 Views · 3 Likes
Flag
Hi Michael,
Like the comments 😆. The fancy electronics are optional and I’m sure you would make a better job of the mechanicals than I have. “Can I build you one?” - I don’t like making more than one of anything now I’m retired, besides, it would be much more interesting to build your own rather than have someone else do it for you.😉😂🤣 ▲
⟩⟩
Martin555
pressonreguardless
robbob
|
|
💬 Re: Controls
2 years ago by 🇩🇪 RNinMunich (
Fleet Admiral)✧ 192 Views · 3 Likes
Flag
Michael,
It's quite simple really😉 Pic 2 is spaghetti junction on toast, Pic 3 is the pizza version for mass production, (The special rectangular black olives can be clearly seen, not my taste😝) Pic 4 is the Fast Food version for microwave cooking 😋 Pic 5 shows the debugger for the software. Anything with 3 to 6 legs that comes along will be thrown overboard, or eaten to fuel the on-board methane gas generator. Thus trickle charging the main power system. Pic 6 shows the hall (proximity) switch, you know, the one that switches the light on 💡 when you stagger down the stairs on a winter's morn. ❄️ Alles klar Herr Kommissar? 😉 😎 ▲
⟩⟩
robbob
Rookysailor
Colin H
|
|
💬 Re: Controls
2 years ago by 🇦🇺 stevedownunder (
Captain)✧ 191 Views · 2 Likes
Flag
Fantastic Graham,
I wish I had the skill and knowledge to build somethin like that. Cheers, Stephen. ▲
⟩⟩
robbob
Graham93
|
|
💬 Re: Controls
2 years ago by 🇩🇪 RNinMunich (
Fleet Admiral)✧ 192 Views · 2 Likes
Flag
Once again 'supercalifragilisticexpialidocious' Graham😮👍
a real 'head turner'. Just one question!. Why is Kayak Ken so snooty? He's always looking down his nose, to see where he's going, and at we mere vassals of course!😌😁 (I called him Ken cos Kevin always makes me think of the precocious kid in 'Kevin Alone At Home'🙄) 😎 ▲
⟩⟩
robbob
Graham93
|
|
💬 Re: Controls
2 years ago by 🇬🇧 mturpin013 (
Admiral)✧ 198 Views · 6 Likes
Flag
Hi Graham again pure alchemy.
Pictures - 1 - I understand diagram👍 2 - is a total brain block🤔 3 - as 2 above🤔 4 - yes, thats a plastic box 👍 5 - yes, plywood with electronic bits 👍 6 - switch and magnet I understand 👍 7 - Yes - that's a video that blows your mind🤣 8 - can you build me one? ▲
⟩⟩
robbob
Graham93
Colin H
stevedownunder
RNinMunich
AndyB
|
|
💬 Re: Controls
2 years ago by 🇺🇸 pressonreguardless (
Rear Admiral)✧ 190 Views · 2 Likes
Flag
Pure Genius, Graham👍👍
Trev ▲
⟩⟩
stevedownunder
Graham93
|
|
💬 Re: Controls
2 years ago by 🇬🇧 philcaretaker (
Commodore)✧ 193 Views · 3 Likes
Flag
Probability, suitability, feasibility all seem ticked now Graham, 😎👍
We all will be watching this space !!!!?! Well done !!🤞 ▲
⟩⟩
robbob
stevedownunder
Graham93
|
📝 Lofting
2 years ago by 🇬🇧 Graham93 ( Vice Admiral)
Vice Admiral)✧ 192 Views · 10 Likes · 2 Comments
Flag
💬 Add Comment
Having gained enough confidence that the drive mechanism has a fair chance of working, it's time to start the build. The blog posts so far have been catching up with a build that started almost a year ago. The remainder of this blog will be close to real-time.
The book by Nick Schade contains 'tables of offsets' for three different kayaks. The book also describes in detail how to use these tables to draw plans. This is new to me and I struggled with understanding the tables and the terminology, but worked it out eventually with the guidance from the book.
The nice thing about having a plan made up of lots of numbers in a table (of offsets) is that it is relatively easy to scale the dimensions to any desired size. This can be done manually but as there are several hundred figures to be scaled, I opted to use a spreadsheet.
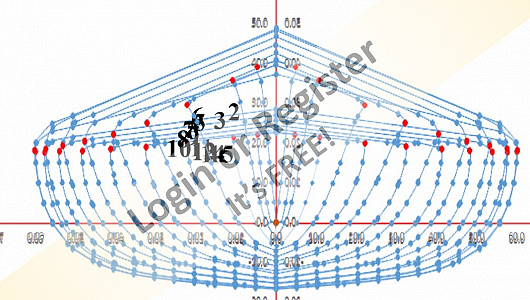
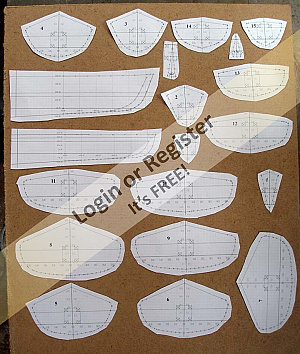
All the numbers were typed into a spreadsheet and then scaled and converted from imperial to metric using a simple formula. The graph function of the spreadsheet was then used to draw a half profile of each form. These graphs were copied and pasted into Photoshop. In Photoshop, each half profile was mirrored to produce a full profile for each of the 16 forms.
With the plans drawn, at last it is time to start making sawdust 👍
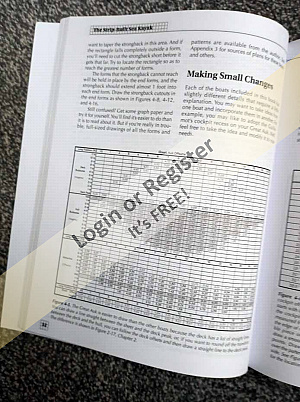


The book by Nick Schade contains 'tables of offsets' for three different kayaks. The book also describes in detail how to use these tables to draw plans. This is new to me and I struggled with understanding the tables and the terminology, but worked it out eventually with the guidance from the book.
The nice thing about having a plan made up of lots of numbers in a table (of offsets) is that it is relatively easy to scale the dimensions to any desired size. This can be done manually but as there are several hundred figures to be scaled, I opted to use a spreadsheet.
All the numbers were typed into a spreadsheet and then scaled and converted from imperial to metric using a simple formula. The graph function of the spreadsheet was then used to draw a half profile of each form. These graphs were copied and pasted into Photoshop. In Photoshop, each half profile was mirrored to produce a full profile for each of the 16 forms.
With the plans drawn, at last it is time to start making sawdust 👍
▲
⟩⟩
Martin555
robbob
Julio
jbkiwi
GaryLC
stevedownunder
AndyB
philcaretaker
pressonreguardless
Colin H
|
💬 Re: Lofting
2 years ago by 🇦🇺 stevedownunder (
Captain)✧ 191 Views · 3 Likes
Flag
Great work Graham,
I like the idea of using a spread sheet, I will try to remember that one. Cheers, Stephen. ▲
⟩⟩
GaryLC
Graham93
pressonreguardless
|
|
💬 Re: Lofting
2 years ago by 🇺🇸 pressonreguardless (
Rear Admiral)✧ 190 Views · 2 Likes
Flag
WELL, DONE, Graham👍👍👍👍
I love your thought process Trev ▲
⟩⟩
Graham93
stevedownunder
|
📝 Formwork
2 years ago by 🇬🇧 Graham93 ( Vice Admiral)
Vice Admiral)✧ 190 Views · 11 Likes · 6 Comments
Flag
💬 Add Comment
The kayak will be built from wood strips glued together over a temporary formwork.
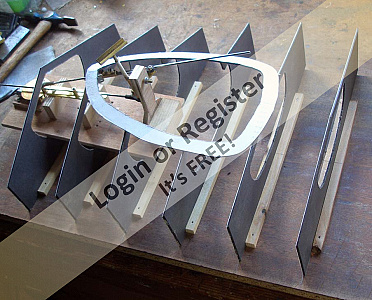
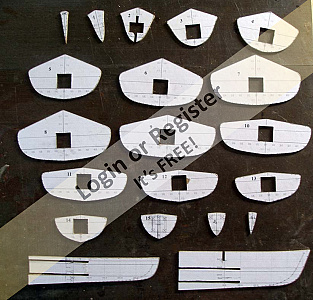
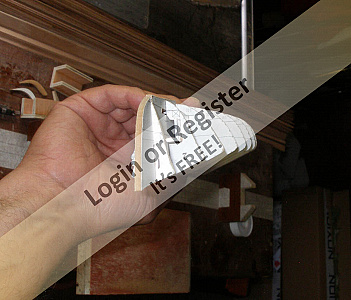
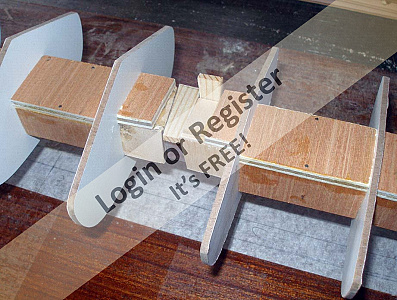
Templates for each of the 16 forms plus two endforms were printed, glued to a sheet of 3mm hardboard and then cut out. 20mm square holes were cut into each of the forms to allow them to be threaded and spaced out on a 'strongback'. The strongback is a 20mm square aluminium tube. Sighting along the forms showed any which were not quite in line. These were adjusted until the forms sighted true. The end forms are threaded into the ends of the tubs and are screwed in place. The forms are spaced apart with plywood spacers. An adjustable spacer tightened with wedges ensures that everything is rigidly held in place. Finally, the edges of the forms were wrapped with plumbers PTFE joint tape to ensure that when the planks are glued together, they will not also be glued to the formwork.


Templates for each of the 16 forms plus two endforms were printed, glued to a sheet of 3mm hardboard and then cut out. 20mm square holes were cut into each of the forms to allow them to be threaded and spaced out on a 'strongback'. The strongback is a 20mm square aluminium tube. Sighting along the forms showed any which were not quite in line. These were adjusted until the forms sighted true. The end forms are threaded into the ends of the tubs and are screwed in place. The forms are spaced apart with plywood spacers. An adjustable spacer tightened with wedges ensures that everything is rigidly held in place. Finally, the edges of the forms were wrapped with plumbers PTFE joint tape to ensure that when the planks are glued together, they will not also be glued to the formwork.
▲
⟩⟩
Martin555
robbob
Julio
GaryLC
stevedownunder
jbkiwi
River Rat
pressonreguardless
philcaretaker
Colin H
AndyB
|
💬 Re: Formwork
2 years ago by 🇦🇺 stevedownunder (
Captain)✧ 189 Views · 2 Likes
Flag
Thanks for clarifying that Graham,
Yeah what could go wrong.... Cheers, Stephen. ▲
⟩⟩
pressonreguardless
GaryLC
|
|
Login To
Remove Ads 💬 Re: Formwork
2 years ago by 🇬🇧 Graham93 (
Vice Admiral)✧ 190 Views · 3 Likes
Flag
Hi Stephen,
The hull will be made in two halves over the formwork. These will then be separated to allow removal of the formers and strongback before gluing the two halves together. Sounds simple enough, I just hope it works out that way! Plenty of opportunity for this to go wrong 🤗 Graham93 ▲
⟩⟩
Martin555
pressonreguardless
stevedownunder
|
|
💬 Re: Formwork
2 years ago by 🇬🇧 Graham93 (
Vice Admiral)✧ 189 Views · 2 Likes
Flag
Hi JB,
The deck will be strip planked before everything is fitted in. I haven’t quite worked out all the details of how I’m going to do that🤔 Graham93 ▲
⟩⟩
Martin555
pressonreguardless
|
|
💬 Re: Formwork
2 years ago by 🇦🇺 stevedownunder (
Captain)✧ 189 Views · 2 Likes
Flag
Hi Graham,
Great progress. This maybe a silly question, but how are you going to remove the formers and strongback? Cheers, Stephen. ▲
⟩⟩
pressonreguardless
Graham93
|
|
💬 Re: Formwork
2 years ago by 🇳🇿 jbkiwi (
Fleet Admiral)✧ 188 Views · 4 Likes
Flag
Looks interesting Graham, - is the deck going to be strips or sheeted once everything is in ?
JB ▲
⟩⟩
Martin555
pressonreguardless
Graham93
stevedownunder
|
|
💬 Re: Formwork
2 years ago by 🇺🇸 pressonreguardless (
Rear Admiral)✧ 189 Views · 2 Likes
Flag
Anxiously anticipating the next steps, Graham.
Great description of the work done.👍👍 Trev ▲
⟩⟩
stevedownunder
Graham93
|
📝 Milling the strips
2 years ago by 🇬🇧 Graham93 ( Vice Admiral)
Vice Admiral)✧ 183 Views · 12 Likes · 9 Comments
Flag
💬 Add Comment
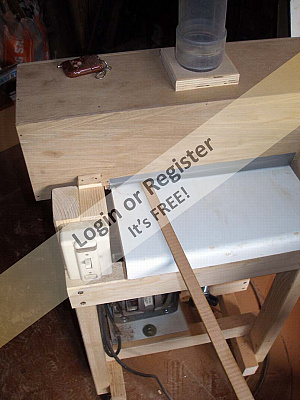
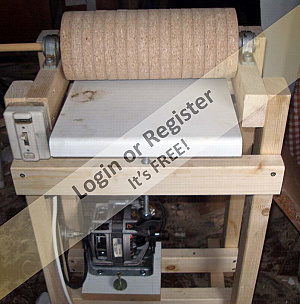
Western Red Cedar is traditionally used for strip built kayaks as it is strong, durable, flexible and lightweight. The strips used on full sized kayaks are typically 22mm x 7mm. Scaling this down to model size results in a size of 4mm x 1.6mm.
I couldn't find a source of ready made cedar strips but a few years ago I made a pair of garage doors from cedar and had saved a few offcuts. These are around 1m long, 95mm wide and 15mm thick. Ideal for cutting into strips.
Two boards of different colour were selected and cut on the bandsaw into pieces measuring 15 mm x 5 mm. These were then sanded to 4mm thick using a home made thickness sander. The thicknessed pieces were then cut into strips measuring 4mm x 2mm and again sanded to a finished size of around 4mm x 1.7mm
The two boards yielded 100+ strips in two different colours which should be plenty for the hull. I still have several more boards left over from the garage doors so I can make more strips if I need - or perhaps another boat! 👍
▲
⟩⟩
Martin555
RNinMunich
Mike Stoney
dave976
GaryLC
mturpin013
jbkiwi
philcaretaker
stevedownunder
robbob
pressonreguardless
Colin H
|
💬 Re: Milling the strips
2 years ago by 🇺🇸 pressonreguardless (
Rear Admiral)✧ 176 Views · 0 Likes
Flag
I'm with you, Graham.
I have a problem parting with anything, as I know it will come in handy later. Trev ▲
⟩⟩
No likes yet
This member will receive 1 point for every like received |
|
Login To
Remove Ads 💬 Re: Milling the strips
2 years ago by 🇬🇧 Graham93 (
Vice Admiral)✧ 179 Views · 3 Likes
Flag
Hi Michael,
I did think about using a power plane, but I was concerned that it might grab and shred thin strips. I’ve managed to sand some strips down to just 0.8mm thickness. I was always told “waste not, want not” by my Lancashire born Dad. Perhaps that’s why I have two sheds full of bits and pieces that may come in useful one day, including many bits I inherited from him 🤔 ▲
⟩⟩
Martin555
scout13
pressonreguardless
|
|
💬 Re: Milling the strips
2 years ago by 🇬🇧 mturpin013 (
Admiral)✧ 186 Views · 2 Likes
Flag
Hi Graham I do a similar thing but using an old Black & Decker electric plane I built a spring mechanism to keep the strips against the fence and pushed down on the blades, so first I circular saw to near finished size then they are put through the planer
"Yorkshire thrift" ▲
⟩⟩
robbob
stevedownunder
|
|
💬 Re: Milling the strips
2 years ago by 🇺🇸 pressonreguardless (
Rear Admiral)✧ 179 Views · 0 Likes
Flag
Great, Thanks for sharing, Graham
Trev ▲
⟩⟩
No likes yet
This member will receive 1 point for every like received |
|
💬 Re: Milling the strips
2 years ago by 🇬🇧 Graham93 (
Vice Admiral)✧ 183 Views · 10 Likes
Flag
Thanks everyone, glad you are enjoying the blog.
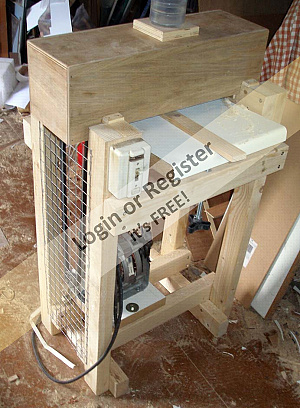
I found a plan on-line for the sander. It's basically a rotating drum wound with abrasive. The table below the drum is adjustable to set the thickness using the screwed rod. It's important to have dust extraction with a sander like this, especially when sanding cedar. Graham93 


▲
⟩⟩
Martin555
RNinMunich
MouldBuilder
robbob
Colin H
mturpin013
jbkiwi
pressonreguardless
philcaretaker
stevedownunder
|
|
💬 Re: Milling the strips
2 years ago by 🇺🇸 River Rat (
Captain)✧ 183 Views · 2 Likes
Flag
If you cant find it make it. I like your style. Still amazing me with your talent!
▲
⟩⟩
stevedownunder
Graham93
|
|
💬 Re: Milling the strips
2 years ago by 🇺🇸 pressonreguardless (
Rear Admiral)✧ 181 Views · 1 Like
Flag
Me Too, Colin
▲
⟩⟩
stevedownunder
|
|
💬 Re: Milling the strips
2 years ago by 🇺🇸 pressonreguardless (
Rear Admiral)✧ 181 Views · 2 Likes
Flag
Spot on Graham.👍👍
I would be very interested in more info on your thickness planer. Trev ▲
⟩⟩
stevedownunder
Graham93
|
|
💬 Re: Milling the strips
2 years ago by 🇬🇧 Colin H (
Fleet Admiral)✧ 182 Views · 3 Likes
Flag
Graham I am loving this blog, your pictures along with the detailed description is enthralling.
Can you tell us how your sanding thicknesser works ,I'm intrigued. Keep it coming shipmate, cheers Colin. ▲
⟩⟩
stevedownunder
Graham93
pressonreguardless
|
📝 Stripping the hull
2 years ago by 🇬🇧 Graham93 ( Vice Admiral)
Vice Admiral)✧ 180 Views · 11 Likes · 5 Comments
Flag
💬 Add Comment
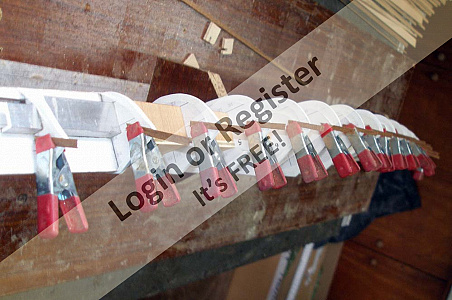
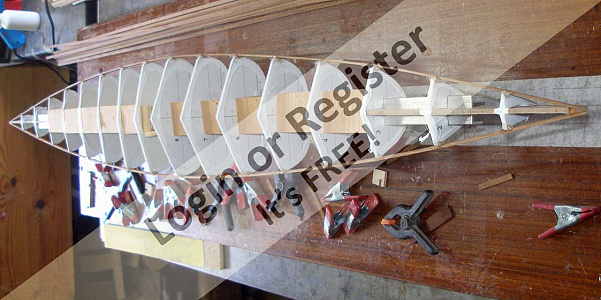
The first strips to be fitted run along the shearlines either side of the hull. Temporary short sticks were clamped onto each form to position the top edge of the first strips along the shearline. The position and angle of these sticks was adjusted while sighting along the length of the formwork to ensure that the first strip would lay fair along the length. The top edge of the strip was beveled to match the angle of the temporary sticks. Once happy with everything, the strip was glued to the forms using hot melt glue. I really dislike using this glue, as I find it very messy, and not very good at sticking anything, but in this case I need a temporary fix so hot glue works OK.
Once the first sheer strip was in place, the process was repeated for the other side of the hull. Great care was taken to ensure that the two strips were symmetrical on the formwork, with lots of sighting and measuring.
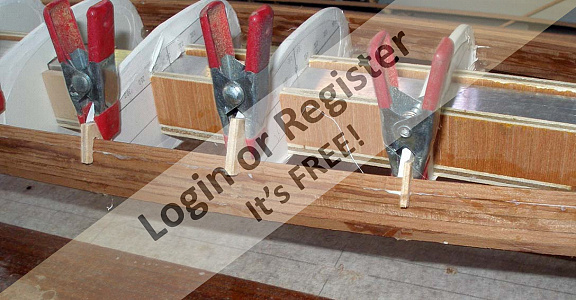
With the first two strips in place, it was then simply a case of adding more strips alternately on each side of the formwork. Each strip had its edge chamfered where necessary to fit with the previous strip. The strips are glued edge to edge with the previous strip using a waterproof white glue. While the glue dries, each strip is held in place with notched plywood pieces clamped to the forms. The PTFE tape wrapped round the forms should ensure that the strips are not glued to the formwork 🤞.
A small section of the hardboard endforms was removed and replaced with a shaped cedar stem to which the strips are glued.


Once the first sheer strip was in place, the process was repeated for the other side of the hull. Great care was taken to ensure that the two strips were symmetrical on the formwork, with lots of sighting and measuring.
With the first two strips in place, it was then simply a case of adding more strips alternately on each side of the formwork. Each strip had its edge chamfered where necessary to fit with the previous strip. The strips are glued edge to edge with the previous strip using a waterproof white glue. While the glue dries, each strip is held in place with notched plywood pieces clamped to the forms. The PTFE tape wrapped round the forms should ensure that the strips are not glued to the formwork 🤞.
A small section of the hardboard endforms was removed and replaced with a shaped cedar stem to which the strips are glued.
▲
⟩⟩
Martin555
RNinMunich
Mike Stoney
robbob
AndyB
Julio
GaryLC
stevedownunder
philcaretaker
pressonreguardless
Colin H
|
💬 Re: Stripping the hull
1 year ago by 🇩🇪 RNinMunich (
Fleet Admiral)✧ 60 Views · 1 Like
Flag
When I saw the title 'Stripping the hull' in my mailbox my first thought was,
Oh dear summat's gone south and had to be removed☹️, the man is human after all. But no! Of course not. On opening the post I discovered that it is another lesson in mini-master carpentry - bordering on marquetry. Brilliant stuff with lotsa food for thought. Cheers, Doug😎 ▲
⟩⟩
Graham93
|
|
Login To
Remove Ads 💬 Re: Stripping the hull
2 years ago by 🇬🇧 GaryLC (
Captain)✧ 182 Views · 3 Likes
Flag
Hi Graham, a very interesting project from day one, and the excitement builds as your project progresses, especially now that we can see the Kayak taking shape before our eyes. Definitely, some rather cunning and devious thinking on the problem-solving front, mind, well worth all the effort as the end result is bordering on absolutely brilliant, a master class in robotics and invention. Keep up the good work on this mind-boggling project. Regards, Gary.
▲
⟩⟩
Graham93
stevedownunder
Colin H
|
|
💬 Re: Stripping the hull
2 years ago by 🇨🇦 Brightwork (
Captain)✧ 189 Views · 1 Like
Flag
You can never have to many clamps!!
▲
⟩⟩
Colin H
|
|
💬 Re: Stripping the hull
2 years ago by 🇬🇧 mturpin013 (
Admiral)✧ 184 Views · 2 Likes
Flag
Coming on really well, I do like to repurpose timber its so satisfying to make something out of nothing
▲
⟩⟩
Colin H
stevedownunder
|
|
💬 Re: Stripping the hull
2 years ago by 🇺🇸 pressonreguardless (
Rear Admiral)✧ 178 Views · 3 Likes
Flag
Looks Good, you seem to have it well under control, Graham👍👍
I have the same problem with hot melt, the strings go everywhere. Trev ▲
⟩⟩
Graham93
Colin H
stevedownunder
|
📝 Stripping the bottom
2 years ago by 🇬🇧 Graham93 ( Vice Admiral)
Vice Admiral)✧ 176 Views · 13 Likes · 2 Comments
Flag
💬 Add Comment
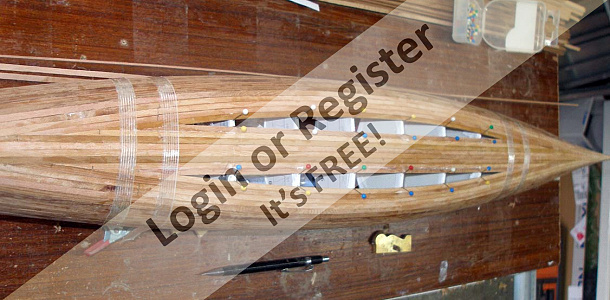
With the sides of the hull completed, I was able to add two strips along the length of the keel. The spaces either side of the keel were then filled with strips, working from alternate sides for each new strip.
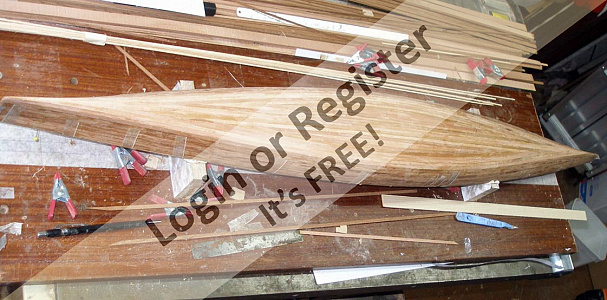
With the hull strips all completed, it's nice to see the slender form of the hull emerging.


With the hull strips all completed, it's nice to see the slender form of the hull emerging.
▲
⟩⟩
Martin555
Mike Stoney
robbob
philcaretaker
AndyB
stevedownunder
mturpin013
Julio
pressonreguardless
jbkiwi
Colin H
River Rat
GaryLC
|
💬 Re: Stripping the bottom
2 years ago by 🇺🇸 pressonreguardless (
Rear Admiral)✧ 174 Views · 1 Like
Flag
Great job of Planking, Graham👍👍👍
Very symmetrical Trev ▲
⟩⟩
stevedownunder
|
|
💬 Re: Stripping the bottom
2 years ago by 🇬🇧 GaryLC (
Captain)✧ 183 Views · 1 Like
Flag
Great bit of planking and looks extremely streamlined, it will go through the water like a knife through butter. Great stuff and brilliant when a plan comes together.
▲
⟩⟩
stevedownunder
|


Login To
Remove Ads
Remove Ads