Join Us On Social Media!

|

|

|
Download The App!
Login To
Remove Ads
Remove Ads
Login To
Remove Ads
Remove Ads
Model Boats Website
HMS Diana(38) Heavy Frigate
3 Posts · 5 Followers · 18 Photos · 24 Likes
Began 1 year ago by
 United Kingdom
Follow This Thread
Not currently following
> Click to follow
> Click to follow
Latest Post 1 year ago by
| Oldest posts shown first (Show Newest First) | (Print Booklet) |
📝 HMS Diana(38) Heavy Frigate
1 year ago by 🇬🇧 cormorant ( Lieutenant Commander)
Lieutenant Commander)✧ 104 Views · 8 Likes · 2 Comments
Flag
💬 Add Comment
Some two years ago I built HMS Cruizer, a 1/64 scale brig sloop from the Nelson's Navy series made by Caldercraft, aka JoTiKa. Some of you may have followed the build blog.
This was my first attempt at this type of model and I was so satisfied and pleased with the result, that I decided to up the ante and have a go at HMS Diana, a 38 gun heavy frigate, also from Caldercraft's Nelson's Navy.
My plan is to learn from the experience (and mistakes) from Cruizer and put it to good use in the building of Diana.
I found the kit to be of the usual high standard in both materials and CNC plywood parts (I have made a video uploaded to YouTube which I can't seem to upload to this site ).
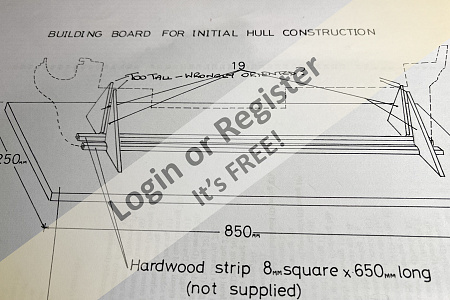
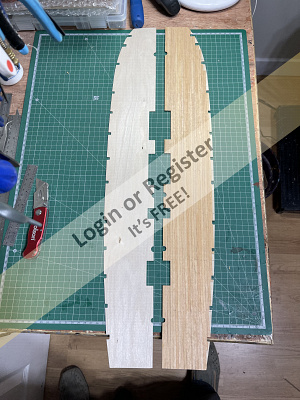
The first stage was to make a building board for initial hull construction.
I first of all found that the 8mm square hardwood strips were too high and some of the bukheads would not fit down far enough onto the keel. A more realistic height for the strips would be 5mm.
I also found that parts 19 appeared to have been wrongly orientated on the drawing, not allowing the lower deck to fit down far enough. I needed to cut then down accordingly. However, having looked a the drawings again, perhaps it was me?
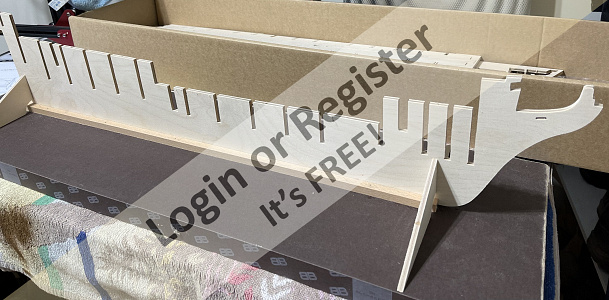
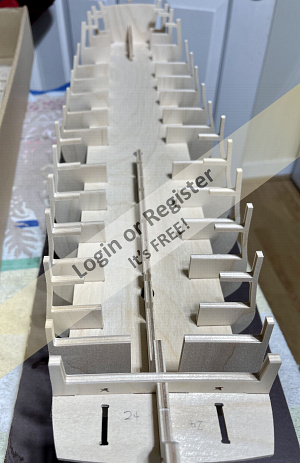
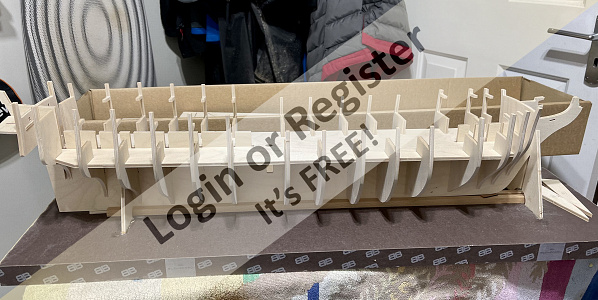
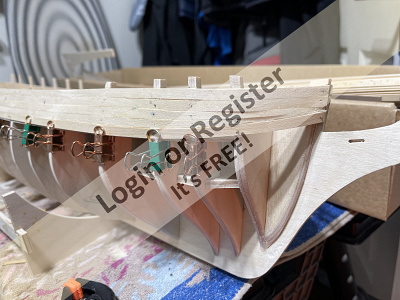
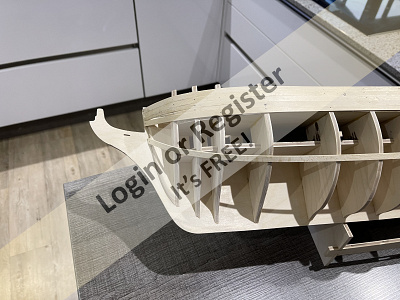
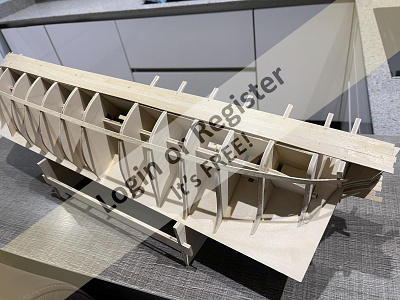
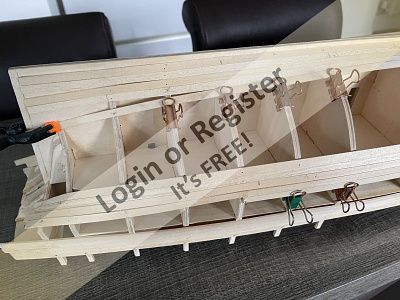
Once sorted I was able to dry fit the 15 bulkheads, deck, and various templates prior to gluing in position.
This was my first attempt at this type of model and I was so satisfied and pleased with the result, that I decided to up the ante and have a go at HMS Diana, a 38 gun heavy frigate, also from Caldercraft's Nelson's Navy.
My plan is to learn from the experience (and mistakes) from Cruizer and put it to good use in the building of Diana.
I found the kit to be of the usual high standard in both materials and CNC plywood parts (I have made a video uploaded to YouTube which I can't seem to upload to this site ).
The first stage was to make a building board for initial hull construction.
I first of all found that the 8mm square hardwood strips were too high and some of the bukheads would not fit down far enough onto the keel. A more realistic height for the strips would be 5mm.
I also found that parts 19 appeared to have been wrongly orientated on the drawing, not allowing the lower deck to fit down far enough. I needed to cut then down accordingly. However, having looked a the drawings again, perhaps it was me?
Once sorted I was able to dry fit the 15 bulkheads, deck, and various templates prior to gluing in position.
▲
⟩⟩
MouldBuilder
AndyN
Martin555
jbkiwi
pressonreguardless
stevedownunder
Graham93
Colin H
|
💬 Re: HMS Diana(38) Heavy Frigate
1 year ago by 🇬🇧 cormorant (
Lieutenant Commander)✧ 82 Views · 5 Likes
Flag
Thanks Graham. Yes, I do intend to feed back any issues to Jotika.
I have just come back onto the site with the intention, (as you have already suggested), to copy and paste the YouTube link:- 
▲
⟩⟩
Colin H
Martin555
jbkiwi
Graham93
stevedownunder
|
|
💬 Re: HMS Diana(38) Heavy Frigate
1 year ago by 🇬🇧 Graham93 (
 Vice Admiral) Vice Admiral)✧ 97 Views · 2 Likes
Flag
Hi Cormorant,
Good start to the build. Are you going to feedback all the issues you find to Caldercraft so they can update the kit? If you paste a link to your YouTube video into the text section, it will allow everyone to take a look. Graham93 ▲
⟩⟩
Colin H
stevedownunder
|
Login To
Remove Ads
Remove Ads
📝 Gun Deck and Gun Deck Walls
1 year ago by 🇬🇧 cormorant ( Lieutenant Commander)
Lieutenant Commander)✧ 62 Views · 6 Likes · 1 Comment
Flag
💬 Add Comment
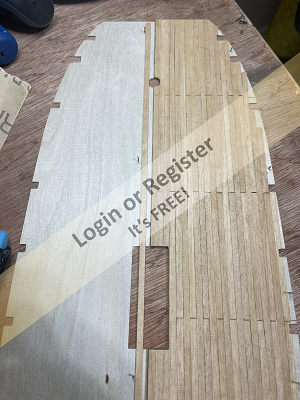
Instructions give me two choices as to when to plank the 0.8mm false gun deck.
'It can be pinned and glued into place, then planked, or planked prior to fixing. The easiest way is the latter but the deck will have much less spring to get it past the top deck supports on the bulkheads.'
I was unable to get the deck anywhere near past the supports prior to planking, without fear of breakage, so I had no choice but to choose the latter. This involved cutting the deck in half along the centre line, then planking each half, starting at the centre line and working outwards
To get the two centre planks butted up as close as possible, I pinned both halves of the deck on the workbench prior to gluing.
However, as you can see in the photo, I was not careful enough when gluing the two halves in the hull and the join is visible, particularly at each end.
The jury is still out as the whether I should fit a 'centreline' plank, or leave well alone, as the top deck and ship's boats will hide most of poor workmanship.
Any views?
Prior to fixing and matt varnishing, I used a fine pencil and ruler to represent the caulking.
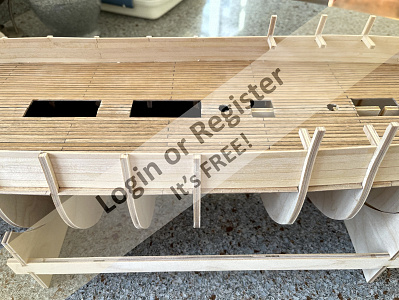
Planking of the inner gun deck walls was quite straightforward, using 1.5x6mm lime wood. Another anomaly in the instructions variously describes it as 5mm and 6mm. It is in fact 6mm, so another note for Jotika.
Although the width would have made no difference, 6mm brought the planks just under the top deck supports, which is where they should be. I had to cut them to size between the middle bulkheads, to attain the correct level, but found no difficulty with a sharp Stanley knife and a straight edge.
Once finished, I was instructed to "paint the outer side of the wall with watered down pva where they are glued to the bulkheads. This will reduce the chance of the planks splitting when cutting out the gun ports."
Then sand the inner side smooth.
The next job is to prepare for first planking.


'It can be pinned and glued into place, then planked, or planked prior to fixing. The easiest way is the latter but the deck will have much less spring to get it past the top deck supports on the bulkheads.'
I was unable to get the deck anywhere near past the supports prior to planking, without fear of breakage, so I had no choice but to choose the latter. This involved cutting the deck in half along the centre line, then planking each half, starting at the centre line and working outwards
To get the two centre planks butted up as close as possible, I pinned both halves of the deck on the workbench prior to gluing.
However, as you can see in the photo, I was not careful enough when gluing the two halves in the hull and the join is visible, particularly at each end.
The jury is still out as the whether I should fit a 'centreline' plank, or leave well alone, as the top deck and ship's boats will hide most of poor workmanship.
Any views?
Prior to fixing and matt varnishing, I used a fine pencil and ruler to represent the caulking.
Planking of the inner gun deck walls was quite straightforward, using 1.5x6mm lime wood. Another anomaly in the instructions variously describes it as 5mm and 6mm. It is in fact 6mm, so another note for Jotika.
Although the width would have made no difference, 6mm brought the planks just under the top deck supports, which is where they should be. I had to cut them to size between the middle bulkheads, to attain the correct level, but found no difficulty with a sharp Stanley knife and a straight edge.
Once finished, I was instructed to "paint the outer side of the wall with watered down pva where they are glued to the bulkheads. This will reduce the chance of the planks splitting when cutting out the gun ports."
Then sand the inner side smooth.
The next job is to prepare for first planking.
▲
⟩⟩
MouldBuilder
AndyN
jbkiwi
Colin H
Martin555
stevedownunder
|
💬 Re: Gun Deck and Gun Deck Walls
1 year ago by 🇬🇧 Martin555 (
 Fleet Admiral) Fleet Admiral)✧ 63 Views · 2 Likes
Flag
Coming along nicely Steve.
Looking forward to the next update to your log. Martin555. ▲
⟩⟩
MouldBuilder
jbkiwi
|
📝 First Planking
1 year ago by 🇬🇧 cormorant ( Lieutenant Commander)
Lieutenant Commander)✧ 53 Views · 10 Likes · 4 Comments
Flag
💬 Add Comment
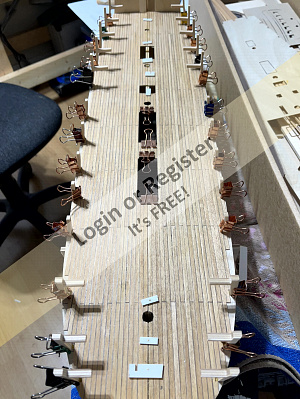
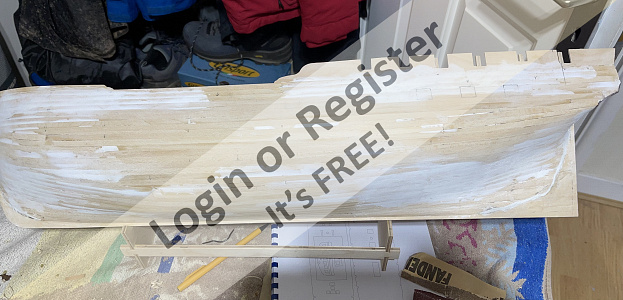
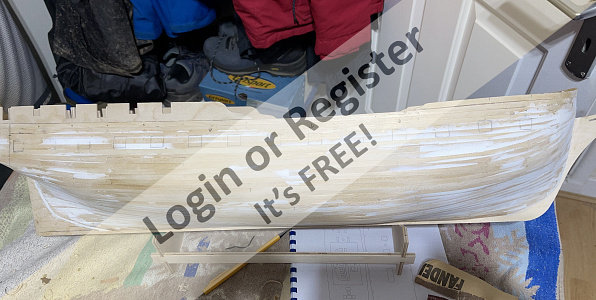
It has taken me two months to complete the first planking! Holidays, illness (over Christmas), major flooding (at the mother-in-laws house), have all played their part, not to mention using the wrong grade of sandpaper.
However, with help and advice from Martin555, and a final sanding, my task is complete.
Once again, the instructions couldn't decide on whether to use 1.5 x 6mm or 1.5 x 5mm lime wood strip, but apart from being annoying, there was only 6mm strip to choose from.
Previously, I have been soaking the planks in warm water, as instructed, but following a demo by Martin555, I have been converted to a plank bender, which has been very successful and a lot less fiddly.
I should have spent more time bevelling and sanding the bulkheads, which caused me some grief during planking, but with the use of polyfilla, I think I have just about got it right.
I had proposed to use proprietary wood filler, but once again, was advised that polyfilla was just as good, and cheaper, in this instance.
The laying of the planks went quite well, but I should have taken more time in shaping, as much filling and sanding was required. Sanding is done with coarse grit, followed by medium. It didn't help that it was only towards the end of the process did I realise that I was using coarse instead of medium for the first pass! The acquisition of the correct grade made life so much easier.
▲
⟩⟩
Scratchbuilder
Len1
bombero
stevedownunder
Graham93
pressonreguardless
MouldBuilder
jbkiwi
AndyN
Colin H
|
💬 Re: First Planking
1 year ago by 🇺🇸 Len1 (
 Sub-Lieutenant) Sub-Lieutenant)✧ 46 Views · 2 Likes
Flag
Thanks for the advice on a plank bender. I had never heard of them.
▲
⟩⟩
cormorant
DWBrinkman
|
|
Login To
Remove Ads 💬 Re: First Planking
1 year ago by 🇬🇧 cormorant (
Lieutenant Commander)✧ 46 Views · 4 Likes
Flag
Hi Colin
A plank bender is similar to a pair of anvil head secateurs and you use them to cut into the grain of the wood to create a bend. The more cuts you make and the deeper you go the tighter the curve. Practice is required on a scrap plank and one of the main problems is being overambitious and cutting right through. Good bit of kit though. 

▲
⟩⟩
DWBrinkman
Len1
MouldBuilder
stevedownunder
|
|
💬 Re: First Planking
1 year ago by 🇳🇿 jbkiwi (
Fleet Admiral)✧ 52 Views · 4 Likes
Flag
Looks good now it's faired Steve,- hard to get so many planks flat with such tight compound bends👍
JB ▲
⟩⟩
MouldBuilder
stevedownunder
cormorant
pressonreguardless
|
|
💬 Re: First Planking
1 year ago by 🇭🇺 MouldBuilder (
Vice Admiral)✧ 60 Views · 2 Likes
Flag
Hi Steve.
Looking good so far but your comments have left me with a question. What does a plank bender look like and how is it used. Thanks. Peter.😊 ▲
⟩⟩
stevedownunder
Colin H
|


Login To
Remove Ads
Remove Ads