Join Us On Social Media!

|

|

|
Download The App!
Login To
Remove Ads
Remove Ads
Login To
Remove Ads
Remove Ads
Model Boats Website
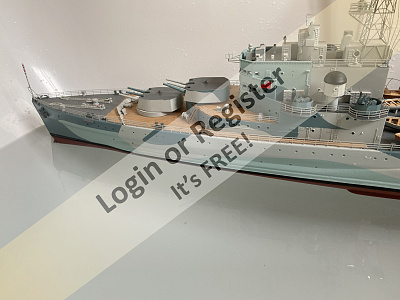
Graupner HMS Belfast 1:150.
16 Posts · 15 Followers · 272 Photos · 165 Likes
Began 12 months ago by
 United Kingdom
Follow This Thread
Not currently following
> Click to follow
> Click to follow
Latest Post 10 months ago by
| Oldest posts shown first (Show Newest First) | (Print Booklet) |
📝 Graupner HMS Belfast 1:150.
12 months ago by 🇬🇧 Scratchbuilder ( Vice Admiral)
Vice Admiral)✧ 138 Views · 16 Likes · 8 Comments
Flag
💬 Add Comment
Hello All.
I am not a fan at all of ARTR models,as they are far too pristine and clinical but the opportunity on this one was too good to be true.
One of the Grandsons visited Belfast on the Thames recently and was so impressed that I just had to do this for him.
I have been able to purchase for literally a song in comparison to the new retail price HMS Belfast.
The model has only been sailed by the previous owner on two occasions,but has already sustained some minor damage.
My plan is to personalise her in the following way.
All main armament to rotate.
Fitting of smoke effect.
Main crane to rotate.
Rotating main Radar.
Fitting of suitable lighting.
I will then undertake a subtle but effective weathering plan.
I have already purchased four appropriate handmade brass M3 propellers (sliding fit with grubscrew as opposed threaded) to replace the original plastic props as fitted.
I attach a few pictures,but until I am well enough to get back into the boat shed I will not be able to make much progress.
Take care all and happy boating.
Regards Bill.
▲
⟩⟩
dave976
stevedownunder
jbkiwi
GaryLC
MouldBuilder
mturpin013
johnf
AndyN
RNinMunich
Graham93
pressonreguardless
TonyAsh
luckyduck
ToraDog
flaxbybuck
Colin H
|
💬 Re: Graupner HMS Belfast 1:150.
12 months ago by 🇬🇧 Scratchbuilder (
Vice Admiral)✧ 112 Views · 0 Likes
Flag
Gents.
Thank you all for the kind comments. I am lucky that I have time on my side so will be able to plan and prepare. Doug… I was aware you had one in your collection as have seen previously.You should recommission!. I had no idea re the manual for the model, subsequently found on line. Doesn't really say a lot other than the obvious but worth a look,thank you for the heads up. Purchased the new propellers from ever faithful Prop Shop(highly recommended quality products). I am looking forward to this refit,not least of all getting my larger hands inside the hull space.I will be conducting weight ballast tests soon with all the components on board. Battery weight could be fun!! Take care all. Bill ▲
⟩⟩
No likes yet
This member will receive 1 point for every like received |
|
Login To
Remove Ads 💬 Re: Graupner HMS Belfast 1:150.
12 months ago by 🇩🇪 RNinMunich (
 Fleet Admiral) Fleet Admiral)✧ 111 Views · 2 Likes
Flag
I too will be watching with avid interest Bill.
Not least because I also have this ship, but not for a song - more like an opera🙄, and have similar plans for it. See my Boat harbour, links below. So I hope you are fit again ASAP so you can get on with your refit👍 I also bought 4 replacement brass props, the plastic prop hubs were cracked on mine anyway. Ref freeboard- The instruction manual specifies two SLA batteries, 6V 6.5Ah I think. So I bought the recommended type and ... lo and behold the damn things wouldn't fit through the hatches and sit flat not no never which way😠 So I plan to use NiMh or LiPo, saving mucho weight which I can then use for internal gubbinses😀 Also have the Graf Spee from this series, similar problems as well a misaligned shaft, poor resin castings, and paintwork. Been some years since I could work on them😭, just inspected Belfast and was ashamed to see the depth of dust on her (Sherlock Holmes' filing system😁). Get well soon Shipmate👍 Doug 😎 ▲
⟩⟩
Colin H
Scratchbuilder
|
|
💬 Re: Graupner HMS Belfast 1:150.
12 months ago by 🇬🇧 johnf (
 Warrant Officer) Warrant Officer)✧ 123 Views · 1 Like
Flag
A really ambitious project on a rather complex model. I shall watch this build with interest!!
Dr John F. Leeds and Bradford. MBC. 😊😊😐 ▲
⟩⟩
Scratchbuilder
|
|
💬 Re: Graupner HMS Belfast 1:150.
12 months ago by 🇬🇧 AndyN (
Warrant Officer)✧ 129 Views · 1 Like
Flag
Holy shit. That's going to be an amazing journey for you sir. Can I watch?
▲
⟩⟩
Scratchbuilder
|
|
💬 Re: Graupner HMS Belfast 1:150.
12 months ago by 🇬🇧 Scratchbuilder (
Vice Admiral)✧ 129 Views · 2 Likes
Flag
Good advice Toradog:Thank you.👍
You’re right there won’t be much free board with my plans,but I will be putting all items in situ and running draught checks in engraving dock number 1 (the bath). I may position them low and use tubing up to the turrets and friction fitting. I have done this in the past with good results. This is why our site is so successful because everyone is happy to share 👍👍 Regards Bill ▲
⟩⟩
RNinMunich
Colin H
|
|
💬 Re: Graupner HMS Belfast 1:150.
12 months ago by 🇺🇸 ToraDog (
 Captain) Captain)✧ 133 Views · 3 Likes
Flag
Scratchbuilder,
It must be wonderful to be able to share your hobby with a Grandchild! I would urge some caution on your build plans. You will be adding quite a bit of weight and much of it will be "high" on the ship. Hopefully, there is some ballast that you can replace with your build plans. Also, be aware of the added current load of those servos( if that is what you are planning to use for your turrets). Carry On!😀 ▲
⟩⟩
RNinMunich
Colin H
Scratchbuilder
|
|
💬 Re: Graupner HMS Belfast 1:150.
12 months ago by 🇬🇧 Scratchbuilder (
Vice Admiral)✧ 137 Views · 1 Like
Flag
Hi Flaxbybuck.
Thank you. Like so many others on our site I am very lucky to have Grandsons who love modelling and really appreciate the skills that we can pass on to them. I shall enjoy doing this refit. Regards Bill. ▲
⟩⟩
Colin H
|
|
💬 Re: Graupner HMS Belfast 1:150.
12 months ago by 🇬🇧 flaxbybuck (
Captain)✧ 134 Views · 2 Likes
Flag
Good luck with your upgrades Bill. I like the look of this model (and of the table cloth😉) I just hope that your grandson will appreciate it !
▲
⟩⟩
Colin H
Scratchbuilder
|
Login To
Remove Ads
Remove Ads
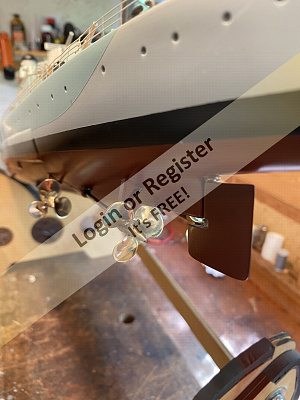
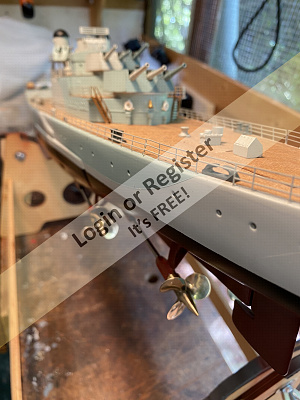
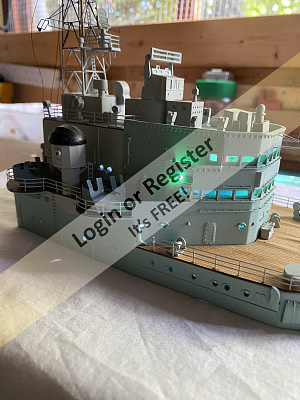
📝 HMS Belfast Update Number 1.Hull format and Propeller change.
12 months ago by 🇬🇧 Scratchbuilder ( Vice Admiral)
Vice Admiral)✧ 103 Views · 7 Likes
Flag
💬 Add Comment
Gents.
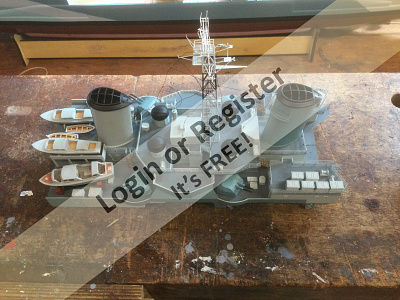
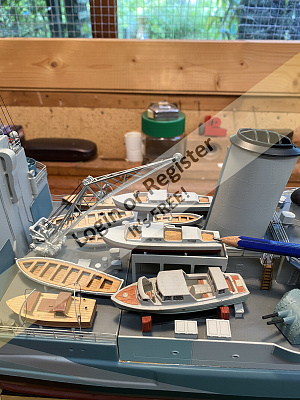
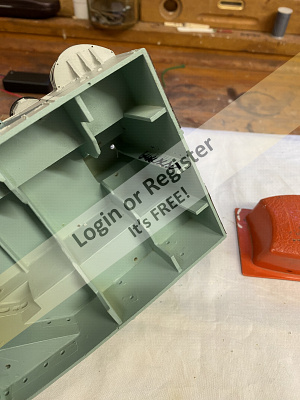
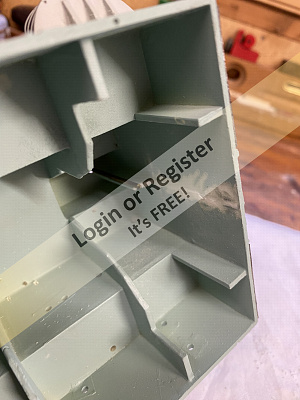
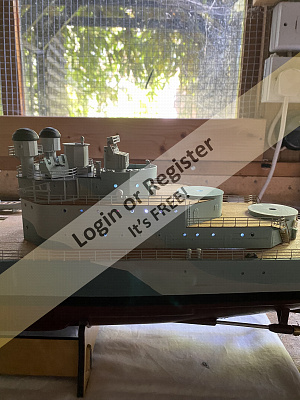
I have now moved Belfast from the dining room table to the boat shed and have mentally started to plan the refit ahead.
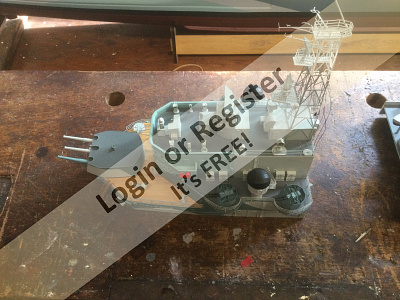
The first picture hopefully shows her shelf position prior to any form of work commencing.
Not a lot of physical work was done today because as previously stated I was mentally planning how and where I will position all the components required to carry out the internal fittings.
I do now have a plan and will in due course show all the components along with a dry run and trim test.
All up weight is going to be challenging!
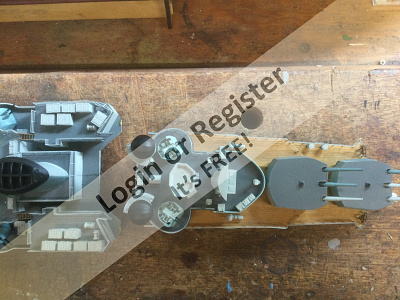
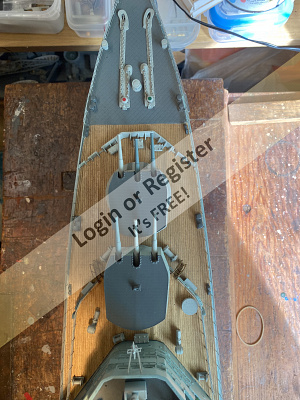
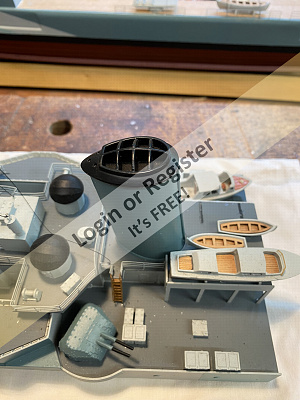
The remaining hull pictures show how the superstructure breaks down into three clear sections.
I have to say that there is surprisingly more room than I originally thought so I am hoping for relatively simplistic progress.🤞
I am sure however that there will be problems along the way as we all know on our builds.
Enough of the hull and superstructure at this time as I will obviously cover more in due course.
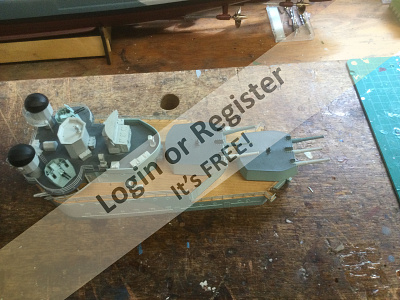
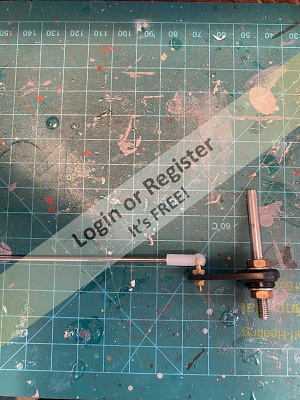
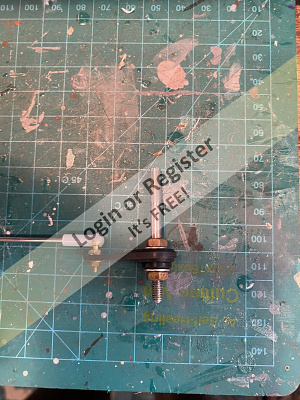
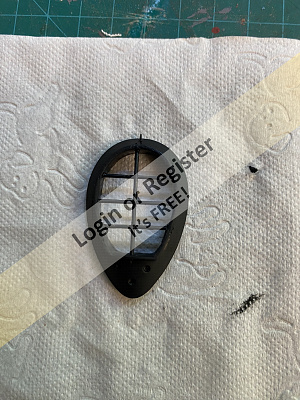
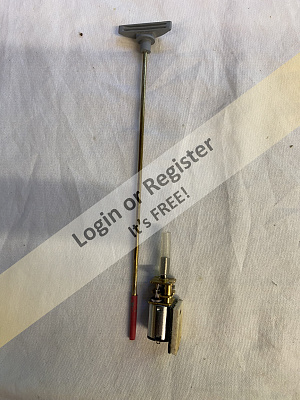
Propellers…M3 push fit with grub screw
The propellers as fitted are really awful being of resin construction and two had been obviously bottomed and we’re missing a blade along with being cracked.
I have purchased four new brass propellers of the same diameter 25mm from Prop shop.Excellent service and quality 👍.
The original props were removed individually.
Each shaft was removed checked for integrity then cleaned and lightly greased prior to refitting.
The new propeller was then fitted along with a spacing collet.
The whole procedure was repeated for the other shafts.
The photographs hopefully show the before and after propellers.
Nice to see new shiny props,but I will weather them in due course.
That’s it for now.
Regards
Bill


I have now moved Belfast from the dining room table to the boat shed and have mentally started to plan the refit ahead.
The first picture hopefully shows her shelf position prior to any form of work commencing.
Not a lot of physical work was done today because as previously stated I was mentally planning how and where I will position all the components required to carry out the internal fittings.
I do now have a plan and will in due course show all the components along with a dry run and trim test.
All up weight is going to be challenging!
The remaining hull pictures show how the superstructure breaks down into three clear sections.
I have to say that there is surprisingly more room than I originally thought so I am hoping for relatively simplistic progress.🤞
I am sure however that there will be problems along the way as we all know on our builds.
Enough of the hull and superstructure at this time as I will obviously cover more in due course.
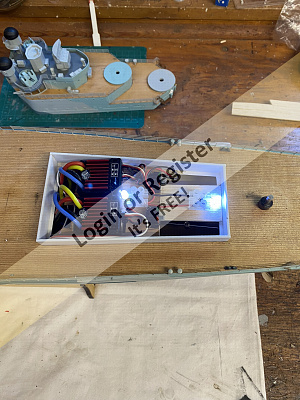
Propellers…M3 push fit with grub screw
The propellers as fitted are really awful being of resin construction and two had been obviously bottomed and we’re missing a blade along with being cracked.
I have purchased four new brass propellers of the same diameter 25mm from Prop shop.Excellent service and quality 👍.
The original props were removed individually.
Each shaft was removed checked for integrity then cleaned and lightly greased prior to refitting.
The new propeller was then fitted along with a spacing collet.
The whole procedure was repeated for the other shafts.
The photographs hopefully show the before and after propellers.
Nice to see new shiny props,but I will weather them in due course.
That’s it for now.
Regards
Bill
▲
⟩⟩
dave976
jbkiwi
MouldBuilder
GaryLC
Colin H
RNinMunich
AndyN
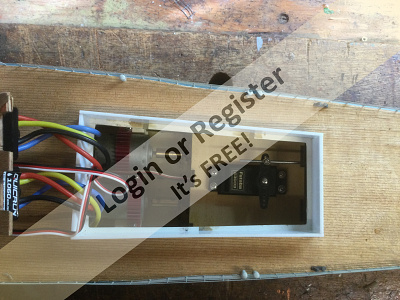
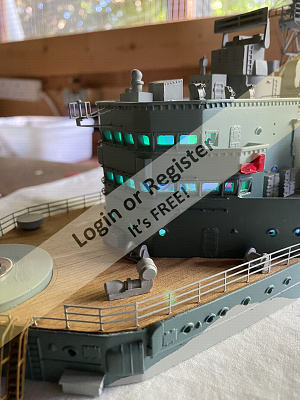
📝 HMS Belfast Update Number 2.Trim Test.Battery Tray and Lifeboat Crane.
11 months ago by 🇬🇧 Scratchbuilder ( Vice Admiral)
Vice Admiral)✧ 97 Views · 12 Likes · 7 Comments
Flag
💬 Add Comment
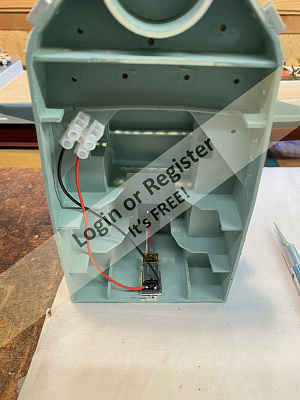
Gents.
Today I had some good spare time so managed three tasks in the refit.
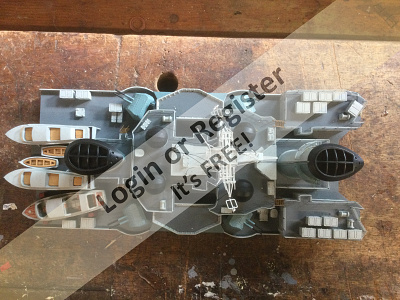
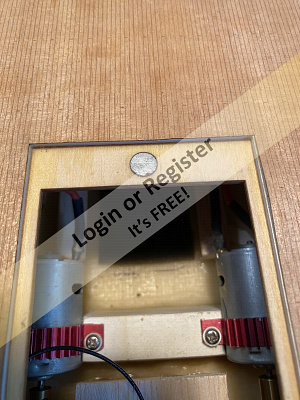
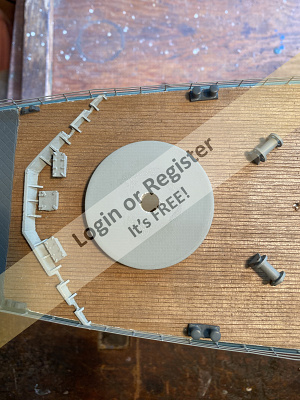
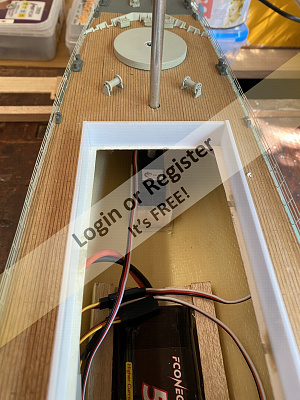
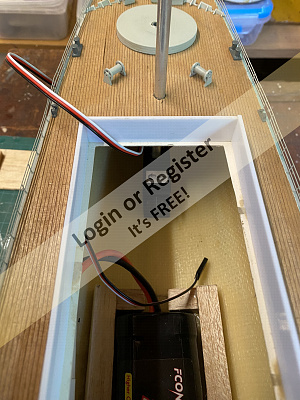
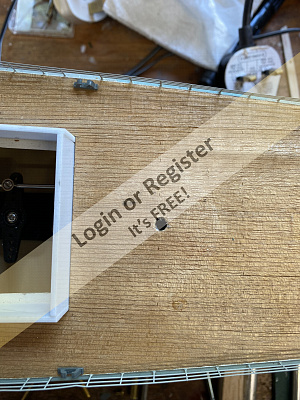
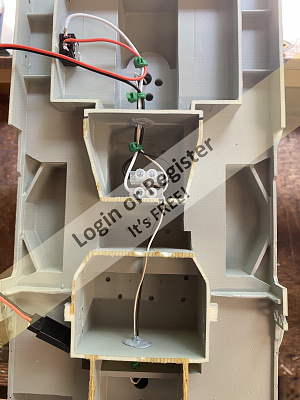
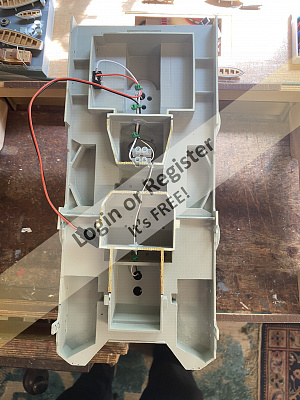
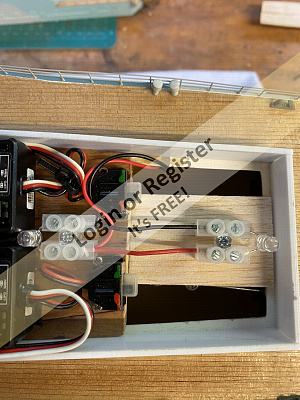
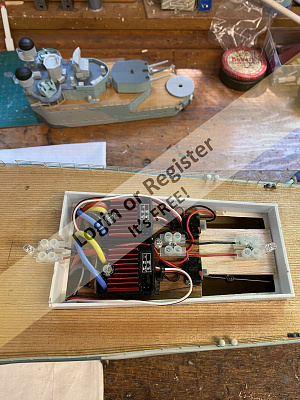
Firstly I placed all the internal items in their rough positions within the hull.
Namely…
Four servos for the guns.
One servo for the crane.
The two power packs.
3 volts pencil battery pack along with the radar motor and two smoker units.
Other small items such as the grain of wheat bulbs for internal lighting are virtually weightless so I left out.
I was pleased,as she settled on the top of the deep draught line.(See pictures)
The stern rides a little high,which doesn’t worry me as from experience she will settle correctly when under way.If not then I will add a tyre balance weight inside the rudder servo inspection hatch.
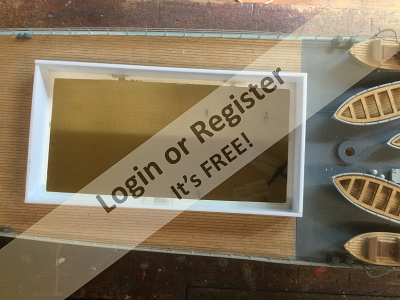
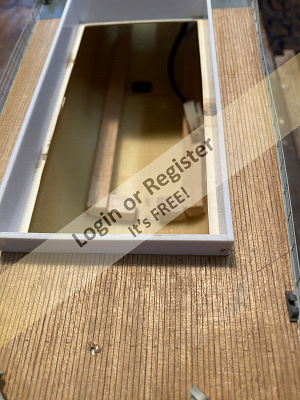
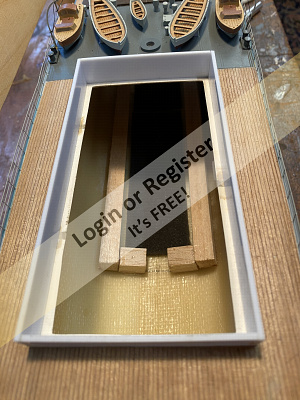
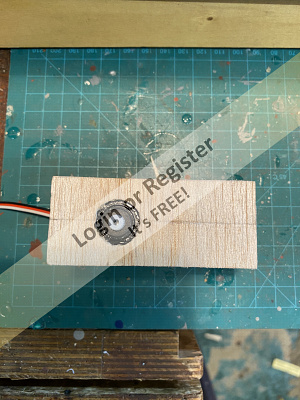
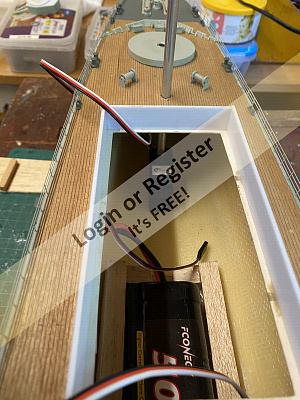
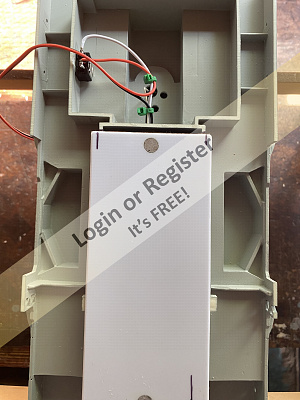
I then built the battery trays using my favourite material…balsa!
It is difficult to show the construction because of access availability,but I have taken pictures as best as possible.
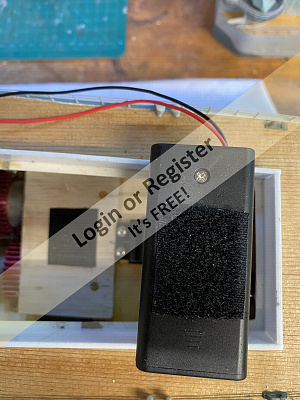
Once the tray was made running from the forward inspection hatch back to the rear engines to house two 7.5v packs then I placed some foam inside the trays to stop the batteries moving.
Hopefully you will see as best as I can the batteries in situ.
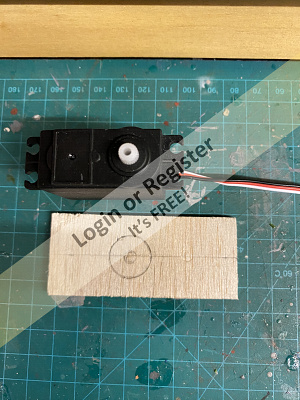
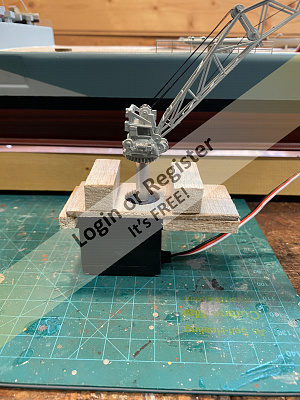
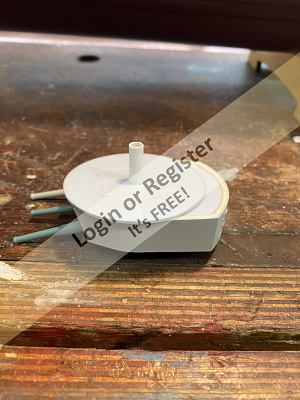
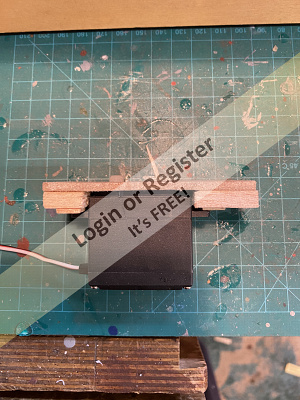
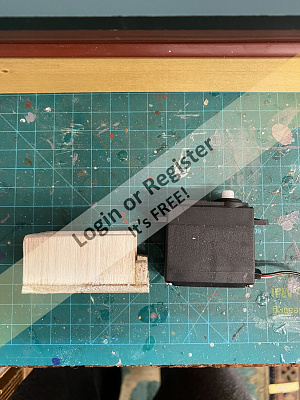
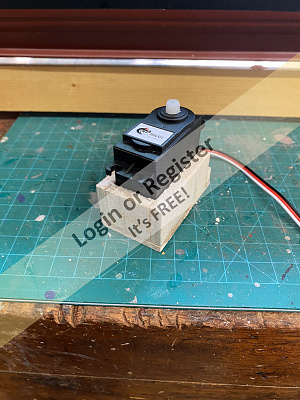
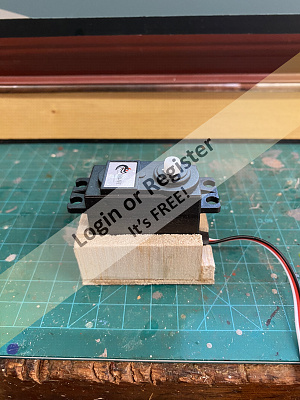
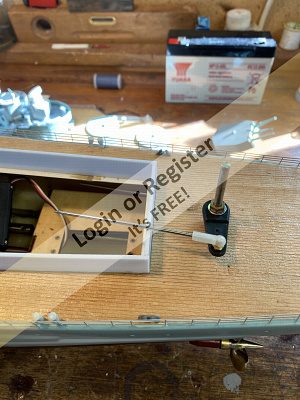
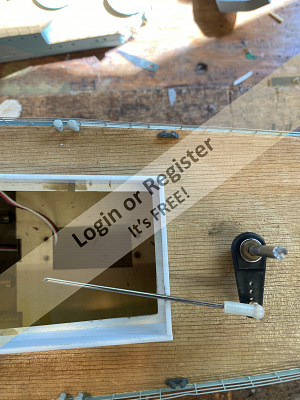
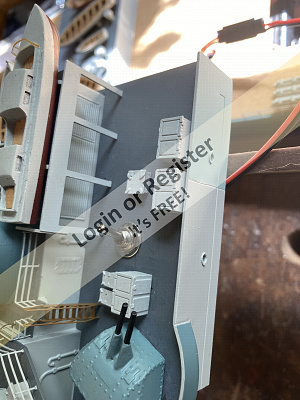
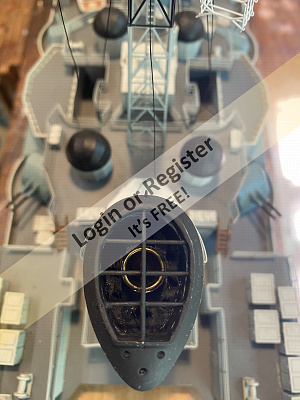
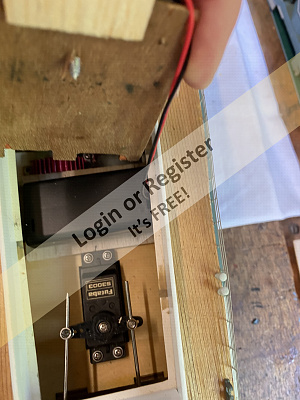
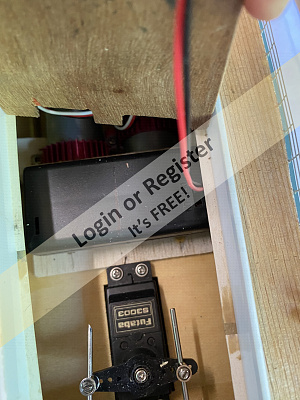
I then moved onto the Crane servo construction.
Relatively simple and hopefully the photographs will show the stages.
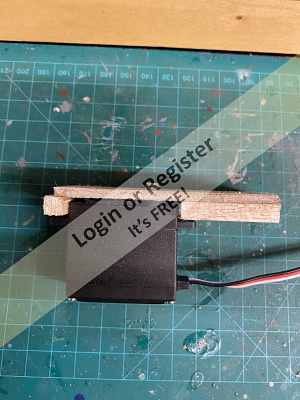
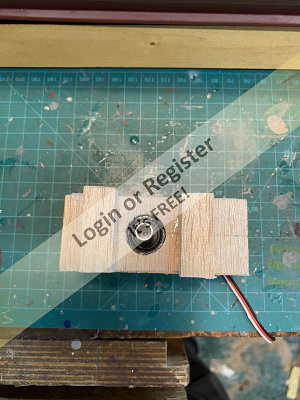
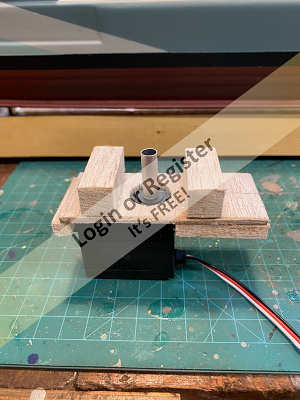
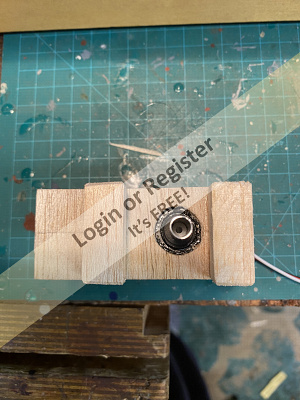
Again using Balsa I made a support so that the servo could be glued directly to the underside of the position where the crane sits on the deck.(The servo support could have been sanded to a higher standard but as it isn’t seen I’m sad to say I let standards drop)
I then turned on the lathe a 3mm diameter length of tube which push fits directly onto the servo knurled head.
I then bench tested the servo with crane in position.
All seemed to work in a ship shape fashion.
It is now that I wished that I had much smaller hands,but managed to glue the servo unit to the underside of the deck.
Having allowed the unit to dry, came the moment of truth.
Unit connected to the RX and she works 👍.
Hopefully the video will show the finished product working.
Sorry if the picture quality is poor on occasions.
I will be fixing the crane to one of the lifeboats so that it lifts the boat out,but didn’t have time today.
Next task will be the forward rotating armament.
Hope you enjoy.
Regards Bill.


Today I had some good spare time so managed three tasks in the refit.
Firstly I placed all the internal items in their rough positions within the hull.
Namely…
Four servos for the guns.
One servo for the crane.
The two power packs.
3 volts pencil battery pack along with the radar motor and two smoker units.
Other small items such as the grain of wheat bulbs for internal lighting are virtually weightless so I left out.
I was pleased,as she settled on the top of the deep draught line.(See pictures)
The stern rides a little high,which doesn’t worry me as from experience she will settle correctly when under way.If not then I will add a tyre balance weight inside the rudder servo inspection hatch.
I then built the battery trays using my favourite material…balsa!
It is difficult to show the construction because of access availability,but I have taken pictures as best as possible.
Once the tray was made running from the forward inspection hatch back to the rear engines to house two 7.5v packs then I placed some foam inside the trays to stop the batteries moving.
Hopefully you will see as best as I can the batteries in situ.
I then moved onto the Crane servo construction.
Relatively simple and hopefully the photographs will show the stages.
Again using Balsa I made a support so that the servo could be glued directly to the underside of the position where the crane sits on the deck.(The servo support could have been sanded to a higher standard but as it isn’t seen I’m sad to say I let standards drop)
I then turned on the lathe a 3mm diameter length of tube which push fits directly onto the servo knurled head.
I then bench tested the servo with crane in position.
All seemed to work in a ship shape fashion.
It is now that I wished that I had much smaller hands,but managed to glue the servo unit to the underside of the deck.
Having allowed the unit to dry, came the moment of truth.
Unit connected to the RX and she works 👍.
Hopefully the video will show the finished product working.
Sorry if the picture quality is poor on occasions.
I will be fixing the crane to one of the lifeboats so that it lifts the boat out,but didn’t have time today.
Next task will be the forward rotating armament.
Hope you enjoy.
Regards Bill.
▲
⟩⟩
dave976
RodC
jbkiwi
MouldBuilder
hermank
johnf
GaryLC
flaxbybuck
Black Shoe
AndyN
Colin H
RNinMunich
|
💬 Re: HMS Belfast Update Number 2.Trim Test.Battery Tray and Lifeboat Crane.
11 months ago by 🇬🇧 Scratchbuilder (
Vice Admiral)✧ 98 Views · 0 Likes
Flag
Prior planning etc 👍
Well done,funny we should discuss the very issue. Bill ▲
⟩⟩
No likes yet
This member will receive 1 point for every like received |
|
Login To
Remove Ads 💬 Re: HMS Belfast Update Number 2.Trim Test.Battery Tray and Lifeboat Crane.
11 months ago by 🇬🇧 flaxbybuck (
Captain)✧ 99 Views · 1 Like
Flag
Well, I just experienced the very thing that I mentioned in my last comment, viz. servo failure. A standard size servo that controls the rudder in my schooner failed after only 6 months use. Thankfully I was mindful of the need for access to all the electrics etc when I made the boat and was able to change the faulty servo without any problem.😉
▲
⟩⟩
Scratchbuilder
|
|
💬 Re: HMS Belfast Update Number 2.Trim Test.Battery Tray and Lifeboat Crane.
11 months ago by 🇬🇧 flaxbybuck (
Captain)✧ 99 Views · 1 Like
Flag
Thanks for your reply Bill.
You'd be surprised how many boats we see where the internal electrics are no longer accessible. 😉 ▲
⟩⟩
Scratchbuilder
|
|
💬 Re: HMS Belfast Update Number 2.Trim Test.Battery Tray and Lifeboat Crane.
11 months ago by 🇬🇧 Scratchbuilder (
Vice Admiral)✧ 99 Views · 1 Like
Flag
Morning Flaxbybuck
Good point and-one that I did take into account and should have mentioned. The crane pinion just slides into the tube that I turned on the lathe and is a friction fit so will lift out easily. The servo cradle is lightly glued and will easily pull off if needed.🤞🤞 I would have preferred to fix with screws but didn’t in this instance want to drill thru the decks or cover screw heads with deck furniture. Thanks for your interest,and happy to help if I can👍. Bill ▲
⟩⟩
flaxbybuck
|
|
💬 Re: HMS Belfast Update Number 2.Trim Test.Battery Tray and Lifeboat Crane.
11 months ago by 🇬🇧 flaxbybuck (
Captain)✧ 97 Views · 1 Like
Flag
I'm interested in the crane servo installation. Should the servo fail will you be able to replace it without a great deal of demolition 😉?
▲
⟩⟩
Scratchbuilder
|
|
💬 Re: HMS Belfast Update Number 2.Trim Test.Battery Tray and Lifeboat Crane.
11 months ago by 🇬🇧 Scratchbuilder (
Vice Admiral)✧ 97 Views · 0 Likes
Flag
Hi Andy.
Thank you for your comments. Always happy for comments and advice from anyone,good or bad! Yes the servos are standard size as I have enough room to play with. Regards Bill ▲
⟩⟩
No likes yet
This member will receive 1 point for every like received |
|
💬 Re: HMS Belfast Update Number 2.Trim Test.Battery Tray and Lifeboat Crane.
11 months ago by 🇬🇧 AndyN (
Warrant Officer)✧ 108 Views · 1 Like
Flag
I'm loving the progress so far. Are you using micro or the standard servos?
▲
⟩⟩
Scratchbuilder
|
📝 HMS Belfast Update Number 3 Forward Armament.
11 months ago by 🇬🇧 Scratchbuilder ( Vice Admiral)
Vice Admiral)✧ 111 Views · 8 Likes
Flag
💬 Add Comment
Evening Gents.
Another update today which covers the construction of the servo supports and mechanism for the forward A and B Main 6inch armament.
The servos used for this are 360 continuous rotation controlled by the TX stick.
This is in two parts.
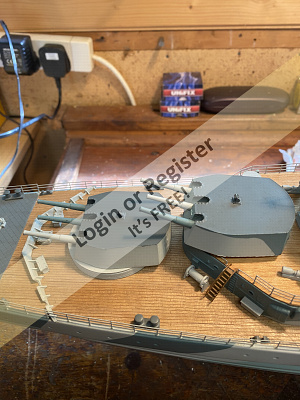
Part one including the first 13 photographs up to and including the media file shows Turret A construction.
The guns were glued in place by the manufacturer with luckily not that strong a glue so they were relatively easy to prize away from the barbette’s.
Having done that I cleaned off the excess glue to ensure clean surfaces.
I then built the servo support in the same way as was described for the crane,although slightly different dimensions.
Having turned the aluminium tubing to the correct length I then glued the finished unit in place on the underside of the deck.
Hopefully the media file shows Turret A working.
Part two relates to Turret B construction and includes the remaining photographs.
This was of a different build as I had to take into account that the bridge section has to be easily removable for hull access.
Once I had correctly positioned the bridge in place I drilled first a pilot hole thru the barbette and then thru the deck.
Once done I enlarged the holes to3.5mm to allow free fitting of the aluminium tubing.
There would be complications fitting the servo unit to the underside of the deck as before in terms of space,so this time I built a suitable box with the intention of gluing it to the bottom of the internal hull.
I then turned the aluminium tubing and cut to length with the bridge section in place.
Having satisfied myself that all dimensions were correct I glued the completed unit to the hull bottom.
Once all the glues were set I popped the guns on and tested the units.
At this point I had my first disappointment as I was hoping to run both guns from the same lead using a three way splitter.
I gave up on this as the guns failed to synchronise properly.I am now using two lead’s which actually is better on reflection.
I hope the photographs are in the right order and this makes sense.
I will in the next update finish the crane,by connecting the lifeboat….hopefully👍🤪
Take care all
Regards Bill.


Another update today which covers the construction of the servo supports and mechanism for the forward A and B Main 6inch armament.
The servos used for this are 360 continuous rotation controlled by the TX stick.
This is in two parts.
Part one including the first 13 photographs up to and including the media file shows Turret A construction.
The guns were glued in place by the manufacturer with luckily not that strong a glue so they were relatively easy to prize away from the barbette’s.
Having done that I cleaned off the excess glue to ensure clean surfaces.
I then built the servo support in the same way as was described for the crane,although slightly different dimensions.
Having turned the aluminium tubing to the correct length I then glued the finished unit in place on the underside of the deck.
Hopefully the media file shows Turret A working.
Part two relates to Turret B construction and includes the remaining photographs.
This was of a different build as I had to take into account that the bridge section has to be easily removable for hull access.
Once I had correctly positioned the bridge in place I drilled first a pilot hole thru the barbette and then thru the deck.
Once done I enlarged the holes to3.5mm to allow free fitting of the aluminium tubing.
There would be complications fitting the servo unit to the underside of the deck as before in terms of space,so this time I built a suitable box with the intention of gluing it to the bottom of the internal hull.
I then turned the aluminium tubing and cut to length with the bridge section in place.
Having satisfied myself that all dimensions were correct I glued the completed unit to the hull bottom.
Once all the glues were set I popped the guns on and tested the units.
At this point I had my first disappointment as I was hoping to run both guns from the same lead using a three way splitter.
I gave up on this as the guns failed to synchronise properly.I am now using two lead’s which actually is better on reflection.
I hope the photographs are in the right order and this makes sense.
I will in the next update finish the crane,by connecting the lifeboat….hopefully👍🤪
Take care all
Regards Bill.
▲
⟩⟩
dave976
RodC
jbkiwi
hermank
Colin H
MouldBuilder
RNinMunich
flaxbybuck
📝 HMS Belfast Update Number 4 Rear Armament .
11 months ago by 🇬🇧 Scratchbuilder ( Vice Admiral)
Vice Admiral)✧ 109 Views · 9 Likes
Flag
💬 Add Comment
Evening Gents.
I know in my last post I said I was going to finish the crane/lifeboat but decided to concentrate on finishing the main armament first.
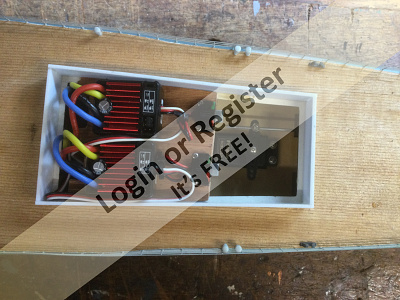
This has been a bit of a head scratcher.The reason being much less space than I originally thought I could utilise.
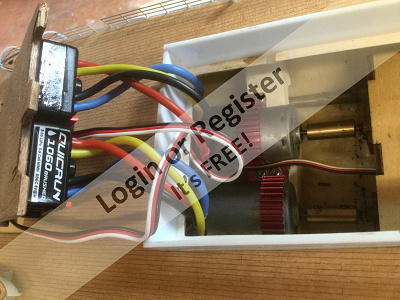
Directly behind the X turret sits the two ESC’s which restricts space.
I have no capacity to move them within the hull.
Directly below the X turret sits the rudder servo which sits quite high again restricting space.
I played with the idea of positioning the servos within the aft superstructure above deck level but this would seriously affect stability at that height so discounted that 😢.
I also tried mini servo’s but wasn’t happy with that either.
Decision made that X turret would remain static.
I then decided that I would utilise the fact that the rudder servo lay behind Y turret,so a cunning plan was hatched 🐣.
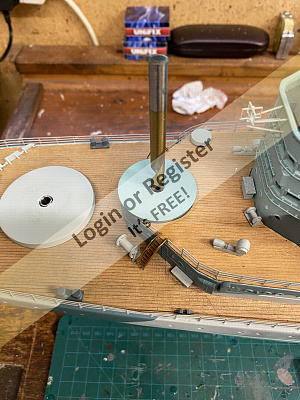
Hopefully the photographs tell a thousand words,but, I started by removing the turret and drilling down thru the deck.
I then turned a small M4 brass bearing and glued in situe in the pre drilled hole in the deck.
I then took an old M4 prop shaft and as the pictures show attached a servo arm to the threaded end and secured using two brass nuts having placed self locking washers each side.
A touch of superglue was placed on the tread to ensure security.
I made up a servo linkage and connected to the new gun mounting servo arm and placed in position with nimble fingers and ample swearing up thru the deck.
The shaft is held in place with a collet and grub screw which rests on the brass bearing.
Then to connect the servo linkage to the rudder servo arm.
A simple adaptation I know but it solved a problem with ease.
I am happy that as I use the rudder the turret rotates as well.
Rotation is a little restricted, but I am comfortable with the solution.
Hopefully the video shows the turret and rudder working.
Sorry if the videos are a bit jumpy but trying to film with one hand and work the TX with the other isn’t good for me 😂😂 hence the servo stutter.
I will finish the crane next.
Regards Bill.


I know in my last post I said I was going to finish the crane/lifeboat but decided to concentrate on finishing the main armament first.
This has been a bit of a head scratcher.The reason being much less space than I originally thought I could utilise.
Directly behind the X turret sits the two ESC’s which restricts space.
I have no capacity to move them within the hull.
Directly below the X turret sits the rudder servo which sits quite high again restricting space.
I played with the idea of positioning the servos within the aft superstructure above deck level but this would seriously affect stability at that height so discounted that 😢.
I also tried mini servo’s but wasn’t happy with that either.
Decision made that X turret would remain static.
I then decided that I would utilise the fact that the rudder servo lay behind Y turret,so a cunning plan was hatched 🐣.
Hopefully the photographs tell a thousand words,but, I started by removing the turret and drilling down thru the deck.
I then turned a small M4 brass bearing and glued in situe in the pre drilled hole in the deck.
I then took an old M4 prop shaft and as the pictures show attached a servo arm to the threaded end and secured using two brass nuts having placed self locking washers each side.
A touch of superglue was placed on the tread to ensure security.
I made up a servo linkage and connected to the new gun mounting servo arm and placed in position with nimble fingers and ample swearing up thru the deck.
The shaft is held in place with a collet and grub screw which rests on the brass bearing.
Then to connect the servo linkage to the rudder servo arm.
A simple adaptation I know but it solved a problem with ease.
I am happy that as I use the rudder the turret rotates as well.
Rotation is a little restricted, but I am comfortable with the solution.
Hopefully the video shows the turret and rudder working.
Sorry if the videos are a bit jumpy but trying to film with one hand and work the TX with the other isn’t good for me 😂😂 hence the servo stutter.
I will finish the crane next.
Regards Bill.
▲
⟩⟩
dave976
RodC
Ronald
jbkiwi
Graham93
johnf
hermank
RNinMunich
Colin H
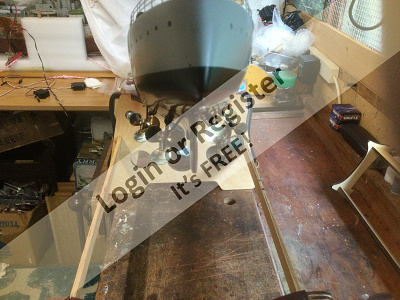
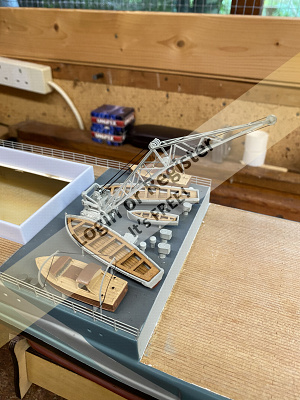
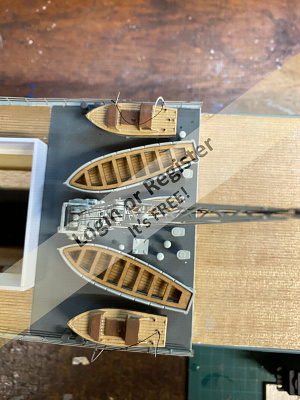
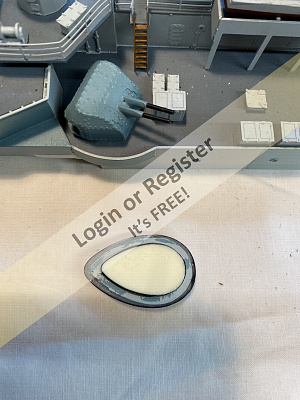
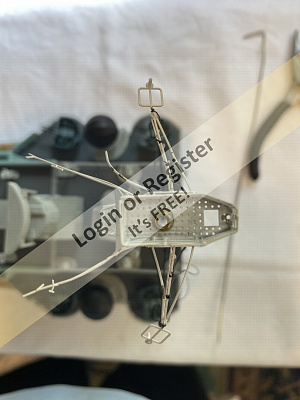
📝 HMS Belfast Update Number 5 Crane/Lifeboat.
11 months ago by 🇬🇧 Scratchbuilder ( Vice Admiral)
Vice Admiral)✧ 108 Views · 8 Likes
Flag
💬 Add Comment
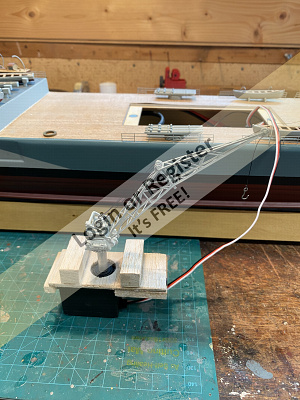
Evening Gents.
The job today was to finish the crane/lifeboat.
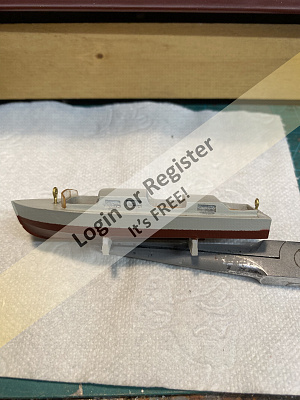
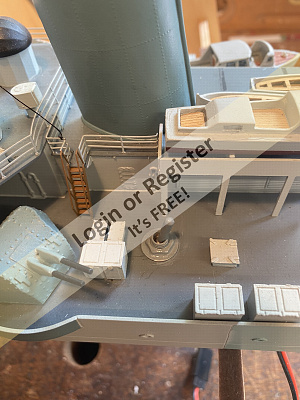
Prior to doing that I just tidied up the Gun turrets and finished off the little minor touch up items on them.
So, to the crane.
The crane having already been completed was repositioned above its servo.
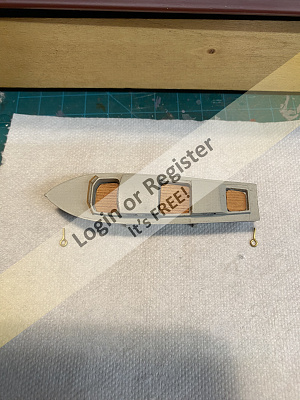
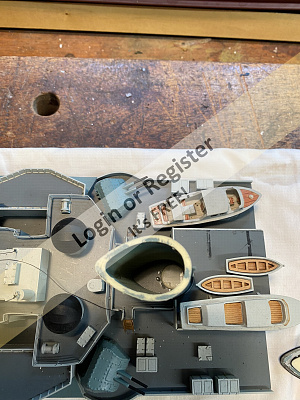
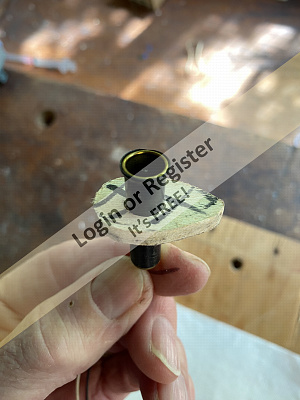
I removed from the boat deck the life boat to be used (identified with a blue pencil in the photographs)
Two 0.25mm holes were drilled in the lifeboat deck and then two brass eyelets glued in place.
I attached some 1mm rigging thread to the eyelets and found the centre of gravity.
The hook from the crane was then attached to the centre point.
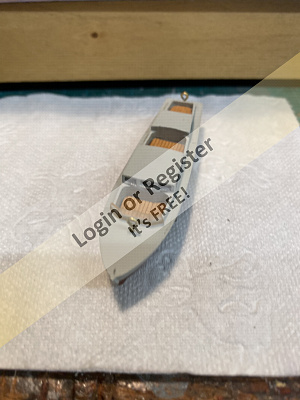
So to test……disaster! as I suspected the boat was all over the place.
Problem resolved by using length of .05mm brass rod bent to shape and put in place from the jib of the crane down thru the hook and into the bow eyelet.
This made the whole set up more rigid (but need to be tidied up)
Tested again and a better result was achieved.
Hopefully the photographs show the sequence.
I must be honest I’m not 100% happy with the finished product and will have to do some more head scratching to achieve a better flow of this section,but considering that all the items are small it could be worse😤.
Any thoughts always appreciated on how to improve it.
Tomorrow I hope to start the smoke generators in the two funnels.
Take care all and stay safe.
Regards Bill
PS.
Having watched the video again I really will have to adjust things!It really isn’t very good.


The job today was to finish the crane/lifeboat.
Prior to doing that I just tidied up the Gun turrets and finished off the little minor touch up items on them.
So, to the crane.
The crane having already been completed was repositioned above its servo.
I removed from the boat deck the life boat to be used (identified with a blue pencil in the photographs)
Two 0.25mm holes were drilled in the lifeboat deck and then two brass eyelets glued in place.
I attached some 1mm rigging thread to the eyelets and found the centre of gravity.
The hook from the crane was then attached to the centre point.
So to test……disaster! as I suspected the boat was all over the place.
Problem resolved by using length of .05mm brass rod bent to shape and put in place from the jib of the crane down thru the hook and into the bow eyelet.
This made the whole set up more rigid (but need to be tidied up)
Tested again and a better result was achieved.
Hopefully the photographs show the sequence.
I must be honest I’m not 100% happy with the finished product and will have to do some more head scratching to achieve a better flow of this section,but considering that all the items are small it could be worse😤.
Any thoughts always appreciated on how to improve it.
Tomorrow I hope to start the smoke generators in the two funnels.
Take care all and stay safe.
Regards Bill
PS.
Having watched the video again I really will have to adjust things!It really isn’t very good.
▲
⟩⟩
dave976
RodC
AndyN
jbkiwi
Colin H
hermank
RNinMunich
chugalone100
📝 HMS Belfast Update Number 6 Making Smoke
11 months ago by 🇬🇧 Scratchbuilder ( Vice Admiral)
Vice Admiral)✧ 115 Views · 11 Likes · 8 Comments
Flag
💬 Add Comment
Evening Gents.
Today I made smoke on both the funnel’s.
There is a mix and match of photographs but hopefully they are in the right order.
The same principles were used on both funnels during construction so I haven’t described both builds.
The plan was to operate the smoke with a servo and switch,but alas I have just run out of room and am up to maximum weight now.
I have simply used a mini switch placed on the deck and painted in grey so it blends as best as possible.
Smokers used are Seuthe No5 6volts,one in each funnel.
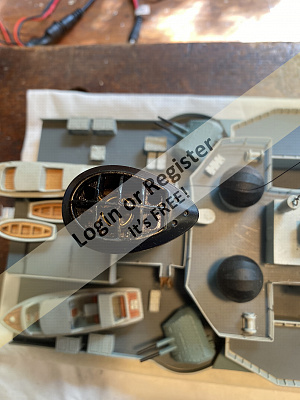
Firstly I carefully removed the funnel caps and drilled the sections out between the cross members of the lattice work.
Although difficult to see in the photographs I then drilled thru the deck base inside the funnel to allow the wiring to pass thru.
I then made two balsa supports to fit inside the funnels and drilled holes to place the smokers in.
Once happy that they fit and sit correctly then I glued the supports in and once dry push fitted the smokers in place.They can be removed in the event of failure.
A test run showed that both worked correctly 👍.
Next I had to turn the superstructure upside down to commence the wiring.
I had to remove the magnetic plastic deck section which gave me unlimited access to it together the simple wiring as shown in the photographs.
A hole was drilled for the switch which was fitted.
I am using a 6volt RX battery pack which sits nicely on top of the main engine battery pack.
The wiring was very simple and has no frills but serves the purpose.(See photographs)
With everything connected and tested for a circuit I put a little fluid in the smokers flipped the switch and all worked quite well.
I have found that the bulky false cage on the tops of the funnels restrict the smoke flow a little,so I will probably remove them completely and make two brass wire cages to fit the tops which will look better and allow more flow.
Probably do that tomorrow if time allows.
Hope you can make sense of this and enjoy the end product.
Take care all.
Regards Bill.


Today I made smoke on both the funnel’s.
There is a mix and match of photographs but hopefully they are in the right order.
The same principles were used on both funnels during construction so I haven’t described both builds.
The plan was to operate the smoke with a servo and switch,but alas I have just run out of room and am up to maximum weight now.
I have simply used a mini switch placed on the deck and painted in grey so it blends as best as possible.
Smokers used are Seuthe No5 6volts,one in each funnel.
Firstly I carefully removed the funnel caps and drilled the sections out between the cross members of the lattice work.
Although difficult to see in the photographs I then drilled thru the deck base inside the funnel to allow the wiring to pass thru.
I then made two balsa supports to fit inside the funnels and drilled holes to place the smokers in.
Once happy that they fit and sit correctly then I glued the supports in and once dry push fitted the smokers in place.They can be removed in the event of failure.
A test run showed that both worked correctly 👍.
Next I had to turn the superstructure upside down to commence the wiring.
I had to remove the magnetic plastic deck section which gave me unlimited access to it together the simple wiring as shown in the photographs.
A hole was drilled for the switch which was fitted.
I am using a 6volt RX battery pack which sits nicely on top of the main engine battery pack.
The wiring was very simple and has no frills but serves the purpose.(See photographs)
With everything connected and tested for a circuit I put a little fluid in the smokers flipped the switch and all worked quite well.
I have found that the bulky false cage on the tops of the funnels restrict the smoke flow a little,so I will probably remove them completely and make two brass wire cages to fit the tops which will look better and allow more flow.
Probably do that tomorrow if time allows.
Hope you can make sense of this and enjoy the end product.
Take care all.
Regards Bill.
▲
⟩⟩
dave976
RodC
ToraDog
chugalone100
Ronald
AndyN
MouldBuilder
hermank
RNinMunich
jbkiwi
Colin H
|
💬 Re: HMS Belfast Update Number 6 Making Smoke
11 months ago by 🇬🇧 Scratchbuilder (
Vice Admiral)✧ 113 Views · 2 Likes
Flag
Hi Andy.
Thank you for your comments. Good idea re moving the smokers further down which I may well do 👍. In the meantime I have revamped the existing ones and think they are working better. I am just about to post the addendum. Regards Bill. ▲
⟩⟩
RodC
hermank
|
|
Login To
Remove Ads 💬 Re: HMS Belfast Update Number 6 Making Smoke
11 months ago by 🇬🇧 AndyN (
Warrant Officer)✧ 122 Views · 3 Likes
Flag
That looks absolutely great, Bill. It will make the heads turn with that smoke.
I made me think however... What if you put those emitters a bit lower inside the chimneys? Would that make the smoke look less concentrated/accumulated in one spot? Excuse my english, I hope you know what I mean. Great job so far, can't wait to see her in action. ▲
⟩⟩
RodC
hermank
Scratchbuilder
|
|
💬 Re: HMS Belfast Update Number 6 Making Smoke
11 months ago by 🇧🇪 hermank (
Captain)✧ 114 Views · 2 Likes
Flag
Mouldbuilder I like your funny comment😊😊😊
▲
⟩⟩
Scratchbuilder
MouldBuilder
|
|
💬 Re: HMS Belfast Update Number 6 Making Smoke
11 months ago by 🇭🇺 MouldBuilder (
Vice Admiral)✧ 113 Views · 4 Likes
Flag
Super job Bill. Just beware of those pesky Seagulls nesting on your new funnel cages.😃
▲
⟩⟩
RodC
Scratchbuilder
AndyN
Colin H
|
|
💬 Re: HMS Belfast Update Number 6 Making Smoke
11 months ago by 🇬🇧 Scratchbuilder (
Vice Admiral)✧ 114 Views · 3 Likes
Flag
Hi JB.
Thanks for following the refit. I am unsure at this time as I havn’t done a full test as yet,but on my Corvette the fluid lasted about 20 min. Have some modifications to do today on the funnels and will then test. Will update you then👍. Regards Bill. ▲
⟩⟩
RodC
hermank
MouldBuilder
|
|
💬 Re: HMS Belfast Update Number 6 Making Smoke
11 months ago by 🇬🇧 Scratchbuilder (
Vice Admiral)✧ 114 Views · 4 Likes
Flag
Morning all.
Doug. I don’t disagree with you on your thoughts,thank you! I had the same problem when I fitted an identical smoker to my Grandsons Corvette build just prior to being taken ill in November. To overcome it I did drill vent holes in the former inside the funnel.(see picture of Corvettes funnel). It did the trick! Having learnt from last time I also did the same on Belfasts funnels,BUT, because the space is smaller I don’t think they are as effective 😤.(Also see picture of vent holes in Belfast). I am going to enlarge the vent holes today and build a better brass cage as I thought yesterday.We can see if that makes a significant difference. I do like your suggestion of putting it all below decks,but sadly don’t have the room. Will update later chaps. Bill👍 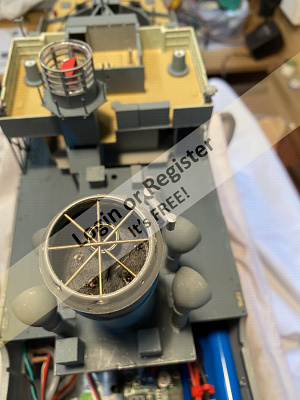
▲
⟩⟩
RNinMunich
RodC
AndyN
Colin H
|
|
💬 Re: HMS Belfast Update Number 6 Making Smoke
11 months ago by 🇩🇪 RNinMunich (
Fleet Admiral)✧ 114 Views · 5 Likes
Flag
Hi Bill,
So far so good👍 Re "I have found that the bulky false cage on the tops of the funnels restrict the smoke flow a little" I'm not convinced that the cage is really the problem. The real problem is most likely that your balsa former closes off the funnel and totally inhibits the 'Chimney effect', which is the whole point of having a funnel in the first place😉. Some 35 years ago I used the Graupner smokers, very similar in form and size but with a wick to 'slurp up' the smoke fluid whereas the Seuthe units (of which I also have some) are 'top fed' with ca 8ml per shot. I soon discovered that building into the funnel with a former such as yours was not terribly effective🤔 No updraught - no chimney effect! Sooo, I fitted a 10mm ally tube in the funnel and mounted the smoker underneath it so that the smoker gizmo did not close off the toob. The smoke fluid reservoir was the cap of a large paint spray can and the smoke unit was mounted on the rim by taking 1mm tinned copper wire from the smoker element through holes drilled in the cap rim, sealed with 2 part epoxy glue. Thus suspending the smoker above the fluid with only the wick immersed. Thus the whole smoke unit remained under deck and did not inhibit removal of deck and superstructure in any way. The 10mm tube provided the required updraught and greatly enhanced the 'Make smoke number one' effect when underway. I used the 'Gear' switch on my Sanwa TX to switch it on as required. Thanks to the large reservoir the unit would run all afternoon. Nor sure how long the 8ml in the Seuthe units will last but I guesstimate not more than ca 30 minutes if that. They were designed essentially for model railway locs. Sorry no pics or vids, did not possess a suitable camera back then🤔 Some years ago the ship (HMS Hotspur 1:72) was completely stripped out for a major refit, and I've been wondering for some time where the hell I put the smoker and reservoir unit🙄 Have moved house 3 times since then! Cheers, Doug 😎 ▲
⟩⟩
dave976
RodC
Scratchbuilder
Colin H
hermank
|
|
💬 Re: HMS Belfast Update Number 6 Making Smoke
11 months ago by 🇳🇿 jbkiwi (
Fleet Admiral)✧ 115 Views · 2 Likes
Flag
Just catching up Bill,- mods are looking great so far.👍 How long will the smoke run before it needs topping up?
JB ▲
⟩⟩
RodC
Scratchbuilder
|
📝 HMS Belfast Follow up to Update No 6..Result!!
11 months ago by 🇬🇧 Scratchbuilder ( Vice Admiral)
Vice Admiral)✧ 113 Views · 14 Likes · 4 Comments
Flag
💬 Add Comment
Afternoon Chaps.
As I previously stated although I was on the whole quite happy with the smoke generators completed yesterday I was a little frustrated with the smoke flow.
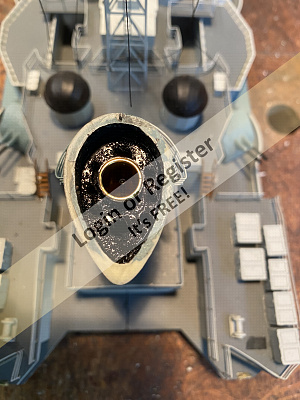
I had decided last evening to change the cage on the funnels,as I thought the large resin frame was restricting the flow and also looked out of proportion.
Quite correctly Doug pointed out re the lack of updraft despite my having drilled vent holes.Thank you also to others who gave suitable advice 👍.
Today I resolved the issue.
I drilled more vent holes in the smoker platforms and also in the deck under the funnels.(I learnt from my mistake on a previous boat re ventilation)
I then cut out the resin cage from both funnel caps and cleaned up the edges.
Careful drilling thru the funnel tops gave me 0.5 mm holes so that I could slide in and glue 0.5mm brass wire.
Phew! No breakages or disasters.
Once the glue was dry I repainted the tops Matt black,let the paint dry and placed in position.
Come the moment of truth……….Tested,and I am sure the smoke flow is better and less restricted.
I also much prefer the thinner cage which looks much more realistic if you compare with the photograph of Belfast’s real funnel.(last picture before video)
Hopefully when on the water with wind flow all should be well🤞🤞
Next I will be taking on the lattice mast front Radar,but not for a couple of days.
Catch you soon and take care all.
Regards Bill.


As I previously stated although I was on the whole quite happy with the smoke generators completed yesterday I was a little frustrated with the smoke flow.
I had decided last evening to change the cage on the funnels,as I thought the large resin frame was restricting the flow and also looked out of proportion.
Quite correctly Doug pointed out re the lack of updraft despite my having drilled vent holes.Thank you also to others who gave suitable advice 👍.
Today I resolved the issue.
I drilled more vent holes in the smoker platforms and also in the deck under the funnels.(I learnt from my mistake on a previous boat re ventilation)
I then cut out the resin cage from both funnel caps and cleaned up the edges.
Careful drilling thru the funnel tops gave me 0.5 mm holes so that I could slide in and glue 0.5mm brass wire.
Phew! No breakages or disasters.
Once the glue was dry I repainted the tops Matt black,let the paint dry and placed in position.
Come the moment of truth……….Tested,and I am sure the smoke flow is better and less restricted.
I also much prefer the thinner cage which looks much more realistic if you compare with the photograph of Belfast’s real funnel.(last picture before video)
Hopefully when on the water with wind flow all should be well🤞🤞
Next I will be taking on the lattice mast front Radar,but not for a couple of days.
Catch you soon and take care all.
Regards Bill.
▲
⟩⟩
dave976
Colin H
RodC
River Rat
JockScott
TerryH
AndyN
pressonreguardless
hermank
jbkiwi
chugalone100
MouldBuilder
RNinMunich
ToraDog
|
💬 Re: HMS Belfast Follow up to Update No 6..Result!!
11 months ago by 🇬🇧 Scratchbuilder (
Vice Admiral)✧ 101 Views · 3 Likes
Flag
Afternoon Jockscott.
Thank you.Still a lot to do on this refit. All the railings are as fitted by Graupner from the factory. I will probably be replacing some stanchions with brass replacements and will be weathering the originals in due course. I think it is unlikely that you will be able to purchase the original railings as spares as Graupner spares are almost impossible to obtain. I did contact Graupner re spares and had a very negative unhelpful reply. Sorry I can’t be of more help. Regards Bill ▲
⟩⟩
Colin H
JockScott
RodC
|
|
Login To
Remove Ads 💬 Re: HMS Belfast Follow up to Update No 6..Result!!
11 months ago by 🇨🇦 JockScott (
 Chief Petty Officer 2nd Class) Chief Petty Officer 2nd Class)✧ 101 Views · 1 Like
Flag
Very impressive. May I ask you: did you do the railings from scratch? If not are they still available?
They don't look like photo etched. ▲
⟩⟩
AlessandroSPQR
|
|
💬 Re: HMS Belfast Follow up to Update No 6..Result!!
11 months ago by 🇭🇺 MouldBuilder (
Vice Admiral)✧ 112 Views · 1 Like
Flag
Great job Bill. This looks really good. Persistence has paid off. 😊😊
▲
⟩⟩
Scratchbuilder
|
|
💬 Re: HMS Belfast Follow up to Update No 6..Result!!
11 months ago by 🇩🇪 RNinMunich (
Fleet Admiral)✧ 112 Views · 1 Like
Flag
Much better Bill👍
😎 ▲
⟩⟩
Scratchbuilder
|
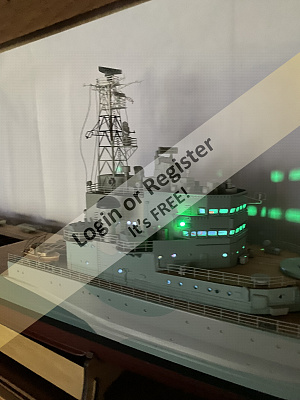
📝 HMS Belfast Update Number 7. Radar and Lighting.
11 months ago by 🇬🇧 Scratchbuilder ( Vice Admiral)
Vice Admiral)✧ 97 Views · 12 Likes · 5 Comments
Flag
💬 Add Comment
Evening Gents.
Trusting you are all well.
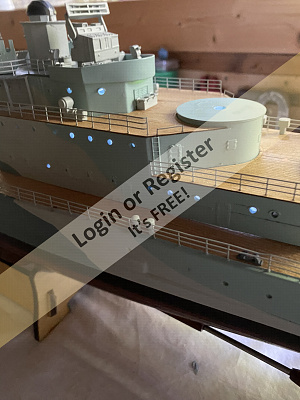
Today I managed to engineer the working radar, Port/Starboard lights and internal bridge lights.
Once again I hope the photographs are in the correct order as they explain so much.
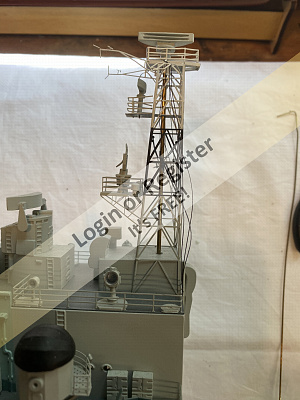
RADAR.
Without stating the obvious I removed the main radar scanner from the top of the lattice mast.
Luckily there is a good area inside the superstructure so I had plenty of room to work.
Taking care I drilled a 3mm hole down thru the lattice base that supports the radar and a secondary section below.
I then inserted a small brass bearing into the top hole leaving me a 2.5mm dia shaft size.
Taking some 2.5mm brass rod I heated the end and dropped it down thru the holes so that it melted a hole thru the bridge deck into the interior.
Then after drilling a hole in the scanner base I fitted it to the top of the rod.
For the motor I used a 3volt 36 rpm reduction motor from the ever faithful spares box and made a small fillet for the back of it.
Using some flexi pipe tubing I pushed it over the brass rod and glued the motor in place on the rear bulkhead.
This gave me a direct drive from motor to radar.
All tested and worked well 👍😇.
Lighting.
I wanted to have working Port/Starboard lights and at the least interior bridge lights so as I had time to spare off I went and did it.🤪
The P/S lights are so small that I simply did not have any bulbs small enough to fit externally.
Plan B…I drilled a 2mm hole thru the light and then glued the bulbs directly to the inside behind the hole.
I then made a small balsa stand and glued one white light grain of wheat bulb to it.
Having glued the balsa stand to the interior I wired all the bulbs up to the same 3volt power supply…..and hey presto we have light.
I hope the photographs do justice and all this makes sense.
I will be looking at some lighting for the mid and rear superstructure in due course.
Take care all till next time.
Regards
Bill👍


Trusting you are all well.
Today I managed to engineer the working radar, Port/Starboard lights and internal bridge lights.
Once again I hope the photographs are in the correct order as they explain so much.
RADAR.
Without stating the obvious I removed the main radar scanner from the top of the lattice mast.
Luckily there is a good area inside the superstructure so I had plenty of room to work.
Taking care I drilled a 3mm hole down thru the lattice base that supports the radar and a secondary section below.
I then inserted a small brass bearing into the top hole leaving me a 2.5mm dia shaft size.
Taking some 2.5mm brass rod I heated the end and dropped it down thru the holes so that it melted a hole thru the bridge deck into the interior.
Then after drilling a hole in the scanner base I fitted it to the top of the rod.
For the motor I used a 3volt 36 rpm reduction motor from the ever faithful spares box and made a small fillet for the back of it.
Using some flexi pipe tubing I pushed it over the brass rod and glued the motor in place on the rear bulkhead.
This gave me a direct drive from motor to radar.
All tested and worked well 👍😇.
Lighting.
I wanted to have working Port/Starboard lights and at the least interior bridge lights so as I had time to spare off I went and did it.🤪
The P/S lights are so small that I simply did not have any bulbs small enough to fit externally.
Plan B…I drilled a 2mm hole thru the light and then glued the bulbs directly to the inside behind the hole.
I then made a small balsa stand and glued one white light grain of wheat bulb to it.
Having glued the balsa stand to the interior I wired all the bulbs up to the same 3volt power supply…..and hey presto we have light.
I hope the photographs do justice and all this makes sense.
I will be looking at some lighting for the mid and rear superstructure in due course.
Take care all till next time.
Regards
Bill👍
▲
⟩⟩
Doogle
dave976
AndyN
Rookysailor
Julio
TerryH
luckyduck
JockScott
RNinMunich
hermank
chugalone100
Colin H
|
💬 Re: HMS Belfast Update Number 7. Radar and Lighting.
11 months ago by 🇬🇧 Scratchbuilder (
Vice Admiral)✧ 94 Views · 1 Like
Flag
Morning Pete.
Re the port light ! Good spot on your part 👍👀. For some reason the port light decided to play up just after fitting and went dim on me so it will be a case of replacing the offending item next week. Take care Bill ▲
⟩⟩
Rookysailor
|
|
Login To
Remove Ads 💬 Re: HMS Belfast Update Number 7. Radar and Lighting.
11 months ago by 🇬🇧 Rookysailor (
 Commodore) Commodore)✧ 107 Views · 1 Like
Flag
Nice job Bill, the port light in the photo does not look as bright as the starboard light, is it lit ? or is it the photo dulling it.
Cheers, Pete ▲
⟩⟩
Scratchbuilder
|
|
💬 Re: HMS Belfast Update Number 7. Radar and Lighting.
11 months ago by 🇬🇧 TerryH (
 Midshipman) Midshipman)✧ 95 Views · 1 Like
Flag
Lovely town class your building. My late father was on her in the early 50s I believe
▲
⟩⟩
Scratchbuilder
|
|
💬 Re: HMS Belfast Update Number 7. Radar and Lighting.
11 months ago by 🇬🇧 Scratchbuilder (
Vice Admiral)✧ 95 Views · 1 Like
Flag
“Those light bulbs look suspiciously like LED’s to me”
You’re right Doug,light bulbs….typo on my part. Put it down to my age! Bill. ▲
⟩⟩
RNinMunich
|
|
💬 Re: HMS Belfast Update Number 7. Radar and Lighting.
11 months ago by 🇩🇪 RNinMunich (
Fleet Admiral)✧ 98 Views · 0 Likes
Flag
Nice jobs Bill👍
Those light 'bulbs' look suspiciously like LEDs to me😉 When I eventually get around to it I'm proposing to use SMD LEDs, about 1mm square!🤓 Cheers, Doug😎 ▲
⟩⟩
No likes yet
This member will receive 1 point for every like received |
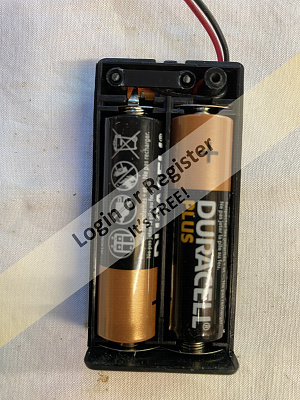
📝 HMS Belfast Update Number 8,more lighting.
11 months ago by 🇬🇧 Scratchbuilder ( Vice Admiral)
Vice Admiral)✧ 86 Views · 9 Likes · 4 Comments
Flag
💬 Add Comment
Evening Gents.
Thus far I have achieved most of what I set out in the first posting of this blog.
I wanted all four main turrets to rotate and have achieved three of the four.Lack of space excluded one.☹️
Both funnels have the desired smoke effect 👍
The crane rotates,but, I admit I am still not 100% happy with it so may redesign certain aspects.😠
The main radar is functioning well😄
The lighting forward is satisfactory,and today I spent a little time on the rear superstructure lighting.😁
This was relatively easy and straight forward.
Once again my lack of space was the problem.
I didn’t want to run the lights (both forward and stern) thru a voltage reducer so I purchase a small switched encased AA battery box (£3.00 on EBay).
I managed to find enough space between the rear motors and rudder servo.
I made a small balsa false deck which rested between the servo and motors.
Fixed in place with two screws so that I can gain access to the motor couplings if needed.
The battery box sits nicely on the false deck and is as low as I can get it to avoid upper weight for stability.Held in place with double sided tape.
With just enough room,on the Speed controller deck and by extending it up to the bulkhead I fixed two electrical connectors along with two white 3volt LED wired them to the battery box and 👍 we had light.
A great use of minimal space.
Once again the photographs show the detail.
I am going to run a mast light at some point
There is still a lot to do do on this refit ie!
Replace the forward/stern flag poles.
The veneer deck was allowed to get wet by the previous owner and has started to lift in places.This needs to be remedied and the veneer treated.
Then there is the weathering and other odds and sods.
More on that in due course.
Hope your all ok everyone.
Thank you for following.
Catch you soon.
Regards
Bill.
PS.
Today 06/06/23 I added a third LED.
Why are we never happy with what we do?🤣
▲
⟩⟩
Doogle
dave976
RNinMunich
luckyduck
MouldBuilder
chugalone100
Graham93
Colin H
AndyN
|
💬 Re: HMS Belfast Update Number 8,more lighting.
11 months ago by 🇬🇧 Scratchbuilder (
Vice Admiral)✧ 83 Views · 0 Likes
Flag
Morning Pete.
Thank you for the comments 👍👀. Using a six channel set. Motors,rudder,guns and crane from the channels. Lights,radar and smoke effects manually at this time. When I have the capacity I will combine smoke and throttle together. Hope all is well. Regards Bill. ▲
⟩⟩
No likes yet
This member will receive 1 point for every like received |
|
Login To
Remove Ads 💬 Re: HMS Belfast Update Number 8,more lighting.
11 months ago by 🇭🇺 MouldBuilder (
Vice Admiral)✧ 83 Views · 1 Like
Flag
Very nice Bill. You really are doing a good job.
How many channels will you need to operate all of the functions? Looking forward to the next episode. Pete.👍😀 ▲
⟩⟩
Scratchbuilder
|
|
💬 Re: HMS Belfast Update Number 8,more lighting.
11 months ago by 🇬🇧 Scratchbuilder (
Vice Admiral)✧ 85 Views · 0 Likes
Flag
Andy.
Thank you for your comments 👍. Always happy for suggestions to improve things. Warm Gel?. This is a new one on me!unless I’m missing the obvious. What is it please? Regards Bill ▲
⟩⟩
No likes yet
This member will receive 1 point for every like received |
|
💬 Re: HMS Belfast Update Number 8,more lighting.
11 months ago by 🇬🇧 AndyN (
Warrant Officer)✧ 94 Views · 2 Likes
Flag
This is becoming a great realistic model. I love the progress so far. Hope you will have enough juice to operate everything for more than 10min😂
As a scale modelmaker I can't wait for the weathering stage. One comment if you don't mind. I would put a warm gel around those leds to make it less starwars-like. ▲
⟩⟩
RNinMunich
Scratchbuilder
|


Login To
Remove Ads
Remove Ads