Join Us On Social Media!

|

|

|
Download The App!
Login To
Remove Ads
Remove Ads
Login To
Remove Ads
Remove Ads
Model Boats Website
Swedish 16 M
8 Posts · 3 Followers · 27 Photos · 51 Likes
Began 12 months ago by
 Canada
Follow This Thread
Not currently following
> Click to follow
> Click to follow
Latest Post 6 months ago by
| Oldest posts shown first (Show Newest First) | (Print Booklet) |
📝 Swedish 16 M
12 months ago by 🇨🇦 Rowen ( Captain)
Captain)✧ 102 Views · 11 Likes
Flag
💬 Add Comment
Readers of my HSwMS Visby blog will be aware the model is complete and operating well.
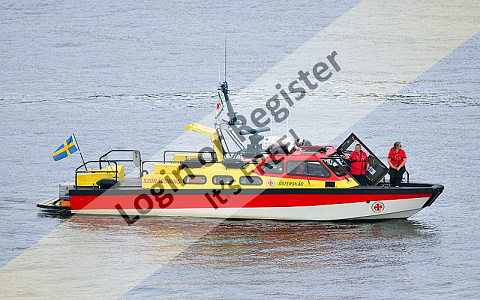
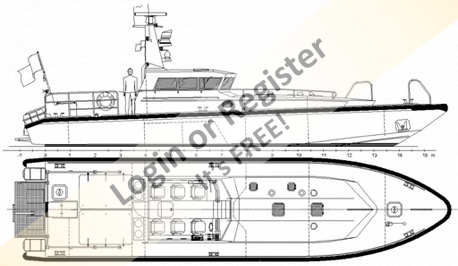
Was quite happy spending last Summer just sailing models; that was until JBKIWI wrote a forum entry introducing the Swedish CB90 class of waterjet propelled fast assault class! Sparked my imagination.
After some research, found the base hull has been developed into a number of forms, including attractive “Interceptor” and VIP vessels.
The hull is of a hard chine style and should not present any unusual challenges. The waterjets are not the same as the Visby, in that the reverse/steering function is different. From experience with the Visby, consider a reverse capability essential.
Decided to use the same base 20mm waterjet units as the Visby. They power a hull in the 30 – 40” O/L range nicely. My preferred size. They also work well and do not leak. Problems friends have encountered with other units.
This offered two approaches, one use “modellers license” and fit the same bucket style units as on the Visby. The other was to use the base waterjet unit, but make up the correct Kamewa “clamshell” style reverse /steering units. These were not available through the jet supplier.
▲
⟩⟩
BOATSHED
dave976
jbkiwi
River Rat
RNinMunich
Colin H
johnf
Rogal118
RodC
hermank
Scratchbuilder
Login To
Remove Ads
Remove Ads
📝 Swedish 16M
12 months ago by 🇨🇦 Rowen ( Captain)
Captain)✧ 77 Views · 8 Likes · 3 Comments
Flag
💬 Add Comment
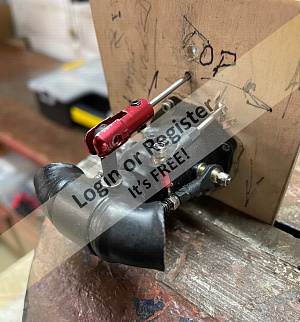
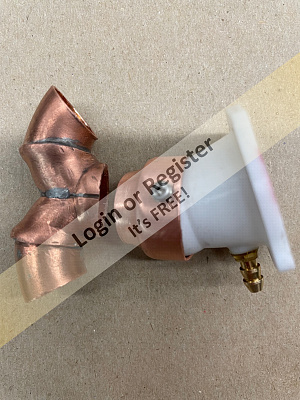
Have found several water jets with steering and reverse capability, using buckets. Have not found one, in this size range, that offers “clamshell” type reversers with steering.
The clamshells are mounted separately from the steering nozzles, unlike the bucket style. So, when the nozzle is steered with the clamshells lowered, the water is directed towards that side of the nozzle. This can give the vessel good manoeuverability.
Decided to try see how these could be replicated.
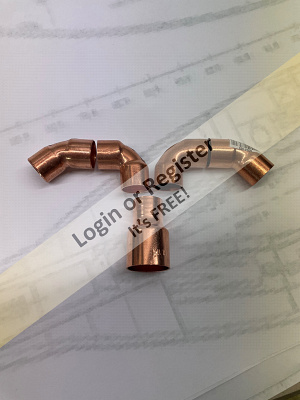
After the usual scratting around with offcuts of plastic pipe realized, using regular copper plumbing fittings, the basic layout could be achieved. When the excess copper was cut away, the shape was replicated. The remaining pieces were then soldered together to form the clamshell unit.
Mounted this to the waterjet nozzle, which had earlier been fitted with a swivelling copper pipe reducer to form the steering nozzle. All the functions were then replicated.
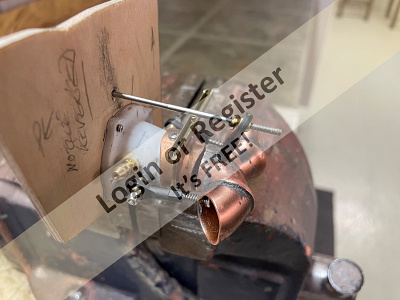
The final picture shows the complete unit on a dummy half transom. Still needs some fettling and the linkages working out. The general idea is evident though.
Having made all my mistakes on this first unit, making the second was a pleasure!
Once the hull is made, will fit two of these units to the stern. Can then apply the final touches, install linkages and all should work - Inshallah!
If it does not, will revert to the bucket style as have spare units.

The clamshells are mounted separately from the steering nozzles, unlike the bucket style. So, when the nozzle is steered with the clamshells lowered, the water is directed towards that side of the nozzle. This can give the vessel good manoeuverability.
Decided to try see how these could be replicated.
After the usual scratting around with offcuts of plastic pipe realized, using regular copper plumbing fittings, the basic layout could be achieved. When the excess copper was cut away, the shape was replicated. The remaining pieces were then soldered together to form the clamshell unit.
Mounted this to the waterjet nozzle, which had earlier been fitted with a swivelling copper pipe reducer to form the steering nozzle. All the functions were then replicated.
The final picture shows the complete unit on a dummy half transom. Still needs some fettling and the linkages working out. The general idea is evident though.
Having made all my mistakes on this first unit, making the second was a pleasure!
Once the hull is made, will fit two of these units to the stern. Can then apply the final touches, install linkages and all should work - Inshallah!
If it does not, will revert to the bucket style as have spare units.
▲
⟩⟩
BOATSHED
hermank
ARL58
RNinMunich
Scratchbuilder
flaxbybuck
Colin H
River Rat
|
💬 Re: Swedish 16M
12 months ago by 🇳🇿 jbkiwi (
 Fleet Admiral) Fleet Admiral)✧ 63 Views · 3 Likes
Flag
Hi Rowen, plumbing's looking good, if you have it looking like this (horizontal section pic) it should work. The bucket must stay straight (ok with the lifters you have) but the nozzle (like pic 3) must turn completely inside the bucket if possible, with a close fit to avoid loss through gaps. There also needs to be a divider/diverter in the center to reduce cross flow between the bucket nozzles when turned. You might need more of a ball end on the moveable nozzle. Pic's the general idea.
Took me a quite a few goes to get one working ok. It will look good if you get it sorted. JB 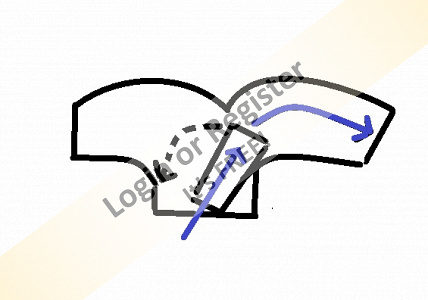
▲
⟩⟩
BOATSHED
hermank
Scratchbuilder
|
|
Login To
Remove Ads 💬 Re: Swedish 16M
12 months ago by 🇬🇧 Scratchbuilder (
 Vice Admiral) Vice Admiral)✧ 69 Views · 2 Likes
Flag
Very innovative copper work.
Great scratch building. Regards Bill. ▲
⟩⟩
BOATSHED
Colin H
|
|
💬 Re: Swedish 16M
12 months ago by 🇬🇧 flaxbybuck (
Captain)✧ 68 Views · 2 Likes
Flag
Impressive bit of cutting and soldering.
Just don't ask to do any domestic plumbing for me any time soon !😉 ▲
⟩⟩
BOATSHED
Colin H
|
📝 Swedish 16 M Interceptor
11 months ago by 🇨🇦 Rowen ( Captain)
Captain)✧ 74 Views · 4 Likes
Flag
💬 Add Comment
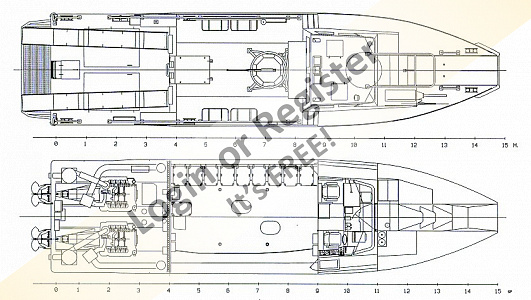
Decided a hull of about 30” O/L should make a nice model, based upon my Visby experience.
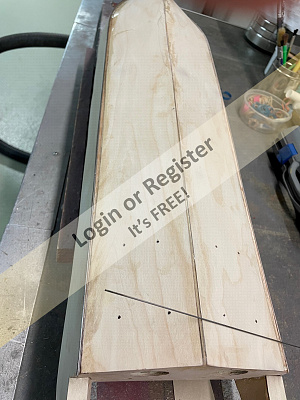
Had plans printed using drawings from the web and, although somewhat pixelated, they are usable. Made the hull as a typical frame and strip style with a thin plywood skin.
It presented no unusual problems, made up using various plywood thicknesses and basswood strip.
The deck edge support strip was made up of ¼” square basswood up to the area when the bow curve begins. Have done this before, not usually very well.
Decided to try to laminate this forward section using a 1/32 bass wood strip and, whilst the wood still requires bending, it turned out superior.
Did most of the bending by saturating the wood in ammonia. Shaping around a curved pattern, followed by drying with a heat gun. Once the shape was achieved laminated the next strip to it with CA glue. This proved much easier than trying to bend a full section strip.
The finished result has the correct curvature and is robust.
Find the ultimate test of bow curvature is to turn the hull over and see if both sides fit the plan. To my relief they did!
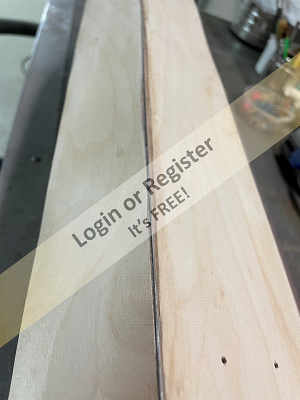
Once the outer skins were fitted and blended into a smooth shape, was unhappy with the chine.
This vessel has a chine strip onto which the bottom and upper skins fit. The strip has a land (about 3/16” wide) on the outer underside, the outer corner of which blends into the upper skin.
This is similar to the one on my Daman 4207 model. Seems to be a development of the traditional chine strip. However, it is difficult to obtain a sharp corner as it is easy to round off the edge with the repetitive sanding needed to make a clean land.
Decided to try another approach. Once the skins were fitted and the land established, CA glued a thin metal wire onto the lower corner of the upper skin.
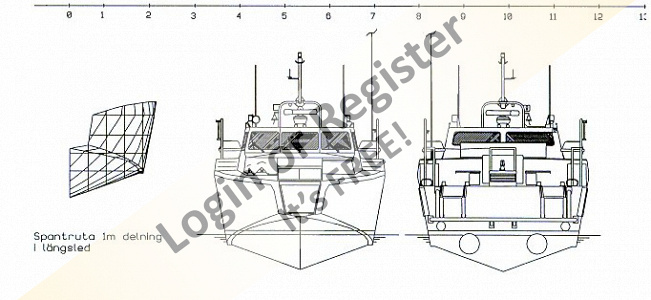
Could then blend the wire into the bottom skin using epoxy, leaving a clean corner on the upper skin. This has the added benefit of truing up the corner. The pictures show the general idea.
Not sure how robust the wire edge will prove to be, but it is nice and sharp.
So far, has survived much emery cloth smoothing without any separation!
The Interceptor and VIP vessels have slightly different chines. The Interceptor does not have one, but there in a small one on the VIP version.
As have decided to build that version, added a thin styrene strip to inside of the wire chine edge to reproduce it.
Had plans printed using drawings from the web and, although somewhat pixelated, they are usable. Made the hull as a typical frame and strip style with a thin plywood skin.
It presented no unusual problems, made up using various plywood thicknesses and basswood strip.
The deck edge support strip was made up of ¼” square basswood up to the area when the bow curve begins. Have done this before, not usually very well.
Decided to try to laminate this forward section using a 1/32 bass wood strip and, whilst the wood still requires bending, it turned out superior.
Did most of the bending by saturating the wood in ammonia. Shaping around a curved pattern, followed by drying with a heat gun. Once the shape was achieved laminated the next strip to it with CA glue. This proved much easier than trying to bend a full section strip.
The finished result has the correct curvature and is robust.
Find the ultimate test of bow curvature is to turn the hull over and see if both sides fit the plan. To my relief they did!
Once the outer skins were fitted and blended into a smooth shape, was unhappy with the chine.
This vessel has a chine strip onto which the bottom and upper skins fit. The strip has a land (about 3/16” wide) on the outer underside, the outer corner of which blends into the upper skin.
This is similar to the one on my Daman 4207 model. Seems to be a development of the traditional chine strip. However, it is difficult to obtain a sharp corner as it is easy to round off the edge with the repetitive sanding needed to make a clean land.
Decided to try another approach. Once the skins were fitted and the land established, CA glued a thin metal wire onto the lower corner of the upper skin.
Could then blend the wire into the bottom skin using epoxy, leaving a clean corner on the upper skin. This has the added benefit of truing up the corner. The pictures show the general idea.
Not sure how robust the wire edge will prove to be, but it is nice and sharp.
So far, has survived much emery cloth smoothing without any separation!
The Interceptor and VIP vessels have slightly different chines. The Interceptor does not have one, but there in a small one on the VIP version.
As have decided to build that version, added a thin styrene strip to inside of the wire chine edge to reproduce it.
▲
⟩⟩
BOATSHED
hermank
ARL58
Colin H
📝 Swedish 16M
11 months ago by 🇨🇦 Rowen ( Captain)
Captain)✧ 71 Views · 5 Likes
Flag
💬 Add Comment
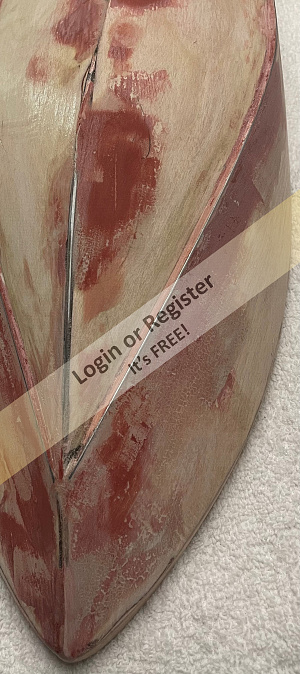
The hull is now fair and prime painted. Decided to try it in a water tank to test for leaks, check ballast, waterjet impeller and reverse operation.
The usual adjustments quickly concluded the ballast and jet rotation questions. There was a couple of leaks around one jet mounting. Easily resolved with silicon seal.
The clamshell nozzles do not to give as much reverse thrust as the bucket style.
As the test tank is very limited in size and shallow, not sure how they will operate in open water.
The ice is now retreating on the Lake Ontario so hope to find out shortly.
The inner jet outlets are also directed towards the centre of the transom, reducing their effectiveness.
At least am now forewarned of the problem and can fit bucket style reverser units if required.
▲
⟩⟩
BOATSHED
Scratchbuilder
hermank
Double Rum
Colin H
📝 Swedish 16 M
11 months ago by 🇨🇦 Rowen ( Captain)
Captain)✧ 63 Views · 9 Likes · 1 Comment
Flag
💬 Add Comment
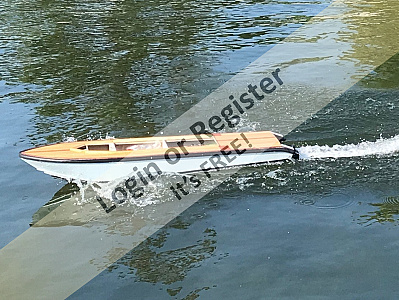
The moment of truth!
Weather has improved, decided to try the unfinished hull with an open water test.
The home made reverse & steering nozzle performance was disappointing. They function in theory and move significant amounts of water. The dimensions of the model though restrict the range of movements necessary to ensure full steering and reverse operation.
These restrictions cause significant disruptions to flow impeding performance and manoeuverability.
JBKIWI offered some words of advice and suggestions following his experience with waterjets. Spent some time trying to figure out how they could be incorporated, but the size restrictions still restrict performance unacceptably.
Have decided to install bucket style nozzles to get some testing in over the summer. Might resurrect the original nozzles next winter and experiment with the necessary modifications.
The flow is much better with these nozzles and a plane can be easily achieved. The hull sits level at rest, but at speed the bow lifts excessively. The performance is good.
Considering the forces generated by a waterjet. The input flow tends to pull the stern down, lifting the bow.
The bow on this vessel is higher than the stern, probably due to its military heritage. This is exaggerated in the last picture, as does the perspective. Think it needs to be lower though.
See pictures
Going to experiment with some simple, fixed transom flaps to increase the upwards force and level the hull
▲
⟩⟩
BOATSHED
stevedownunder
pressonreguardless
GaryLC
jbkiwi
Scratchbuilder
RNinMunich
Colin H
hermank
|
💬 Re: Swedish 16 M
11 months ago by 🇳🇿 jbkiwi (
Fleet Admiral)✧ 54 Views · 7 Likes
Flag
Looks to be moving pretty well Rowen, - took me more than a few tries to get the reverse buckets sorted, but worth it when I did. Try making a mould of a suitably sized and scalloped bucket with air dry modelling clay, by using a wooden male plug to make an impression. Use release wax in the mould and use 6oz glass cloth with polyester resin to make a shell.
You can add strength or reinforced fitting points later. A lot easier than using plumbing fittings, and a lot lighter, and you can make as many as you like my just making multiple impressions (I've used a few moulds more than once.) My last and most successful bucket was 3mm ply with a resin scalloped interior flow director. Keep at it ! JB JB ▲
⟩⟩
BOATSHED
hermank
MouldBuilder
stevedownunder
pressonreguardless
GaryLC
Rowen
|
📝 Swedish 16M
10 months ago by 🇨🇦 Rowen ( Captain)
Captain)✧ 50 Views · 5 Likes
Flag
💬 Add Comment
Made up a pair of simple, bent alloy transom flaps. Fitted them under the rear stern of the hull using double sided adhesive tape.
Had limited experience of determining the correct operating angle, so guessed at 20 degrees from horizontal. Tried the hull out again and these flaps definitely control the bow lifting. So much so, at full speed, it digs in and now resembles a displacement hull!
Obviously the 20degree angle is excessive, examined the installation carefully and also wonder if the self-adhesive tape thickness (about 30 thou.) is exaggerating the lift force.
Decided to make up two more flaps that are almost flat and fit them to the hull with a smear of silicone. This should be quite thin, yet easy to cut if more adjustments are required. Tried this arrangement and the bow lifting is much reduced. The hull remains almost flat as the speed increases.
The pictures of the actual vessel show the bow does lift, so am going to reduce the size of the flaps to limit the down thrust.
Attached are several photos. Will upload them chronologically, they illustrate these efforts. Pictures 3 and 7 show the reduced lift best.
Unfortunately, one of the reverse servos has now failed, need to fit a replacement before testing can continue.
Once corrected, plan to retest using smaller tabs to should reduce downforce slightly.
▲
⟩⟩
BOATSHED
pressonreguardless
hermank
Scratchbuilder
Colin H
📝 Swedish 16M
10 months ago by 🇨🇦 Rowen ( Captain)
Captain)✧ 46 Views · 4 Likes
Flag
💬 Add Comment
Consigned yet another useless micro servo to my pile of failed electrical items.
Noticed that pile also far exceeds the standard servo pile! Decided they are not worth the trouble.
Will cope with the installation challenges of using standard size ones in future.
Replaced the two micro servos with standard items. Quite a few minor modifications were required. Noticed the control response is very different. The reaction of the micro servos is much quicker than standard, but the standard movement more deliberate.
Quite fast enough for this application though, the reverse function is not that effective anyway.
Cut the transom flap overhang down by almost 50% and decided to reinforce the adhesive with a couple of small bolts to avoid coming off in operation.
The end result is good. The bow now lifts slightly on a full plane as the stern is no longer sucked down.
With the wisdom of hindsight, would have been better to have chosen a lightly larger scale. The model is incomplete yet the hull displacement already approaches the upper edge of the boot topping.
Guess have a weight problem, something more widespread than this vessel though!
Have some minor modifications planned and will complete the model over our winter. The grey colour chosen is not appropriate for a luxury yacht, am toying with a change.
Will continue this blog once have restarted work.
▲
⟩⟩
BOATSHED
Len1
Colin H
hermank
📝 SWEDISH 16M
6 months ago by 🇨🇦 Rowen ( Captain)
Captain)✧ 37 Views · 5 Likes
Flag
💬 Add Comment
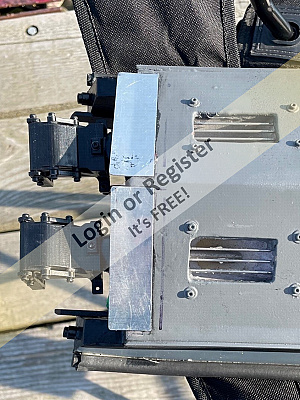
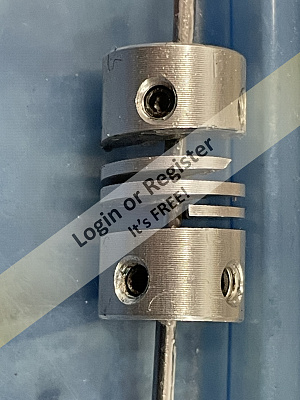
Decided to do another water test and concluded the noise and poor performance had to be addressed. Removed the solid couplings that fastened the two motors to the Waterjets and, with some fettling, managed to squeeze a scroll coupling onto each unit.
This improved both the noise and performance. Was running the model through its paces and noticed a sudden drop in noise, performance seemed unaffected.
On examination found one of the couplings had disintegrated. (see picture).
Upon further examination also found the motor / WJ mounting had fractured. This misaligned the motor / WJ. With great difficulty exchanged the mounting and replaced the coupling. On a bench test note the noise had reduced markedly, as anticipated.
All needed now was a quick water test to confirm noise reduction and review performance before working to complete the project.
The weather Gods were kind and managed to get a quick test in a few days ago. Noise, whist still evident, is at an acceptable level. Performance was adequate. Unfortunately, the test was curtailed by a wiring connection that pulled apart. Simple fix, but not at the waterside.
A fellow sailor videoed the test. Interesting to note that once the model had accelerated the transom flaps force the bow down so the plane is level.
Feel confident that the model can be further developed and will complete the many outstanding details over the winter.
▲
⟩⟩
BOATSHED
mturpin013
Scratchbuilder
Colin H
Rogal118


Login To
Remove Ads
Remove Ads