Join Us On Social Media!

|

|

|
Download The App!
Login To
Remove Ads
Remove Ads
Login To
Remove Ads
Remove Ads
Model Boats Website
Lady T
14 Posts · 1 Follower · 37 Photos · 70 Likes
Began 6 years ago by
 United Kingdom
Follow This Thread
Not currently following
> Click to follow
> Click to follow
Latest Post 6 years ago by
| Oldest posts shown first (Show Newest First) | (Print Booklet) |
📝 Lady T
6 years ago by 🇬🇧 AlanP ( Lieutenant)
Lieutenant)✧ 12 Views · 5 Likes · 2 Comments
Flag
💬 Add Comment
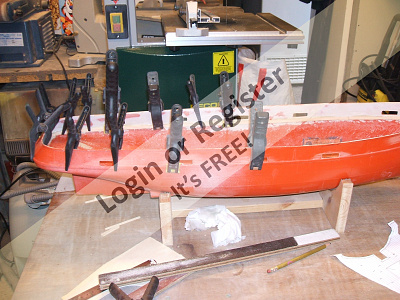
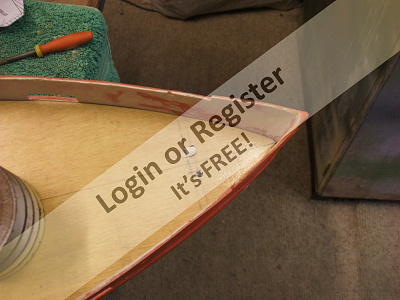
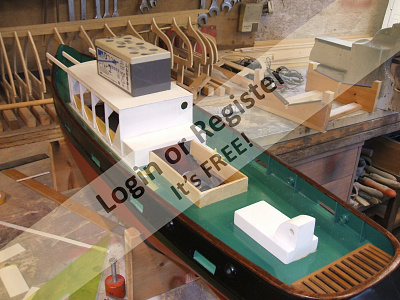
This is a build of the LadyT from Mobile Marine Models, I am quite a way into the build now and have not taken photo's of every part of the build and I may get things a bit out of sequence, but I will do my best.
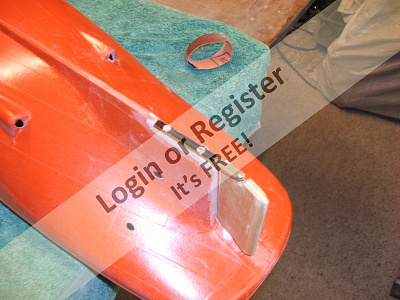
The hull and a set of templates was given to me, I have found out that the templates in most cases are for guidence only. The hull is not one of the best mouldings I have had but with a bit of effort was knocked into shape.
In order that the rudder could be removed from the boat for repair I glued a piece of 3mm brass strip to the hull with Araldit and P38 filler, another piece of brass with a hole to take the rudder was laid on top and two 3.3mm holes drilled through both pieces, the brass on the hull was tapped 4mm and the piece with the hole for the rudder was drilled 4mm clear and countersunck.
By undoing the tiller arm and removing the two 4mm countersunk screws the rudder can be removed for repair.
The rudder was made with thin ply and P38 using the drawing to make a template of the shape.
▲
⟩⟩
Sinc5508
Dave M
figtree7nts
Donnieboy
RNinMunich
|
💬 Lady T
6 years ago by 🇬🇧 Dave M (
 Vice Admiral) Vice Admiral)✧ 5 Views · 3 Likes
Flag
Hi Alan
Build looking good. Rather than post new entries in the Response column, you can add to the build blog, which will also allow you to give a meaningful title, add more pics and encourage others to respond to your new posts. I look forward to see how you progress. ▲
⟩⟩
Sinc5508
SelwynWilliams
RNinMunich
|
|
💬 Lady T
6 years ago by 🇬🇧 AlanP (
Lieutenant)✧ 13 Views · 5 Likes
Flag
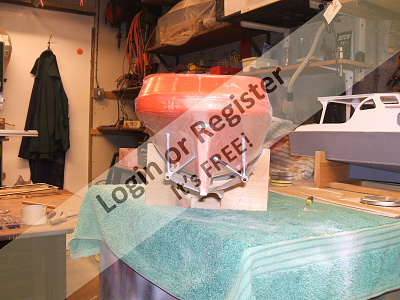
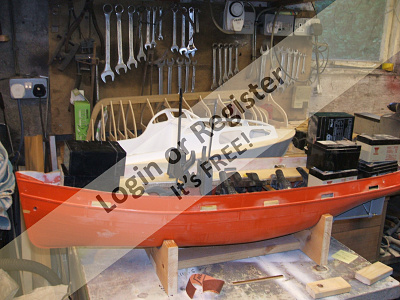
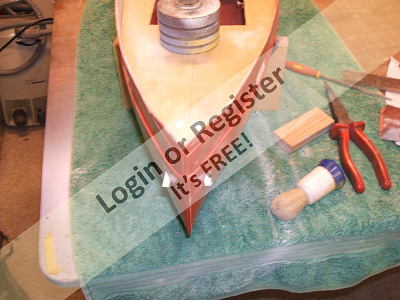
The next stage was to fit the prop tubes and motors, MMModels prop tubes and T4 motors were used. Now I will admit that getting the tubes lined up and getting them to come out of the hull nearly horizontal gave me a lot of headaches. The hull had different thicknesses and shapes of fibreglass were the motors had to be fitted, the A frame markings on the hull, especially the inboard ones were way out, all of this plus the fact that the motors had to be fitted more or less on the bottom of the hull. Aligning pieces were made on the lathe to go between the prop shafts and the motors. Motor mounts were made from hardwood and shaped on a belt sander to fit the hull bottom.
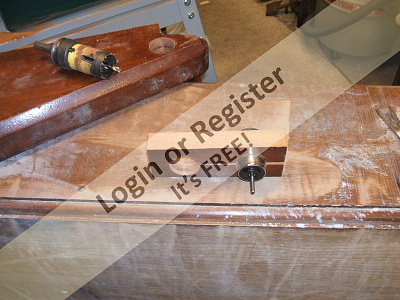
I think I had about five attempts at this stage using all sorts of pieces of ply with holes in them, wooden wedges and of course masking tape. Motor mounts, I only have one photo of these, holes drilled in hardwood with a hole cutter, then cut in two on the bandsaw to give two halves that can clamp the motor, draught excluder stuck on the inside and the two halves fastened together with two wood screws. 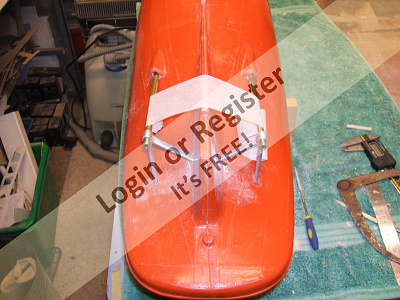


▲
⟩⟩
figtree7nts
SelwynWilliams
Donnieboy
Dave M
RNinMunich
|
Login To
Remove Ads
Remove Ads
📝 Bulwarks and deck supports
6 years ago by 🇬🇧 AlanP ( Lieutenant)
Lieutenant)✧ 12 Views · 4 Likes · 2 Comments
Flag
💬 Add Comment
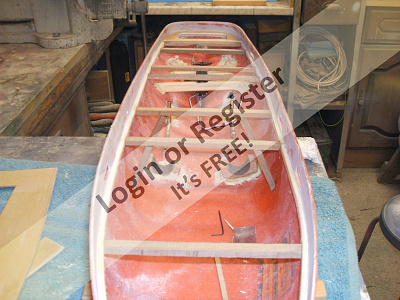
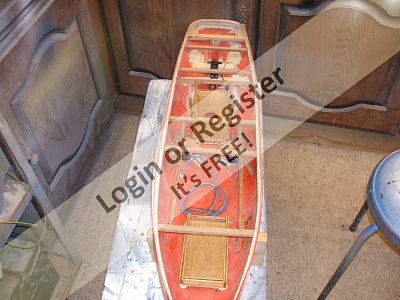
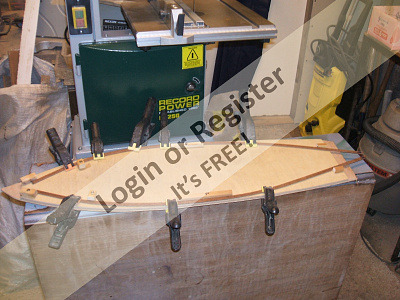
The next stage was to smooth out the Bukwarks so that a deck support could be fitted around the hull, the washports and rope hawsers were cut out, if I was to do this again I would cut these out after filling the bulwarks.
P38 was used to smooth out the Bulwarks, this really was a labour of love, lots of filling and sanding. For the deck support around the hull I used 3mm lime (Ikea blinds) two layers to give 6mm support glued with Araldite.
The rest of the deck supports were then glued in place, I think it was at this stage that I added the two battery placements after having the hull in the bath to work out were they had to go.
▲
⟩⟩
Fred
RNinMunich
Dave M
figtree7nts
|
💬 Bulwarks and deck supports
6 years ago by 🇬🇧 AlanP (
Lieutenant)✧ 9 Views · 1 Like
Flag
Thanks Fred, you did pass on the information thanks, and I have read the builds. Thought I would post my build on this site as I have had a lot of help from people here. I am going to try to give a bit more detail of the build, bad bits and all.
Alan ▲
⟩⟩
RNinMunich
|
|
💬 Bulwarks and deck supports
6 years ago by 🇬🇧 Fred (
Lieutenant)✧ 4 Views · 1 Like
Flag
Hi Alan P
I do not know if 1 if I have pasted this on to you via another forum or 2 if you have seen this post from another forum ▲
⟩⟩
Baggie
|

📝 Decks
6 years ago by 🇬🇧 AlanP ( Lieutenant)
Lieutenant)✧ 12 Views · 4 Likes · 1 Comment
Flag
💬 Add Comment
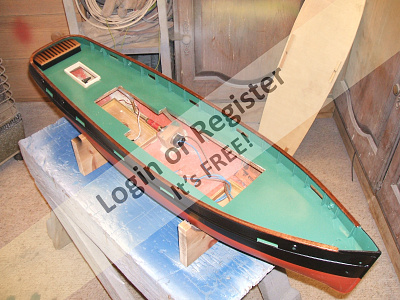
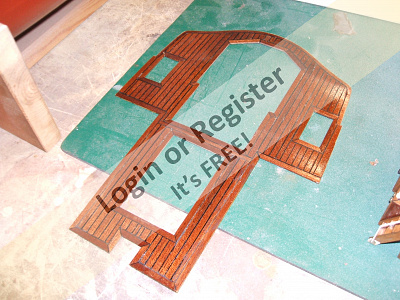
Templates were made out of cardboard, good job that I like Weetabix, a bit of messing about but eventually I got a good fit, these were transferred onto the 3mm ply for the deck.
Before fitting the deck the ply was given a couple of coats of Z-Poxy finishing resin rubbing down in-between coats, this filled in the grain ready for painting and also made it waterproof.
After the glue had dried the deck and bulwark were given a coat of primere, then two coats of the finishing colour. After a week of the paint left to harden the coamings (if that's the right spelling) were glued in place.
▲
⟩⟩
Baggie
Fred
RNinMunich
figtree7nts
|
💬 Decks
6 years ago by 🇩🇪 RNinMunich (
 Fleet Admiral) Fleet Admiral)✧ 3 Views · 0 Likes
Flag
Looking very good 👍
Shaving brush to help shave off the bottom weed I see 😉 Thanks for reminding me of Weetabix👍 used to like 'em with butter and marmalade, Chivers Thick Cut 😊 must check out the local English Shop (before Brexit maybe kills it🤔) and yes 'coamings' is right 👍 Cheers Doug 😎 ▲
⟩⟩
No likes yet
This member will receive 1 point for every like received |
📝 Bulwark supports
6 years ago by 🇬🇧 AlanP ( Lieutenant)
Lieutenant)✧ 12 Views · 4 Likes · 1 Comment
Flag
💬 Add Comment
The deck and bulwarks were given another coat of paint, after this had dried the wash ports and rope hawsers were masked off and the hull given two coats of red primer, the water line was marked using a pencil on a block of wood, bottom part of the hull masked off and the top part given two coats of satin black. Starting to look like a boat now.
The rope crate was made out of plasticard to be a good tight fit on the coaming.
The bulwark positions were marked with pencil on the top of the bulwark. After cutting them all out of plasticard, each one was sanded to fit it's position, then keeping them in order and sticking them to upside down masking tape they were sprayed with paint.
All the supports were glued into position with super glue, a toothpick and my best glasses.
▲
⟩⟩
Fred
figtree7nts
RNinMunich
Colin H
|
💬 Bulwark supports
6 years ago by 🇩🇪 RNinMunich (
Fleet Admiral)✧ 3 Views · 0 Likes
Flag
Nice one Alan 👍
Can sympathise re all the bulwark supports 🤔 Had a similar trial of patience when I soldered dozens of stanchion supports for my HMS Hotspur, and then had to super glue 'em to the deck😲 So far so good 👍 Cheers Doug 😎 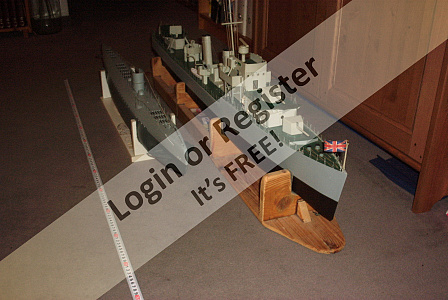
▲
⟩⟩
No likes yet
This member will receive 1 point for every like received |
📝 Bulwark capping
6 years ago by 🇬🇧 AlanP ( Lieutenant)
Lieutenant)✧ 12 Views · 4 Likes · 4 Comments
Flag
💬 Add Comment
So, here we go again. Bulwark capping, I didn't have a piece of teak wide enough to cut these out off, so two strips of teak were cut to the relevant size on the band saw and sanded. A large piece of plywood was laid on the top of the hull, the hull outline was drawn onto the plywood, blocks of wood were secured to the plywood to hold the strips of teak in place but exaggerating the curve. [To allow for spring back]
The teak was soaked overnight, the next day it was soaked in boiling water a few times, whilst still hot and wet it was placed in the blocks to dry.
I had to alter the blocks once to gain a bit more curve.
After the strips were properly dried, the top and sides of the strips were given two coats of finishing resin and left to dry, then the underside was coated with super glue and left the dry.
Then the tricky bit, wearing my best glasses I applied with the aid of a tooth pick super glue to the tops and bulwark supports and fitted the capping's.
The piece around the stern was cut out of one piece and looks alright.
▲
⟩⟩
Baggie
Fred
RNinMunich
Colin H
|
💬 Bulwark capping
6 years ago by 🇩🇪 RNinMunich (
Fleet Admiral)✧ 3 Views · 0 Likes
Flag
Looks very shipshape Baggie, or is it a toast rack 😁
Unusual construction style in two halves. Look forward to seeing how it turns out 👍 Build Blog??? ▲
⟩⟩
No likes yet
This member will receive 1 point for every like received |
|
Login To
Remove Ads 💬 Bulwark capping
6 years ago by 🇬🇧 Baggie (
 Chief Petty Officer 1st Class) Chief Petty Officer 1st Class)✧ 4 Views · 0 Likes
Flag
Thanks to all of you re your posts of your various builds - I am learning a lot from you, your ways of adapting and with the photos, understanding much about building. My Wills Everard is coming on and I am, I think doing OK.
▲
⟩⟩
No likes yet
This member will receive 1 point for every like received |
|
💬 Bulwark capping
6 years ago by 🇬🇧 Fred (
Lieutenant)✧ 3 Views · 0 Likes
Flag
Looking good Alan, as RNinMunich said good tip on the bending of the bulwark.
Fred ▲
⟩⟩
No likes yet
This member will receive 1 point for every like received |
|
💬 Bulwark capping
6 years ago by 🇩🇪 RNinMunich (
Fleet Admiral)✧ 3 Views · 0 Likes
Flag
Nice job Alan👍 Good bending tips too, cheers Doug 😎
▲
⟩⟩
No likes yet
This member will receive 1 point for every like received |
📝 Anchor chain tubes
6 years ago by 🇬🇧 AlanP ( Lieutenant)
Lieutenant)✧ 13 Views · 5 Likes · 2 Comments
Flag
💬 Add Comment
I forgot about this bit, it was done before the hull and decks were painted.
The tubes to take the anchor chain, there is probable a proper name for these but I have no idea what it is 😡
The positions on the deck were marked off and two holes drilled slightly smaller than the plastic tube that I was going to use, the same size holes were drilled on the hull, there are markings on the hull were the anchors go. Using a small round file the holes were opened up to take the tube, a small amount of super glue to hold the tubes in position and then the plastic tubes sanded off against the hull and deck. A bit of P38 around the tubes and sanded. Job done 😁
▲
⟩⟩
Fred
Donnieboy
figtree7nts
RNinMunich
Colin H
|
💬 Anchor chain tubes
6 years ago by 🇬🇧 Fred (
Lieutenant)✧ 3 Views · 0 Likes
Flag
Hi
That is a nice tight looking deck, just hope mine comes out that good. ▲
⟩⟩
No likes yet
This member will receive 1 point for every like received |
|
💬 Anchor chain tubes
6 years ago by 🇩🇪 RNinMunich (
Fleet Admiral)✧ 3 Views · 0 Likes
Flag
Hawsepipes Old Chap, Hawsepipes! 😁
Pronounced hawse(r)pipe. Build is coming on fine, very tidy work 👍 The weights you use look extremely familiar 😉 Did the same with the cabin roof for my Sea Scout reno. Carry on Blogging, cheers Doug 😎 ▲
⟩⟩
No likes yet
This member will receive 1 point for every like received |
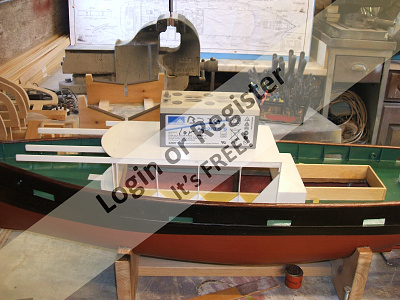
📝 Superstructure
6 years ago by 🇬🇧 AlanP ( Lieutenant)
Lieutenant)✧ 12 Views · 4 Likes · 4 Comments
Flag
💬 Add Comment
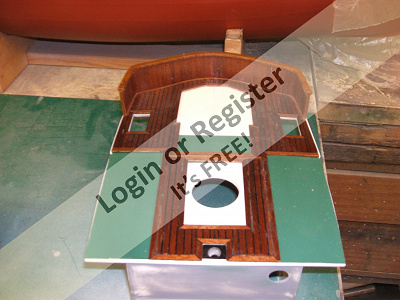
I have made the superstructure out of plasticard as it is much easier to paint, no filling in of the grain as there is with wood.
The main superstructure and the engine room structure are supposed to be as one, I am keeping these separate in the hope that I can house the switches and charging sockets under the engine structure.
I only have the two photo's of this stage I'm afraid.
The main superstructure and the engine room structure are supposed to be as one, I am keeping these separate in the hope that I can house the switches and charging sockets under the engine structure.
I only have the two photo's of this stage I'm afraid.
▲
⟩⟩
Fred
Baggie
RNinMunich
Donnieboy
|
💬 Superstructure
6 years ago by 🇬🇧 AlanP (
Lieutenant)✧ 9 Views · 0 Likes
Flag
😁😁😁😁😁😁
▲
⟩⟩
No likes yet
This member will receive 1 point for every like received |
|
Login To
Remove Ads 💬 Superstructure
6 years ago by 🇩🇪 RNinMunich (
Fleet Admiral)✧ 4 Views · 1 Like
Flag
Okey Dokey 👍
Doesn't mounting them on the roof make her roll a bit though?? 😲😁😁 ▲
⟩⟩
Krampus
|
|
💬 Superstructure
6 years ago by 🇬🇧 AlanP (
Lieutenant)✧ 9 Views · 1 Like
Flag
Hi Doug, just big lead acid batteries in this boat, I only use li po's in my fast electric boats.
Two of our club members have had fires with these so I am very careful with them. Cheers Alan ▲
⟩⟩
RNinMunich
|
|
💬 Superstructure
6 years ago by 🇩🇪 RNinMunich (
Fleet Admiral)✧ 3 Views · 0 Likes
Flag
Plasticard! 😲 That's cheating 😁 but I can more than appreciate why, being in the middle of renovating a 60s built wooden boat!
I also separated the bridge and deck houses on my destroyer to hide various switches and sockets👍 BTW: if you're using LiPos DON'T CHARGE THEM IN THE BOAT PLEASE!!!😡 Charge 'em in a LiPo Safe bag! Cheers Doug 😎 ▲
⟩⟩
No likes yet
This member will receive 1 point for every like received |
📝 Doors
6 years ago by 🇬🇧 AlanP ( Lieutenant)
Lieutenant)✧ 14 Views · 6 Likes · 5 Comments
Flag
💬 Add Comment
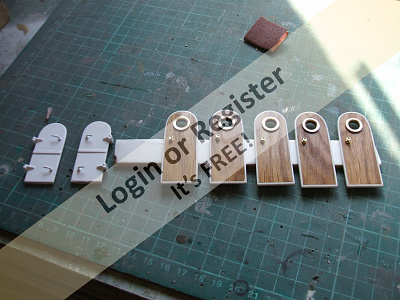
Here is a photo of the doors for the main superstructure, made out of a thin piece of Oak with a surround made from plasticard, brass portholes and dolls house knobs. The watertight doors made from plasticard and the hinges also made from plasticrd with the aid of a magnifying glass 😁
I bought the two sets of portholes from MMModels as it wasn't worth the trouble of making them all, lazy I know 😜
I bought the two sets of portholes from MMModels as it wasn't worth the trouble of making them all, lazy I know 😜
▲
⟩⟩
mturpin013
RNinMunich
MouldBuilder
figtree7nts
marky
Fred
|
💬 Doors
6 years ago by 🇬🇧 Colin H (
Fleet Admiral)✧ 3 Views · 0 Likes
Flag
Thanks Alan, nice and simple the way I like it. I'll put some veneer on a piece of 1/16th ply then cut out and try my luck at framing.
Cheers for now Colin. ▲
⟩⟩
No likes yet
This member will receive 1 point for every like received |
|
Login To
Remove Ads 💬 Doors
6 years ago by 🇬🇧 AlanP (
Lieutenant)✧ 10 Views · 1 Like
Flag
Hi Colin, I think the wood for the doors is about 2mm thick, a thin strip slightly wider than 2mm of plasticard is super glued around the edge, then using wet and dry sanded flush front and back. After drilling the hole for the porthole, the whole lot was given a couple of coats of Halfords clear lacquer and the knob stuck on. 👍
▲
⟩⟩
rolfman2000
|
|
💬 Doors
6 years ago by 🇬🇧 Fred (
Lieutenant)✧ 3 Views · 0 Likes
Flag
Looking great, keep up the good work, looking forward to your next update👍
▲
⟩⟩
No likes yet
This member will receive 1 point for every like received |
|
💬 Doors
6 years ago by 🇬🇧 Colin H (
Fleet Admiral)✧ 3 Views · 0 Likes
Flag
Nicely done, how did you frame the doors please, I would like to pinch your idea, as I have a big box of veneers of all sorts.
▲
⟩⟩
No likes yet
This member will receive 1 point for every like received |
|
💬 Doors
6 years ago by 🇩🇪 RNinMunich (
Fleet Admiral)✧ 3 Views · 0 Likes
Flag
Very nice 👍
▲
⟩⟩
No likes yet
This member will receive 1 point for every like received |
📝 Boatdeck bulwark & boatdeck planking
6 years ago by 🇬🇧 AlanP ( Lieutenant)
Lieutenant)✧ 13 Views · 5 Likes · 2 Comments
Flag
💬 Add Comment
I haven't posted for a while as I have only been running on three cylinders, but all four firing now, so off we go.
An edging is glued around the boatdeck, this then allows a thin piece of plasticard to be glued in place for the boatdeck bulwark, after the glue had dried, planks cut from a sheet of veneer were glued inside and out and the bulwark and finished with a teak capping.
A cardboard template was made for the boatdeck overlay planking, this was then transferred onto 1mm ply for the planking to be laid on. Using planks cut from a sheet of veneer and cotton thread for the caulking, Aliphatic glue, a tooth pick and my best glasses the planking was completed. The finished planking was given several coats of clear lacquer rubbing down in between coats to give it a nice finish.
Planking at this scale with fine thread as caulking is definitely a labour of love.
▲
⟩⟩
RNinMunich
Fred
Donnieboy
marky
mturpin013
|
💬 Boatdeck bulwark & boatdeck planking
6 years ago by 🇨🇦 Donnieboy (
 Warrant Officer) Warrant Officer)✧ 3 Views · 0 Likes
Flag
Excellant job.Thanks for the hint of using the thread.Looks better than magic marker on the edge of the planks.
▲
⟩⟩
No likes yet
This member will receive 1 point for every like received |
|
💬 Boatdeck bulwark & boatdeck planking
6 years ago by 🇬🇧 Fred (
Lieutenant)✧ 3 Views · 0 Likes
Flag
Hi
That is looking good.👍 Keep up the good work, looking forward to your updates. Fred ▲
⟩⟩
No likes yet
This member will receive 1 point for every like received |
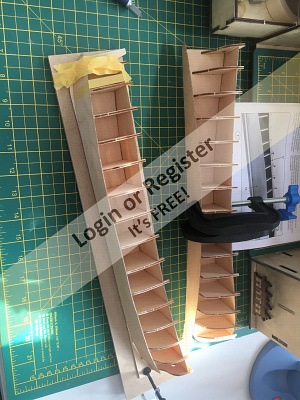
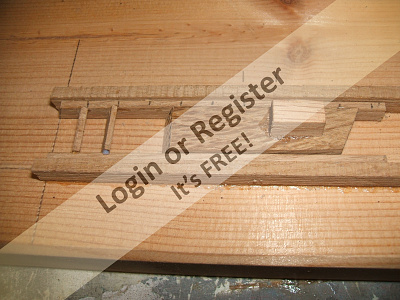
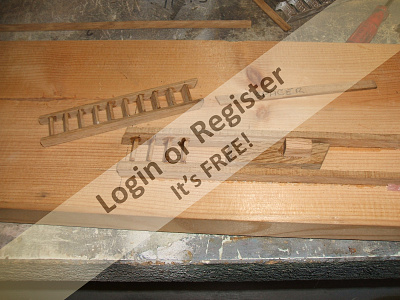
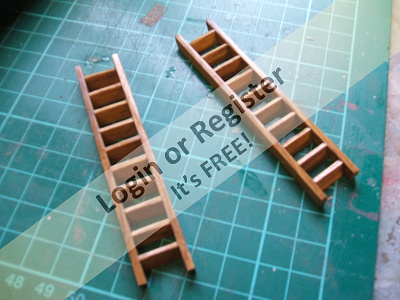
📝 wooden ladders
6 years ago by 🇬🇧 AlanP ( Lieutenant)
Lieutenant)✧ 17 Views · 9 Likes · 5 Comments
Flag
💬 Add Comment
There are two long ladders from the deck to the boat deck and three shorter ones around the battery boxes.
I had a few goes at these free hand and they all ended up on the fire. So I made this jig, the two side rails are placed at each side with a piece of wood with the end cut at the angle of the treads, it is a snug fit between the side rails, a spacer is made to get equal spacing's between the treads. The inside of the jig is coated in candle wax to stop the glue sticking the ladders to the jig, Each tread is cut and sanded to be a tight fit between the side rails and glued in place using a tooth pick and super glue.
Well that explanation makes sense to me, but the photo's should make it clear.
▲
⟩⟩
Inkoust
hightide
mturpin013
Donnieboy
figtree7nts
RNinMunich
Fred
Baggie
Colin H
|
💬 wooden ladders
6 years ago by 🇬🇧 mturpin013 (
 Admiral) Admiral)✧ 5 Views · 2 Likes
Flag
very nice piece of work, always worth making a jig where possible, it shows in the consistency of the finished product
▲
⟩⟩
teejay
Donnieboy
|
|
Login To
Remove Ads 💬 wooden ladders
6 years ago by 🇬🇧 AlanP (
Lieutenant)✧ 9 Views · 0 Likes
Flag
Yes, I think it was Fred, they were given a couple of coats of clear lacquer after sanding to finish them off.
▲
⟩⟩
No likes yet
This member will receive 1 point for every like received |
|
💬 wooden ladders
6 years ago by 🇬🇧 Fred (
Lieutenant)✧ 4 Views · 1 Like
Flag
Hi
Like the idea of the jig, did you use mahogany for the ladders? Loving the detail you are putting into this👍 Fred ▲
⟩⟩
Inkoust
|
|
💬 wooden ladders
6 years ago by 🇩🇪 RNinMunich (
Fleet Admiral)✧ 3 Views · 0 Likes
Flag
Brilliant 👍 Where there's a will .... 😉
▲
⟩⟩
No likes yet
This member will receive 1 point for every like received |
|
💬 wooden ladders
6 years ago by 🇬🇧 Baggie (
Chief Petty Officer 1st Class)✧ 6 Views · 2 Likes
Flag
Well done you. it certainly is worth persevering to get things right.... as I am finding building my first boat. All these things you guys show on the various’forums’ are so very useful and interesting. Thank you.
▲
⟩⟩
Gravedigger47
Gascoigne
|


Login To
Remove Ads
Remove Ads