Join Us On Social Media!

|

|

|
Download The App!
Login To
Remove Ads
Remove Ads
Login To
Remove Ads
Remove Ads
Model Boats Website
1-35 scale S100 schennllboot
5 Posts · 0 Followers · 40 Photos · 7 Likes
Began 6 years ago by
 United Kingdom
Follow This Thread
Not currently following
> Click to follow
> Click to follow
Latest Post 6 years ago by
| Oldest posts shown first (Show Newest First) | (Print Booklet) |
📝 1-35 scale S100 schennllboot blog
6 years ago by 🇬🇧 teejay ( Petty Officer 1st Class)
Petty Officer 1st Class)✧ 8 Views · 7 Likes · 3 Comments
Flag
💬 Add Comment
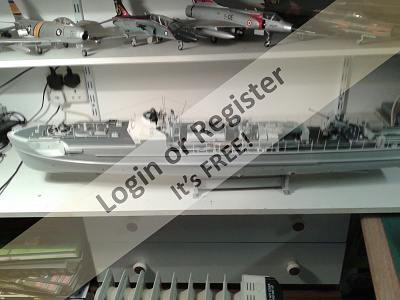
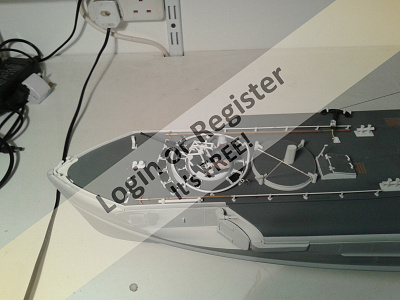
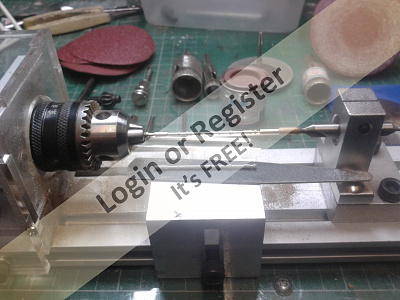
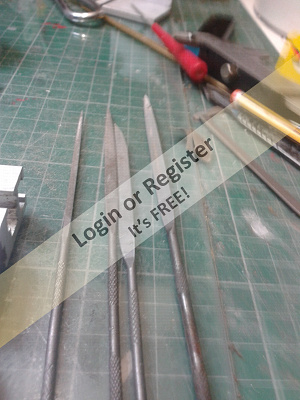
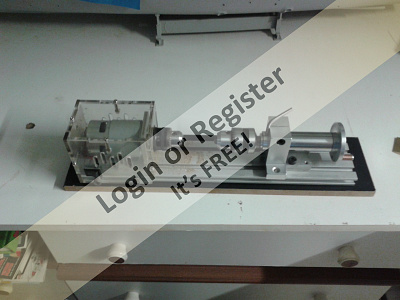
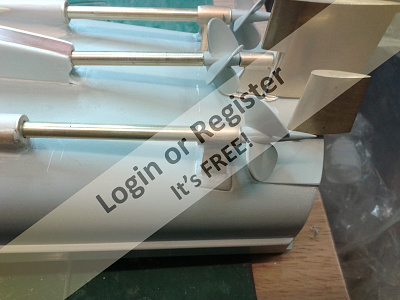
Hi all this is my first blog, last year I post my intention to do a project about an RAF D boat that my Father served on and as a precursor to that build That I was going to do this S/E boat as the hull design is shared buy both, and as plastic kit modeller the kit great the first stage was to put together the decks and superstructure as normal, with the exception of all the bits that would be easily broken as most kit aircraft modellers aerials and guns tend to brake ,so long ago I got into the habit of making these out brass rod or bar using a mini drill and a set of needle files, holding the drill in my left hand and the files in my right, when started this I saw the number of stanches I needed so I came across this little beauty a mini bead lathe it is a great bit of kit and not expensive less than £50 and plenty of types and accessories available so all the stanches aerials hand rails, gun rails, horn, and some of the components for the rudder and tiller were made on this lathe. so good time being had in my first radio control boat . the next post will show all the parts for the rudder/tiller setup


▲
⟩⟩
boaty
reilly4
mturpin013
MouldBuilder
Donnieboy
Rowen
marky
|
💬 1-35 scale S100 schennllboot
6 years ago by 🇬🇧 mturpin013 (
 Admiral) Admiral)✧ 1 View · 0 Likes
Flag
The mini lathe looks a good piece of kit if you don't have a full size lathe and for under £50 can't go wrong.
▲
⟩⟩
No likes yet
This member will receive 1 point for every like received |
|
Login To
Remove Ads 💬 1-35 scale S100 schennllboot
6 years ago by 🇬🇧 teejay (
Petty Officer 1st Class)✧ 1 View · 0 Likes
Flag
Hi camyaj sorry but I have not kept the details, but if you type mini bead lathe in Google or what ever search engine you use, you should find quit a few at varying prices but more important you should be able to find one that suits you personal needs and budget. you may also find other machines such as a mini milling machines and accessories,( am waiting for one to arrive) but be aware check the accessories suit your choice of lathe as made a mistake with one , but was ok as I was able to modify the part to suit my lathe.
▲
⟩⟩
No likes yet
This member will receive 1 point for every like received |
|
💬 1-35 scale S100 schennllboot
6 years ago by 🇬🇧 camyaj (
 Petty Officer 2nd Class) Petty Officer 2nd Class)✧ 5 Views · 2 Likes
Flag
Details/Link for the lathe please
Thanks ▲
⟩⟩
mturpin013
Colin H
|
Login To
Remove Ads
Remove Ads
📝 1-35 scale S100 schennllboot
6 years ago by 🇬🇧 teejay ( Petty Officer 1st Class)
Petty Officer 1st Class)✧ 1 View · 0 Likes · 1 Comment
Flag
💬 Add Comment
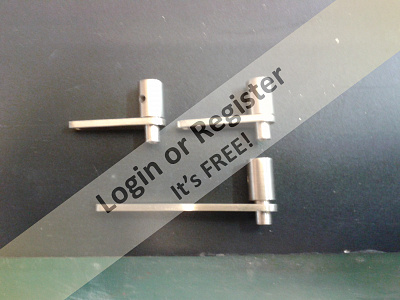
Hi all for the second blog report on the schenllboot I am going to go over the rudder an propeller shaft assembly in more detail.
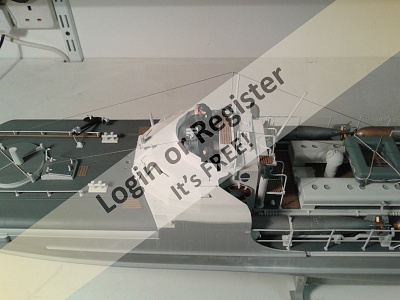
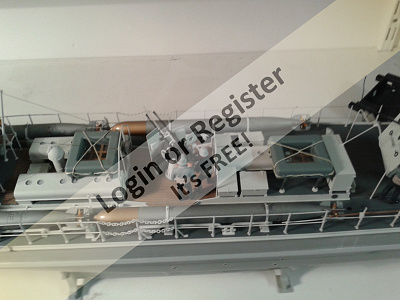
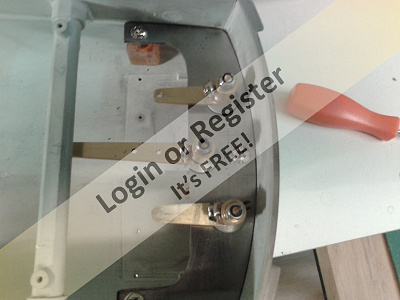
The first stage was to make the rudders which were made of brass ,and having taken note of what has been said about the increase in size needed for the kit by other members I have increased the size of the rudders by 50% so that they have more effect and hopefully the boat will be more agile .I fitted 3mm treaded rod on to the rudder and in a 4mm flanged tube to reinforce the brass rod.
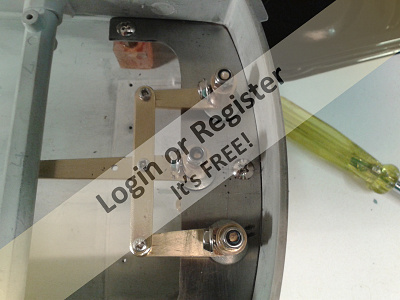
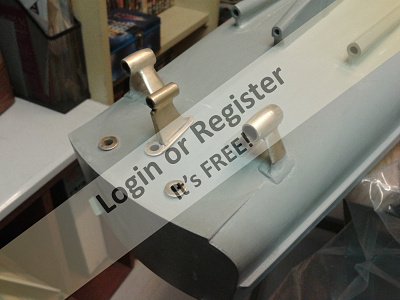
The second stage was to make and fit 5mm flanged tube in the location for the rudders in the boat , these were made to be above the water line and will be sealed in place to reduce the possibility of leaks. These were fitted to a rudder platform inside the boat which was fitted to the kit moulding for the rubbing strip that runs the length on the boat and secured by making resin blocks which were fitted with computer extension nuts .which were then superglue in place to secure the rudder platform. The rudders were then fitted in place and held in position with the tiller collars which were made from 8mm rod and fitted the tiller arms and locked in place with 3mm computer screws and ni-lock nuts, a connecting plate was then fitted to connect the three tillers together, I also fitted rubberised washers to seal the rudder tubes.
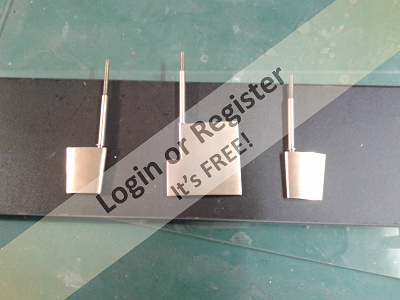
The third stage was to make the propeller supports. The centre support was a direct copy of the kit part made of brass and fitted to the kit with a plate and screws (this plate and the rudder plate were made from galvanised steel)and will sealed with resin after the I test the boat for leaks.
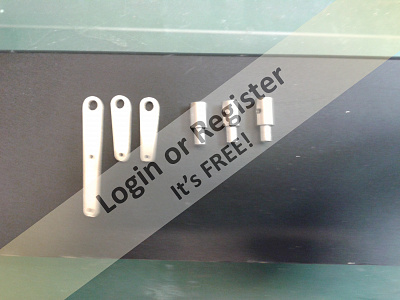
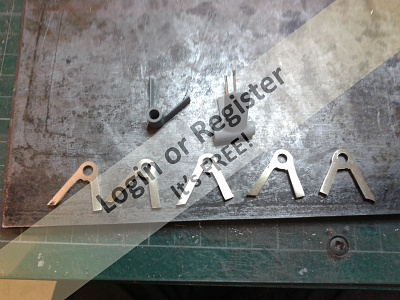
The port and starboard supports were made by taking the kit parts and cutting them in have along the joint line or mould seam this gave me a template ,which I used to make cross-section segments but I did alter the template by increasing the boss diameter to 10mm and extending the support legs so that the finished support could be fitted through the hull (the picture of these show the mk1 version where I forgot to allow for the 4mm prop shaft which has a 6mm tube) any way the boss of these segments were drilled out with a 7mm drill and a length of 7mm brass tube fitted through the boss to assemble the segments, all of which were coated in soldering flux at this stage of the assembly which were riveted at both ends to hold it all together during soldering, after soldering the supports were then filed to the size and shape to resemble the kit parts as close as possible and fitted to the hull using a superglue and talcum power mix and then I cast resin around the extensions to secure the prop supports in place.
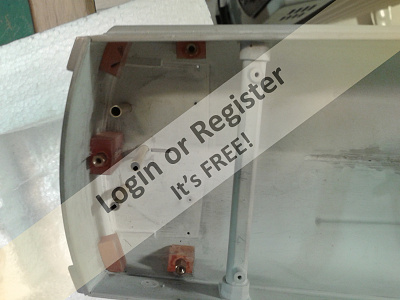
The forth stage is the propeller shaft housing for the centre propeller housing I place a brass rod in a plastic straw and place in position in hull and using resin I sealed the hull with the rod in place this gave me a pilot hole for the centre prop shaft after I removed the brass rod. For the port and starboard shafts I used the kit parts which had hole place when assembled, this when I reinforced the housings ,the centre housing I glue 2mm of plasticard on each side and for the port and starboard I made a brass tube shroud which covered the housings which left gaps between the kit part and the brass which was filled by casting resin in the gap this increased the diameter to 10 mm so that there were little chance of breaking throw with the drill and finished these off by fill-in the outside with body filler and sanded to shape and finish . I then drilled through the pilot hole in the housings using very long extended drills and a wheel brace ( if I had use a power drill the heat would have melted the plastic of the kit and may have caused problems) I drill the shaft housings out 6mm them filed them out with 6mm file so that I could insert a length of 6mm brass tube. After all this was done I fitted a flanged bush made from 7mm tube and 2mm brass plate turned to 11mm to the ends or the propeller shaft housings.
And now it is time I have to ask for some help could any one advise me on the length of propeller shafts , I know I can use a 300mm shaft for the centre shaft but port and starboard will have to be longer . and I also need advice on selecting the motors , I want to use 4mm prop shaft with 35mm propellers. Any opinions welcome.


The first stage was to make the rudders which were made of brass ,and having taken note of what has been said about the increase in size needed for the kit by other members I have increased the size of the rudders by 50% so that they have more effect and hopefully the boat will be more agile .I fitted 3mm treaded rod on to the rudder and in a 4mm flanged tube to reinforce the brass rod.
The second stage was to make and fit 5mm flanged tube in the location for the rudders in the boat , these were made to be above the water line and will be sealed in place to reduce the possibility of leaks. These were fitted to a rudder platform inside the boat which was fitted to the kit moulding for the rubbing strip that runs the length on the boat and secured by making resin blocks which were fitted with computer extension nuts .which were then superglue in place to secure the rudder platform. The rudders were then fitted in place and held in position with the tiller collars which were made from 8mm rod and fitted the tiller arms and locked in place with 3mm computer screws and ni-lock nuts, a connecting plate was then fitted to connect the three tillers together, I also fitted rubberised washers to seal the rudder tubes.
The third stage was to make the propeller supports. The centre support was a direct copy of the kit part made of brass and fitted to the kit with a plate and screws (this plate and the rudder plate were made from galvanised steel)and will sealed with resin after the I test the boat for leaks.
The port and starboard supports were made by taking the kit parts and cutting them in have along the joint line or mould seam this gave me a template ,which I used to make cross-section segments but I did alter the template by increasing the boss diameter to 10mm and extending the support legs so that the finished support could be fitted through the hull (the picture of these show the mk1 version where I forgot to allow for the 4mm prop shaft which has a 6mm tube) any way the boss of these segments were drilled out with a 7mm drill and a length of 7mm brass tube fitted through the boss to assemble the segments, all of which were coated in soldering flux at this stage of the assembly which were riveted at both ends to hold it all together during soldering, after soldering the supports were then filed to the size and shape to resemble the kit parts as close as possible and fitted to the hull using a superglue and talcum power mix and then I cast resin around the extensions to secure the prop supports in place.
The forth stage is the propeller shaft housing for the centre propeller housing I place a brass rod in a plastic straw and place in position in hull and using resin I sealed the hull with the rod in place this gave me a pilot hole for the centre prop shaft after I removed the brass rod. For the port and starboard shafts I used the kit parts which had hole place when assembled, this when I reinforced the housings ,the centre housing I glue 2mm of plasticard on each side and for the port and starboard I made a brass tube shroud which covered the housings which left gaps between the kit part and the brass which was filled by casting resin in the gap this increased the diameter to 10 mm so that there were little chance of breaking throw with the drill and finished these off by fill-in the outside with body filler and sanded to shape and finish . I then drilled through the pilot hole in the housings using very long extended drills and a wheel brace ( if I had use a power drill the heat would have melted the plastic of the kit and may have caused problems) I drill the shaft housings out 6mm them filed them out with 6mm file so that I could insert a length of 6mm brass tube. After all this was done I fitted a flanged bush made from 7mm tube and 2mm brass plate turned to 11mm to the ends or the propeller shaft housings.
And now it is time I have to ask for some help could any one advise me on the length of propeller shafts , I know I can use a 300mm shaft for the centre shaft but port and starboard will have to be longer . and I also need advice on selecting the motors , I want to use 4mm prop shaft with 35mm propellers. Any opinions welcome.
▲
⟩⟩
No likes yet
This member will receive 1 point
for every like received
This member will receive 1 point
for every like received
|
💬 Rudders and propeller
6 years ago by 🇨🇦 Donnieboy (
 Warrant Officer) Warrant Officer)✧ 3 Views · 2 Likes
Flag
Wonderful craftmanship.I had a schnellboot just a little bit larger.I used 3 speed 400's.Had no problem with them.The boat moved at a scale speed.That's one option to try.
▲
⟩⟩
SelwynWilliams
teejay
|
📝 lastest progress
6 years ago by 🇬🇧 teejay ( Petty Officer 1st Class)
Petty Officer 1st Class)✧ 1 View · 0 Likes · 4 Comments
Flag
💬 Add Comment
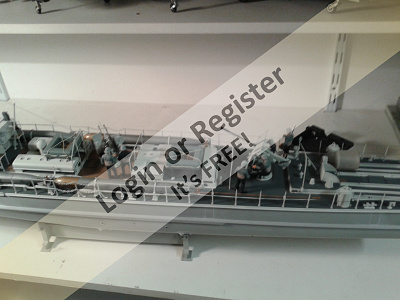
Hi All here is the last on the schenllboot S100 I have been able to finish the paint work on the hull and she is now ready for final coats of varnish and full reinstallation of the RC equipment , still a bit nervous about that, part of the installation instructions are indicating the red wires on two of the esc,s need to be cut , I think this is the switch wire so the you only need one switch to active the other motors . I will look in to that before cutting

▲
⟩⟩
No likes yet
This member will receive 1 point
for every like received
This member will receive 1 point
for every like received
|
💬 lastest progress
6 years ago by 🇩🇪 RNinMunich (
 Fleet Admiral) Fleet Admiral)✧ 1 View · 0 Likes
Flag
BTW TJ,
to paraphrase Maggie Thatcher's immortal words to the German Chancellor; "You may call me Doug"! 😉 Cheers, U No Who! 😎 ▲
⟩⟩
No likes yet
This member will receive 1 point for every like received |
|
Login To
Remove Ads 💬 lastest progress
6 years ago by 🇩🇪 RNinMunich (
Fleet Admiral)✧ 1 View · 0 Likes
Flag
My pleasure TJ, get well soon👍
But as an ex Pat living in Germany for 30 odd years and having worked on several types of Fast Patrol Boats / Fast Attack Craft your spelling of Schnellboot is still making my hair stand on end! 🤔 BTW: DON'T cut the switch wires on the ESCs or you won't be able to turn them on! Cut the red wires in the 3 wire cables from the ESCs to the RX. Cheers, Doug 😎 BTW 2: boat looks good, nice work👍 I have a couple of 1/72 kits for E-Boat / S-Boot, hope mine turns out as well as yours! 😉 ▲
⟩⟩
No likes yet
This member will receive 1 point for every like received |
|
💬 lastest progress
6 years ago by 🇬🇧 teejay (
Petty Officer 1st Class)✧ 2 Views · 1 Like
Flag
Hi RNinMunich thank a lot put my mind at rest and nice to have the reasoning explained , also good to here from you, been a while, and good to be back making stuff again after getting the needles in my spine hope all is well with all members
▲
⟩⟩
RNinMunich
|
|
💬 lastest progress
6 years ago by 🇩🇪 RNinMunich (
Fleet Admiral)✧ 2 Views · 1 Like
Flag
Hi TJ, that instruction is quite correct👍
It indicates that the ESCs have Battery eliminator Circuits (BEC) which means that there is an internal circuit which 'syphons' off 5V from the main drive battery to supply the receiver via the red wire in the ESC to RX cable. The ESC itself takes it's power from the drive battery. If all three red wires are left connected this will cross couple all three BEC circuits and may well damage the ESCs. The RX only needs one power supply! 😉 In my multiple shaft boats I usually disconnect all the red leads from ESC to RX and fit a separate RX battery. Cheers, Doug 😎 ▲
⟩⟩
teejay
|
📝 electrical connectors
6 years ago by 🇬🇧 teejay ( Petty Officer 1st Class)
Petty Officer 1st Class)✧ 8 Views · 0 Likes · 1 Comment
Flag
💬 Add Comment
Hi all back at bench for a couple hours my back is slowly improving. the build is nearly complete,
but I do have a bit of a problem with the motors, two of the motors have grouper type connectors the other has connectors form Halfords,
The one from Halfords is motor 3 this is the central motor ,
motors 1&2 have grouper connectors ,
motor runs really well no problems, but 1&2 RUN INTERMITTILY but only when tweak the connector,
Now I don't know if there is some other piece of kit I yet to find out about or maybe the grouper type connectors are just finicky , any body any suggestions or comments before I replace the connections with the Halfords connectors
and here is question for Doug you said it would be wise to fit a switch and a fuse on the battery for the RX I have a four cell battery , what size of fuse would recommend.
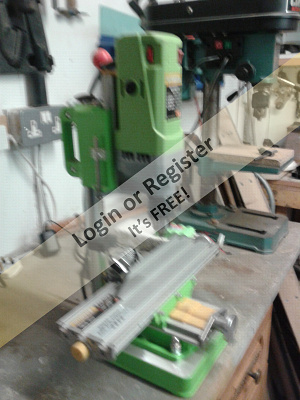
and lastly here is the picture of my little milling machine
but I do have a bit of a problem with the motors, two of the motors have grouper type connectors the other has connectors form Halfords,
The one from Halfords is motor 3 this is the central motor ,
motors 1&2 have grouper connectors ,
motor runs really well no problems, but 1&2 RUN INTERMITTILY but only when tweak the connector,
Now I don't know if there is some other piece of kit I yet to find out about or maybe the grouper type connectors are just finicky , any body any suggestions or comments before I replace the connections with the Halfords connectors
and here is question for Doug you said it would be wise to fit a switch and a fuse on the battery for the RX I have a four cell battery , what size of fuse would recommend.
and lastly here is the picture of my little milling machine
▲
⟩⟩
No likes yet
This member will receive 1 point
for every like received
This member will receive 1 point
for every like received
|
💬 electrical connectors
6 years ago by 🇩🇪 RNinMunich (
Fleet Admiral)✧ 1 View · 0 Likes
Flag
Hi TJ,
1: "grouper connectors"!? Do you mean Graupner? Pics please. 2: What the heck are 'Halford connectors'? Bullet connectors perhaps? 3: Why two types of connectors at all? 4: Fuse; I actually recommended a fuse between the drive battery and the ESCs to protect both the ESCs and the motors. The switch is normally for the RX only, unless you can find a high current switch which isn't too big to put between the drive battery and the ESCs. Fuse for the RX supply is not normally necessary, especially if a BEC supply is used. With a separate RX battery maximum a 2A fuse. The RX takes only a few milliamps BUT each decent size servo will take up to 500mA. So 2A will do for up to 4 servos. Which motors by the way? Odd that they have different connectors😲 Cheers, Doug 😎 ▲
⟩⟩
No likes yet
This member will receive 1 point for every like received |
📝 electrical connectors
6 years ago by 🇬🇧 teejay ( Petty Officer 1st Class)
Petty Officer 1st Class)✧ 8 Views · 0 Likes · 3 Comments
Flag
💬 Add Comment
Hi Doug just to let you know the battery for the RX a four cell NiMH of 4.8V
▲
⟩⟩
No likes yet
This member will receive 1 point
for every like received
This member will receive 1 point
for every like received
|
💬 electrical connectors
6 years ago by 🇩🇪 RNinMunich (
Fleet Admiral)✧ 1 View · 0 Likes
Flag
Hi, don't bother with the pics, just change the Graupner connectors for bullets. Preferably the gold type.
Cheers, Doug 😎 ▲
⟩⟩
No likes yet
This member will receive 1 point for every like received |
|
Login To
Remove Ads 💬 electrical connectors
6 years ago by 🇬🇧 teejay (
Petty Officer 1st Class)✧ 8 Views · 1 Like
Flag
Hi Doug thanks again for your help , yes Graupner connectors and yes the one that works well are bullet connectors I will post pictures tomorrow asap.
▲
⟩⟩
RNinMunich
|
|
💬 electrical connectors
6 years ago by 🇩🇪 RNinMunich (
Fleet Admiral)✧ 1 View · 0 Likes
Flag
I'd twigged that 😉
▲
⟩⟩
No likes yet
This member will receive 1 point for every like received |


Login To
Remove Ads
Remove Ads