Join Us On Social Media!

|

|

|
Download The App!
Login To
Remove Ads
Remove Ads
Login To
Remove Ads
Remove Ads
Model Boats Website
Range Safety Launch?
8 Posts · 2 Followers · 30 Photos · 26 Likes
Began 6 years ago by
 United Kingdom
Follow This Thread
Not currently following
> Click to follow
> Click to follow
Latest Post 6 years ago by
| Oldest posts shown first (Show Newest First) | (Print Booklet) |
📝 Range Safety Launch?
6 years ago by 🇬🇧 NPJ ( Warrant Officer)
Warrant Officer)✧ 12 Views · 0 Likes
Flag
💬 Add Comment
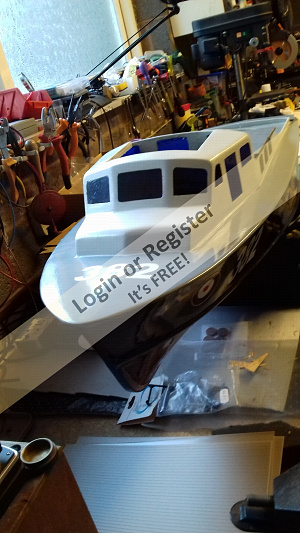
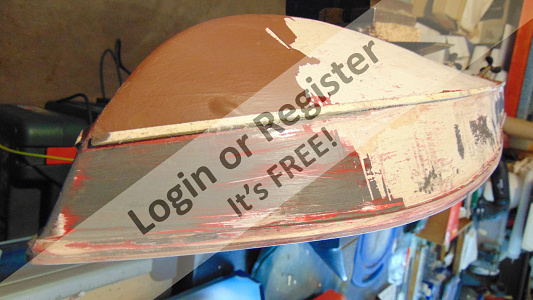
The ‘Range Safety Launch’………….
Intro.
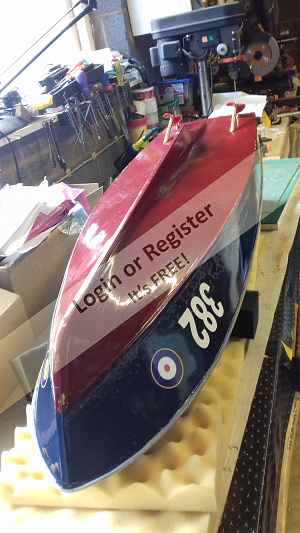
I am now the owner of this boat. Wooden, good hull lines and hull paint work but needing to be finished. I am told that it looks like it started life as a kit, but has had considerable modification to at least the above deck layout and detail.
Advice is that it could be a rather simplified Range Safety Launch, but maybe I can use a little ‘artistic licence’ and just make it look interesting and capable.
There are two main reasons for sharing this project.
1. I will undoubtedly need guidance
2. Maybe some of the information will assist others
The hull is 44 inches ( 112cm ) long and 14 inches (36cm ) wide, it has two brushed MFA Torpedo 800 motors………. and weighs in currently at 15 lbs 4ozs (6.91 kgs).
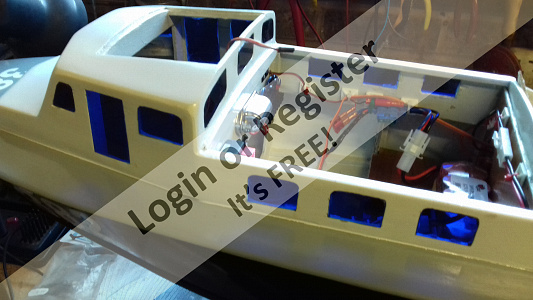
It is large enough for me to be able to work on reasonably comfortably and apart from the cabin/upper deck areas to be ‘improved’, I aim to introduce sound, lighting, active radar sweep, search light, together with maybe a deck hoist and water /fire monitor appliance.
At my age it is difficult to tell the difference between wishful thinking and dementing……
However, the prime aim is to try and achieve at least some of this whilst having the boat usable during the current ‘season’.
There is so much knowledge, good will and help available on this site that even before I touched a thing, information came pouring in.
If anyone feels like making a contribution then please just ‘pile in’.
Have ordered some parts so next time should have something to show.
NPJ.
Intro.
I am now the owner of this boat. Wooden, good hull lines and hull paint work but needing to be finished. I am told that it looks like it started life as a kit, but has had considerable modification to at least the above deck layout and detail.
Advice is that it could be a rather simplified Range Safety Launch, but maybe I can use a little ‘artistic licence’ and just make it look interesting and capable.
There are two main reasons for sharing this project.
1. I will undoubtedly need guidance
2. Maybe some of the information will assist others
The hull is 44 inches ( 112cm ) long and 14 inches (36cm ) wide, it has two brushed MFA Torpedo 800 motors………. and weighs in currently at 15 lbs 4ozs (6.91 kgs).
It is large enough for me to be able to work on reasonably comfortably and apart from the cabin/upper deck areas to be ‘improved’, I aim to introduce sound, lighting, active radar sweep, search light, together with maybe a deck hoist and water /fire monitor appliance.
At my age it is difficult to tell the difference between wishful thinking and dementing……
However, the prime aim is to try and achieve at least some of this whilst having the boat usable during the current ‘season’.
There is so much knowledge, good will and help available on this site that even before I touched a thing, information came pouring in.
If anyone feels like making a contribution then please just ‘pile in’.
Have ordered some parts so next time should have something to show.
NPJ.
▲
⟩⟩
No likes yet
This member will receive 1 point
for every like received
This member will receive 1 point
for every like received
Login To
Remove Ads
Remove Ads
📝 "issues"
6 years ago by 🇬🇧 NPJ ( Warrant Officer)
Warrant Officer)✧ 14 Views · 3 Likes
Flag
💬 Add Comment
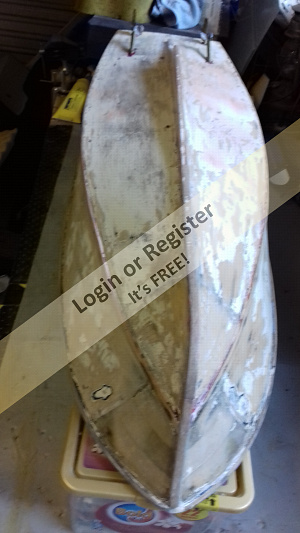
For those not following the Leaking Boat thread. We have a 'hitch'.
Model took on water whilst in bath trials. See first image.
No obvious point so going to need to do some stripping.
Plan is when visitors leave I will post re the electrics and sound whilst having a go at the sanding, sealing and painting bit!
Upwards and onwards.
NPJ


Model took on water whilst in bath trials. See first image.
No obvious point so going to need to do some stripping.
Plan is when visitors leave I will post re the electrics and sound whilst having a go at the sanding, sealing and painting bit!
Upwards and onwards.
NPJ
▲
⟩⟩
Ray
SelwynWilliams
RNinMunich
📝 Bit of a problem.............
6 years ago by 🇬🇧 NPJ ( Warrant Officer)
Warrant Officer)✧ 12 Views · 1 Like · 6 Comments
Flag
💬 Add Comment
Well if you have read the “Leaking Boat” thread you will know that my cunning plan to fix the leak failed…………..
Even after drilling holes in the boat (?!?!), pouring in sealer and persuading my ‘assistant’ (I think I am married to her, but it was a long time ago now to be sure) to shake the boat as you would a cocktail shaker to distribute the fluid over the insides (not seen her move like that in thirty years)……………………..Did not do the trick.
Yes I know you told me!
I am now not in a place I wanted to be. No sailing for it this season, facing the prospect of a lot of dust and over-spray and trying to apply skills I do not have.
I am at the edge of my” River of Styx”.
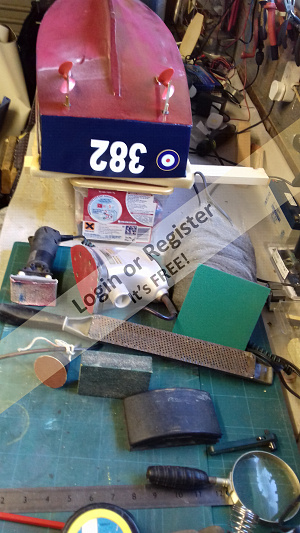
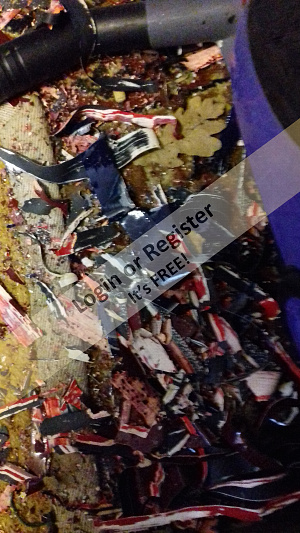
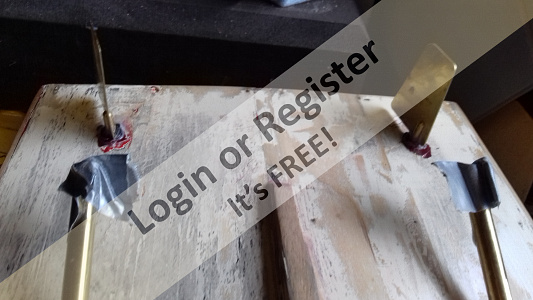
The images show I have reluctantly collected together items I have for stripping paint. The large wire brush I have in my other hand!
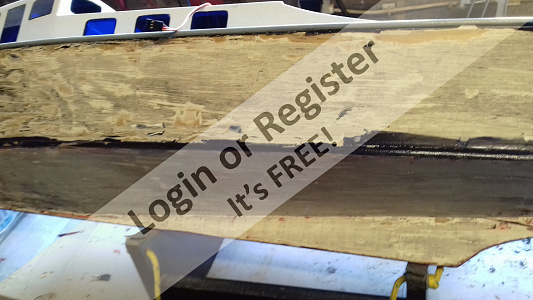
So I have had a bit of a go at the ‘red stuff’. Looks like a large area to tackle and then I went to investigate that ‘funny bit’ on the side of the bow.
Well bits of filler flew off in all directions and exposed this crack which I hope you can see to the right of the metal rule.
Could this be the source of the leak?
Well it is two compartments away from where the water collects. On the other hand someone mentioned water passing along the ‘layers?.........
Am I really going to need to strip all the paintwork down to the wood or is there something else I could look for as a clue?
Most of September I will not be able to function much so I will have a good go whilst I can.
It really does seem to suggest I have “bought a pup”.
All the best.
NPJ


Even after drilling holes in the boat (?!?!), pouring in sealer and persuading my ‘assistant’ (I think I am married to her, but it was a long time ago now to be sure) to shake the boat as you would a cocktail shaker to distribute the fluid over the insides (not seen her move like that in thirty years)……………………..Did not do the trick.
Yes I know you told me!
I am now not in a place I wanted to be. No sailing for it this season, facing the prospect of a lot of dust and over-spray and trying to apply skills I do not have.
I am at the edge of my” River of Styx”.
The images show I have reluctantly collected together items I have for stripping paint. The large wire brush I have in my other hand!
So I have had a bit of a go at the ‘red stuff’. Looks like a large area to tackle and then I went to investigate that ‘funny bit’ on the side of the bow.
Well bits of filler flew off in all directions and exposed this crack which I hope you can see to the right of the metal rule.
Could this be the source of the leak?
Well it is two compartments away from where the water collects. On the other hand someone mentioned water passing along the ‘layers?.........
Am I really going to need to strip all the paintwork down to the wood or is there something else I could look for as a clue?
Most of September I will not be able to function much so I will have a good go whilst I can.
It really does seem to suggest I have “bought a pup”.
All the best.
NPJ
▲
⟩⟩
Ray
|
💬 Bit of a problem.............
6 years ago by 🇩🇪 RNinMunich (
 Fleet Admiral) Fleet Admiral)✧ 13 Views · 1 Like
Flag
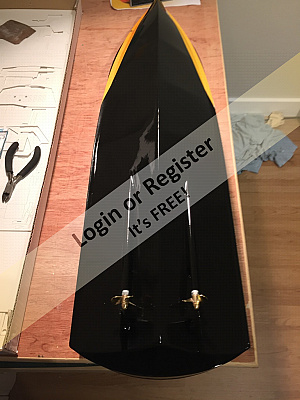
I believe it should be black Neville.
I would also correct the number. All the Fireboat and similar builders on the site know where to get the decals. Check out the Build Blogs / Discussions. I've started printing my own on adhesive Decal Paper, but I'm just like that 😉 Cheers, Doug 😎 ▲
⟩⟩
NPJ
|
|
Login To
Remove Ads 💬 Bit of a problem.............
6 years ago by 🇬🇧 NPJ (
Warrant Officer)✧ 13 Views · 1 Like
Flag
So heat gun should arrive tomorrow.....................Oh I do like buying new toys!
Given that I am now going to destroy all the decals, should I be changing the number on the hull and would that mean a change from Blue to Black? I should not be asking this, but looking it up. However, you have it in your head. Enjoyed the 'woodies' bit elsewhere. TTFN. ▲
⟩⟩
RNinMunich
|
|
💬 Bit of a problem.............
6 years ago by 🇩🇪 RNinMunich (
Fleet Admiral)✧ 14 Views · 2 Likes
Flag
Hi Neville, yep, only took about a half hour per hull 😊
And NO DUST 😉 If adjustable use the gun on medium heat and don't get too close or too long on the same spot or you'll scorch the wood. As soon as the paint starts to bubble or flake lift it with a not too sharp but not blunt 3/4" chisel. The gun will blow it off in chunks. I found that the chisel was more effective than a normal scraper. Work the gun from side to side just ahead of the chisel. After that I shone a very bright light inside the hull, which instantly showed up the holes and thin spots. I ringed them all with a felt tip and they then received extra attention and fibreglass strengthening. That'll fix your leak wherever the heck it is😊 Eeezy peezy😉 So - Tally Ho matey! Cheers, Doug 😎 PS I didn't have to 'scrap' either boat 😁😁 PPS I love the embedded insect fossils in your hull! Or are they cave paintings?? 😁 ▲
⟩⟩
NPJ
Donnieboy
|
|
💬 Bit of a problem.............
6 years ago by 🇬🇧 NPJ (
Warrant Officer)✧ 12 Views · 0 Likes
Flag
So that stripping Doug was done with heat gun and scrapper?
I would go for that. Onetenor, if you are reading this............Thanks for the suggestions. Always welcome and I have a long way to go with this! NPJ ▲
⟩⟩
No likes yet
This member will receive 1 point for every like received |
|
💬 Bit of a problem.............
6 years ago by 🇩🇪 RNinMunich (
Fleet Admiral)✧ 14 Views · 2 Likes
Flag
Hi again Neville,
Onetenor just posted this response to your 'Bit of a problem' but on the wrong thread😲 "Re the leaking boat problem. I would cut away the section between the stem and first bulkhead/frame. Replace with new wood.Then pour the resin into that space. No need for cocktail shaking ( unless you like watching wife ) just keep turning so the resin/varnish runs around all the seam/joints in that section until it sets.👍" OK, would fix the leak; if it is in that section and if it's done right. BUT: it would leave a kink in the hull lines cos the wood would no longer have the natural bend between the bullheads. The inserted piece would be flatter. You can see this effect clearly on the port side of my PTB hull in the pic. At the top in the pic. You can 'see the join' quite clearly When I'd cleaned the old paint off I found that there was a separate piece from stem to the second bulkhead. Repairs to the chine line made that look a bit smoother but nothing I could do about the rest without re-skinning the whole side😡 which I didn't fancy. I'll try to disguise it a little with the pacific camouflage paint 😉 Cheers, Doug 😎 

▲
⟩⟩
NPJ
Donnieboy
|
|
💬 Bit of a problem.............
6 years ago by 🇩🇪 RNinMunich (
Fleet Admiral)✧ 13 Views · 1 Like
Flag
Evenin' Neville, For God's Sake (Whoever he may be) put the wire brush back in the drawer and save it for cleaning engine blocks😲
Use a heat gun and a scraper to get the paint off without destroying the wood. Like I had to do with my Gina 2 fish cutter and PTB hulls. Much less dust than trying to sand / wire-brush the paint off. That way will take you a month of Sundays anyway. The sand the hull flat and cover it with two layers of fibreglass tissue and resin. I used EzeKote, no mixing, no smell, sets in about 20 minutes and brushes wash out in warm water. 😊 Apply a final coat of resin. Sand flat and prime. The pics show these three stages for the cutter and the PTB. If the crack is bad reinforce it on the inside with a couple of layers of tissue and resin. Then give the whole inside of the boat two coats of resin. Take out anything that stops you getting down to the underwater hull and keel joints. That should fix your leak once and for all, strengthen the boat to help prevent any further hull damage if you hit something underway and give you a good base for the final colour coats. Bon chance!👍 Now back to fixing the prop shaft in my cutter.😉 Cheers, Doug 😎 Oh, and by the way - 'DON'T PAY THE FERRYMAN'! 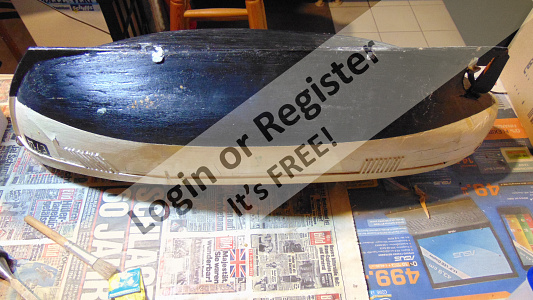

▲
⟩⟩
NPJ
|
📝 'The Stripper'
6 years ago by 🇬🇧 NPJ ( Warrant Officer)
Warrant Officer)✧ 16 Views · 5 Likes · 1 Comment
Flag
💬 Add Comment
It seems that the proper procedure for fixing the leak and then moving on to “the good stuff” is to strip all the paint off and see what we have.
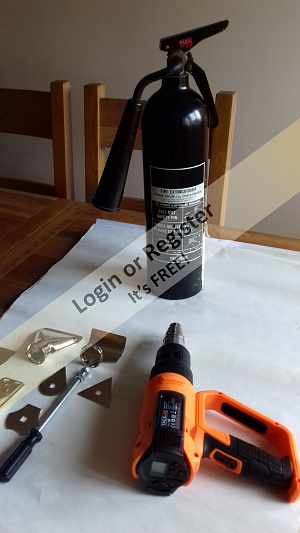
So the heat gun has been obtained ( I already had the fire extinguisher..) as amongst other reasons there would be less dust.
Time for a few tentative steps. Now at this point I am not only well out of my comfort zone, but up to my knees in my “slough of despond”……………………….
After all, I bought a boat to sail this month and so far I have drilled holes in it and am now about to set it alight!
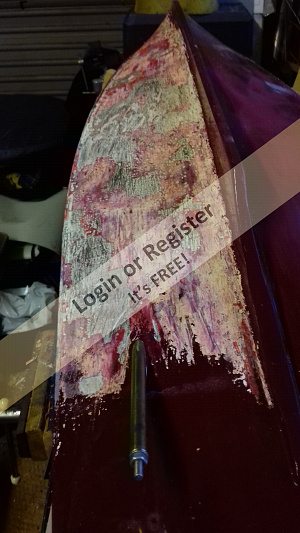
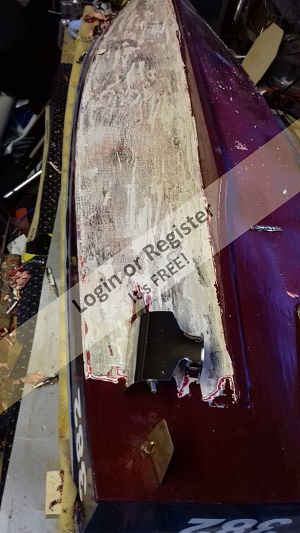
First image shows efforts with lower heat and using the tools supplied and the next two show temperature taken up to 450 degrees c and a ¾ inch chisel used to remove paint. A much better outcome.
Now who suggested that would be the answer I wonder???
45 minutes spent to get this far and although I did remove the plastic props ( being replaced by brass anyway) I wondered if I should remove prop shafts? I have used a bit of a deflector to reduce the heat anyway.
On the final images, I wonder whether I am down far enough to start sanding or to go further.
Now that I have started I hope to complete at least the general stripping tomorrow.
TTFN.
NPJ


So the heat gun has been obtained ( I already had the fire extinguisher..) as amongst other reasons there would be less dust.
Time for a few tentative steps. Now at this point I am not only well out of my comfort zone, but up to my knees in my “slough of despond”……………………….
After all, I bought a boat to sail this month and so far I have drilled holes in it and am now about to set it alight!
First image shows efforts with lower heat and using the tools supplied and the next two show temperature taken up to 450 degrees c and a ¾ inch chisel used to remove paint. A much better outcome.
Now who suggested that would be the answer I wonder???
45 minutes spent to get this far and although I did remove the plastic props ( being replaced by brass anyway) I wondered if I should remove prop shafts? I have used a bit of a deflector to reduce the heat anyway.
On the final images, I wonder whether I am down far enough to start sanding or to go further.
Now that I have started I hope to complete at least the general stripping tomorrow.
TTFN.
NPJ
▲
⟩⟩
suntugs
Ray
MouldBuilder
RNinMunich
Donnieboy
|
💬 'The Stripper'
6 years ago by 🇩🇪 RNinMunich (
Fleet Admiral)✧ 14 Views · 2 Likes
Flag
Evenin Neville, So far so good👍
If you are down to the primer you can start sanding. I started with 150 grit (80 on the cutter where there was 'inches' of filler!) and worked up (down?) to 600 grit Tamiya Sponges before priming. The primer doesn't react much to the heat as it's mostly fine chalk dust or similar. Glad the chisel 'trick' worked for you as well. Cheers, Doug 😎 Forgot to mention: before priming I applied two coats of EzeKote resin. Sanded that flat with 400 / 600 grit Tamiya sponges used wet. Then primed with grey primer filler. Pics show Sea Scout, Fish Cutter and PTB. The latter after EzeKoteing and the last with primer. 
▲
⟩⟩
NPJ
SelwynWilliams
|
📝 Still Stripping......With Care!
6 years ago by 🇬🇧 NPJ ( Warrant Officer)
Warrant Officer)✧ 15 Views · 4 Likes · 6 Comments
Flag
💬 Add Comment
Starting to feel a little better about this.
Still many things that can go wrong on me, but for anyone else who has not done this before, try it. if I can do it anyone can!
This second period of scrapping has been much easier. Twice the area covered in half the time taken in the first session.
Yes I have left some of the ‘twiddley bits’ for later and going for the larger areas first.
I am hoping to get away with leaving the deck to a rub down and re-paint.
What has become more obvious as I progress is the need for space and preparation when using a heat gun. Completely invisible, a lot of heat is generated ( mine can produce 600c but I am using it on 450c) and it travels a surprising distance.
I found I did not clear the floor enough or allow a large enough clear area around me.
Others may manage in a very small space, but I was surprised by how much paint/material there was coming off with each push of the tool. This fell to the floor and smoked…………
When pointing the gun away with one hand whilst scrapping with the other it is easy to lose track of where the gun is pointing!
Having somewhere safe to put the gun down when hot is critical, as is having at least a damp cloth if not more to hand to ‘damp down’.
I will not post more on this until the stripping and sanding are finished, but I am surprised as to how satisfying the work is yet it looks so challenging at the outset.
TTFN.
NPJ.
▲
⟩⟩
RNinMunich
Ray
suntugs
figtree7nts
|
💬 Still Stripping......With Care!
6 years ago by 🇬🇧 NPJ (
Warrant Officer)✧ 12 Views · 0 Likes
Flag
No way through to the bow from inside as first compartment is completely blocked off.
I am thinking some 'putty' then tissue and EsiKote or resin for the whole of that area both sides. As the clean off progresses, thinking about general layout of the 'bits' and wiring layout. NPJ 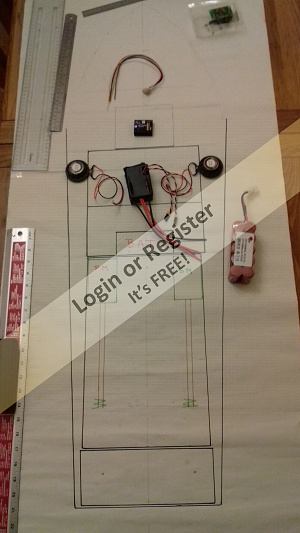
▲
⟩⟩
No likes yet
This member will receive 1 point for every like received |
|
Login To
Remove Ads 💬 Still Stripping......With Care!
6 years ago by 🇬🇧 NPJ (
Warrant Officer)✧ 12 Views · 0 Likes
Flag
Oh thank you kind Sir, I am really over come.............
A lot of information in that Post. Will be really helpful. I concur, really bought a 'pig in a poke', 'donkey in a sack' or whatever. I will look later today, but doubt access being available to the bow from inside. Starting Monday, I am out of action for almost two weeks so will try and crack on now. Dropping my 'Jazzed up' ideas means a rethink on the electrics. Will look there for light relief whilst rubbing away! All the best my friend. NPJ ▲
⟩⟩
No likes yet
This member will receive 1 point for every like received |
|
💬 Still Stripping......With Care!
6 years ago by 🇩🇪 RNinMunich (
Fleet Admiral)✧ 12 Views · 0 Likes
Flag
That was exactly my impression Colin, your call was a pleasant surprise.
Stay in touch, Cheers, Doug 😎 ▲
⟩⟩
No likes yet
This member will receive 1 point for every like received |
|
💬 Still Stripping......With Care!
6 years ago by 🇬🇧 Colin H (
Fleet Admiral)✧ 13 Views · 1 Like
Flag
No additional thoughts at this stage Doug, looks like you covered it all, thanks for the phone chat, nice to hear a voice to go with the face. Cheers Colin.
▲
⟩⟩
NPJ
|
|
💬 Still Stripping......With Care!
6 years ago by 🇩🇪 RNinMunich (
Fleet Admiral)✧ 14 Views · 2 Likes
Flag
Evenin' Neville,
I told you you'd get the hang of it pretty quick. (It was either that or you'd burn the house down😲)😁 Seriously; I'm proud of you👍 You had the guts to give it a go and you're learning fast 👍 Hat off Sir! A few observations; (Colin might also have some at this point, had a very nice chat with him on the phone this afternoon - but that's another Encyclopedia Britannica!) #1 if the paint scraps are smoking the gun is too hot or too close, or moving too slow. Wind it down to 350 and see how that goes. Back up to ~400 if seems necessary. #2 Bow cracks; I see a bodge up there where someone couldn't bend the skin properly or, benefit of the doubt (In dubio pro reo!), maybe it was collision damage. Whatever; filler in a thin crack will always vibrate out again sometime😡 Try to get at the inside and seal it with two layers of fibreglass tissue well soaked in resin, EzeKote is what I used. Wait about 10 minutes before applying second layer. Then it should bond well with the first. When that has set (ca 20 - 30 minutes) then you can apply some fine filler from the outside. When set sand smooth and seal the whole hull outside with two layers of FG tissue. Sand smooth and if any bare wood appears apply wood sealer or EzeKote thinned with 10% warm water. Don't overdo the water or it takes yonks to dry and set - Yes, it happened to me🤔 Then continue with priming / finishing as described above; or look in my Sea Scout 'Jessica' blog for the fine details. The beauty of using EzeKote for all this is that you can get a whole hull done inside and out in one day and no mixing ratios to cock up😊👍 If it's any consolation to you; when I did all this on my fish cutter and PTB loads of filler went soft and fell out as well, and the 'goo' holding the prop shafts in my PTB as well. No sweat as I wanted to realign the shafts anyway! TIP: I removed all shafts rudders and any other protrusions in the way so there were no 'twiddly' bits left to make things awkward. Leaving the odd patch of sanded paint which is still firmly fixed to the wood is OK; as long as you can't feel a 'bump' with your finger tips and you are going to seal it with resin and primer anyway. Then it can't react with the new paint. Here endeth the 3039th epistle from Admiral Doug. Will all dissenters, contradictors and other lobbyists and Trump lawyers please queue up at the Spanish inquisition Office next door. Take a number, we'll grill you in turn 😁😁 How do you like your stake? Cheers All, Happy building and renovating, Doug 😎 Now back to me fish cutter gearbox, mechanical gubbinses are not really my strength🤔 HAMMER, have you got a minute please!? (Viewing / reading tip; click on the thread title, then you can read the the structured version in paragraphs as I wrote it 😉) ▲
⟩⟩
NPJ
Donnieboy
|
|
💬 Still Stripping......With Care!
6 years ago by 🇬🇧 NPJ (
Warrant Officer)✧ 12 Views · 0 Likes
Flag
I am not posting this as a build update because scraping and sanding is boring…………although I now believe I will eventually finish it.
However, I have already found 4 areas with cracks. Whilst I was working on one of the sides a prop shaft fell off…….Just as well it was on its stand and not in the water! Now some of these cracks I suspect will be with filler falling out but there is a lot of filler in some parts anyway. It is coming along, but do I really have to remove every paint layer after the old primer? Surely if it is well sanded some little bits can be left, not large patches just bits in very awkward places…………….please? Other questions Where the Hull sides join the stern should those corners be square or rounded? When I scrapped the paint off most the filler fell out so it is difficult to tell how it was! Should the cracks in the bow planking be filled before sealing and is ordinary filler correct or does it need a ‘resinous mix’……………..? Cheers folks NPJ 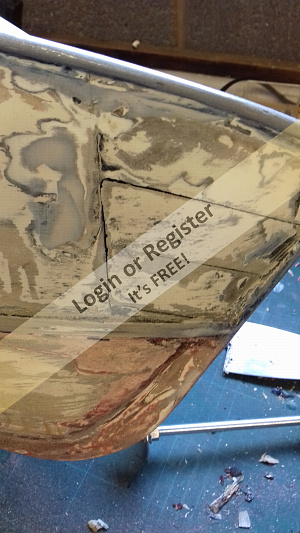

▲
⟩⟩
No likes yet
This member will receive 1 point for every like received |
📝 Now Coating and Matting
6 years ago by 🇬🇧 NPJ ( Warrant Officer)
Warrant Officer)✧ 16 Views · 5 Likes · 2 Comments
Flag
💬 Add Comment
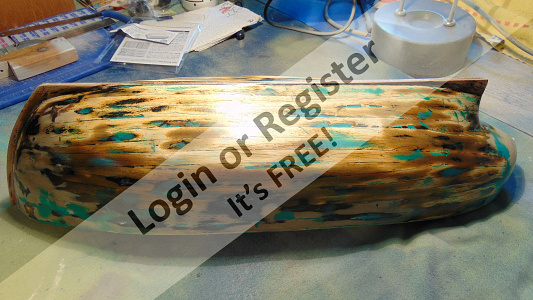
On to Coating and Matting. (as well as sanding!)
Now have at least finished all the stripping.
Then did the ‘bright light in the hull bit’ to look for areas that needed patching.
The major problem area was in the bow and that did not receive the light as it is a totally blanked off compartment. However, it was obvious from the outside anyway so, could I assume it was the only leak?
Decided to put a fine matt over the whole hull, not deck, just to be sure of best chance of success. I can imagine what will be said here if it still leaks after all this!
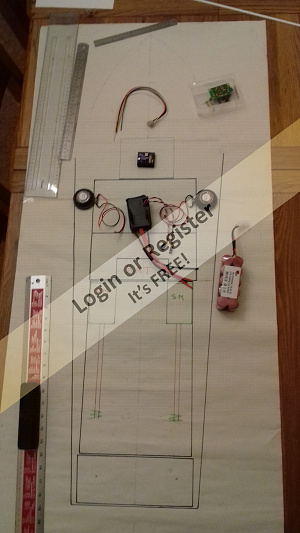
I had ordered some supplies ready for the next stage and drew up a plan view of the boat to help think through layout of electrics and other items.
Made my usual mistakes about size.
Some fittings purchased too small………However, never too large now that’s interesting.
Some materials purchased too large. Now have a life’s worth of Resin……(when does it ‘go off’ by?) Also have a lounge floors worth of tissue matting!
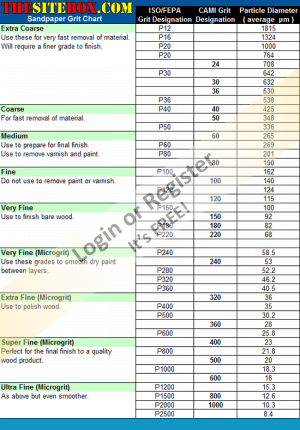
Also Sandpaper. Now there is a mine field. So now I know a bit more about that and which way the numbers work! When I forgot to put the mask on, I had some of the crispest 'bogies' in years.............. No images posted!
On the plus side, although I never wanted to get into this stripping sanding, filling sanding, sealing sanding, matting sanding, painting sanding, painting, sanding bit…………….
I now feel I started out with someone’s boat I had bought and now it has become “my boat” for real!
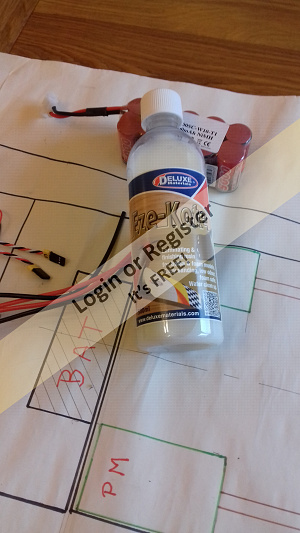
I am at the stage now where I have put some filler in and applied the first coat of Eze-Kote from DeLuxe Materials
To use Eze-kote read stuff from RNinMunich on this blog or the’ leaking boat’ thread. Washes out of the brushes very easily.
There is such as this ..... Youtube link - watch?v=yP05qv3QtUk
RNinMunich or Colin H. and the like have bits of extra comment and experience that is always very helpful.
BTW, after that finer sanding before first coat, I did the dust down and vacuuming bit but it still felt a bit ‘chalky’ so I gave it a wipe with Methylated Spirits. Now I realise that has water in it, so if anything goes wrong it could be blamed on that.................
Having left the first coat to dry I started to cut out the light matt to apply after the next sanding.
The matting I have is called Glassfibre Surface Tissue EGlass from FibreGlass Direct. A part of Tricel Composites (NI) Limited. Available internationally in lengths from a metre upwards, it is quite fine in weave so we shall see what happens.
I have left quite a wide margin at the moment but may reduce that when I have tried using it!
This is another first for me so plenty of room for mistakes...............
Will need to cover with the matt in stages as I cannot get around all the boat without changing its position.
Going for the bottom of the vessel and stern board first as I figure they are going to be easier than some of the other bits. Then will leave that to cure before moving the boat.
Really worried about the joins/overlaps and how well I will cope with those, not to mention the curved bit!
Started to look at electrics and layout for a bit of a change.
I will post again when I have had the first battles with the matting!
TTFN.
NPJ

Now have at least finished all the stripping.
Then did the ‘bright light in the hull bit’ to look for areas that needed patching.
The major problem area was in the bow and that did not receive the light as it is a totally blanked off compartment. However, it was obvious from the outside anyway so, could I assume it was the only leak?
Decided to put a fine matt over the whole hull, not deck, just to be sure of best chance of success. I can imagine what will be said here if it still leaks after all this!
I had ordered some supplies ready for the next stage and drew up a plan view of the boat to help think through layout of electrics and other items.
Made my usual mistakes about size.
Some fittings purchased too small………However, never too large now that’s interesting.
Some materials purchased too large. Now have a life’s worth of Resin……(when does it ‘go off’ by?) Also have a lounge floors worth of tissue matting!
Also Sandpaper. Now there is a mine field. So now I know a bit more about that and which way the numbers work! When I forgot to put the mask on, I had some of the crispest 'bogies' in years.............. No images posted!
On the plus side, although I never wanted to get into this stripping sanding, filling sanding, sealing sanding, matting sanding, painting sanding, painting, sanding bit…………….
I now feel I started out with someone’s boat I had bought and now it has become “my boat” for real!
I am at the stage now where I have put some filler in and applied the first coat of Eze-Kote from DeLuxe Materials
To use Eze-kote read stuff from RNinMunich on this blog or the’ leaking boat’ thread. Washes out of the brushes very easily.
There is such as this ..... Youtube link - watch?v=yP05qv3QtUk
RNinMunich or Colin H. and the like have bits of extra comment and experience that is always very helpful.
BTW, after that finer sanding before first coat, I did the dust down and vacuuming bit but it still felt a bit ‘chalky’ so I gave it a wipe with Methylated Spirits. Now I realise that has water in it, so if anything goes wrong it could be blamed on that.................
Having left the first coat to dry I started to cut out the light matt to apply after the next sanding.
The matting I have is called Glassfibre Surface Tissue EGlass from FibreGlass Direct. A part of Tricel Composites (NI) Limited. Available internationally in lengths from a metre upwards, it is quite fine in weave so we shall see what happens.
I have left quite a wide margin at the moment but may reduce that when I have tried using it!
This is another first for me so plenty of room for mistakes...............
Will need to cover with the matt in stages as I cannot get around all the boat without changing its position.
Going for the bottom of the vessel and stern board first as I figure they are going to be easier than some of the other bits. Then will leave that to cure before moving the boat.
Really worried about the joins/overlaps and how well I will cope with those, not to mention the curved bit!
Started to look at electrics and layout for a bit of a change.
I will post again when I have had the first battles with the matting!
TTFN.
NPJ
▲
⟩⟩
Ray
MouldBuilder
RNinMunich
Colin H
Donnieboy
|
💬 Now Coating and Matting
6 years ago by 🇬🇧 NPJ (
Warrant Officer)✧ 12 Views · 0 Likes
Flag
Thanks for the encouragement Donnieboy.
Hope to move it forward today to the tissue bit in the way you are suggesting. Fittings may end up in a selection bag on Ebay! TTFN. NPJ ▲
⟩⟩
No likes yet
This member will receive 1 point for every like received |
|
💬 Now Coating and Matting
6 years ago by 🇨🇦 Donnieboy (
Warrant Officer)✧ 15 Views · 3 Likes
Flag
After the application of fibreglass or matting i usually put on a second coat of EZ-Cote.After drying lightly sand.Overlaps I find easy to level up with another coat of EZ-Cote.I have been using the same bottle for 3 years.That stuff really stretches.All the wrong size fittings can always be used on other projects or modify them to suit yours.
▲
⟩⟩
NPJ
RNinMunich
Colin H
|
📝 Sticking and Spraying
6 years ago by 🇬🇧 NPJ ( Warrant Officer)
Warrant Officer)✧ 17 Views · 4 Likes · 5 Comments
Flag
💬 Add Comment
This is the situation as of this week.
I now have a yellow boat!
Now out of communication for ten days ish.........
Shed loads of stuff learned during this part of the project.
EziKote great stuff to use.
Matting easier to apply than imagined.
TTFN.
NPJ
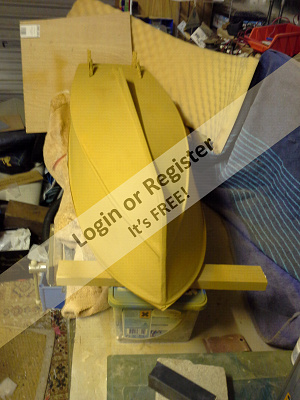
I now have a yellow boat!
Now out of communication for ten days ish.........
Shed loads of stuff learned during this part of the project.
EziKote great stuff to use.
Matting easier to apply than imagined.
TTFN.
NPJ
▲
⟩⟩
MouldBuilder
Ray
mturpin013
Donnieboy
|
💬 Sticking and Spraying
6 years ago by 🇩🇪 RNinMunich (
Fleet Admiral)✧ 13 Views · 1 Like
Flag
Ain't got no 'Alfords in Germany 😭
But the hull is looking good Neville,👍 ▲
⟩⟩
NPJ
|
|
Login To
Remove Ads 💬 Sticking and Spraying
6 years ago by 🇬🇧 cormorant (
 Lieutenant Commander) Lieutenant Commander)✧ 12 Views · 1 Like
Flag
Good to see someone else is using Halfords shake and rattle. I often use it as a primer/filler and a top coat. Excellent results.

▲
⟩⟩
Ray
|
|
💬 Sticking and Spraying
6 years ago by 🇩🇪 RNinMunich (
Fleet Admiral)✧ 13 Views · 1 Like
Flag
Sorry, didn't seem like it somehow 😲
I'll shut up and leave you in peace. Ciao, Doug 😎 ▲
⟩⟩
suntugs
|
|
💬 Sticking and Spraying
6 years ago by 🇬🇧 NPJ (
Warrant Officer)✧ 14 Views · 0 Likes
Flag
Now what are you moaning about? is this not the build blog?
I am working on a tablet and struggling............ The colour was Halfords choice. The only filler/primer in a fifteen mile radius! Will have more detail on the progress when matters are back to what passes for normal. TTFN NPJ ▲
⟩⟩
No likes yet
This member will receive 1 point for every like received |
|
💬 Sticking and Spraying
6 years ago by 🇩🇪 RNinMunich (
Fleet Admiral)✧ 13 Views · 1 Like
Flag
Interesting colour 😲 Whatever floats Your boat! 😉
Neville, why aren't you adding this stuff to your Build Blog? instead of spreading it over several disconnected posts?? Cheers, Doug 😎 ▲
⟩⟩
NPJ
|
📝 Spraying Again.......
6 years ago by 🇬🇧 NPJ ( Warrant Officer)
Warrant Officer)✧ 17 Views · 4 Likes · 11 Comments
Flag
💬 Add Comment
Well had a break of a few weeks, now back on the job.
So now have a Red Oxide boat rather than Yellow one………………
Although these next stages are a bit ‘ samey’, I have learnt a few things as it happens.
For example, I had put three coats of the Halfords filler/primer on a couple of days before I had a break. Now when I left it all looked dry, well covered and ‘solid’. When I came back to it some weeks later the longer drying period had shown up some gaps.
Well not gaps actually but ‘mouths’ where tissue I had overlapped had pulled apart slightly. interesting, easily fixed with some 240 grit sanding, showing that the drying period is longer than it would appear. At least for filler/primer which is a much thicker substance than just spray paint.
With the sanding, I had not appreciated the difference between the grades say from 240 upwards (or is it downwards) as my experience was with doorframes and floorboards. For the stage I am at, 240 and 400 seem very effective and leave a good surface. What I did find was how important dust becomes………………
The sandpaper rides on it (the powdery dust) and so becomes much less effective and I found brushing with a thin 2 inch brush worked well, using the vacuum cleaner to clear up later. I did try blowing it off with the heat gun but that put the dust up in the air too much. it is my intention to try ‘wet and dry’ approach for later coats and looking for a better answer when it comes to finishing coats.
Another interesting discovery was coverage per rattle can.
It may be my ‘beginner’ technique, but it seems to take a lot of paint.
On this size of boat hull, 44inches (112cm) by 14 inches (36 cm), it took a 500ml rattle can of yellow filler/primer for three coats. For two coats of the red primer it took the whole of a 300ml can.
Also discovered, using these ‘rattle cans’ for the first time, that the primer on its own comes out differently to the filler primer. This unsettled me for a minute or so but appreciate may be due to the different density so will be aware next time.
Another issue that became obvious was…………..I must improve my ‘masking off’ !
So that is it so far. Next stage is - going to buy a couple more cans for the finishing coats, do a bath test, mark the white line point, more sanding down and then start applying the finishing coats.
Any helpful comments will be much appreciated.
NPJ
▲
⟩⟩
MouldBuilder
suntugs
Ray
Donnieboy
|
💬 Spraying Again.......
6 years ago by 🇬🇧 NPJ (
Warrant Officer)✧ 15 Views · 1 Like
Flag
Just to feel comfortable I am going to go with a matt sealer of some sought............
NPJ ▲
⟩⟩
Inkoust
|
|
Login To
Remove Ads 💬 Spraying Again.......
6 years ago by 🇩🇪 RNinMunich (
Fleet Admiral)✧ 13 Views · 2 Likes
Flag
Agreed Boaty 👍
With a plastic or glass fibre hull it's a slightly different kettle of fish. However I'm still wary of the primer absorbing moisture.🤔 Sealing with a matt or silk lacquer seems to give an extra knot or so as well😉 But here we were discussing wooden hulls. Cheers, Doug 😎 ▲
⟩⟩
NPJ
Ray
|
|
💬 Spraying Again.......
6 years ago by 🇬🇧 boaty (
 Chief Petty Officer 2nd Class) Chief Petty Officer 2nd Class)✧ 16 Views · 3 Likes
Flag
Hi Doug Red primer certainly is porus and does need some protection when used on a wooden hull. The only exception to this is when the hull is plastic then plastic primer can be used.
It adheres better than the standard primer and is readily available from the likes of Halfords etc. I have used this on my italeri P.T 109 and is still good seven years on. Boaty😁 ▲
⟩⟩
NPJ
Ray
RNinMunich
|
|
💬 Spraying Again.......
6 years ago by 🇩🇪 RNinMunich (
Fleet Admiral)✧ 12 Views · 0 Likes
Flag
Bon chance mon ami👍
▲
⟩⟩
No likes yet
This member will receive 1 point for every like received |
|
💬 Spraying Again.......
6 years ago by 🇭🇺 MouldBuilder (
 Vice Admiral) Vice Admiral)✧ 13 Views · 1 Like
Flag
Thanks Doug. I start today.😊
▲
⟩⟩
RNinMunich
|
|
💬 Spraying Again.......
6 years ago by 🇩🇪 RNinMunich (
Fleet Admiral)✧ 12 Views · 1 Like
Flag
Mornin' Peter,
Red primer can be a good match for some anti-fouling paints. If you are happy with the colour - fine. BUT!! Seal the primer paint with several thin coats of matt or silk clear varnish for the reasons mentioned to Neville above! Primer is porous!! Flatten the primer with 1000 / 1500 wet n dry until your fingertips tell you the surface is good. Apply the varnish in several thin coats, flattening lightly with 2000 / 3000 w&d between coats, until you have a good sealed surface. The varnish (or lacquer) will also give some extra protection against knocks and bangs 😊 Cheers, Doug 😎 ▲
⟩⟩
Ray
|
|
💬 Spraying Again.......
6 years ago by 🇩🇪 RNinMunich (
Fleet Admiral)✧ 13 Views · 2 Likes
Flag
Mornin' Neville, ."How wet is wet"?
Hold the paper under a running tap, warm water, until it goes dark all over. Remove excess water with kitchen roll. You don't have to flood the hull but keep the paper well wetted. For convenience I use the Tamiya sanding sponges. They mould themselves to any shape they are used on which is great for compound curves. Keep a bowl of warm water handy to re-wet the paper or sponge from time to time and to clean of the residue that builds up on the paper. Also regularly wipe off the slurry that builds up on the object you are sanding with kitchen roll or a damp flat dense kitchen sponge. When you are finished wash off the hull (or whatever) with the the flat sponge and clean water. Dry off carefully with kitchen roll or non-linting cloth. DON'T do a bath test with just primer on the hull as the primer is porous! it consists mostly of finely ground chalk dust or similar in a solvent suspension. Wait until you have at least the first top coat on to seal it. You only have to look at a car with a primed wing, that has then been driven around in typical British weather for a few weeks, to see why!! Don't forget the 'secret ingredient' 😉 All the best, Doug 😎 PS Nearly forgot 😲 Start using a few drops of liquid soap on the w&d from the final preparation of the primer coat through til the end. ▲
⟩⟩
NPJ
Ray
|
|
💬 Spraying Again.......
6 years ago by 🇭🇺 MouldBuilder (
Vice Admiral)✧ 12 Views · 0 Likes
Flag
Really useful information here. I will take it all on board. I would like to know though if the primer red is the ideal colour for your top coat for antifouling, can it remain as primer only or is it necessary to go to a proper top coat paint.
Thanks.🤓😊 ▲
⟩⟩
No likes yet
This member will receive 1 point for every like received |
|
💬 Spraying Again.......
6 years ago by 🇬🇧 NPJ (
Warrant Officer)✧ 15 Views · 1 Like
Flag
Thanks both.Really helps.
Question is as I have not used it before............"How wet is wet"? I have no idea and have not seen reference anywhere here. I thought I had and image of the 'mouths' but cannot find it. Only two small instances and at the overlap areas. Very pleased with how the damaged areas are looking and how solid the who;e thing now feels. If I am going to really wet it with rubbing down, I will bring forward the bath test as that will be quite a moment for me! All the best both. NPJ ▲
⟩⟩
Inkoust
|
|
💬 Spraying Again.......
6 years ago by 🇩🇪 RNinMunich (
Fleet Admiral)✧ 14 Views · 2 Likes
Flag
Hi Neville,
Check out my Sea Scout 'Jessica' renovation blog for how to achieve good paint finish! 'Wet n dry' is the ONLY way to go. Right from the priming stage. it stops the 'riding' you describe and the generation of flying dust which is anathema to any paint or varnish finish, but you do have to clean and re-wet the paper and the object you are sanding from time to time!!! Any mistakes at that stage will carry through to the top coats and still be visible 😡 Don't quite understand how you created 'mouths'. I'm wondering if you sprayed too close and/or too heavy!? Your apparently exorbitant paint consumption seems to hint at this🤔 For the record; I started with 240 on the primer/filler for my Sea Scout and worked up through 400, 600, 1000, and 2000 and 3000 for the final top coats and deck varnish. All 'Wet', with a few drops of liquid soap added at the top coat stages, i.e. from the 1000 stage. At the end I polish with a mild cutting polish 'Anti hologram' they call it here, from the auto industry. Tedious I agree and a generous dollop of patience is required (the 'Secret ingredient' I have often mentioned here 😉 But when you see the result it warms the cockles and makes it all worthwhile.😊 Happy spraying, cheers, Doug 😎 BTW; for the blue on my Sea Scout hull I used a 400ml rattle can for several coats (more than three in the end) and there's still some left ! BTW2; For masking I use Tamiya tape for nice crisp edges. Fill in behind that with 'normal' fine masking tape and newspaper. 

▲
⟩⟩
NPJ
suntugs
|
|
💬 Spraying Again.......
6 years ago by 🇬🇧 Colin H (
Fleet Admiral)✧ 15 Views · 3 Likes
Flag
Hi there, the filler primer used on a car would normally cover a front wing with 3coats, so going by your Hull size it was about the right amount, 300ml primer would normally have given 2 coats so again about right. Although I usually try doing very light mist coats with 20 minutes between not allowing the paint to harden between coats allows the paint to bond better. When rubbing down between top coats I prefer to use 1200 wet and dry, wet in frequently, and the final rub down with 2500 wet and dry before finally polishing.
This is my preferred method, but other methods will still work. Cheers Colin. ▲
⟩⟩
NPJ
suntugs
Donnieboy
|


Login To
Remove Ads
Remove Ads