Join Us On Social Media!

|

|

|
Download The App!
Login To
Remove Ads
Remove Ads
Login To
Remove Ads
Remove Ads
Model Boats Website
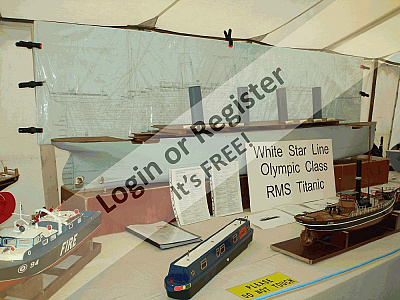
Olympic Class RMS Olympic & RMS Titanic
31 Posts · 2 Followers · 89 Photos · 3 Likes
Began 13 years ago by
 United Kingdom
Follow This Thread
Not currently following
> Click to follow
> Click to follow
Latest Post 11 years ago by
| Oldest posts shown first (Show Newest First) | (Print Booklet) |
📝 Commencing build at 100 scale
13 years ago by 🇬🇧 Dave M ( Vice Admiral)
Vice Admiral)✧ 5 Views · 0 Likes · 2 Comments
Flag
💬 Add Comment
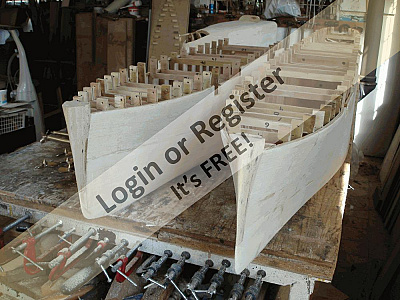
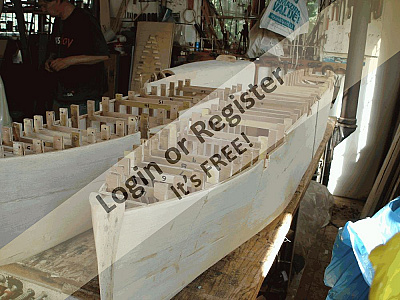
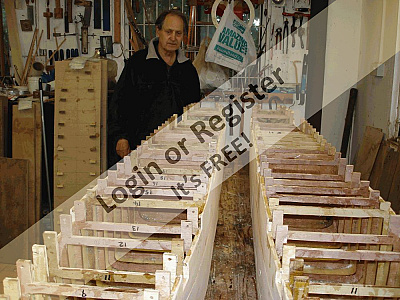
Earlier this year my friend Bill Lucy suggested that he was interested in building a 100 scale model of the RMS Titanic, as 2012 was the centenary year of the disaster. As he has already built RMS Queen Mary at 192 scale and RMS Lusitania at 100 scale this was no idle suggestion. Realising an opportunity to complete a large model for myself I opted to join Bill in constructing both models in tandem at his "shipyard", The Smallholding in Cheshire. This will enable us to share the costs and buy at bulk prices for the wood and fiberglass.
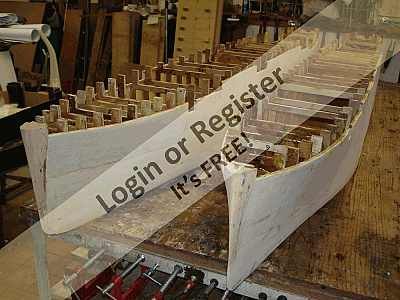
Plans were sourced from Dr R Haan at 100 scale and arrived on six large sheets, which plotted extensive details. Bill's previous models had been all fiberglass from his own moulds, but the Olympics were to be built on frames covered in balsa and fiberglassed inside and out. The frames were plotted and both sets cut at the same time, a considerable saving as there are 39 in each hull! At 8' total length each hull was built on two 4' baseboards initially built as one hull but with two solid formers on aft and stern sections bolted together.
One hull is nearly complete and the central stern tube and rudder skeg are next. The second hull will be sheeted shortly and lessons learnt from the first effort will hopefully speed up progress.
Dave and Bill
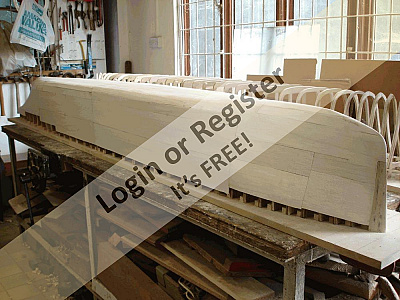
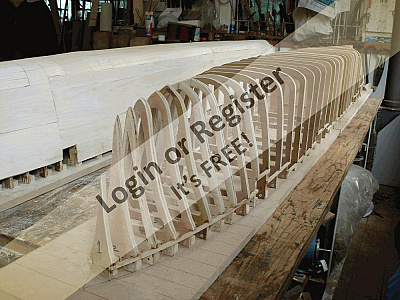
▲
⟩⟩
No likes yet
This member will receive 1 point
for every like received
This member will receive 1 point
for every like received
|
💬 Commencing build at 100 scale
13 years ago by 🇬🇧 Dave M (
Vice Admiral)✧ 5 Views · 0 Likes
Flag
Cyano bought cheap from the pound shop! Balsa sourced from local model shop in Alsager, Cheshire. We get discount as members of C&DMBC but his prices are good. 50 sheets of 1/8 by 4" - probably the metric equivalent but Imperial measures were in use in 1907 so we like to keep in period!
▲
⟩⟩
No likes yet
This member will receive 1 point for every like received |
|
💬 Commencing build at 100 scale
13 years ago by 🇬🇧 nasraf (
 Chief Petty Officer 1st Class) Chief Petty Officer 1st Class)✧ 5 Views · 0 Likes
Flag
You must be working very hard to get so much done God knows how much you must be spending on balsa and glue !!
Keep up the good work. nasraf ▲
⟩⟩
No likes yet
This member will receive 1 point for every like received |
Login To
Remove Ads
Remove Ads
📝 More Pictures of frames and stern tube
13 years ago by 🇬🇧 Dave M ( Vice Admiral)
Vice Admiral)✧ 5 Views · 0 Likes
Flag
💬 Add Comment
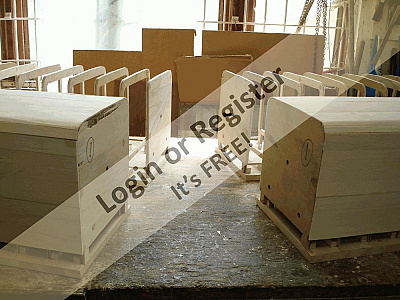
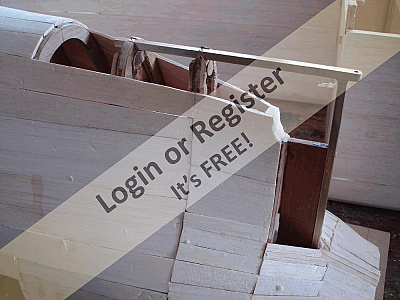
Two views of both models on their respective slipways, plus a view of the bow frames with a bottle to give an idea of size. The final picture is of the central stern tube with stuffing box. The shafts will be 5mm stainless with home made 4 blade prop. We need to have this tube in place before we fiberglass inside the hull. We are using 1/4" square brass rod for the rudder skeg as it is vulnerable on such a large model and needs to abrorb the odd collision. The balsa covering is still rough and will be faired to exact contour once the inside is fiber glassed,
Dave and Bill
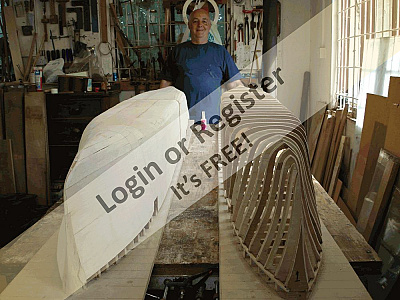
Dave and Bill
▲
⟩⟩
No likes yet
This member will receive 1 point
for every like received
This member will receive 1 point
for every like received
📝 Stern tubes, props and rudder skeg
13 years ago by 🇬🇧 Dave M ( Vice Admiral)
Vice Admiral)✧ 5 Views · 0 Likes
Flag
💬 Add Comment
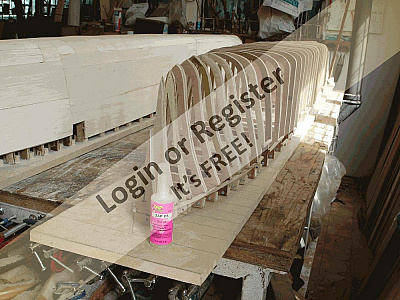
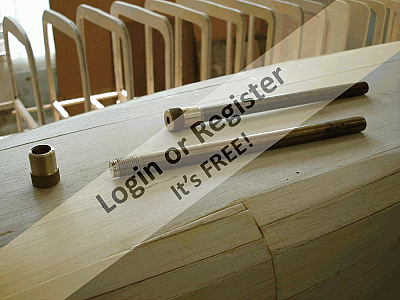
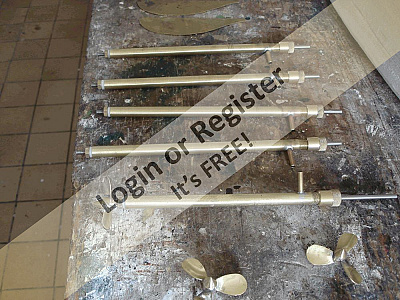
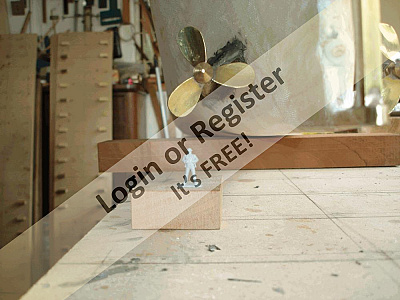
All six stern tubes now completed to same design. Nylon bushes with stuffing box, tube fed with oil via oiler tubes. Shafts 5mm stainless steel. Props from brass home constructed left and right handed at 2.5" 3 blades and 4 blade 2" for center shaft. The skeg is 1/4" sq brass silver soldered and epoxied into hull.
We have started to plank the second hull and will be fiber glassing the inside of the first hull shortly.
Dave and Bill

We have started to plank the second hull and will be fiber glassing the inside of the first hull shortly.
Dave and Bill
▲
⟩⟩
No likes yet
This member will receive 1 point
for every like received
This member will receive 1 point
for every like received
📝 Nearly ready for fiberglassing the hull
13 years ago by 🇬🇧 Dave M ( Vice Admiral)
Vice Admiral)✧ 5 Views · 0 Likes · 1 Comment
Flag
💬 Add Comment
Work almost complete on both hulls. Central prop shaft fitted to one hull and final fitting progressing with second hull. Balsa covering to rear and solid rear transom to be fitted together with fairing round central 4 blade propeller. The rudders are work in progress but blanks have been cut. This will allow us to design a method to fix and make removable the rudders as well as design the control mechanism. We have tested some 170gm glass cloth and epoxy resin and will use this on the outside of the hull. Next job is to fiberglass with glass mat all over the inside of the hull and formers.
Dave & Bill


Dave & Bill
▲
⟩⟩
No likes yet
This member will receive 1 point
for every like received
This member will receive 1 point
for every like received
|
💬 Nearly ready for fiberglassing the hull
13 years ago by 🇬🇧 nasraf (
Chief Petty Officer 1st Class)✧ 5 Views · 0 Likes
Flag
I put my comments in wrong place on your 1 st blog, sorry will not do it again.
nasraf ▲
⟩⟩
No likes yet
This member will receive 1 point for every like received |
📝 Fibre glassed Inside hulls
13 years ago by 🇬🇧 Dave M ( Vice Admiral)
Vice Admiral)✧ 5 Views · 0 Likes
Flag
💬 Add Comment
Both hulls now covered with fibre-glass matting and resin on the insides. Glass matting cut to distance between formers and then resin worked into weave. Extra resin poured into front four formers to provide structural strength to the bow. A model of this size and weight needs this. Extra matting round the stern area and central prop shafts and rudder supports well fixed.
As we are building each model in two halves the area around the central formers has been strengthened with additional matting where the hull joins the formers.
Bill has also been making the funnells, he had made a mould for his Lusitania and the dimensions are correct to the plan. This has proved a good use of any remaining resin mix when we were doing the hulls.
The next job in two days after the resin has hardened will be to sand the outside to final shape, then cover with glass cloth and epoxy resin, followed by more coats of resin with added sanding filler to achieve the final hull finish.
If the hulls are to be plated this will need to be done after the glass cloth is resined. We have the plans to do this but are undecided at present.
Dave and Bill
▲
⟩⟩
No likes yet
This member will receive 1 point
for every like received
This member will receive 1 point
for every like received
📝 Epoxy and glass cloth applied
13 years ago by 🇬🇧 Dave M ( Vice Admiral)
Vice Admiral)✧ 5 Views · 0 Likes
Flag
💬 Add Comment
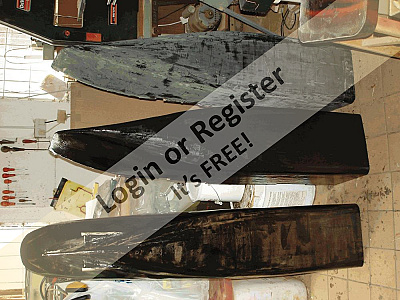
Finally the hulls were ready for application of glass cloth and epoxy resin. Applied with a large spreader to Impregnate the cloth into the balsa hull. After the initial coat the hulls were rubbed down with fine wet and dry to remove surface blemishes. A coat of resin coloured black and thickened with a fine powder produced a very hard finish. The initial hull needed quite a bit of sanding and we used a large body repair sander to remove any blemishes, then rubbed flat with wet and dry and final coat applied again with the spreader. So far only one forward section is to this stage, but all hulls have the cloth and epoxy applied. Hopefully our technique Improved from the initial hull and less sanding will be required. The outer prop shafts have been fitted to the two rear hulls and the three remaining halves will be treated with coloured epoxy and filler. Still undecided about the plating.
The motors have been aligned with the prop shafts and all the couplings are made. Silicon tube will provide the flexible coupling. We are using 777 motors for the outer props and an open frame motor for the central prop all from Model Motors Direct. The motor mounts will be fabricated ready for installation.
Rudders are fabricated and once fitted we will be ready to ballast and take to the lake for initial sea trials to test the setup. One picture shows a scale man adjacent to the propellor!
Dave and Bill
▲
⟩⟩
No likes yet
This member will receive 1 point
for every like received
This member will receive 1 point
for every like received
📝 Hulls completed to deck levels
13 years ago by 🇬🇧 Dave M ( Vice Admiral)
Vice Admiral)✧ 5 Views · 0 Likes
Flag
💬 Add Comment
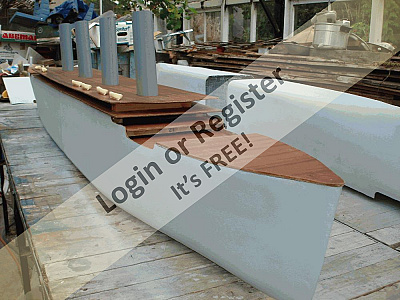
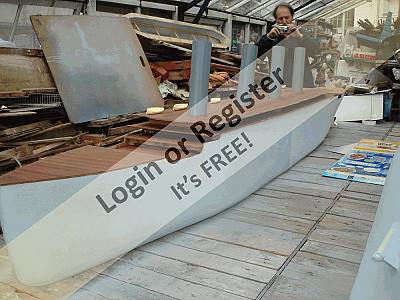
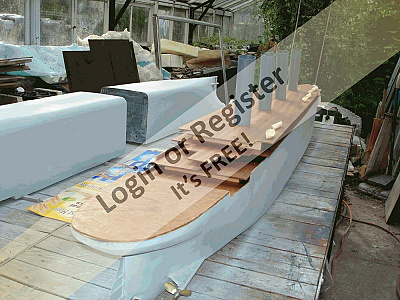
We have now after much consideration finished both hulls to deck edges with the correct shape for the lower decks. We are now making card templates for the decks. From past experience with the 100 scale model of the Lusitania it is Important that all the decks lift off the hull to protect the fittings and railings. The decks can then be carried in a separate box, which will also provide a useful stand for display purposes. We also need to arrange for space and access to add the battery and ballast. Latest thought is to use concrete moulded into the hull shape with lifting handles for ease of use.
We are displaying the model as built to date next weekend at The Yesteryear rally at Malpas in the model tent so need to tidy up the hull to give some representation of the final model, We do intend to add plate details but this will be added when we apply the primer undercoat and that is some way off at present. All funnels have been made and lifeboats castings have been commenced- we need 60 of the 30' type!
Bill and Dave
▲
⟩⟩
No likes yet
This member will receive 1 point
for every like received
This member will receive 1 point
for every like received
📝 Hull prepared for display
13 years ago by 🇬🇧 Dave M ( Vice Admiral)
Vice Admiral)✧ 5 Views · 0 Likes
Flag
💬 Add Comment
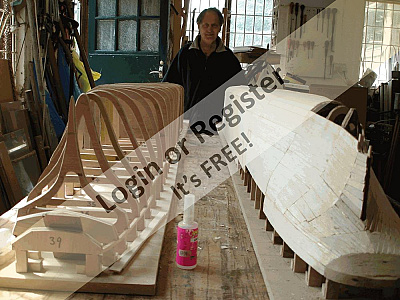
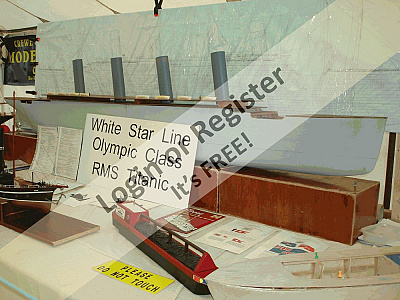
We have now managed to get one hull (RMS Titanic) ready for our display at the Malpas Yesteryear vintage steam rally on Saturday and Sunday. The rudder and props are installed and decks have been shown with the rough templates we have made to progress to the next stage of the build. Due to the size it is the best way we have found to identify what goes where and ensures we will be able to dismantle the model for transportation. Funnels and lifeboats are displayed but the model is in overall grey primer which has accentuated the join in the hull - it was much less obvious in black, and we have resined the end plated inside the join and need to sand the faces flat which will Improve the fit. RMS Olympic can be seen in the background - upside down.
Dave & Bill

Dave & Bill
▲
⟩⟩
No likes yet
This member will receive 1 point
for every like received
This member will receive 1 point
for every like received
📝 Plating of hull commences
13 years ago by 🇬🇧 Dave M ( Vice Admiral)
Vice Admiral)✧ 5 Views · 0 Likes · 9 Comments
Flag
💬 Add Comment
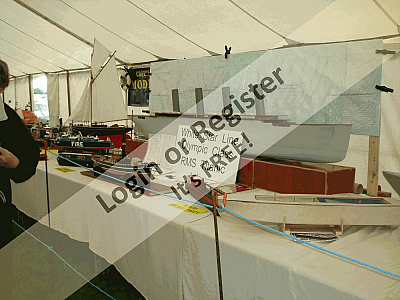
Attended the Malpas steam rally and exhibited one of the hulls.
We have now commenced the plating of the hull. This will help us to position the portholes. We may use 5mm leds as portholes as they can then be Illuminated which will give a realistic effect. Looks like I will be ordering from China as several hundred will be required for both boats! Has any one else tried LEDs for portholes? The top hat variety have a flat face so fit the job to a T.
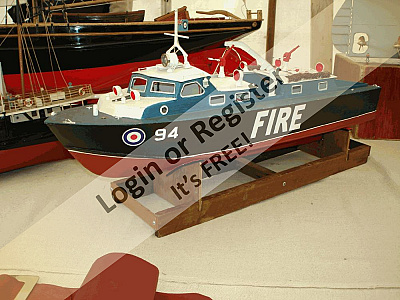
Just a few pics of our display. My Aerokits Fire tender was patrolling in front in case any of the construction workers fell!
Dave & Bill
We have now commenced the plating of the hull. This will help us to position the portholes. We may use 5mm leds as portholes as they can then be Illuminated which will give a realistic effect. Looks like I will be ordering from China as several hundred will be required for both boats! Has any one else tried LEDs for portholes? The top hat variety have a flat face so fit the job to a T.
Just a few pics of our display. My Aerokits Fire tender was patrolling in front in case any of the construction workers fell!
Dave & Bill
▲
⟩⟩
No likes yet
This member will receive 1 point
for every like received
This member will receive 1 point
for every like received
|
💬 Plating of hull commences
13 years ago by 🇬🇧 Dave M (
Vice Admiral)✧ 5 Views · 0 Likes
Flag
HI Nasraf - could be some deck lights. Quite common and not actually lights but glass set in deck to give light below decks.
Dave ▲
⟩⟩
No likes yet
This member will receive 1 point for every like received |
|
Login To
Remove Ads 💬 Plating of hull commences
13 years ago by 🇬🇧 nasraf (
Chief Petty Officer 1st Class)✧ 5 Views · 0 Likes
Flag
HI All
Thanks for comments it seems LEDs would be best so will have look at RS and Maplin to see what I can get. As I do not need many cost will not be so much of a problem. At present I do not know how many port holes there are, as pictures I have are not very detailed so there is still a bit of research to do before I cut too many holes. in particular I need to know if there are any port holes in the hull, there must have been a need for some light in the engine room and possibly in the crew quarters in the bow. Kind regards Nasraf ▲
⟩⟩
No likes yet
This member will receive 1 point for every like received |
|
💬 Plating of hull commences
13 years ago by 🇬🇧 Dave M (
Vice Admiral)✧ 5 Views · 0 Likes
Flag
HI Nasraf
You can get yellow or warm white LEDS. Just like filament lights they can be dimmed so you may be able to use. I used to use filament lamps but they run so hot and will melt most plastic bits, plus the smell of warm paint is not pleasant, especially indoors. Having looked at the price of LEDs I may change to fibre optics. I used to buy 100 for Ãa€sÂA£1 but prices have risen! I look forward to hearing how you progress with your Coromandel. Kind regards Dave ▲
⟩⟩
No likes yet
This member will receive 1 point for every like received |
|
💬 Plating of hull commences
13 years ago by 🇬🇧 b111yboy64 (
 Recruit) Recruit)✧ 5 Views · 0 Likes
Flag
HI chaps - could you try an amber led on low current/voltage? Amber gives a glow very like the old oil lamps. I've used them (dare I say it) on model railways to good effect. Cheers, Bill M.
▲
⟩⟩
No likes yet
This member will receive 1 point for every like received |
|
💬 Plating of hull commences
13 years ago by 🇬🇧 nasraf (
Chief Petty Officer 1st Class)✧ 5 Views · 0 Likes
Flag
HI Dave it was a bit of a glib comment and on more considered thought, you will have no problems with energy capacity from a battery of the size you are fitting, which I think would be about 60 AH at 12 volts.
Your idea on lighting port holes, I think I will incorporate in the Coromandel as I expect it to spend virtually all its time on the wall and not in water. The Coromandel must have been lit with oil lamps ( due to its age ) so it may be better to use filament lamps on a low voltage to get a more realistic colour. With kind regards nasraf ▲
⟩⟩
No likes yet
This member will receive 1 point for every like received |
|
💬 Plating of hull commences
13 years ago by 🇬🇧 Dave M (
Vice Admiral)✧ 5 Views · 0 Likes
Flag
HI Nasraf
Don't think I will be sailing it for that long! The battery is from a golf trolley so should last as the motors are low current. We should have them on the water shortly so will know more then. Still waiting to contact the owner of the steamer, Dave ▲
⟩⟩
No likes yet
This member will receive 1 point for every like received |
|
💬 Plating of hull commences
13 years ago by 🇬🇧 nasraf (
Chief Petty Officer 1st Class)✧ 5 Views · 0 Likes
Flag
HI Dave
Thanks for reply I can see that you look like being the first to install an IC engine driving a generator to supply the power needs, as was proposed by another blog or some large batteries or it could all be driven by steam !!!! nasraf ▲
⟩⟩
No likes yet
This member will receive 1 point for every like received |
|
💬 Plating of hull commences
13 years ago by 🇬🇧 Dave M (
Vice Admiral)✧ 5 Views · 0 Likes
Flag
Yes all electric. Very modern in its day but then this was the biggest and best that money can buy. The beauty of LEDs is that I can use a 317 IC chip to control the voltage (hence brightness). I am thinking in terms of some form of mattrix so that I can select individual or banks of lights to control. Not sure how many LEDs yet but the 317 will have to be supplemented with additional power MOSFET's as the current is possibly in the region of 20 amps for a fully lit ship. it wil depend on the Milli-amps each LED will need. Been looking at my China suppliers and note they do some surface mount devices that could be used for the upper lights. I will post more details in due course.
The steamer is a Dean's Marine kit I think but I wll ask the owner and get back to you. Godd luck with your build Dave ▲
⟩⟩
No likes yet
This member will receive 1 point for every like received |
|
💬 Plating of hull commences
13 years ago by 🇬🇧 nasraf (
Chief Petty Officer 1st Class)✧ 5 Views · 0 Likes
Flag
You have both worked very hard to get to this point. LED's seem to be a good idea for port holes and should look quite spectacular when lit up. Do you know if the original ships had electric light or oil lamps ? as in either case I expect that they would have given quite a yellow light,but in a model perhaps the brighter the better.
I am interested to know a bit more about the steamer on the front of your stand. nasraf ▲
⟩⟩
No likes yet
This member will receive 1 point for every like received |
📝 Hull Plating commenced and decks started
13 years ago by 🇬🇧 Dave M ( Vice Admiral)
Vice Admiral)✧ 5 Views · 0 Likes
Flag
💬 Add Comment
We have used electrical insulation tape cut to plate size and applied horizontally. Sprayed with four coats of primer filler and tape removed. Over-sprayed with another coat of primer filler and result is very realistic. We will now mark out the portholes along the plated side to ensure all is in alignment, and add (scribe) the vertical plate joins. Had the side view of the plan copied at our local Prontaprint in Crewe. Only now called "at o1ne". This will save us lots of time as we need to have templates for all the cabin sides and deck tops. Using a copy of the plan ensures we get the size and positions right. Four sheets of plans need to be copied - at 12' by 3' each you will understand the savings. We have cut the rear and fore decks out as well as the two well decks so need to start adding the lower cabin details. First though we will sort out the fixing points for the decks. We intend to make all decks with railings, removeable.
Bill & Dave
Bill & Dave
▲
⟩⟩
No likes yet
This member will receive 1 point
for every like received
This member will receive 1 point
for every like received


Login To
Remove Ads
Remove Ads