Join Us On Social Media!

|

|

|
Download The App!
Login To
Remove Ads
Remove Ads
Login To
Remove Ads
Remove Ads
Model Boats Website
Dromedary Class Paddle Tug
10 Posts · 3 Followers · 52 Photos · 39 Likes
Began 5 years ago by
 United Kingdom
Follow This Thread
Not currently following
> Click to follow
> Click to follow
Latest Post 5 years ago by
| Oldest posts shown first (Show Newest First) | (Print Booklet) |
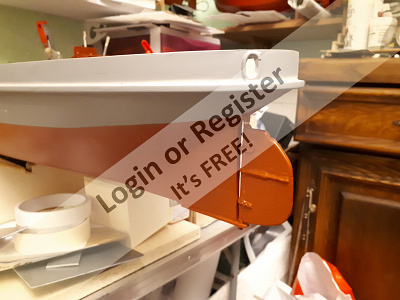
📝 Dromedary Class Paddle Tug
5 years ago by 🇬🇧 barryskeates ( Leading Seaman)
Leading Seaman)✧ 15 Views · 0 Likes
Flag
💬 Add Comment
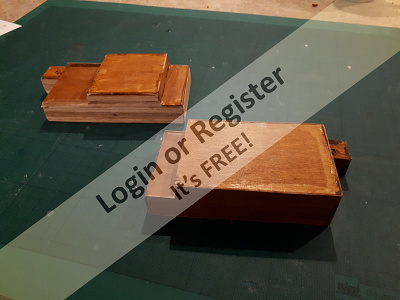
Semi scratch build
Hull, funnels, some fittings from Marks Boat Bits
the rest built from plans and photos
Hull, funnels, some fittings from Marks Boat Bits
the rest built from plans and photos
▲
⟩⟩
No likes yet
This member will receive 1 point
for every like received
This member will receive 1 point
for every like received
Login To
Remove Ads
Remove Ads
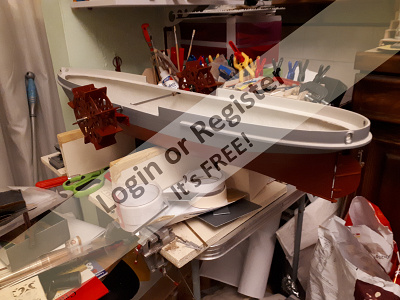
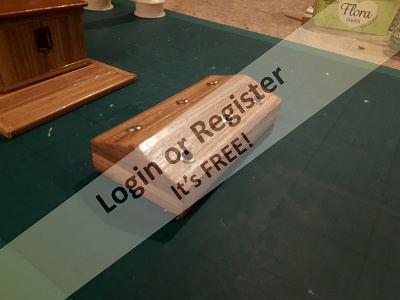
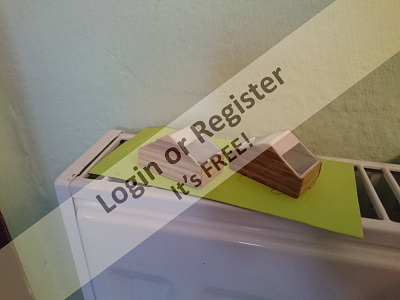
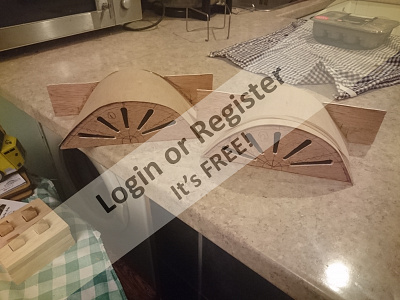
📝 Hull painted and Paddle Wheels done
5 years ago by 🇬🇧 barryskeates ( Leading Seaman)
Leading Seaman)✧ 23 Views · 9 Likes
Flag
💬 Add Comment
thus far put the rudder on, painted the bottom part of the Hull red and put together the Paddle Wheels
▲
⟩⟩
gazza131420
petercbrown
mturpin013
Joe727
marky
JOHN
Donnieboy
MouldBuilder
RNinMunich
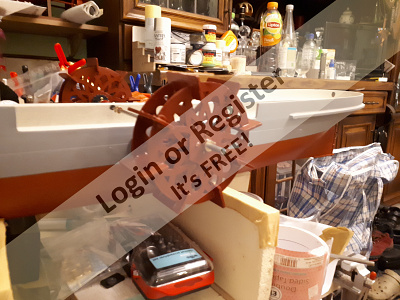
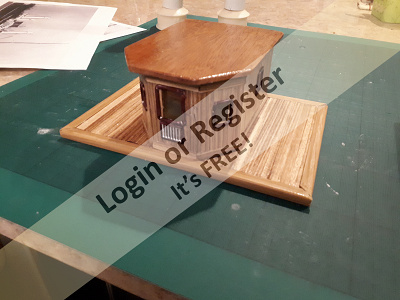
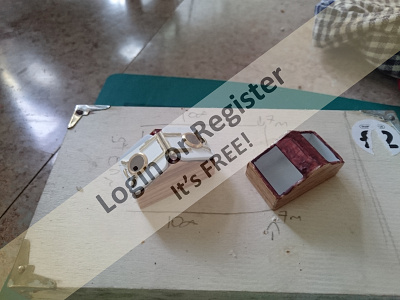
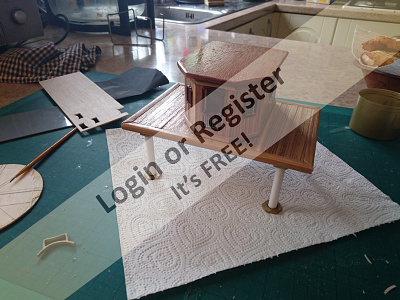
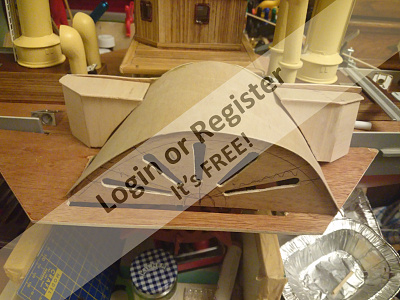
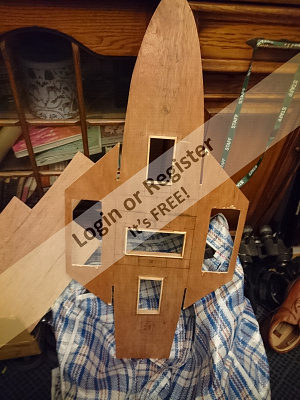
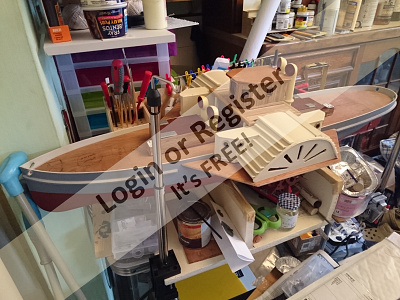
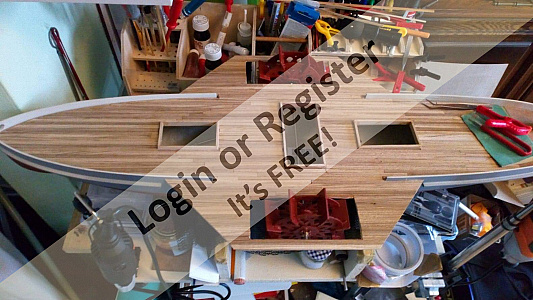
📝 Deck and Funnels
5 years ago by 🇬🇧 barryskeates ( Leading Seaman)
Leading Seaman)✧ 17 Views · 2 Likes
Flag
💬 Add Comment
Going for a removable deck (bold on so to speak)
so most of deck cutout and generally marked up for Engine cover, wheel house platform as well as where the funnels will go.
also dry fitted the Funnels to the main funnel mounts to see what we have and ensure it all fits together

so most of deck cutout and generally marked up for Engine cover, wheel house platform as well as where the funnels will go.
also dry fitted the Funnels to the main funnel mounts to see what we have and ensure it all fits together
▲
⟩⟩
petercbrown
mturpin013
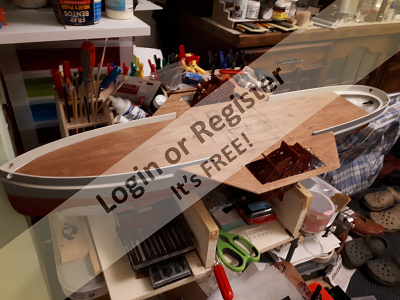
📝 Deck Parts
5 years ago by 🇬🇧 barryskeates ( Leading Seaman)
Leading Seaman)✧ 20 Views · 7 Likes
Flag
💬 Add Comment
good weekend
Made up, painted and planked up the engine cover and the 2 funnel stands.
Funnel stands need to have the Cowl vents, funnels, hatches and tow mounts fitted to them. Need top make up, create, paint all of those first of course😁
also looking at a steam generator to go into the front Funnel so a hole will be drilled into the mount for that as well
▲
⟩⟩
RNinMunich
petercbrown
BOATSHED
Ronald
Colin H
Donnieboy
mturpin013
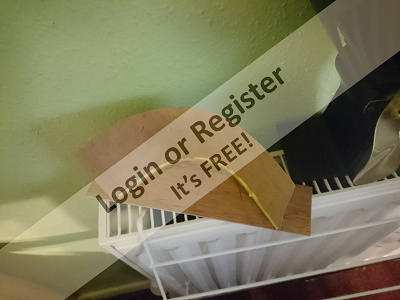
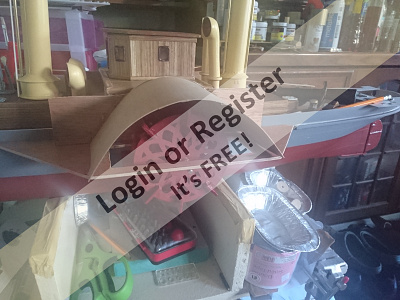
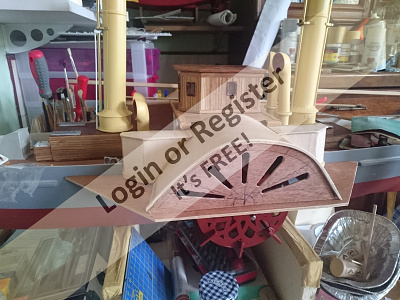
📝 end of week report LOL
5 years ago by 🇬🇧 barryskeates ( Leading Seaman)
Leading Seaman)✧ 18 Views · 4 Likes
Flag
💬 Add Comment
good week this week, i should of said that there are 2 of us working on this Tug, myself and my father.
this means that we are splitting the work up and as he is retired he can spend some more time on the boat than i can.
so, (and i forgot to take the "before" photos) we have the wheelhouse and the platform it sits on (as the platform is held above the deck on a number of legs.
plasticard and wood veneer outer cladding with a (removable) roof.
going to put lighting in the table, telegraph, binnacle, map table and ships wheel.
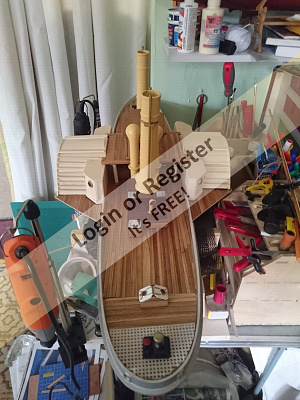
painted the 4 Cowl vents
then we dry fitted (placed no glue) the various parts( wheel house, funnels, mounts) into place on the deck to see how it looks.
finally painted the funnels yellow to match the Cowl vents
still to do on the Funnel mounts is to
paint and place the vents (flat vents),
fit the Cowl vents,
paint and fit the hatch covers (white hatches with bronze hinges)
fit the pipework to the exterior of the funnels
drill holes in the front mount for the steam generator funnel
and finally mount the funnels to the mounts
(so not too much just for those 2 bits)
this means that we are splitting the work up and as he is retired he can spend some more time on the boat than i can.
so, (and i forgot to take the "before" photos) we have the wheelhouse and the platform it sits on (as the platform is held above the deck on a number of legs.
plasticard and wood veneer outer cladding with a (removable) roof.
going to put lighting in the table, telegraph, binnacle, map table and ships wheel.
painted the 4 Cowl vents
then we dry fitted (placed no glue) the various parts( wheel house, funnels, mounts) into place on the deck to see how it looks.
finally painted the funnels yellow to match the Cowl vents
still to do on the Funnel mounts is to
paint and place the vents (flat vents),
fit the Cowl vents,
paint and fit the hatch covers (white hatches with bronze hinges)
fit the pipework to the exterior of the funnels
drill holes in the front mount for the steam generator funnel
and finally mount the funnels to the mounts
(so not too much just for those 2 bits)
▲
⟩⟩
RNinMunich
gazza131420
Colin H
Donnieboy
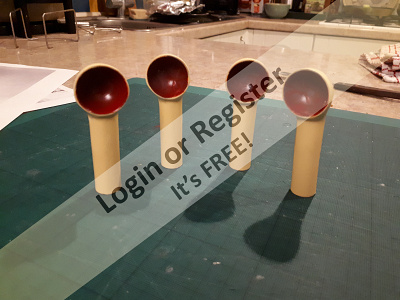
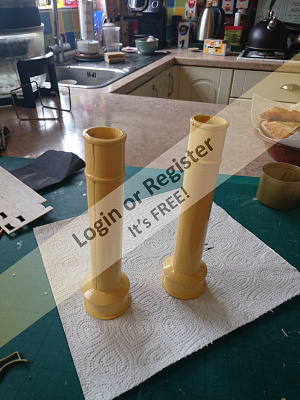
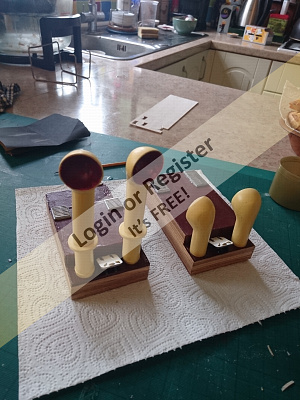
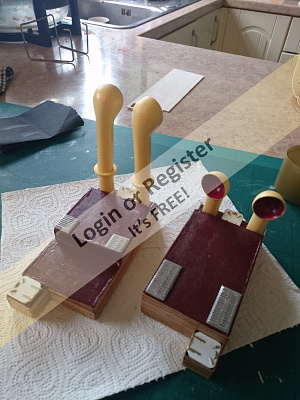
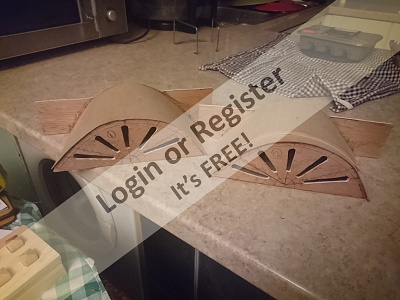
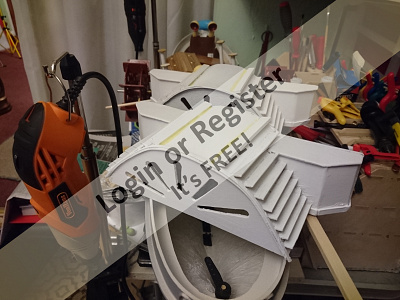
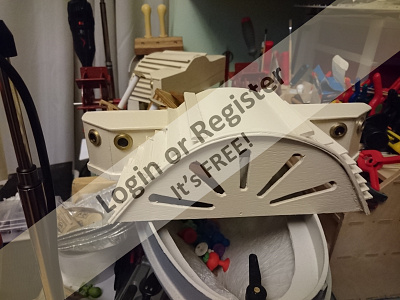
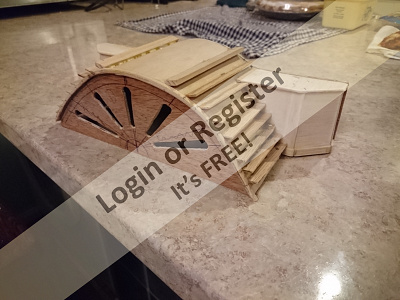
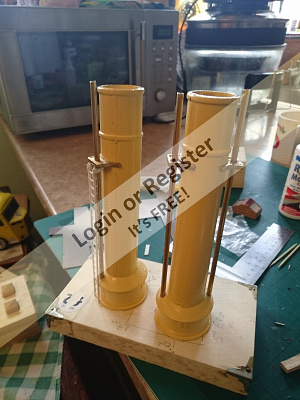
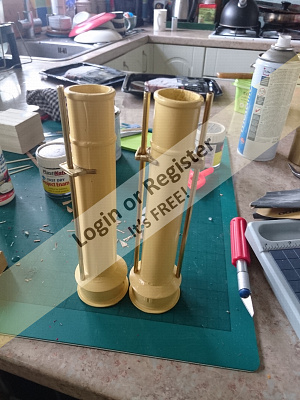
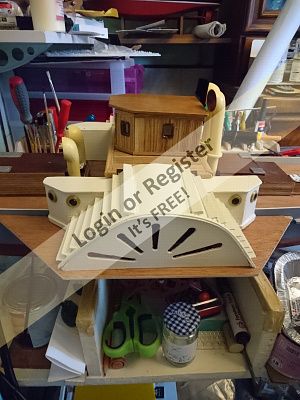
📝 funnel mounts and deck hatches
5 years ago by 🇬🇧 barryskeates ( Leading Seaman)
Leading Seaman)✧ 18 Views · 3 Likes · 2 Comments
Flag
💬 Add Comment
Fitted the "legs" to the wheel house so now at correct height when on the deck.
Funnel mounts done (just need to finish the funnels, workout what holes to drill and then mount the funnels to the mounts)
so we added 2 hatches to each mount, painted white with brass hinges.
the one placed between the Cowl vents is open, the one at the back is closed.
as we only had "closed" hatches put a triangle shaped bit of plastic under the "open" hatch to prop open.
When dry mounting the Cowl Vents found an issue with the rear vents as they are suppose to be higher than the wheelhouse and the ones i got where not, so found 2 wooden cotton reels the right height and turned then down to the correct width using the pillar drill as a lathe, painted them up and then placed the Cowl vents on those.
also painted the "flat" vents chrome and stuck those to the mounts as well.
to finish off these all we have to do is fit the breather pipes and ladder to funnels and fix the funnels to the mounts (allowing for the front funnel to have the hole for the smoke generator.
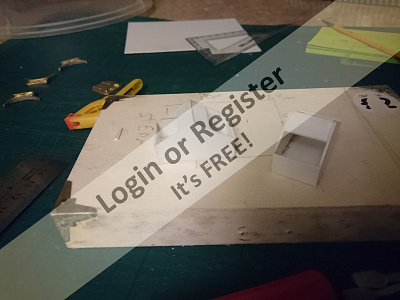
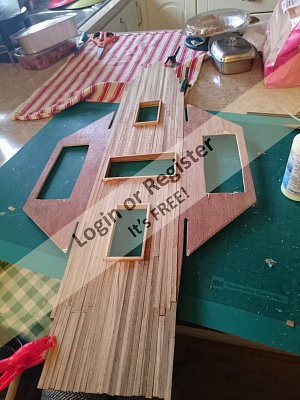
Started work on the 2 deck hatches using 1mm plastic sheet.
Made the 2 housings up and the planked and varnished them ready for the hatches.
found out i had only enough hatches to do 1 housing, so drilled a 7mm hole in the hatch for a 10mm brass porthole, painted white with brass hinges.
once dry stuck them on the housing ready to go.
(ordered some more hatches to i can complete the other housing lol)
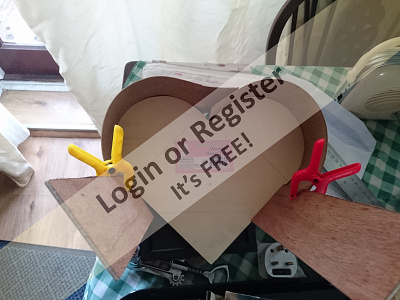
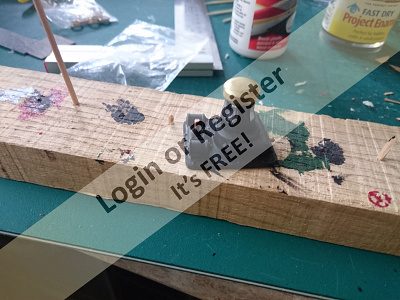
one last thing was to start on the wheel box.
Found in "The Works" in town a heart shaped box which was almost perfect for a mold for the thin wood that was steamed to shape and then held on the heart to fix the curve in place.
next to do is to make up the front and back of the wheel boxes and stick the "curved" wood to that

Funnel mounts done (just need to finish the funnels, workout what holes to drill and then mount the funnels to the mounts)
so we added 2 hatches to each mount, painted white with brass hinges.
the one placed between the Cowl vents is open, the one at the back is closed.
as we only had "closed" hatches put a triangle shaped bit of plastic under the "open" hatch to prop open.
When dry mounting the Cowl Vents found an issue with the rear vents as they are suppose to be higher than the wheelhouse and the ones i got where not, so found 2 wooden cotton reels the right height and turned then down to the correct width using the pillar drill as a lathe, painted them up and then placed the Cowl vents on those.
also painted the "flat" vents chrome and stuck those to the mounts as well.
to finish off these all we have to do is fit the breather pipes and ladder to funnels and fix the funnels to the mounts (allowing for the front funnel to have the hole for the smoke generator.
Started work on the 2 deck hatches using 1mm plastic sheet.
Made the 2 housings up and the planked and varnished them ready for the hatches.
found out i had only enough hatches to do 1 housing, so drilled a 7mm hole in the hatch for a 10mm brass porthole, painted white with brass hinges.
once dry stuck them on the housing ready to go.
(ordered some more hatches to i can complete the other housing lol)
one last thing was to start on the wheel box.
Found in "The Works" in town a heart shaped box which was almost perfect for a mold for the thin wood that was steamed to shape and then held on the heart to fix the curve in place.
next to do is to make up the front and back of the wheel boxes and stick the "curved" wood to that
▲
⟩⟩
Colin H
mturpin013
Donnieboy
|
💬 Re: funnel mounts and deck hatches
5 years ago by 🇬🇧 barryskeates (
Leading Seaman)✧ 15 Views · 0 Likes
Flag
hi, cheers, might well do that (not straight away) but will do that a tad later 👍👍👍👍👍
▲
⟩⟩
No likes yet
This member will receive 1 point for every like received |
|
💬 funnel mounts and deck hatches
5 years ago by 🇬🇧 mturpin013 (
 Admiral) Admiral)✧ 16 Views · 2 Likes
Flag
Nice work, can I offer a very simple but effective improvement to the Cowl Vents, just cut small circle of black card and stick it in the red area and it looks as if there is a hole to the interior, then just paint with a matt varnish. I did mine and I think they look good
▲
⟩⟩
barryskeates
petercbrown
|
📝 Wheel Boxes
5 years ago by 🇬🇧 barryskeates ( Leading Seaman)
Leading Seaman)✧ 17 Views · 2 Likes
Flag
💬 Add Comment
Done a load of work around the wheel boxes this week (as well has finishing the other Deck hatch as the parts had arrived).
Started with a blanking plate where we drew on the curve of the wheel box as well as the height of the side boxes.
steamed 2 thin strips of wood into shape and glues them to the plates.
Then glued the 2 preformed wheel box shapes to the plates.
Once dry, using the preformed boxes cut out 2 wheel box fronts, marked up where the slots are going to go (not skilled enough to cut the required 10 slots so gone for 5 instead).
Once cut out and shaped, glued into place and at the same time removed the extra material from the blacking plate to form the backs of the wheel boxes and side boxes.
once all of that was dry, cut out of balsa wood the 4 side boxes (2 each side, front and rear), glued together, shaped to fit and then fitted to the backing plate and wheel box arches.
We found that the Wheelhouse platform was actually slightly too big (port and starboard wise) so cut into the platform slightly do the wheel boxes etc fit, looks better and once all fitted together will be fine.
Next thing to do is the steps over the 2 wheel boxes, so ordered some more wood strips to do that.
once all that is done, seal and paint the boxes.
Also on the plan for this coming week is to mark out and cut the deck holes for the battery, steam generator and other bits and bobs 🤞
▲
⟩⟩
gazza131420
Colin H
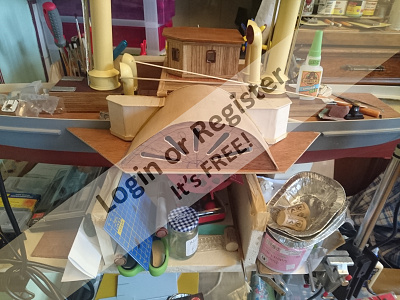
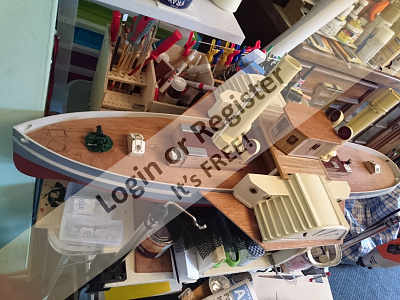
📝 Wheel Boxes and deck holes
5 years ago by 🇬🇧 barryskeates ( Leading Seaman)
Leading Seaman)✧ 19 Views · 5 Likes · 1 Comment
Flag
💬 Add Comment
Forgot an item on the last update, I fitted the pipes and ladder to the 2 funnels.
This week:-
My dad did a load more work on the wheel boxes, mainly adding the "steps" and portholes to the boxes.
Cutting thin steps, a touch of Gel superglue to pin in place and then wood glue to secure it in place.
found an issue with the 2 boxes not being 100% matching and "straight" so to speak so a bit of messing around to get each step to fit.
Once all the steps fitted and glue dry, the undercoated and painted with a number of top coats of a cream colour.
we did not fancy trying to cut/drill holes in the 4 side boxes for the portholes, so purchased some plastic stick on portholes, painted them a brass colour, painted the glass black and then stuck them onto the side boxes.
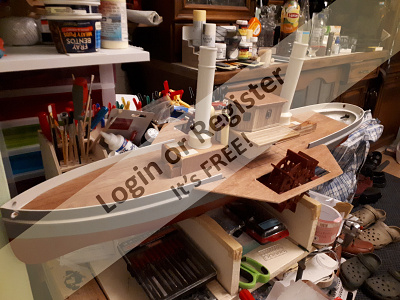
we cut the 3 holes in the deck for the engine cover, and both the front and rear funnel mounts.
lined the holes with wood so that the mounts and engine cover fits over the raised ridges snugly thus giving us a form of waterproofing as well as access holes for the battery and smoke generator.
Made up the rear Capstan and front anchor winch (not pictured).
also cutout the remaining rear deck section to go over the servo and rudder area.
finally dry fitted all bits thus far to give us an item as to how its going to look.
This week:-
My dad did a load more work on the wheel boxes, mainly adding the "steps" and portholes to the boxes.
Cutting thin steps, a touch of Gel superglue to pin in place and then wood glue to secure it in place.
found an issue with the 2 boxes not being 100% matching and "straight" so to speak so a bit of messing around to get each step to fit.
Once all the steps fitted and glue dry, the undercoated and painted with a number of top coats of a cream colour.
we did not fancy trying to cut/drill holes in the 4 side boxes for the portholes, so purchased some plastic stick on portholes, painted them a brass colour, painted the glass black and then stuck them onto the side boxes.
we cut the 3 holes in the deck for the engine cover, and both the front and rear funnel mounts.
lined the holes with wood so that the mounts and engine cover fits over the raised ridges snugly thus giving us a form of waterproofing as well as access holes for the battery and smoke generator.
Made up the rear Capstan and front anchor winch (not pictured).
also cutout the remaining rear deck section to go over the servo and rudder area.
finally dry fitted all bits thus far to give us an item as to how its going to look.
▲
⟩⟩
jbkiwi
Ishmael
gazza131420
Colin H
RNinMunich
|
💬 Re: Wheel Boxes and deck holes
5 years ago by 🇩🇪 RNinMunich (
 Fleet Admiral) Fleet Admiral)✧ 14 Views · 0 Likes
Flag
Looking really good Barry 👍
Looking forward to seeing her in action! BTW; Technical term for the 'ridges' is 'coaming' I believe😉 Cheers, Doug 😎 ▲
⟩⟩
No likes yet
This member will receive 1 point for every like received |
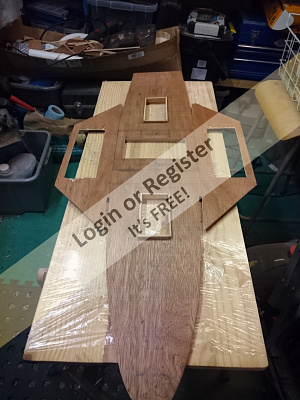
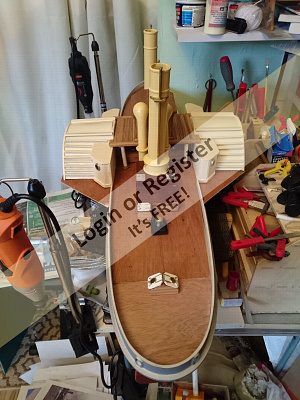
📝 Planking the deck
5 years ago by 🇬🇧 barryskeates ( Leading Seaman)
Leading Seaman)✧ 17 Views · 3 Likes
Flag
💬 Add Comment
Had a few days off enjoying the sunshine so slowed down slightly so a short update today
Sealed the deck, holes etc to protect from water ingress into the wood itself then
Dad went ahead and planked the deck in zebra wood strips.
Once done, satin varnished it with a few coats to seal it all in.
looking this week (as i am off this week) to start on the internals, battery boxes, servos, switches, motor mount and motor etc, so should be fun LOL
▲
⟩⟩
RNinMunich
Donnieboy
Colin H
📝 quite a while since last update
5 years ago by 🇬🇧 barryskeates ( Leading Seaman)
Leading Seaman)✧ 16 Views · 4 Likes · 1 Comment
Flag
💬 Add Comment
it been quite a while since the last update, holidays, work, sun shine etc all got in the way
we have done some amount of work on the model in past few months mostly around the running gear and some electrics
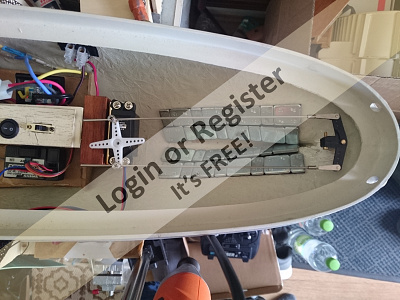
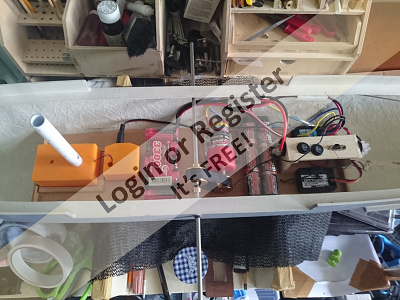
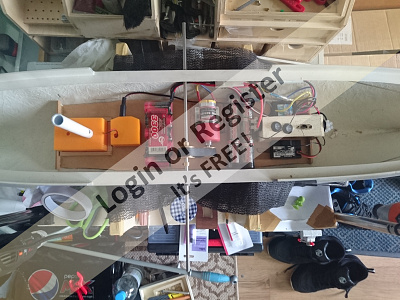
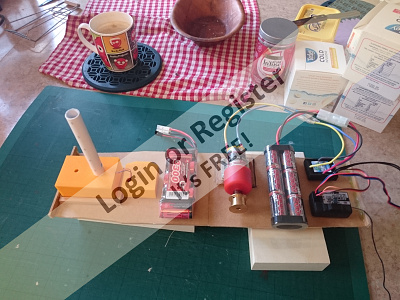
Made up a platform on which all of the main electric components will sit on, these include the 2 batteries (6 volt for the steam and lighting) 7.2v for the motor.
also on the platform will be the smoke/steam generator, motor, ESC, receiver and at the back the Servo for the rudder.
platform made out of MDF and sealed up and then re-enforced with wood strips
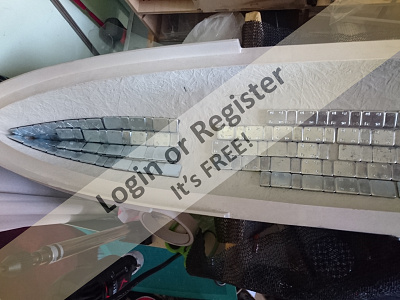
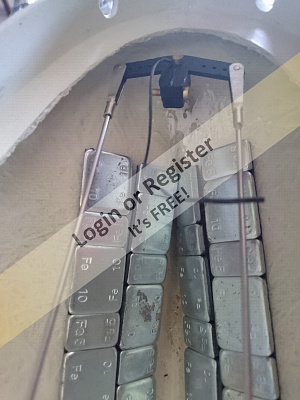
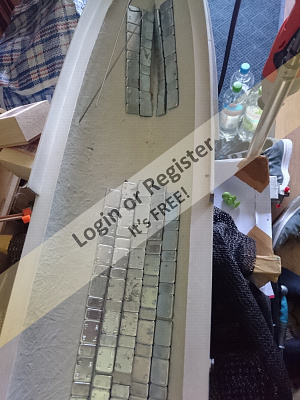
before fixing the platform inside the huil (permanent fixing) did a "Bath" test to add ballast to the hull as you would imagine that it rides high without anything expect for the platform/batteries and paddles.
used Car wheel weights as ballast as you can go done to the nearest gram with those as well as stick on on where needed.
once ballasted (not fully as need to put superstructure and deck fittings on before the final a ballast glues (epoxy) the platform, into place (with the ballast under it) we can still put extra to the sides and bow/stern
worked out where the Servo is going to go, fitted that to the rear of the platform and used 2 rods to goto the rudder arm
added 3 switches to a small shelf on the platform, these will be the main ESC/Motor Power switch, one switch for the steam and 1 for the lights.
Also ensured we can get to the 2 battery leads fore charging
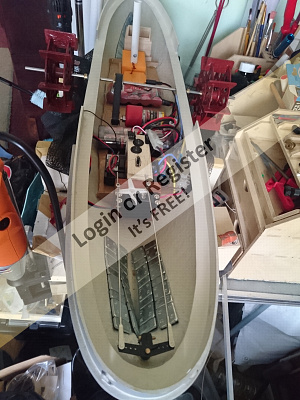
Added the Navigation lights (and wiring) to the wheel boxes as well as wiring up the small set of lights we have in the engine cover.
as we are looking at a removable deck (so the whole thing comes off rather then just sections of the deck)on it if we need to get to the stuff like battery/motor etc we can.
looking for a solution pointed me to look at the metal clips that are used to hold car speakers into place in car doors etc, basically a slide on spring clip with a hole one side and a grooved hole the other to screw into.
drilled the hole in the deck where needed (8 holes in the main deck and 2 in the stern for the rudder area.)
drilled holes in the GRP platform on which the deck rests, clipped the metal clips to the hull/desk rest, i have glued some small metal washers to the top of the deck to protect it then we can basically screw the deck to the hull (and remove) without damaging the deck or hull and we are screwing into metal clips and and pulling the deck to the metal clips
next thing to do is look at fixing the wheel boxes to the deck, the a way of fixing (but being ale to remove) the house house if needed.
then lights and wiring of as we are looking at getting lights to the wheel house as well as a few other places
at the same time putting other the deck fittings (Mast, work/life boats) etc
once all that done a final ballast, tighten all of the various bolts/screens, charge battery and test sailing (could take a while as working on this slowly)
we have done some amount of work on the model in past few months mostly around the running gear and some electrics
Made up a platform on which all of the main electric components will sit on, these include the 2 batteries (6 volt for the steam and lighting) 7.2v for the motor.
also on the platform will be the smoke/steam generator, motor, ESC, receiver and at the back the Servo for the rudder.
platform made out of MDF and sealed up and then re-enforced with wood strips
before fixing the platform inside the huil (permanent fixing) did a "Bath" test to add ballast to the hull as you would imagine that it rides high without anything expect for the platform/batteries and paddles.
used Car wheel weights as ballast as you can go done to the nearest gram with those as well as stick on on where needed.
once ballasted (not fully as need to put superstructure and deck fittings on before the final a ballast glues (epoxy) the platform, into place (with the ballast under it) we can still put extra to the sides and bow/stern
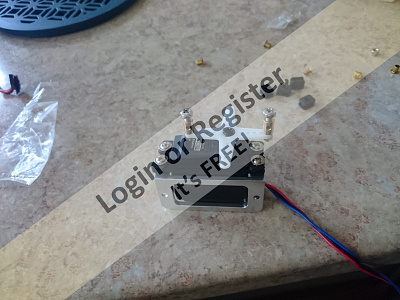
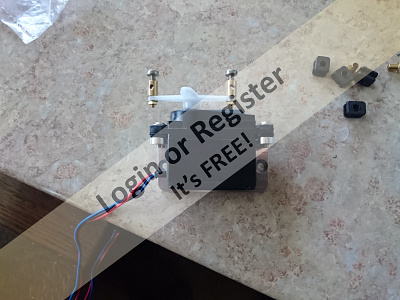
worked out where the Servo is going to go, fitted that to the rear of the platform and used 2 rods to goto the rudder arm
added 3 switches to a small shelf on the platform, these will be the main ESC/Motor Power switch, one switch for the steam and 1 for the lights.
Also ensured we can get to the 2 battery leads fore charging
Added the Navigation lights (and wiring) to the wheel boxes as well as wiring up the small set of lights we have in the engine cover.
as we are looking at a removable deck (so the whole thing comes off rather then just sections of the deck)on it if we need to get to the stuff like battery/motor etc we can.
looking for a solution pointed me to look at the metal clips that are used to hold car speakers into place in car doors etc, basically a slide on spring clip with a hole one side and a grooved hole the other to screw into.
drilled the hole in the deck where needed (8 holes in the main deck and 2 in the stern for the rudder area.)
drilled holes in the GRP platform on which the deck rests, clipped the metal clips to the hull/desk rest, i have glued some small metal washers to the top of the deck to protect it then we can basically screw the deck to the hull (and remove) without damaging the deck or hull and we are screwing into metal clips and and pulling the deck to the metal clips
next thing to do is look at fixing the wheel boxes to the deck, the a way of fixing (but being ale to remove) the house house if needed.
then lights and wiring of as we are looking at getting lights to the wheel house as well as a few other places
at the same time putting other the deck fittings (Mast, work/life boats) etc
once all that done a final ballast, tighten all of the various bolts/screens, charge battery and test sailing (could take a while as working on this slowly)
▲
⟩⟩
ChrisG
SteveL
MouldBuilder
RNinMunich
|
💬 Re: quite a while since last update
5 months ago by 🇬🇧 SteveL (
 Recruit) Recruit)✧ 13 Views · 0 Likes
Flag
Looks great Barry. How far have you progressed? What' s the latest?
Steve ▲
⟩⟩
No likes yet
This member will receive 1 point for every like received |


Login To
Remove Ads
Remove Ads