Join Us On Social Media!

|

|

|
Download The App!
Login To
Remove Ads
Remove Ads
Login To
Remove Ads
Remove Ads
Model Boats Website
RoMarin/Krick Dusseldorf Fire Boat.
37 Posts · 36 Followers · 393 Photos · 322 Likes
Began 5 years ago by
 Hungary
Follow This Thread
Not currently following
> Click to follow
> Click to follow
Latest Post 1 year ago by
| Oldest posts shown first (Show Newest First) | (Print Booklet) |
📝 RoMarin/Krick Dusseldorf Fire Boat.
5 years ago by 🇭🇺 MouldBuilder ( Vice Admiral)
Vice Admiral)✧ 174 Views · 9 Likes · 8 Comments
Flag
💬 Add Comment
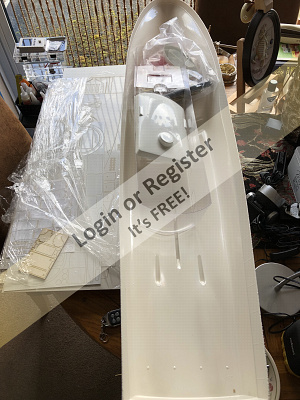
I have been looking forward to starting this build for some time. It looks like this will be an interesting model to build but mainly I look forward to setting up the 16 channels required to give full function to all of the special features.
The Dusseldorf is one of three identical boats built for use in the Ruhr area of Germany. The boats are equipped for disaster situations, (they must have known I was going to build it)😀. They can be used for ship fires, oil leaks or as a port facility at risk of explosion.
The fire monitors, radar, boat crane, lighting and anchor winch will all be working if I can sort out the controls. The fire monitors are of particular interest because if I get things right, they will swivel, lift and lower and shoot water. We will see.
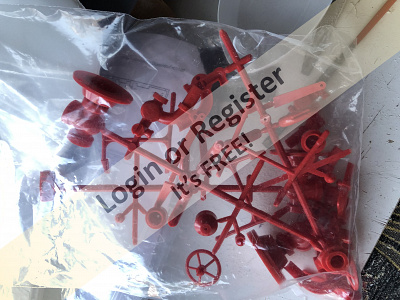
As stated in the instructions, I read most of them to see how things looked. I got bored at page six so forgot that bit. The next stage was to check the contents against the bill of materials. There must be 1000 pieces. I checked the large pieces and gave the rest a miss also. Not a good start I hear you cry. You will get used to it.
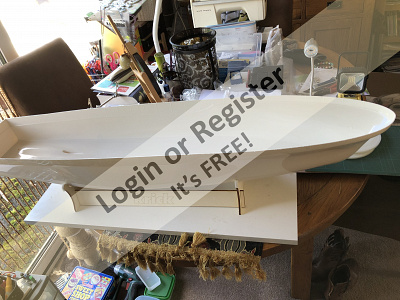
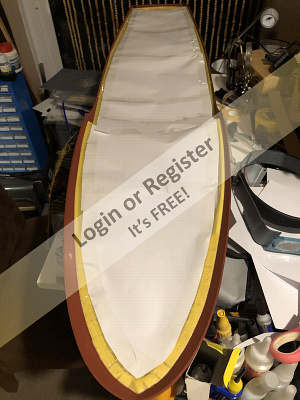
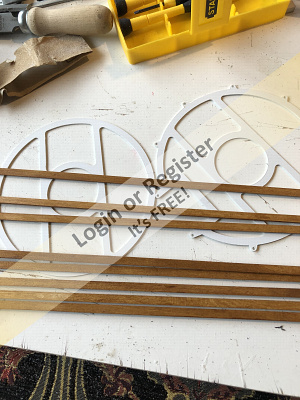
I proceeded to remove the stand parts and lightly sanded off the connection remains. I assembled it using super glue but I will strengthen the inner corners with Epoxy later. I stuck some draft excluder tape to all of the edges which contact the hull for safety.
Next stage was to trim off the excess material at deck level of the Hull. With 1.5mm thick ABS this is quite a job especially considering that the boat measures around 2.8 Metres all around. I used a Stanley knife to remove the bulk of the material followed by different sized files to trim to size. This process takes a lot of care so that not too much material is removed. The hull has a rather crude sort of line to work to but I think I will put more reliance on my eye and a two foot steel rule. I still have a little filing of the edges to do before I will be completely happy as this edge will be visible on the completed model.
According to the instructions my next stage is to fit the rudders, motors and prop shafts. A job for next week.

The Dusseldorf is one of three identical boats built for use in the Ruhr area of Germany. The boats are equipped for disaster situations, (they must have known I was going to build it)😀. They can be used for ship fires, oil leaks or as a port facility at risk of explosion.
The fire monitors, radar, boat crane, lighting and anchor winch will all be working if I can sort out the controls. The fire monitors are of particular interest because if I get things right, they will swivel, lift and lower and shoot water. We will see.
As stated in the instructions, I read most of them to see how things looked. I got bored at page six so forgot that bit. The next stage was to check the contents against the bill of materials. There must be 1000 pieces. I checked the large pieces and gave the rest a miss also. Not a good start I hear you cry. You will get used to it.
I proceeded to remove the stand parts and lightly sanded off the connection remains. I assembled it using super glue but I will strengthen the inner corners with Epoxy later. I stuck some draft excluder tape to all of the edges which contact the hull for safety.
Next stage was to trim off the excess material at deck level of the Hull. With 1.5mm thick ABS this is quite a job especially considering that the boat measures around 2.8 Metres all around. I used a Stanley knife to remove the bulk of the material followed by different sized files to trim to size. This process takes a lot of care so that not too much material is removed. The hull has a rather crude sort of line to work to but I think I will put more reliance on my eye and a two foot steel rule. I still have a little filing of the edges to do before I will be completely happy as this edge will be visible on the completed model.
According to the instructions my next stage is to fit the rudders, motors and prop shafts. A job for next week.
▲
⟩⟩
ASTRAGALO
jbkiwi
Inkoust
RNinMunich
JOHN
Martin555
Cashrc
figtree7nts
Colin H
|
💬 Re: RoMarin/Krick Dusseldorf Fire Boat.
4 years ago by 🇭🇺 MouldBuilder (
Vice Admiral)✧ 171 Views · 1 Like
Flag
I bought them on ebay. About £6 each I think.
As for the paint, I have used Halfords Red Oxide for below the waterline. I have used Tamiya spray cans for the rest. I am spraying the main cabin and hull with a deeper red than pictured. As the hull is ABS, I did not see any need for fibre glassing. ▲
⟩⟩
Martin555
|
|
Login To
Remove Ads 💬 Re: RoMarin/Krick Dusseldorf Fire Boat.
4 years ago by 🇺🇸 bruce1946 (
 Midshipman) Midshipman)✧ 170 Views · 2 Likes
Flag
Where did you get your micro motors from for the monitors and batteries
▲
⟩⟩
MouldBuilder
Martin555
|
|
💬 Re: RoMarin/Krick Dusseldorf Fire Boat.
4 years ago by 🇺🇸 bruce1946 (
Midshipman)✧ 170 Views · 2 Likes
Flag
I just ordered my Dusseldorf from Cornwell models. they were the only one to have the kit anymore Krick factory in china is shut down. Per Krick.
What is the color red and brand you are using or suggested paint to paint this boat, is it flat red or gloss? I love you detail and instructions, photo's did you use epoxy and fiber glass on the hull? Hopefully I will have my boat next week. I still need the monitor kit. Thank you ▲
⟩⟩
MouldBuilder
Martin555
|
|
💬 Re: RoMarin/Krick Dusseldorf Fire Boat.
5 years ago by 🇩🇪 RNinMunich (
 Fleet Admiral) Fleet Admiral)✧ 170 Views · 1 Like
Flag
Hi Pete,
If you're happy ...! I was just a bit concerned as you mentioned 'deck level' but the pics showed some bulwark mouldings! You know best, you have the 'bits' in front of you. 👍 Cheers, Doug ▲
⟩⟩
Martin555
|
|
💬 Re: RoMarin/Krick Dusseldorf Fire Boat.
5 years ago by 🇭🇺 MouldBuilder (
Vice Admiral)✧ 170 Views · 3 Likes
Flag
Hi Doug.
There was a formed line on the hull which was the guide for this material removal. I am happy that not too much was cut away. I am finding that the plan is not quite 1:1. This is not too much of an issue but I have come across a dimension that is given as 35mm in the instructions but measures 30mm on the plan. The plan scale is generally around 0.976:1. ▲
⟩⟩
ASTRAGALO
Martin555
RNinMunich
|
|
💬 Re: RoMarin/Krick Dusseldorf Fire Boat.
5 years ago by 🇩🇪 RNinMunich (
Fleet Admiral)✧ 170 Views · 2 Likes
Flag
Way to go Pete👍 Welcome home!
Should be fun getting all the special function possibilities working 😉 I look forward to the 'How Tos?' 😁 Doug 😎 BTW Are you SURE you should have trimmed so much off the hull? I hope you haven't cut off any moulded in bulwarks!! 😮 Don't chuck the bits away just in case! ▲
⟩⟩
Martin555
MouldBuilder
|
|
💬 Re: RoMarin/Krick Dusseldorf Fire Boat.
5 years ago by 🇬🇧 Martin555 (
Fleet Admiral)✧ 170 Views · 1 Like
Flag
Hi,
I am looking forward to seeing your progress with this project. It looks very interesting. Good luck with the build. Martin. ▲
⟩⟩
MouldBuilder
|
|
💬 Re: RoMarin/Krick Dusseldorf Fire Boat.
5 years ago by 🇺🇸 Cashrc (
Vice Admiral)✧ 170 Views · 2 Likes
Flag
I’m so glad Krick acquired the old Robbe line. I finished the Neptun tug a month or so ago, and imho Krick has done a fine job resurrecting the Robbe kits. Looks like your well on your way to building a nice model.😀
▲
⟩⟩
RNinMunich
MouldBuilder
|
Login To
Remove Ads
Remove Ads
📝 Fitting the Rudders
5 years ago by 🇭🇺 MouldBuilder ( Vice Admiral)
Vice Admiral)✧ 174 Views · 4 Likes · 1 Comment
Flag
💬 Add Comment
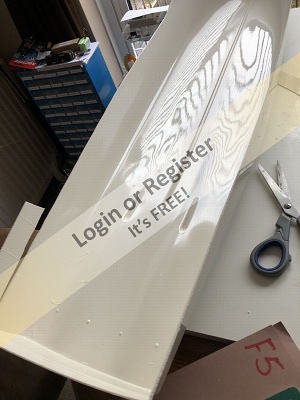
There are four rudders on this boat. The design for these is a vast improvement on the Aeronauts Pilot Boat I recently completed.
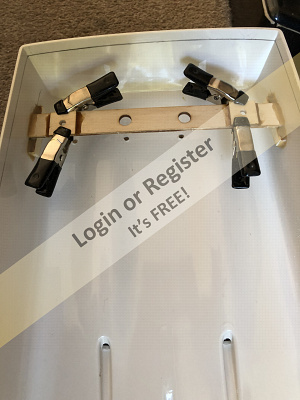
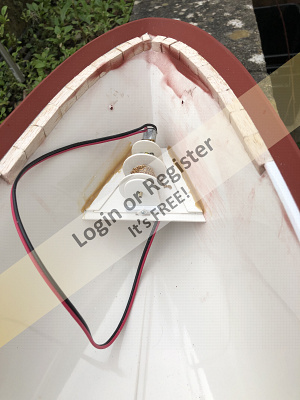
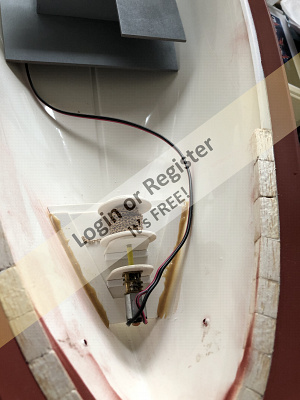
The first stage was to drill all of the required holes in the hull. These include two for the anchors, two for the prop shafts, one for the water inlet tube and four for the rudders. As this is an ABS hull moulding, drilling is not usually too much of a problem but due to the cost of the model, I decided to protect the insides around the holes with tape to decrease the possibility of cracking. I start the holes off with a 3mm drill and then increase to the final size which in this case was 4mm, 6mm, 7mm and 4mm respectively. I gently filed around the holes to get a nice slide fit and correct alignment of the tubes.
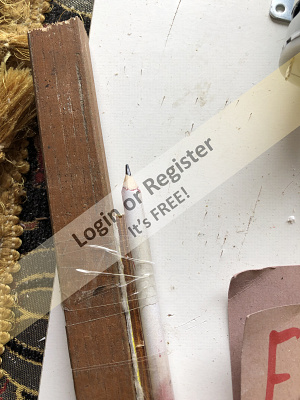
The deck lies on a support rib which will later be glued around the inside of the hull. The instructions highlight the build of a simple device which will hold a pencil at a height of 7.5mm. A pencil is taped to a straight piece of wood of about 30cm long with a suitable spacer in between which was 3mm in this case. You can then place the stick to contact both sides of the hull and then draw a constant line at exactly 7.5mm down. Simple but effective. This will form the height guide for the deck support. This line was also continued around the bow of the ship which will form the bulwark later.
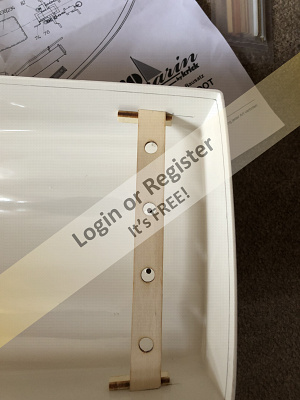
The next job was to prepare and glue the side supports inside the hull for the rudder tube support board. Next job was to glue the support board in place. I did not notice at this time that the support board had quite a bad bend in it. The bow was upwards which resulted in the two centre tube alignment inserts being above the end of the tubes. The solution was to glue the two middle alignment inserts under the support board instead. A little awkward but the result is good.
The rudder tubes were now fitted and glued to be water tight with Stabilit Express glue. This is good for water tightness.
I painted the four rudders matt black and then protected with Lacquer. Although the instructions state that the rudders should be fitted and set up at this stage, I have decided to leave this for as long as possible to avoid damage.
The next job is to fit the twin motors and prop shafts. This is a job for next week.


The first stage was to drill all of the required holes in the hull. These include two for the anchors, two for the prop shafts, one for the water inlet tube and four for the rudders. As this is an ABS hull moulding, drilling is not usually too much of a problem but due to the cost of the model, I decided to protect the insides around the holes with tape to decrease the possibility of cracking. I start the holes off with a 3mm drill and then increase to the final size which in this case was 4mm, 6mm, 7mm and 4mm respectively. I gently filed around the holes to get a nice slide fit and correct alignment of the tubes.
The deck lies on a support rib which will later be glued around the inside of the hull. The instructions highlight the build of a simple device which will hold a pencil at a height of 7.5mm. A pencil is taped to a straight piece of wood of about 30cm long with a suitable spacer in between which was 3mm in this case. You can then place the stick to contact both sides of the hull and then draw a constant line at exactly 7.5mm down. Simple but effective. This will form the height guide for the deck support. This line was also continued around the bow of the ship which will form the bulwark later.
The next job was to prepare and glue the side supports inside the hull for the rudder tube support board. Next job was to glue the support board in place. I did not notice at this time that the support board had quite a bad bend in it. The bow was upwards which resulted in the two centre tube alignment inserts being above the end of the tubes. The solution was to glue the two middle alignment inserts under the support board instead. A little awkward but the result is good.
The rudder tubes were now fitted and glued to be water tight with Stabilit Express glue. This is good for water tightness.
I painted the four rudders matt black and then protected with Lacquer. Although the instructions state that the rudders should be fitted and set up at this stage, I have decided to leave this for as long as possible to avoid damage.
The next job is to fit the twin motors and prop shafts. This is a job for next week.
▲
⟩⟩
ASTRAGALO
jbkiwi
RNinMunich
Martin555
|
💬 Re: Fitting the Rudders
5 years ago by 🇩🇪 RNinMunich (
Fleet Admiral)✧ 174 Views · 2 Likes
Flag
How did I manage to miss this!🙄
Great stuff Pete, your skills are going up exponentially👍 When I think back to our first discussions ... Hat off 😉 I use Grandads ancient wood gauge for jobs like that hull marking. I have that job before me with my Deans Marine Manxman hull 😮 KUTGW 👍 Doug 😎 ▲
⟩⟩
MouldBuilder
Martin555
|
📝 Fitting shafts and motors
5 years ago by 🇭🇺 MouldBuilder ( Vice Admiral)
Vice Admiral)✧ 175 Views · 5 Likes · 11 Comments
Flag
💬 Add Comment
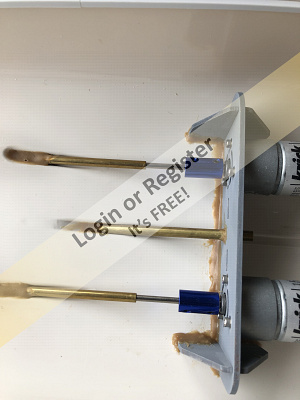
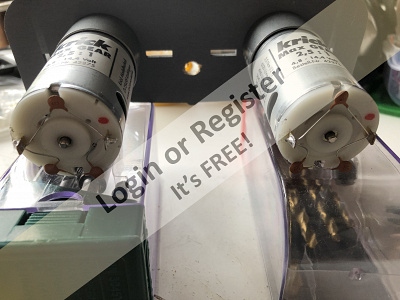
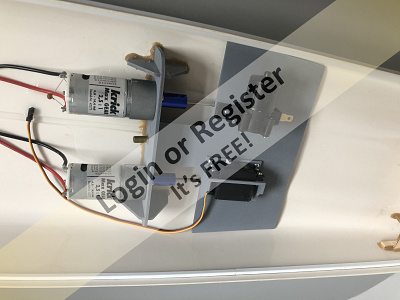
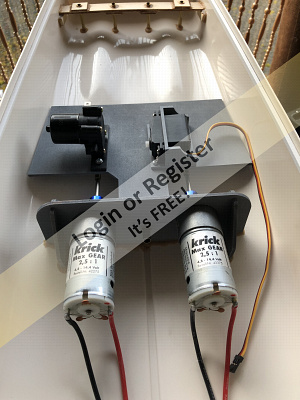
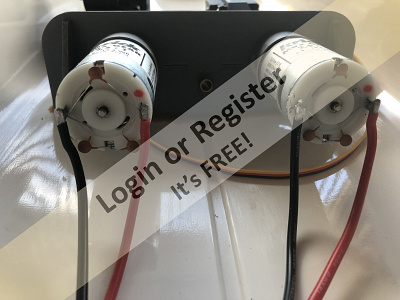
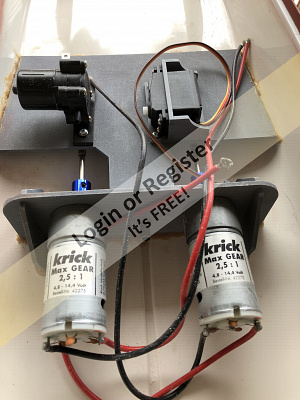
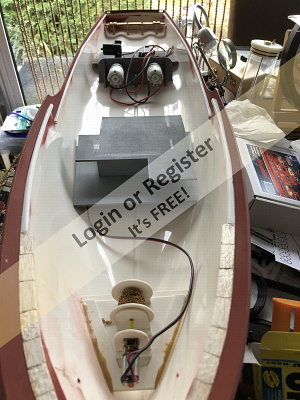
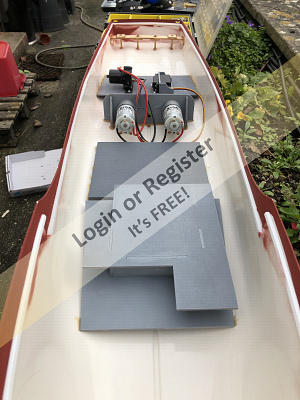
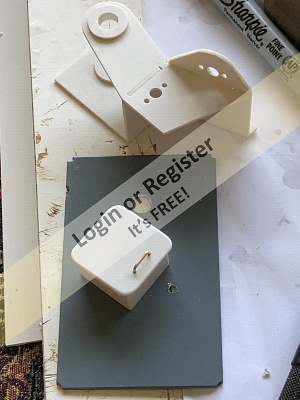
I have spent the last couple of sessions preparing and fitting the prop shafts, mounts and pump plate.
First was to prepare the wood profiles, paint with sanding sealer and then prime them. They look a lot neater sprayed grey than just plain ply wood. I checked the two motors and found that the suppressor was not of the correct value. I removed it and replaced with the normal 47nf capacitor across the terminals and 10nf from each terminal to the casing. I then connected the wires to the terminals.
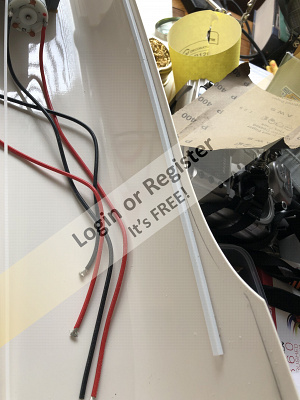
I built the assemblies, fitted the motors and placed then in the hull. I then inserted the shafts and connected them to the motors via solid connectors. I prefer solid drive connectors where possible as I believe this should reduce vibration which is often introduced through universal joints. When I was happy with the alignment, I glued the shafts in place with Acrylate. I then fitted and glued the water intake pipe also with Acrylate.
Next came the pump plate. This plate also has the rudder servo secured to it. After assembly, this was also glued to the hull.
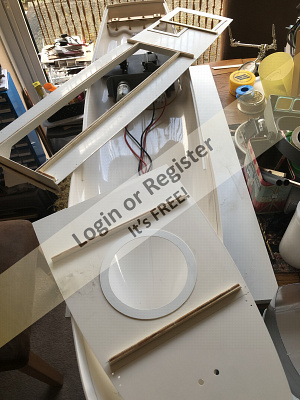
Next job was to fit the rear deck support and the bead on the outside which will eventually hold the rubber fender strip. The pencil taped to the flat stick at a distance of 12mm was used to mark the outside of the hull similar to marking the deck support line before.
It was now time to prepare the two deck levels. Strengthening braces of ply wood were fitted all around. This has resulted in quite a strong unit. The instructions say that the fitting of the decks is next. I think they have forgotten all of the working features of this build. If the decks are glued now, there is no room for fitting in all of the gadgets. I will wait until I know what is required.
Next time I will start the preparation of the cabin. This part contains most of the fire monitor servos and piping, radar and search lights plus general lighting. Very busy.


First was to prepare the wood profiles, paint with sanding sealer and then prime them. They look a lot neater sprayed grey than just plain ply wood. I checked the two motors and found that the suppressor was not of the correct value. I removed it and replaced with the normal 47nf capacitor across the terminals and 10nf from each terminal to the casing. I then connected the wires to the terminals.
I built the assemblies, fitted the motors and placed then in the hull. I then inserted the shafts and connected them to the motors via solid connectors. I prefer solid drive connectors where possible as I believe this should reduce vibration which is often introduced through universal joints. When I was happy with the alignment, I glued the shafts in place with Acrylate. I then fitted and glued the water intake pipe also with Acrylate.
Next came the pump plate. This plate also has the rudder servo secured to it. After assembly, this was also glued to the hull.
Next job was to fit the rear deck support and the bead on the outside which will eventually hold the rubber fender strip. The pencil taped to the flat stick at a distance of 12mm was used to mark the outside of the hull similar to marking the deck support line before.
It was now time to prepare the two deck levels. Strengthening braces of ply wood were fitted all around. This has resulted in quite a strong unit. The instructions say that the fitting of the decks is next. I think they have forgotten all of the working features of this build. If the decks are glued now, there is no room for fitting in all of the gadgets. I will wait until I know what is required.
Next time I will start the preparation of the cabin. This part contains most of the fire monitor servos and piping, radar and search lights plus general lighting. Very busy.
▲
⟩⟩
ASTRAGALO
jbkiwi
mturpin013
Martin555
RNinMunich
|
💬 Re: Fitting shafts and motors
5 years ago by 🇩🇪 RNinMunich (
Fleet Admiral)✧ 174 Views · 1 Like
Flag
All's well .... 👍
After I bought my Dual Quicrun I found the Action Electronics Dual ESC with rudder mixer AND output for a 3rd (centre) motor 😠 Natch more expensive but ideal for MTBs / PTBs! Have fun Pete, Cheers, Doug😎 ▲
⟩⟩
MouldBuilder
|
|
Login To
Remove Ads 💬 Re: Fitting shafts and motors
5 years ago by 🇭🇺 MouldBuilder (
Vice Admiral)✧ 174 Views · 1 Like
Flag
Thanks Doug. The Pilot Boat has one which, incidentally, is wired backwards on one motor. I remember switching the wires.😀
▲
⟩⟩
RNinMunich
|
|
💬 Re: Fitting shafts and motors
5 years ago by 🇩🇪 RNinMunich (
Fleet Admiral)✧ 174 Views · 2 Likes
Flag
Hi Pete,
Soooo, I have sucked 😝 and seen! Tested my dual ESC on the motors of my Graf Spee. Yellow is positive when going ahead, as suspected. Cheers Doug 😎 BTW: don't forget to set the teeny weeny switches 1 and 2 to the right for Boat mode; forward / reverse with no brake!!! Switch 3 also to the right for NiMh battery, left for LiPo. Alles klar Herr Kommissar? 😁 ▲
⟩⟩
MouldBuilder
Martin555
|
|
💬 Re: Fitting shafts and motors
5 years ago by 🇩🇪 RNinMunich (
Fleet Admiral)✧ 174 Views · 1 Like
Flag
Don't know yet Peter. I suspect the yellow.
I'll suck it and see 😉 Oh goody! A box of electronic goodies just arrived😊 ▲
⟩⟩
Martin555
|
|
💬 Re: Fitting shafts and motors
5 years ago by 🇭🇺 MouldBuilder (
Vice Admiral)✧ 174 Views · 1 Like
Flag
Thanks for the explanation Doug. I will reverse one. Do you know which, yellow or blue, is positive on the ESC.😊
▲
⟩⟩
Martin555
|
|
💬 Re: Fitting shafts and motors
5 years ago by 🇩🇪 RNinMunich (
Fleet Admiral)✧ 174 Views · 2 Likes
Flag
Hi Pete,
"I have wired them the same polarity because I use a dual ESC so I can just swap the wires over for one of the motors." Hmmm! OK, but it is bad practice to mix up the colours; i.e. you would end up with the plus volts on a black wire and ground on the red!😮 The load (i.e. motor) should always be wired to indicate the required supply polarity. Makes troubleshooting much easier and helps to prevent accidents or magic smoke.💥🤕 Super Glue is just the 'street name' for Cyanoacrylate glues. Must have missed Mike's comment 🤔 Don't know what Loctite is made of but it smells quite different🙈 Cheers, Doug BTW: I have one of those Dual ESCs as well👍 It's destined for fitting to my destroyer or maybe the Southampton tug. I also have an Action Electronics dual ESC which has a built in rudder mixer. This might help the destroyer steering more than the Hobby Wing cos it only needs one stick for control of both motors and rudder with motor assisted steering! ▲
⟩⟩
Martin555
MouldBuilder
|
|
💬 Re: Fitting shafts and motors
5 years ago by 🇭🇺 MouldBuilder (
Vice Admiral)✧ 174 Views · 2 Likes
Flag
I forgot to mention the motor wiring. I have wired them the same polarity because I use a dual ESC so I can just swap the wires over for one of the motors. 😊
By the way. Is there a difference between Cyanoacrylate, super glue and Loctite? I saw a confusing comment in Mikes build blog.😀 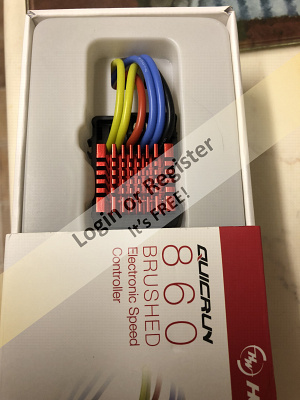
▲
⟩⟩
ASTRAGALO
RNinMunich
|
|
💬 Re: Fitting shafts and motors
5 years ago by 🇩🇪 RNinMunich (
Fleet Admiral)✧ 174 Views · 1 Like
Flag
I agree Peter,
I get a lot of stuff from Krick as well. Prices are acceptable and delivery prompt. I have a few of those pumps (also used in car windscreen washers). Found that they do tend to clog in murky waters but otherwise no problem. Funny, I'd forgotten the 'acrylate' part of Cyanoacrylate!! Got too used to calling it CA or Gluper Sue 😁 Cheers, Doug 😎 ▲
⟩⟩
MouldBuilder
|
|
💬 Re: Fitting shafts and motors
5 years ago by 🇭🇺 MouldBuilder (
Vice Admiral)✧ 174 Views · 3 Likes
Flag
Thanks to you both.
The pumps are Krick. I have found this company to supply quality items. Time will tell if this goes for their pumps as well. I will show you my nails Doug. Soon. In the mean time, this glue is recommended by Krick for the water tight areas. I used it on the Pilot Boat and it has performed well so far. Well, the boat has not sunk yet.🤓 ▲
⟩⟩
ASTRAGALO
Martin555
RNinMunich
|
|
💬 Re: Fitting shafts and motors
5 years ago by 🇬🇧 Martin555 (
Fleet Admiral)✧ 174 Views · 1 Like
Flag
You are doing a great job, coming along nicely.
However the pump that you are using could cause you problems as I have used this type of pump a couple of times and found it is not very reliable and has packed up. Maybe I was just unlucky and had two from the same batch! Martin. ▲
⟩⟩
MouldBuilder
|
|
💬 Re: Fitting shafts and motors
5 years ago by 🇩🇪 RNinMunich (
Fleet Admiral)✧ 174 Views · 2 Likes
Flag
More good stuff Peter, coming on very well👍
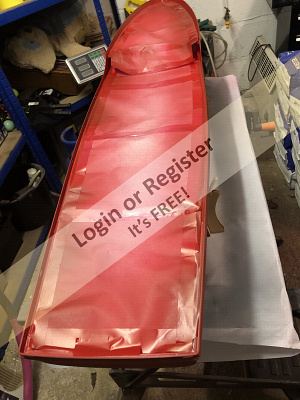
Odd with the motors! What capacitors were fitted then? "I prefer solid drive connectors where possible as I believe this should reduce vibration which is often introduced through universal joints." Hmm! Whereas I agree that universals can introduce rattling and vibration, especially the 3 part kardan couplings, or the all metal UJs. This is mostly due to bad alignment of the shafts in the first place. Otherwise a UJ or a kardan would not be necessary. BUT; using a rigid solid coupling demands that your shaft alignment is absolutely perfect. Otherwise due to it's rigidity any slight misalignment will cause excessive friction and wear on the shaft bearing and motor output bearing, which will ultimately lead to vibration anyway. Not to mention wasting power to overcome the friction. I don't like universals either. Which is why I make rigid couplings as alignment tools only and then fit a semi-rigid spiral coupling (as shown in my Sea Scout postings) for operation. This absorbs any residual misalignment as well as providing some axial flexibility to absorb the thrust reaction from the prop. And they are totally silent and vibration free😊 I buy mine from Krick incidentally. Acrylate glue? Never heard of it, so I looked it up🤓 Hadn't realised you are into finger nail cosmetics Pete 😮 "WHAT ARE ACRYLATES? FOUND IN: Artificial Nail Products (Acrylic Nails, Nail Enhancing Polishes). Acrylates are derived from acrylic acid and are commonly found in cosmetic nail preparations. Ethyl acrylate acts as an adhesive to apply artificial nails and eyelashes. Ethyl methacrylate and methyl methacrylate allow sculptured artificial nails to mold and adhere to the natural nail plate. " 😁😂🤣 Yo MUST post some pics of your 'scultured nails' Pete 😂🤣 I like the ghostly translucent superstructure 👍 Gives lots of scope for some interesting LED light effects. I note that you have wired both motors the same way (polarity). Your choice, but assuming that they run clockwise, (seen from the output shaft end) then the combined side-thrust from the two props on the downward / bottom stroke (😮) will produce a strong torque reaction causing a list to starboard and will try to push the bow to port / stern to starboard. The latter you will have to constantly correct with the rudder. Had exactly that effect with the first runs of my destroyer, until a Retd. Cap'n RN told me to reverse the port motor! On the other hand, you can always use this effect to do some snazzy parking! Approach the 'dock' on the stbd. side at a slight bow on angle, give the throttle a quick blip and the side thrust should park the stern neatly on the dockside! 😊 Practise makes perfect! Looking forward to the next instalment, cheers, Doug 😎 ▲
⟩⟩
MouldBuilder
Martin555
|
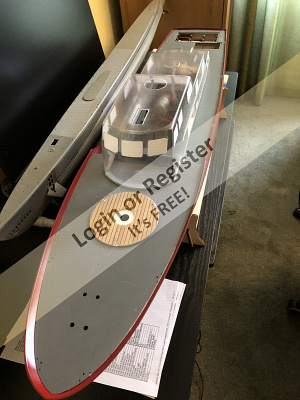
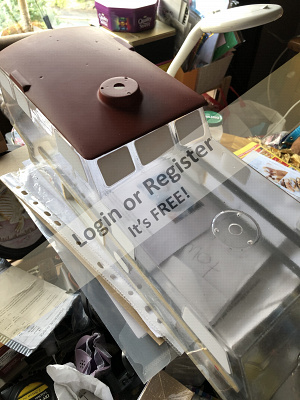
📝 Completing the Hull ready for the Deck.
4 years ago by 🇭🇺 MouldBuilder ( Vice Admiral)
Vice Admiral)✧ 188 Views · 5 Likes · 2 Comments
Flag
💬 Add Comment
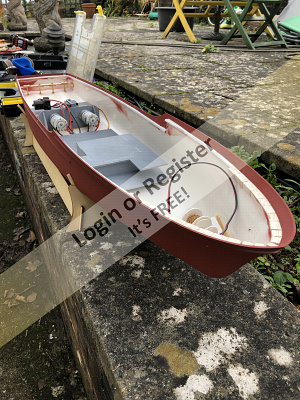
Did a little work on the Dusseldorf, It`s been a while. I fitted the Anchor winch assembly into the hull. I tried it first and the 1:400 geared motor gives a good representation of speed. I then fixed in the remaining electronics platforms. Things are starting to look a little better now. I then drilled holes and slotted with files the water drainage for the deck. I must admit I was dreading this but I am happy to say that the results are good.
I know that a lot of people do not agree with me but I find painting of certain parts much easier before assembly. I have primed the hull and deck pieces and will finish painting before I assemble. I used this method on the Pilot boat and was fairly successful. The one area I did have a glue accident, I covered with a no scripted life raft container. I will take more care when applying glue this time.
I have started to finish paint the deck pieces which I hope to fit soon.
▲
⟩⟩
ASTRAGALO
petercbrown
mturpin013
jbkiwi
Martin555
|
💬 Re: Completing the Hull ready for the Deck.
4 years ago by 🇺🇸 figtree7nts (
 Admiral) Admiral)✧ 186 Views · 2 Likes
Flag
Hi Pete,
Your Dusseldorf is coming along nicely! Cheers, Ed ▲
⟩⟩
MouldBuilder
Martin555
|
|
💬 Re: Completing the Hull ready for the Deck.
4 years ago by 🇬🇧 Martin555 (
Fleet Admiral)✧ 186 Views · 1 Like
Flag
Well Peter you have been a busy boy.
Submarine and boat. You must have a big workshop to work in. You are definitely making good progress on both projects. Keep up the good work. Martin555. ▲
⟩⟩
MouldBuilder
|
📝 Starting on the decking.
4 years ago by 🇭🇺 MouldBuilder ( Vice Admiral)
Vice Admiral)✧ 205 Views · 8 Likes · 2 Comments
Flag
💬 Add Comment
Just a small update. I started to do some of the final painting coats. I know that most members save this until the end but masking a completed model fills me with dread. I have finished the hull bottom, the bulwark and the deck. I will glue the deck in place next.
I have started the wood decking for the three monitors. I first stained the wood and then cut and stuck strips to the base plates. I have now started to trim and form the inner bore and the outside shape. Unfortunately, I had a little accident. I cut one of the holes tabs off of one base. I tried to stick it back on but failed. I have now made a new small tab from scrap and will stick it on when they are complete.
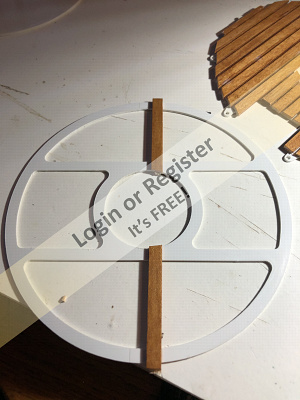
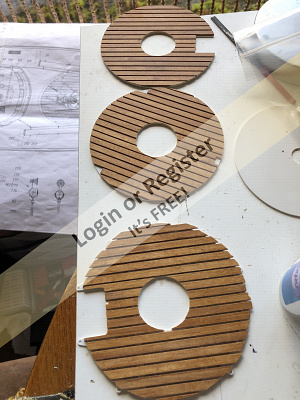
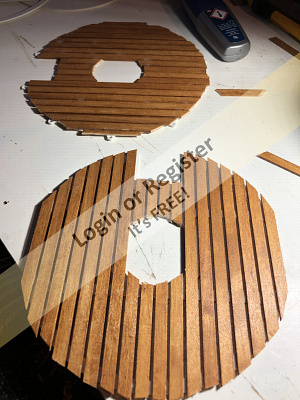
I have started the wood decking for the three monitors. I first stained the wood and then cut and stuck strips to the base plates. I have now started to trim and form the inner bore and the outside shape. Unfortunately, I had a little accident. I cut one of the holes tabs off of one base. I tried to stick it back on but failed. I have now made a new small tab from scrap and will stick it on when they are complete.
▲
⟩⟩
ASTRAGALO
Jgels
Inkoust
marky
Rookysailor
mturpin013
Martin555
jacko
|
💬 Re: Starting on the decking.
4 years ago by 🇺🇸 Cashrc (
Vice Admiral)✧ 206 Views · 3 Likes
Flag
She’s looking good, really want to see this one in the water.
▲
⟩⟩
Martin555
MouldBuilder
petercbrown
|
|
💬 Re: Starting on the decking.
4 years ago by 🇬🇧 Martin555 (
Fleet Admiral)✧ 206 Views · 2 Likes
Flag
Nice work, keep it up.
Martin555. ▲
⟩⟩
petercbrown
MouldBuilder
|
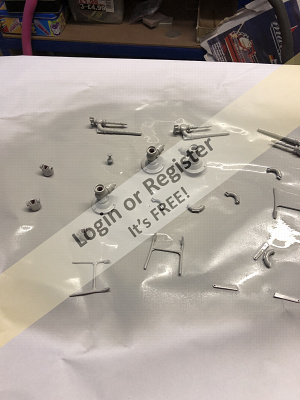
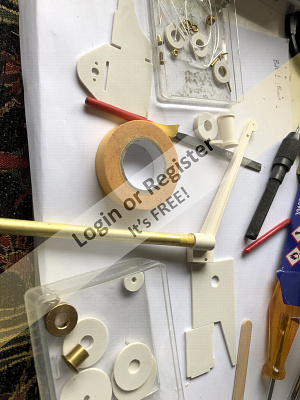
📝 Building the monitors
4 years ago by 🇭🇺 MouldBuilder ( Vice Admiral)
Vice Admiral)✧ 212 Views · 5 Likes · 7 Comments
Flag
💬 Add Comment
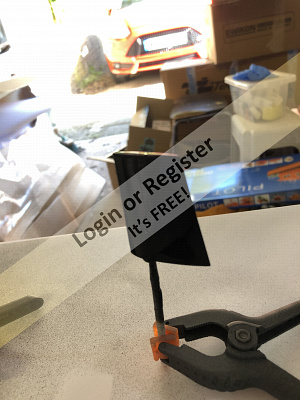
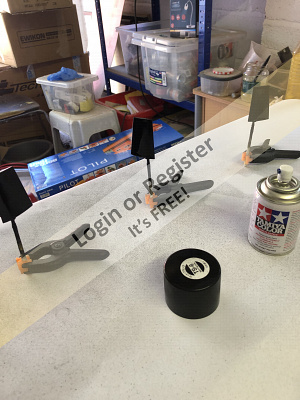
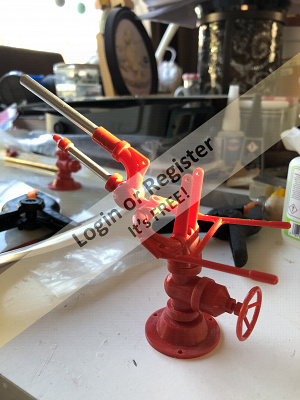
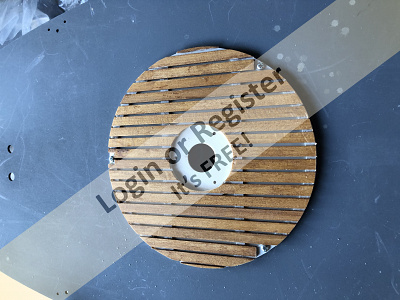
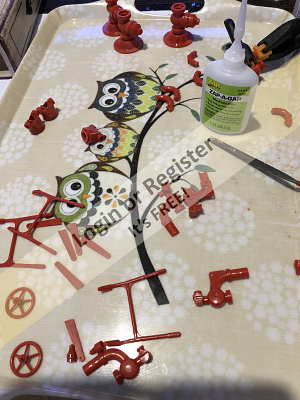
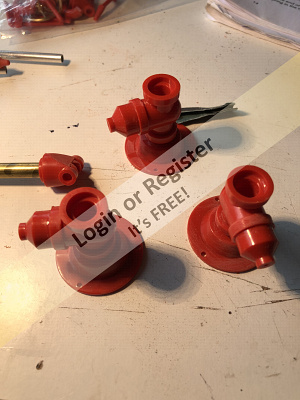
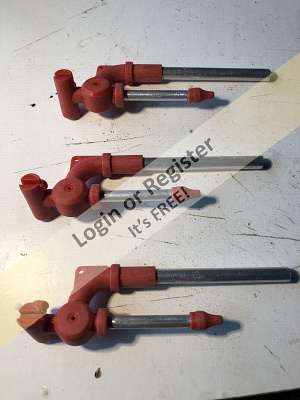
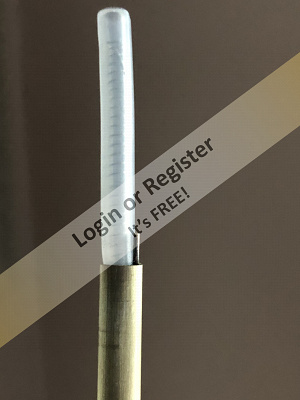
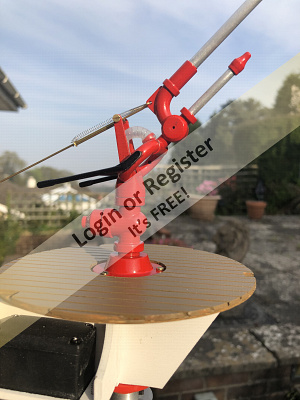
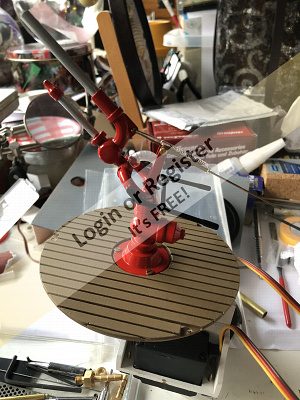
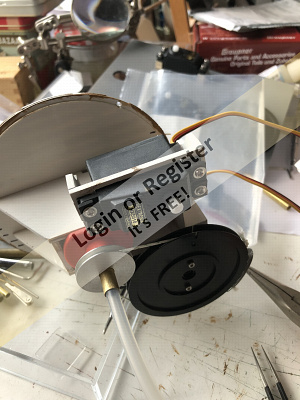
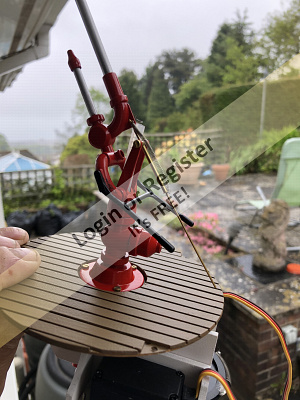
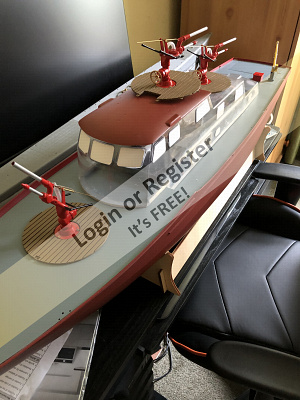
Having a little break from the Submarine and getting on with Dusseldorf. In my last update I had started on the decking area for the three monitors. I have now tidied these up and trimmed all of the planks to size. I will satin varnish these to complete soon. I have started to assemble the three monitors now. They are really neat little assemblies and manufactured using red polymer. They look good enough to use as is but after reading another blog, I decided that they would look even better when all of the join lines and ejector pin marks were hidden. I have used 400 wet and dry paper and smoothed out all of the faces. I have roughed up all of the faces to help the paint stick properly. There are a lot of faces to do so will take a while. I have completed most of the assembly but will finish after painting.
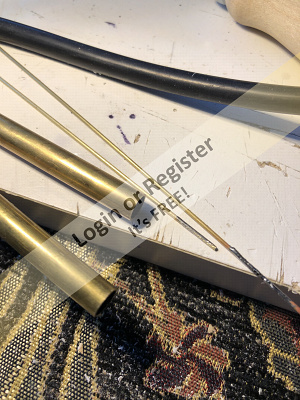
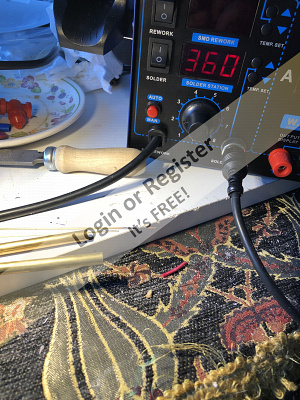
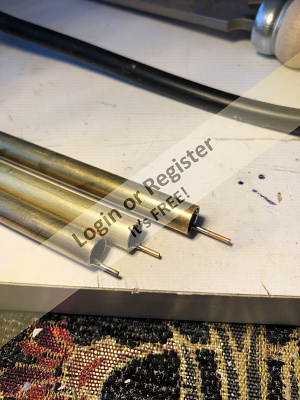
The main tube which carries the silicone water tube, also has a much smaller tube fitted inside. Both tubes are brass so I decided to fix by soft soldering. Due to the heat required, I used my soldering centre with the iron set to 360 degrees C. I first tinned both the inside of the 7mm tube and the outside of the 1mm tube, (the small tube carries an operating thread to raise and lower the nozzle with spring assistance). I then placed the small tube inside the large and soldered in place by holding the iron in place for about twenty seconds adding a little solder to the joint. This was successful. I did all three tubes like this.
This weekend I will try to complete the monitors. As I have to paint them, I might not manage this. I still have to figure out how I can get the silicone tube through the brass tube. It fitted well earlier but now that the small tube is soldered inside, it will not go in easily. The longest brass tube is 160mm.
▲
⟩⟩
ASTRAGALO
jbkiwi
Joe727
marky
Martin555
|
💬 Re: Building the monitors
4 years ago by 🇭🇺 MouldBuilder (
Vice Admiral)✧ 211 Views · 2 Likes
Flag
Thanks Cash. I will be very careful.👍
Interesting about the pumps being cheaper on ebay. Another one to watch. Good luck with the build Chumbucket. Do you plan, like me, to get all of the functions working? Peter.😊 ▲
⟩⟩
ASTRAGALO
Martin555
|
|
Login To
Remove Ads 💬 Re: Building the monitors
4 years ago by 🇺🇸 Cashrc (
Vice Admiral)✧ 211 Views · 3 Likes
Flag
Also, if you’re going to make your monitors move vertically, be very careful with the return spring. It’s very light, and when I was testing the movement in the Dolly I let the servo move too much. The resultant slack in the monofilament actuating thread got caught in the spring and I didn’t catch it, so the next time I lowered the nozzle it got caught in the spring and damaged it. Just a heads up.
Cash ▲
⟩⟩
RNinMunich
MouldBuilder
Martin555
|
|
💬 Re: Building the monitors
4 years ago by 🇺🇸 Cashrc (
Vice Admiral)✧ 211 Views · 3 Likes
Flag
Hi Peter. That pump is the standard one Krick sells, I have one in my Neptune and in my Dolly. The one in the Dolly gave me some trouble, but I’m pretty sure I ran it too long dry on the bench. I think I have it fixed now, however, we’ll see later. Anyway, that pump is also used for windshield washers that have an external pump, like a retro fit for classic cars. Both Amazon and the aftermarket parts houses have it for considerably less than Krick sells it for. Part number SI-A0050.
Cash ▲
⟩⟩
bruce1946
MouldBuilder
Martin555
|
|
💬 Re: Building the monitors
4 years ago by 🇺🇸 chumbucket (
 Master Seaman) Master Seaman)✧ 212 Views · 2 Likes
Flag
Im interested in this build,just picked one up at Harbor Models last week,should be here soon.I belong to the PMPBA Boat club here in Portland Oregon
▲
⟩⟩
MouldBuilder
Martin555
|
|
💬 Re: Building the monitors
4 years ago by 🇬🇧 Martin555 (
Fleet Admiral)✧ 211 Views · 1 Like
Flag
Nice work, I am looking forward to seeing them in operation.
Martin555. ▲
⟩⟩
MouldBuilder
|
|
💬 Re: Building the monitors
4 years ago by 🇭🇺 MouldBuilder (
Vice Admiral)✧ 212 Views · 3 Likes
Flag
Thanks for that Mike. Wondered how to get the tube through.
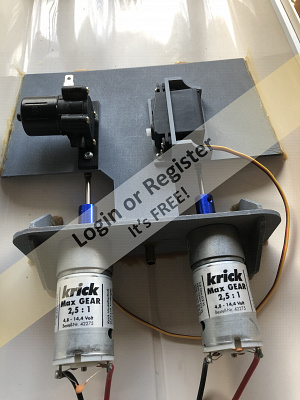
The pump is a Krick 6 to 12 volt dc with a flow rate of 1200ml/min. I assume this is at 12 v, probably less at 6v. Krick recommend this pump for three monitors. I hope they are right.😁 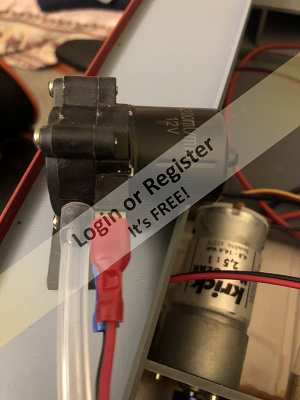
▲
⟩⟩
ASTRAGALO
Joe727
Martin555
|
|
💬 Re: Building the monitors
4 years ago by 🇬🇧 mturpin013 (
Admiral)✧ 211 Views · 4 Likes
Flag
To get the silicon tube through, tie very tightly a piece of strong cotton thread around the end of the silicon tube, then thread the cotton through the brass tube, pull on the tread at the same time holding the other end which will stretch the silicon tube reducing its diameter, then keeping stretched feed through the brass tube😜
PS can we see the pump please and its spec. ▲
⟩⟩
RNinMunich
marky
Martin555
MouldBuilder
|
📝 Fitting the Deck.
4 years ago by 🇭🇺 MouldBuilder ( Vice Admiral)
Vice Admiral)✧ 219 Views · 3 Likes · 2 Comments
Flag
💬 Add Comment
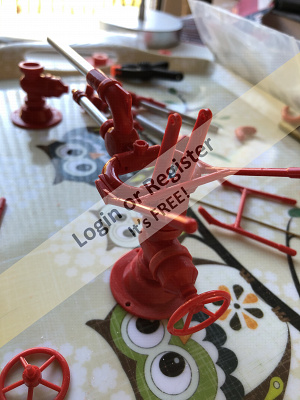
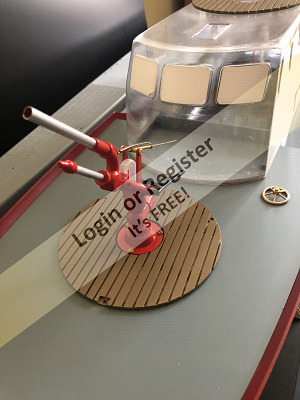
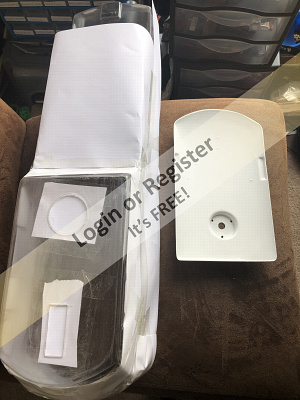
I am still working on the monitors at the moment. Removing the ejector marks and the visible split lines has been quite a job. The final result prior to painting looks good. It is a shame that I have had to do this improvement as the mouldings were the perfect colour to start with.
I fitted the rear main deck a couple of weeks ago and now it was time to fit the forward deck. It was a surprise to find that it was about 6mm too large, around 3mm all around. I spent the best part of 4 hours carefully filing the shape and bevelling the edge to fit. It looks good but I will wait a while before fixing it as there are a few functions underneath.
I fitted the rear main deck a couple of weeks ago and now it was time to fit the forward deck. It was a surprise to find that it was about 6mm too large, around 3mm all around. I spent the best part of 4 hours carefully filing the shape and bevelling the edge to fit. It looks good but I will wait a while before fixing it as there are a few functions underneath.
▲
⟩⟩
ASTRAGALO
Joe727
Martin555
|
💬 Re: Fitting the Deck.
4 years ago by 🇭🇺 MouldBuilder (
Vice Admiral)✧ 218 Views · 2 Likes
Flag
Hi John.
I hope your Dusseldorf has arrived. Do you intend to activate all of the functions. I am currently improving the monitors. I have finished all of the painting of them now but having a nightmare trying to install the silicone tubes. Good luck with the build and if you come up against a problem just ask as I might have hit the same.😊 Peter. ▲
⟩⟩
ASTRAGALO
Martin555
|
|
💬 Re: Fitting the Deck.
4 years ago by 🇺🇸 Jgels (
 Recruit) Recruit)✧ 219 Views · 2 Likes
Flag
Hello my name is John from Ohio USA. I'm patiently waiting for my Dusseldorf to arrive, its about 2 weeks late as of today.
I have been watching your build and it is looking great ! Its a shame you had to go through all that extra work on the deck. Keep up the good work. ▲
⟩⟩
MouldBuilder
Martin555
|
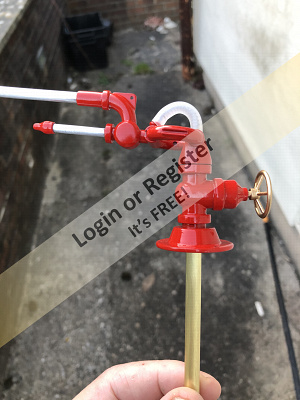
📝 Monitors nearly there.
4 years ago by 🇭🇺 MouldBuilder ( Vice Admiral)
Vice Admiral)✧ 221 Views · 10 Likes · 3 Comments
Flag
💬 Add Comment
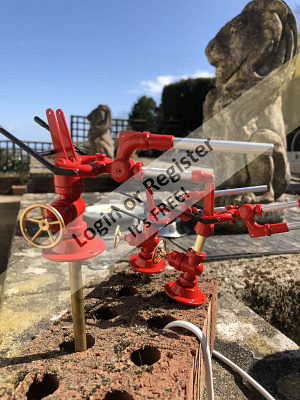
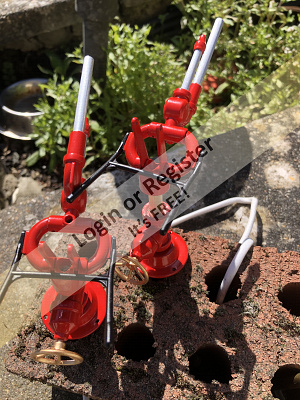
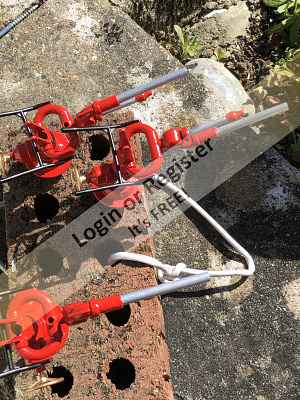
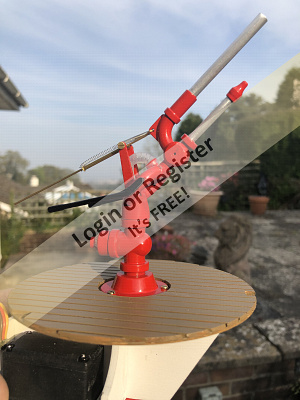
I have now finished the repainting of the monitors and I am pleased with the results. Thanks to Martin555 for posting how he removes splitlines and ejector marks from his mouldings. This made me feel that I was being lazy for not doing this. The results are a massive improvement. I used small needle files and 400 wet and dry to do this and then remove the shine from all of the parts to help the paint.
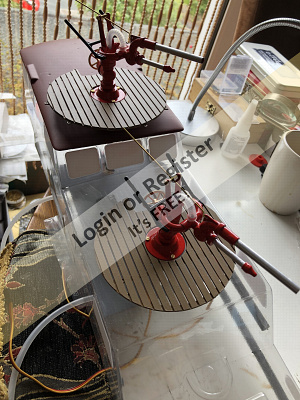
For the painting I first used Tamiya Fine Primer. The finish was excellent. I then used Tamiya plastic spray in Italian Red. I gave everything two coats of this followed by two coats of clear gloss.
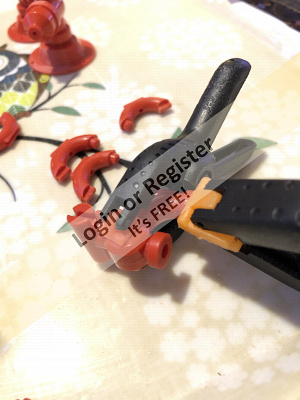
I have now cold assembled all of the monitors and filed where necessary to ensure free movement. This is critical for when I fit all of the servo-controlled movements. My next job will be to finally fix them together with glue and connect the servos. First, Though, I had to fit the silicone tubes through the brass tubes. Not too difficult you would think but the silicone tube is bigger in diameter than the brass tube they go through. I followed the instructions from Mike given below but I could only get them about half way through before either the tube failed or the thread broke. I tried several ways to connect them but finally succeeded when wrapping the thread tightly near to one end, as described by Mike, but then adding soap to the tube as well. This was successful. The Brass tube is 120mm long. This is the shortest one of the three, the longest being 180mm. Should be good if I follow a similar principle.
The actuating mechanisms have now been built and primed and the servos added. My next task is to complete the operating mechanisms, assemble the monitors and fix them to their gratings. I will try to complete this soon.
For the painting I first used Tamiya Fine Primer. The finish was excellent. I then used Tamiya plastic spray in Italian Red. I gave everything two coats of this followed by two coats of clear gloss.
I have now cold assembled all of the monitors and filed where necessary to ensure free movement. This is critical for when I fit all of the servo-controlled movements. My next job will be to finally fix them together with glue and connect the servos. First, Though, I had to fit the silicone tubes through the brass tubes. Not too difficult you would think but the silicone tube is bigger in diameter than the brass tube they go through. I followed the instructions from Mike given below but I could only get them about half way through before either the tube failed or the thread broke. I tried several ways to connect them but finally succeeded when wrapping the thread tightly near to one end, as described by Mike, but then adding soap to the tube as well. This was successful. The Brass tube is 120mm long. This is the shortest one of the three, the longest being 180mm. Should be good if I follow a similar principle.
The actuating mechanisms have now been built and primed and the servos added. My next task is to complete the operating mechanisms, assemble the monitors and fix them to their gratings. I will try to complete this soon.
▲
⟩⟩
ASTRAGALO
RNinMunich
Jimbo1
Ronald
bruce1946
jbkiwi
Rookysailor
mturpin013
Martin555
Joe727
|
💬 Re: Monitors nearly there.
4 years ago by 🇪🇸 bombero (
 Warrant Officer) Warrant Officer)✧ 220 Views · 2 Likes
Flag
Make sure the monitors are realy loose on their vertical movements, I have had to dismantle them and adjust them as they would not work and found they have to drop easily without any support!😊
▲
⟩⟩
Ianh
Martin555
|
|
Login To
Remove Ads 💬 Re: Monitors nearly there.
4 years ago by 🇪🇸 bombero (
Warrant Officer)✧ 220 Views · 2 Likes
Flag
Hi ALL,
I am also starting to build one of these boats during the lockdown (I am English and live in Spain)and am very interested in your helpful information. I previously built a Billing "joffre"tug Len🤞😊 ▲
⟩⟩
MouldBuilder
Martin555
|
|
💬 Re: Monitors nearly there.
4 years ago by 🇬🇧 Martin555 (
Fleet Admiral)✧ 220 Views · 1 Like
Flag
Those monitors really look good.
Well worth all the extra effort you went through. A job well done. Martin555. ▲
⟩⟩
MouldBuilder
|
📝 Special Functions
4 years ago by 🇭🇺 MouldBuilder ( Vice Admiral)
Vice Admiral)✧ 229 Views · 6 Likes · 1 Comment
Flag
💬 Add Comment
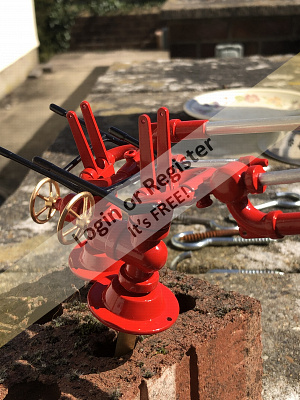
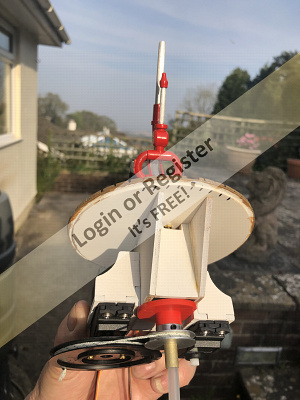
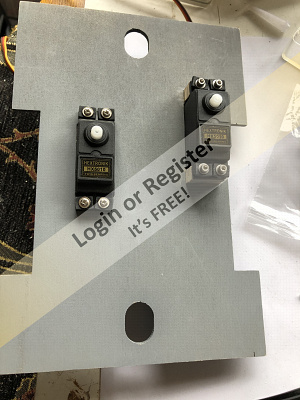
Work has taken priority over the past several weeks but I have managed to get some work done on the project from time to time. My focus has been on the special functions.
First, I completed the front monitor by adding the servo unit and the drive mechanisms. The instructions do have most of the information but due to there being so many parts and these being referred to only by their part number, I found it best to separate all of the required parts and dry assemble before committing to glue. All went well and I connected the servos to see how it functioned. There was a little slippage of the but generally went well. To reduce the slippage. The drive cord is tensioned by a spring connection. After putting more pre-tension on this spring, the slippage was eliminated.
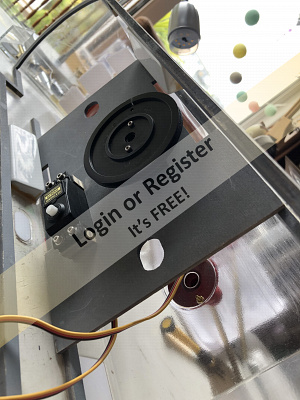
The dual monitors were next on the list but I decided on a change. Bring on the crane.
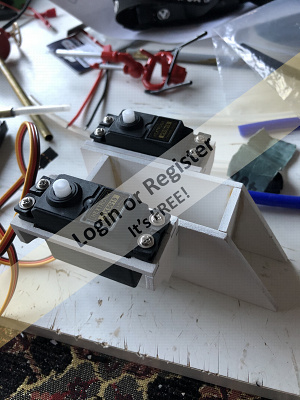
I separated all of the parts and built the crane as a test. All seemed good so I disassembled and painted, my own colour choices I might add. Then I assembled the running gear frame and dry fitted the two motors for testing. I noticed that one of the motors was taller than the plan and would need to go right through the base plate and be seen from the top going through the deck. I decided top do my first basic scratch build. Not to the standard of many on this site, but little acorns and all that. I decided to invent a crane inspection hatch. I made it from scrap pieces of ABS. (No yoghurt pots to hand). I then wired the motors and added suppressors to each. The whole unit was now built and connected up to the TX. It works very well. A little juddery on rotation but I will look at that later. An elastic band doubled up provides the drive so I think it might be slipping slightly on the pulleys.
I have now started to assemble the double monitor unit. I have assembled the servo plate and installed it. I have fitted the lower running bearings and completed a test assembly, with the gratings, onto the cabin roof. Looks good so I will try to complete this for the next update.
One piece of advice for all those making this model. You will come to a point on the monitors that you will have to solder a tiny tube inside a larger diameter tube. This small tube takes the thread that will operate the raising and lowering of the monitors. Check multiple times before you glue these into the monitor heads as the instructions and plans do not agree. Watch which side the servo arm is fixed and work out these tube positions before gluing to the monitors.


First, I completed the front monitor by adding the servo unit and the drive mechanisms. The instructions do have most of the information but due to there being so many parts and these being referred to only by their part number, I found it best to separate all of the required parts and dry assemble before committing to glue. All went well and I connected the servos to see how it functioned. There was a little slippage of the but generally went well. To reduce the slippage. The drive cord is tensioned by a spring connection. After putting more pre-tension on this spring, the slippage was eliminated.
The dual monitors were next on the list but I decided on a change. Bring on the crane.
I separated all of the parts and built the crane as a test. All seemed good so I disassembled and painted, my own colour choices I might add. Then I assembled the running gear frame and dry fitted the two motors for testing. I noticed that one of the motors was taller than the plan and would need to go right through the base plate and be seen from the top going through the deck. I decided top do my first basic scratch build. Not to the standard of many on this site, but little acorns and all that. I decided to invent a crane inspection hatch. I made it from scrap pieces of ABS. (No yoghurt pots to hand). I then wired the motors and added suppressors to each. The whole unit was now built and connected up to the TX. It works very well. A little juddery on rotation but I will look at that later. An elastic band doubled up provides the drive so I think it might be slipping slightly on the pulleys.
I have now started to assemble the double monitor unit. I have assembled the servo plate and installed it. I have fitted the lower running bearings and completed a test assembly, with the gratings, onto the cabin roof. Looks good so I will try to complete this for the next update.
One piece of advice for all those making this model. You will come to a point on the monitors that you will have to solder a tiny tube inside a larger diameter tube. This small tube takes the thread that will operate the raising and lowering of the monitors. Check multiple times before you glue these into the monitor heads as the instructions and plans do not agree. Watch which side the servo arm is fixed and work out these tube positions before gluing to the monitors.
▲
⟩⟩
ASTRAGALO
Jimbo1
marky
jbkiwi
Rookysailor
Martin555
|
💬 Re: Special Functions
4 years ago by 🇬🇧 Martin555 (
Fleet Admiral)✧ 229 Views · 2 Likes
Flag
No Yogurt pots!!! That will never do. LOL!!
Rubber bands do tend to bunch up and then give and that will also cause the juddering. It looks like you will have servos coming out of your ears LOL! Nice work, Martin555. ▲
⟩⟩
jbkiwi
MouldBuilder
|
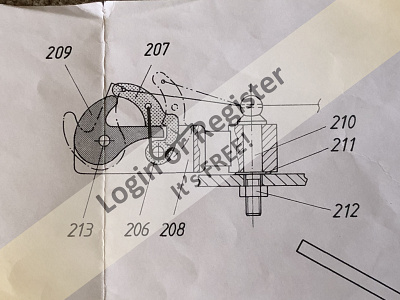
📝 Tow Hook
4 years ago by 🇭🇺 MouldBuilder ( Vice Admiral)
Vice Admiral)✧ 233 Views · 3 Likes
Flag
💬 Add Comment
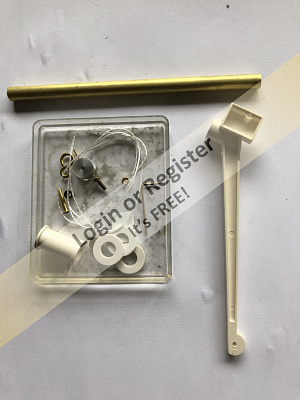
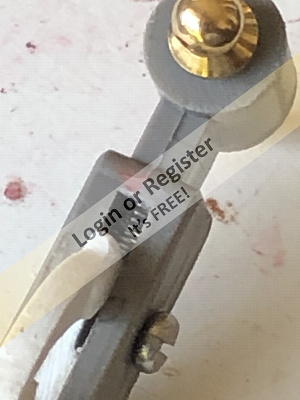
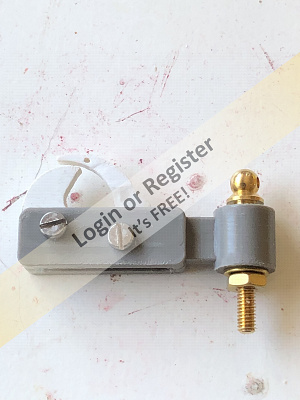
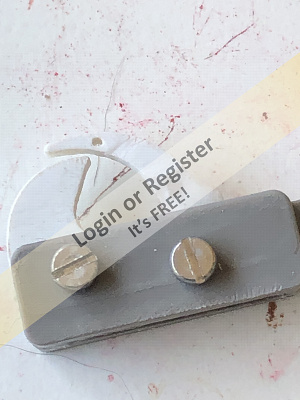
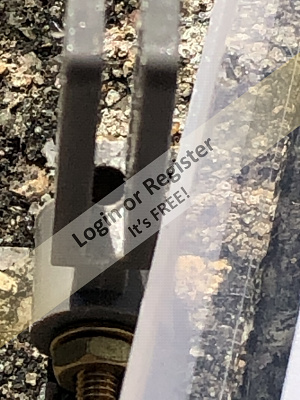
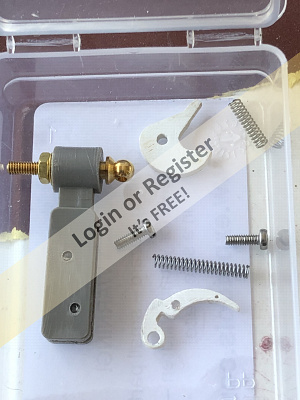
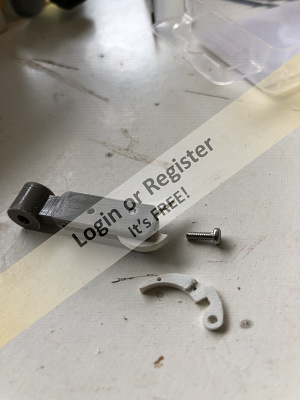
Managed a little work over the past few weeks in between improving my workshop and the Gato Submarine. I started to assemble the tow hook which has an automatic release. The instructions show a wire spring which has to be made from a small steel rod supplied. I bent it to shape and fitted it, after adjusting the hooks to make room for it, and gave it a test. I would have needed a hydraulic cylinder to get this arrangement to function. There is no way a servo could have moved it. I decided to modify the system.
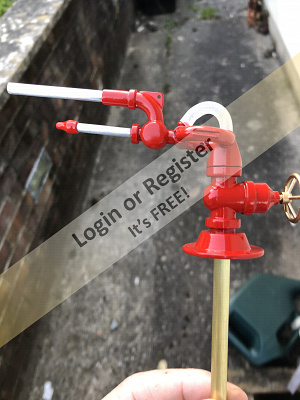
Firstly, I epoxy glued the parts I had adjusted to get the spring wire in place and filed and drilled them back to as they were. I then drilled a 2.7mm diameter hole to accept a 2.2mm diameter by 0.31mm wire diameter spring by 15mm long. See photo. The bar down which you have to drill is only 3mm wide so care is required. Care is also required regarding the depth of this hole so that the spring does not rest against the central brass column which the tow hook swivels around. I have now dropped the spring in place and reassembled the unit. This is a much better solution. It now works very well and does not take too much force to activate.
Next job is to shape and fit the anchor guides. Another job I have not been looking forward to. I can then fix down the fore deck and complete the painting of the hull.😊
Peter.
▲
⟩⟩
marky
Martin555
bruce1946


Login To
Remove Ads
Remove Ads