Join Us On Social Media!

|

|

|
Download The App!
Login To
Remove Ads
Remove Ads
Login To
Remove Ads
Remove Ads
Model Boats Website
Refit Irishman to Yorkshireman tugboat
7 Posts · 1 Follower · 23 Photos · 22 Likes
Began 5 years ago by
 United Kingdom
Follow This Thread
Not currently following
> Click to follow
> Click to follow
Latest Post 5 years ago by
| Oldest posts shown first (Show Newest First) | (Print Booklet) |
📝 Refit Irishman to Yorkshireman tugboat
5 years ago by 🇬🇧 Rogal118 ( Lieutenant Commander)
Lieutenant Commander)✧ 15 Views · 3 Likes · 3 Comments
Flag
💬 Add Comment
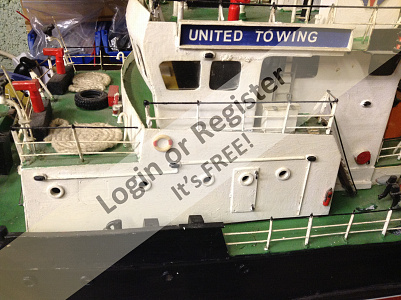
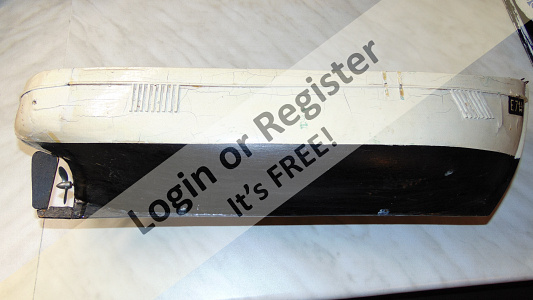
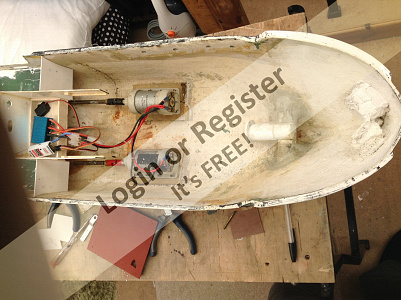
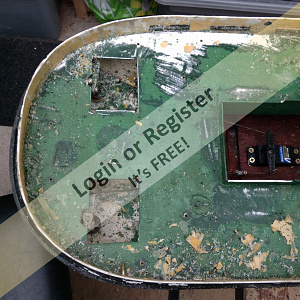
I purchased this from an ex seaman who had actually crewed the Yorkshireman out of Hull. He was now finding it difficult to lift the model and transport it, so decided to sell. The model had seen a few owners and may have been 20 years + old. It had had at least 4 coats of paint the latest being done by what looked like a plasterer.
On closer inspection some of the fixtures and fittings were damaged and re glued, parts looked as if the top superstructure had been dropped and the bow section bulwarks had been smashed and refitted badly
On closer inspection some of the fixtures and fittings were damaged and re glued, parts looked as if the top superstructure had been dropped and the bow section bulwarks had been smashed and refitted badly
▲
⟩⟩
Inkoust
Colin H
Martin555
|
💬 Re: Refit Irishman to Yorkshireman tugboat
5 years ago by 🇩🇪 RNinMunich (
 Fleet Admiral) Fleet Admiral)✧ 10 Views · 1 Like
Flag
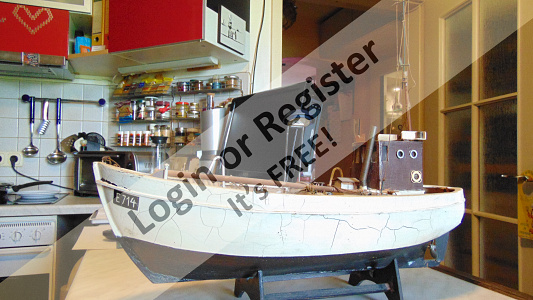
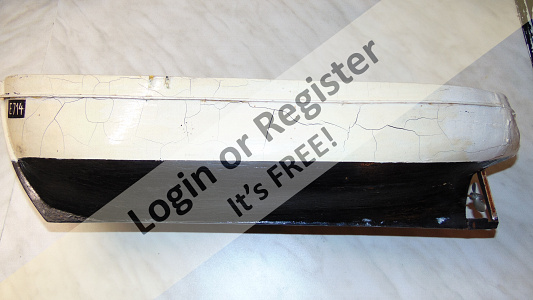
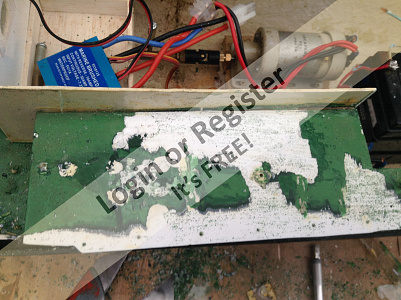
" It had had at least 4 coats of paint the latest being done by what looked like a plasterer."
Funny that Rogal! I had exactly the same situation with the restoration / conversion of an ancient Billing Boats fish cutter, the Gina 2. Dave-M actually said he thought it looked like it had been plastered! 😮 Pics show the wreck I started with and where I'm at. Paint finish in last pic is actually Arctic White, lighting and camera makes it look very off white!😮 Oh well! She'd been at sea for a while 😁 You can follow my 'trail' in my Build Blog at 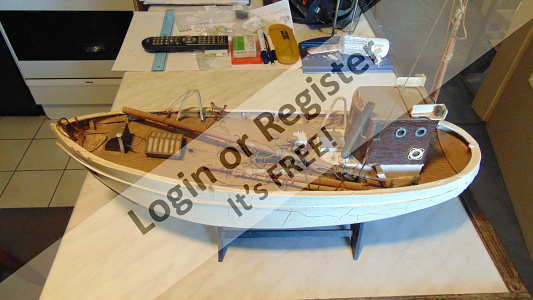


▲
⟩⟩
Inkoust
|
|
Login To
Remove Ads 💬 Re: Refit Irishman to Yorkshireman tugboat
5 years ago by 🇬🇧 Lordgord (
 Petty Officer 1st Class) Petty Officer 1st Class)✧ 24 Views · 3 Likes
Flag
Good luck Rogal, that is just the sort of project I like doing myself.
There is something really rewarding bringing a model back to it's former glory.⛵ ▲
⟩⟩
Rogal118
RNinMunich
Donnieboy
|
|
💬 Re: Refit Irishman to Yorkshireman tugboat
5 years ago by 🇬🇧 Martin555 (
Fleet Admiral)✧ 9 Views · 1 Like
Flag
Hi,
It looks like you have quite a project on you hands good luck. Martin. ▲
⟩⟩
Rogal118
|
Login To
Remove Ads
Remove Ads
📝 Remove all fittings
5 years ago by 🇬🇧 Rogal118 ( Lieutenant Commander)
Lieutenant Commander)✧ 14 Views · 3 Likes · 3 Comments
Flag
💬 Add Comment
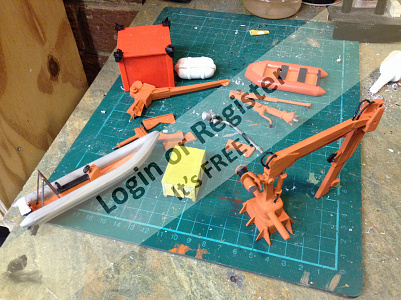
On closer inspection I realised that the glue used was something akin to molten toffee,which, as it happened wasn't a bad thing because all the parts snapped off perfectly and in one piece. The hiab crane was in 3 pieces and was stuck to the deck upside down. So after quite a while patiently chipping the layers of paint off the removed fittings I was down to the bare metal/cast resin/ plastic. After some research I became familiar with what a hiab should look like and started to piece it back together. The metal had snapped in a couple of places so I had to drill 1 MM. holes through the breaks and pin together after 1st applying a 2 part araldite glue. I then drilled more holes at the joints of the crane and inserted small pieces of piano wire that protruded slightly.using small pieces of black plastic electrical cable with the wire removed I bonded these small lengths onto the piano wire to mimic flexible hydraulic pipes.
▲
⟩⟩
Colin H
RNinMunich
Martin555
|
💬 Re: Remove all fittings
5 years ago by 🇬🇧 Rogal118 (
Lieutenant Commander)✧ 15 Views · 1 Like
Flag
Hi there, I had not thought that far ahead.i am a railway modeller to and a lot of the chaps weather their locos and do an excellent job, but I've never been that brave. Although it would help hiding a multitude of sins. I'll see how good things turn out and decide then
▲
⟩⟩
Martin555
|
|
Login To
Remove Ads 💬 Re: Remove all fittings
5 years ago by 🇬🇧 Colin H (
Fleet Admiral)✧ 9 Views · 2 Likes
Flag
Good to see proper modelling skills at work.
Cheers Colin. ▲
⟩⟩
Rogal118
RNinMunich
|
|
💬 Re: Remove all fittings
5 years ago by 🇬🇧 Martin555 (
Fleet Admiral)✧ 9 Views · 1 Like
Flag
Hi,
Looking good. Do you plan on weathering the boat. Martin. ▲
⟩⟩
Rogal118
|
📝 Deck work
5 years ago by 🇬🇧 Rogal118 ( Lieutenant Commander)
Lieutenant Commander)✧ 14 Views · 3 Likes · 1 Comment
Flag
💬 Add Comment
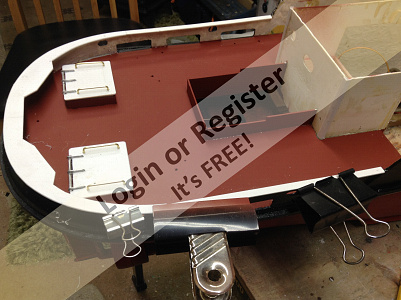
Thankfully one of the first jobs I did on bringing the boat home was to take a lot of photos for reference, these I have found invaluable in remembering where the parts are to be refitted. Having spent a while on the fittings cleaning and repainting I decided to leave alone. one point I can pass on was the use of my stash of different sized bulldog clips, these were invaluable to aid painting the small parts. I found gripping the deck fitting dowels with the clips I could paint all the fitting and then hang up to dry without touching the paint. On removing the deck fittings a large amount of deck paint flicked off too. So a natural progression was to remove the rest, in doing so the bulwark supports all came off, then the bulwark capping, then guess what the bulwarks. Surprise surprise, I'm glad the original glue was crap. By the time I'd finished I had a empty hull and a kit of parts that was in a sorry state. The only deck tight fitting was the aft deck so I left it in place. The bow deck and mid section just about removed themselves,oh what have I done!!. Did you ever take a clock to bits as a kid to see how they worked?

▲
⟩⟩
Colin H
RNinMunich
Martin555
|
💬 Re: Deck work
5 years ago by 🇬🇧 Martin555 (
Fleet Admiral)✧ 9 Views · 0 Likes
Flag
Hi,
That is looking like becoming a big job, but lucky that it almost fell apart. I will be following your progress with great interest. Keep up the good work. Martin. ▲
⟩⟩
No likes yet
This member will receive 1 point for every like received |
📝 Yorkshireman refit- rear deck
5 years ago by 🇬🇧 Rogal118 ( Lieutenant Commander)
Lieutenant Commander)✧ 15 Views · 3 Likes · 2 Comments
Flag
💬 Add Comment
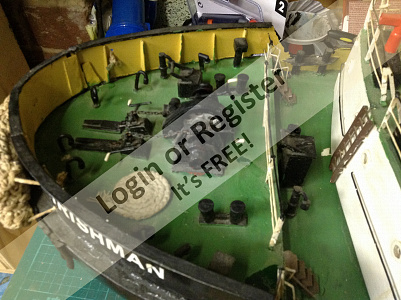
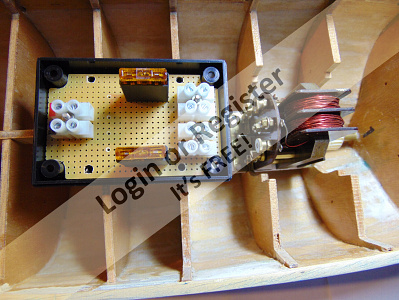
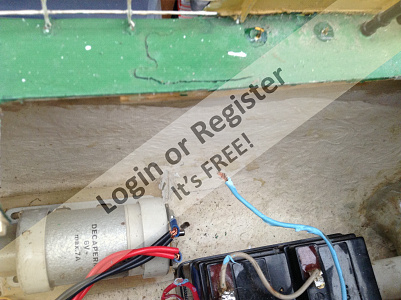
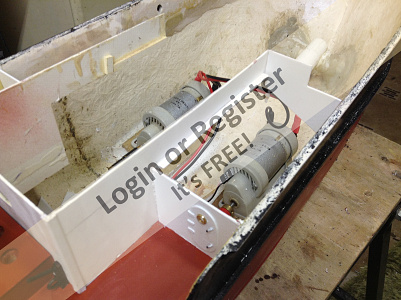
No turning back now I thought this was going to be straight forward. I've decided to put the main bridge superstructure to one side of the work bench and forget it, for now. In the past I found its easy to try to do to much, you get bogged down,disheartened and loose interest. So the next job now the decks are off was to check the rudders operation. It did seem a bit vague,the boat came with a full set of working radio gear. 4x6volt batteries in banks of 2 that took a charge well. A steering servo and 2x decaperm geared 6v motors turning in opposite directions with handed 4 bladed screws. The rudder cranks were white metal that didn't grip the rudder shafts tight enough, hence the vagueness, 1 motor was loose on the mountings, the other had a cracked gear box cover.
Is it me, this scenario seems so reminiscent of so many good looking cars and bikes I've bought over the last 40 years, only to find within a couple of weeks you've got "sucker" written across your forehead, and a lame dog on your hands.
These to me are the type of challenge I like. There the only ones I know come to think of it. New kits are for pussies? Jokingly. Anyway if someone in the past has taken all that time and effort to turn a silk purse into a pigs ear, I look at it as a challenge to turn it back into its former glory.
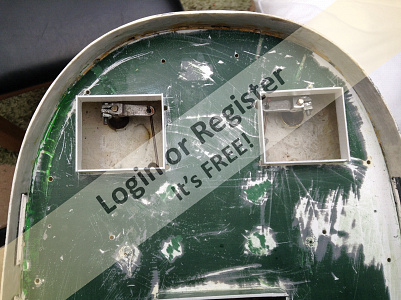
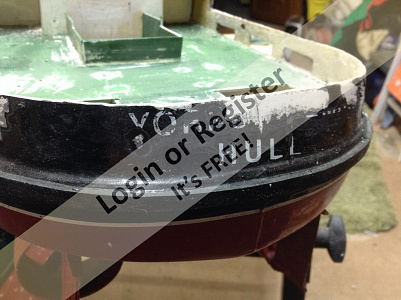
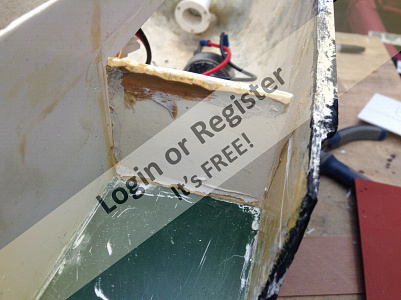
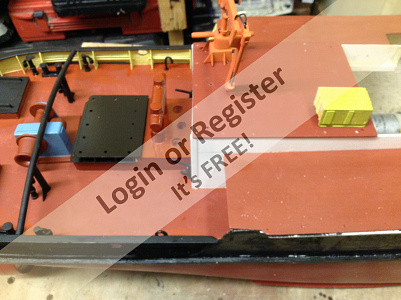
None of the hatch tops were square especially the covers for the rudder cranks, and as can be seen in the accompanying photos the deck holes weren't raised to stop water ingress. I re cut the holes to help fit new cranks and fitted 10mm up stands, made new sheet hatch covers then refitted the original hinges and handles. Also while cleaning the loose paint layers off the outer stern bulwark, I uncovered the original name of the boat. It was originally a "Yorkshireman" hence my goal to turn a Irishman into a Yorkshireman. Apparently after a bit of reading up they were sister ships in real time and were built not 20miles from me at Selby, Yorkshire around 1976.
Is it me, this scenario seems so reminiscent of so many good looking cars and bikes I've bought over the last 40 years, only to find within a couple of weeks you've got "sucker" written across your forehead, and a lame dog on your hands.
These to me are the type of challenge I like. There the only ones I know come to think of it. New kits are for pussies? Jokingly. Anyway if someone in the past has taken all that time and effort to turn a silk purse into a pigs ear, I look at it as a challenge to turn it back into its former glory.
None of the hatch tops were square especially the covers for the rudder cranks, and as can be seen in the accompanying photos the deck holes weren't raised to stop water ingress. I re cut the holes to help fit new cranks and fitted 10mm up stands, made new sheet hatch covers then refitted the original hinges and handles. Also while cleaning the loose paint layers off the outer stern bulwark, I uncovered the original name of the boat. It was originally a "Yorkshireman" hence my goal to turn a Irishman into a Yorkshireman. Apparently after a bit of reading up they were sister ships in real time and were built not 20miles from me at Selby, Yorkshire around 1976.
▲
⟩⟩
RNinMunich
Colin H
Martin555
|
💬 Re: Yorkshireman refit- rear deck
5 years ago by 🇬🇧 Rogal118 (
Lieutenant Commander)✧ 15 Views · 1 Like
Flag
Cheers thanks for the encouragement.👍
▲
⟩⟩
Martin555
|
|
💬 Re: Yorkshireman refit- rear deck
5 years ago by 🇬🇧 Martin555 (
Fleet Admiral)✧ 9 Views · 0 Likes
Flag
Hi,
I have never done a boat refurbishment before. It looks very interesting and you never know what you will find. It must be more difficult than you make it look. Keep up the good work. Martin. ▲
⟩⟩
No likes yet
This member will receive 1 point for every like received |
📝 Rebuild rear deck Yorkshireman
5 years ago by 🇬🇧 Rogal118 ( Lieutenant Commander)
Lieutenant Commander)✧ 17 Views · 3 Likes · 3 Comments
Flag
💬 Add Comment
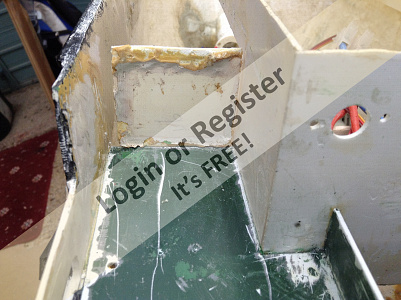
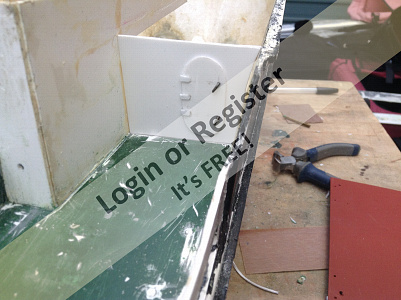
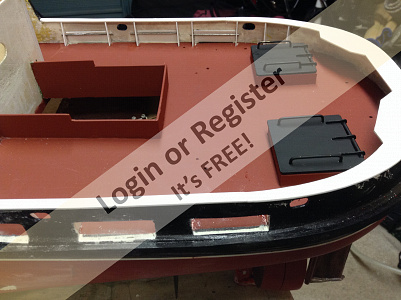
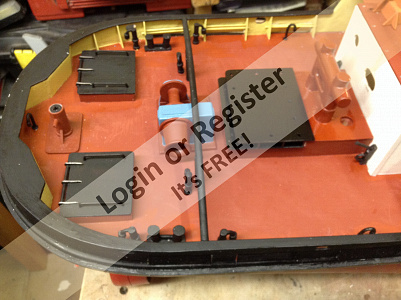
Now all the flaky paint has been removed it's time to start rebuilding. A trip to the model shop for everything I thought I might need and a bit more just in case. sheet, flat, round and angled plastic in various sizes paint ,glue and piano wire should do for now. The first job I wanted to tackle was the rear deck bulkheads between the hull sides and the engine room, port and starboard. originally these had been badly fitted,and glued in place with mastic, filler, glue, bostick and other substances scientists are still trying to identify. I also thought that there should be watertight doors here, but through lack of drawings and photos I decided to use modellers licence and make my own. I fitted the bulkheads then fitted an oval shaped door on the surface,added hinges and handles plus a little brass porthole for effect. I then squared everything up and trimmed to size at deck level as the deck will be supported by this bulkhead later. Using some of the small plastic angle I super glued everything in place as this increases the glueing surface to be bonded and it worked quite well. So I added other angled strips to support the deck against the engine room sides. I still had the original main deck in one piece and thought about recutting a new one but the old was still useable and besides all the holes for the handrails were in and I didn't fancy redriling them again. It came in handy for aligning all the parts and checking everything was square and true.
Hope the photos give a gist of the text above.
Hope the photos give a gist of the text above.
▲
⟩⟩
mturpin013
RNinMunich
Martin555
|
💬 Re: Rebuild rear deck Yorkshireman
5 years ago by 🇬🇧 mturpin013 (
 Admiral) Admiral)✧ 9 Views · 0 Likes
Flag
That's a job and a half, the results are looking really good keep it up
▲
⟩⟩
No likes yet
This member will receive 1 point for every like received |
|
Login To
Remove Ads 💬 Re: Rebuild rear deck Yorkshireman
5 years ago by 🇩🇪 RNinMunich (
Fleet Admiral)✧ 9 Views · 0 Likes
Flag
Wow twin Decaperms!
You should be able to swing a pair of 50mil screws with those. She won't win any races but should have a good 'pull'! How big is the beast? Love the w/t doors👍 Used a similar method to make some for my 1/72 destroyer HMS Hotspur. KUTGW! Cheers, Doug 😎 ▲
⟩⟩
No likes yet
This member will receive 1 point for every like received |
|
💬 Re: Rebuild rear deck Yorkshireman
5 years ago by 🇬🇧 Martin555 (
Fleet Admiral)✧ 9 Views · 0 Likes
Flag
Hi Rogal 118,
Coming along nicely. Keep up the good work. Martin. ▲
⟩⟩
No likes yet
This member will receive 1 point for every like received |
📝 Rear deck bulwark capping and freeing ports. Refit
5 years ago by 🇬🇧 Rogal118 ( Lieutenant Commander)
Lieutenant Commander)✧ 18 Views · 3 Likes · 1 Comment
Flag
💬 Add Comment
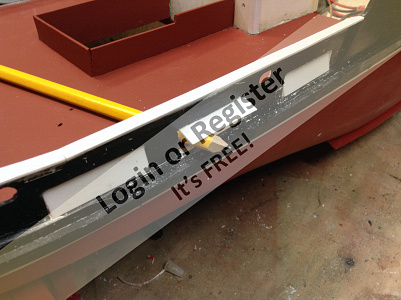
Well a couple of coats of paint to the deck certainly tidies things up a bit. So next using the old bulwark
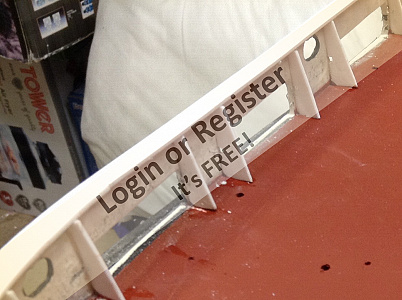
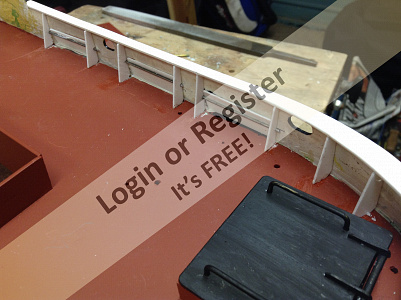
capping as a template I cut new out from sheet. Clamped in place and trimmed to give an even overhang all around in and out. On measuring the bulwark heights there was up to 1mm difference and the top edge was wavy, a bit of filling with a 12in flat file soon sorted that though. Small flat plastic extrusion was used for the straight capping, butt jointing to the previous cut, curved rear section. Before bonding in place I decided to tidy up the freeing ports, these were all shapes and sizes and looked as if originally the modeller had employed his pet rat to nibble the holes out. I squared them up and made them look all the same. My next dilemma was what to do with them. The model originally had them covered with thin clear plastic sheet,stopping any water splashes from escaping back into the pond. Looking at the vague copy of plans I had it showed a wire strip across the freeing port for the port flap to pivot around. After a bit of trial and error I realised I could get this to work. Basically the flap had to open if water pressed against it from the deck side but be forced shut when the pond/sea water pushed from the outside of the boat. The way I found to do this was to put the pivot wire 1/3rd down from the top of the freeing port so most of the weight was at the bottom, this ensured the flap was self closing.i made the flap the same width as the port but slightly higher so the top edge was inside the bulwark and the bottom was outside this way they would only pivot outwards at the bottom,when bonded to the wire pivot. a little chamfering, top outer and bottom inner provided a near perfect fit. The next job was to fit the vertical bulwark supports each side of the freeing ports and make a pivot hole for the wire to turn freely and the flaps could pivot and shut perfectly. After couple of goes I did achieve it and finished all 6 in about 2 hrs. I then glued all the capping in place using the bulldog clips while the glue set. Next was the bulwark support brackets. When set the wire pivot was fitted in the small holes 1/3rd down for the flaps, these were bonded in place one at a time and left to set before bonding the next as they tended to fall out of position if not fully set. When all were done they worked perfectly even blowing gently opened and shut them. I was chuffed to nuts as they say and well pleased with several nights work
capping as a template I cut new out from sheet. Clamped in place and trimmed to give an even overhang all around in and out. On measuring the bulwark heights there was up to 1mm difference and the top edge was wavy, a bit of filling with a 12in flat file soon sorted that though. Small flat plastic extrusion was used for the straight capping, butt jointing to the previous cut, curved rear section. Before bonding in place I decided to tidy up the freeing ports, these were all shapes and sizes and looked as if originally the modeller had employed his pet rat to nibble the holes out. I squared them up and made them look all the same. My next dilemma was what to do with them. The model originally had them covered with thin clear plastic sheet,stopping any water splashes from escaping back into the pond. Looking at the vague copy of plans I had it showed a wire strip across the freeing port for the port flap to pivot around. After a bit of trial and error I realised I could get this to work. Basically the flap had to open if water pressed against it from the deck side but be forced shut when the pond/sea water pushed from the outside of the boat. The way I found to do this was to put the pivot wire 1/3rd down from the top of the freeing port so most of the weight was at the bottom, this ensured the flap was self closing.i made the flap the same width as the port but slightly higher so the top edge was inside the bulwark and the bottom was outside this way they would only pivot outwards at the bottom,when bonded to the wire pivot. a little chamfering, top outer and bottom inner provided a near perfect fit. The next job was to fit the vertical bulwark supports each side of the freeing ports and make a pivot hole for the wire to turn freely and the flaps could pivot and shut perfectly. After couple of goes I did achieve it and finished all 6 in about 2 hrs. I then glued all the capping in place using the bulldog clips while the glue set. Next was the bulwark support brackets. When set the wire pivot was fitted in the small holes 1/3rd down for the flaps, these were bonded in place one at a time and left to set before bonding the next as they tended to fall out of position if not fully set. When all were done they worked perfectly even blowing gently opened and shut them. I was chuffed to nuts as they say and well pleased with several nights work
▲
⟩⟩
mturpin013
RNinMunich
Martin555
|
💬 Re: Rear deck bulwark capping and freeing ports. Refit
5 years ago by 🇬🇧 Martin555 (
Fleet Admiral)✧ 10 Views · 1 Like
Flag
Hi Rogal 118,
Very neat and tidy work. It just goes to show with a bit of time and skill you can work magic! Martin. ▲
⟩⟩
Inkoust
|
📝 Yorkshireman refit towing post deck
5 years ago by 🇬🇧 Rogal118 ( Lieutenant Commander)
Lieutenant Commander)✧ 21 Views · 4 Likes · 1 Comment
Flag
💬 Add Comment
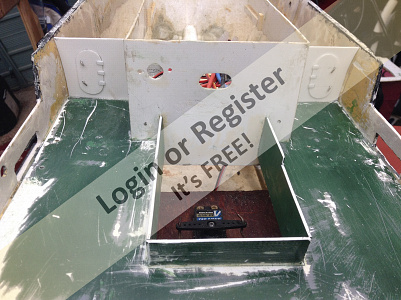
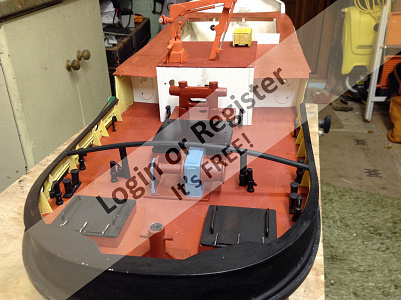
Now realising that the refit was here for the long haul. I purchased the complete Aziz to get us experience at the pond and to bring us into contact with far more experienced modellers and tuggists. These guys have been brilliant and helped with my forward planning of the refit. One area that needed addressing was the towing post connection, the original was just bonded to the removable deck hatch that gave access to the steering servo. This wouldn't have pulled a butterfly without breathing off.
A solid block of U shaped wood straddling the servo motor was fitted to the underneath of the deck, which In turn was screwed to the servo mounting block bonded to the hull. Which I soon found it wasn't, so a good blob of 2part Araldite and a heavy weight sorted that out overnight. Now any forces on the tow post would be transferred down to a larger area of the hull bottom.
If building the boat kit from scratch this must be considered at an early stage, especially if thinking of towing in the future
One tip given to me from a long standing member regarding thie towing pull was to have a rear tow link loose tethered from a post as far aft as possible.
The reason soon became clear, if the only tow connection is from the centre of the tug, and if for any reason the tug should turn to port or starboard more than I few degrees the weight of the towed vessel could pull the tug over, having a slipping line just long enough to allow the tow line to clear the stern sides. Any further and upon taking the strain the stern of the boat is pulled in line and safety.
There is a nautical term for this tether but I can't remember it.
Cheers Rog.
▲
⟩⟩
Inkoust
mturpin013
RNinMunich
Martin555
|
💬 Re: Yorkshireman refit towing post deck
5 years ago by 🇬🇧 Martin555 (
Fleet Admiral)✧ 9 Views · 0 Likes
Flag
Hi Rogal 118,
She is looking good. You are certainly getting on with it. Martin. ▲
⟩⟩
No likes yet
This member will receive 1 point for every like received |


Login To
Remove Ads
Remove Ads