Join Us On Social Media!

|

|

|
Download The App!
Login To
Remove Ads
Remove Ads
Login To
Remove Ads
Remove Ads
Model Boats Website
Graupner Hertha Jeep
11 Posts · 3 Followers · 40 Photos · 49 Likes
Began 5 years ago by
 United States
Follow This Thread
Not currently following
> Click to follow
> Click to follow
Latest Post 5 years ago by
| Oldest posts shown first (Show Newest First) | (Print Booklet) |
📝 Graupner Hertha Jeep
5 years ago by 🇺🇸 Cashrc ( Vice Admiral)
Vice Admiral)✧ 6 Views · 5 Likes · 3 Comments
Flag
💬 Add Comment
Okay, so I’ve just finished the Graupner Taucher Wulf, and I’m one of those modelers that likes to have the workbench..ahh..working. Now, the Wulf was a bit of a pain in the rump to build, mainly because the instructions were almost non existent. There were pictures, mind you, lots of pictures, some even contradicted each other..but precious little info, measurements, that sort of thing. Anyway, I swore up and down that I would never build another modern Graupner boat again. I have a small stash of kits and a couple of boats to restore..nope, not doing it.
Then, that little voice in my head returned..same voice that tells me it’s okay to drop the hammer at a red light because that voice didn’t see the police cruiser in the parking lot..same voice that says “you’re not THAT full, one more slice of pizza wont kill you”. That voice. The one that said..”Look! The little Hertha Jeep is on sale! You’ve already seen the worst with the Taucher, go ahead and buy it. You KNOW what your getting into this time...ahhhhahahahahaha!”
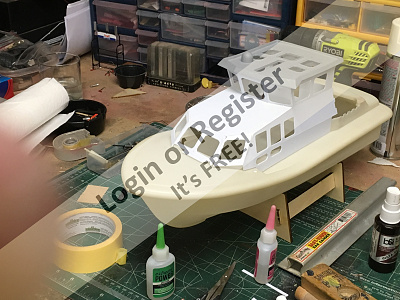
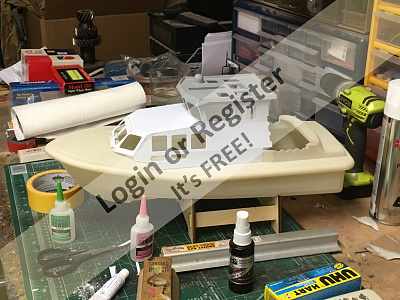
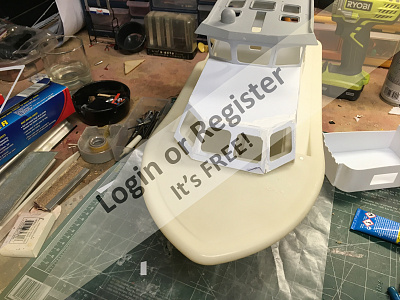
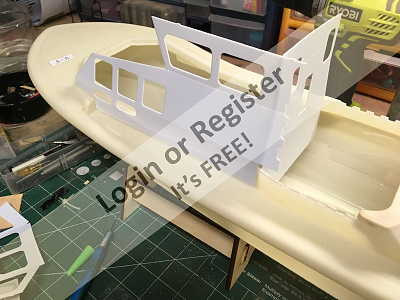
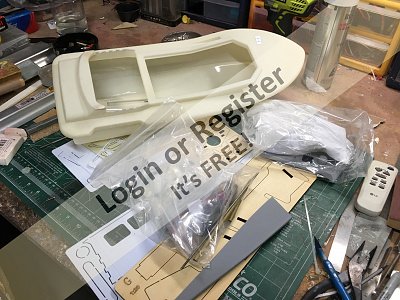
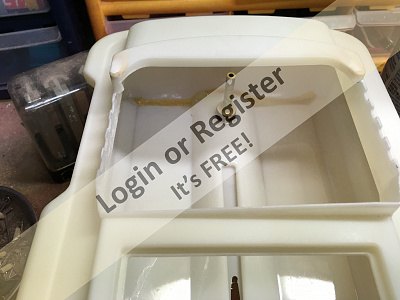
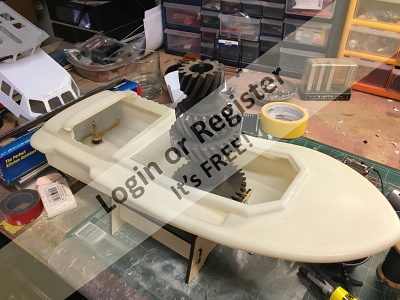
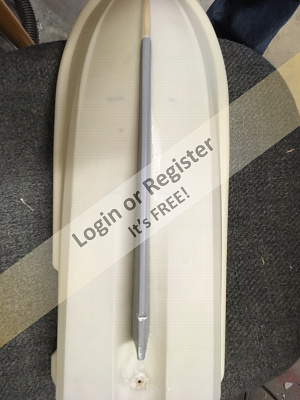
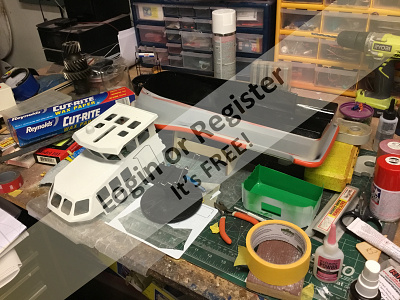
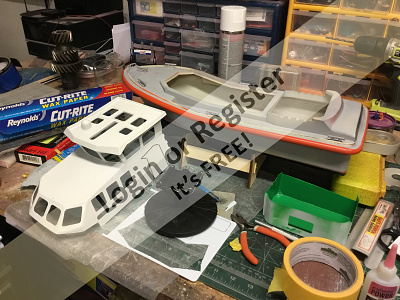
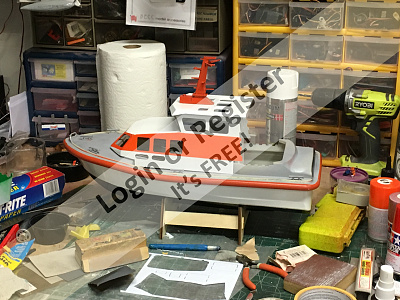
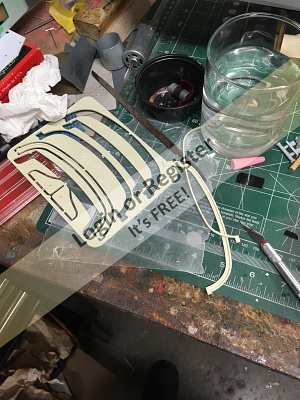
So theres a Hertha Jeep on my bench. And, again, lots of pics, a little more info this time, some things that make me scratch my head and some that make sense. The hull is blow molded..I think it’s ABS but it just looks different from any plastic I’ve ever seen. Nicely made though. The kit parts and fittings looked good, so I dove in.
I decided that this time, I was going to build everything as sub assemblies and make sure everything fits to my satisfaction before I build myself into a corner like I did with the Wulf. The first thing I started was the cabin. It’s built from some very thin laser or machine cut abs. Much thinner than the Wulfs pilothouse. The cabin roof is molded in either resin or plastic and primered, and I used that and the hull to jig up the cabin. Everything fit okay until I got to the forward windscreen. The oblique angles and the way the darn thing fit had me stumped. Then I trimmed it, which was a mistake. However, it started to look decent when I realized that some of the ca had dribbled down and glued the bottom edge of the windscreen to the hull. !!@&&%!!!!
I had to break the bottom edge of the windscreen to get it loose from the hull. However, I was able to fix the damage with some scrap plastic and a little “modelers bondo” (Tamiya plastic filler). This was a rookie mistake, I was thinking of protecting the hull with wax paper, but I didn’t heed THAT voice, and got burned in the process. Lesson learned.
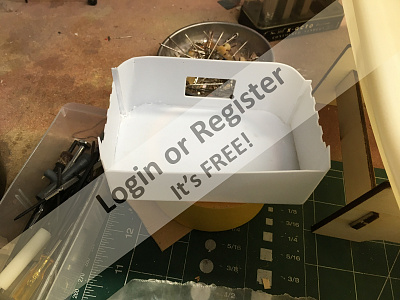
Once the cabin was done, I built the insert that goes into the aft part of the hull. I don’t have pics of that yet but I’ll post them soon.


Then, that little voice in my head returned..same voice that tells me it’s okay to drop the hammer at a red light because that voice didn’t see the police cruiser in the parking lot..same voice that says “you’re not THAT full, one more slice of pizza wont kill you”. That voice. The one that said..”Look! The little Hertha Jeep is on sale! You’ve already seen the worst with the Taucher, go ahead and buy it. You KNOW what your getting into this time...ahhhhahahahahaha!”
So theres a Hertha Jeep on my bench. And, again, lots of pics, a little more info this time, some things that make me scratch my head and some that make sense. The hull is blow molded..I think it’s ABS but it just looks different from any plastic I’ve ever seen. Nicely made though. The kit parts and fittings looked good, so I dove in.
I decided that this time, I was going to build everything as sub assemblies and make sure everything fits to my satisfaction before I build myself into a corner like I did with the Wulf. The first thing I started was the cabin. It’s built from some very thin laser or machine cut abs. Much thinner than the Wulfs pilothouse. The cabin roof is molded in either resin or plastic and primered, and I used that and the hull to jig up the cabin. Everything fit okay until I got to the forward windscreen. The oblique angles and the way the darn thing fit had me stumped. Then I trimmed it, which was a mistake. However, it started to look decent when I realized that some of the ca had dribbled down and glued the bottom edge of the windscreen to the hull. !!@&&%!!!!
I had to break the bottom edge of the windscreen to get it loose from the hull. However, I was able to fix the damage with some scrap plastic and a little “modelers bondo” (Tamiya plastic filler). This was a rookie mistake, I was thinking of protecting the hull with wax paper, but I didn’t heed THAT voice, and got burned in the process. Lesson learned.
Once the cabin was done, I built the insert that goes into the aft part of the hull. I don’t have pics of that yet but I’ll post them soon.
▲
⟩⟩
doghouse
RNinMunich
Colin H
jbkiwi
Martin555
|
💬 Re: Graupner Hertha Jeep
5 years ago by 🇩🇪 RNinMunich (
 Fleet Admiral) Fleet Admiral)✧ 3 Views · 3 Likes
Flag
"I had to break the bottom edge of the windscreen to get it loose from the hull."
Hi Cash, next time something like that happens (and we've all done it!) try a Razor Saw! Nevertheless, good start👍 I like the Tamiya spray cans too, better than the Revell ones. Great for the large stuff like hulls and saves firing up (and subsequently cleaning😝) the airbrush. I reserve that for the fiddly bits where I need a finer spray. Cheers, Doug 😎 ▲
⟩⟩
Cashrc
doghouse
Martin555
|
|
Login To
Remove Ads 💬 Re: Graupner Hertha Jeep
5 years ago by 🇳🇿 jbkiwi (
Fleet Admiral)✧ 2 Views · 2 Likes
Flag
I'm sure it will end up looking good once finished. Interesting model.
JB ▲
⟩⟩
Cashrc
Martin555
|
|
💬 Re: Graupner Hertha Jeep
5 years ago by 🇬🇧 Martin555 (
Fleet Admiral)✧ 1 View · 1 Like
Flag
A good start Cash,
Keep up the good work. Martin555. ▲
⟩⟩
Cashrc
|
Login To
Remove Ads
Remove Ads
📝 More done
5 years ago by 🇺🇸 Cashrc ( Vice Admiral)
Vice Admiral)✧ 6 Views · 5 Likes · 2 Comments
Flag
💬 Add Comment
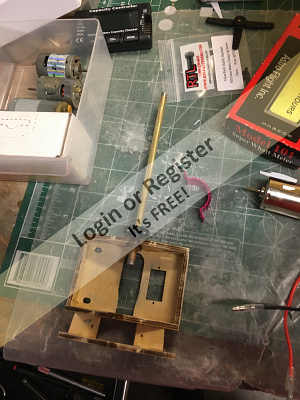
Real quick update. I built up the stuffing tube and rudder post. Both are made from 6mm brass tube in which you install flanged 6x3 mm bushings. They’re a tight fit, but I soldered themin just in case. I installed the rudder post tube into the hull, followed by the ply bushings that are glued in place over the tube and against the hull, then slathered epoxy over the joint. I also started test fitting some of the motor mount parts to get an idea how this will all fit.
Hopefully I’ll get more done this weekend, once the power system is in, I can concentrate on finishing up the upper superstructure, then, it’s time to paint and detail. Thinking about either airbrushing her or Tamiya rattle can. The Tamiya paints aren’t cheap, but they cover well and dry fast.
Hopefully I’ll get more done this weekend, once the power system is in, I can concentrate on finishing up the upper superstructure, then, it’s time to paint and detail. Thinking about either airbrushing her or Tamiya rattle can. The Tamiya paints aren’t cheap, but they cover well and dry fast.
▲
⟩⟩
watson220
doghouse
Colin H
RNinMunich
Martin555
|
💬 Re: More done
5 years ago by 🇺🇸 Cashrc (
Vice Admiral)✧ 1 View · 0 Likes
Flag
Thanks Doug, I hope I can do her justice. Like you, I really like the Tamiya rattle cans, I was going to use my airbrush but the Tamiya paints are working well right now. Have you ever tried the Tamiya acrylic for airbrushing? I’m thinking about giving that a go sometime.
Cash ▲
⟩⟩
No likes yet
This member will receive 1 point for every like received |
|
💬 Re: More done
5 years ago by 🇩🇪 RNinMunich (
Fleet Admiral)✧ 3 Views · 3 Likes
Flag
Hi Cash,
Some (43) pics of the big'un here- ▲
⟩⟩
Cashrc
doghouse
Martin555
|

📝 Motor mount and keel
5 years ago by 🇺🇸 Cashrc ( Vice Admiral)
Vice Admiral)✧ 6 Views · 5 Likes
Flag
💬 Add Comment
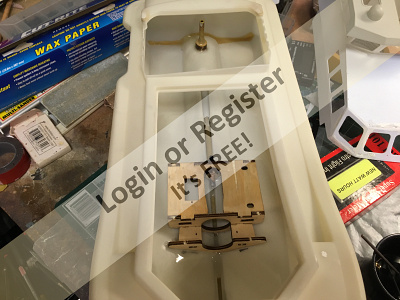
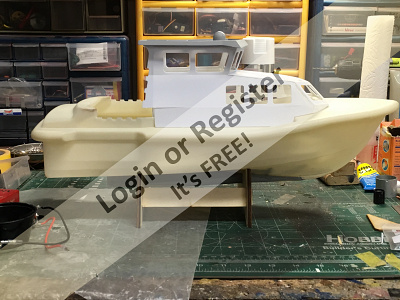
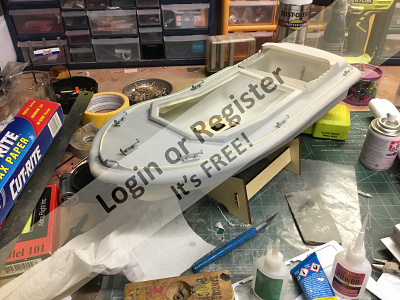
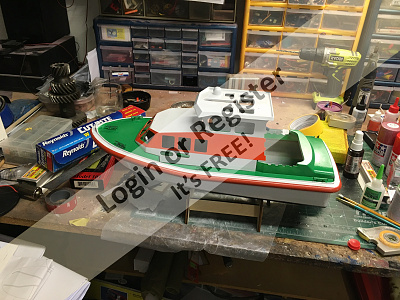
I decided to do a bit this afternoon, got the motor mount/stuffing tube assembly completed and installed. The stern tube is glued to the mount then goes thru the bottom of the hull and out the rear of the keel. I did a quick lash up to check fit, and started to tack the keel on, when I found the keel was twisted to the point the boat would have a permanent trim to port. I was able to get the keel off, thought I could tweak it straight, but found there was a molding error that could only be fixed by cutting the lower part of the keel. This allowed me to assemble everything straight, then I glued the cut piece back on and filled the cut with scrap plastic and filler, then sanded it smooth. Before I shut down for the day, I gave the superstructure a light coat of primer so I could better see what I needed to sand or fill on my repair on the fwd window section.
▲
⟩⟩
Colin H
MouldBuilder
jbkiwi
Martin555
RNinMunich
📝 Paint
5 years ago by 🇺🇸 Cashrc ( Vice Admiral)
Vice Admiral)✧ 7 Views · 6 Likes · 2 Comments
Flag
💬 Add Comment
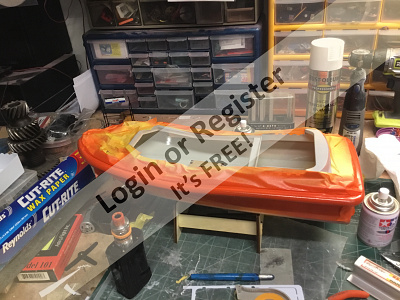
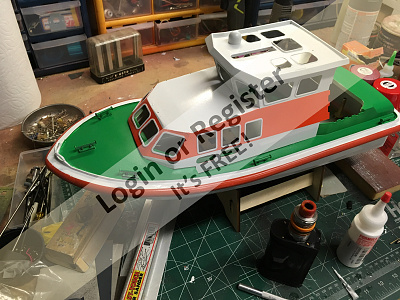
Did some painting today and added a..I don’t know what you’d call it, but it’s a rail that runs around the deck just inboard by 12 mm or so. I’m using some Home Depot rattle can white and Tamiya orange and green, with some leftover appliance epoxy for the hull below the waterline. Going to try to do a bit more tomorrow.
Cash
Cash
▲
⟩⟩
watson220
doghouse
Colin H
jbkiwi
MouldBuilder
Martin555
|
💬 Re: Paint
5 years ago by 🇭🇺 MouldBuilder (
Vice Admiral)✧ 3 Views · 3 Likes
Flag
Looking very good. I must admit that the painting is my least favourite task. I just cannot drum up enough patience. The build looks super. Look forward to seeing it fully painted.👍
▲
⟩⟩
Cashrc
doghouse
Martin555
|
|
💬 Re: Paint
5 years ago by 🇬🇧 Martin555 (
Fleet Admiral)✧ 2 Views · 2 Likes
Flag
Hi Cashrc,
Nice, as soon as you start getting paint on it seems to give you the feeling that you are actually starting to get somewhere. Well done. Martin555. ▲
⟩⟩
Cashrc
doghouse
|
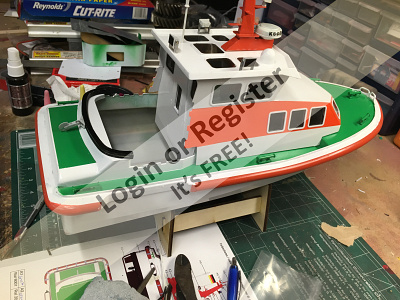
📝 More paint
5 years ago by 🇺🇸 Cashrc ( Vice Admiral)
Vice Admiral)✧ 6 Views · 5 Likes · 1 Comment
Flag
💬 Add Comment
So, my lovely spouse and I went to a function at our Church Friday night..it was a lot of fun, called a “Getaway”..it’s primary function was to have couples young and old to rediscover each other, both spiritually and secularly. Anyway, by Friday I’m worn out, work takes its toll. I’m paid well, but I think some of my soul is stripped away each week. Long story short, I told her if I go to this shindig I’ll probably lay off service Sunday. When Teresa and Grace left for church, I went out and did a little painting. That’s the way the day went for me..paint a bit, go get groceries..paint a bit, do the dishes..paint a bit, watch the Cowboys. I got a bit done, however, I just realized the aft part of the deck is mostly white with green panels. I may or may not “fix” that, as the deck and hull are joined from the factory, and I think I have stock in masking tape corporations by now.
Came out pretty good, did a little touch up and I need to do a bit more, but it’s looks ok. Next up is trimming and detailing fittings for the superstructure, windows, add rudder linkage, then glue in the aft deck insert and start to finish her up.
BTW, thanks to all who have posted so far, I appreciate the kind remarks and input!
Cash
▲
⟩⟩
doghouse
Colin H
MouldBuilder
jbkiwi
Martin555
|
💬 Re: More paint
5 years ago by 🇬🇧 Martin555 (
Fleet Admiral)✧ 3 Views · 3 Likes
Flag
A little bit at a time is always the way to go, otherwise it starts to feel more like a job than a hobby.
Keep up the good work. Martin555. ▲
⟩⟩
jbkiwi
doghouse
Cashrc
|
📝 Windows and frames
5 years ago by 🇺🇸 Cashrc ( Vice Admiral)
Vice Admiral)✧ 6 Views · 5 Likes
Flag
💬 Add Comment
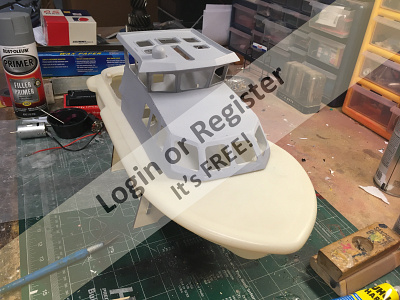
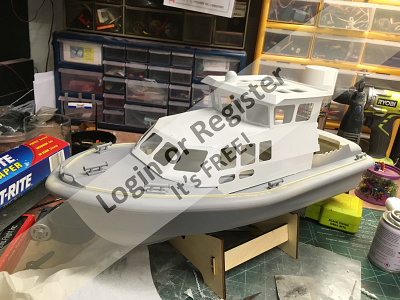
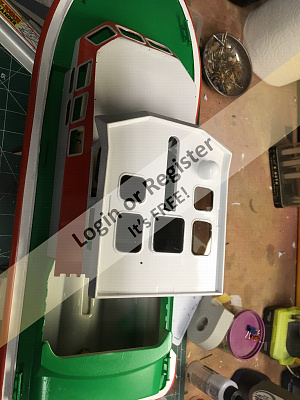
Nothing earth shaking tonight, I installed the skylights in the cabin roof, and the window frames in the cabin proper. I didn’t paint the frames, they’re molded in with, some guys paint them, some don’t, I elected not to. The windows supplied with the kit are tinted and laser cut, but still have to be trimmed as they are a mite oversized.
Going to see how they fit in the window frames, if I don’t like how the fit I’ll cut windows from clear and make my life a little easier to boot.
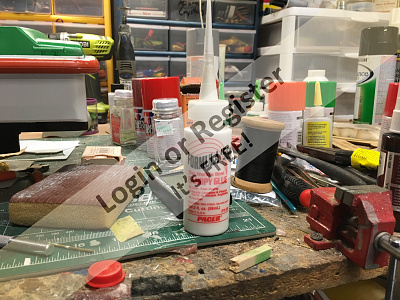
By the way, I use RC56 to do all my glazing, it’s designed for plastic canopies and dries crystal clear. It’s not waterproof but it is water resistant, had several planes get pretty damp flying in misty weather never had the glue let go.
Going to see how they fit in the window frames, if I don’t like how the fit I’ll cut windows from clear and make my life a little easier to boot.
By the way, I use RC56 to do all my glazing, it’s designed for plastic canopies and dries crystal clear. It’s not waterproof but it is water resistant, had several planes get pretty damp flying in misty weather never had the glue let go.
▲
⟩⟩
jbkiwi
doghouse
Colin H
MouldBuilder
Martin555
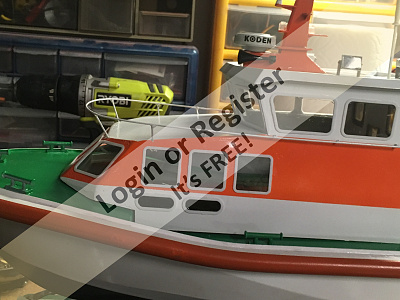
📝 Had to do it!!
5 years ago by 🇺🇸 Cashrc ( Vice Admiral)
Vice Admiral)✧ 5 Views · 4 Likes
Flag
💬 Add Comment
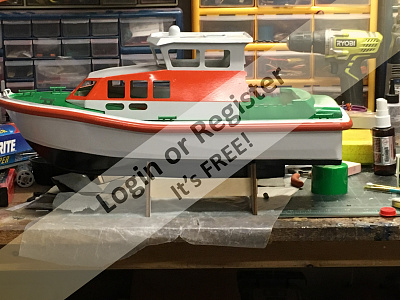
So, tonight I finished the windows, decided to use my own stock of clear for the forward and side cabin windows, used the kit smoked windows in the skylights and aft cabin and door. I kept looking at that green aft deck, and decided to “make it right” i.e match the box art as close as my skills would allow. So..I masked her off and painted her, and let the paint dry while I glazed. Came out ok😀
▲
⟩⟩
MouldBuilder
Martin555
doghouse
Colin H
📝 Just a bit more
5 years ago by 🇺🇸 Cashrc ( Vice Admiral)
Vice Admiral)✧ 5 Views · 4 Likes · 4 Comments
Flag
💬 Add Comment
Had a little time to work today. I left work early today to pick up my upper dentures, which broke in half a few days ago as I munched on a pickle spear😠 I’ve had bad gums since my late 20s, have had a full set of dentures for three years, the uppers are over ten. Anyway, I had them repaired, picked them up and went home. Only pain I felt was in my wallet....🤣
Soooo..I started detailing the mast. Went for the airbrush first, but I’m still new to it, and the paint I was using came out a little wetter and runnier than I liked, so I Tamiya rattle canned the parts, let them dry and installed what I could before dinner.
I have a few more to do then it’s...wait for it....railings.😮
Cash
▲
⟩⟩
MouldBuilder
doghouse
jbkiwi
Martin555
|
💬 Re: Just a bit more
5 years ago by 🇭🇺 MouldBuilder (
Vice Admiral)✧ 1 View · 0 Likes
Flag
Looks really nice.
▲
⟩⟩
No likes yet
This member will receive 1 point for every like received |
|
Login To
Remove Ads 💬 Re: Just a bit more
5 years ago by 🇬🇧 Nerys (
Fleet Admiral)✧ 1 View · 0 Likes
Flag
Interesting little boat. I like!
▲
⟩⟩
No likes yet
This member will receive 1 point for every like received |
|
💬 Re: Just a bit more
5 years ago by 🇺🇸 figtree7nts (
 Admiral) Admiral)✧ 2 Views · 2 Likes
Flag
Hi Cash,
It looks really good!👍 She has good details! Cheers, Ed ▲
⟩⟩
Cashrc
Martin555
|
|
💬 Re: Just a bit more
5 years ago by 🇬🇧 Martin555 (
Fleet Admiral)✧ 2 Views · 2 Likes
Flag
Nice work, keep it up.
Martin555. ▲
⟩⟩
doghouse
Cashrc
|
📝 Dang it!!!!!
5 years ago by 🇺🇸 Cashrc ( Vice Admiral)
Vice Admiral)✧ 5 Views · 4 Likes · 2 Comments
Flag
💬 Add Comment
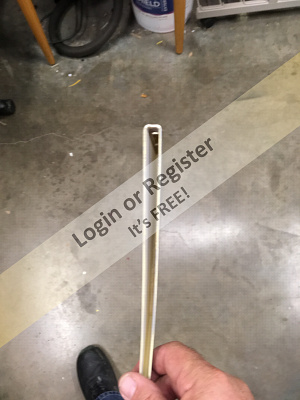
Hi y’all. Been a bit since I posted anything on the Jeep. Did a test run on the motor and shaft, sounded a bit “buzzy” at mid throttle but smoother out in low and max power. Then, I installed the prop, and tested again..this time, I thought she was going to vibrate to pieces, and the amps went wayyy up. I tried reinstalling the motor, checked my coupling motor and shaft alignment, all looked good. Then, when I had it a low throttle, barely “ticking over”, I noticed the prop was a little..wobbly. On close inspection I found that the shaft was slightly bent right where the threaded portion ended, causing the aft end of the prop to rotate out of round by about 2mm. Now, I don’t have the tools to really straighten a shaft this size and get it dead on, so I looked the shaft over, found the bend, put it in my vise and gently bent it in the opposite direction. I got lucky as subsequent tests showed I was on the right track. Much quieter, very little vibration and the amp draw diminished dramatically. But, it’s still not right. Usable, but not dead straight. I found a vendor on eBay with 3mm model boat shafts that are threaded, so I’m waiting for that to arrive. Once it’s here, I’ll cut it to size and retest.
I did get the upper railing made up and installed, did a combo of soldering the easy joints and ca’d the rest. I also got the towing bar and gear built, painted and installed.
I did get the upper railing made up and installed, did a combo of soldering the easy joints and ca’d the rest. I also got the towing bar and gear built, painted and installed.
▲
⟩⟩
jbkiwi
Martin555
MouldBuilder
RNinMunich
|
💬 Re: Dang it!!!!!
5 years ago by 🇳🇿 jbkiwi (
Fleet Admiral)✧ 1 View · 0 Likes
Flag
Hi Cash, a good way to straighten a shaft to a reasonable degree (If you haven't done this already) is to find a flat surface (such as a bench top etc) place a torch or strong light at the back and roll the shaft on the bench. Look where the light shines through underneath and hold the shaft in that position. Place the shaft on a flat piece of hard wood and tap along the high spot gently with a plastic hammer (or similar a few times (not just at one point, - and don't use a steel hammer!).
Try rolling again in the same spot on your bench and check for light, and keep repeating as often as necessary. It might take a while and a bit of chasing, but it's a lot more gentle than putting it in a vice, and you won't over bend it if you are careful. Needs patience! JB ▲
⟩⟩
No likes yet
This member will receive 1 point for every like received |
|
💬 Re: Dang it!!!!!
5 years ago by 🇩🇪 RNinMunich (
Fleet Admiral)✧ 2 Views · 1 Like
Flag
Bad luck Cash 🤔
As I read the second sentence 'shaft whip' instantly came to mind! I had a similar experience with my first attempt to make a shaft for my fish cutter restoration / conversion. Second attempt was a 'wobbly prop' cos I couldn't get the damn thread concentric on the shaft. Martin (Westquay) came to my rescue and made me a decent straight shaft and tube assembly 😊 Cheers, Doug 😎 ▲
⟩⟩
Martin555
|
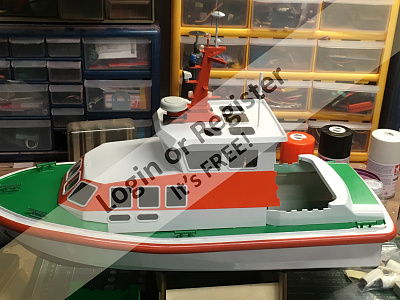
📝 Just about done
5 years ago by 🇺🇸 Cashrc ( Vice Admiral)
Vice Admiral)✧ 3 Views · 2 Likes · 1 Comment
Flag
💬 Add Comment
Well, this is pretty much how she’ll look when she’s splashed. I might have a minor detail or two to do, but right now all she needs is esc, receiver and a battery, and there’s a access panel in the aft lower bulkhead that I need to fit and tape on. It allows access to the rudder arm. Hopefully I’ll have some maiden shots next week.
Cash
Cash
▲
⟩⟩
jbkiwi
Martin555
|
💬 Re: Just about done
5 years ago by 🇬🇧 Martin555 (
Fleet Admiral)✧ 1 View · 0 Likes
Flag
Nice job Cash,
Looking forward to seeing the video. Martin555. ▲
⟩⟩
No likes yet
This member will receive 1 point for every like received |


Login To
Remove Ads
Remove Ads