Join Us On Social Media!

|

|

|
Download The App!
Login To
Remove Ads
Remove Ads
Login To
Remove Ads
Remove Ads
Model Boats Website
Milford Star
16 Posts · 5 Followers · 75 Photos · 68 Likes
Began 5 years ago by
 United Kingdom
Follow This Thread
Not currently following
> Click to follow
> Click to follow
Latest Post 4 years ago by
| Oldest posts shown first (Show Newest First) | (Print Booklet) |
📝 Milford Star
5 years ago by 🇬🇧 Elsrickle ( Warrant Officer)
Warrant Officer)✧ 10 Views · 4 Likes · 3 Comments
Flag
💬 Add Comment
Hi guys I thought I would try to do a blog on the Caldercraft Milford Star I am building. As a retired maintenance electrician I had to have something to occupy my time and always fancied model boats. So am now in the second year of my model boat apprenticeship.
All advice and comments are welcome as some mistakes will be made along the road.
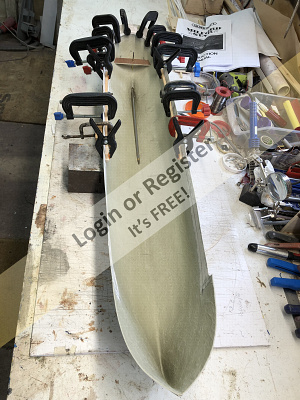
I have started by coating the inside of the hull with body filler and smoothing down. This should give the deck support a better grip, and easier to do now than when the deck is in position for smooth bulkheads.Have fitted extra support to rudder shaft and longer prop shaft to get motor more central.
Will also be doing other extras as I go along.
Especially with all the hull space just asking to be filled.
All advice and comments are welcome as some mistakes will be made along the road.
I have started by coating the inside of the hull with body filler and smoothing down. This should give the deck support a better grip, and easier to do now than when the deck is in position for smooth bulkheads.Have fitted extra support to rudder shaft and longer prop shaft to get motor more central.
Will also be doing other extras as I go along.
Especially with all the hull space just asking to be filled.
▲
⟩⟩
RNinMunich
Rookysailor
MouldBuilder
Martin555
|
💬 Re: Milford Star
5 years ago by 🇬🇧 Elsrickle (
Warrant Officer)✧ 7 Views · 1 Like
Flag
Did check out and can fit batteries ok will show when battery boxes go in
▲
⟩⟩
Martin555
|
|
Login To
Remove Ads 💬 Re: Milford Star
5 years ago by 🇬🇧 Rookysailor (
 Commodore) Commodore)✧ 8 Views · 2 Likes
Flag
Hi Elsrickle, Nice choice of boat, have built the Caldercraft Sir Kay, which I believe is the same hull as the Milford Star. Be careful of moving the motor forward, I believe the short prop tube is so the motor can make more room for batteries, Caldercraft are pretty good on their instructions.😐
Cheers, Peter (Rooky) ▲
⟩⟩
RNinMunich
Martin555
|
|
💬 Re: Milford Star
5 years ago by 🇬🇧 Martin555 (
 Fleet Admiral) Fleet Admiral)✧ 7 Views · 1 Like
Flag
You are off to a good start Elsrickle,
already looking forward to the next instalment. keep up the good work. I will be following your build log with great interest. Martin555. ▲
⟩⟩
Rookysailor
|
Login To
Remove Ads
Remove Ads
📝 Hull &Deck
5 years ago by 🇬🇧 Elsrickle ( Warrant Officer)
Warrant Officer)✧ 9 Views · 3 Likes · 5 Comments
Flag
💬 Add Comment
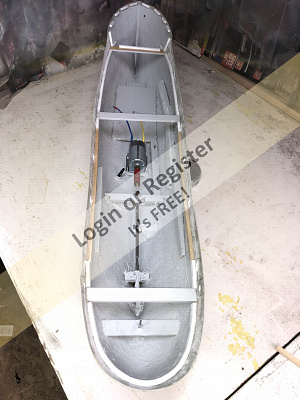
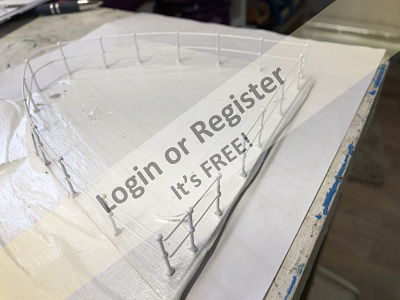
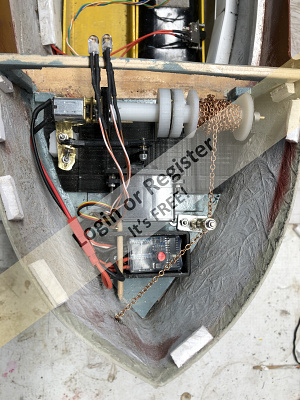
Now got motor mounted am using a five pole, speed will be fast enough and these motors run quieter better to hear sound generator. Have put in supports for extra fittings, also added some cross pieces just to stiffen up the hull. Cut out the holes in bulwarks for doors and added two extra at stern for bollards. Base is also fitted for battery boxes with a piece of 50x6mm flat bar for ballast will add more at later stage if required. Drilled and fitted the intake for the cooling water. (Caused a bit of bother when checking out water line for ballast. Had the deck on with all the parts spread on deck didn’t need any ballast, till I found a lot of water ballast. Forgot to seal the input pipe.oh dear!!) Have fitted a piece of trunking along the side for the cables.
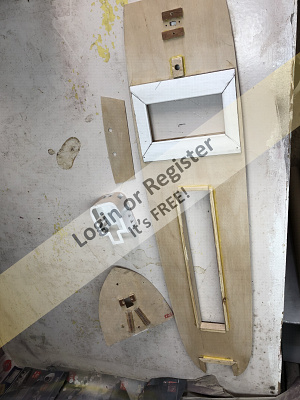
Decks fitted out. Bow piece has 2 plastic tubes 5mm I/d fitted to hold leds for interior lighting with hole out at anchor winch for access to lights two blocks with inserts for fastening down winch.
Wheelhouse also cut at bottom as going to be removable for access to lamps etc.
White plastic on deck is for holding battery cover in place. Cutout for power on/off switch and a bit of extra support for forward mast also extra support on stern as that is for sound loudspeaker.
▲
⟩⟩
MouldBuilder
Rookysailor
Martin555
|
💬 Re: Hull &Deck
5 years ago by 🇬🇧 Elsrickle (
Warrant Officer)✧ 7 Views · 1 Like
Flag
Think it’s the photo when the deck sits on it is a nice fit all round
▲
⟩⟩
Martin555
|
|
Login To
Remove Ads 💬 Re: Hull &Deck
5 years ago by 🇬🇧 Rookysailor (
Commodore)✧ 8 Views · 2 Likes
Flag
See what you mean Doug, a good optimum delusion!😁
▲
⟩⟩
Martin555
RNinMunich
|
|
💬 Re: Hull &Deck
5 years ago by 🇩🇪 RNinMunich (
Fleet Admiral)✧ 8 Views · 2 Likes
Flag
Yep, it's an optical delusion Peter.
Magnify the pic (Right mouse key --> View Image --> +) and it looks OK 😉 😎 ▲
⟩⟩
Martin555
Rookysailor
|
|
💬 Re: Hull &Deck
5 years ago by 🇬🇧 Rookysailor (
Commodore)✧ 7 Views · 1 Like
Flag
Hi Elsrickle, In photo 1, it looks as if the front cross beam is pulling in the bulwarks, or is it a optical delusion?😐
Cheers, Peter ▲
⟩⟩
Martin555
|
|
💬 Re: Hull &Deck
5 years ago by 🇬🇧 Martin555 (
Fleet Admiral)✧ 7 Views · 1 Like
Flag
Good work Ian,
Forgot to seal the input pipe Tut! Tut! She is coming along nicely. Keep up the good work. Martin555. ▲
⟩⟩
Rookysailor
|
📝 Deck Fittings
5 years ago by 🇬🇧 Elsrickle ( Warrant Officer)
Warrant Officer)✧ 9 Views · 3 Likes · 1 Comment
Flag
💬 Add Comment
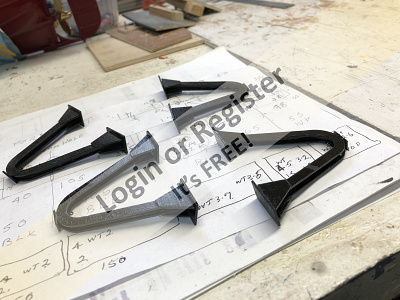
Have decided rather than the follow the instruction to build each section. I am going to build most of the deck fittings before going further in the build. Some of the instruction are a bit vague and the drawing is not to scale, it will be easier to place items if already assembled. Have also made the small steps for access to superstructure from the deck as the drawing does not show any. Made with some old railing wire and plastic card chequered plate. Saw them on an old photo of the Sir Lancelot which was of the same class. Have fitted smoke generator in funnel and also fitted 2mm studs on base of funnel for better fixing to superstructure. The funnel is made from plastic drain pipe same diameter as the styrene pieces. The loudspeaker box will be fitted in the stern below the wooden slats where the ships boat sits this one is for the steam sound generator. As I didn’t like the printed sheets for fish pond and hatches have made them from strips of walnut and lime wood the same with the trawl boards. Fishpond will also be used as battery cover and front hatch will be the removable cover for the power on/off switch, the superstructure hatch is the cover over the steam whistle loudspeaker which will be fitted in the superstructure.


▲
⟩⟩
MouldBuilder
jbkiwi
Martin555
|
💬 Re: Deck Fittings
5 years ago by 🇬🇧 Martin555 (
Fleet Admiral)✧ 6 Views · 0 Likes
Flag
I have done the same in the past, I have skipped sections and done some of the detail work just to keep me from getting bogged down with the same old same old feeling.
The only problem is keeping track of what you have or have not done, or maybe it's just me.LOL!! Martin555. ▲
⟩⟩
No likes yet
This member will receive 1 point for every like received |
📝 Deck Fittings 2
5 years ago by 🇬🇧 Elsrickle ( Warrant Officer)
Warrant Officer)✧ 9 Views · 3 Likes · 1 Comment
Flag
💬 Add Comment
Have continued with deck fittings.power switch fitted in deck and front hatch made to hide switch. Fish pond, hatch, trawl boards, winch and stern duck boards all completed and varnished. Bow railings made on template and painted as well as funnel and side gallows also completed. Water tanks have made on printer get nice rectangle cubes to size and painted ready for fittings.


▲
⟩⟩
marky
Martin555
jbkiwi
|
💬 Re: Deck Fittings 2
5 years ago by 🇬🇧 Martin555 (
Fleet Admiral)✧ 7 Views · 1 Like
Flag
Very nice indeed.
It's the detail work that people see is the most time consuming and rewarding part of the build. You are doing a fantastic job keep it up. Martin555. ▲
⟩⟩
Rookysailor
|
📝 Electronics
5 years ago by 🇬🇧 Elsrickle ( Warrant Officer)
Warrant Officer)✧ 9 Views · 3 Likes · 2 Comments
Flag
💬 Add Comment
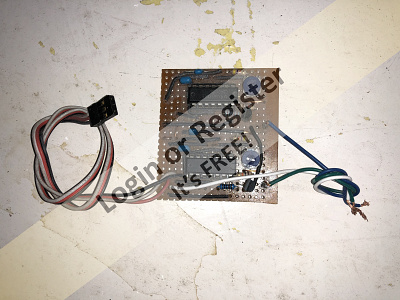
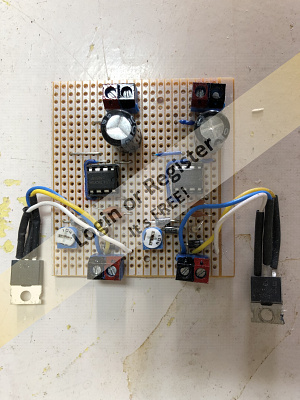
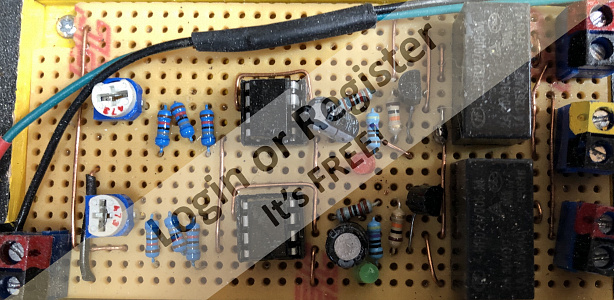
First photo is an attiny IC kindly made and programmed for me by martin 555 to send a message in Morse code from the Morse signal lamp. Commenced building various vero boards circuits, from left after martin’s IC the first is the two unequal cycle timers for the d/f and Morse light. Second is the variable voltage controller for water pump and direction finder. Third is switching controller on throttle to bring on d/f, water pump and smoke generator. Fourth is a voltage regulator three of them two 6volts for lights and smoke generator and one 5volts for Morse lamp. Fifth is unequal cycle timer to simulate flickering boiler fire working with smoke generator, (Tried flickering leds but not happy with them). Also have a quad switch for lights and single switch for horn from action electronics. Unable to find that type of circuit to build so had to buy them.


▲
⟩⟩
RNinMunich
MouldBuilder
Martin555
|
💬 Re: Electronics
5 years ago by 🇭🇺 MouldBuilder (
 Vice Admiral) Vice Admiral)✧ 7 Views · 1 Like
Flag
Photo sorting would be really helpful. This sorting that happens now seems to pick the most boring picture as the post header.
▲
⟩⟩
Martin555
|
|
💬 Re: Electronics
5 years ago by 🇬🇧 Elsrickle (
Warrant Officer)✧ 8 Views · 2 Likes
Flag
Sorry guys photos went out of sequence when I posted
▲
⟩⟩
MouldBuilder
Martin555
|
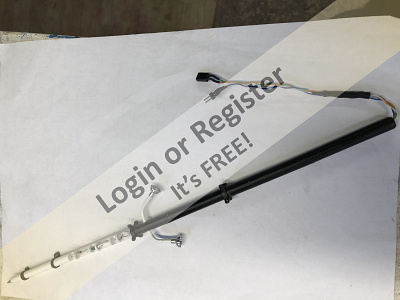
📝 D/Finder, Water Pump
5 years ago by 🇬🇧 Elsrickle ( Warrant Officer)
Warrant Officer)✧ 11 Views · 5 Likes · 2 Comments
Flag
💬 Add Comment
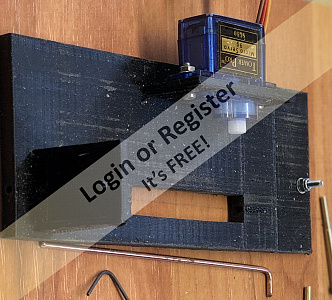
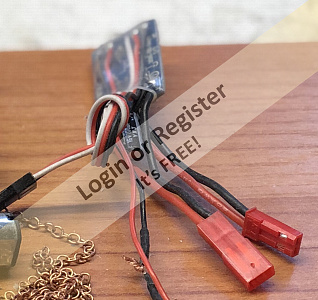
Direction finder built and working. Brass part of linkage should me on photo5, the motor used was small geared 30rpm motor with speed controlled by preset voltage reducer on veroboard third photo. Video of d/f running on test. Second photo of pump support and fourth photo of pump fitted in position. Have changed original voltage controller not happy with operation. So now fitted a 5 volt regulator to supply a small esc connected to the throttle control. This gives me a trickle of water out on start and a progressive increase in flow as propellor speeds up. Am busy now on the last working addition trying to make an anchor winch with a free flow drop and rewind up. Should be done for next week hopefully, then on to the lighting system.


▲
⟩⟩
RNinMunich
jbkiwi
marky
MouldBuilder
Martin555
|
💬 Re: D/Finder, Water Pump
5 years ago by 🇳🇿 jbkiwi (
Fleet Admiral)✧ 7 Views · 1 Like
Flag
Looking good!, nice to get bits working.
JB ▲
⟩⟩
Martin555
|
|
💬 Re: D/Finder, Water Pump
5 years ago by 🇬🇧 Martin555 (
Fleet Admiral)✧ 6 Views · 0 Likes
Flag
I like the working D/F Loop in the video, that's is nice work.
I am looking forward to seeing your future log updates. Your Milford Star is coming together nicely. keep up the good work. Martin555. ▲
⟩⟩
No likes yet
This member will receive 1 point for every like received |
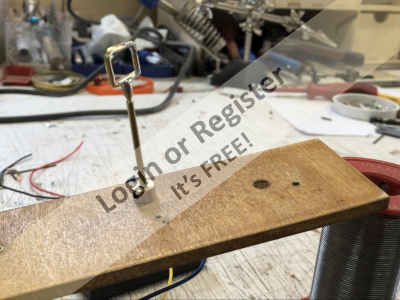
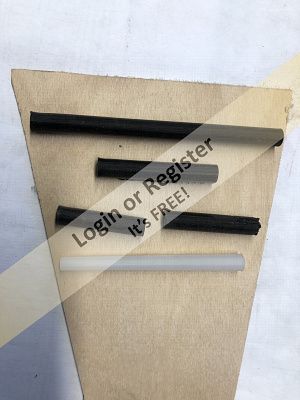
📝 Mast lights
4 years ago by 🇬🇧 Elsrickle ( Warrant Officer)
Warrant Officer)✧ 12 Views · 2 Likes
Flag
💬 Add Comment
As I wanted to install lights in foremast and had trouble trying to drill the centre of the doweling in one piece. I decided to try a hollow section mast. This is in five sections with 4mm thin brass tubing a firm push fit. The length of these sections was determined by where the mast rings are positioned. Which enabled the joints to be hidden.The mast rings are glued only on the top side of the ring and a strengthener fitted below the deck to hold the mast in position. Lights are fitted and wired through the sections one wire used for ovolt of mast lights and one wire used for ovolt of deck lights. Wiring has two plugs at end for connecting to main cabling under the deck. The mast is then assembled and when installed all the rigging at the various rings will hold the mast firmly in position. This style of fitting means the mast can always be removed for lamp replacement if required. Although I made the mast on my printer it could always be done this way using short pieces of doweling which are easier to drill though the centre.
▲
⟩⟩
jbkiwi
Martin555
📝 Anchor Winch
4 years ago by 🇬🇧 Elsrickle ( Warrant Officer)
Warrant Officer)✧ 14 Views · 4 Likes · 2 Comments
Flag
💬 Add Comment
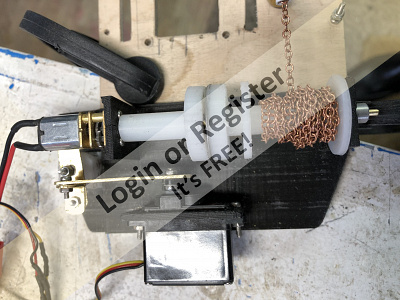
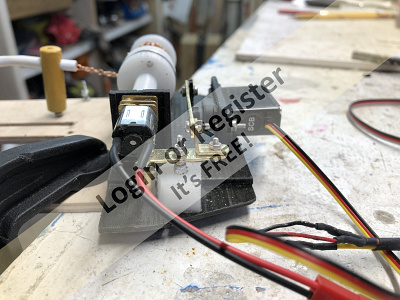
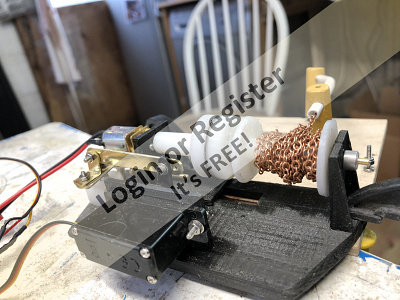
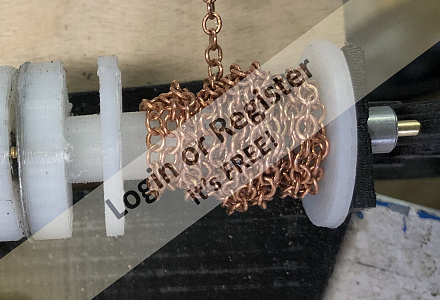
This is now the the mark six version(previous versions scrapped) after various attempts I found the use of magnets for the clutch the most reliable. The drum with the chain has a metal disc made from top of soup tin as this was thin and light, superglued to drum with a small brass nail in to give extra security. A brass rod going through the chain drum also protrudes through into the drive drum for a short distance top keep things in alignment. A brass ring is also soldered to the brass rod to keep chain drum in firm position, the drive drum is also recessed for this ring enabling magnets to close up to metal ring. The servo is used to disengage the magnet allowing the anchor to free fall in lower position servo neutral position brings magnet back to chain drum holding anchor taut then when the servo is push forward it only slides on linkage and the motor turns to raise the anchor. The motor is a small geared motor of about 100 rpm and has a esc fitted for better control when inching home the anchor. Both magnet and servo I operate from tx stick. Care has to be taken to get the adjustment on the linkage correct and the chain drum must spin very freely. I also had to change the servo to a 3kg servo to beat the magnet pull and fit ball joints on linkage for better adjustment. My anchor was 4grams and that seemed the lightest the drum would move freely with. However the motor can lift 40 grams as that what I tested the lift at. Also did 100 non stop free fall drops and lifts to check reliability and everything was firm after my test.
▲
⟩⟩
jbkiwi
Graham93
Martin555
RNinMunich
|
💬 Re: Anchor Winch
4 years ago by 🇳🇿 jbkiwi (
Fleet Admiral)✧ 11 Views · 1 Like
Flag
Re- This is now the the mark six version
Very ingenious! JB ▲
⟩⟩
Martin555
|
|
💬 Re: Anchor Winch
4 years ago by 🇩🇪 RNinMunich (
Fleet Admiral)✧ 11 Views · 1 Like
Flag
Excellent Elsrickle,👍👍👍
By far the simplest solution I have seen yet, but elegant and very effective. Well done and many thanks for sharing. Gonna try this on my destroyer. Got a few of those little geared motors kicking about. Same principle could also be used for the depth charge cranes and boat davits😁 Cheers, Doug 😎 ▲
⟩⟩
Martin555
|
📝 Anchor in boat
4 years ago by 🇬🇧 Elsrickle ( Warrant Officer)
Warrant Officer)✧ 14 Views · 4 Likes · 8 Comments
Flag
💬 Add Comment
Here is video of anchor working from boat. Couldn’t get the two videos in same blog.
▲
⟩⟩
jbkiwi
Martin555
RNinMunich
figtree7nts
|
💬 Re: Anchor in boat
4 years ago by 🇬🇧 Elsrickle (
Warrant Officer)✧ 12 Views · 2 Likes
Flag
Haven’t tried anything like that. But need to watch it might also slip when lifting the anchor if it has to pull through weed or anything while raising the anchor. I watch as it comes up as with the speed controller you can creep the anchor as soon as it’s in sight.
Elsrickle ▲
⟩⟩
Martin555
jbkiwi
|
|
Login To
Remove Ads 💬 Re: Anchor in boat
4 years ago by 🇬🇧 Elsrickle (
Warrant Officer)✧ 11 Views · 1 Like
Flag
Hi will give a more detailed story soon just looking out some old bits to photo to help explain better
Elsrickle ▲
⟩⟩
Martin555
|
|
💬 Re: Anchor in boat
4 years ago by 🇳🇿 jbkiwi (
Fleet Admiral)✧ 11 Views · 1 Like
Flag
Brilliant system. I was wondering if you could fit a round magnet the diam of the drum, and set it up to act as a safety 'clutch' to slip if you went past the stopping point (if it doesn't work like that now), to avoid putting strain on/stalling the motor etc ? Pic is just to show type I mean.
JB 
▲
⟩⟩
Martin555
|
|
💬 Re: Anchor in boat
4 years ago by 🇬🇧 Martin555 (
Fleet Admiral)✧ 10 Views · 0 Likes
Flag
As you have just posted your winch here i would carry on with the detailed explanation here too.
Martin555. ▲
⟩⟩
No likes yet
This member will receive 1 point for every like received |
|
💬 Re: Anchor in boat
4 years ago by 🇬🇧 Elsrickle (
Warrant Officer)✧ 11 Views · 1 Like
Flag
Hi guys will try and explain it in more detail will I keep it here or post in another area
▲
⟩⟩
Martin555
|
|
💬 Re: Anchor in boat
4 years ago by 🇭🇺 MouldBuilder (
Vice Admiral)✧ 11 Views · 1 Like
Flag
Very impressive.
I agree with Martin, it would be great if you could add additional details. Thanks. Peter.😀 ▲
⟩⟩
Martin555
|
|
💬 Re: Anchor in boat
4 years ago by 🇬🇧 Martin555 (
Fleet Admiral)✧ 11 Views · 1 Like
Flag
Definitely the best free fall Anchor winch system i have seen.
Excellent work. Is it possible to give a more in-depth article of the making and operating system ? Martin555. ▲
⟩⟩
MouldBuilder
|
|
💬 Re: Anchor in boat
4 years ago by 🇺🇸 figtree7nts (
 Admiral) Admiral)✧ 11 Views · 1 Like
Flag
Hi Elsricle,
Very good, With the working anchor! Cheers, Ed ▲
⟩⟩
Martin555
|
📝 Winch detail
4 years ago by 🇬🇧 Elsrickle ( Warrant Officer)
Warrant Officer)✧ 15 Views · 5 Likes · 2 Comments
Flag
💬 Add Comment
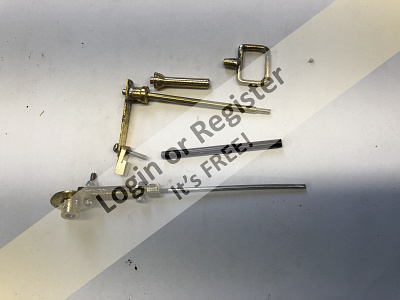
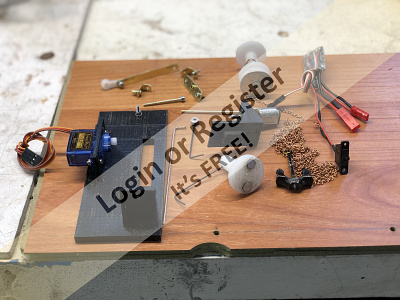
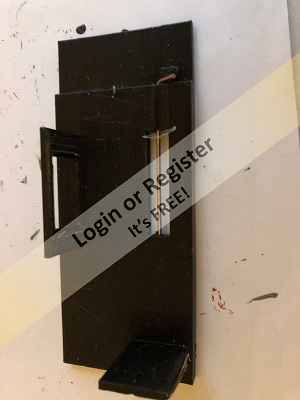
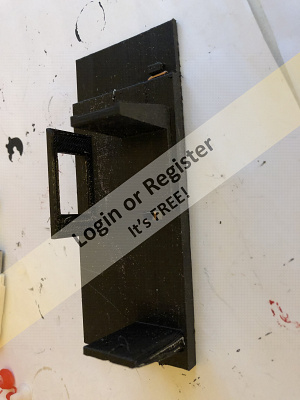
As you can see this is made mostly with printer but am sure could be made with wood or plastic. The base has a slot 8mm wide by 5mm thick a hole 1.8mm goes through it and the sliding motor mount 1.5mm wire is used as guide and holds the mount in place the wire is also held in position with the small keeper block. The mount must be able to slide freely with no tight spots. Pictures show wire in base and on mount.
Next chain drum and drive disc have 2.1mm hole all the way through for 2mm brass shaft the 3mm hole drill 10mm deep in drive drum at motor end. The motor then gets fitted on sliding platform. On drive drum face drill 2 holes 6mm Dia and 3mm deep, 180 degs apart for magnets. These are then glued in with a bed of epoxy adhesive as in photo, where the 2mm shaft goes through drill a recess 5mm Dia and 2mm deep for cable drum retaining ring. Also drill a hole 1.5mm Dia about 5mm from end of motor side of drum and tap for M2 grub screw for holding motor shaft. Now fix drum on to motor.
At chain drum side cut a thin piece of tin and glue to face of drum this I used super glue and a mall brass nail fitted for a bit of extra security as in photo. Two 1mm holes drilled through the centre length of the drum very close to the outside diameter and clear of centre shaft. A piece of copper wire can be fed through one hole the chain link fed through the copper wire and the wire is fed through the other hole then the two twisted together or soldered to hold chain in centre of drum.
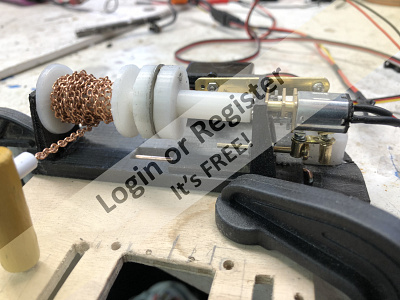
Now 2mm brass rod is pushed through the drum ( I fitted 2 x 2mm flat washers at this point between mounting bracket and chain drum to ensure the drum did not rub on bracket) making sure sure the drum spins very freely the rod is pushed through the hole in the motor drum until it meets the motor shaft then push hard to slide the motor to end stop. Now slowly push motor forward towards the chain drum (fully open gap between drum 7-10mm) when fully home fit holding sleeve on brass rod at outside of bracket and tighten grub screw this should give the correct length for rod. Now push motor back to end and make sure shaft is still in motor drum. If not adjust until it is still in shaft Next push chain drum back against washers and shaft pushed towards motor make a saw cut in brass rod to mark drum position now remove shaft and make a brass ring to fit tightly on saw cut on shaft and solder then clean all solder from chain drum side of shaft refit and check drum still runs freely adjust as required when sure cut off brass rod as photo
The base I made is 120 x 50mm x 5mm, chain drum 30mm x 25mm Dia, mountings were 28mm high x20mm wide. Will continue with linkage setup next. Any questions or ideas please feel free to let me know.


Next chain drum and drive disc have 2.1mm hole all the way through for 2mm brass shaft the 3mm hole drill 10mm deep in drive drum at motor end. The motor then gets fitted on sliding platform. On drive drum face drill 2 holes 6mm Dia and 3mm deep, 180 degs apart for magnets. These are then glued in with a bed of epoxy adhesive as in photo, where the 2mm shaft goes through drill a recess 5mm Dia and 2mm deep for cable drum retaining ring. Also drill a hole 1.5mm Dia about 5mm from end of motor side of drum and tap for M2 grub screw for holding motor shaft. Now fix drum on to motor.
At chain drum side cut a thin piece of tin and glue to face of drum this I used super glue and a mall brass nail fitted for a bit of extra security as in photo. Two 1mm holes drilled through the centre length of the drum very close to the outside diameter and clear of centre shaft. A piece of copper wire can be fed through one hole the chain link fed through the copper wire and the wire is fed through the other hole then the two twisted together or soldered to hold chain in centre of drum.
Now 2mm brass rod is pushed through the drum ( I fitted 2 x 2mm flat washers at this point between mounting bracket and chain drum to ensure the drum did not rub on bracket) making sure sure the drum spins very freely the rod is pushed through the hole in the motor drum until it meets the motor shaft then push hard to slide the motor to end stop. Now slowly push motor forward towards the chain drum (fully open gap between drum 7-10mm) when fully home fit holding sleeve on brass rod at outside of bracket and tighten grub screw this should give the correct length for rod. Now push motor back to end and make sure shaft is still in motor drum. If not adjust until it is still in shaft Next push chain drum back against washers and shaft pushed towards motor make a saw cut in brass rod to mark drum position now remove shaft and make a brass ring to fit tightly on saw cut on shaft and solder then clean all solder from chain drum side of shaft refit and check drum still runs freely adjust as required when sure cut off brass rod as photo
The base I made is 120 x 50mm x 5mm, chain drum 30mm x 25mm Dia, mountings were 28mm high x20mm wide. Will continue with linkage setup next. Any questions or ideas please feel free to let me know.
▲
⟩⟩
jbkiwi
MouldBuilder
Martin555
Graham93
RNinMunich
|
💬 Re: Winch detail
4 years ago by 🇬🇧 Elsrickle (
Warrant Officer)✧ 14 Views · 1 Like
Flag
Thanks glad you enjoyed it
Ian ▲
⟩⟩
Martin555
|
|
💬 Re: Winch detail
4 years ago by 🇬🇧 Martin555 (
Fleet Admiral)✧ 10 Views · 0 Likes
Flag
That is a very clever and well though out system.
Excellent work Ian. Martin555. ▲
⟩⟩
No likes yet
This member will receive 1 point for every like received |


Login To
Remove Ads
Remove Ads