Join Us On Social Media!

|

|

|
Download The App!
Login To
Remove Ads
Remove Ads
Login To
Remove Ads
Remove Ads
Model Boats Website
Robbe PT15 cabin and bridge..from scratch...
14 Posts · 5 Followers · 68 Photos · 73 Likes
Began 4 years ago by
 United States
Follow This Thread
Not currently following
> Click to follow
> Click to follow
Latest Post 4 years ago by
| Oldest posts shown first (Show Newest First) | (Print Booklet) |
📝 Robbe PT15 cabin and bridge..from scratch...
4 years ago by 🇺🇸 Cashrc ( Vice Admiral)
Vice Admiral)✧ 8 Views · 4 Likes · 5 Comments
Flag
💬 Add Comment
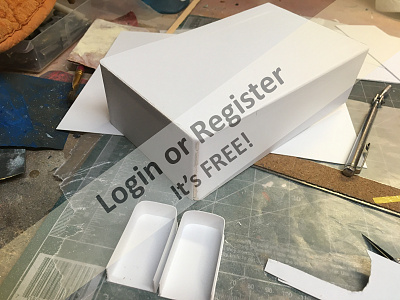
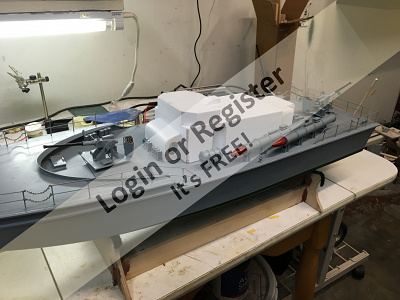
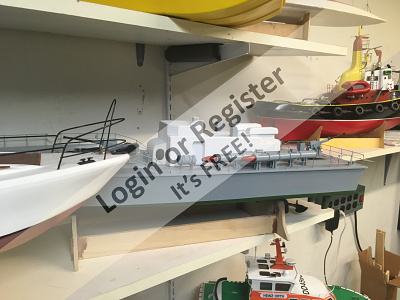
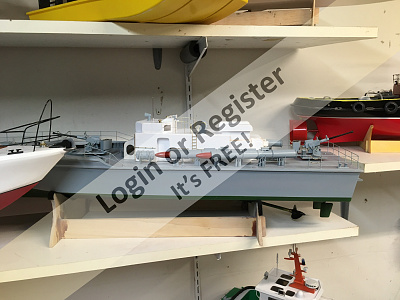
Hi everybody. Y’all remember the “fun” I had about 2 months ago, with the SAR motor issue and the loss of the PT15’s cabin and bridge? Well, I’ve got the SAR fixed, retrofitted a 3530 1700 kv outrunner and a much better coupling, and she runs smooth and cool. So...I decided to go ahead and do some updates and maintenance to my other boats in the fleet, which led me to the PT..I decided to start building the superstructure and get her back in the water. I worked too hard on her to let her sit around and gather dust.
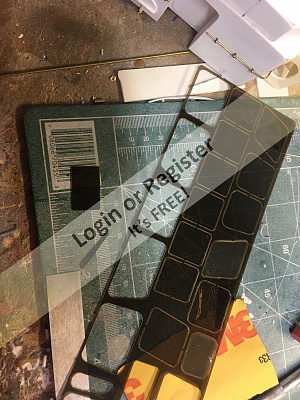
I bought a pack of styrene sheet in various thicknesses, and ordered some sundry items that will be needed from Cornwall Model Boats. While I’m waiting for those I decided to start cutting plastic.
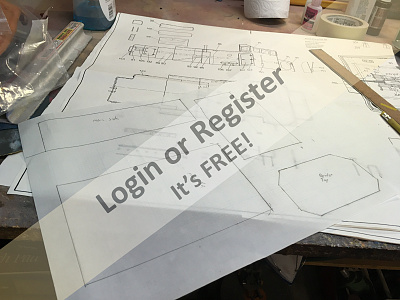
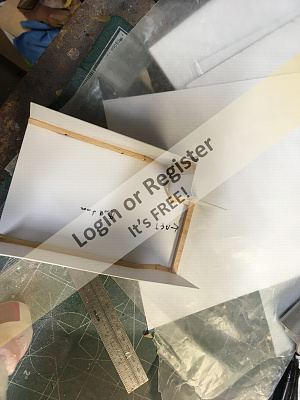
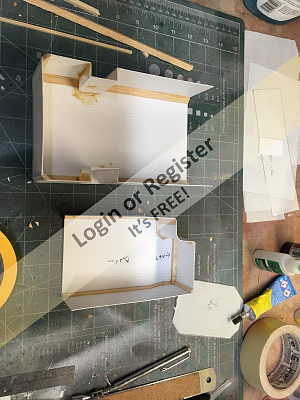
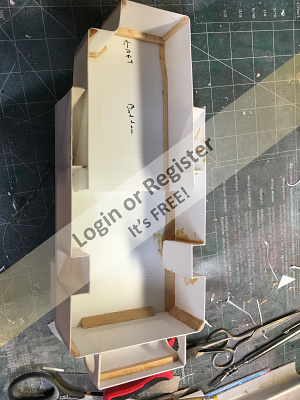
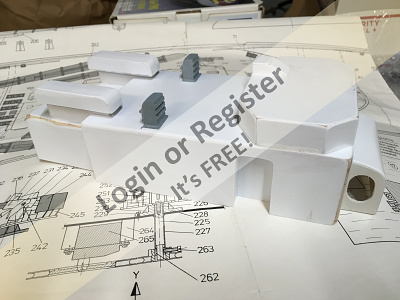
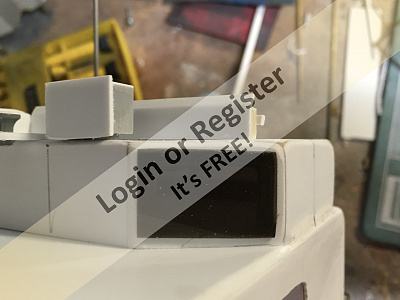
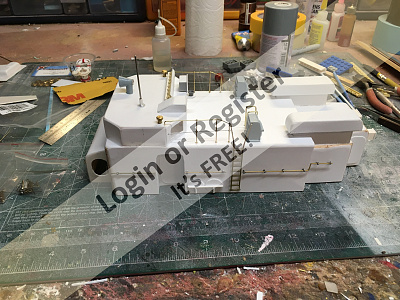
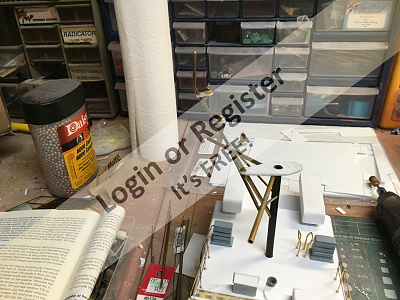
Now, the original structure was comprised of 2 main moldings, some detail moldings, and of course built up detail parts and fittings. All that is at the bottom of the lake, and this boat is way the heck out of production, so I had no choice but to build it up from sheet. Luckily I kept my plans. I traces what I needed to get started from the plans and cut templates. Then I cut my sides and tops.i built the main cabin first. I’m using balsa stock at the joints to allow me to sand a decent radius in the finished cabin(s) as the original had a slight radius at most corners. I also had to build up the entry “buckets” as they were molded parts too.
I got the main cabin built last night, and the sub/aft cabin tonight. I think it looks okay for now, need to finish some sanding and then join the two halves together with a bulkhead and ramps as the original. Still have to do the bridge, the original bridge was molded with the lower main cabin as a unit, and that entire section was molded from tinted clear plastic, you masked off the windows and shot it with paint. I’m going to have to build the bridge as a separate part and glue it on. If I decide to do clear windows, I’ll have to cut the openings, paint the cabin and then glaze the windows before gluing it on, then mask the openings when I paint the final assembly, as I’ll have no access to the inside of the bridge once it’s glued in place. Alternatively, I can just paint the whole thing and paint the windows as they were pretty dark to begin with. I’ll make that decision in a few days, but I’m leaning towards glazed windows as I think it’ll be worth the effort.
Take a look tell me what y’all think, this is my first time scratch building anything in plastic.

I bought a pack of styrene sheet in various thicknesses, and ordered some sundry items that will be needed from Cornwall Model Boats. While I’m waiting for those I decided to start cutting plastic.
Now, the original structure was comprised of 2 main moldings, some detail moldings, and of course built up detail parts and fittings. All that is at the bottom of the lake, and this boat is way the heck out of production, so I had no choice but to build it up from sheet. Luckily I kept my plans. I traces what I needed to get started from the plans and cut templates. Then I cut my sides and tops.i built the main cabin first. I’m using balsa stock at the joints to allow me to sand a decent radius in the finished cabin(s) as the original had a slight radius at most corners. I also had to build up the entry “buckets” as they were molded parts too.
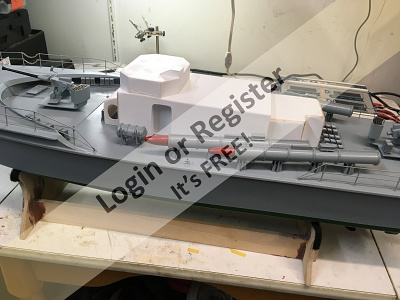
I got the main cabin built last night, and the sub/aft cabin tonight. I think it looks okay for now, need to finish some sanding and then join the two halves together with a bulkhead and ramps as the original. Still have to do the bridge, the original bridge was molded with the lower main cabin as a unit, and that entire section was molded from tinted clear plastic, you masked off the windows and shot it with paint. I’m going to have to build the bridge as a separate part and glue it on. If I decide to do clear windows, I’ll have to cut the openings, paint the cabin and then glaze the windows before gluing it on, then mask the openings when I paint the final assembly, as I’ll have no access to the inside of the bridge once it’s glued in place. Alternatively, I can just paint the whole thing and paint the windows as they were pretty dark to begin with. I’ll make that decision in a few days, but I’m leaning towards glazed windows as I think it’ll be worth the effort.
Take a look tell me what y’all think, this is my first time scratch building anything in plastic.
▲
⟩⟩
Joe727
MouldBuilder
RNinMunich
Martin555
|
💬 Re: Robbe PT15 cabin and bridge..from scratch...
4 years ago by 🇺🇸 Cashrc (
Vice Admiral)✧ 5 Views · 1 Like
Flag
Thank you!!
▲
⟩⟩
Martin555
|
|
Login To
Remove Ads 💬 Re: Robbe PT15 cabin and bridge..from scratch...
4 years ago by 🇺🇸 Cashrc (
Vice Admiral)✧ 5 Views · 1 Like
Flag
I’m using CA for the wood to styrene. I scuff the plastic at the joint to promote bonding. I’ll probably strengthen some of the joints with Stabilit.
Cash ▲
⟩⟩
Martin555
|
|
💬 Re: Robbe PT15 cabin and bridge..from scratch...
4 years ago by 🇭🇺 MouldBuilder (
Vice Admiral)✧ 5 Views · 2 Likes
Flag
Super job Cash.👍
▲
⟩⟩
Cashrc
Martin555
|
|
💬 Re: Robbe PT15 cabin and bridge..from scratch...
4 years ago by 🇩🇪 RNinMunich (
 Fleet Admiral) Fleet Admiral)✧ 5 Views · 2 Likes
Flag
I reckon that's pretty damn good Cash👍
Especially for a first effort with plasticard. Reminds me of the way I built the superstructure for my H class destroyer all those years ago. 0.5mm ply and 3mm square section obeche stiffeners back then, but the method was exactly the same😉 KUTGW. Looking forward to seeing PT15 back in action on the Red River Patrol. BTW: warn Lt jg Errol that the Fleet Admiral has his eye on him🤓 We don't like junior officers with ATTITUDE !!😠 Ten days reduced Catnip rations! Cheers, Fleet 😎 ▲
⟩⟩
Cashrc
Martin555
|
|
💬 Re: Robbe PT15 cabin and bridge..from scratch...
4 years ago by 🇬🇧 Martin555 (
Fleet Admiral)✧ 4 Views · 1 Like
Flag
Looking good cash,
What glue did you use to join the balsa wood to the plastic.? Martin555. ▲
⟩⟩
Cashrc
|
Login To
Remove Ads
Remove Ads
📝 I have my orders...
4 years ago by 🇺🇸 Cashrc ( Vice Admiral)
Vice Admiral)✧ 7 Views · 3 Likes
Flag
💬 Add Comment
LTjg Errol T Cat is pushing me to get this done, as the Texas Navy needs to have a patrol vessel for the night watch...I reminded him that I am the ranking officer, but all I got was this look.....🤣

▲
⟩⟩
Joe727
MouldBuilder
RNinMunich
📝 The Bridge
4 years ago by 🇺🇸 Cashrc ( Vice Admiral)
Vice Admiral)✧ 9 Views · 5 Likes · 3 Comments
Flag
💬 Add Comment
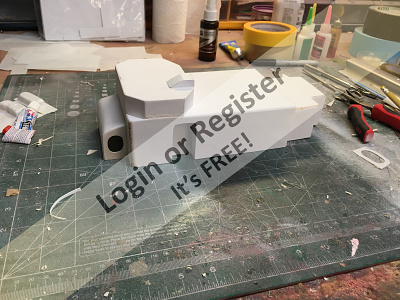
Got the bridge built tonight, took about 2 hours of cutting, fiddling, sanding, cursing and gluing.😁 need to finish sand everything then assemble the superstructure, plus add the fwd entryway thingy that goes on the front of the main structure. Once all that is done it’s retime for fiddly bits.
I have determined that I’m not cutting out the windows. The originals were part of the entire molding, and that was a very dark tint, so in most light they were pretty close to opaque anyway. My SAR came with tinted windows that I didn’t use, and I THINK I kept them. If I can find them I’ll cut them down and glue on, or I’ll paint the windows a dark gray. There is a fine line between challenging and frustration...and I think once I cut the windows it would really weaken the bridge, so there’s that.
I have determined that I’m not cutting out the windows. The originals were part of the entire molding, and that was a very dark tint, so in most light they were pretty close to opaque anyway. My SAR came with tinted windows that I didn’t use, and I THINK I kept them. If I can find them I’ll cut them down and glue on, or I’ll paint the windows a dark gray. There is a fine line between challenging and frustration...and I think once I cut the windows it would really weaken the bridge, so there’s that.
▲
⟩⟩
jbkiwi
mturpin013
redpmg
Martin555
RNinMunich
|
💬 Re: The Bridge
4 years ago by 🇿🇦 redpmg (
 Commodore) Commodore)✧ 5 Views · 2 Likes
Flag
Hi Cash - looking great so far - doing very well for a first scratch build in styrene. Looks like the build will be as good as original. Re the windows - does not seem to be much point in having them unless you detail inside - you could add frames from fine styrene strip to add a bit more realism - and perhaps add a clear view ring in one from a piece of round tubing.
While looking through another site for something else came across a reference to a PT 15 Superstructure - lo & behold another case of lost superstructure and another scratch build - so its been a problem before. Unfortunately had to shut down and now cant remember which site - if its important can search again ▲
⟩⟩
Cashrc
Martin555
|
|
Login To
Remove Ads 💬 Re: The Bridge
4 years ago by 🇺🇸 Cashrc (
Vice Admiral)✧ 6 Views · 2 Likes
Flag
Yeah Doug I see your point. But, I know my limitations, and to be quite honest, I’m surprised it looks as good as it does.
There might be a workaround to this whole thing however. Got ideas, y’know😁 Oh...about the magnets. I used craft store magnets that obviously were not up to the task. Also, I may have not had the right size to begin with. That’s another thing I’m going to re-engineer, along with getting the balance right. I think I know what my problem was, as this boat calls for 8 cells, and I was setting her up for 6 cells or 2 Lipos. She looked okay in the tub, but I’m pretty sure I need to add at least 3-4 ozs in the stern to keep her stern planted and stable. We’ll see. Cash ▲
⟩⟩
mturpin013
Martin555
|
|
💬 Re: The Bridge
4 years ago by 🇩🇪 RNinMunich (
Fleet Admiral)✧ 7 Views · 3 Likes
Flag
Meanwhile ... Back at the Blockhouse!😉
So far so good Cash👍 You know, I can understand your excuses .. er justification .. for not fitting proper windows but, if you're anything like me it will bug you in future, especially at the lakeside🤔 Can't see that the windows would substantially weaken that 'box' structure. Perhaps in fact the contrary? Surely just like a good weld in steel is stronger than the plate around it a plastic window 'welded' into the structure with the right solvent glue ought to strengthen rather than weaken. Just a thought. I still get one now and again😁 Cheers, Doug 😎 PS Don't forget the magnets this time!!😉 ▲
⟩⟩
Maurice
Martin555
Joe727
|
📝 Superstructure assembled
4 years ago by 🇺🇸 Cashrc ( Vice Admiral)
Vice Admiral)✧ 8 Views · 4 Likes · 2 Comments
Flag
💬 Add Comment
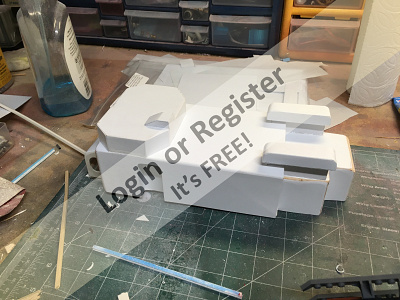
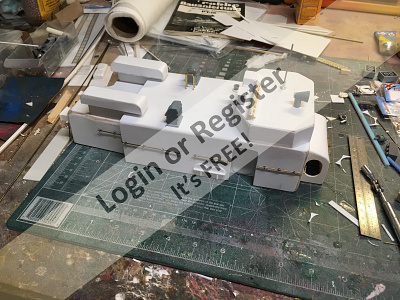
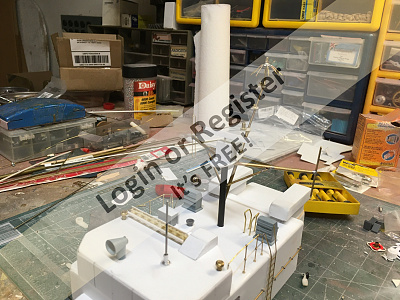
So, today I spent a little time in the shop and worked on the superstructure for the PT15. I had to make the bulkhead and ramps to fit the aft cabin into the forward cabin. Once I had that fitted to my satisfaction, I applied Stabilt Express to the top of the bulkhead and ramps, and about one third of the way down, and jigged the assembly on the deck. This way it would sit on the deck flush, and the glue wouldn’t travel all the way down to the deck, making a bonded mess. Worked almost perfect, got one little drip that pulled a dot of paint off but I can touch that up.
I built the forward entryway with 2 pieces of scrap plura and sheeted the top down to the deck with one thin piece of styrene, then glued it in place. I also found the dark brown tinted windows that came with my SAR, i used clear plastic in their stead on that boat, so I’m going to cut and shape them and glue them on the outside of the bridge. The original molding had the windows molded in such a way that they protruded slightly from the main part of the bridge, I’ll cut small openings to let some light shine through, and the externally amounted windows will look close to the original, and be easier to install. A little filling and sanding and it’s time to start some details.
Cash
▲
⟩⟩
Joe727
jbkiwi
redpmg
Martin555
|
💬 Re: Superstructure assembled
4 years ago by 🇺🇸 Cashrc (
Vice Admiral)✧ 5 Views · 1 Like
Flag
Thank you Martin.
▲
⟩⟩
Martin555
|
|
💬 Re: Superstructure assembled
4 years ago by 🇬🇧 Martin555 (
Fleet Admiral)✧ 4 Views · 1 Like
Flag
Looking good cash.
Martin555. ▲
⟩⟩
Cashrc
|
📝 Dance of the Fiddly Bits!!
4 years ago by 🇺🇸 Cashrc ( Vice Admiral)
Vice Admiral)✧ 18 Views · 7 Likes · 2 Comments
Flag
💬 Add Comment
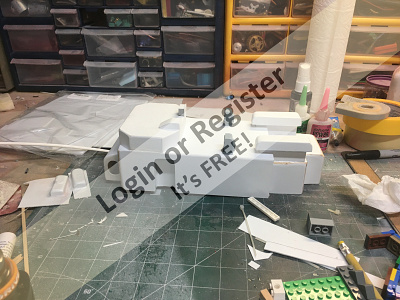
So, our county and the surrounding counties are under shelter or stay at home orders. One can go for a walk, walk the dog, etc, but no groups meetings and no gatherings, cinema, etc. Since I’m in an “essential business” (parts department auto dealer) I’m still working. However, I set my vacation up several months ago for this Wednesday till Tuesday next week. Fun. Lotsa fun. Plus, my daughters school has resorted to online class, and my wife is now working from home, and we’re driving the cats mad. They want their privacy back, I reckon. Anyway, built up some of the detail from plastic sheet, wood, legos and zip ties.
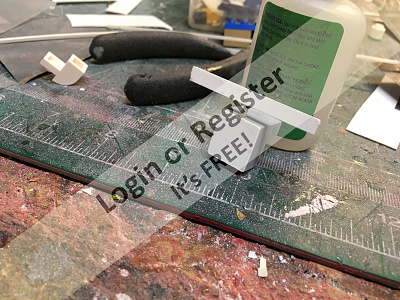
I did the exchangers or ventilators, not sure what they are to be honest, out of sheet styrene, and the mounts from styrene covered balsa. Those were fairly simple. The ventilators were another matter, as the ventilator grilles were molded fittings that are now out of production, with the closest set to me at the bottom of the lake making a good home for catfish. So, I razed my daughters old Legos, found a couple that were close in dimension to my original units, shaped them, sheeted the shapes side with sheet styrene. I then cut off the lugs, sanded, then made grilles from cut down tie wrap strip. Finished the rest of the detail with sheet and strip. Not exactly like my former units, but they look the part. I went ahead and gave them a quick coat of paint to see how they turned out, the installed them.
Cash
▲
⟩⟩
Escrich
redpmg
RNinMunich
jbkiwi
MouldBuilder
marky
Martin555
|
💬 Re: Dance of the Fiddly Bits!!
4 years ago by 🇬🇧 marky (
Commodore)✧ 12 Views · 2 Likes
Flag
Hi Cash ,
Great job ,you and your family stay safe (and the cats). Cheers Marky👍 ▲
⟩⟩
Cashrc
Martin555
|
|
💬 Re: Dance of the Fiddly Bits!!
4 years ago by 🇬🇧 Martin555 (
Fleet Admiral)✧ 12 Views · 1 Like
Flag
Hi cash,
It is surprising what you can make from Lego. You are doing a great job. Keep it up. Martin555. ▲
⟩⟩
Rookysailor
|
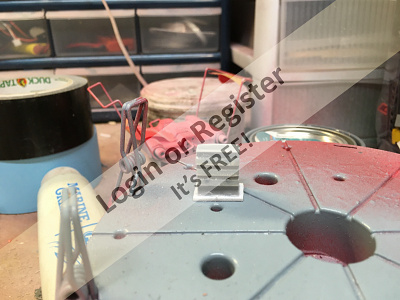
📝 More fiddly bits!
4 years ago by 🇺🇸 Cashrc ( Vice Admiral)
Vice Admiral)✧ 16 Views · 5 Likes · 2 Comments
Flag
💬 Add Comment
Hi y’all, real quick update. I modified a Robbe venturi vent into a hailer/speaker by sanding the bell down and installing a rivet into the rear, made the wind break from a modified LEGO, sheet styrene and styrene rod, added an antenna and made a few rails. My care package from Cornwall Model Boats arrived today with some stanchions, ladders and portholes, so I’m set. It’s wide open throttle from here on out!!😁
Cash
Cash
▲
⟩⟩
MouldBuilder
RNinMunich
jbkiwi
redpmg
Martin555
|
💬 Re: More fiddly bits!
4 years ago by 🇿🇦 redpmg (
Commodore)✧ 12 Views · 1 Like
Flag
When you have completed it Cash sure it will be hard to distinguish from the original - making a really good job of it.
Stay well away from your customers and please wear a mask & gloves - want to see more of your builds in future. ▲
⟩⟩
RNinMunich
|
|
💬 Re: More fiddly bits!
4 years ago by 🇬🇧 Martin555 (
Fleet Admiral)✧ 11 Views · 0 Likes
Flag
Hi cash,
That is really starting to look like the original. Well done. Martin555. ▲
⟩⟩
No likes yet
This member will receive 1 point for every like received |
📝 Attack of the Fiddly Bits!!
4 years ago by 🇺🇸 Cashrc ( Vice Admiral)
Vice Admiral)✧ 16 Views · 5 Likes · 4 Comments
Flag
💬 Add Comment
So, did a little more today, the escape hatches at the bottom of the superstructure and the side rails. I found that the mouthpiece of my vape mod was the exact diameter of the hatches, so I used it as a template.🤣
Hopefully I’ll have enough of the proper size of brass wire to do the upper rails or I might have to scavenge thru my unbuilt kit stash!! Can’t just bop on down to Hobby Lobby right now😮
Cash
Hopefully I’ll have enough of the proper size of brass wire to do the upper rails or I might have to scavenge thru my unbuilt kit stash!! Can’t just bop on down to Hobby Lobby right now😮
Cash
▲
⟩⟩
Joe727
marky
redpmg
Martin555
MouldBuilder
|
💬 Re: Attack of the Fiddly Bits!!
4 years ago by 🇺🇸 Cashrc (
Vice Admiral)✧ 12 Views · 1 Like
Flag
Hi Martin. Don’t know about scratch building right now, but I can see it happening in the course of time. However, I have 2 Deans Marines kits in my stash, a “Wacht Am Rhein” that I got in a trade, partially built but has quite a bit left to do, and a new “Canned Heat” PBR. Looking at the plans I can see where what I’ve done an learned so far will be a big help building those two kits.
Cadh ▲
⟩⟩
Martin555
|
|
Login To
Remove Ads 💬 Re: Attack of the Fiddly Bits!!
4 years ago by 🇬🇧 Martin555 (
Fleet Admiral)✧ 12 Views · 2 Likes
Flag
Hi Cash,
After you have completed this i can see you will be doing a lot more scratch building projects. Great work. Martin555. ▲
⟩⟩
Cashrc
marky
|
|
💬 Re: Attack of the Fiddly Bits!!
4 years ago by 🇺🇸 Cashrc (
Vice Admiral)✧ 15 Views · 4 Likes
Flag
Thanks!! The handrails were painted gray on the original. I had painted the bridge then painted each detail added as I installed them, or after. I had to touch up the bridge several times to correct scratches, etc from various installs. My reasoning now is to install everything that’s supposed to be gray now, with the exception of the mast, then give the structure several light coats, touch up where needed, then install the mast and other non gray components. Think it’ll come out better that way.
Cash ▲
⟩⟩
Joe727
marky
MouldBuilder
Martin555
|
|
💬 Re: Attack of the Fiddly Bits!!
4 years ago by 🇭🇺 MouldBuilder (
Vice Admiral)✧ 12 Views · 2 Likes
Flag
Really coming on well. Will you remove all of the handrails for painting.
Good job.😊 ▲
⟩⟩
Cashrc
Martin555
|
📝 Fiddly Bits on the Roof...(yeah, it’s a stretch)
4 years ago by 🇺🇸 Cashrc ( Vice Admiral)
Vice Admiral)✧ 17 Views · 7 Likes · 3 Comments
Flag
💬 Add Comment
Hi y’all. Last day of vacation back to work Tuesday, so I gotta as much done this morning as I could. Made some holes in the back part of the bridge, these will let some light shine thru the tinted windows I will install later. I did the aft ones as access will be limited by the rails and mast. I just did holes in the very back and rectangular cut outs in the aft sides. I was going to forego this and just paint or decal the windows, but someone ( cough,cough,FLEET! cough,cough) convinced me otherwise.🤣
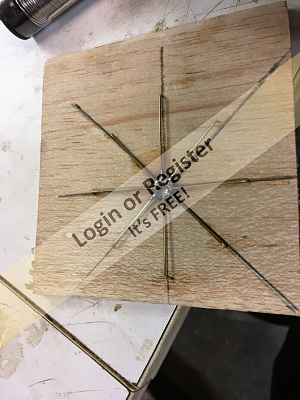
Anyway, got that done, then dug into my Cornwall care package and brought out the stanchions I ordered. They are Caldercraft units, look almost exactly like the originals, but the are just about a hair thinner, and the corresponding holes in the balls are smaller. Luckily I had some brass and piano wire the right size. I also ordered some ladder stock which I used. I loosely built up the rails, attached the stanchions and wires in their drilled holes, and made sure everything looked good before I ca’d the mess together. Where the upper rail, it down stanchion and ladder rail meet I soldered and put a drop of ca on to be safe. I then built and installed the two mushroom ventilators.
That’s almost it, save for a few things. Lights, mast, etc. a few things that aren’t supposed to be grey will be added last. I’m very close to the first coat of Tamiya AS26 grey, once that’s on I can judge what needs a little more sanding, filling, and touching up before the second coat. Think I’ll have her done by late next week.
Cash
▲
⟩⟩
mturpin013
RNinMunich
marky
redpmg
Martin555
Joe727
MouldBuilder
|
💬 Re: Fiddly Bits on the Roof...(yeah, it’s a stretch)
4 years ago by 🇩🇪 RNinMunich (
Fleet Admiral)✧ 12 Views · 2 Likes
Flag
Sorreeee!😔
😁😎 ▲
⟩⟩
Martin555
Cashrc
|
|
Login To
Remove Ads 💬 Re: Fiddly Bits on the Roof...(yeah, it’s a stretch)
4 years ago by 🇺🇸 Cashrc (
Vice Admiral)✧ 13 Views · 2 Likes
Flag
Fleet, sad to say I’ve not seen the posts the lifting problem was discussed. The Tamiya paints are a synthetic lacquer, I primered the hull don’t remember if I primered the superstructure. Only trouble I’ve had is some of the brass parts I had to redo originally, but I had decanted some of the spray paint and brushed it on. The whole thing will get several light coats of TS26 Tamiya after a light scuffing with 1000 grit. Might have to scrounge up another can of primer this week.
Cash PS...don’t know if the cabin can be lit as the bridge is solidly glued on and access...hm..wait, I could come in from underneath in the main structure....Doggone it Fleet you did it to me again🤣🤣🤣 PPS..”lifting process”...Bwahahaha!! I’ll keep that twixt you, me and the forum lest one of us limps for a while..😂 ▲
⟩⟩
Martin555
RNinMunich
|
|
💬 Re: Fiddly Bits on the Roof...(yeah, it’s a stretch)
4 years ago by 🇩🇪 RNinMunich (
Fleet Admiral)✧ 12 Views · 2 Likes
Flag
Whoooo? Li'l ol' meee!?😮😉
Now that's what I call 'Pushing 'limits' Cash👍 Wasn't sure if you would risk it, but I'm sure you'll be glad you did - WHEN it's done and dusted😊 Especially if you illuminate the wheelhouse.💡 BTW: Before you rush into your first coat of Tamiya grey I strongly recommend that you precede it with a thin coat of light grey primer. That should help prevent any of the 'lifting' problems that Martin555 and others experienced. (Unless of course 'the Commodore' is looking for a new 'lifting process'! 😁😁) (Good that we have the Atlantic between us!!😮) Since you've built with styrene use plastic primer if you can, especially if the styrene wasn't prepared by lightly rubbing down with a 600 - 1000 wet n dry, e.g. Tamiya sponge. But any other 'normal', e.g. auto primer will do. Also cheaper than Tamiya paint for showing up any defects which need filling/sanding etc.😉 In view of the alacrity of your repairs Fleet Command will defer a decision on holding a General Court until they are completed, and waive it on successful completion of Sea Trials and commissioning into active service. Carry on Sub. That reminds me, I believe your next Promotion Board is coming up soon .... 😉 Cheers, FLEET// 😎 ▲
⟩⟩
Martin555
Cashrc
|
📝 Up Before the Mast!!
4 years ago by 🇺🇸 Cashrc ( Vice Admiral)
Vice Admiral)✧ 16 Views · 6 Likes · 6 Comments
Flag
💬 Add Comment
Hi y’all. Got some really fun news Thursday. I’ve been furloughed 😮! The company will keep paying my insurance, and I lose no seniority, but they are making temporary cuts across the board...so basically, I have a 30 day unpaid vacation. They want to try to get me back on board after that. We’ll see. Luckily I don’t have a lot of bills, house is paid for, got a small improvement loan and the normal lot of utilities so we’re okay, and I have one more check coming on the 10th. Soooooo....I’ll have plenty of time to spend with family, get some rest, and oh...BUILD😊
So, since this is the first time I’ve been unemployed, temporarily or otherwise, after I came home and commiserated with my wife, I decided to go to the bench and abuse some brass and plastic 😂
I did what I did with the original mast, substituted a 6 mm piece of CF tubing for wood. My main yardarm is a slight bit thicker than the first mast as I had to raid my stash for brass tubing. Took a couple of hours to cut, bend, fit, glue and solder but it’s about halfway there. We binge watched “The Marvelous Mrs Maisel” till 130 am, so I’ll be getting up about 9 am and start on finishing the mast tomorrow. I’ll post my progress.
Cash
▲
⟩⟩
Escrich
MouldBuilder
mturpin013
RNinMunich
marky
Martin555
|
💬 Re: Up Before the Mast!!
4 years ago by 🇬🇧 mturpin013 (
 Admiral) Admiral)✧ 13 Views · 2 Likes
Flag
Goodish news on the job, but my advice is submerge yourself in the family and modeling, It will all come right eventually, keep smilling.
▲
⟩⟩
RNinMunich
Martin555
|
|
Login To
Remove Ads 💬 Re: Up Before the Mast!!
4 years ago by 🇩🇪 RNinMunich (
Fleet Admiral)✧ 13 Views · 3 Likes
Flag
Liked the work you've done there Cash👍 but not the news👎
The employment laws (or lack of them and social insurance) are the main reasons I turned down a transfer to the US, (Lake Success, Long Island, New York) in '87 and decided to stay in Munich. Never regretted it. Best of luck for the future🤞 enjoy your extended workshop time. Helps to take the mind off the damn bugs!❄️❄️❄️ Cheers, Doug 😎 PS Message from Chief of Staff: Your fictitious salary as Sub Lieutenant in our fictitious Texas Navy Detachment will continue to be paid into your fictitious Cayman Island account for the duration of the emergency 😁 FLEET// ▲
⟩⟩
Cashrc
marky
Martin555
|
|
💬 Re: Up Before the Mast!!
4 years ago by 🇬🇧 Martin555 (
Fleet Admiral)✧ 12 Views · 2 Likes
Flag
Hi Cash,
I bet you are enjoying making this instead of assembling the kit. You get more satisfaction knowing that you made all of it. Really looking good. Well done. Martin555. ▲
⟩⟩
Cashrc
marky
|
|
💬 Re: Up Before the Mast!!
4 years ago by 🇬🇧 marky (
Commodore)✧ 12 Views · 2 Likes
Flag
Sorry forgot to say ,the mast and superstructure are looking great .
Cheers again Marky👍 ▲
⟩⟩
Cashrc
Martin555
|
|
💬 Re: Up Before the Mast!!
4 years ago by 🇬🇧 marky (
Commodore)✧ 12 Views · 2 Likes
Flag
Sorry to hear about your work ,lots in the UK in the same boat ,if your furlouged here the government will pay upto 80% of your salary to a maximum of £2500 per month ,a bit more tricky if your self employed where the formulas a bit weird and difficult according to my brother.
Stay safe and try to enjoy the time with your family. Cheers Marky👍 ▲
⟩⟩
Cashrc
Martin555
|
|
💬 Re: Up Before the Mast!!
4 years ago by 🇿🇦 redpmg (
Commodore)✧ 13 Views · 3 Likes
Flag
Sorry to hear about your work problem Cash - one wonders how many are in the same boat. At least you are taking a positive view of it . We are in pretty much the same situation as all Laser orders have stopped and better half's small business is closed for the duration - so both her part time employees have no income either.
Do like the mast on the superstructure however - really good work there ▲
⟩⟩
Cashrc
marky
Martin555
|
📝 Hauled Up Before the Mast...Again!
4 years ago by 🇺🇸 Cashrc ( Vice Admiral)
Vice Admiral)✧ 18 Views · 7 Likes · 3 Comments
Flag
💬 Add Comment
Hi ya’ll. Before I go on, I just want to say thanks for the support, comments and ideas. Really helps especially with what’s going on now. Again..thank you.😊
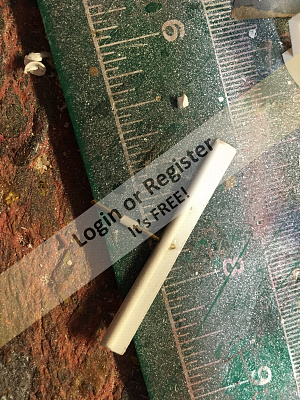
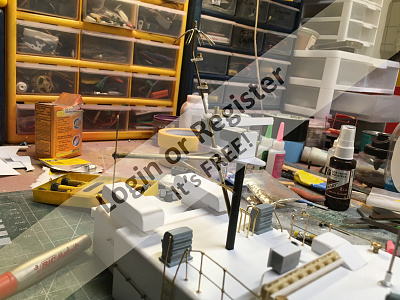
So..got up this morning and did a little more work on the mast assembly. The original fittings kit had brass standoffs for the mast lamps which were made from the brass parts and brass servo grommets. I have grommets galore, but my brass stock was either too thin or too thick. So, I used cut down servo arms for the bases and the grommets for lights. I then turned my attention to the upper radar doohickey on the upper part of the mast. In case y’all are wondering, “doohickey” is an accepted technical term here in Texas. Anyway, the best way to make this thing up is to make up a jig from a piece of 1/4 inch soft balsa sheet. The object is to bend the unsoldered end down to press into the wood to keep the wire steady while soldering. I went one step further and tacked that end with a little CA, once done I cut the radar loose then proceeded to measure, cut and bend the wires to shape.
The lower radar and housing is made up of modified legos, the bar from sheet and rod, and the small support is brass wire with nylon tube over that. I then made up and soldered/glued the tip aerials on. I need to ad the main lamp and horn, then a little going over with fine sandpaper to clean up and paint.
Cash
▲
⟩⟩
Escrich
MouldBuilder
jbkiwi
marky
RNinMunich
Martin555
redpmg
|
💬 Re: Hauled Up Before the Mast...Again!
4 years ago by 🇩🇪 RNinMunich (
Fleet Admiral)✧ 13 Views · 2 Likes
Flag
Hi Cash,
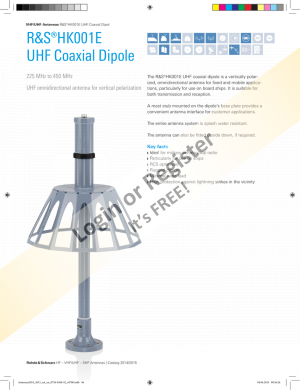
Looking good👍 "Doohickey" is not exactly unknown to us Pommes either😉 Probably imported by the USAF, or maybe my Dad picked it up during his Thor Missile training in the States in '58? Anyway, your spidery doohickey at the top of the mast is not part of a radar. Looks more to me like the ground plane (i.e. electrical counterbalance) for a coaxial UHF antenna. The actual antenna being the thick stub above the spider. See attached pics of such antennas from Rohde & Schwarz, which I used extensively in my naval ship COMMS system designs. The E version being the later one with extended frequency range for DATALINK compatibility. There was always a departmental 'fight', COMMS, ESM, Radar, for prime position at the top of the mast to get maximum range🙄 The 'trombone slide' on the starboard boom looks like a VHF folded dipole for Low Band VHF. The 'downpipe' on the port boom is probably a straightforward VHF High Band dipole. What I miss is a couple of 5 or 7m, maybe even 10m (30ft), HF whip or rod antennas? And of course, MOST important, the combi TV and AM/FM radio antenna!!😉 Cheers, Doug 😎 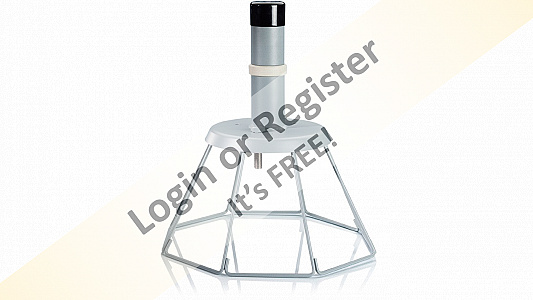
▲
⟩⟩
Martin555
marky
|
|
Login To
Remove Ads 💬 Re: Hauled Up Before the Mast...Again!
4 years ago by 🇬🇧 Martin555 (
Fleet Admiral)✧ 11 Views · 0 Likes
Flag
Very good work cash.
I like the “doohickey” I bet you are really enjoying making this. Martin555. ▲
⟩⟩
No likes yet
This member will receive 1 point for every like received |
|
💬 Re: Hauled Up Before the Mast...Again!
4 years ago by 🇿🇦 redpmg (
Commodore)✧ 12 Views · 1 Like
Flag
Hi Cash - if anything that superstructure is going to look better than the original - really good work you are doing there.
▲
⟩⟩
Martin555
|


Login To
Remove Ads
Remove Ads