Join Us On Social Media!

|

|

|
Download The App!
Login To
Remove Ads
Remove Ads
Login To
Remove Ads
Remove Ads
Model Boats Website
Yorkshireman refit
1 Post · 3 Followers · 3 Photos · 8 Likes
Began 4 years ago by
 United Kingdom
Follow This Thread
Not currently following
> Click to follow
> Click to follow
Latest Post 4 years ago by
| Oldest posts shown first (Show Newest First) | (Print Booklet) |
📝 Yorkshireman refit
4 years ago by 🇬🇧 Rogal118 ( Lieutenant Commander)
Lieutenant Commander)✧ 24 Views · 8 Likes · 8 Comments
Flag
💬 Add Comment
Well it's been a year since I last updated my blog whilst sat on the beach in Kos Greece. Just haven't had the time, but have of late and have actually nearly finished the refit.
My last job that I have been putting off was one of those fiddly little finishing off jobs of the finer detail. Cleaning 5 layers of paint from the bulkhead lights taken from around the original superstructure.
Started yesterday and got all twelve cleaned, then this morning consulted the plans for shape and positioning. I used .8mm piano wire and bent to shape. Then superglued the bulkhead lights in position. I then found a piece of red fine tube from the top of a "WD40" oil can and cut into 1mm pieces forming small "O" shapes, I then cut a piece out to make them into a "C", then clipped these into position to form what looked like small conduit fixing clips.
Next to make was the 2 junction boxes, this time I used slightly larger tube about 2mm dia. and cut into 2 MM lengths,I notched the bottom to fit over the wire and glued in place. A 1 MM hole was drilled in the side facing downwards and added a short piece of wire glued in this hole to represent a take off feed to the lower lights.
All in all, a job I was not looking forward to doing, turned out to be quite a rewarding little 5 hours spent. Hope you agree and maybe gives you some inspiration to finish those little "put off" jobs. Because having read a lot of the blogs on this brilliant site, has certainly given me the confidence and inspiration to do what I do now.
Thanks everyone, here's to contented modelling and keep safe.
Roger
▲
⟩⟩
Dibdawg
jbkiwi
marky
MouldBuilder
figtree7nts
Ianh
RNinMunich
Martin555
|
💬 Re: Yorkshireman refit
4 years ago by 🇬🇧 marky (
 Commodore) Commodore)✧ 3 Views · 1 Like
Flag
Great build ,
Stay safe . Cheers Marky👍 ▲
⟩⟩
Martin555
|
|
Login To
Remove Ads 💬 Re: Yorkshireman refit
4 years ago by 🇩🇪 RNinMunich (
 Fleet Admiral) Fleet Admiral)✧ 4 Views · 2 Likes
Flag
He He! Figured that.
Just pulling your anchor chain Roger👍 I remembered your original Harbour post when you acquired the refit job. Used to be UNITED TOWING. She's come a long way since then, quite a transformation, nice job👍 Cheers, Doug 😎 BTW If you get the tractor beam working please PM me the secret👍 😂🤣🤣💥 ▲
⟩⟩
Rogal118
Martin555
|
|
💬 Re: Yorkshireman refit
4 years ago by 🇬🇧 Rogal118 (
Lieutenant Commander)✧ 20 Views · 4 Likes
Flag
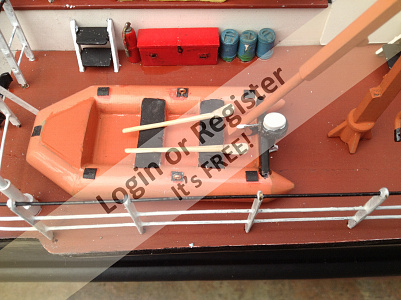
Never thought of that, maybe that is the future. Tractor beam eh! Sounds good to me. Name was just a play on letters. A few more photos from earlier in the refurb.

▲
⟩⟩
jbkiwi
RNinMunich
MouldBuilder
Martin555
|
|
💬 Re: Yorkshireman refit
4 years ago by 🇩🇪 RNinMunich (
Fleet Admiral)✧ 5 Views · 3 Likes
Flag
Nice job Roger👍
'Untied Towing'! Interesting. How does that work? Tractor Beam??😁 "Beam us up Scotty"😉 "Energise". "Aye aye Cap'n!" "Oh no! Ah canna hold 'em, It's the dilithium crystals😮" 😎 ▲
⟩⟩
Martin555
MouldBuilder
Rogal118
|
|
💬 Re: Yorkshireman refit
4 years ago by 🇬🇧 Rogal118 (
Lieutenant Commander)✧ 21 Views · 5 Likes
Flag
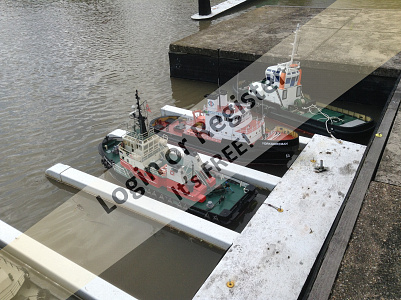
Sure here it is
▲
⟩⟩
jbkiwi
marky
MouldBuilder
Martin555
RNinMunich
|
|
💬 Re: Yorkshireman refit
4 years ago by 🇭🇺 MouldBuilder (
 Vice Admiral) Vice Admiral)✧ 4 Views · 2 Likes
Flag
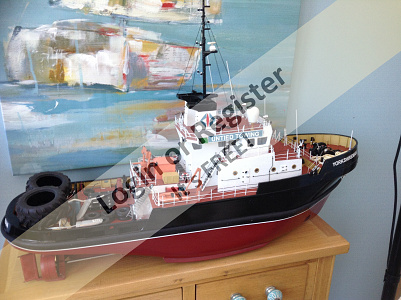
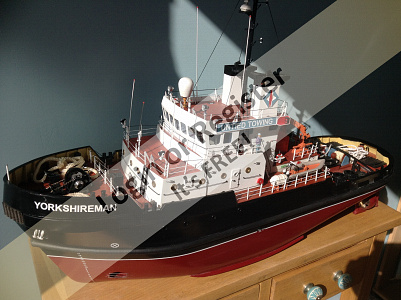
Nice job. Looks very good. If you get time, can you add a picture of the full model.
Thanks. Peter.👍 ▲
⟩⟩
RNinMunich
Martin555
|
|
💬 Re: Yorkshireman refit
4 years ago by 🇩🇪 RNinMunich (
Fleet Admiral)✧ 4 Views · 2 Likes
Flag
That looks MUCH better Rogal👍
Those WD40 toobs also make great whip or rod antennas, e.g. the VHF IMM rods, ladder rungs, handrails, pipework ... Wondered where you'd got to. Thought maybe emigrated to Kos 😁 Glad you like the site😊 "having read a lot of the blogs on this brilliant site, has certainly given me the confidence and inspiration to do what I do now. " We've certainly achieved our objective with you.😊 Looking forward to your next build. NTM sea trials of 'Yorkshireman'!! Look after yourself (-selves). Cheers, Doug 😎 ▲
⟩⟩
marky
Martin555
|
|
💬 Re: Yorkshireman refit
4 years ago by 🇬🇧 Martin555 (
Fleet Admiral)✧ 3 Views · 1 Like
Flag
Well considering you were not looking forward to that little "put off job" i think it came out extremely good and well worth the time spent in it.
I also like the way you used the red tubing from the "WD40" can. When you look around it is surprising what you will find to use on model making. Well done. Martin555. ▲
⟩⟩
marky
|


Login To
Remove Ads
Remove Ads