Join Us On Social Media!

|

|

|
Download The App!
Login To
Remove Ads
Remove Ads
Login To
Remove Ads
Remove Ads
Model Boats Website
Star 45 Racing Yacht Build
30 Posts · 12 Followers · 216 Photos · 221 Likes
Began 4 years ago by
 United States
Follow This Thread
Not currently following
> Click to follow
> Click to follow
Latest Post 4 years ago by
| Oldest posts shown first (Show Newest First) | (Print Booklet) |
📝 Star 45 Racing Yacht Build
4 years ago by 🇺🇸 Joe727 ( Commander)
Commander)✧ 13 Views · 8 Likes
Flag
💬 Add Comment
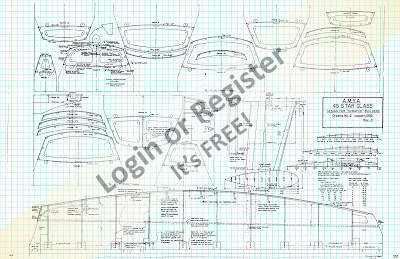
Since it looks like the lockdown will continue for a while I decided it was time I do another, more complex build. Most of my boat building and sailing experience is with RC Sailing Yachts so I decided to build Star 45. This boat is a AMYA Class sailed among sailing clubs in the States, not sure if it is popular elsewhere in the world. Let me know if any of you have seen these...
This is one of the sailing yachts that can be scratch built, is a nice size, 45 inches, and they sail nicely. Plans are available on line as are lazer cut frames to make building a lot easier. Chine hull is also desired by myself given my poor planking history.
Will include build photos as I go.
Joe 😎😎😎
▲
⟩⟩
billmcl61
MouldBuilder
nasraf
Martin555
Skydive130
ianed57
philcaretaker
RonH
Login To
Remove Ads
Remove Ads
📝 Getting Started
4 years ago by 🇺🇸 Joe727 ( Commander)
Commander)✧ 11 Views · 6 Likes · 6 Comments
Flag
💬 Add Comment
First, I spent time looking at the web for the Star 45 information available. Attached is a link of one of the sites that is very thorough including history of the boat Class. I sailed one of these Stars about 10 years ago and really enjoyed it, a fun sail!
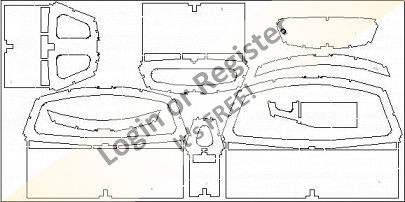
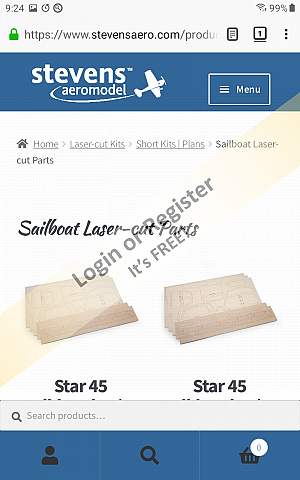
Decided to order the lazer cut frames as they are affordable, $60 usd, would probably cost me that much in materials alone. Stevensaero.com was highly recommended by previous builders. See photo.
Also purchased the Star 45 Construction Manual by Steve Deligan. This is a bargain at $20 for a pdf download. Received within hours of ordering and I like it so far. I do not know how to post more than one web link so I will do in another post.
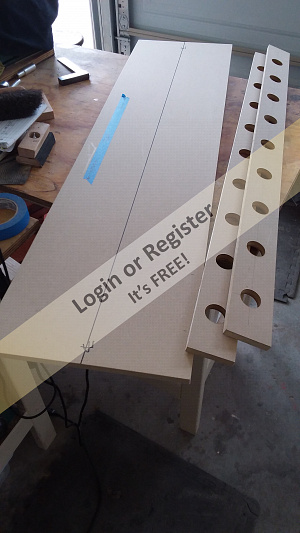
While waiting for frames to arrive I built a Building Board, 48" long out of 1/2" mdf. Nice flat surface and very straight. Holes in top and bases are to provide possible tie downs. Will be using clamps, rubber bands and maybe even some bungie cord to construct the hull.
Even building your own boat can get pretty costly, so keeping with my mo, I will be building mostly from scratch. This will include masts, booms, sails, hardware, etc. Will stick to a a meager budget.
Thanks for your interest, please ask any questions that you may have.
Joe 😎


Decided to order the lazer cut frames as they are affordable, $60 usd, would probably cost me that much in materials alone. Stevensaero.com was highly recommended by previous builders. See photo.
Also purchased the Star 45 Construction Manual by Steve Deligan. This is a bargain at $20 for a pdf download. Received within hours of ordering and I like it so far. I do not know how to post more than one web link so I will do in another post.
While waiting for frames to arrive I built a Building Board, 48" long out of 1/2" mdf. Nice flat surface and very straight. Holes in top and bases are to provide possible tie downs. Will be using clamps, rubber bands and maybe even some bungie cord to construct the hull.
Even building your own boat can get pretty costly, so keeping with my mo, I will be building mostly from scratch. This will include masts, booms, sails, hardware, etc. Will stick to a a meager budget.
Thanks for your interest, please ask any questions that you may have.
Joe 😎

▲
⟩⟩
billmcl61
MouldBuilder
jbkiwi
Puddle-pirate
Martin555
Skydive130
|
💬 Re: Getting Started
4 years ago by 🇿🇦 Ianh (
Commander)✧ 6 Views · 1 Like
Flag
Hi,
I use an Ex SLEC Wing and Fuselage Jig. The angles are ex SLEC and are slotted these bolt through to Captive Nuts. A little bit of invention after I built the 16' Lancster that at my age I can no longer see it fly after 6 years of construction I don't want to put it in the ground! 

▲
⟩⟩
billmcl61
|
|
Login To
Remove Ads 💬 Re: Getting Started
4 years ago by 🇭🇺 MouldBuilder (
 Vice Admiral) Vice Admiral)✧ 8 Views · 3 Likes
Flag
Never really thought about a sailing boat. I will take interest in this build and see if this changes.
Peter.😊 ▲
⟩⟩
billmcl61
Joe727
Martin555
|
|
💬 Re: Getting Started
4 years ago by 🇺🇸 Joe727 (
Commander)✧ 7 Views · 2 Likes
Flag
Nerys,
Thank you for the note, one of our club members sailed the real deal in the Olympics some time ago. There are RC fiberglass hulls available but I love to build things, plus I always stick to a minimalist budget. Joe ▲
⟩⟩
billmcl61
Martin555
|
|
💬 Re: Getting Started
4 years ago by 🇬🇧 Nerys (
 Fleet Admiral) Fleet Admiral)✧ 8 Views · 3 Likes
Flag
Very interesting boat to build, the full size version was designed in America way back in 1910 by Francis Sweithsguth. They became an International class and were sailed in The summer Olympics from 1932 - 2012. They were a very popular class in the US but never really caught on in the Uk apart from the few officionados who sailed them because of their Olympic status. A RC model will be very interesting, I believe there is a kit extant for a static model, but I look forward to seeing this model in action,
Nerys ▲
⟩⟩
billmcl61
Martin555
Joe727
|
|
💬 Re: Getting Started
4 years ago by 🇺🇸 Joe727 (
Commander)✧ 6 Views · 1 Like
Flag
Martin555,
Have you ever sailed a sailing yacht? If not, next time you see one at the pond ask to try it. You'll be hooked, they sail like the real thing. Each boat type has it's own feel, you'll swear you can feel the rudder and sails thru your TX control sticks. Thanks for your interest. Joe ▲
⟩⟩
billmcl61
|
|
💬 Re: Getting Started
4 years ago by 🇬🇧 Martin555 (
Fleet Admiral)✧ 7 Views · 2 Likes
Flag
Hi Joe,
I am not into sailing and don't know the first thing about them. But i will definitely be following this log. You never know i might actually learn something about them. Good luck. Martin555. ▲
⟩⟩
billmcl61
Joe727
|
📝 Hull Frames arrived, had to get busy
4 years ago by 🇺🇸 Joe727 ( Commander)
Commander)✧ 12 Views · 8 Likes · 6 Comments
Flag
💬 Add Comment
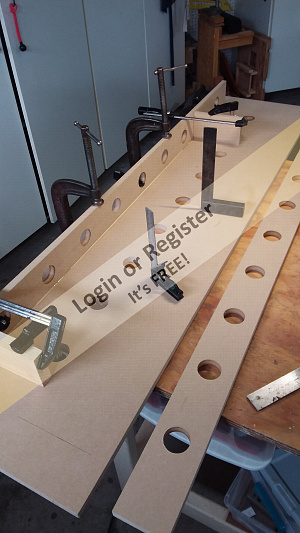
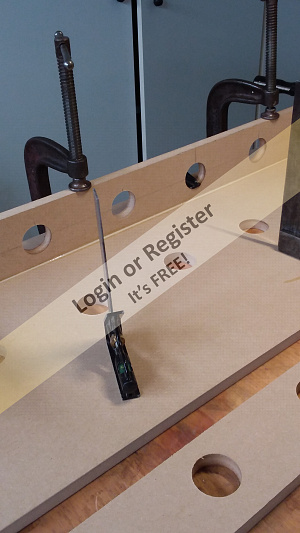
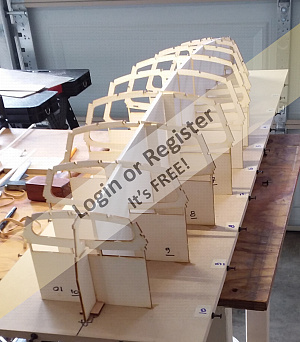
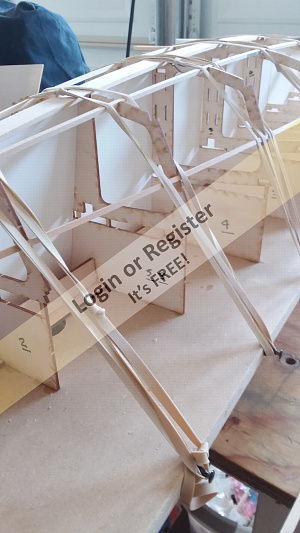
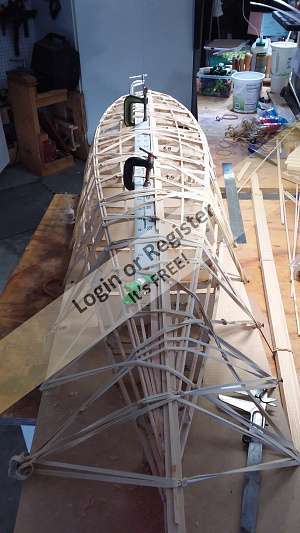
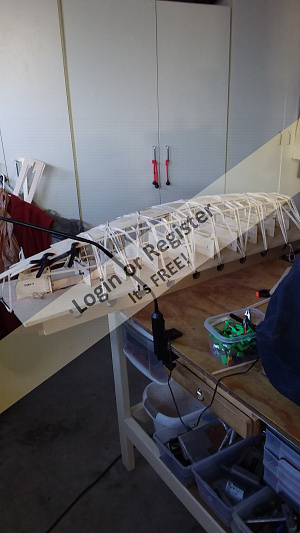
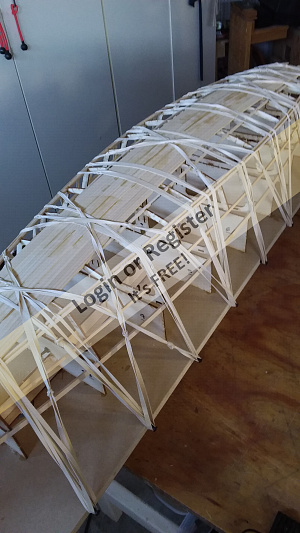
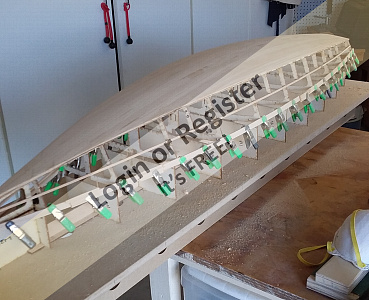
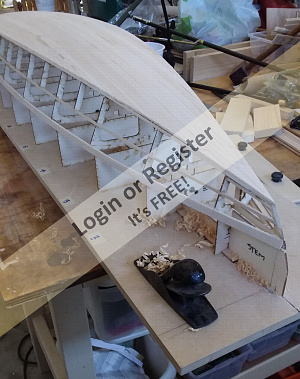
Frames arrived within two days so I had to continue to work today....could not wait till tomorrow! Frames are 3/32" plywood, very nice quality laser cut.
Each frame was set very carefully making certain that they are square horizontally and vertically.
The temporary white boards set between the frames were made from foamcore board, cut precisely to the correct width. These are used to keep the frames vertical as the stringers are installed. Will be removed once the keelson, stringers and chine logs and sheer rails are installed.
Side stringers started and show how I am using rubber bands to hold members in place while glue dry. I use Titebond III Ultimate wood glue, my method is to put some glue on both surfaces, let them sit about 5 minutes, then clamp together. Black push pins were installed at each station to allow for rubber bands. Rubber bands span at frames, NOT midpoints of spans as that would deflect the stringers. Getting late, more tomorrow.
😋Joe 😴
▲
⟩⟩
billmcl61
RNinMunich
mturpin013
jbkiwi
ianed57
Skydive130
Martin555
Graham93
|
💬 Re: Hull Frames arrived, had to get busy
4 years ago by 🇺🇸 Joe727 (
Commander)✧ 7 Views · 2 Likes
Flag
Sy,
I've built dozens of stick and tissue airplanes, it's the only way to go! Jor ▲
⟩⟩
billmcl61
Martin555
|
|
Login To
Remove Ads 💬 Re: Hull Frames arrived, had to get busy
4 years ago by 🇺🇸 Joe727 (
Commander)✧ 8 Views · 3 Likes
Flag
Sy,
I've used these single edged blade for years, on every thing, wood , styrene, etc. Buy them in boxes of 100, cost about 6 cents a piece. Toss them as soon as they get dull, go through a couple on a long day. Aren't scalpels for doctors? 🤔 Joe ▲
⟩⟩
billmcl61
RNinMunich
Martin555
|
|
💬 Re: Hull Frames arrived, had to get busy
4 years ago by 🇬🇧 Skydive130 (
 Rear Admiral) Rear Admiral)✧ 8 Views · 3 Likes
Flag
Hi Joe, still using single edged razor blades, when scalpel blades are cheap as chips, hats off to you ha ha!
The hull is certainly taking shape, in fact it’s like watching a stick n tissue aircraft build all over again! I would guess with all the bands Ect holding it do3n, it should be just about the most warp free structure ever. I look forward to sheeting you sheet it! Kind regards Sy ▲
⟩⟩
billmcl61
Martin555
Joe727
|
|
💬 Re: Hull Frames arrived, had to get busy
4 years ago by 🇺🇸 Joe727 (
Commander)✧ 8 Views · 3 Likes
Flag
Sy,
Thanks for the comments. I can't take full credit for the building board, it's a combination of ideas I have seen on-line. The push pin idea came from a Star 45 build blog. The holes are mine, giving and option for clamping and stringing hold down lines/bands. The mdf at 1/2" is plenty stiff due to vertical board base. I've seen many narrow boards, say 5", but the full 12" width allows for a nice flat surface for all of those squares I use, plus the rubber band clamps work well at that width. I too have built many balsa stick planes, really enjoy it. First did it with my Dad in the 50's, had to cut out all of those parts with the old double edged thin razor blades. Still use single edge blades for all my work! Thanks for your interest. Joe 😎 ▲
⟩⟩
billmcl61
Skydive130
Martin555
|
|
💬 Re: Hull Frames arrived, had to get busy
4 years ago by 🇬🇧 Skydive130 (
Rear Admiral)✧ 8 Views · 3 Likes
Flag
The other reason I’ve always build powered boats and not yachts is the fear of trying to cast a lead bulb or try and buy one ready made, I shall watch with interest! 👍
▲
⟩⟩
billmcl61
Joe727
Martin555
|
|
💬 Re: Hull Frames arrived, had to get busy
4 years ago by 🇬🇧 Skydive130 (
Rear Admiral)✧ 7 Views · 2 Likes
Flag
May well consider building one of these in the future? Shall watch your build with interest, but I really like your building board/jig setup. I’ve had aircraft kits from Stevensaero in the past and they are superb, even delivery it to 🇬🇧 no problem. Kind regards Sy
▲
⟩⟩
Joe727
Martin555
|
📝 Stringers, keelson.....
4 years ago by 🇺🇸 Joe727 ( Commander)
Commander)✧ 10 Views · 6 Likes · 7 Comments
Flag
💬 Add Comment
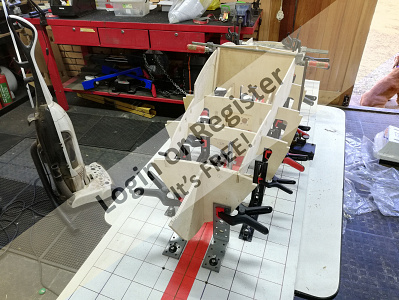
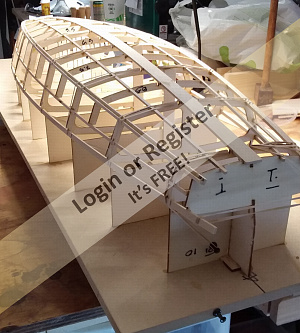
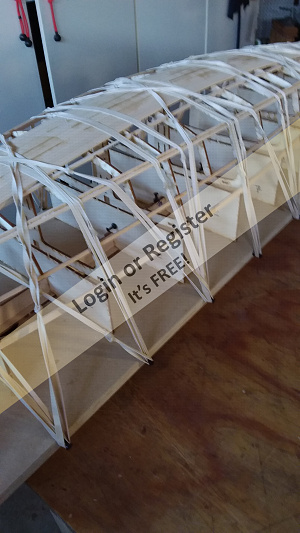
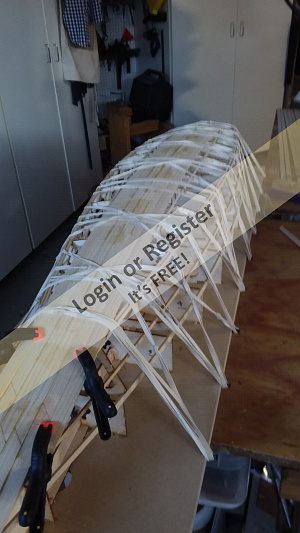
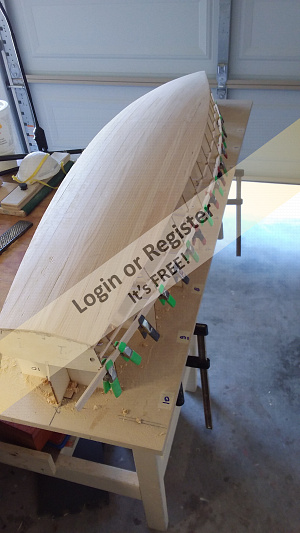
Placed keelson first, then stringers, chines and last sheers. Installed one at a time, both sides, then allowed to dry for several hours each. Watching glue cure....
Joe


Joe
▲
⟩⟩
billmcl61
MouldBuilder
RNinMunich
Graham93
Martin555
Skydive130
|
💬 Re: Stringers, keelson.....
4 years ago by 🇺🇸 Joe727 (
Commander)✧ 7 Views · 2 Likes
Flag
Doug,
I just discovered that my spell checker changed chines to chimes!! ☹️ Joe ▲
⟩⟩
billmcl61
Martin555
|
|
Login To
Remove Ads 💬 Re: Stringers, keelson.....
4 years ago by 🇩🇪 RNinMunich (
Fleet Admiral)✧ 8 Views · 3 Likes
Flag
"I missed that typo!"
Joe, you wouldn't believe how often I hit the N instead of M, but at least that way round the Spellchecker usually underlines it in red😉 Doug 😎 ▲
⟩⟩
billmcl61
Martin555
Joe727
|
|
💬 Re: Stringers, keelson.....
4 years ago by 🇬🇧 Martin555 (
Fleet Admiral)✧ 8 Views · 3 Likes
Flag
All i can say Joe Is sand and try, sand and try until you get a really nice fit.
And take your time to get it right. Martin555. ▲
⟩⟩
billmcl61
MouldBuilder
Joe727
|
|
💬 Re: Stringers, keelson.....
4 years ago by 🇺🇸 Joe727 (
Commander)✧ 7 Views · 2 Likes
Flag
Doug,
I missed that typo! Joe ▲
⟩⟩
billmcl61
RNinMunich
|
|
💬 Re: Stringers, keelson.....
4 years ago by 🇩🇪 RNinMunich (
Fleet Admiral)✧ 8 Views · 3 Likes
Flag
"Watching glue cure...."
💤💤💤💤💤💤💤💤 Don't the 'chimes' keep you awake though? Very musical! 😁😂 😎 ▲
⟩⟩
billmcl61
Rookysailor
Joe727
|
|
💬 Re: Stringers, keelson.....
4 years ago by 🇺🇸 Joe727 (
Commander)✧ 7 Views · 2 Likes
Flag
Martin,
Planking is coming up soon, I'm a bit apprehensive as this is definitely not my area of expertise. Joe ▲
⟩⟩
billmcl61
Martin555
|
|
💬 Re: Stringers, keelson.....
4 years ago by 🇬🇧 Martin555 (
Fleet Admiral)✧ 7 Views · 2 Likes
Flag
Progressing nicely Joe.
Keep up the good work. Martin555. ▲
⟩⟩
billmcl61
Joe727
|
📝 Fence Picket Planks!
4 years ago by 🇺🇸 Joe727 ( Commander)
Commander)✧ 10 Views · 6 Likes
Flag
💬 Add Comment
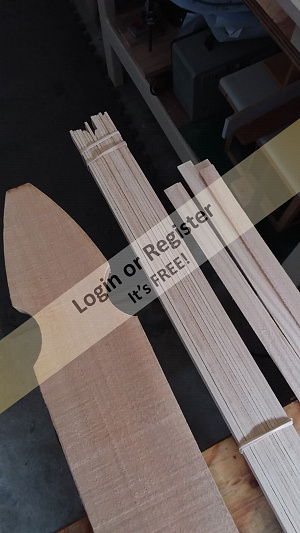
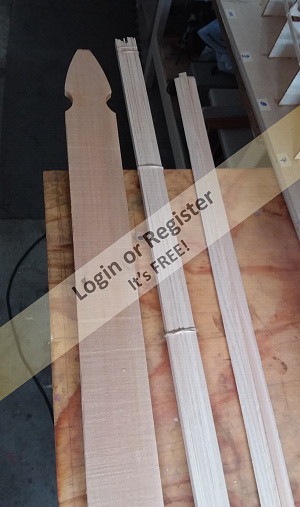
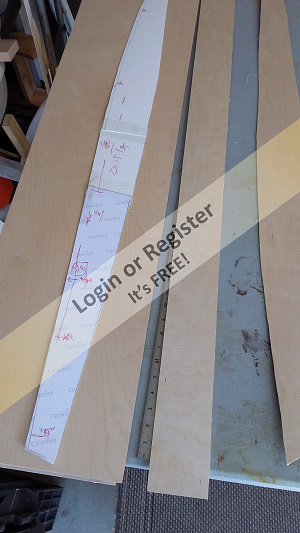
Found some cedar pickets at the lumber yard, they are🤣 straight grained and very lightweight, must be kiln-dried. I ripped thin strips on my small table saw, they are a little under 1/8" x 1/2". Best of all they are only 97 cents. One will be enough for the bottom planks.
Sanded each by hand to remove saw marks and any roughness.
Used a straightedge to make sure that the first plank would be straight as they flex a bit. Time to watch the glue dry.
Joe
Sanded each by hand to remove saw marks and any roughness.
Used a straightedge to make sure that the first plank would be straight as they flex a bit. Time to watch the glue dry.
Joe
▲
⟩⟩
billmcl61
RNinMunich
MouldBuilder
Martin555
Skydive130
Graham93
📝 Bottom Planking underway
4 years ago by 🇺🇸 Joe727 ( Commander)
Commander)✧ 11 Views · 7 Likes · 3 Comments
Flag
💬 Add Comment
I am placing two planks at a time to hopefully keep this hull straight. Four in so far. Using Titebond III woodworkers glue make placement easy. I set two in place, opposite sides, then place rubber bands and an occasional clamp. Since I have plenty of time I am letting these cure for anywhere from 4 hours to overnight.
Joe 😎😎😎
Joe 😎😎😎
▲
⟩⟩
billmcl61
RNinMunich
MouldBuilder
Ygagnon
Martin555
Graham93
Skydive130
|
💬 Re: Bottom Planking underway
4 years ago by 🇩🇪 RNinMunich (
Fleet Admiral)✧ 9 Views · 4 Likes
Flag
"I especially suffer during the painting phase.😁"
Me too MB🤔 I just ordered another large tin of Patience, double strength😉 Cheers, Doug 😎 ▲
⟩⟩
billmcl61
Martin555
Joe727
Rookysailor
|
|
Login To
Remove Ads 💬 Re: Bottom Planking underway
4 years ago by 🇭🇺 MouldBuilder (
Vice Admiral)✧ 8 Views · 3 Likes
Flag
This looks rather tricky. I, like Simon, lack in patience. I especially suffer during the painting phase.😁
▲
⟩⟩
billmcl61
Joe727
Martin555
|
|
💬 Re: Bottom Planking underway
4 years ago by 🇬🇧 Skydive130 (
Rear Admiral)✧ 9 Views · 4 Likes
Flag
Patience is a virtue Joe, something I struggle with sometimes! I e got a feeling this hull will be the truest ever! 👍
▲
⟩⟩
Ianh
billmcl61
Joe727
Martin555
|
📝 Outer Sheer Rails & Bottom Planking
4 years ago by 🇺🇸 Joe727 ( Commander)
Commander)✧ 15 Views · 10 Likes · 8 Comments
Flag
💬 Add Comment
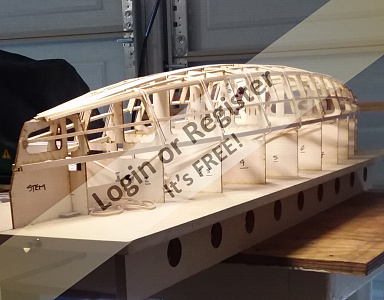
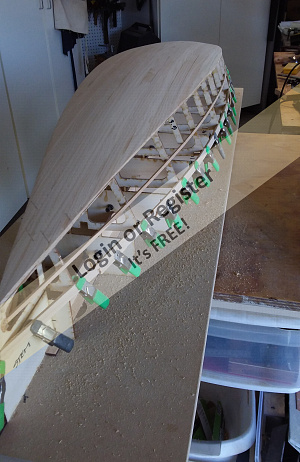
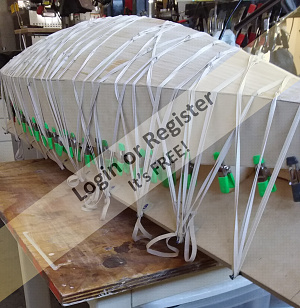
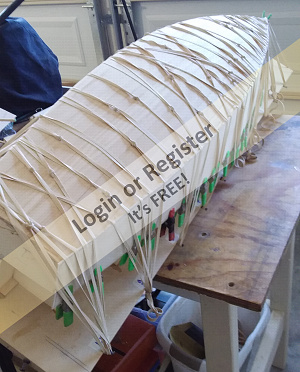
All bottom planking is now in place however additional trimming is still needed as well as further sanding. The cedar gives a nice solid surface, I am glad I used this material rather than something soft like balsa. Remember this bottom cost me 97 cents!
Typically these wood hulls get fiberglass but I am thinking about just using resin and deleting the fiberglass mat. Not sure at this point, any opinions welcome.
Outer sheet rails installed and clamped. These are 1/8 × 3/8" over 1/8 x 1/4", pretty stiff!
Sides are next, plan to use 1/16" plywood that I just received from National Balsa 12"x48" size sheets....👍
Joe 😎
▲
⟩⟩
mturpin013
MouldBuilder
billmcl61
Colin H
jbkiwi
robbob
ianed57
Skydive130
Martin555
RNinMunich
|
💬 Re: Outer Sheer Rails & Bottom Planking
4 years ago by 🇺🇸 Joe727 (
Commander)✧ 5 Views · 0 Likes
Flag
Mturpin,
Yes, I'll explain the reason for the thin plywood. This boat design is for speed and racing in regatta, therefore the intent is to keep it light weight with the boat weight located as much as possible in the keel. The initial design (not mine) is based on the Star 45 design which is typically an all painted hull. The only reason the bottom is planked is that it is a compound cure, can't do with plywood sheets unless in strips. The sides are flat curves so weight can be saved with the 1/16" ply. The intent has been to paint the entire hull but since the cedar bottom looks pretty good I may leave it clear. Thanks for the question. Joe😎 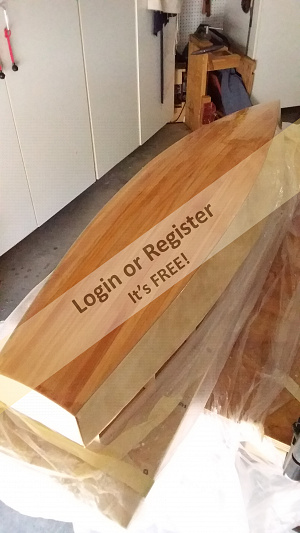
▲
⟩⟩
No likes yet
This member will receive 1 point for every like received |
|
Login To
Remove Ads 💬 Re: Outer Sheer Rails & Bottom Planking
4 years ago by 🇬🇧 mturpin013 (
 Admiral) Admiral)✧ 7 Views · 2 Likes
Flag
Any reason why the sides are ply and not planked, it would look nice planked and varnished.
▲
⟩⟩
Joe727
Martin555
|
|
💬 Re: Outer Sheer Rails & Bottom Planking
4 years ago by 🇬🇧 ianed57 (
 Sub-Lieutenant) Sub-Lieutenant)✧ 9 Views · 4 Likes
Flag
Hi,
If you can't get Eze-Kote I have used Z-Poxy by Zap successfully in the past. I find it easier to mix, apply and sand than some of the epoxies aimed at full size boatbuilders. I notice you can get it on Amazon and I'm sure Jeff would be happy to deliver some to you! I have used it on the outside of wooden hulls with no fibreglass sheet. I should think, if you are building from cedar, you would be OK. Ian ▲
⟩⟩
RNinMunich
billmcl61
Joe727
Martin555
|
|
💬 Re: Outer Sheer Rails & Bottom Planking
4 years ago by 🇮🇪 billmcl61 (
 Warrant Officer) Warrant Officer)✧ 7 Views · 2 Likes
Flag
That Eze-kote sounds like just the thing that I need as my tug will have a balsa bottom, but the only places I can find it are in the UK, and carriage, just a stones throw across the water is almost as much as the stuff itself, unfortunately with the current situation all the model shops here are closed and I haven't come across this previously, so I guess it will be resin and fibreglass.
Bill ▲
⟩⟩
Joe727
Martin555
|
|
💬 Re: Outer Sheer Rails & Bottom Planking
4 years ago by 🇬🇧 Skydive130 (
Rear Admiral)✧ 9 Views · 4 Likes
Flag
And a beautiful bottom it is Doug 😂😂😂
▲
⟩⟩
RNinMunich
Joe727
Martin555
billmcl61
|
|
💬 Re: Outer Sheer Rails & Bottom Planking
4 years ago by 🇩🇪 RNinMunich (
Fleet Admiral)✧ 8 Views · 3 Likes
Flag
" I am looking up the eze-kote product right now. "
Try it Joe. I guarantee you won't be disappointed👍 It's not the cheapest resin around BUT; No messing with hardener (too much it goes off too fast, too little it never sets☹️), It isn't sticky, brushes on easy, doesn't stink 🙈, (can be used indoors without the 'Management' getting on your case😉), sets in about 20 minutes at 'room' temperature, and when you're done you simply clean your brush in warm water, instead of chucking it away!😊 I love it. Also use it as a wood sealer, diluted with 20 - 25% water. Have also used it to preserve a bamboo table on the terrace, still standing after 5 years or more 😊 Cheers, Doug 😎 ▲
⟩⟩
billmcl61
Martin555
Joe727
|
|
💬 Re: Outer Sheer Rails & Bottom Planking
4 years ago by 🇺🇸 Joe727 (
Commander)✧ 8 Views · 3 Likes
Flag
Doug,
Thanks for the fast response! I am looking up the eze-kote product right now. I see that it is made in the UK, but is sold thru Horizon Hobbies in the States. Will read reviews but this looks like it is well worth a try. I have used the epoxy based resin fiberglass systems for years but honestly can say it's not my favorite thing to do. Always too thick and sticky... Thank you, Joe👍😎 ▲
⟩⟩
billmcl61
Martin555
RNinMunich
|
|
💬 Re: Outer Sheer Rails & Bottom Planking
4 years ago by 🇩🇪 RNinMunich (
Fleet Admiral)✧ 11 Views · 6 Likes
Flag
"Typically these wood hulls get fiberglass but I am thinking about just using resin and deleting the fiberglass mat. Not sure at this point, any opinions welcome."
Go for it Joe👍 On my Danish fish cutter restoration I reinforced the (badly built!) hull on the inside with resin and fibre glass tissue. On the outside I then used only three coats of Deluxe Materials Eze-Kote water based resin (No hardener and brushes wash out in warm water😉) Progressively flatten the resin coats as you go with 600 to 2000 / 3000 grit W&D (add a drop of liquid soap😉) and you can get a glass like finish😀 Clear lacquer or paint (☹️) to taste. Cheers, Doug 😎 PS That's one cheap bottom! 😮 ▲
⟩⟩
Ygagnon
Ianh
billmcl61
Skydive130
Martin555
Joe727
|
📝 Hull sides
4 years ago by 🇺🇸 Joe727 ( Commander)
Commander)✧ 12 Views · 7 Likes
Flag
💬 Add Comment
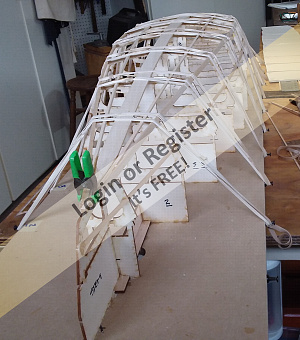
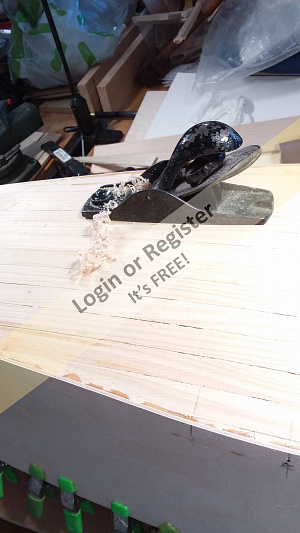
Side frames were prepared for covering, the best way I found to trim the edges was to use a small hand plane. It was much cleaner than using a lot of sandpaper.
Used some scrap cardboard taped together and created a template by holding it to the hull and tracing an outline. Hard to see as it is 45" long.
I then cut the sides back to back at the same time from 1/16" plywood. Pieces are over sized by about 1/4" all around and will be trimmed in place once the glue has cured.
Using Titebond III, I glued one side to the hull. The shear is held in place with clamps and the chine edge is secured with the rubber bands. I had some concerns with the rubber bands really working, but this system has proved to be a fast easy way to secure pieces in place.
More to come.
Joe 😎
▲
⟩⟩
MouldBuilder
nasraf
RNinMunich
billmcl61
Martin555
Skydive130
Colin H
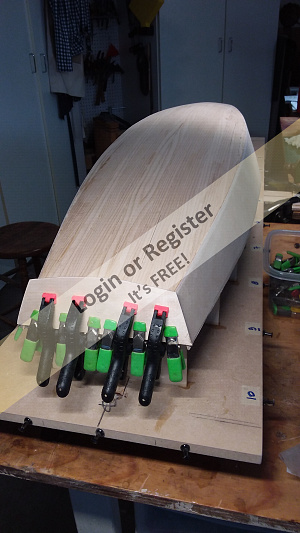
📝 both sides set, glue curing....while I sleep
4 years ago by 🇺🇸 Joe727 ( Commander)
Commander)✧ 11 Views · 6 Likes · 2 Comments
Flag
💬 Add Comment
Both sides now glued up and clamped. Will let cure for about 12 hours and hope to make some progress tomorrow on cleaning up the edges.
Joe 😌😴😴😴
Joe 😌😴😴😴
▲
⟩⟩
MouldBuilder
nasraf
RNinMunich
billmcl61
Martin555
Skydive130
|
💬 Re: both sides set, glue curing....while I sleep
4 years ago by 🇺🇸 Joe727 (
Commander)✧ 6 Views · 1 Like
Flag
Sy,
Yes, I think it will remain straight. The laser cut frames were well worth purchasing, makes it much easier to end up with a nice hull. Joe 😎 ▲
⟩⟩
Martin555
|
|
💬 Re: both sides set, glue curing....while I sleep
4 years ago by 🇬🇧 Skydive130 (
Rear Admiral)✧ 8 Views · 3 Likes
Flag
Hi Joe, cannot wait to see that hull released from all its tie downs, should be straight and true for sure. 👍
▲
⟩⟩
Joe727
billmcl61
Martin555
|
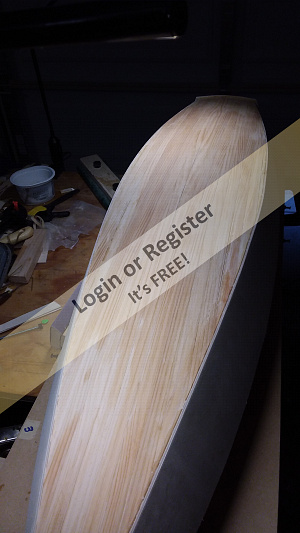
📝 Trimming sides, transom piece, sanding block
4 years ago by 🇺🇸 Joe727 ( Commander)
Commander)✧ 12 Views · 7 Likes · 7 Comments
Flag
💬 Add Comment
Removed all those rubber bands, time to trim the edges of the sides. The sides are a very thin 1/16" marine plywood and I was surprised at how easily a small plane worked to remove the excess. Thought it might splinter the edges but it didn't. The plywood is of a high quality.
I had made this large sanding block previously to sand hulls, holds an entire sheet of sandpaper. It works well for rounding out the surfaces.
The transom gets another layer of plywood, again 1/16". Hull getting closer to glassing.
Joe 😎


I had made this large sanding block previously to sand hulls, holds an entire sheet of sandpaper. It works well for rounding out the surfaces.
The transom gets another layer of plywood, again 1/16". Hull getting closer to glassing.
Joe 😎
▲
⟩⟩
Rookysailor
billmcl61
Skydive130
mturpin013
MouldBuilder
nasraf
ianed57
|
💬 Re: Trimming sides, transom piece, sanding block
4 years ago by 🇺🇸 Joe727 (
Commander)✧ 7 Views · 2 Likes
Flag
Sy,
Thank you! I must admit I am pleasantly surprised at how well it has gone together. Maybe it's the lockdown, I have more time and take care with each step, allowing everything to fully cure. The laser cut frames get the credit for giving the boat a straight foundation. Take care, Joe 😎👍 ▲
⟩⟩
billmcl61
Martin555
|
|
Login To
Remove Ads 💬 Re: Trimming sides, transom piece, sanding block
4 years ago by 🇬🇧 Skydive130 (
Rear Admiral)✧ 8 Views · 3 Likes
Flag
Looks superb !👍👍😜
▲
⟩⟩
billmcl61
Martin555
Joe727
|
|
💬 Re: Trimming sides, transom piece, sanding block
4 years ago by 🇬🇧 mturpin013 (
Admiral)✧ 8 Views · 3 Likes
Flag
Lovely job Joe it will look fantastic when finished
▲
⟩⟩
billmcl61
Martin555
Joe727
|
|
💬 Re: Trimming sides, transom piece, sanding block
4 years ago by 🇺🇸 Joe727 (
Commander)✧ 7 Views · 2 Likes
Flag
Peter,
Thanks for the comments. I'll post photos and information on the glassing. Joe ▲
⟩⟩
billmcl61
Martin555
|
|
💬 Re: Trimming sides, transom piece, sanding block
4 years ago by 🇺🇸 Joe727 (
Commander)✧ 7 Views · 2 Likes
Flag
Martin555,
Thank you for your interest and comments. Joe ▲
⟩⟩
billmcl61
Martin555
|
|
💬 Re: Trimming sides, transom piece, sanding block
4 years ago by 🇭🇺 MouldBuilder (
Vice Admiral)✧ 8 Views · 3 Likes
Flag
Super job Joe. The hull looks really smooth. The wood looks quality in the photos too.
When you get to the glassing, could you possibly do several pictures as I have never done this before. Can you advise on the materials used also. Thanks.👍 Peter. ▲
⟩⟩
billmcl61
Joe727
Martin555
|
|
💬 Re: Trimming sides, transom piece, sanding block
4 years ago by 🇬🇧 Martin555 (
Fleet Admiral)✧ 7 Views · 2 Likes
Flag
Good work Joe.
Looking really nice. Martin555. ▲
⟩⟩
billmcl61
Joe727
|


Login To
Remove Ads
Remove Ads