Join Us On Social Media!

|

|

|
Download The App!
Login To
Remove Ads
Remove Ads
Login To
Remove Ads
Remove Ads
Model Boats Website
a yacht yet to get a name
19 Posts · 8 Followers · 41 Photos · 22 Likes
Began 12 years ago by
 United Kingdom
Follow This Thread
Not currently following
> Click to follow
> Click to follow
Latest Post 4 years ago by
| Oldest posts shown first (Show Newest First) | (Print Booklet) |
📝 a yacht yet to get a name
12 years ago by 🇬🇧 nasraf ( Chief Petty Officer 1st Class)
Chief Petty Officer 1st Class)✧ 5 Views · 0 Likes · 6 Comments
Flag
💬 Add Comment
With the end of the build of the Coromandel in sight the question has been what to do next. Building model boats I think, is a bit of an addiction and when you are retired it gives you something to think about and the hours spent in the garage/shed in silence, with only your thoughts are very relaxing and I would recommend to all.
The garage is much more comfortable at this time of year and is the time to get the dirty work done.
After doing two electrical powered boats with all the battery charging activities, I have been taken, when watching those with sail powered models, with the time that is spent by them in actually sailing the boat I thought that that should be the next project.
I spent some time looking at the various kits and ready built models available but these do not require very much effort in getting to the sailing bit.
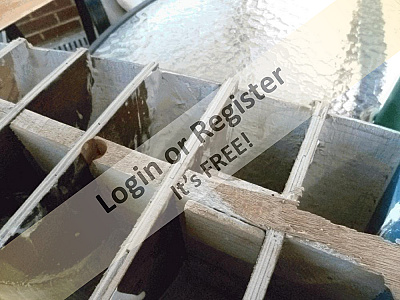
So my attention turned to the source of many of the models on this site, e-bay. After watching for a few weeks something that looked like a good start came up, a timber built yacht hull, not too far away for collection only. When I bid I did not really know what is was, as it was made as a static display, but as it sold at the starting bid price 99 p. I was not going to loose much if it ended up in the dustbin.
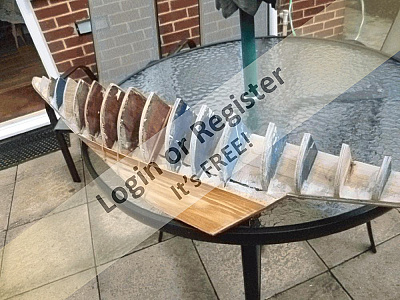
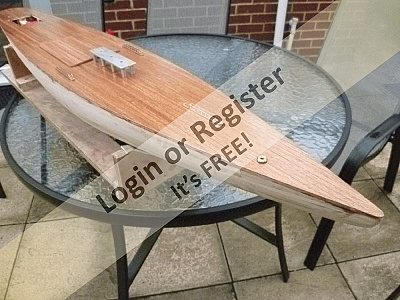
At first I was very Impressed with the item as it was built on frames and planked, I think with bambo. I expect that it was made some where in the far east and is about 48 inches long. it was obviously not water tight as there were small gaps in some places between the planks, but I thought that the solution to that was to remove the deck and line and reinforce the interior with glass fibre and resin. After removing the deck and the various bits of detail, I found that unfortunately the inside had been coated with a considerable amount of " white stuff" which looks like emulsion paint or poor quality PVA glue which I do not think will be a satisfactory surface on which to bond the fibre glass.
So what to do, my thoughts are to remove the planking ( the glue is not very strong ) to sand off all, or most of the white stuff and try and put it all together again. if this fails clean the frames and fit new planking.
If anyone has any better ideas I would be grateful for their advice.
I have attached some pics of it at present

The garage is much more comfortable at this time of year and is the time to get the dirty work done.
After doing two electrical powered boats with all the battery charging activities, I have been taken, when watching those with sail powered models, with the time that is spent by them in actually sailing the boat I thought that that should be the next project.
I spent some time looking at the various kits and ready built models available but these do not require very much effort in getting to the sailing bit.
So my attention turned to the source of many of the models on this site, e-bay. After watching for a few weeks something that looked like a good start came up, a timber built yacht hull, not too far away for collection only. When I bid I did not really know what is was, as it was made as a static display, but as it sold at the starting bid price 99 p. I was not going to loose much if it ended up in the dustbin.
At first I was very Impressed with the item as it was built on frames and planked, I think with bambo. I expect that it was made some where in the far east and is about 48 inches long. it was obviously not water tight as there were small gaps in some places between the planks, but I thought that the solution to that was to remove the deck and line and reinforce the interior with glass fibre and resin. After removing the deck and the various bits of detail, I found that unfortunately the inside had been coated with a considerable amount of " white stuff" which looks like emulsion paint or poor quality PVA glue which I do not think will be a satisfactory surface on which to bond the fibre glass.
So what to do, my thoughts are to remove the planking ( the glue is not very strong ) to sand off all, or most of the white stuff and try and put it all together again. if this fails clean the frames and fit new planking.
If anyone has any better ideas I would be grateful for their advice.
I have attached some pics of it at present
▲
⟩⟩
No likes yet
This member will receive 1 point
for every like received
This member will receive 1 point
for every like received
|
💬 a yacht yet to get a name
12 years ago by 🇬🇧 frankburgess (
 Master Seaman) Master Seaman)✧ 5 Views · 0 Likes
Flag
I used stainless threaded rod to hold the keel on..the rod was superglued deep into the wooden keel and then passed up through drillings in the hull with nuts inside pulled up tight.
S/S rod can be bought from yacht chandlers. Best Regards Frank ▲
⟩⟩
No likes yet
This member will receive 1 point for every like received |
|
Login To
Remove Ads 💬 a yacht yet to get a name
12 years ago by 🇬🇧 nasraf (
Chief Petty Officer 1st Class)✧ 5 Views · 0 Likes
Flag
Thanks Frank for your comments and your experience on restoring an old planked hull.
Your thoughts on keel modifications follow what I was thinking of doing with the removable torpedo attached to the timber keel with a couple of hex headed screws, I was thinking of making this of brass rod if I can find any at the right price. I am still planking, have done port side and part way through starboard side but it is a long job when trying to re use all the old parts. I will do a blog soon in main section on progress. ▲
⟩⟩
No likes yet
This member will receive 1 point for every like received |
|
💬 a yacht yet to get a name
12 years ago by 🇬🇧 frankburgess (
Master Seaman)✧ 5 Views · 0 Likes
Flag
Dear Nasraf
I assume what you have is a static model. The idea of fibreglassing the inside is excellent. I restored a 1952 planked pond yacht and used tissue on the inside, it makes the boat watertight and holds the hull together under the strains of sailing. I suspect you may have to rethink the keel shape as well as fitting lead ballast to get it to sail well. There are some models that fit a removable fin keel with a lead 'torpedo' so you retain its appearance for display. Good luck with it Frank ▲
⟩⟩
No likes yet
This member will receive 1 point for every like received |
|
💬 a yacht yet to get a name
12 years ago by 🇬🇧 Dave M (
 Vice Admiral) Vice Admiral)✧ 5 Views · 0 Likes
Flag
Glad to hear you have commenced work on the restoration.
If you weigh the wood you can work out if it will float by calculating the weight of the volume of water displaced. Detail is something I seem to take ages to complete. Looks like I will be still finishing next year! ▲
⟩⟩
No likes yet
This member will receive 1 point for every like received |
|
💬 a yacht yet to get a name
12 years ago by 🇬🇧 nasraf (
Chief Petty Officer 1st Class)✧ 5 Views · 0 Likes
Flag
Thanks very much Dave for your response and suggestion for a name. I rather like the suggestion of a bit of nasraf but have no need yet to make a decision as it may not even get finished.
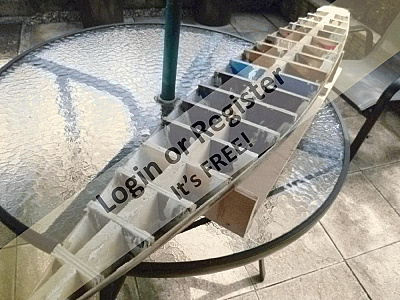
I have now taken off the port side planking, this was not too difficult as it appears that it was assembled using small amounts of Impact adhesive, and liberally coated with, I think plaster of paris. Once the planks are removed I have found that if Immersed in water for a few minutes the softened white stuff can be scraped off and when dry cleaned up with glass paper. I have now started to replank with a water proof wood adhesive but I can see it will be a long job. I intend to complete the planking and then reinforce on the inside with glass fibre. Once this is done the structure should be quite sound and then I will cut away as much of the inside structure as is sensible and practical. I could not face the idea of remaking all the frames and starting again. it is large enough to displace a lot of water, so I hope that it can stand the weight of the hull. 💭 Glad to you are still at it with the Titanic/Olympic, trouble is with the detail it takes a long time and it is not easy to see a lot for your work. 😊 ▲
⟩⟩
No likes yet
This member will receive 1 point for every like received |
|
💬 a yacht yet to get a name
12 years ago by 🇬🇧 Dave M (
Vice Admiral)✧ 5 Views · 0 Likes
Flag
HI Nasraf
Well you've certainly found yourself an interesting project 😀 Should make into a nice schooner pond type yacht. if you wish to keep the wood effect on the outside your choices are limited. My initial thought was to advise covering with glass cloth and epoxy resin but the small gaps you describe will probably show. 😰 Possibly your biggest problem is the internal construction. its basically a big plank down the centre with solid frames. For a sailing model you really need space inside for all the gear. I agree that removing all the planking is possibly the best option. 👍 You can then decide what to do with the frames. With all that wood the model may be very heavy and you will need to cut out large sections for RC gear. You may wish to consider making new frames and keel from some nice ply using the originals as templates. You can the easily cut out the centre of each frame to give you plenty of access. You can then reapply the nice clean planks you rescued. 😀 Lots of work but I know you like a challenge and its well within your capability 😀 As for a name how about "Nasreen" ▲
⟩⟩
No likes yet
This member will receive 1 point for every like received |
Login To
Remove Ads
Remove Ads
📝 yacht tgn 2
12 years ago by 🇬🇧 nasraf ( Chief Petty Officer 1st Class)
Chief Petty Officer 1st Class)✧ 5 Views · 0 Likes · 1 Comment
Flag
💬 Add Comment
A bit of an update on progress so that the story does not get too far behind.
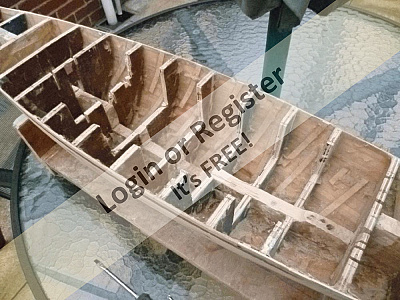
I have now removed the planking from the Port side as said below.
I have attached pics of hull with the top planking removed, I am going to leave planking on keel and pin using panel pins and cover outside with glass fibre/resin.
I have now removed the planking from the Port side as said below.
I have attached pics of hull with the top planking removed, I am going to leave planking on keel and pin using panel pins and cover outside with glass fibre/resin.
▲
⟩⟩
No likes yet
This member will receive 1 point
for every like received
This member will receive 1 point
for every like received
|
💬 yacht tgn 2
12 years ago by 🇬🇧 Dave M (
Vice Admiral)✧ 5 Views · 0 Likes
Flag
Good to see you have started.The fibre glass will sort out any leakages. I will be interested to see how you install the winches etc 😀
▲
⟩⟩
No likes yet
This member will receive 1 point for every like received |
📝 yacht tgn 3
12 years ago by 🇬🇧 nasraf ( Chief Petty Officer 1st Class)
Chief Petty Officer 1st Class)✧ 6 Views · 1 Like · 3 Comments
Flag
💬 Add Comment
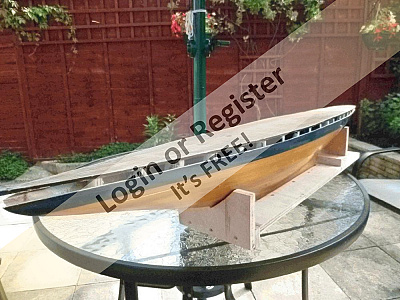
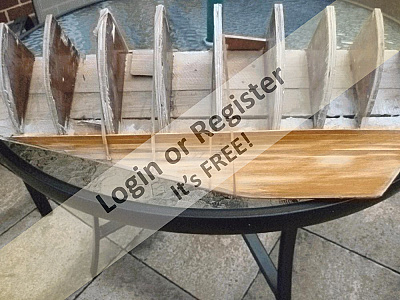
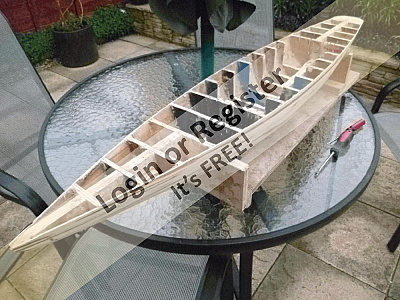
At last I have finished the re planking. This has turned out to be a longer task than anticipated, but now it is done I am gaining some satisfaction from the start of the recovery of the model.
I intially tried to replank with the intention of varnishing the timber planks, so held planks in place with rubber bands, this resulted in only being able to fit a single plank at a time. As it became obvious, that due to the loss of some planks on removal, this was not viable, I reverted to pinning the strips to the formers and removing the pins when the glue had dried.
It is necessary to use some filler in positions where the old planks have been damaged and for some reason some of the planks are a bit short now.
After lining the inside with glass fibre I cut out some of the solid formers using a circular saw, a bit of a hairy experience and a lot of sawdust.
a few pics as it is now, next task is to fit floor to cut out area and refit deck, but first is to learn a bit more about model yachts and where the holes in the deck should be as once it is on there will no way to get it off again.
▲
⟩⟩
Inkoust
|
💬 yacht tgn 3
12 years ago by 🇬🇧 Dave M (
Vice Admiral)✧ 5 Views · 0 Likes
Flag
You can use a bit of extruded aluminium channel to provide a variable mast position on the deck. Can be done as I have seen it on a one metre yacht. You will need to get some stays and adjustment turnbuckles to hold the mast vertical. I've used the Robbe fittings and they work well. I use shark fishing trace for the stays, nylon covered stainless steel, much cheaper than buying model yacht stays. Your local fishing shop should have some, they come with their own bits of tube to crimp the ends. Get some stainless wire and make your own connectors, again much cheaper than buying model yacht fixings.
Good luck 😀 ▲
⟩⟩
No likes yet
This member will receive 1 point for every like received |
|
Login To
Remove Ads 💬 yacht tgn 3
12 years ago by 🇬🇧 nasraf (
Chief Petty Officer 1st Class)✧ 5 Views · 0 Likes
Flag
Thanks Dave for comments and agree with you on the circular saw, I do not recommend it for any others.
Also agree on your comments on sails so I think now I had better spend a bit of time with the drawing board before I stick the deck on. As I like a bit of experimentation I intend to make the mast position variable so that I can learn a bit as I go along. As I do not belong to a club I only have occasional contact with other modellers, perhaps it is time that I joined the club at Yate I have been thinking of it for some time. I see some Australin billonaire is following your example and building another Titanic, although his is full size, it will be interesting to see if it happens. ▲
⟩⟩
No likes yet
This member will receive 1 point for every like received |
|
💬 yacht tgn 3
12 years ago by 🇬🇧 Dave M (
Vice Admiral)✧ 5 Views · 0 Likes
Flag
Well you certainly have started. You are a brave man to have used a circular saw for such a purpose.
Unless you intend to have all your rigging above deck you may need to remove some more formers. I suggest a pin saw as this will be much safer and the blade can be turned thro' 90 degress to cut across the bottoms. You really now need to have a sail plan of some sort as the final handling of the yacht is very dependant on you mast position. It may be helpful to enlist the help of a local fellow club member who sails yachts to advise the best rig. Hull finish looks good, Should be nice and watertight. 😀 ▲
⟩⟩
No likes yet
This member will receive 1 point for every like received |
📝 ytgn 4
12 years ago by 🇬🇧 nasraf ( Chief Petty Officer 1st Class)
Chief Petty Officer 1st Class)✧ 5 Views · 0 Likes · 4 Comments
Flag
💬 Add Comment
Thanks Dave for your last comments I have a tackle shop quite near and have used it but will have to look for shark bits.
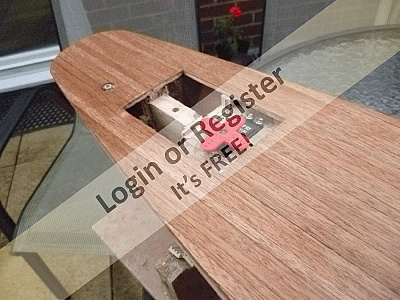
I have now attached old deck to rest of hull and finished adding filler to all the Imperfections, as the old deck had heavy scribe lines for planking I have fitted upside down and will plank with individual mahogany 1 mm by
8 mm strips.
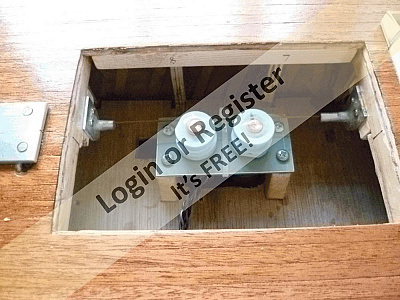
I have installed the sail winch and aluminium tubes, to run the control line for and aft through brass grommets on the deck.
From my brother in law's vast store of fishing rods ( obtained from numerous car boot sales ) he has supplied me with a suitable glass fibre tapered tube for a mast.
A few pics attached as it is now.


I have now attached old deck to rest of hull and finished adding filler to all the Imperfections, as the old deck had heavy scribe lines for planking I have fitted upside down and will plank with individual mahogany 1 mm by
8 mm strips.
I have installed the sail winch and aluminium tubes, to run the control line for and aft through brass grommets on the deck.
From my brother in law's vast store of fishing rods ( obtained from numerous car boot sales ) he has supplied me with a suitable glass fibre tapered tube for a mast.
A few pics attached as it is now.
▲
⟩⟩
No likes yet
This member will receive 1 point
for every like received
This member will receive 1 point
for every like received
|
💬 ytgn 4
12 years ago by 🇿🇦 hawkgripen (
 Able Seaman) Able Seaman)✧ 6 Views · 0 Likes
Flag
hI nasraf
by the looks of the boat it looks a lot like the old J Class yachts. do some research to see any familarity. Just search for "j class yachts" on the net. otherwise u are doing a great job. ▲
⟩⟩
No likes yet
This member will receive 1 point for every like received |
|
Login To
Remove Ads 💬 ytgn 4
12 years ago by 🇬🇧 Dave M (
Vice Admiral)✧ 5 Views · 0 Likes
Flag
Seems OK on basis of 1L = 1Kg. I am assuming this is the bare hull weight and ballast will be extra? 😀
▲
⟩⟩
No likes yet
This member will receive 1 point for every like received |
|
💬 ytgn 4
12 years ago by 🇬🇧 nasraf (
Chief Petty Officer 1st Class)✧ 5 Views · 0 Likes
Flag
HI Dave
As I have done away with my bath and only have shower now, flotation tests are more of a problem and my paddling pool is not deep enough for the yacht, and too much hard work to blow up.. I am not sure that I want to put it in the water before the outside is sealed. Therefore have done a rough calculation that indicates a displacement of about 20 litres, as it at present weighs 3.5 Kg there should not be a problem. ▲
⟩⟩
No likes yet
This member will receive 1 point for every like received |
|
💬 ytgn 4
12 years ago by 🇬🇧 Dave M (
Vice Admiral)✧ 5 Views · 0 Likes
Flag
Coming on apace. Have you tried it in water yet to see how it floats? 😀
▲
⟩⟩
No likes yet
This member will receive 1 point for every like received |
📝 ytgn 5
12 years ago by 🇬🇧 nasraf ( Chief Petty Officer 1st Class)
Chief Petty Officer 1st Class)✧ 5 Views · 0 Likes
Flag
💬 Add Comment
Thanks very much for your comments and your reference to the J class and subsequent research has changed my course of action.
I was thinking of making it a vintage Marblehead, but it is fairly obvious that the model was originally a J class and although it was a static model, its length of 119.5 cms fits it into the size required.Also when I first obtained it the deck works were in keeping with this class, various cabins and a lot of winches.
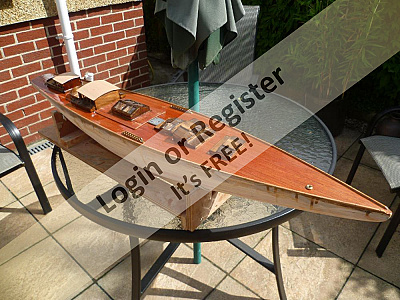
I have attached some pics of boat now that deck is planked and my scheme for a variable mast position, this will now be altered to a fixed mast as I intend to make it a sort of J class, I do not want to limit myself too much as it is only intended to be for amusement.
I have so far only done a bit of research, so have a number of points to resolve. I do not now want to use a torpedo keel ballast, so will have to look into a lead cast block and probably cut off some of the existing timber keel structure.
Another problem will be the rudder, if I try and fit one like the original, as this has a tilted axis this will be difficult to do now that I have fitted the deck, what I might do is to fit a fixed blade to the keel and fit a removalable fin one when sailing.
I also have a problem now with fitting the control line on the centre line of the boat, but this is what model building is about, SOMETHING TO KEEP THE MIND ACTIVE.

I was thinking of making it a vintage Marblehead, but it is fairly obvious that the model was originally a J class and although it was a static model, its length of 119.5 cms fits it into the size required.Also when I first obtained it the deck works were in keeping with this class, various cabins and a lot of winches.
I have attached some pics of boat now that deck is planked and my scheme for a variable mast position, this will now be altered to a fixed mast as I intend to make it a sort of J class, I do not want to limit myself too much as it is only intended to be for amusement.
I have so far only done a bit of research, so have a number of points to resolve. I do not now want to use a torpedo keel ballast, so will have to look into a lead cast block and probably cut off some of the existing timber keel structure.
Another problem will be the rudder, if I try and fit one like the original, as this has a tilted axis this will be difficult to do now that I have fitted the deck, what I might do is to fit a fixed blade to the keel and fit a removalable fin one when sailing.
I also have a problem now with fitting the control line on the centre line of the boat, but this is what model building is about, SOMETHING TO KEEP THE MIND ACTIVE.
▲
⟩⟩
No likes yet
This member will receive 1 point
for every like received
This member will receive 1 point
for every like received
📝 ytgn 6
12 years ago by 🇬🇧 nasraf ( Chief Petty Officer 1st Class)
Chief Petty Officer 1st Class)✧ 5 Views · 0 Likes
Flag
💬 Add Comment
I have been following Dave M's progress on his Bristol cutter, as I am contemplating similar problems with the yacht.
I have not progressed much on my build, but have done a lot of research on the J Class and have come to the conclusion to try and reproduce one particular boat, this will resolve the name problem but gives rise to others.
As far as I can determine all 10 of the J class boats were different as far as their deck arrangements were concerned and not much information is available on the various details. So as I wanted to construct a uk designed and built boat and one that had a lot of photographs on the web, I have decided on the Velsheda.
The Velsheda has 2 inset
▲
⟩⟩
No likes yet
This member will receive 1 point
for every like received
This member will receive 1 point
for every like received
📝 ytgn6 part 2
12 years ago by 🇬🇧 nasraf ( Chief Petty Officer 1st Class)
Chief Petty Officer 1st Class)✧ 5 Views · 0 Likes · 4 Comments
Flag
💬 Add Comment
My last post got a bit messed up and some was left off so here is part 2.
The Velsheda has 2 inset cockpits that are inserted through the deck so I shall have similar sealing problems to Dave's so I shall be interested in how he resolves them. The J Class boats seem to spend a lot of their time in a very tilted mode with part of the deck under water, I am going to restrict the height of the sail rig to make it more manageable.
On a yacht blog site I have seen,there is a lot of worry about casting lead, with the respect to water in the mould and the need to get the C of G as low as possible, I shall revert to my original scheme of a detachable torpedo ballast cast in a metal tube.
▲
⟩⟩
No likes yet
This member will receive 1 point
for every like received
This member will receive 1 point
for every like received
|
💬 ytgn6 part 2
12 years ago by 🇬🇧 nasraf (
Chief Petty Officer 1st Class)✧ 5 Views · 0 Likes
Flag
Thanks hawkgripen for your various comments and advice, I have been a bit busy recently on various things, but on Valsheda making various deck structures.
I do not think I will re build in fibre glass as I have spent too much time on restoring the timber structure, I am not much worried how well it goes, as I think I like building the models rather than sailing them. I have reverted to the original scheme of using a detachable ballast on the keel, I have now drilled the holes to fit threaded inserts for attachment. The ballast will be a copper tube filled with lead with turned streamlined ends, this will be a little way off yet as I still have a lot of detail to do. The next two major tasks are mast and rigging and sail control system, then the sails and then the ballast. When I have finished the structures on the deck I will update the blog, but it is getting a bit cold in the garage so it is not as inviting as the settee and TV. ▲
⟩⟩
No likes yet
This member will receive 1 point for every like received |
|
Login To
Remove Ads 💬 ytgn6 part 2
12 years ago by 🇿🇦 hawkgripen (
Able Seaman)✧ 6 Views · 0 Likes
Flag
HI again Nasrat. Been thinking since last comment. Seeing that you have internal issues on the boat why dont you finish off the outisde and make a mould from it. Finish it off externally and keep as original as received as a static. Fibre glass a new one and you have all the space required to do the internals. Have also read somewhere that the RC J builders == build out, extend the keel profile to lower the c of g and to get weight as low as possible. This results in a bigger rudder but remember you have a big yacht.
Still thinking. hawkgripen ▲
⟩⟩
No likes yet
This member will receive 1 point for every like received |
|
💬 ytgn6 part 2
12 years ago by 🇿🇦 hawkgripen (
Able Seaman)✧ 6 Views · 0 Likes
Flag
h
HI there, I'm a bit slow on net and would like to know if you have cast the ballast yet. Could have possible solution for you. is the "lead area" in keel of yacht hollow. ▲
⟩⟩
No likes yet
This member will receive 1 point for every like received |
|
💬 ytgn6 part 2
12 years ago by 🇬🇧 DavyJones (
 Recruit) Recruit)✧ 5 Views · 0 Likes
Flag
We were casting lead to make fishing weights as kids and we're still here. Don't let the health & safety boys put you off!
As with most things in life its about reducing risks and a little common sense goes a long way. Just remember you are playing with molten metal and take suitable precautions. Hear are some suggestions based on my experience (cock ups) casting metals of various types over the years. Most accidents are caused either during the melting, transport or pouring of the molten metal (or in the mould itself). 1. Wear stout shoes, gloves & eye protection (and a jacket & long trousers) keep exposed skin to a minimum! 2. Think what might go wrong (eg if you drop the container of molten metal). Do a dry run & clear any obstructions out of the way. 3. Don't balance your crucible (ladle/saucepan) over a flame and then be surprised when it tips over and spills lead everywhere - make sure its supported and stable. 4. Use a suitable container to hold the lead - make sure its strong enough - especially the handle attachment. A long handle is better than a short one Two handles are even better - more so as the amount (and therefore weight) of lead increases. 5. Molten metal mould water = steam = bang. Make sure the mould is dry - Put it in the oven at 100 deg for at least an hour - if you're still not sure leave it a day & repeat! Plaster/clay/cement moulds take longer than you think to dry out so be patient as if you put them in the oven damp they will crack (or explode - this is still better than going bang when you are pouring the lead so don't skip this stage). I prefer MDF/wood moulds as they are simpler (and if you can't tell when these are wet you probably shouldn't be attempting this). 6. Make sure the mould is stable and adequately supported - (remember you are adding weight) 7. Don't stand directly over your mould when pouring and have it tilted mould slightly away from you - if the worst happens the lead will make a rapid exit. You will not have time to duck so make sure you are not going to be in its way before hand. Lastly if something goes wrong don't be a hero. Get out of the way and let the accident happen on its own - that way you will still be around to deal with the consequences (and face the music if you are daft enough to do this in the kitchen). If you follow these steps you will reduce the risks by 99%. By the way if you are thinking of using sand as a mould - Bake silver sand it until its bone dry and add engine oil as a binder - won't do complex shapes and stinks of burning oil but will produce simple castings quickly. Safe Building! ▲
⟩⟩
No likes yet
This member will receive 1 point for every like received |
📝 ytgn 7
11 years ago by 🇬🇧 nasraf ( Chief Petty Officer 1st Class)
Chief Petty Officer 1st Class)✧ 6 Views · 1 Like · 3 Comments
Flag
💬 Add Comment
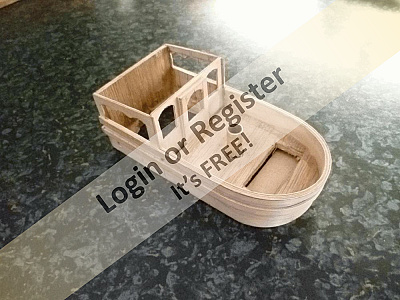
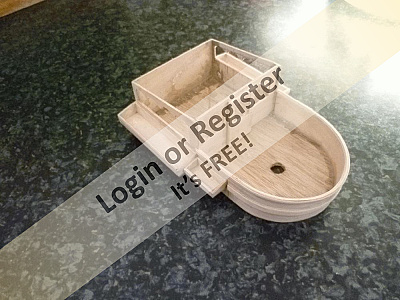
At last a bit of progress to report. it has taken some time to design and make the various deck structures, the attached pics show the bits all made from 2 mm ply.
There are a lot of glazed windows on the Valsheda, so I thought a good method of making the multiple units is to cut the complete window outline and to make the glazing from 2 mm perspex, to glue these in initially with double sided tape, as used by dress makers and when fitted to apply a generous coat of epoxy resin over all the outside surfaces thus providing a fillet of adhesive between the perspex and the timber frame. The intermediate glazing bars then being glued to the perspex. in this way thin glazing bars can be fitted and the glue does not extrude around the frame. A further coat of epoxy resin is then applied over all the assembly.
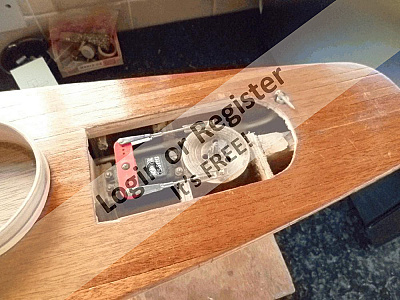
The rudder servo and linkages have been modified in order that the rudder can be removed for transport, this being held in place by a turned brass tube nut which represents the binnacle in the stern cockpit.
At present the two cabin and cockpit assemblies are removeable from the deck so the problems of overcoming the leakage into the hull still have to be resolved, the most likely solution will be to seal the main cabin assembly to the deck with silicone sealant, but as the aft assembly will require to be removable, some more thought will be required.
Twin winches for sail control have been fitted, these are made from 6 volt motor gearbox units fitted with drums. The intention is to run the sail sheets round the drums with the tension being provided by elastic bands housed in aluminium tubes running for and aft.
There are a lot of glazed windows on the Valsheda, so I thought a good method of making the multiple units is to cut the complete window outline and to make the glazing from 2 mm perspex, to glue these in initially with double sided tape, as used by dress makers and when fitted to apply a generous coat of epoxy resin over all the outside surfaces thus providing a fillet of adhesive between the perspex and the timber frame. The intermediate glazing bars then being glued to the perspex. in this way thin glazing bars can be fitted and the glue does not extrude around the frame. A further coat of epoxy resin is then applied over all the assembly.
The rudder servo and linkages have been modified in order that the rudder can be removed for transport, this being held in place by a turned brass tube nut which represents the binnacle in the stern cockpit.
At present the two cabin and cockpit assemblies are removeable from the deck so the problems of overcoming the leakage into the hull still have to be resolved, the most likely solution will be to seal the main cabin assembly to the deck with silicone sealant, but as the aft assembly will require to be removable, some more thought will be required.
Twin winches for sail control have been fitted, these are made from 6 volt motor gearbox units fitted with drums. The intention is to run the sail sheets round the drums with the tension being provided by elastic bands housed in aluminium tubes running for and aft.
▲
⟩⟩
sandkb
|
💬 ytgn 7
11 years ago by 🇬🇧 nasraf (
Chief Petty Officer 1st Class)✧ 5 Views · 0 Likes
Flag
HI hawkgripen
Long time since looking at site what with Christmas, the weather and computer problems. Thanks for suggestions and I think I will have to silicone the two cabin assemblies, as with any luck these may not need to be removed. The main equipment will be installed in under the main hatch and I think I will seal this with a rubber gasket, the cover being held in place by magnets and steel strips, these rare earth magnets are very powerful and provide quite a high holding force. ▲
⟩⟩
No likes yet
This member will receive 1 point for every like received |
|
Login To
Remove Ads 💬 ytgn 7
11 years ago by 🇿🇦 hawkgripen (
Able Seaman)✧ 6 Views · 0 Likes
Flag
Looks like I was "cut off" with the above message.
Regarding the housing installation I think the most Important section that must be readily available is the pit area where the electronic /electrical equipment is in . By looking at the photos I would suggest that you silicon the rudder housing down. I dont know what the bottom of the structures look like. What I did was to glue a strips of wood on the insides of the opening, extending approx 6-10 mm above the deck, where the house must come over. if you have enough clearance on the underside of your house then it fits over the strips thereby preventing water from washing in. Give me some time , need to take a photo to show you. ▲
⟩⟩
No likes yet
This member will receive 1 point for every like received |
|
💬 ytgn 7
11 years ago by 🇿🇦 hawkgripen (
Able Seaman)✧ 6 Views · 0 Likes
Flag
Morning Nasraf. good to hear from you again.
Been waiting to see progress. ▲
⟩⟩
No likes yet
This member will receive 1 point for every like received |
📝 ytgn 8
10 years ago by 🇬🇧 nasraf ( Chief Petty Officer 1st Class)
Chief Petty Officer 1st Class)✧ 6 Views · 1 Like · 1 Comment
Flag
💬 Add Comment
It has been a very long time since I did any thing to the Valsheda I had reached a stage where I had to do something difficult so it has sat there for close on 18 months. I have also become very in volved with the Bristol Aero Collection that now takes up a lot of my time restoring various bits of guided weapon equipment.
Any how thats my excuse, the bit I did not want to do was to fit the strips along the top edges of the deck, eventually I got the dremel out and fitted a 1.5 mm drill and drilled a lot of holes in the strips and then marked through to the deck and retained with panel pins. Then took them all out and refitted using epoxy glue and put the pins the whole way in. Then repainted the deck and strips with 2 part epoxy varnish. The heads of the pins are not flush in all cases so I will have to do a bit of careful fileling. Eventually I intend to cover the strips with the same colour as the hull.
I attach a few pictures as she is with the various deck fittings, next job is to make the mast and various rigging.
▲
⟩⟩
sandkb
|
💬 ytgn 8
10 years ago by 🇬🇧 Dave M (
Vice Admiral)✧ 5 Views · 0 Likes
Flag
Good to see you have not abandoned us altogether.
The model is looking quite superb and I look forward to seeing how you progress. 😀 ▲
⟩⟩
No likes yet
This member will receive 1 point for every like received |
📝 ytgn 9
10 years ago by 🇬🇧 nasraf ( Chief Petty Officer 1st Class)
Chief Petty Officer 1st Class)✧ 8 Views · 1 Like
Flag
💬 Add Comment
Now back in harness am begining to make some progress.
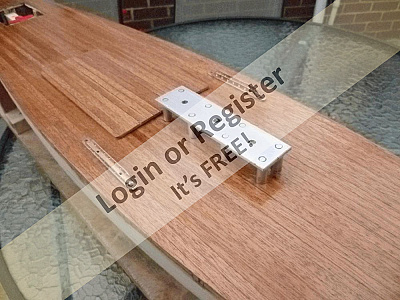
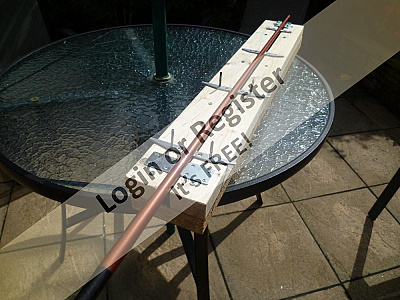
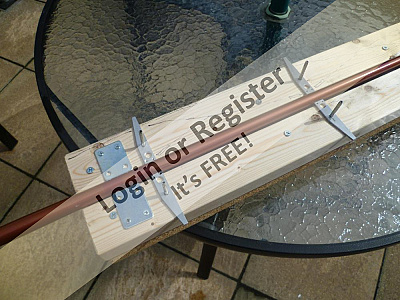
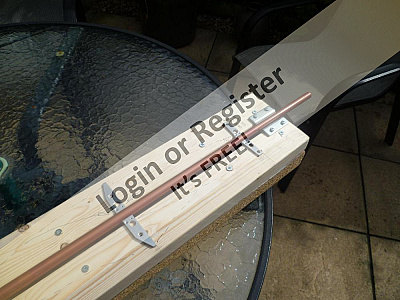
This is to manufacture the mast and rigging. The mast is made from a piece of fishing rod, it is a bit big and out of scale but is quite robust and I am not trying to make a true scale boat.
The spreaders are made from 1/8 thick aluminium sheet and are once again not true to scale but are quite strong and make fitting to slots in the mast a bit stronger.
In order to fit and glue the spreaders in the mast I made a jig to ensure that all were held in alignment during the fitting and glueing process this is shown in attached pics.
Since my early contributions on this subject I find the Improvements to this site are very Impressive and those involved in all the work that has been done deserve our great thanks and a bit of a contribution to the pot to cover the costs.
▲
⟩⟩
sandkb


Login To
Remove Ads
Remove Ads