Join Us On Social Media!

|

|

|
Download The App!
Login To
Remove Ads
Remove Ads
Login To
Remove Ads
Remove Ads
Model Boats Website
Arduino and model boats
8 Posts · 9 Followers · 4 Photos · 26 Likes
Began 4 years ago by
 United Kingdom
Follow This Thread
Not currently following
> Click to follow
> Click to follow
Latest Post 4 years ago by
| Oldest posts shown first (Show Newest First) | (Print Booklet) |
📝 Arduino and model boats
4 years ago by 🇬🇧 G6SWJ ( Midshipman)
Midshipman)✧ 16 Views · 4 Likes · 4 Comments
Flag
💬 Add Comment
PART ONE
Hello – it’s great to see that there are a bunch of you interested in Arduino and model boats
I love playing with Arduino, I learn something new almost every day and find it mentally stimulating and rewarding working through the “How can I do this” of an Arduino project.
It’s a big topic and comes with a set of it’s own jargon so it can be difficult to know where to start, how much is it going to cost, where can I purchase the boards etc. etc.
There are some fundamental building blocks that you need in place to be able to start your Arduino journey and it can be all to easy to give up on the subject when you hit a brick wall.
My approach will be blended learning – there are some fabulous free learning resources on the internet – these are top notch well thought out and well-presented short videos.
We all have different levels of understanding about Arduino – I will pitch the posts at those just starting their adventure – read on past if this is not you and and you come across familiar territory and maybe check back in when things get a bit more juicy.
A taster for some of the projects to come
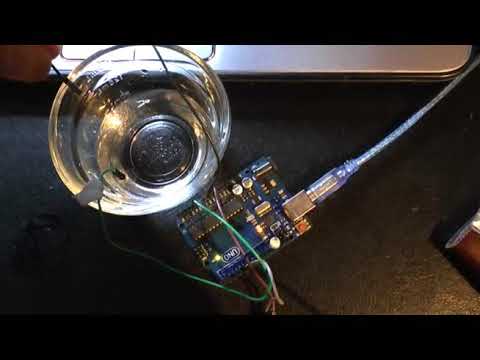
A bilge water alarm -


Hello – it’s great to see that there are a bunch of you interested in Arduino and model boats
I love playing with Arduino, I learn something new almost every day and find it mentally stimulating and rewarding working through the “How can I do this” of an Arduino project.
It’s a big topic and comes with a set of it’s own jargon so it can be difficult to know where to start, how much is it going to cost, where can I purchase the boards etc. etc.
There are some fundamental building blocks that you need in place to be able to start your Arduino journey and it can be all to easy to give up on the subject when you hit a brick wall.
My approach will be blended learning – there are some fabulous free learning resources on the internet – these are top notch well thought out and well-presented short videos.
We all have different levels of understanding about Arduino – I will pitch the posts at those just starting their adventure – read on past if this is not you and and you come across familiar territory and maybe check back in when things get a bit more juicy.
A taster for some of the projects to come
A bilge water alarm -
▲
⟩⟩
MouldBuilder
Colin H
Julio
Martin555
|
💬 Re: Arduino and model boats
4 years ago by 🇭🇺 MouldBuilder (
 Vice Admiral) Vice Admiral)✧ 13 Views · 1 Like
Flag
I will be following with great interest. I bought a 32 exercise Arduino starter pack some time ago which is still unused. Time to get cracking I think. I am in quarantine now so I should find some time to start.
Thanks for all of your time you are giving us Jonathan. It is much appreciated. Peter.👍 ▲
⟩⟩
Martin555
|
|
Login To
Remove Ads 💬 Re: Arduino and model boats
4 years ago by 🇩🇪 Hellmut1956 (
 Master Seaman) Master Seaman)✧ 17 Views · 2 Likes
Flag
It is great to see another one trying to add to the toolbox of the naval modeler the use of electronics. About more than a decade ago I had been disappointed by the poor implementation of a multi prop module from robbe. During just a weekend a friend, also a naval modeler and myself, build a small board using the avr mega8 controller and were able to display a numeric value of each of the 8 channels signal on an 80x4 display. From there it was just a small step to have these simple circuits offer full functional operation and control of 8 servos from a single signal, a single channel of an RC system. In those days this was a simple and cheap way to achieve this.
Today, with an Arduino UNO clone for less than 5 Euros from China and with a tremendously more powerful controller, the AT mega328P is the cheapest and easiest way to use electronics to implement the desired functionality, RC controlled, into your model. The Arduino IDE, the programming environment, additionally makes the programming and loading of programs on the controller. This will open a world of possibilities as a powerful tool for naval modelers. When you look on the circuit board of an Arduino UNO, is really not more than making available all pins of the controller on pins of the board. In my days we programmed the atmega8 with a Basic compiler, BASCOM. The great think of this compiler ist that may of the instructions it offers are building blocks for naval modelers projects. Here you find the Basic compiler which can do programs the size most of the projects might require and it is for free. The purchased version, as I own it, in my opinion is worth it once you have projects exploding in your mind. ▲
⟩⟩
Martin555
Colin H
|
|
💬 Re: Arduino and model boats
4 years ago by 🇪🇸 Julio (
 Petty Officer 1st Class) Petty Officer 1st Class)✧ 24 Views · 2 Likes
Flag
Hi:
I am added to the study group ... if you like it. ▲
⟩⟩
xtramaths
Martin555
|
|
💬 Re: Arduino and model boats
4 years ago by 🇬🇧 Martin555 (
 Fleet Admiral) Fleet Admiral)✧ 14 Views · 2 Likes
Flag
Hi Jonathan,
I started learning Arduino after watching Paul Mcwhorter's videos. I only learnt to switch a few lighting circuits on and off and some Morse signals then promptly forgot it. I must try and do better LOL!!! Martin555. ▲
⟩⟩
Colin H
Julio
|
Login To
Remove Ads
Remove Ads
📝 Arduino & Model Boats - Part 2
4 years ago by 🇬🇧 G6SWJ ( Midshipman)
Midshipman)✧ 16 Views · 4 Likes · 6 Comments
Flag
💬 Add Comment
If you have watched the “setting the scene” videos from Part 1 you should now be more familiar with some aspects of Arduino.
I am going to suggest that you don’t purchase any boards or accessories right now. Wait until we have covered a bit more of the topic – you will be able to judge then whether this is for you or not and therefore save wasting money.
In Summary:
> Arduino is open source and anybody can manufacture the boards – if not made by Arduino(Italy) then they should have a different name e.g. Seeeduino
> The boards have inputs and outputs (Analog 0-5v, Digital 0 or 5v)
> It is necessary to select the com (communication) "port" in the IDE that the Arduino board is connected to
> It is necessary to select which Arduino board type (Uno,Nano etc) you are using in the IDE
> Programs (also known as Sketches) are written in the free IDE computer software
> Programs are uploaded from the IDE to the Arduino board using a USB cable
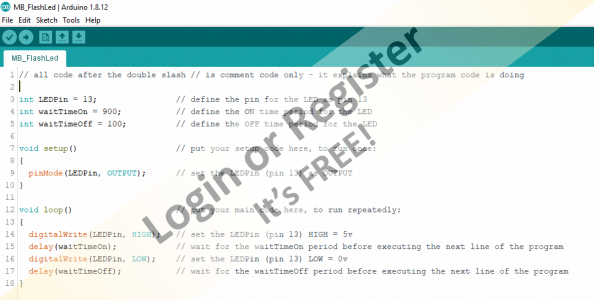
The next video shows you how to write a very simple program to flash an LED - the full program code can be seen in the attached image
I am going to suggest that you don’t purchase any boards or accessories right now. Wait until we have covered a bit more of the topic – you will be able to judge then whether this is for you or not and therefore save wasting money.
In Summary:
> Arduino is open source and anybody can manufacture the boards – if not made by Arduino(Italy) then they should have a different name e.g. Seeeduino
> The boards have inputs and outputs (Analog 0-5v, Digital 0 or 5v)
> It is necessary to select the com (communication) "port" in the IDE that the Arduino board is connected to
> It is necessary to select which Arduino board type (Uno,Nano etc) you are using in the IDE
> Programs (also known as Sketches) are written in the free IDE computer software
> Programs are uploaded from the IDE to the Arduino board using a USB cable
The next video shows you how to write a very simple program to flash an LED - the full program code can be seen in the attached image
▲
⟩⟩
billmcl61
RNinMunich
Colin H
Martin555
|
💬 Re: Arduino & Model Boats - Part 2
4 years ago by 🇬🇧 G6SWJ (
Midshipman)✧ 15 Views · 3 Likes
Flag
Hi Rick,
All Martin said and - Yes the Nano can be used - it's great for model boats as it has a small footprint. It is easy to connect more than one Nano together to form distributed processing if we need more input/output pins or more processing power. Regards Jonathan ▲
⟩⟩
Martin555
Colin H
RNinMunich
|
|
Login To
Remove Ads 💬 Re: Arduino & Model Boats - Part 2
4 years ago by 🇩🇪 RNinMunich (
Fleet Admiral)✧ 13 Views · 1 Like
Flag
"Great article but can it be transferred to the "HOW TO" section "
I 'see' your thinking Mike, but the advantage of leaving it as a Blog is that we can print the whole caboosh as a Booklet😁 Finding it again later should be easy enough by simply searching for Arduino! Cheers, Doug 😎 PS Another advantage is that here we can add comments and ask questions, which is not easily possible in the How To section. One (anyone) can only make revisions - which might lead to chaos.😮 As far as I know there are only four of us at the moment who can alter Blog posts in addition to the originator, and only one of those has direct experience of Arduino programming. Cheers, Doug 😎 ▲
⟩⟩
Martin555
|
|
💬 Re: Arduino & Model Boats - Part 2
4 years ago by 🇬🇧 Colin H (
Fleet Admiral)✧ 13 Views · 1 Like
Flag
Good video, I believe I can understand your explanation and I will be trying it for myself.
Following with great interest, thanks, Colin. ▲
⟩⟩
Martin555
|
|
💬 Re: Arduino & Model Boats - Part 2
4 years ago by 🇬🇧 mturpin013 (
 Admiral) Admiral)✧ 14 Views · 2 Likes
Flag
Great article but can it be transferred to the "HOW TO" section otherwise it will as time goes on disappear as the blogs move on, in the "HOW TO" section it will always be available.
▲
⟩⟩
Martin555
RNinMunich
|
|
💬 Re: Arduino & Model Boats - Part 2
4 years ago by 🇬🇧 Martin555 (
Fleet Admiral)✧ 12 Views · 0 Likes
Flag
Hi Rick,
I have used a Mega, Uno and a Nano and they all program the same. Hope this helps. Martin555. ▲
⟩⟩
No likes yet
This member will receive 1 point for every like received |
|
💬 Re: Arduino & Model Boats - Part 2
4 years ago by 🇨🇦 Newby7 (
Fleet Admiral)✧ 13 Views · 1 Like
Flag
I liked the videos but not sure yet if can use the nano.
Rick ▲
⟩⟩
Martin555
|
📝 Arduino & Model Boats - Part 3
4 years ago by 🇬🇧 G6SWJ ( Midshipman)
Midshipman)✧ 16 Views · 4 Likes
Flag
💬 Add Comment
HINTS AND TIPS
>>DOCUMENT your code as you go
We can add comments to our program code to help us understand what each line or section is doing. All text on the same line after a double forward slash is defined as a comment
e.g. // This is a comment
This has no effect on the program code or memory use when uploaded to the Arduino.
In a simple program this may seem unnecessary – it is however a good habit to adopt. When you open a program 6 months down the road you may find you look at the code you wrote and struggle to understand your long forgotten logic – it can be very annoying when you can’t understand your own code!
>>SAVE your program regularly with a different name
I use an approach where I give the program a name and suffix _xxx.
xxx is simply an incremental serial number “MyLedFlasher_001.ino”, “MyLedFlasher_002.ino” etc
Often my enthusiasm overruns and I change lots of lines of code all at the same time only to find the program does not do what I expected or results in an error. If you have overwritten your previous working copy with the same file name you will feel your blood pressure rising. When the going gets tough I rename after each and every change - trust me this approach pays dividends...
>>SYNTAX – what is it?
Definition = “the structure of statements in a computer language”
There are a set of rules (syntax) you need to comply with in order for the IDE to accept your program code as valid.
For example one syntax rule is most lines of code require the “line terminator character” – a semi colon to be added to each line of code to tell the IDE “end of line”.
If you make Syntax errors then the code will not upload(compile) to the Arduino board and you will be left with an orange error bar at the bottom of screen and some error text hinting at what might be wrong with your code.
Another example of a Syntax error is incorrect use of lower case or capital letters for program commands.
digitalWrite(LEDPin, HIGH); is valid syntax and works
digitalwrite(LEDPin, HIGH); is invalid syntax and does not work as the letter w is in lower case
Brackets are always used in pairs - open and close () or {} - it is easy when code gets more complex to omit a bracket
Get used to the orange error bar and syntax errors they happen all the time to all programmers – or at least it does for me.
You will get familiar with solving the errors over time – some can take a few minutes to work out what you have done wrong.
In the worst case it can be best to take a step backwards – open the previous saved working version, rename it so the working version is left untouched and then start again with your changes.
-x-x-x-x-x-x-x-x-x-x-x-x-x-x-x-x-x-x-x-x-x-x-x-x-x-x-x-x-x-x-x-
So that was some heavy stuff, on a lighter note looking forward to some of the upcoming projects I will touch on - very happy to add requests to this list
Bilge water alarm
Temperature Alarm
Dimming LED’s
Morse code & Aldis lamp signalling your own message
Simulating rotating emergency light
Moving a servo - this could be to let down a ramp or simulating gun turret movement
Slowing down servo movement
Running a servo movement sequence
Automatic ballast trim to correct/rebalance vessel leaning to one side or other
Active stabilisers
Reading the receiver channels
Engine sound device
Switching 16 circuits from just one transmitter stick
Holding a compass heading
Remember Rome was not built in a day - Be patient with yourself and enjoy this fascinating topic
Regards
Jonathan
▲
⟩⟩
billmcl61
Colin H
RNinMunich
Martin555
📝 Arduino & Model Boats - Part 4
4 years ago by 🇬🇧 G6SWJ ( Midshipman)
Midshipman)✧ 17 Views · 5 Likes
Flag
💬 Add Comment
Summary of learning points so far:
> Arduino is open source – anybody can make the boards
> Arduino boards have inputs and outputs - analog (0-5v) and digital 0 or 5v
> We use the IDE to write our code and upload it via a USB cable to the Arduino board
> We need to tell the IDE which com “port” and type of Arduino board we are using
> Programs are also known as sketches
> Programs have 2 parts – SETUP runs once as the program starts and LOOP that runs continually
> DOCUMENT code as you create it using // This is a comment
> SAVE your code regularly using a new name each time, the name hints at what the program does – e.g. MyLedFlasher_001, MyLedFlasher_002, etc
> Syntax – a set of language rules you must comply with
>> Terminate lines with ;
>> Use upper and lower case appropriately where needed
>> Brackets always used in pairs – open and close
Future topics we will cover:
+ Data types
+ Compiling code
+ Debugging code
+ Functions
+ Common programming structures/concepts e.g. "If this then do that"
+ Command sheets
+ Addin libraries
+ Interrupts
+ Serial monitor
+ Debouncing
+ i2c & SPI
+ PWM = pulse width modulation
+ Sensors
+ Arduino performance
+ How to power the Arduino
+ Quick glimpse at ATtiny, Teensy and esp32
And the command I hate the most “delay” - like driving a Ferrari with the hand brake on...
Regards
Jonathan
▲
⟩⟩
billmcl61
Julio
MouldBuilder
RNinMunich
Martin555
📝 Arduino & Model Boats 5
4 years ago by 🇬🇧 G6SWJ ( Midshipman)
Midshipman)✧ 15 Views · 3 Likes
Flag
💬 Add Comment
After this buidling block hopefully things will start to fall into place and become more interesting - hold the faith👍
The next building block we are going to cover is the IDE SERIAL MONITOR.
The SERIAL MONITOR allows us to “see” what is going “under the hood” of our program – it’s a bit like having a see-through oven door! to get used to how it works we will send a simple message from the Arduino to the IDE Serial Monitor on our desktop computer.
The SERIAL MONITOR is mainly used during program development & debugging to help identify what is going on inside our program LOOP as will be seen in the next tutorials..
Using the SERIAL MONITOR we can:
>>> Receive data from the Arduino serial port (serial = one character after the other)
>>> Send DATA to the Arduino serial port. (which I am not going to cover here)
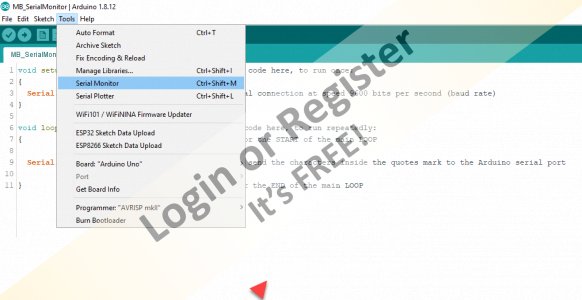
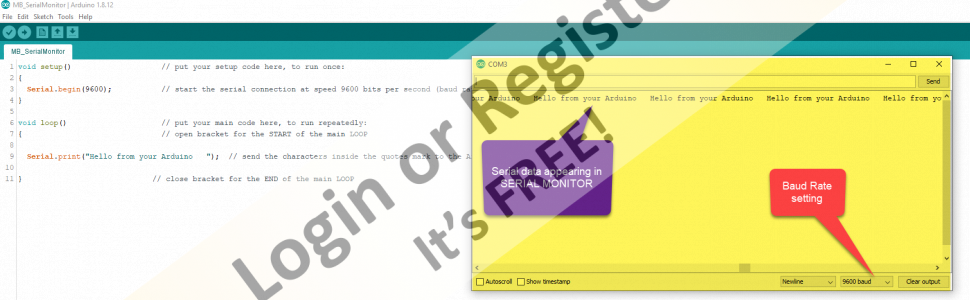
The SERIAL MONITOR is accessed through the IDE command ribbon by selecting “TOOLS” and then “SERIAL MONITOR” - when selected a popup window opens on your computer which is the SERIAL MONITOR. (see pic 2)
To send serial data from the Arduino to the SERIAL MONITOR we have to:
In SETUP
Start the serial connection using the command Serial.begin(speed) where speed for serial communication is one of the following Supported baud rates are 300, 600, 1200, 2400, 4800, 9600, 14400, 19200, 28800, 31250, 38400, 57600, and 115200
In the program LOOP
We need to send data to the serial port - to do this we use this command
Serial.print(); an example might be Serial.print(“hello from your Arduino”);
Everything between the quote marks will be sent to the Arduino serial port and be received by the IDE SERIAL MONITOR via the USB cable and displayed in the desktop IDE popup window.
The serial monitor popup in image 3 is highlighted in yellow
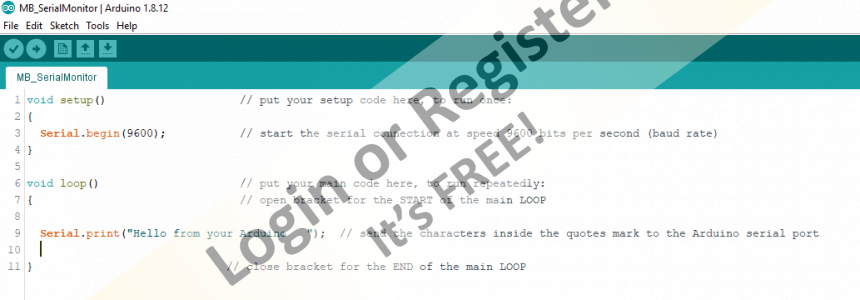
The example program is detailed in image 1 and also below
void setup() // put your setup code here, to run once:
{
Serial.begin(9600); // start the serial connection at speed 9600 bits per second (baud rate)
}
void loop() // put your main code here, to run repeatedly:
{ // open bracket for the START of the main LOOP
// send the characters inside the quotes mark to the Arduino serial port
Serial.print("Hello from your Arduino ");
} // close bracket for the END of the main LOOP
and with all the // comments removed
void setup()
{
Serial.begin(9600);
}
void loop()
{
Serial.print("Hello from your Arduino ");
}
NOTES
# We need to make sure that the baud rate speed we set in the program SETUP – Serial.begin(9600); matches the SERIAL MONITOR baud rate – we can change the Serial Monitor baud rate by selecting a value from a drop down list just to the right at the bottom of the monitor popup window – if they don’t match you will either see lots of odd characters or nothing at all in your SERIAL MONITOR popup window
# A good speed to use to start with for the Serial Communication baud rate is 9600.
# The Arduino Uno and Nano only have one serial port. Other Arduino boards may have more serial ports and we would need to use a slightly different command as we would also refer to the serial port number e.g. SETUP serial3.begin(9600); and Serial3.print(“hello”);
Regards
Jonathan
The next building block we are going to cover is the IDE SERIAL MONITOR.
The SERIAL MONITOR allows us to “see” what is going “under the hood” of our program – it’s a bit like having a see-through oven door! to get used to how it works we will send a simple message from the Arduino to the IDE Serial Monitor on our desktop computer.
The SERIAL MONITOR is mainly used during program development & debugging to help identify what is going on inside our program LOOP as will be seen in the next tutorials..
Using the SERIAL MONITOR we can:
>>> Receive data from the Arduino serial port (serial = one character after the other)
>>> Send DATA to the Arduino serial port. (which I am not going to cover here)
The SERIAL MONITOR is accessed through the IDE command ribbon by selecting “TOOLS” and then “SERIAL MONITOR” - when selected a popup window opens on your computer which is the SERIAL MONITOR. (see pic 2)
To send serial data from the Arduino to the SERIAL MONITOR we have to:
In SETUP
Start the serial connection using the command Serial.begin(speed) where speed for serial communication is one of the following Supported baud rates are 300, 600, 1200, 2400, 4800, 9600, 14400, 19200, 28800, 31250, 38400, 57600, and 115200
In the program LOOP
We need to send data to the serial port - to do this we use this command
Serial.print(); an example might be Serial.print(“hello from your Arduino”);
Everything between the quote marks will be sent to the Arduino serial port and be received by the IDE SERIAL MONITOR via the USB cable and displayed in the desktop IDE popup window.
The serial monitor popup in image 3 is highlighted in yellow
The example program is detailed in image 1 and also below
void setup() // put your setup code here, to run once:
{
Serial.begin(9600); // start the serial connection at speed 9600 bits per second (baud rate)
}
void loop() // put your main code here, to run repeatedly:
{ // open bracket for the START of the main LOOP
// send the characters inside the quotes mark to the Arduino serial port
Serial.print("Hello from your Arduino ");
} // close bracket for the END of the main LOOP
and with all the // comments removed
void setup()
{
Serial.begin(9600);
}
void loop()
{
Serial.print("Hello from your Arduino ");
}
NOTES
# We need to make sure that the baud rate speed we set in the program SETUP – Serial.begin(9600); matches the SERIAL MONITOR baud rate – we can change the Serial Monitor baud rate by selecting a value from a drop down list just to the right at the bottom of the monitor popup window – if they don’t match you will either see lots of odd characters or nothing at all in your SERIAL MONITOR popup window
# A good speed to use to start with for the Serial Communication baud rate is 9600.
# The Arduino Uno and Nano only have one serial port. Other Arduino boards may have more serial ports and we would need to use a slightly different command as we would also refer to the serial port number e.g. SETUP serial3.begin(9600); and Serial3.print(“hello”);
Regards
Jonathan
▲
⟩⟩
RNinMunich
billmcl61
Martin555
📝 Arduino & Model Boats 6 - Digital Multi Voice Sound
4 years ago by 🇬🇧 G6SWJ ( Midshipman)
Midshipman)✧ 16 Views · 4 Likes · 3 Comments
Flag
💬 Add Comment
Time for some carrots!!!
Putting in the time and energy to learn a new skill is hard work, until you reach the tipping point where things begin to fall into place it can all seem a bit confusing, boring and pointless.
Often initial motivation ebbs and the realisation of the new skill fades.
So time for something inspirational ....DIGITAL MULTI VOICE SOUND DEVICE
So these videos are of a guys amazing project which might re-ignite some motivation.
It's "Jedi" level so not for the next tutorial😉
There are many different sounds/ engine types that are available free and you can easily encode your own sound - yes it's in a truck but think how this concept could be transferred to a model boat - engine sound, horn, anchor, guns, sea gulls , general harbour noise ......
Total cost excluding small amplifier and speaker about £10
Oh and did I mention that this was Jedi level - it's a very complex project as published, hundreds and hundreds of lines of code and does some crazy amazing stuff - most not relevant to model boats - extract the good bits and we have a simple sound project which performs as well as some commercial boards costing 5 to 20 times the price....
However complex the code this is the single command that makes the noise
dacWrite(DAC1, Value);
Enjoy these videos - I hope you find them inspirational...
Jonathan


▲
⟩⟩
RNinMunich
billmcl61
Julio
Martin555
|
💬 Re: Arduino & Model Boats 6 - Digital Multi Voice Sound
4 years ago by 🇩🇪 RNinMunich (
Fleet Admiral)✧ 13 Views · 1 Like
Flag
Hi Jonathan,
Recommendations and useful links to suppliers are always welcome, especially when relevant to current projects and topics. Only exception might be if it is obvious that the poster has a personal commercial interest in the linked company. I for one would be VERY interested in benefiting from your pioneering experience👍 My opinion anyway. I'm sure Stephen will chime in if he has other reservations. Cheers, Doug 😎 AKA Assistant Chief Cook and Bottle Washer🙄 BTW: I love carrots, especially caramelised😋 What's up Doc?😁 ▲
⟩⟩
Martin555
|
|
Login To
Remove Ads 💬 Re: Arduino & Model Boats 6 - Digital Multi Voice Sound
4 years ago by 🇬🇧 G6SWJ (
Midshipman)✧ 14 Views · 2 Likes
Flag
Hi Martin,
I have limited play time each week - I have recently been working with another model boater to create a two way serial data exchange module that turned out just fine but used up my play time so no tutorial publication here. I find myself in a situation where every penny counts due to the pandemic - in my previous life I had a healthy monthy budget that I could spend on electronic gadgets without thinking twice... most of the examples I will publish are based around the Arduino Nano or esp32. I will collate some of the suppliers I have used over the years and publish the list if that's ok with the forum owners(?) Next installment to follow soon... Regards Jonathan ▲
⟩⟩
Martin555
RNinMunich
|
|
💬 Re: Arduino & Model Boats 6 - Digital Multi Voice Sound
4 years ago by 🇬🇧 Martin555 (
Fleet Admiral)✧ 12 Views · 0 Likes
Flag
Hi G6SWJ,
I am definitely not anywhere near "Jedi" level and have an extremely limited budget so i might not be able to do some of this course but i am looking forward to your next log update. Martin555. ▲
⟩⟩
No likes yet
This member will receive 1 point for every like received |
📝 Arduino & Model Boats 7
4 years ago by 🇬🇧 G6SWJ ( Midshipman)
Midshipman)✧ 13 Views · 1 Like
Flag
💬 Add Comment
Apologies to those interested in this topic for the long gap between posts - life got in the way!
Summary of learning points so far:
> Arduino is open source – anybody can make the boards
> Arduino boards have inputs and outputs - analog (0-5v) and digital 0 or 5v
> We use the IDE to write our code and upload it via a USB cable to the Arduino board
> We need to tell the IDE which com “port” and type of Arduino board we are using
> Programs are also known as sketches
> Programs have 2 parts – SETUP runs once as the program starts and LOOP that runs continually
> DOCUMENT code as you create it using // This is a comment
> SAVE your code regularly using a new name each time, the name hints at what the program does – e.g. MyLedFlasher_001, MyLedFlasher_002, etc
> Syntax – a set of language rules you must comply with
>> Terminate lines with ;
>> Use upper and lower case appropriately where needed
>> Brackets always used in pairs – open and close
> We can send text from the Arduino to the IDE Serial Monitor popup window by using the command Serial.print()
Arduino has INPUTS and OUTPUTS
In this post we will use an input 'state' to send some text to the IDE Serial Monitor popup
The code below monitors the 'state' of one input pin (pin8) and depending on the 'state' of pin8 (HIGH or LOW) sends some text to the IDE Serial Monitor popup window.
To make pin 8 HIGH I connect a jumper cable between the Ardunio 5v pin and pin 8
To make pin 8 LOW I connect a jumper cable between the GND (ground or zero volt pin) and pin 8.
When using Arduino you will regularly come across the concept of pins (both INPUT and OUTPUT) being HIGH or LOW.
HIGH simply means that the pin is at 5 volts and LOW that the pin is at 0 volts (zero or GND (gound)) – NB Some Arduino’s are based around 3.3v logic not 5volt – I’ll cover this later
So:
HIGH = 5volts or logic value 1 (one)
and
LOW = 0 volts or logic value 0 (zero)
The HIGH or LOW are often referred to as “logic states”
To 'test' the logic state of the pin8 we will use the command digitalRead(8) – this will return one of two values – ‘1’ = the pin is high @ +5v or ‘0’ the pin is LOW @ 0v
++++++++++++++++++++++++++++++++++++++++++++++++++++++++++
We need a way to work with the result 1 (HIGH) or 0 (LOW) - the result of the digitalRead(8)
To do this we use the 'if' command.
The 'if' command checks for a condition (e.g. =1) and executes some code only if the condition is 'true'.
The code below will check if pin8 =1 and if true print text to the IDE Serial Monitor
void setup() // put your setup code here, to run once:
{
Serial.begin(9600); // start the serial communication
pinMode(8, INPUT); // set the pin 8 as INPUT
}
void loop() // put your main code here, to run repeatedly:
{
if (digitalRead(8)==1) // test if pin8 is HIGH (value of 1)
{
// if the above condition is 'true' send the text
// to the serial port which we can view in the IDE Serial Monitor
Serial.println("Digital pin 8 is HIGH");
}
}
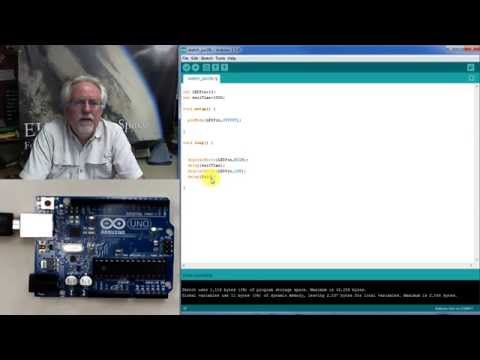
A Youtube video link is attached that shows the output text in the IDE Serial monitor - it's not very exciting!
Well done if you have made it here !! we now have enough building blocks in place with some minor additions to do some more meaningful stuff....
Regards
Jonathan
Summary of learning points so far:
> Arduino is open source – anybody can make the boards
> Arduino boards have inputs and outputs - analog (0-5v) and digital 0 or 5v
> We use the IDE to write our code and upload it via a USB cable to the Arduino board
> We need to tell the IDE which com “port” and type of Arduino board we are using
> Programs are also known as sketches
> Programs have 2 parts – SETUP runs once as the program starts and LOOP that runs continually
> DOCUMENT code as you create it using // This is a comment
> SAVE your code regularly using a new name each time, the name hints at what the program does – e.g. MyLedFlasher_001, MyLedFlasher_002, etc
> Syntax – a set of language rules you must comply with
>> Terminate lines with ;
>> Use upper and lower case appropriately where needed
>> Brackets always used in pairs – open and close
> We can send text from the Arduino to the IDE Serial Monitor popup window by using the command Serial.print()
Arduino has INPUTS and OUTPUTS
In this post we will use an input 'state' to send some text to the IDE Serial Monitor popup
The code below monitors the 'state' of one input pin (pin8) and depending on the 'state' of pin8 (HIGH or LOW) sends some text to the IDE Serial Monitor popup window.
To make pin 8 HIGH I connect a jumper cable between the Ardunio 5v pin and pin 8
To make pin 8 LOW I connect a jumper cable between the GND (ground or zero volt pin) and pin 8.
When using Arduino you will regularly come across the concept of pins (both INPUT and OUTPUT) being HIGH or LOW.
HIGH simply means that the pin is at 5 volts and LOW that the pin is at 0 volts (zero or GND (gound)) – NB Some Arduino’s are based around 3.3v logic not 5volt – I’ll cover this later
So:
HIGH = 5volts or logic value 1 (one)
and
LOW = 0 volts or logic value 0 (zero)
The HIGH or LOW are often referred to as “logic states”
To 'test' the logic state of the pin8 we will use the command digitalRead(8) – this will return one of two values – ‘1’ = the pin is high @ +5v or ‘0’ the pin is LOW @ 0v
++++++++++++++++++++++++++++++++++++++++++++++++++++++++++
We need a way to work with the result 1 (HIGH) or 0 (LOW) - the result of the digitalRead(8)
To do this we use the 'if' command.
The 'if' command checks for a condition (e.g. =1) and executes some code only if the condition is 'true'.
The code below will check if pin8 =1 and if true print text to the IDE Serial Monitor
void setup() // put your setup code here, to run once:
{
Serial.begin(9600); // start the serial communication
pinMode(8, INPUT); // set the pin 8 as INPUT
}
void loop() // put your main code here, to run repeatedly:
{
if (digitalRead(8)==1) // test if pin8 is HIGH (value of 1)
{
// if the above condition is 'true' send the text
// to the serial port which we can view in the IDE Serial Monitor
Serial.println("Digital pin 8 is HIGH");
}
}
A Youtube video link is attached that shows the output text in the IDE Serial monitor - it's not very exciting!
Well done if you have made it here !! we now have enough building blocks in place with some minor additions to do some more meaningful stuff....
Regards
Jonathan
▲
⟩⟩
RNinMunich
📝 Arduino & Model Boats 8 - Bilge Water Alarm
4 years ago by 🇬🇧 G6SWJ ( Midshipman)
Midshipman)✧ 13 Views · 1 Like · 3 Comments
Flag
💬 Add Comment
Here is the full code for a Bilge Water Alarm.
If you have followed this thread you should be able to follow what's going on - the video is using the same code as posted below.
Part of learning Arduino is uploading someone else's working code that you may not understand to your own Arduino board and then changing values etc and seeing what affect that has ....
Regards
Jonathan _._
+ + + + + + + + + + + + +
// Water Alarm 25/07/2020
// Use 2 wire probes located in the area that may contain water, place them a few cm's apart
// Connect one wire to a GND pin the other to Analog pin A0
// To make the sound we connect a small piezoelectric sounder to pin 6 and GND
int soundFreq = 700; // Sound frequency (in Hz)
int soundStep = 50; // Sound frequency increment - to make the alarm sound vary in pitch we will increment the tone frequency when it is triggered
const int ledPin = 13 ; // LED pin
const int soundPin = 6; // Ouput pin 6 connected to our piezoelectric sounder device
const int sensorPin = A0; // Simple piece of wire connected to pin A0 used as a probe located in area that may contain water
uint16_t sensorValue = 0; // variable to store the analog pin value when it is read using command analogRead(pin) - value will be in the range 0-1023
void setup() // Setup code - this runs once and sets up outpin etc.
{
pinMode(ledPin, OUTPUT) ; // define our ledPin as output
pinMode(soundPin, OUTPUT); // define our soundPin as output
pinMode(sensorPin, INPUT_PULLUP); // define our analog sensor pin as input - we are using pin A0
//digitalWrite(A0, INPUT_PULLUP); // Set the default state
}
void loop()
{
sensorValue = analogRead(sensorPin); // Read the analog value of A0 - will return a value between 0 and 1023
if (sensorValue > 1000) // test the analog sensor value now stored in variable "sensorValue" - if it's greater than 1000 then continue. If less than 1000 process the code defined by "else"
{
digitalWrite(ledPin, LOW);
noTone(soundPin);
delay(50);
}
else // if the sensoValue is less than 1000 then process the code below
{
digitalWrite(ledPin, HIGH); // Turn on the LED by setting the ledPin to High (5v)
// The code chunk below is used to make the frequency of the sound on the soundPin vary
// By increasing frequency to a preset value and then decreasing to a preset value - it then repeats each loop up & down in frequency to shape the alarm sound
tone(soundPin, soundFreq) ; // Set the soundPin to the value stored in soundFreq
soundFreq = soundFreq + soundStep; // increment the soundFreq by adding the value stored in the variable named soundStep - if soundStep = 50 the frequency will increase / if soundStep = - 50 the frequency will decrease
if (soundFreq == 1200) // test the soundFreq - if it's reached 1200 then
{
soundStep = -50; // change value of soundStep to - 50
}
if (soundFreq == 700) // test the soundFreq Value
{
soundStep = 50; // change value of soundStep to 50
}
delay(25); // pause 25ms
digitalWrite(ledPin, LOW); // turn the led pin off (0v) by setting the value to LOW
delay(25); pause 25ms
}
}
Below is the same code but without comments - might make easier reading as displayed on the forum.
int soundFreq = 700;
int soundStep = 50;
const int ledPin = 13 ;
const int soundPin = 6;
const int sensorPin = A0;
uint16_t sensorValue = 0;
void setup()
{
pinMode(ledPin, OUTPUT) ;
pinMode(soundPin, OUTPUT);
pinMode(sensorPin, INPUT_PULLUP);
//digitalWrite(A0, INPUT_PULLUP);
}
void loop()
{
sensorValue = analogRead(sensorPin);
if (sensorValue > 1000)
{
digitalWrite(ledPin, LOW);
noTone(soundPin);
delay(50);
}
else
{
digitalWrite(ledPin, HIGH);
tone(soundPin, soundFreq) ;
soundFreq = soundFreq + soundStep;
if (soundFreq == 1200)
{
soundStep = -50;
}
if (soundFreq == 700)
{
soundStep = 50;
}
delay(25);
digitalWrite(ledPin, LOW);
delay(25); pause 25ms
}
}
▲
⟩⟩
RNinMunich
|
💬 Re: Arduino & Model Boats 8 - Bilge Water Alarm
4 years ago by 🇬🇧 Martin555 (
Fleet Admiral)✧ 12 Views · 0 Likes
Flag
Thank you Jonathan,
I have never been very good when it comes to computers and that sort of thing. Following this thread will not be easy for me so please be prepared for me to ask a lot of silly questions. Martin555. ▲
⟩⟩
No likes yet
This member will receive 1 point for every like received |
|
Login To
Remove Ads 💬 Re: Arduino & Model Boats 8 - Bilge Water Alarm
4 years ago by 🇬🇧 G6SWJ (
Midshipman)✧ 13 Views · 1 Like
Flag
Hi Martin,
Thank you for the question - I will make a post about data types, memory use, scope etc. In answer to your question: 'int' - is a data type that allows you to store a whole number value from -32,768 to 32,767 e.g. int myAge=21; 😋 The const keyword prefix stands for constant (read only). This means that the const variable can be used just as any other variable of its type, but its value cannot be changed A good use of a constant would be: date of birth or Pi const int dobYear = 1964; 'const' is used in the code example where we have defined a variable name referring to hardware pin(s). e.g. const int ledPin = 13 ; Clearly we do not want a coding error to change a hardware pin reference in normal use as this would lead to malfunctioning! So it's a belt and braces approach to eliminate this type of error ocurring, just a nice approach to adopt when declaring pin references. Should any part of the code attempt to modify the 'const' you will get a compile error. Hope that helps Jonathan ▲
⟩⟩
Martin555
|
|
💬 Re: Arduino & Model Boats 8 - Bilge Water Alarm
4 years ago by 🇬🇧 Martin555 (
Fleet Admiral)✧ 12 Views · 0 Likes
Flag
Hi Jonathan,
What is the meaning/difference between :- "int" and "const int" Martin555. ▲
⟩⟩
No likes yet
This member will receive 1 point for every like received |


Login To
Remove Ads
Remove Ads