Join Us On Social Media!

|

|

|
Download The App!
Login To
Remove Ads
Remove Ads
Login To
Remove Ads
Remove Ads
Model Boats Website
Cariad Bristol Pilot Cutter
14 Posts · 2 Followers · 32 Photos · 1 Like
Began 12 years ago by
 United Kingdom
Follow This Thread
Not currently following
> Click to follow
> Click to follow
Latest Post 11 years ago by
| Oldest posts shown first (Show Newest First) | (Print Booklet) |
📝 Cariad Bristol Pilot Cutter
12 years ago by 🇬🇧 Dave M ( Vice Admiral)
Vice Admiral)✧ 14 Views · 0 Likes · 4 Comments
Flag
💬 Add Comment
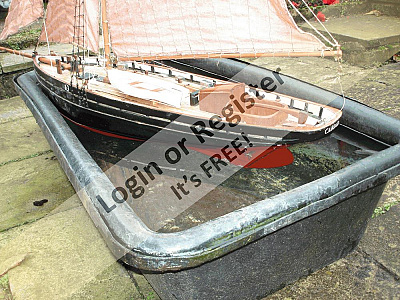
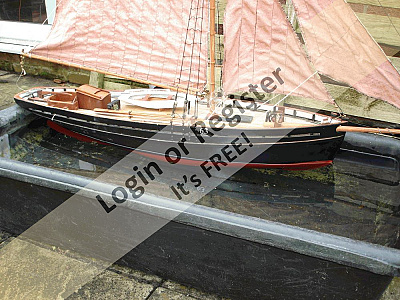
Started over a year ago, built from the Chris Brown fibreglass hull and plan. Got sidetracked with the Olympic build but completed this year. As well as the sails there is a small electric motor to help with recovery on calm days and to avoid the occasional water plant bank!
There are two winches controlling the sails - an arm winch works the mainsail with a drum winch controlling the fore sails. I have tried to make the running and standing rigging as accurate as possible and made all the pulleys / deadeyes. The deck is planked with pine strips and mahogany veneer covers the rear cabin and cockpit. Masts are pine suitably dyed. I made the sails from the plans supplies but am not happy with the finished result and will remake in time.
I have had several sails in most conditions and the model sails but not as well as I had hoped - not down to the design - probably my poor sails.
There is 4.5Kg of lead in the hull and I remove this to assist with transport. Today was a very blustery day and I was lucky to make it back to shore as the boat was blown flat and shipped a lot of water. This entered via the rudder post and rear cockpit so a rethink is necessary.
There is a solid keel so recasting the lead so it is all outside the boat and attached to the keel should bring the CoG much lower and Improve stability.
I show the model "as is" on one of the quieter days on the lake but will show more details as I progress.
▲
⟩⟩
No likes yet
This member will receive 1 point
for every like received
This member will receive 1 point
for every like received
|
💬 Cariad Bristol Pilot Cutter
12 years ago by 🇬🇧 Dave M (
Vice Admiral)✧ 14 Views · 0 Likes
Flag
HI Brian
Yes sorry for the delay. Had back to back weddings one last month and another this so rather busy with other matters at present. I believe the best way would for me to start a new build blog and describe the steps I took when building my model. I can then share the experience with other members and answer any questions as we proceed. I am fully committed to other tasks today but will try and start the blog tonight. Kind regards Dave 😀 ▲
⟩⟩
No likes yet
This member will receive 1 point for every like received |
|
Login To
Remove Ads 💬 Cariad Bristol Pilot Cutter
12 years ago by 🇬🇮 Brianww (
 Recruit) Recruit)✧ 15 Views · 0 Likes
Flag
Hello Dave,
I sent you a PM the other day, just wondering if you received it ? Kind Regards, Brian ▲
⟩⟩
No likes yet
This member will receive 1 point for every like received |
|
💬 Cariad Bristol Pilot Cutter
12 years ago by 🇬🇧 Dave M (
Vice Admiral)✧ 14 Views · 0 Likes
Flag
HI Brian
Very happy to help with your Cariad build. So as I don't spend too much time teaching you to suck eggs please will you provide a bit more info on your skilset and experience with model building in any format. I assume you also purchased the plans with the hull? Do you have any tools to start the build and an area where the build is to be undertaken? If you prefer to share this by way of a personal message that will be fine. Hear from you soon Kind regards Dave 😀 ▲
⟩⟩
No likes yet
This member will receive 1 point for every like received |
|
💬 Cariad Bristol Pilot Cutter
12 years ago by 🇬🇮 Brianww (
Recruit)✧ 15 Views · 0 Likes
Flag
Greetings, I have just received the hull for Cariad from Chris Brown, and have been reading your posts about your building process. You are obviously very experienced. I have not done any model building in many years, so this will be quite a challenge, any information you would be kind enough to pass along to me would be greatly appreciated. For example: just exactly where did you
start ? Ballast ? Bulkheads ? I have a little experience with sailing yachts, having helped rebuilds on a couple, in my spare time.l Kind Regards, Brian ▲
⟩⟩
No likes yet
This member will receive 1 point for every like received |
Login To
Remove Ads
Remove Ads
📝 Cariad Rear Cockpit and Rudder
12 years ago by 🇬🇧 Dave M ( Vice Admiral)
Vice Admiral)✧ 14 Views · 0 Likes · 2 Comments
Flag
💬 Add Comment
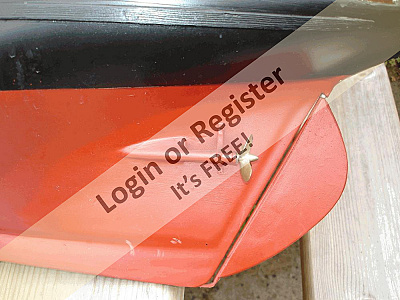
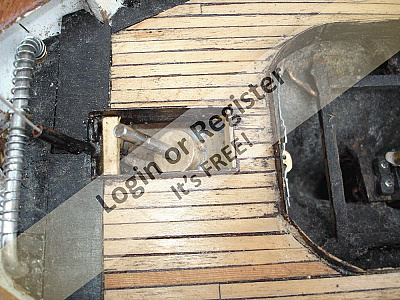
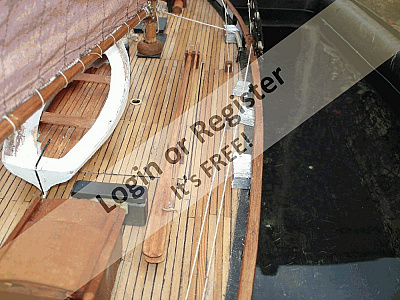
The rudder is angled to align with the keel. The post rises thro the deck and has an arm attached, which the pilot used to control the rudder from the cockpit. in practice this required a push pull arrangement to transfer the servo travel to the rudder post. A brass bush fixed by grub screw carries two brass arms which connect via cable to the servo mounted below the open cockpit. I had constructed a push fit cover over the post to partly seal the hole. Clearly this is not sufficient and I will be sealing this completely, probably with a bespoke silicon casting this fits the hole and can be covered with wood to preserve the appearance.
The other problem is the open cockpit. This is a tight fit around the coamings and would have been OK except I had failed to seal the area under the seat. as a result any water in the cockpit drained into the hull - not good. I attach some pictures to give the general idea. More pics will follow as I progress.

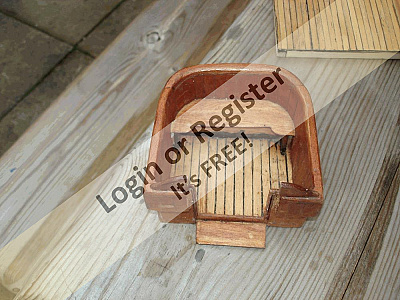


The other problem is the open cockpit. This is a tight fit around the coamings and would have been OK except I had failed to seal the area under the seat. as a result any water in the cockpit drained into the hull - not good. I attach some pictures to give the general idea. More pics will follow as I progress.
▲
⟩⟩
No likes yet
This member will receive 1 point
for every like received
This member will receive 1 point
for every like received
|
💬 Cariad Rear Cockpit and Rudder
12 years ago by 🇬🇧 Dave M (
Vice Admiral)✧ 14 Views · 0 Likes
Flag
HI jon
Yes tried that but I have a servo (just visible) that I need to get at. The actual cockpit is a snug fit round the coamings and has a siicon seal. The problem was I had failed to completely seal the inside just below either side of the seat. Sorry not that clear on the photo but there is 1/8" gap either side! Water will get in the cockpit whatever I do but providing it remains there I have no problem - perhaps a self bailer or pump may be required, but if I can keep the boat more vertical this will not be too great a problem. The rudder is the main problem and I will bee making the much more watertight. The tiller arm is there for show and can't be seen moving whilst sailing so I am considering cutting the rudder post level with the arm fastening. I can then fully seal the deck opening and make a false support for the tiller arm. Thanks for the input, gutter sealant sounds a good idea round the rear covering 😀 ▲
⟩⟩
No likes yet
This member will receive 1 point for every like received |
|
💬 Cariad Rear Cockpit and Rudder
12 years ago by 🇬🇧 triumphjon (
 Master Seaman) Master Seaman)✧ 15 Views · 0 Likes
Flag
would it be possible to build a ledgefor the base of the cockpit to sit on ? a thin bead of silicon could then be used to aid sealing . Ive several sailing vessels where Ive got hatches I dont need to remove very often where Ive applied a thin bead of gutter sealant , this doesnt set so remains reusable , also means your able to remove the hatch again ! !jon
▲
⟩⟩
No likes yet
This member will receive 1 point for every like received |
📝 Cariad Lead and Keel
12 years ago by 🇬🇧 Dave M ( Vice Admiral)
Vice Admiral)✧ 14 Views · 0 Likes · 6 Comments
Flag
💬 Add Comment
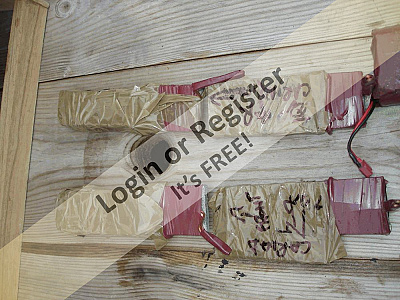
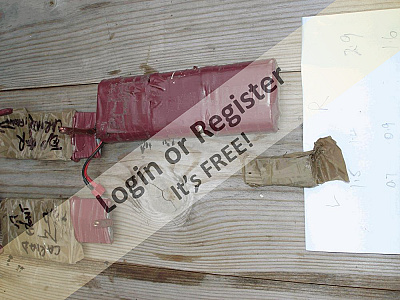
The existing ballast consists of 5 pieces of lead and a battery placed inside the hull on the base of the hull. There is a solid keel running the length of the boat but I could not add any weight into this inside the boat. The ballast weighs 4.7kg excluding the battery and clearly would be best placed in or alongside the keel. I propose therefore to make a bolt on lead keel to fit the length of the boat. The existing ballast has 2.9kg forward of the mast and 1.6kg about midships with a small 0.2kg weight in the stern. I will need to keep the ratio the same on the false keel and there is a 1kg difference in port and starboard. By extending the keel down as against making wider I will also increase the sailing stability. On the water the boat will not look any different and the keel will be removed for transportation and when on display. Pictures of the keel and lead weights give the details. I will post more as the work progresses

▲
⟩⟩
No likes yet
This member will receive 1 point
for every like received
This member will receive 1 point
for every like received
|
💬 Cariad Lead and Keel
10 years ago by 🇨🇦 rkretchmar (
Recruit)✧ 14 Views · 0 Likes
Flag
Dave I got a hold of Chris, thanks Ray
▲
⟩⟩
No likes yet
This member will receive 1 point for every like received |
|
Login To
Remove Ads 💬 Cariad Lead and Keel
10 years ago by 🇨🇦 rkretchmar (
Recruit)✧ 14 Views · 0 Likes
Flag
Hello! Dave. I just got up and was thankful to get the info you sent on Cariad. it is most kind of you to contact Chris if I do not hear in the week. I really am a builder, have raced IOM's, some times in the sea, two good sailing sites, one a man made lake about 6 miles from here and a lake that the boat club used about 30 miles from here. Boat club is into tugs most of the time and no knowledge of sailing vessels. I am pushing 83 and was going to order Cariad, but heart problems put the stoppers on that. My email address is: *Removed - email addresses should be sent via private message*. Thanks again Ray
▲
⟩⟩
No likes yet
This member will receive 1 point for every like received |
|
💬 Cariad Lead and Keel
10 years ago by 🇬🇧 Dave M (
Vice Admiral)✧ 14 Views · 0 Likes
Flag
HI Ray
Hull length 38" plus bow sprit 10" but this can slide onto the deck bar about 1" so 39" for transport Mast height 35" plus say 6" for the gaf topsail but Mine is rigged to allow removal in strong winds and for transport. My sailing waters were too much for the internal ballast Chris suggests and I have added a bolt on keel. Please see my other build blog at ▲
⟩⟩
No likes yet
This member will receive 1 point for every like received |

|
💬 Cariad Lead and Keel
10 years ago by 🇨🇦 rkretchmar (
Recruit)✧ 14 Views · 0 Likes
Flag
Hello, I am in Canada, Vancouver is on the west coast and the Pacific, I have asked Chris for a quote on full set, no power, via email, and so I will wait a while, but if you would not mind, please measure yours for lengths and mast height. Appreciate this....Regards Ray
▲
⟩⟩
No likes yet
This member will receive 1 point for every like received |
|
💬 Cariad Lead and Keel
10 years ago by 🇬🇧 Dave M (
Vice Admiral)✧ 14 Views · 0 Likes
Flag
I will measure tomorrow and post details 😀
Not sure exactly where Chris trades from, I suggest you give him a ring and ask. I have always met him at aone of the model shows he attends. ▲
⟩⟩
No likes yet
This member will receive 1 point for every like received |
|
💬 Cariad Lead and Keel
10 years ago by 🇨🇦 rkretchmar (
Recruit)✧ 15 Views · 1 Like
Flag
Just one question. is her length OA 38" including bow sprit?
is Chris Brown's Laleston place effected by flooding? ▲
⟩⟩
Inkoust
|
📝 Rear cockpit and Rudder
12 years ago by 🇬🇧 Dave M ( Vice Admiral)
Vice Admiral)✧ 14 Views · 0 Likes
Flag
💬 Add Comment
Sealed the cockpit with bits of wood and will add silicon sealant round all the joints when the glue has hardened.
Had thought about cutting the rudder post so it was below deck but decided to stick with my original fitting. I have reworked the front and rear coamings around the rudder. When dry I intend to seal with silicon sealant and will cast a silicon plug to seal the gap around the rudder post. When finished I intend to flood the deck with all hatches in place and check for any leakage. I have still to make the silicon seal.

Had thought about cutting the rudder post so it was below deck but decided to stick with my original fitting. I have reworked the front and rear coamings around the rudder. When dry I intend to seal with silicon sealant and will cast a silicon plug to seal the gap around the rudder post. When finished I intend to flood the deck with all hatches in place and check for any leakage. I have still to make the silicon seal.
▲
⟩⟩
No likes yet
This member will receive 1 point
for every like received
This member will receive 1 point
for every like received
📝 Motor and prop shaft
12 years ago by 🇬🇧 Dave M ( Vice Admiral)
Vice Admiral)✧ 28 Views · 0 Likes · 7 Comments
Flag
💬 Add Comment
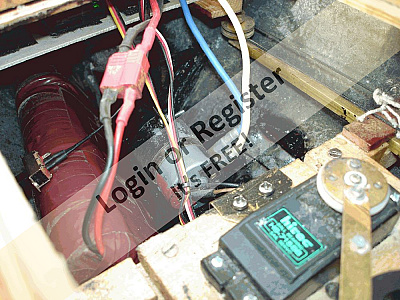
I had originally arranged for a belt drive to the prop but was not happy with this arrangement as adjustment was difficult. I have now changed to direct drive with a high tork low rev motor - ex equipment so I don't know the provenance but it is low current - stall is 1amp and size is between a 400 and 500 type motor. Our lake is large but as with most sailing vessels there is a tendency for the boat to find the obstacles and the motor helps correct the course when the wind is being unhelpful 😰 Decided to complete this before I commence fitting the lead to the keel below the boat as the new arrangement gives more space and acess inside. Motor now replaced. Final fitting will be completed once tested on the lake.


▲
⟩⟩
No likes yet
This member will receive 1 point
for every like received
This member will receive 1 point
for every like received
|
💬 Motor and prop shaft
12 years ago by 🇬🇧 Dave M (
Vice Admiral)✧ 28 Views · 0 Likes
Flag
HI David
Sounds very similar to our lake. I can easily lower the Topsail and with the lead now amidships and sealed to the base of the hull I am confidant that I can sail safely. My bowsprit is also wedged so acts like yours. Also helps to load into car and storage. Actually need nearer 6Kg of lead in the end so my total weight is over 7Kg. Thanks for the additional feedback Dave ▲
⟩⟩
No likes yet
This member will receive 1 point for every like received |
|
Login To
Remove Ads 💬 Motor and prop shaft
12 years ago by 🇬🇧 Lifeboatmember (
 Able Seaman) Able Seaman)✧ 28 Views · 0 Likes
Flag
HI Dave
I think I did not explain very clearly about wind at our lake it comes in of the sea but the lake sits down below an embankment and on one side there are apartment blocks so the wind does swirl around to the point you can be beating in one direction when the wind will do a 180degree change in direction. if the wind is gusting about I leave the topsail off this makes it a little more stable.My bowsprite is held in position by a wooden tapered wedge so if I do run into anything the bowsprite just slides back onto the deck then all I have to do is pull the bowsprite forward and refit the wedge and away we go.Cant remember the weight of the ballast could weigh boat minus masts and rigging etc it will give us a ballpark figure when I get a chance will mail you. Good sailing David ▲
⟩⟩
No likes yet
This member will receive 1 point for every like received |
|
💬 Motor and prop shaft
12 years ago by 🇬🇧 Dave M (
Vice Admiral)✧ 28 Views · 0 Likes
Flag
HI David
Yes I had 4.7kg of lead either side of the keel and I was very lucky to make it back to shore. I have plenty of scuppers so the deck drained ok. Problem was my poor sealing at the rear. That's now sorted and I have built a lead keel extension. Tried in the test pond and appears very stable. I have covered the lead with glass cloth and fibreglass and once hardened (bit too cold at present) I will make it nice and symmetrical and smooth. I wish our lake had such nice wind. Problem is we a we surrounded by trees which cause horrible gusts and turbulence. I agree about the damage you can cause. The worst problem is getting the bowsprit entangled. What is the weight of your ballast? 😀 ▲
⟩⟩
No likes yet
This member will receive 1 point for every like received |
|
💬 Motor and prop shaft
12 years ago by 🇬🇧 Lifeboatmember (
Able Seaman)✧ 28 Views · 0 Likes
Flag
I have a pilot cutter with internal ballast a length of scaffold tube full of lead the battery for the winch and rudder control sits on top of the tube. I have sailed it in fairly strong winds without problems of stability though she will heel over so that the gunwales are in the water or even just under, our pond is on the coast of the Bristol channel so as you can Imagine the winds come straight in of the sea where the originals once sailed. The original boats were excellent sea boats they were sailed by one man and a boy once the pilot was rowed across to the waiting merchant ship.
Hope you have as great enjoyment sailing your boat as I have had with mine, one word of caution you should warn your fellow pond users not get in the way as they do not turn to quickly and if you hit another boat with the weight of the keel and the power in the sails you will inflict damage. ▲
⟩⟩
No likes yet
This member will receive 1 point for every like received |
|
💬 Motor and prop shaft
12 years ago by 🇬🇧 ianed57 (
 Sub-Lieutenant) Sub-Lieutenant)✧ 28 Views · 0 Likes
Flag
Got you. I used race an old Marblehead in the early eighties and it was amazing how much just one strand of weed round the bulb would affect the sailing performance.
Ian ▲
⟩⟩
No likes yet
This member will receive 1 point for every like received |
|
💬 Motor and prop shaft
12 years ago by 🇬🇧 Dave M (
Vice Admiral)✧ 28 Views · 0 Likes
Flag
Thanks Ian. We have lots of underwater foliage in our lake and fin and bulb boats get snagged, whereas pond type keels don't. I agree this would really help the stability but the benefit is outweighed (no pun intended 😀 ) by the snagging problem.
I hope I will be as successful as you with the silicon sealant, if I work out a bailing solution I will post details ▲
⟩⟩
No likes yet
This member will receive 1 point for every like received |
|
💬 Motor and prop shaft
12 years ago by 🇬🇧 ianed57 (
Sub-Lieutenant)✧ 28 Views · 0 Likes
Flag
Dave- just a thought. As you have decided to go with an external keel why not go the hole hog and fit a fin and bulb? I once saw a Pilot Cutter with this arrangement sailing at Bude in Cornwall and she went very well and, of course, the whole thing was removable for display.
I have a friend who also fitted an ex-metre class fin and bulb to a paddle steamer- there's a video of it on here- and it Improved matters no end. Sometimes needs must- but I can understand that fitting a fin to scale boat might go against the grain. I have a cutter built on a GRP hull- the old JB Mouldings Monica- and I had to seal in the cockpit with silicone as a lot of water came in. I have often wondered about self baling cockpits but never really understood the geometry! As you say, if you can seal the cockpit you could probably live with water sitting in there. Hope you can sort it out...Ian ▲
⟩⟩
No likes yet
This member will receive 1 point for every like received |
📝 Lead Keel fitting
12 years ago by 🇬🇧 Dave M ( Vice Admiral)
Vice Admiral)✧ 28 Views · 0 Likes · 3 Comments
Flag
💬 Add Comment
I have used a piece of aluminium extrusion I happened to have to make a frame for the lead. This was fitted to the keel with three stainless bolts passed through three brass tubes fitted into the original keel, which is solid fibreglass. I made a very rough mould to fit the aluminium and poured lead into this to create the keel. I have bound the lead to the extrusion with copper wire passed through holes in both at each end and in the middle. Due to the hull shape there is more ballast needed at the prow than the stern so the casting reflects this. Also additional lead was added on the starboard side to balance the battery. Once correctly balanced I intend to cover with glass cloth and resin and make the keel symmetrical with balsa infills. I will also make a balsa fairing to spead the load onto the bulbous forward part of the hull


▲
⟩⟩
No likes yet
This member will receive 1 point
for every like received
This member will receive 1 point
for every like received
|
💬 Lead Keel fitting
12 years ago by 🇬🇧 DavyJones (
Recruit)✧ 28 Views · 0 Likes
Flag
Thanks - and so it begins......
▲
⟩⟩
No likes yet
This member will receive 1 point for every like received |
|
Login To
Remove Ads 💬 Lead Keel fitting
12 years ago by 🇬🇧 Dave M (
Vice Admiral)✧ 28 Views · 0 Likes
Flag
HI Martyn
▲
⟩⟩
No likes yet
This member will receive 1 point for every like received |

|
💬 Lead Keel fitting
12 years ago by 🇬🇧 DavyJones (
Recruit)✧ 28 Views · 0 Likes
Flag
Dave,
Where might a chap accquire a set of plans? Martyn ▲
⟩⟩
No likes yet
This member will receive 1 point for every like received |
📝 Keel Fitting - rethink
12 years ago by 🇬🇧 Dave M ( Vice Admiral)
Vice Admiral)✧ 28 Views · 0 Likes
Flag
💬 Add Comment
Progressed this and spent some time making the keel. Worked fine in the test tank and the Yacht is rock steady, the mast is flexing if I push at the top.
However I have several misgivings; the keel is very heavy and the proposed mounting may not be sufficiently strong to withstand the forces experienced on the lake, wind is unpredictable and everything needs to be shipshape to avoid disaster; the sheer size and depth of the keel will make steering unpredictable as the nice clean lines will have been spoilt. 😰
Others have successfully sailed this model with internal ballast and it is possible that I can achieve the same result. Re-reading Philip Vaughn Williams article in Model Boats from a few years ago (vol 48 577) it appears that the full size carried all its ballast in the middle third of the vessel - to allow good seamanship in riding the waves rather than ploughing through. I intend therefore to make a mould of the inside of the hull using balsa fitted to contour and then casting in two pieces, port and starboard. I have a square block for the base of the mast mounting so will use this to key the lead in place. I did favour removing the lead for transport but believe I may have to have it as a permanent fixture. Fortunately I have a suitable carriage to transport to the lake side. 😊
▲
⟩⟩
No likes yet
This member will receive 1 point
for every like received
This member will receive 1 point
for every like received
📝 Keel Fitting
12 years ago by 🇬🇧 Dave M ( Vice Admiral)
Vice Admiral)✧ 28 Views · 0 Likes
Flag
💬 Add Comment
Have now fitted 6kg of lead sheet to the base of the hull in small pieces applied each side of the mast support. Decided against casting two single pieces as access is restricted and the sheet follows the contour nicely. I need to test in water and once trimmed I will fix in place , possibly by pouring in polyester resin to cover over. I believe this will be necessary as I do not want any movement whist at sea!
Need to fill up the holes in the keel for the abandonded outer keel.


Need to fill up the holes in the keel for the abandonded outer keel.
▲
⟩⟩
No likes yet
This member will receive 1 point
for every like received
This member will receive 1 point
for every like received
📝 Rudder post seal
12 years ago by 🇬🇧 Dave M ( Vice Admiral)
Vice Admiral)✧ 28 Views · 0 Likes · 2 Comments
Flag
💬 Add Comment
Made the seal in situ with a false base beneath the cover. Used casting silicon as it dries nice and hard. Pleased with the result which has made the rear deck absolutely watertight. I used a small brass screw to hold the cover in place and Improve the seal underneath.

▲
⟩⟩
No likes yet
This member will receive 1 point
for every like received
This member will receive 1 point
for every like received
|
💬 Rudder post seal
12 years ago by 🇬🇧 Dave M (
Vice Admiral)✧ 28 Views · 0 Likes
Flag
The hull is a nice solid casting in fibreglass. Very realistic finish and ideal for the model. The shape of the hull is very rounded and scratch building would require quite a number of frames to achieve the correct contours. However if this is your building method of choice then you will certainly enjoy the build.
Lead shot is good for ballast and the method you suggest would work. I have a good supply of lead sheet so have used this without incurring extra cost. ▲
⟩⟩
No likes yet
This member will receive 1 point for every like received |
|
💬 Rudder post seal
12 years ago by 🇬🇧 DavyJones (
Recruit)✧ 28 Views · 0 Likes
Flag
Me again! I've ordered the plans from Chris and await their arrival - at the moment I'm thinking scratch build but was wondering what others thought about the merits of the fibreglass hull?
- PS re the ballast I've seen lead shot used -secured by putting it in a plastic bag adding yacht varnish mixing and then pouring into the bilges. This chap has some good ideas - ▲
⟩⟩
No likes yet
This member will receive 1 point for every like received |

📝 Ballasting complete- motor refitted
12 years ago by 🇬🇧 Dave M ( Vice Admiral)
Vice Admiral)✧ 28 Views · 0 Likes
Flag
💬 Add Comment
Polyester resin now set nicely and all lead very secure in the bottom of the boat. Floatation test shows a slight list which has been corrected with four small lumps of lead seen on the deck but now fixed inside with some silicon bath sealant so I can reposition if required.
Motor now fixed on stand supported with props to the keel and hull side. I have a small brass bracket fixed with two screws to the winch cross members so removal for servicing is easily achieved.
Just need to complete the boat on the deck. Will probably remove when on water, so will fix to deck with rigging rope.
Just need a nice steady wind to test stability. Video to follow, 😀
▲
⟩⟩
No likes yet
This member will receive 1 point
for every like received
This member will receive 1 point
for every like received


Login To
Remove Ads
Remove Ads