Join Us On Social Media!

|

|

|
Download The App!
Login To
Remove Ads
Remove Ads
Login To
Remove Ads
Remove Ads
Model Boats Website
Krick Nordstrand Trawler Kit # 21430
7 Posts · 7 Followers · 23 Photos · 46 Likes
Began 4 years ago by
 United States
Follow This Thread
Not currently following
> Click to follow
> Click to follow
Latest Post 3 years ago by
| Oldest posts shown first (Show Newest First) | (Print Booklet) |
📝 Krick Nordstrand Trawler Kit # 21430
4 years ago by 🇺🇸 MIR ( Chief Petty Officer 2nd Class)
Chief Petty Officer 2nd Class)✧ 37 Views · 6 Likes · 9 Comments
Flag
💬 Add Comment
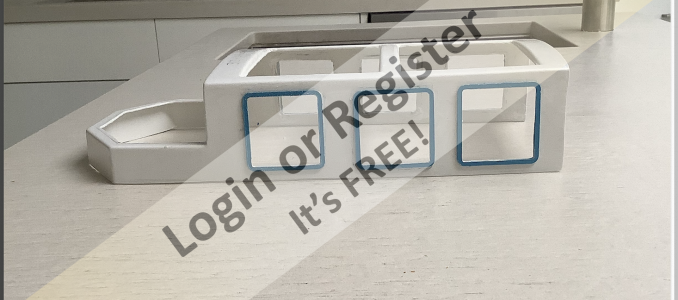
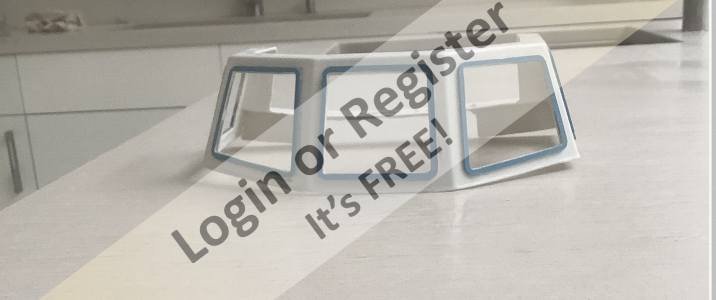
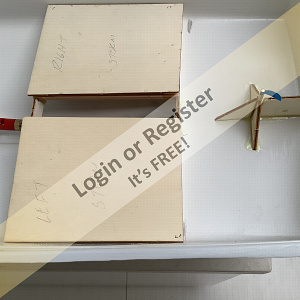
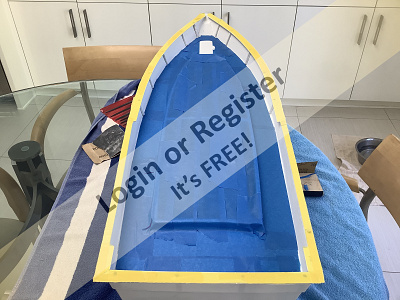
I have been building the model for the last 8 weeks. First time model builder.. I am well into the model now. I have just finished cutting all the parts off the ABS sheets. I have gone much farther than these photos indicate and will be posting more as I go along. I am now sanding and cleaning up all the rough edges and have to cut the excess material of the hull. I have attached some photos of my progress. The website has been quite helpful if I have any questions as I go along.


▲
⟩⟩
MouldBuilder
Colin H
jbkiwi
stevedownunder
figtree7nts
Martin555
|
💬 Re: Krick Nordstrand Trawler Kit # 21430
4 years ago by 🇺🇸 MIR (
Chief Petty Officer 2nd Class)✧ 39 Views · 1 Like
Flag
It definitely is not a beginners model. I will keep you posted. Thanks for the kind words. Best MIR
▲
⟩⟩
Martin555
|
|
Login To
Remove Ads 💬 Re: Krick Nordstrand Trawler Kit # 21430
4 years ago by 🇺🇸 MIR (
Chief Petty Officer 2nd Class)✧ 39 Views · 1 Like
Flag
I think they make very good models. What level do you think the police launch is. How long and what is the width. Is the hull all in one piece. Thanks MIR
▲
⟩⟩
Martin555
|
|
💬 Re: Krick Nordstrand Trawler Kit # 21430
4 years ago by 🇬🇧 Nerys (
 Fleet Admiral) Fleet Admiral)✧ 34 Views · 2 Likes
Flag
I think you are amazing to take on a model like this for your first effort. The work you are doing is exemplary and I look forward to reading and seeing more as you progress.
Nerys ▲
⟩⟩
Martin555
MIR
|
|
💬 Re: Krick Nordstrand Trawler Kit # 21430
4 years ago by 🇭🇺 MouldBuilder (
 Vice Admiral) Vice Admiral)✧ 34 Views · 2 Likes
Flag
Looking good. The build so far looks very similar to my Krick Police Launch which is nearing completion, still.😁
Peter. ▲
⟩⟩
Martin555
MIR
|
|
💬 Re: Krick Nordstrand Trawler Kit # 21430
4 years ago by 🇬🇧 Martin555 (
Fleet Admiral)✧ 36 Views · 3 Likes
Flag
Hi MIR.
As Punch and Judy would say "That's the way to do it" LOL!!! Martin555. ▲
⟩⟩
RNinMunich
MouldBuilder
MIR
|
|
💬 Re: Krick Nordstrand Trawler Kit # 21430
4 years ago by 🇺🇸 MIR (
Chief Petty Officer 2nd Class)✧ 37 Views · 1 Like
Flag
Thanks it is coming along slowly. Just purchased all the electronics so I can get that all working before I put the main deck in place. Mike
▲
⟩⟩
Martin555
|
|
💬 Re: Krick Nordstrand Trawler Kit # 21430
4 years ago by 🇨🇦 Newby7 (
Fleet Admiral)✧ 34 Views · 2 Likes
Flag
Well done it looks good.
Rick ▲
⟩⟩
MIR
Martin555
|
|
💬 Re: Krick Nordstrand Trawler Kit # 21430
4 years ago by 🇺🇸 figtree7nts (
 Admiral) Admiral)✧ 34 Views · 2 Likes
Flag
Hi MIR,
You are doing a great job of it! Your build of your model looks great so far! Please post more info as you go along! Regards, Ed ▲
⟩⟩
MIR
Martin555
|
|
💬 Re: Krick Nordstrand Trawler Kit # 21430
4 years ago by 🇬🇧 Martin555 (
Fleet Admiral)✧ 34 Views · 1 Like
Flag
Hi MIR,
You are off to a great start. That looks a very nice model to make. Keep up the good work. Good luck with the build. Martin555. ▲
⟩⟩
MIR
|
Login To
Remove Ads
Remove Ads
📝 Putting in super structure
4 years ago by 🇺🇸 MIR ( Chief Petty Officer 2nd Class)
Chief Petty Officer 2nd Class)✧ 39 Views · 4 Likes
Flag
💬 Add Comment
The model may look a bit rough but final sanding and shaping still has to be done. All the windows have been masked off for painting in the future. I am waiting for all the motor parts and and servos so I can get all that working and tested before I secure the main deck. What is clear as I go along plans are only a guide and sometimes you have to do what makes more sense. The CA cement was perfect for securing the wood frame to the plastic and set up quickly. A little goes a long way.

▲
⟩⟩
MouldBuilder
Colin H
RNinMunich
Martin555
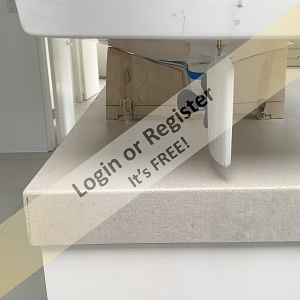
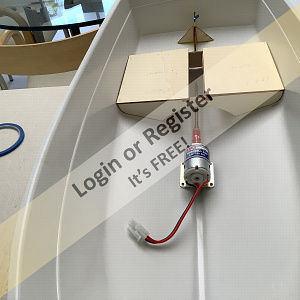
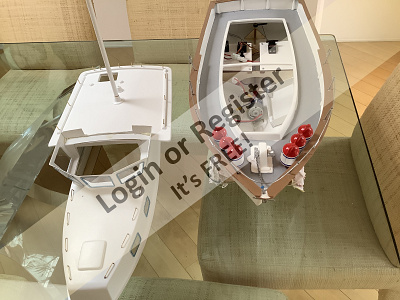
📝 Salon, Rudder Assembly.Motor and Prop Assembly
4 years ago by 🇺🇸 MIR ( Chief Petty Officer 2nd Class)
Chief Petty Officer 2nd Class)✧ 39 Views · 7 Likes · 4 Comments
Flag
💬 Add Comment
Being my first model things have gone pretty well, I think. Instructions are only a guide. After 8 weeks I am starting to make some headway. Just finished the salon deck and door. All the photos show ruff edges and masking tape but they will all be gone when I complete sanding and filling which I am doing at this time as well.
Rudder Post:
The rudder post I must admit I got some good advice on and without it the model could have had some big issues. Happy to report the 3 hr job came out perfectly. The key is keeping everything in line while the rudder shaft is drying. Look at picture 8 for details. The 15 minute epoxy gave me time to make the final adjustments before setting occurred. I would recommend this for the beginner.
Motor and Prop Shaft Alignment
This has now been finally been put into work. I had been avoiding this for the past 8 weeks. There is still final adjusting of the motor and prop shaft but I am waiting for the aligning coupler tool from Mobile Marine in the UK. Being an ex coast guardsmen I never dealt with so many issues below the waterline. If the prop shaft and motor are not aligned perfectly as I am sure all of you are well aware the model will be doing a rumba when its maiden voyage finally arrives.
Best
MIR
▲
⟩⟩
Colin H
jbkiwi
figtree7nts
Rookysailor
MouldBuilder
RNinMunich
Martin555
|
💬 Re: Salon, Rudder Assembly.Motor and Prop Assembly
4 years ago by 🇺🇸 figtree7nts (
Admiral)✧ 34 Views · 2 Likes
Flag
Hi MIR,
Your model is coming along nicely! I like how it's shaping up! Just take your time! Your doing a great job of it! Regards, Ed ▲
⟩⟩
MIR
Martin555
|
|
Login To
Remove Ads 💬 Re: Salon, Rudder Assembly.Motor and Prop Assembly
4 years ago by 🇭🇺 MouldBuilder (
Vice Admiral)✧ 34 Views · 2 Likes
Flag
Looks a great start. Krick do make very nice kits.
Peter.👍 ▲
⟩⟩
MIR
Martin555
|
|
💬 Re: Salon, Rudder Assembly.Motor and Prop Assembly
4 years ago by 🇨🇦 Newby7 (
Fleet Admiral)✧ 34 Views · 2 Likes
Flag
Your first model sure wouldn't know it by the work you've done .
Rick ▲
⟩⟩
MIR
Martin555
|
|
💬 Re: Salon, Rudder Assembly.Motor and Prop Assembly
4 years ago by 🇬🇧 Martin555 (
Fleet Admiral)✧ 34 Views · 1 Like
Flag
Hi MIR,
As your first model boat i think it is coming along nicely. It is surprising how long a model can take to make. But you are making progress, so take your time. It will look great when she is finished. Well done. Martin555. ▲
⟩⟩
Nerys
|
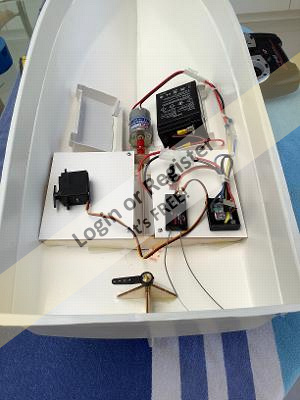
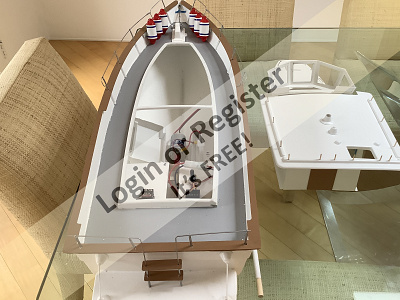
📝 Shaft alignment and electroniscs
4 years ago by 🇺🇸 MIR ( Chief Petty Officer 2nd Class)
Chief Petty Officer 2nd Class)✧ 44 Views · 9 Likes · 8 Comments
Flag
💬 Add Comment
As I mentioned I am a first time model builder and for those who are just starting out the shaft alignment is one of the most important areas in putting your model together and yes I had some very good help thanks to this website. Don't be afraid to ask. If this section is done wrong your boat will be doing the rumba on it's maiden voyage.. If it sounds like a food blender you have some work to do and this issue does not get fixed by putting grease in it.
For the experienced builder the prop alignment is not a big deal at al. I had ordered a alignment tool from the UK and unfortunately the kit did not have my shaft size so I had drill what I received but I did not have a lathe so things got just a bit out of alignment. The easiest way to do this is to make your own alignment tool out of wood and match the motor shaft and the prop shaft diameters.
I must have looked at this angle 30 times and to the eye it was perfect but it was off just a bit.The good news is I was able to correct the shaft and it is now running very well.
You can see by the attached picture I was able to avoid drilling lots of holes for the control units. I used double face tape to secure them. All the control wires came through the strut area.
Once the rudder is done I will now be able to secure the deck and start building the upper deck area. Took 12 weeks to get to this point but most of the upper deck has been in work.
Actually I am quite happy with the way things are coming out.
Best
MIR
▲
⟩⟩
Ianh
stevedownunder
jacko
redpmg
Martin555
robbob
MouldBuilder
RNinMunich
Colin H
|
💬 Re: Shaft alignment and electroniscs
4 years ago by 🇺🇸 MIR (
Chief Petty Officer 2nd Class)✧ 39 Views · 1 Like
Flag
Thanks for the kind words and your advice along the way. MIR
▲
⟩⟩
Martin555
|
|
Login To
Remove Ads 💬 Re: Shaft alignment and electroniscs
4 years ago by 🇺🇸 figtree7nts (
Admiral)✧ 34 Views · 2 Likes
Flag
Hi MIR,
You've done a marvelous job! Of making sure the shaft is true! Way to go! Great Job! Regards, Ed ▲
⟩⟩
Martin555
MIR
|
|
💬 Re: Shaft alignment and electroniscs
4 years ago by 🇺🇸 MIR (
Chief Petty Officer 2nd Class)✧ 39 Views · 1 Like
Flag
Thanks Colin I Just put a brace under the shaft and the problem was solved. In the future I have to make my own alignment coupler. Best MIR
▲
⟩⟩
Martin555
|
|
💬 Re: Shaft alignment and electroniscs
4 years ago by 🇨🇦 Newby7 (
Fleet Admiral)✧ 33 Views · 1 Like
Flag
Nicely done so far keep up the good work.
Rick ▲
⟩⟩
Martin555
|
|
💬 Re: Shaft alignment and electroniscs
4 years ago by 🇬🇧 Colin H (
Fleet Admiral)✧ 34 Views · 2 Likes
Flag
You are doing very well for a newcomer, if the shaft tube itself isn't damaged then you could just put new bearings in.
I often have to do this as my main hobby is the restoration of vintage model boats. Looking good so far keep trying and ask when you get stuck. Cheers Colin. ▲
⟩⟩
MIR
Martin555
|
|
💬 Re: Shaft alignment and electroniscs
4 years ago by 🇺🇸 MIR (
Chief Petty Officer 2nd Class)✧ 39 Views · 2 Likes
Flag
Thanks for the kind words. I tried to drill out the brass tube that came from the UK from Mobile Marine but in drilling it obviously I was off. I do not have a lathe and I will have someone make me one in the future. Once I know my shaft size of the motor and the size of the shaft which I will look at before I purchase the next model so I have the right one. This was very challenging but I made a few adjustments and it is now working well. I am also going to put in an oiler tube as well. Thanks again for the advice.
MIR ▲
⟩⟩
MouldBuilder
Colin H
|
|
💬 Re: Shaft alignment and electroniscs
4 years ago by 🇿🇦 redpmg (
 Commodore) Commodore)✧ 33 Views · 3 Likes
Flag
The boat is coming along well - glad to see you are taking your time and not expecting it to be finished overnight. doing a great job !
And some very wise words coming from a so called "beginner" ( suspect you must have built other things before !) - single most important thing on any model boat is motor /shaft alignment (even if you are using Huco type couplings ) - full size boats too come to that. If you have a lathe an alignment tool is simple to make - with the right length piece of brass rod - gap to suit your coupling - (lucky to have lots of old round pin brass plugs - dismantled those and have lots of ideal size) All you need is one end drilled to suit the shaft and tother to suit the motor. With centre drills piece of cake.......If you don't possess a lathe sure a member of your club will be able to make you one easily. First one was made for me by a friend from hex brass . Sad that Graupner stopped making a lot of their nice items - amongst them the very useful gearboxes and shafts - included with those was a very nice setup for direct drive off a 380/400 motor - George Turner used those on all his fast models - only complaint was the plastic oiler fitting - so usually soldered a piece of brass tube on instead........ I bought all Westbourne's stock of them and any others found........Sadly only have a few left. They made things so simple .............. This ones going in a 16" model of a Fairey Huntress 
▲
⟩⟩
figtree7nts
Colin H
Martin555
|
|
💬 Re: Shaft alignment and electroniscs
4 years ago by 🇬🇧 Martin555 (
Fleet Admiral)✧ 33 Views · 0 Likes
Flag
Hi MIR,
This dose look a bit of a challenge especially for your first build. As you say the prop shaft and motor alignment is very important to get right and is not as easy as some people think. Keep up the good work. Martin555. ▲
⟩⟩
No likes yet
This member will receive 1 point for every like received |
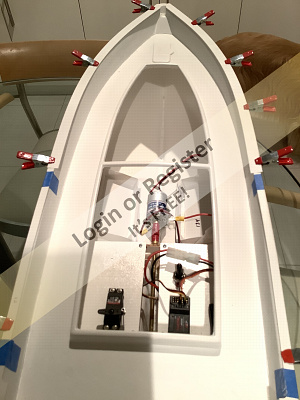
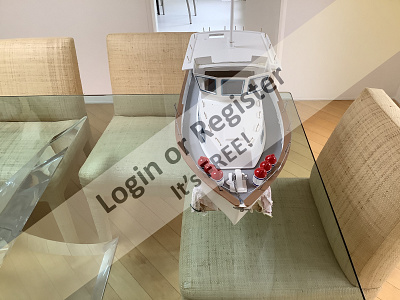
📝 Servo and Wiring and Main Deck
4 years ago by 🇺🇸 MIR ( Chief Petty Officer 2nd Class)
Chief Petty Officer 2nd Class)✧ 42 Views · 9 Likes · 12 Comments
Flag
💬 Add Comment
Let me start off by saying I had hit the wall last week on a few issues. After spending 5 hours on trying to get everything to fit properly I thought it maybe time to put the model in dry dock for a while. I have decided to name the boat The Miracle. What I have found out after 14 weeks 21 minutes and 14 seconds but whose counting is that many parts that you need are not included in the model. Luckily Amazon has had most of them.
For those who are experienced model builders my issues are not even issues. You will notice by the attached photos a few things which may help the new model builders. If you look at the main deck that has now been put into position the instructions called to put the main deck in at the very beginning which would have made it very hard to do what you see now. I have learned they are a just a guide. What has been helpful is the instructions are one to one so I can answer most of the issues as I go along.
You want to have all the electronics done and servos working properly before you start on anything else. Luckily I had some very good advice on this and everything now works perfectly.
The next problem was when I got the remote control it was not properly linked up to the receiver, this was 4 hrs of frustration. There is a very small hole in the receiver unit which has to be pressed to link it up. This was not explained properly. It is now working.
The servo which you will see has a very important part which again did not come with the model and they are called clevis adjustable linkage stoppers. This gives you the ability to adjust the push rod very easily to line up your rudder. If you don't have these buy them. Trust me on this.
I have put a switch in the system to shut everything on and off and will be adding another one so I don't have to take out the batteries for
charging.
You will see in the pictures I am in the process of filling and sanding. You can see if you mask properly you can save hrs on your clean up. You put it right up to your joint on either side and just when it is setting up you take it off. What you see was before and after in 20 minutes.
The clips are just to hold the cap rails in position to the hull while I am still shapeing and will start glueing them this week. I also have to drill the cap rails to receive the stanchions. This is not as easy as it looks since it has to be a vertical drill position which also takes into account the side wall angle here the use of the calipers is very important.
The good news is the model has come out of dry dock.
Best
MIR
▲
⟩⟩
mturpin013
RNinMunich
figtree7nts
stevedownunder
MouldBuilder
jbkiwi
redpmg
Martin555
Colin H
|
💬 Re: Servo and Wiring and Main Deck
4 years ago by 🇭🇺 MouldBuilder (
Vice Admiral)✧ 34 Views · 2 Likes
Flag
Hi MIR. You are doing very well for your first build.
One thing I think I should add to the conversation is that you should always protect your electronics with a suitable fuse. Auto centres will sell small car fuses and a suitable fuse holder. This should be fitted as soon as you can. There are several different ampage values available from 1A to 40A more or less.👍👍👍 Peter. ▲
⟩⟩
Martin555
MIR
|
|
Login To
Remove Ads 💬 Re: Servo and Wiring and Main Deck
4 years ago by 🇩🇪 RNinMunich (
Fleet Admiral)✧ 33 Views · 1 Like
Flag
No sweat Mir, that's why we are all here👍
BTW: MIR, isn't that Russian for peace? Name of their old space station. Cheers, Doug 😎 ▲
⟩⟩
Martin555
|
|
💬 Re: Servo and Wiring and Main Deck
4 years ago by 🇺🇸 MIR (
Chief Petty Officer 2nd Class)✧ 39 Views · 3 Likes
Flag
Thanks for all the information. I am glad you informed me of the battery issue and the shaft alignment alternatives on the next one. Best MIR
▲
⟩⟩
Martin555
figtree7nts
RNinMunich
|
|
💬 Re: Servo and Wiring and Main Deck
4 years ago by 🇺🇸 MIR (
Chief Petty Officer 2nd Class)✧ 39 Views · 3 Likes
Flag
Still major issues ahead. Thanks for your support. Best MIR
▲
⟩⟩
Martin555
figtree7nts
RNinMunich
|
|
💬 Re: Servo and Wiring and Main Deck
4 years ago by 🇩🇪 RNinMunich (
Fleet Admiral)✧ 35 Views · 4 Likes
Flag
Heartily agree Red👍👍👍 Especially re LiPos. And would add, if I may😌
Please folks - NEVER charge any battery inside a model!😮 Even the highly tolerant SLAs are not completely sealed and can vent hydrogen gas if stressed by too high a charge voltage - causing high current to flow. If the hydrogen can collect inside the boat and you then do a bench test with a brushed motor any spark could have interesting results!💥 At best launching your superstructure to the ceiling, at worst setting fire to your boat, hair, bench, workshop, house😭 depending on what's around the model. Apart from you!🤕 I find it more convenient to have my batteries on a separate charging bench (dining table🙄) anyway😉 And I never usually charge any model battery type at more than 500mA, or 1Amp if I'm in a hurry. Never mind all that manufacturer's blurb about charging at 10C, 20C or whatever. That's just to encourage you to drastically shorten the life of your batteries so you buy more! Someone (JB?😁) will surely object to this 'but I charge mine with X Amps and they work fine ...' OK but for how long? And do they still charge to full capacity? Treat your batteries nicely and they will do the same for you - and your wallet!😊🤑 I never had a battery get too hot to touch while on charge unless there was a fault with it. Had a LiPo once with a short in the first cell!! Rapidly disappeared out to the garden in a fire retarding bag! Shaft/motor alignment: "you move the motor around on the mount (or move the mount) until it runs at its fastest no load speed on that voltage" We must be similarly ancient Red cos I dimly remember reading something like that as well. I use the normal drive battery for the tests and the ESC and a Servo Tester to adjust the volts applied to the motor. I then connect an ammeter between the battery and motor, jiggle the motor around until the current drawn is at minimum. Easier to discern than 'most revs' by ear.🙉 The rest then as you describe Red👍 W.r.t " (shades of HMS Pinafore Doug - pardon the insubordination)" We (and I use that in the Royal sense - being Monarch of the Seas😁😂) will overlook your indiscretion in this instance Captain. We will assume 'Extenuating Circumstances'. However, what I can't forgive is ... that I now can't get the HMS Pinafore music gedoodle out of my head!🙉🙉🙉 Cheers, FLEET//😎 

▲
⟩⟩
Rookysailor
Martin555
Colin H
MIR
|
|
💬 Re: Servo and Wiring and Main Deck
4 years ago by 🇺🇸 figtree7nts (
Admiral)✧ 34 Views · 2 Likes
Flag
Hi MIR,
You model is coming along nicely! Very good, Keep up the awesome work! Cheers, Ed ▲
⟩⟩
Martin555
MIR
|
|
💬 Re: Servo and Wiring and Main Deck
4 years ago by 🇺🇸 MIR (
Chief Petty Officer 2nd Class)✧ 40 Views · 2 Likes
Flag
Thanks JB I am now getting ready to shape the hull and put on the cap rails. Best MIR
▲
⟩⟩
stevedownunder
Martin555
|
|
💬 Re: Servo and Wiring and Main Deck
4 years ago by 🇺🇸 MIR (
Chief Petty Officer 2nd Class)✧ 40 Views · 2 Likes
Flag
Thank for all this advice. I now have the motor running pretty well and thanks for the advice on the battery situation. Best MIR
▲
⟩⟩
stevedownunder
Martin555
|
|
💬 Re: Servo and Wiring and Main Deck
4 years ago by 🇳🇿 jbkiwi (
Fleet Admiral)✧ 35 Views · 3 Likes
Flag
Looking good so far Mir, looks very tidy.
JB ▲
⟩⟩
stevedownunder
Martin555
MIR
|
|
💬 Re: Servo and Wiring and Main Deck
4 years ago by 🇺🇸 MIR (
Chief Petty Officer 2nd Class)✧ 40 Views · 2 Likes
Flag
Learning great stuff everyday. Best MIR
▲
⟩⟩
stevedownunder
Martin555
|
|
💬 Re: Servo and Wiring and Main Deck
4 years ago by 🇿🇦 redpmg (
Commodore)✧ 46 Views · 4 Likes
Flag
Hi MIR - Boat is coming along well - frustrating but its the normal sort of problems that you run across starting out - sometimes its also hard to remember the way you solved a problem before for an experienced modeller. Someone said the only way to gain experience is by making mistakes - you don't usually make them again . That applies to all of us - including very experienced modellers like Lord High Admiral Doug (shades of HMS Pinafore Doug - pardon the insubordination)
Forgot to add in the previous alignment discussion - there was another way suggested long ago in a now defunct magazine - with your motor loosely in situ joined to the propshaft connect it to a single battery (1.2 to 1.5v) - 7.2 & 6v motors will run very slowly - you move the motor around on the mount (or move the mount) until it runs at its fastest no load speed on that voltage - (you can usually estimate that by the sound it makes by running it prior to placing in situ) then set the motor in that position A dab of silicone /glue would do . Always another way for everything......... And by the way you can use a Z bend on one end of a servo rod cut to size - tiny adjustments being made on the threaded end. Threaded end of purchased servo rods usually come with the plastic connector here in SA. (Expensive so tend to make my own). There is also a better system called a servo saver which has a spring incorporated to reduce the risk of overloading the servo - used instead of the Z bend. Your problem with the radio was probably caused by the fact they all tend to be made in China - and the Chingelese instructions are never clear......... That's why its useful to belong to a club or this forum where you can seek advice One thing further - Nimh batteries can tend to get very hot when charging - had a set that would almost burn you - lasted 5 years though. Used virtually every weekend once or twice. So do Ni Cads which also tend to explode if seriously overcharged or charged too fast . Lead acids can swell and leak - and its almost suicidal to charge Lipo's in situ. They need to be in a fireproof container . So I would tend to rather remove the batteries for charging if you can do so. ▲
⟩⟩
RNinMunich
stevedownunder
MIR
Martin555
|
|
💬 Re: Servo and Wiring and Main Deck
4 years ago by 🇬🇧 Martin555 (
Fleet Admiral)✧ 36 Views · 3 Likes
Flag
Hi MIR,
It is good to see you are making progress. Like most things the more you do something the better you become at it, so carry on and keep up the good work. Martin555. ▲
⟩⟩
MouldBuilder
stevedownunder
MIR
|
📝 Stanchions and other issues.
4 years ago by 🇺🇸 MIR ( Chief Petty Officer 2nd Class)
Chief Petty Officer 2nd Class)✧ 40 Views · 4 Likes · 5 Comments
Flag
💬 Add Comment
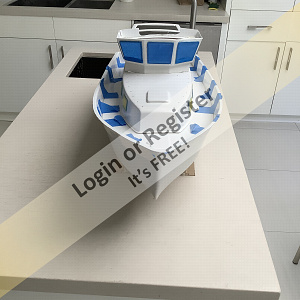
Well 16 weeks later I am getting ready to start putting the THE MIRACLE together. The name comes from a few special people who jumped in before the boat went into permanent dry dock. Actually it is coming together pretty well. All the electronics are in and the rudder and servos are all working perfectly.
I am switching out the wood mast that came with the kit with a 10mm piece brass tube of the same size which will be painted and I will then run wires down the tube so I can have an active mast light. I am also going to make active the side navigation lights and an active radar which I have put together.
The stanchions were a challenge in getting the correct angle and drilling them through he cap rails without damaging the sidewalls. This was a 4 day process to get them all in place.
What you see attached is the side rails getting ready for primer and then painting. I am into many days of masking and re masking due to the different colors that have to be applied.
Once I spray the side walls that will be taped and then the deck paint will be applied. The cap rails will be mahogany in color.
I have found even when I use the 2500 grit sand paper if you apply the primer mist correctly and do the same process on your color there is no reason to sand in between coats. I am using Testors 3 oz enamel spray cans. I bought all the cans from the same batch at the same time. This is very important.
I have just started putting the swim step together.
Best
MIR
▲
⟩⟩
MouldBuilder
RNinMunich
Joe727
Colin H
|
💬 Re: Stanchions and other issues.
4 years ago by 🇩🇪 RNinMunich (
Fleet Admiral)✧ 33 Views · 1 Like
Flag
"never knew it could be this much fun ..."
Good to hear Mir, that's what it's all about👍 Like what I see so far very much😀 "The good news is the model has come out of dry dock." Does that mean that she's already launched and now in the 'wet' fitting out dock? All the best, Doug 😎 ▲
⟩⟩
Martin555
|
|
Login To
Remove Ads 💬 Re: Stanchions and other issues.
4 years ago by 🇺🇸 MIR (
Chief Petty Officer 2nd Class)✧ 39 Views · 1 Like
Flag
Thanks made the corrections on the stanchions today. Best MIR
▲
⟩⟩
Martin555
|
|
💬 Re: Stanchions and other issues.
4 years ago by 🇺🇸 MIR (
Chief Petty Officer 2nd Class)✧ 39 Views · 3 Likes
Flag
Thanks never knew it could be this much fun. Best MIR
▲
⟩⟩
MouldBuilder
Martin555
RNinMunich
|
|
💬 Re: Stanchions and other issues.
4 years ago by 🇺🇸 figtree7nts (
Admiral)✧ 34 Views · 2 Likes
Flag
Hi MIR,
Your doing a good job on your model! Keep up the good work! Regards, Ed ▲
⟩⟩
Martin555
MIR
|
|
💬 Re: Stanchions and other issues.
4 years ago by 🇬🇧 Martin555 (
Fleet Admiral)✧ 34 Views · 1 Like
Flag
She is coming along nicely.
Keep it up. Martin555. ▲
⟩⟩
MIR
|
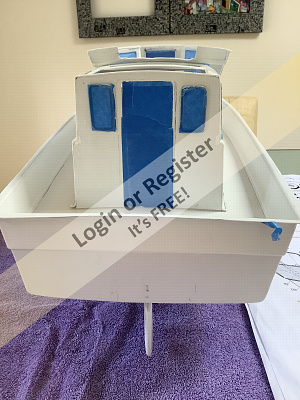
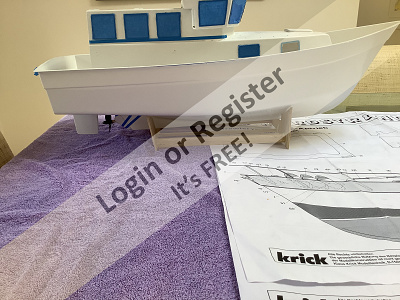
📝 Starting to finally assemble the Trawler
3 years ago by 🇺🇸 MIR ( Chief Petty Officer 2nd Class)
Chief Petty Officer 2nd Class)✧ 40 Views · 7 Likes · 5 Comments
Flag
💬 Add Comment
For those who have followed the build I have been off the grid for a while trying to make some head way. The deck had to be redone and the stanchions had to be re aligned. The cap rails had to be put on the hull. I then drilled the holes for the stanchions. Ran into some problems in the drilling process but caught the mistake before I started drilling.
Being a new builder I have made some errors which I have been able to correct before I made them secure. I was not taking off enough of the material from the ABS molds this was out of caution. When they say remove the excess that's what it means.
I now have the rudder and the shaft in place and all the electronics. I have bench tested the transmitter and receiver all is working.
For those who have not put in a shaft the key for me was getting the coupler that fits both the shaft of the motor and the shaft of the boat. The experienced builder can do it with ease.
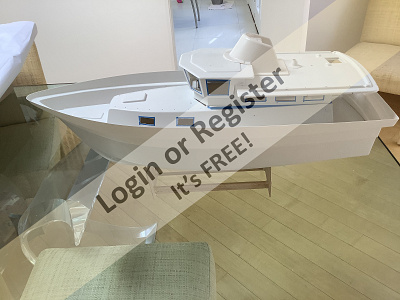
The hull and the salon deck are now painted and I am continuing to mount the deck pieces and continue to paint the parts as I go. Right now I would give myself a C but I am enjoying the build.
MIR
Being a new builder I have made some errors which I have been able to correct before I made them secure. I was not taking off enough of the material from the ABS molds this was out of caution. When they say remove the excess that's what it means.
I now have the rudder and the shaft in place and all the electronics. I have bench tested the transmitter and receiver all is working.
For those who have not put in a shaft the key for me was getting the coupler that fits both the shaft of the motor and the shaft of the boat. The experienced builder can do it with ease.
The hull and the salon deck are now painted and I am continuing to mount the deck pieces and continue to paint the parts as I go. Right now I would give myself a C but I am enjoying the build.
MIR
▲
⟩⟩
paulgm
Inkoust
Cashrc
figtree7nts
neill
MouldBuilder
Martin555
|
💬 Re: Starting to finally assemble the Trawler
3 years ago by 🇺🇸 Cashrc (
Vice Admiral)✧ 36 Views · 1 Like
Flag
She’s looking good!! Glad you kept on it and saw the build through.👍
▲
⟩⟩
Martin555
|
|
Login To
Remove Ads 💬 Re: Starting to finally assemble the Trawler
3 years ago by 🇺🇸 figtree7nts (
Admiral)✧ 50 Views · 2 Likes
Flag
Hi MIR,
You have done a great job of it! She's coming along nicely! Cheers, Ed ▲
⟩⟩
Cashrc
Martin555
|
|
💬 Re: Starting to finally assemble the Trawler
3 years ago by 🇬🇧 Martin555 (
Fleet Admiral)✧ 39 Views · 1 Like
Flag
Peter,
That is something i will have to discuss with you at a latter date. LOL!! Martin555. ▲
⟩⟩
Cashrc
|
|
💬 Re: Starting to finally assemble the Trawler
3 years ago by 🇭🇺 MouldBuilder (
Vice Admiral)✧ 44 Views · 2 Likes
Flag
Hi MIR.
She is looking really nice. I like the wood colouring. It breaks up the white really well. What are these things "instructions" that you refer to Martin. By the way MIR, give yourself an A. Peter.😀 ▲
⟩⟩
Cashrc
Martin555
|
|
💬 Re: Starting to finally assemble the Trawler
3 years ago by 🇬🇧 Martin555 (
Fleet Admiral)✧ 40 Views · 2 Likes
Flag
Hi MIR,
It is nice to see you are making headway. As a new builder you are now discovering that even model boat kit's are not as easy as most people think. Understanding the instructions and drawings is a skill in it's self. Keep up the good work. Martin555. ▲
⟩⟩
Cashrc
MouldBuilder
|


Login To
Remove Ads
Remove Ads