Join Us On Social Media!

|

|

|
Download The App!
Login To
Remove Ads
Remove Ads
Login To
Remove Ads
Remove Ads
Model Boats Website
Scratch built, Working Steam powered Drifter trawler LT100, to 1:24th scale.
73 Posts · 28 Followers · 623 Photos · 522 Likes
Began 4 years ago by
 Australia
Follow This Thread
Not currently following
> Click to follow
> Click to follow
Latest Post 1 year ago by
| Oldest posts shown first (Show Newest First) | (Print Booklet) |
📝 Scratch built, Working Steam powered Drifter trawler LT100, to 1:24th scale.
4 years ago by 🇦🇺 stevedownunder ( Captain)
Captain)✧ 211 Views · 7 Likes · 4 Comments
Flag
💬 Add Comment
LT100 My Way.
With this build log there is a lot of ground to catch up on I have been building this model for more than 20 years. I do not profess to be an expert builder, nor that this is an exceptional model, especially considering that this is only my second scratch built model.
However my intention is to build the best model I can (this is true most of the time). My first reasonable scratch build being a simple hard chine cabin cruiser. Most of the models I have built have been plastic kits.
My intention with this project was to build a working model without many compromises, that is to say when out of the water you would not be able to tell it is a working model.
I welcome constructive comment.
I hope people enjoy the journey with me.
Looking around for a scratch build project, something that wouldn’t take too long (ha-ha) or be too complex or too large, I found that I really liked the look of steam drifter trawlers.
A wooden prototype being preferred as I could build a model hull out of wood then build a steam plant to power it; therefore the model would have some similarity to the original even if internally it wasn’t a replica.
So the decision was made to build myself one, I started searching for suitable plans, this was in a time before the internet when things weren’t just a click away, therefore I relied on the couple of plans catalogues that I had in my possession.
Plans were found in the MAP Plans catalogue, then this project got off to something of a false start in 1990 with the purchase of a set of plans drawn by R. A. Neville to a scale of 1/24, from the Plan Shop in New South Wales Australia these are for a typical Wooden Steam Drifter.
I am not sure when these plans were first printed, however I have inherited a copy of Model Engineer published in September 1959 which is the first of 4 articles titled, How to build a Wooden Steam Drifter, written by R. A. Neville (I didn’t find this article until many years after starting work on this project!) I wasn’t quite happy with these plans, being more interested in building something that represented an actual vessel.
So I sat on them for quite a while umming and arr-ing, thinking they are not quite what I wanted.
Then to my amazement and elation, on the cover of Model Boats in April 1993 was a beautifully made model, that had been entered into Class C9 kit class at the 1993 Model Engineer Exhibition, of LT100 built by Robin Butler, winning a Silver medal, and guess what next month there were to be plans for this trawler, wow just what I wanted!
Life got in the way of hobby as it usually does and it wasn’t until a few years later in 1996 that I purchased the plans drawn of Formidable LT 100 by James Pottinger to a scale of 1/33, along with the book From Tree to Sea by Ted Frost, this is a wonderful book about the construction of LT 100 drawing from Ted Frosts memories as an apprentice ship wright.
The plans arrived, then I had them enlarged to what I thought was 1:24 scale, as mentioned earlier I intended to power the model by steam, I went off and measured the opening for the wheel house and I found I could comfortably fit the 3 ½in diameter boiler I was thinking of building through the opening.
Having no experience with steam at all, I imagined that steam plants would require quite a bit of servicing, with this in mind I thought it was important to be able to remove the entire steam plant easily for routine maintenance. Next step was to get some plans for an engine.
Probably in 1996, my dad and I went to Kilsyth (an outer suburb of Melbourne, Australia), where Live Steam Supplies of Victoria were, they specialised in miniature steam in all its aspects. Whilst there I purchased plans for a ½ in bore ½ in stroke, twin cylinder double acting oscillating steam engine designed by Basil Harley, published by Model Maker plans service.
Probably first printed in July 1983, I have the August 1983 Model Boats with part two in a series of articles to build the engine and boiler along with a 42in long steam launch, once again I didn’t find this article until much later after purchasing the plans even though this was a magazine I had bought!
I had already decided to make the centre flue boiler designed by Peter Arnot. Peter ran an excellent series of articles in Model Boats for a Vee 4 steam engine, boiler and associated equipment throughout the year of 1993, I intended to purchase some 3 ½in copper pipe as illustrated in the plan.
Unfortunately Live Steam Supplies of Victoria didn’t have any 3 ½in copper pipe, turns out this isn’t a size commonly used in Australia, what to do, luckily I had bought along the trawler plans and after a few quick measurements were taken, a rash on the spot decision was made, (this would latter cause problems).
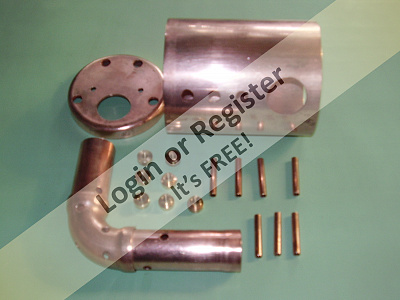
I purchased two pieces of 4in diameter copper pipe that were cut to length, along with flat sheet copper for the end plates, smaller diameter tubing, a few packs of solder on nuts and tails along with other various items including a Cheddar ceramic gas burner.
The steam engine and boiler were started along with the work boat, work proceeding roughly in parallel.
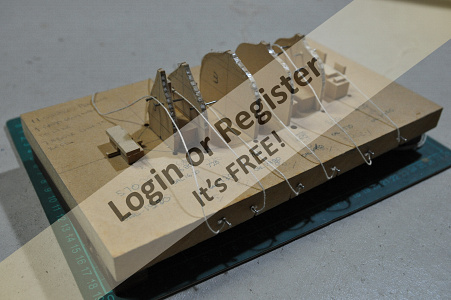
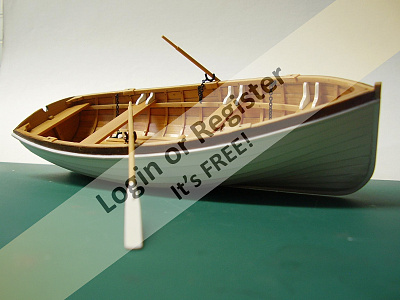
Most people start with the hull, however I decided to start making the work boat first, my thinking being if I can make a small clinker built boat to the standard I wanted then the rest should be achievable, also I wouldn’t be in such a rush to finish what is really “just a fitting” for the project, therefore possibly doing a better job.
After reading the clinker-built boat section of “PLANK-ON-FRAME MODELS and SCALE MASTING & RIGGING Volume 2” by Harold A Underhill a start could be made.
I wanted to use Huon pine, for most of this little boat, this is a very slow growing timber unique to Tasmania in Australia, which was used to build real ships and boats from, due to its ability to not rot even when submerged, it also has a straight, fine grain and generally pale in colour.
I made a start by spending a day at dad’s using his table saw to cut up some blocks of Huon pine into strips to make up a “kit” of material.
This material I had bought back from Tasmania on my honeymoon, packed into our suitcases to my wife’s bewilderment.
Then making a building board and formers from MDF (not the best material to use as the dust is very bad for you, I was unaware of this at the time). The keel was fabricated from several pieces of an unknown hard wood all pinned together with homemade bamboo pins, a Huon pine transom being pinned to the stern post also keel doublers attached for planks to rest on.
I would like to say that I could not have made the work boat without Harold Underhill’s book, there was a lot of reading then rereading combined with head scratching going on during the build. The main difficulty was to generate the shape of planks.
At one point I nearly scrapped the whole thing as I couldn’t seem to get the planking just right, however after some consideration I pressed on with the attitude it doesn’t really matter if this one is not perfect I will learn lesions in building it and I can always build another if it isn’t up to scratch.
Once templates were made the plank would be cut and steamed then clamped into position, left there for a few days then glued on with Cyanoacrylate and pinned to the previous plank, making sure not to pin it to the building frame.
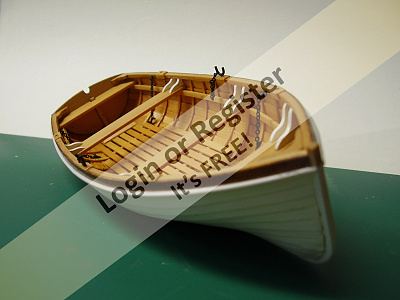
After planking the hull was removed from its jig then ribs, benches, floor boards, rubbing strake and knees were added, some artistic licence was taken, I didn’t follow the plans completely choosing to not add grab lines like you would see on a life boat and a device that I was unable to determine its purpose mounted on the transom.
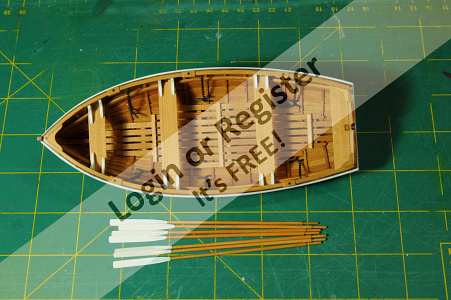
Next oars were made, these are not shown on the plans, I didn’t want to make paddle’s, so I looked through books that I have trying to determine proportions and came up with something that looks like an oar to me, I made these from Huon pine in two parts.
Next came the crutches and sockets, Brass tube was used for the sockets being fitted into holes drilled. Next the crutches, these were fabricated from brass wire and fine chain silver soldered together, when I am silver soldering small parts I use a technique my dad taught me.
That is to cut off the required amount of solder and once you have heated the flux a little to boil most of the moisture away, then place the solder using tweezers where it is required, the solder will stay in place because most of the moisture has gone from the flux, gently apply heat and you should have a very neat job.
While on the subject of soldering a low-cost alternative to fire bricks is to use what is called Hebel in Australia this is a lightweight product used in buildings and landscaping it is an aerated concrete sold in blocks.
Once the flux was cleaned up, they were painted black using Humbrol enamel.
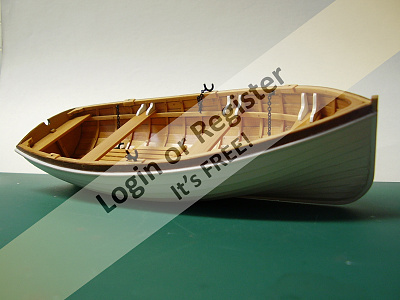
Using a Teak coloured wood stain, I masked then stained the top strake down to the rubbing strake.
The inside and top strake now received a couple of coats of satin varnish. The rest of it received a few coats of Humbrol satin white airbrushed on.
In the end after it was finished, I hadn’t quite achieved what I set out to do however, I was quite happy with my little work boat even with its short comings.
Cheers,
Stephen.

With this build log there is a lot of ground to catch up on I have been building this model for more than 20 years. I do not profess to be an expert builder, nor that this is an exceptional model, especially considering that this is only my second scratch built model.
However my intention is to build the best model I can (this is true most of the time). My first reasonable scratch build being a simple hard chine cabin cruiser. Most of the models I have built have been plastic kits.
My intention with this project was to build a working model without many compromises, that is to say when out of the water you would not be able to tell it is a working model.
I welcome constructive comment.
I hope people enjoy the journey with me.
Looking around for a scratch build project, something that wouldn’t take too long (ha-ha) or be too complex or too large, I found that I really liked the look of steam drifter trawlers.
A wooden prototype being preferred as I could build a model hull out of wood then build a steam plant to power it; therefore the model would have some similarity to the original even if internally it wasn’t a replica.
So the decision was made to build myself one, I started searching for suitable plans, this was in a time before the internet when things weren’t just a click away, therefore I relied on the couple of plans catalogues that I had in my possession.
Plans were found in the MAP Plans catalogue, then this project got off to something of a false start in 1990 with the purchase of a set of plans drawn by R. A. Neville to a scale of 1/24, from the Plan Shop in New South Wales Australia these are for a typical Wooden Steam Drifter.
I am not sure when these plans were first printed, however I have inherited a copy of Model Engineer published in September 1959 which is the first of 4 articles titled, How to build a Wooden Steam Drifter, written by R. A. Neville (I didn’t find this article until many years after starting work on this project!) I wasn’t quite happy with these plans, being more interested in building something that represented an actual vessel.
So I sat on them for quite a while umming and arr-ing, thinking they are not quite what I wanted.
Then to my amazement and elation, on the cover of Model Boats in April 1993 was a beautifully made model, that had been entered into Class C9 kit class at the 1993 Model Engineer Exhibition, of LT100 built by Robin Butler, winning a Silver medal, and guess what next month there were to be plans for this trawler, wow just what I wanted!
Life got in the way of hobby as it usually does and it wasn’t until a few years later in 1996 that I purchased the plans drawn of Formidable LT 100 by James Pottinger to a scale of 1/33, along with the book From Tree to Sea by Ted Frost, this is a wonderful book about the construction of LT 100 drawing from Ted Frosts memories as an apprentice ship wright.
The plans arrived, then I had them enlarged to what I thought was 1:24 scale, as mentioned earlier I intended to power the model by steam, I went off and measured the opening for the wheel house and I found I could comfortably fit the 3 ½in diameter boiler I was thinking of building through the opening.
Having no experience with steam at all, I imagined that steam plants would require quite a bit of servicing, with this in mind I thought it was important to be able to remove the entire steam plant easily for routine maintenance. Next step was to get some plans for an engine.
Probably in 1996, my dad and I went to Kilsyth (an outer suburb of Melbourne, Australia), where Live Steam Supplies of Victoria were, they specialised in miniature steam in all its aspects. Whilst there I purchased plans for a ½ in bore ½ in stroke, twin cylinder double acting oscillating steam engine designed by Basil Harley, published by Model Maker plans service.
Probably first printed in July 1983, I have the August 1983 Model Boats with part two in a series of articles to build the engine and boiler along with a 42in long steam launch, once again I didn’t find this article until much later after purchasing the plans even though this was a magazine I had bought!
I had already decided to make the centre flue boiler designed by Peter Arnot. Peter ran an excellent series of articles in Model Boats for a Vee 4 steam engine, boiler and associated equipment throughout the year of 1993, I intended to purchase some 3 ½in copper pipe as illustrated in the plan.
Unfortunately Live Steam Supplies of Victoria didn’t have any 3 ½in copper pipe, turns out this isn’t a size commonly used in Australia, what to do, luckily I had bought along the trawler plans and after a few quick measurements were taken, a rash on the spot decision was made, (this would latter cause problems).
I purchased two pieces of 4in diameter copper pipe that were cut to length, along with flat sheet copper for the end plates, smaller diameter tubing, a few packs of solder on nuts and tails along with other various items including a Cheddar ceramic gas burner.
The steam engine and boiler were started along with the work boat, work proceeding roughly in parallel.
Most people start with the hull, however I decided to start making the work boat first, my thinking being if I can make a small clinker built boat to the standard I wanted then the rest should be achievable, also I wouldn’t be in such a rush to finish what is really “just a fitting” for the project, therefore possibly doing a better job.
After reading the clinker-built boat section of “PLANK-ON-FRAME MODELS and SCALE MASTING & RIGGING Volume 2” by Harold A Underhill a start could be made.
I wanted to use Huon pine, for most of this little boat, this is a very slow growing timber unique to Tasmania in Australia, which was used to build real ships and boats from, due to its ability to not rot even when submerged, it also has a straight, fine grain and generally pale in colour.
I made a start by spending a day at dad’s using his table saw to cut up some blocks of Huon pine into strips to make up a “kit” of material.
This material I had bought back from Tasmania on my honeymoon, packed into our suitcases to my wife’s bewilderment.
Then making a building board and formers from MDF (not the best material to use as the dust is very bad for you, I was unaware of this at the time). The keel was fabricated from several pieces of an unknown hard wood all pinned together with homemade bamboo pins, a Huon pine transom being pinned to the stern post also keel doublers attached for planks to rest on.
I would like to say that I could not have made the work boat without Harold Underhill’s book, there was a lot of reading then rereading combined with head scratching going on during the build. The main difficulty was to generate the shape of planks.
At one point I nearly scrapped the whole thing as I couldn’t seem to get the planking just right, however after some consideration I pressed on with the attitude it doesn’t really matter if this one is not perfect I will learn lesions in building it and I can always build another if it isn’t up to scratch.
Once templates were made the plank would be cut and steamed then clamped into position, left there for a few days then glued on with Cyanoacrylate and pinned to the previous plank, making sure not to pin it to the building frame.
After planking the hull was removed from its jig then ribs, benches, floor boards, rubbing strake and knees were added, some artistic licence was taken, I didn’t follow the plans completely choosing to not add grab lines like you would see on a life boat and a device that I was unable to determine its purpose mounted on the transom.
Next oars were made, these are not shown on the plans, I didn’t want to make paddle’s, so I looked through books that I have trying to determine proportions and came up with something that looks like an oar to me, I made these from Huon pine in two parts.
Next came the crutches and sockets, Brass tube was used for the sockets being fitted into holes drilled. Next the crutches, these were fabricated from brass wire and fine chain silver soldered together, when I am silver soldering small parts I use a technique my dad taught me.
That is to cut off the required amount of solder and once you have heated the flux a little to boil most of the moisture away, then place the solder using tweezers where it is required, the solder will stay in place because most of the moisture has gone from the flux, gently apply heat and you should have a very neat job.
While on the subject of soldering a low-cost alternative to fire bricks is to use what is called Hebel in Australia this is a lightweight product used in buildings and landscaping it is an aerated concrete sold in blocks.
Once the flux was cleaned up, they were painted black using Humbrol enamel.
Using a Teak coloured wood stain, I masked then stained the top strake down to the rubbing strake.
The inside and top strake now received a couple of coats of satin varnish. The rest of it received a few coats of Humbrol satin white airbrushed on.
In the end after it was finished, I hadn’t quite achieved what I set out to do however, I was quite happy with my little work boat even with its short comings.
Cheers,
Stephen.
▲
⟩⟩
Jerry Todd
RNinMunich
GaryLC
redpmg
robbob
Colin H
Martin555
|
💬 Re: Scratch built, Working Steam powered Drifter trawler LT100, to 1:24th scale.
4 years ago by 🇬🇧 mturpin013 (
 Admiral) Admiral)✧ 210 Views · 3 Likes
Flag
Hi Stephen, you say " I hadn’t quite achieved what I set out to do however," I wonder how much better you thought it would be, its a fantastic start and great to read another interesting build.
I'm particularly interested in the boiler part of your build so I'm hoping for some detail on that. I am planning to build my own boiler quite soon when I've finished the police boat, I already have the hull and engine finished, just need some steam now. ▲
⟩⟩
RNinMunich
stevedownunder
Martin555
|
|
Login To
Remove Ads 💬 Re: Scratch built, Working Steam powered Drifter trawler LT100, to 1:24th scale.
4 years ago by 🇦🇺 stevedownunder (
Captain)✧ 210 Views · 2 Likes
Flag
Hi Martin,
I have gone through the text and made alterations, you are right it all looked like a big "blob of text". Thanks for pointing that out. Cheers, Stephen. ▲
⟩⟩
mturpin013
Martin555
|
|
💬 Re: Scratch built, Working Steam powered Drifter trawler LT100, to 1:24th scale.
4 years ago by 🇦🇺 stevedownunder (
Captain)✧ 210 Views · 1 Like
Flag
Hi Martin,
Thank you. I have written this in word and when I copy and paste into here it all seems to bunch up, I will try to improve it. Cheers, Stephen. ▲
⟩⟩
Martin555
|
|
💬 Re: Scratch built, Working Steam powered Drifter trawler LT100, to 1:24th scale.
4 years ago by 🇬🇧 Martin555 (
 Fleet Admiral) Fleet Admiral)✧ 210 Views · 1 Like
Flag
Hi Stephen,
Firstly may i say what a pleasure it is to see a build log from you after such a long time. It is the new editors loss and our gain. The model looks so realistic if you had a different background no-one would be able to tell the difference. Fantastic workmanship. I hope you do not take this the wrong way but i found reading this was a bit of a battle as i kept reading the same line several times. My eye site is not the best anymore. Would it be possible to write it in smaller sentences. Martin555. ▲
⟩⟩
stevedownunder
|
Login To
Remove Ads
Remove Ads
📝 Scratch built, Working Steam powered Drifter trawler LT100, to 1:24th scale.
4 years ago by 🇦🇺 stevedownunder ( Captain)
Captain)✧ 215 Views · 8 Likes · 12 Comments
Flag
💬 Add Comment
Part 2.
I am a fitter and turner by trade and was fortunately allowed to use the well equipped machine shop at work, so half an hour each day before work started.
I would work on my steam engine, added to that my father had a very well equipped workshop at his home although at that time I lived on the other side of Melbourne making it difficult to just "drop in" for a half hour session.
Another problem was dad and I would get chatting and the time would vanish without much happening (not a bad thing really now he has gone), occasionally I would be able to work there for a few hours on the weekend, therefore I had some parts being made at work and some parts being made at dads, one thing that was made at dads was the crank shaft.
The first one, I made was as indicated on the plans being fabricated construction, however ended up having a .006” run out when checked between “Vee” blocks in hind sight this was probably due to the rod being used having a slight bend in it, what to do!
I wasn’t happy with the idea of making another one the same, even though if I machined some rod down to make it straight that would probably fix this problem.
So I decided to make the crank out of a solid piece of machining grade stainless steel, how hard could that be! Well it turned out to be more difficult than first thought and after a lot of machining, whilst trying to get to the final diameter of 3/16” the cutting force overcome the resistance to deflect and my crank shaft came out of the lathe with a bang bending and breaking it beyond repair( see photo 943 ).
Lesson learnt, this was quite off putting for a while, so I attempted to straighten the original fabricated crank, only making it worse; well that was the end of that, back to the drawing board.
Then I decided to go back to making a crank from a solid piece of steel, I still liked this option as it would give me a completely concentric crank. I came to the conclusion that stainless was not the go and settled on a piece of 4140 grade steel, otherwise known as shafting steel.
I increased the shaft diameter to 1/4in this time and succeeded in my endeavour.
Of course the main down side of this increase in diameter is an increase in surface area and friction causing greater resistance for the shaft to rotate.
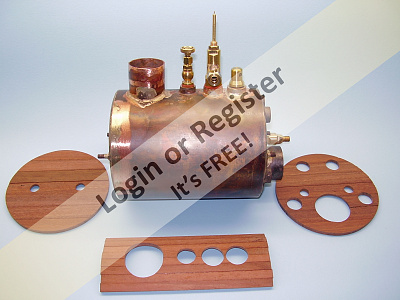
I followed Peter Arnot’s instructions and made up a boiler to his plan, the only change I made apart from the increase in overall diameter was to increase the filling bush diameter to make it a little easier to fill with water.
I also made Peter’s manual boiler feed pump, which was latter used to pressure test my boiler.
Around this time I moved house and built myself a garage and workshop, this put a hold on the project for some years.
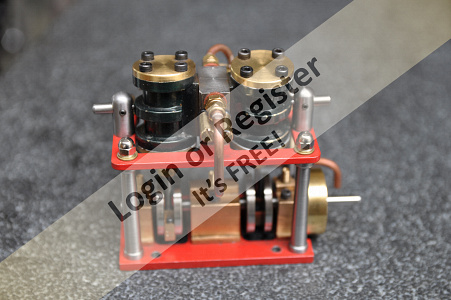
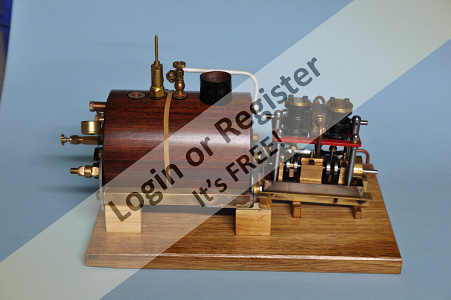
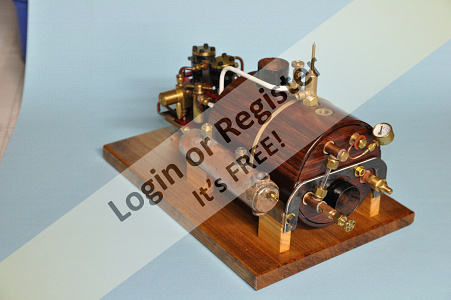
After completing the steam engine I painted it and ran it on compressed air, it ran beautifully at 30 psi I was quite happy with this.
So I had a boiler and steam engine the time had come to “flash it up” first run showed that it took a very very long time to raise steam and once it did raise steam the engine didn’t run for long before the pressure dropped.
I only ran the engine three times before I had large leaks mainly between the cylinder port and distribution block faces, the leaks being so big the engine wouldn’t run properly!
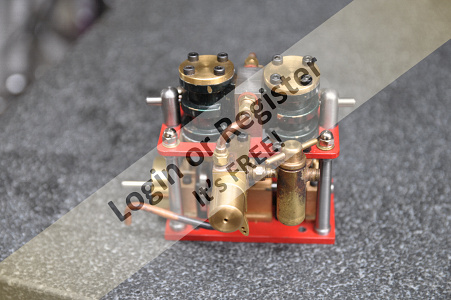
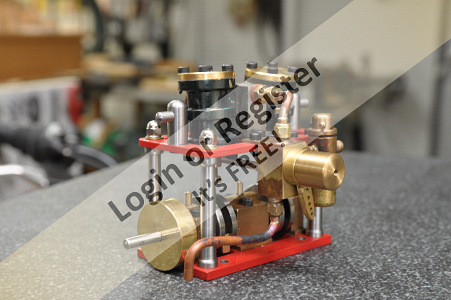
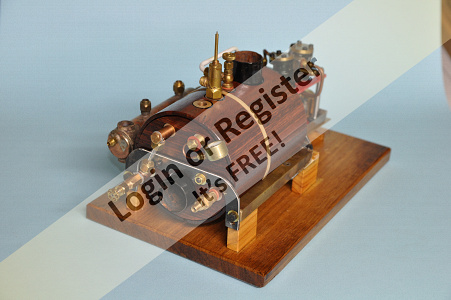
Not to be deterred, I decided keep going as planned and mount the engine with boiler together on a frame as this would enable quick and easy removal of the entire plant from the boat for servicing.
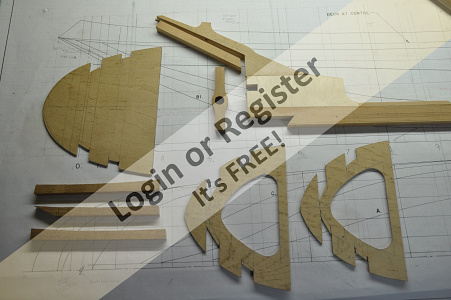
Before making the frame I made a couple of paper cut outs, a front and side view placing them on the plans to work out positions for mounting the boiler and engine.
I wanted to mount the engine near to where the real boats engine was mounted, it became apparent that the engine was not going to sit low enough to be directly coupled to the prop shaft.
In the end I decided a gear drive was the best solution this required lifted the engine slightly.
The boiler was mounted parallel to the water line therefore sitting at an angle to the keel.
Cheers,
Stephen.

I am a fitter and turner by trade and was fortunately allowed to use the well equipped machine shop at work, so half an hour each day before work started.
I would work on my steam engine, added to that my father had a very well equipped workshop at his home although at that time I lived on the other side of Melbourne making it difficult to just "drop in" for a half hour session.
Another problem was dad and I would get chatting and the time would vanish without much happening (not a bad thing really now he has gone), occasionally I would be able to work there for a few hours on the weekend, therefore I had some parts being made at work and some parts being made at dads, one thing that was made at dads was the crank shaft.
The first one, I made was as indicated on the plans being fabricated construction, however ended up having a .006” run out when checked between “Vee” blocks in hind sight this was probably due to the rod being used having a slight bend in it, what to do!
I wasn’t happy with the idea of making another one the same, even though if I machined some rod down to make it straight that would probably fix this problem.
So I decided to make the crank out of a solid piece of machining grade stainless steel, how hard could that be! Well it turned out to be more difficult than first thought and after a lot of machining, whilst trying to get to the final diameter of 3/16” the cutting force overcome the resistance to deflect and my crank shaft came out of the lathe with a bang bending and breaking it beyond repair( see photo 943 ).
Lesson learnt, this was quite off putting for a while, so I attempted to straighten the original fabricated crank, only making it worse; well that was the end of that, back to the drawing board.
Then I decided to go back to making a crank from a solid piece of steel, I still liked this option as it would give me a completely concentric crank. I came to the conclusion that stainless was not the go and settled on a piece of 4140 grade steel, otherwise known as shafting steel.
I increased the shaft diameter to 1/4in this time and succeeded in my endeavour.
Of course the main down side of this increase in diameter is an increase in surface area and friction causing greater resistance for the shaft to rotate.
I followed Peter Arnot’s instructions and made up a boiler to his plan, the only change I made apart from the increase in overall diameter was to increase the filling bush diameter to make it a little easier to fill with water.
I also made Peter’s manual boiler feed pump, which was latter used to pressure test my boiler.
Around this time I moved house and built myself a garage and workshop, this put a hold on the project for some years.
After completing the steam engine I painted it and ran it on compressed air, it ran beautifully at 30 psi I was quite happy with this.
So I had a boiler and steam engine the time had come to “flash it up” first run showed that it took a very very long time to raise steam and once it did raise steam the engine didn’t run for long before the pressure dropped.
I only ran the engine three times before I had large leaks mainly between the cylinder port and distribution block faces, the leaks being so big the engine wouldn’t run properly!
Not to be deterred, I decided keep going as planned and mount the engine with boiler together on a frame as this would enable quick and easy removal of the entire plant from the boat for servicing.
Before making the frame I made a couple of paper cut outs, a front and side view placing them on the plans to work out positions for mounting the boiler and engine.
I wanted to mount the engine near to where the real boats engine was mounted, it became apparent that the engine was not going to sit low enough to be directly coupled to the prop shaft.
In the end I decided a gear drive was the best solution this required lifted the engine slightly.
The boiler was mounted parallel to the water line therefore sitting at an angle to the keel.
Cheers,
Stephen.
▲
⟩⟩
Ianh
RNinMunich
mturpin013
jbkiwi
robbob
Colin H
Martin555
redpmg
|
💬 Re: Scratch built, Working Steam powered Drifter trawler LT100, to 1:24th scale.
4 years ago by 🇦🇺 stevedownunder (
Captain)✧ 213 Views · 1 Like
Flag
Hi mturpin013,
You are quite right it was disappointing, one of those walk away and try another day moments. Cheers, Stephen. ▲
⟩⟩
Martin555
|
|
Login To
Remove Ads 💬 Re: Scratch built, Working Steam powered Drifter trawler LT100, to 1:24th scale.
4 years ago by 🇬🇧 mturpin013 (
Admiral)✧ 213 Views · 2 Likes
Flag
Stephen this just gets better and better, it must have been such a disappointment when the shaft decided it had had enough. Some really nice work on the engine and boiler. I will be following with interest.
▲
⟩⟩
Martin555
stevedownunder
|
|
💬 Re: Scratch built, Working Steam powered Drifter trawler LT100, to 1:24th scale.
4 years ago by 🇳🇿 jbkiwi (
Fleet Admiral)✧ 213 Views · 2 Likes
Flag
A work of art Steve, hope you are able improve the run time.
JB ▲
⟩⟩
stevedownunder
Martin555
|
|
💬 Re: Scratch built, Working Steam powered Drifter trawler LT100, to 1:24th scale.
4 years ago by 🇦🇺 stevedownunder (
Captain)✧ 213 Views · 1 Like
Flag
Hi redpmg,
We are still at the beginning of the story. I think the burner was too small for the boiler, add to that that my little engine after a couple of runs leaked steam profusely. I will get back to the steam side of things in later updates, there is a long way to go. Thanks for your interest. Cheers, Stephen. ▲
⟩⟩
Martin555
|
|
💬 Re: Scratch built, Working Steam powered Drifter trawler LT100, to 1:24th scale.
4 years ago by 🇬🇧 Martin555 (
Fleet Admiral)✧ 213 Views · 0 Likes
Flag
It has more steam than i have at the moment LOL!!!
Martin555. ▲
⟩⟩
No likes yet
This member will receive 1 point for every like received |
|
💬 Re: Scratch built, Working Steam powered Drifter trawler LT100, to 1:24th scale.
4 years ago by 🇦🇺 stevedownunder (
Captain)✧ 213 Views · 1 Like
Flag
Hi Martin,
Thanks again, the thing is that while the boiler looks good it fails to produce enough steam. Cheers, Stephen. ▲
⟩⟩
Martin555
|
|
💬 Re: Scratch built, Working Steam powered Drifter trawler LT100, to 1:24th scale.
4 years ago by 🇦🇺 stevedownunder (
Captain)✧ 213 Views · 1 Like
Flag
Hi redpmg,
I would be open to that. I did wait 7 weeks for any response. I do recall Martyn the previous editor was not interested in an article if the boat was on the internet. Also I am running a blog on the SOS site in parallel. Cheers, Stephen. ▲
⟩⟩
Martin555
|
|
💬 Re: Scratch built, Working Steam powered Drifter trawler LT100, to 1:24th scale.
4 years ago by 🇦🇺 stevedownunder (
Captain)✧ 213 Views · 1 Like
Flag
Thanks Rob,
I am glad you and others like the blog. I have gone through and spaced things out more. Thanks again. 👍 Cheers, Stephen. ▲
⟩⟩
Martin555
|
|
💬 Re: Scratch built, Working Steam powered Drifter trawler LT100, to 1:24th scale.
4 years ago by 🇬🇧 robbob (
Admiral)✧ 213 Views · 3 Likes
Flag
Fabulous looking models Stephen, beautifully made and finished.
It's a pleasure to read such a well written blog, although as already mentioned, breaking it up into paragraphs would make it easier on the eye !. Use the 'edit' button on the posting to do this. Your 'photos are excellent too 👍. I'll certainly be following your blog with great interest and admiration. Rob. ▲
⟩⟩
hmsnostalgia
stevedownunder
Martin555
|
|
💬 Re: Scratch built, Working Steam powered Drifter trawler LT100, to 1:24th scale.
4 years ago by 🇿🇦 redpmg (
 Commodore) Commodore)✧ 213 Views · 2 Likes
Flag
By the way Steve meant to add its seems the new Editor of Model Boats although not a modeller herself is said to be very professional . Take it you were talking of her predecessor who was let go when the magazine ceased production in lockdown. She might well be interested in a revised edition in the future - it seems that some articles stem from build blogs on the MB magazine website - one is coming up shortly in the magazine - so why not from this site.
▲
⟩⟩
stevedownunder
Martin555
|
|
💬 Re: Scratch built, Working Steam powered Drifter trawler LT100, to 1:24th scale.
4 years ago by 🇬🇧 Martin555 (
Fleet Admiral)✧ 213 Views · 1 Like
Flag
Hi Stephen,
A real treat for the eyes. That is a lovely boiler and engine. I have always been fascinated by steam and it's power but i do not posses the skills to be able to make such technical equipment. You on the other hand have the skills in abundance. Absolutely fantastic a beautiful model in its own right. A true show Piece. Extremely well done. Martin555. ▲
⟩⟩
stevedownunder
|
|
💬 Re: Scratch built, Working Steam powered Drifter trawler LT100, to 1:24th scale.
4 years ago by 🇿🇦 redpmg (
Commodore)✧ 213 Views · 2 Likes
Flag
Nice engine - you made a very good job of it after all your trials and tribulations - enjoying your blog very much - Boiler looks great too. BUT first thing that struck me was that the boiler looks a little small for the engine. That would give you problems with duration of run and possibly intermittent problems with the running as it would tend to run out of steam - quite literally. Perhaps that might be why you are having running problems.
Owned a Cheddar Kompact at one time - designed for the Mini Steam class - even with that the boiler was much larger relative to the engine than yours - and it was only intended for short duration runs - so ran out of steam fairly quickly. Friend Neville in Swellendam builds large Double 10 & Launch engines from Stuart Turner designs - his engines are dwarfed by the 3 pot Yarrow type boilers - and he has water pumps fitted for constant boiler feed. Kevin Doveton from Napier builds small engine sets - but even with tiny single cylinders they are also dwarfed by the boilers. Posted a few pictures of both of their boats & engines on this forum - including a video of Kevins outboard version. I am not an expert on steam engines and stand to be corrected - just giving an opinion so please don't view this a criticism - purely a comment on what I see - very much admire your perseverance & skill in getting them built. ▲
⟩⟩
stevedownunder
Martin555
|
📝 Scratch built, Working Steam powered Drifter trawler LT100, to 1:24th scale.
4 years ago by 🇦🇺 stevedownunder ( Captain)
Captain)✧ 218 Views · 7 Likes · 2 Comments
Flag
💬 Add Comment
Part 3
Having come this far and thinking I’ll fix those problems later.
I decided to move ahead with the hull, this led to the next problem I worked out that my original drawing enlargements were too big, so back to the printing shop where they were re sized.
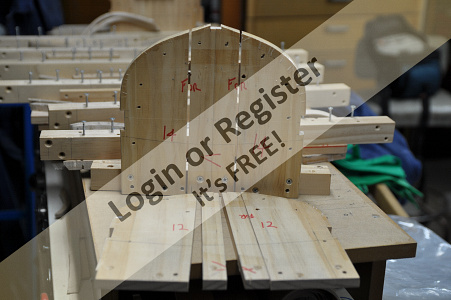
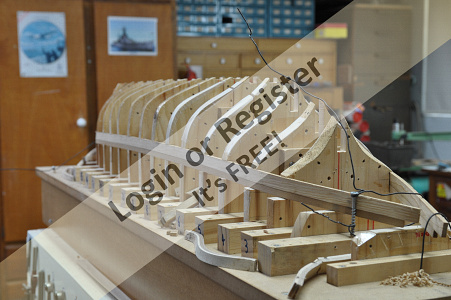
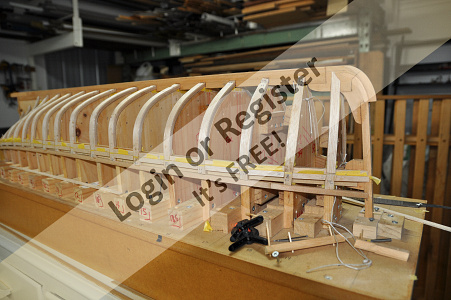
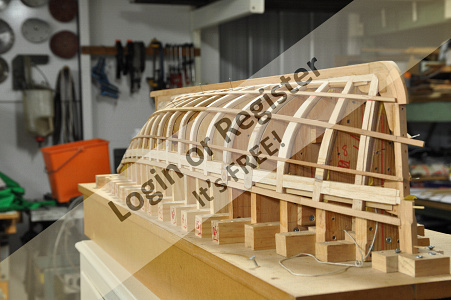
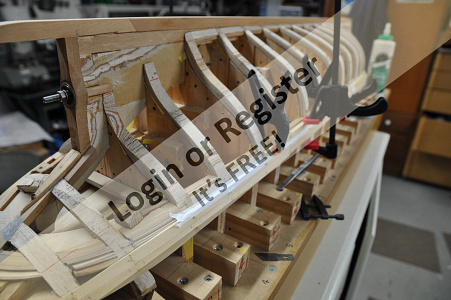
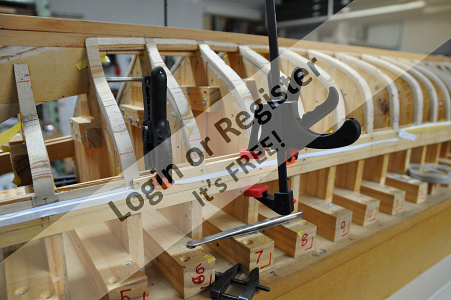
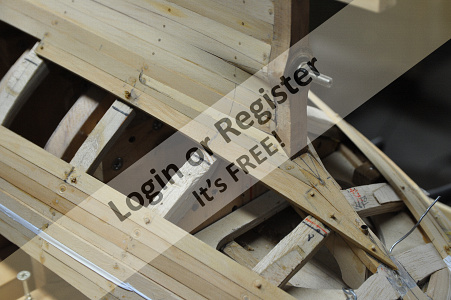
Work began midway through 2005 with construction of a building board.
I had decided to build the hull using bent frame method, this produces a light weight yet strong structure.
Only downside is this method is more work than a more mainstream cut frame on keel method. Referring back to Harold A Underhill’s book “PLANK-ON-FRAME MODELS and SCALE MASTING & RIGGING Volume 2 in the relevant section there is a description on how to go about building a hull using the bent frame method, included are recommended former spacing’s.
On checking the enlarged plan’s, the distance between frames was too great so 10 more former's or bulkheads were added turning the original 10 into 20, this required some old school drafting, at the time I had no Auto Cad skills!
This process took quite some time as each former needed a back and front drafted as well as the overall outside and an inside line that is minus plank and rib thickness this was a bit tedious though quite enjoyable.
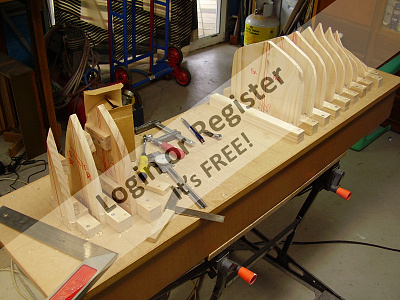
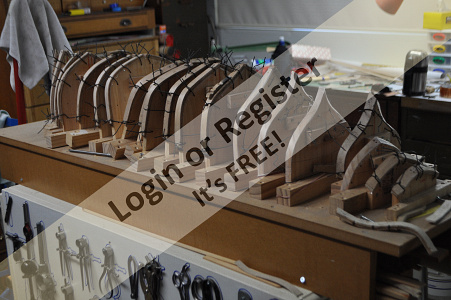
After completion of drafting, some radiata pine was purchased for use as former's to bend wood that would become the ribs.
After cutting and shaping the former's they were mounted at right angles to the building board using square DAR (dressed all round) clear pine.
Cheers,
Stephen.


Having come this far and thinking I’ll fix those problems later.
I decided to move ahead with the hull, this led to the next problem I worked out that my original drawing enlargements were too big, so back to the printing shop where they were re sized.
Work began midway through 2005 with construction of a building board.
I had decided to build the hull using bent frame method, this produces a light weight yet strong structure.
Only downside is this method is more work than a more mainstream cut frame on keel method. Referring back to Harold A Underhill’s book “PLANK-ON-FRAME MODELS and SCALE MASTING & RIGGING Volume 2 in the relevant section there is a description on how to go about building a hull using the bent frame method, included are recommended former spacing’s.
On checking the enlarged plan’s, the distance between frames was too great so 10 more former's or bulkheads were added turning the original 10 into 20, this required some old school drafting, at the time I had no Auto Cad skills!
This process took quite some time as each former needed a back and front drafted as well as the overall outside and an inside line that is minus plank and rib thickness this was a bit tedious though quite enjoyable.
After completion of drafting, some radiata pine was purchased for use as former's to bend wood that would become the ribs.
After cutting and shaping the former's they were mounted at right angles to the building board using square DAR (dressed all round) clear pine.
Cheers,
Stephen.
▲
⟩⟩
RNinMunich
mturpin013
Colin H
Ianh
redpmg
Martin555
robbob
|
💬 Re: Scratch built, Working Steam powered Drifter trawler LT100, to 1:24th scale.
4 years ago by 🇦🇺 stevedownunder (
Captain)✧ 216 Views · 1 Like
Flag
You are right Martin, I am still near the beginning.
Cheers, Stephen. ▲
⟩⟩
Martin555
|
|
💬 Re: Scratch built, Working Steam powered Drifter trawler LT100, to 1:24th scale.
4 years ago by 🇬🇧 Martin555 (
Fleet Admiral)✧ 216 Views · 1 Like
Flag
Hi Stephen,
I know this was written some time ago so asking questions may seem to be early as the answers will probably be in the next update. Nice work. For the benefit of the new guys to the hobby there is a lot of work that has to be done before you start to see progress on the model. Martin555. ▲
⟩⟩
stevedownunder
|
📝 Scratch built, Working Steam powered Drifter trawler LT100, to 1:24th scale.
4 years ago by 🇦🇺 stevedownunder ( Captain)
Captain)✧ 219 Views · 5 Likes · 4 Comments
Flag
💬 Add Comment
Part 4
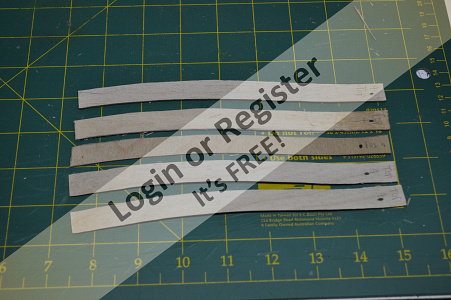
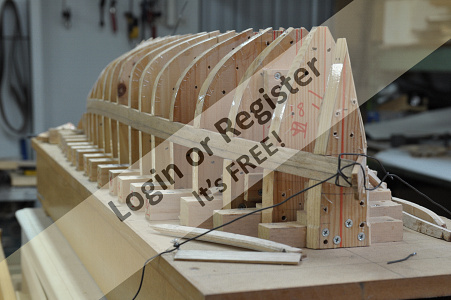
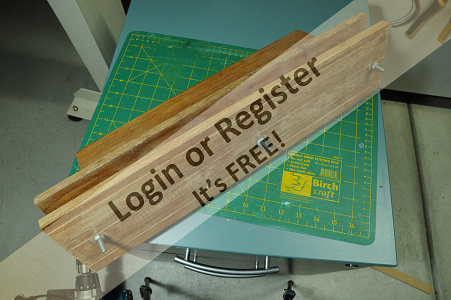
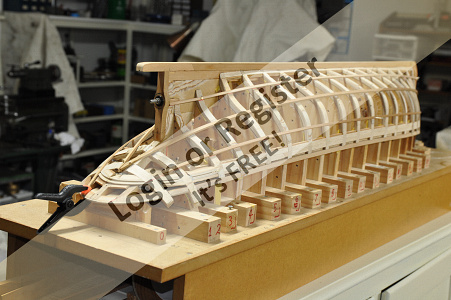
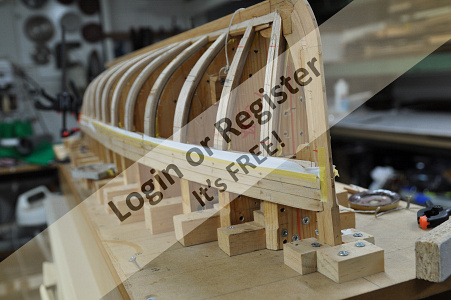
Then work started on the keel.
I decided on a composite using ¼in aircraft quality ply as a core for strength, with Huon pine outer, this is to give the appearance of a solid Huon pine keel.
Making up the ½in thickness all glued together with a polyurethane adhesive that is fully waterproof, yeah I know total overkill, I found this adhesive very messy and ended up only using it for gluing the keel.
I intended to make the ribs by steam bending Huon pine, after several failed attempts with the wood breaking.
I abandoned Huon pine as a material, the problem in my opinion was this material is a Soft Wood therefore having a short grain which when bending is more likely to fracture or break, ok it also could be I didn’t know what I was doing when it comes to bending using steam, also I hadn’t made a purpose built steaming apparatus at that point.
In the end I think the type of material and thickness of material combined with the radius of bend were too great.
What to do, I then experimented with some Tasmanian Oak, a hard wood readily available in Australia, it became apparent that I could use Tas Oak for all the ribs except the ones with compound and sharp radius curves.
For sharp radius curves I used layers of thin plywood glued together using Titebond 3.
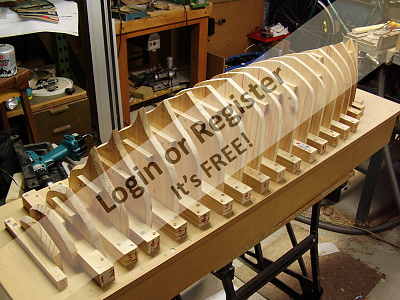
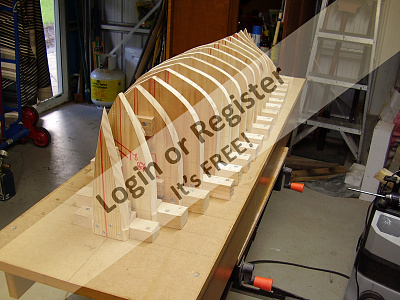
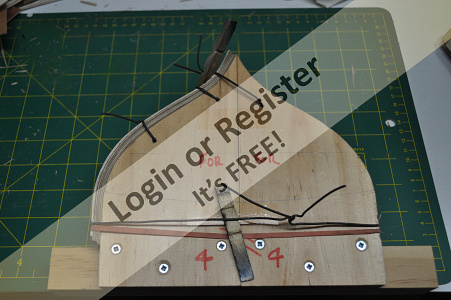
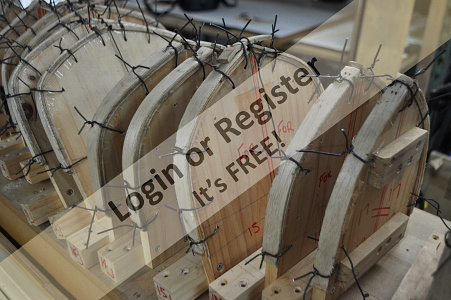
To bend strips of wood to the frames holes were drilled into frames for wire to pass through them.
When thicker pieces were steamed they were quickly tied tightly to each frame, these were left for around a week for the wood to dry and conform to its new shape, then removed glued and tied back on. All ribs had an outer layer of hard balsa;
this was added to be partly sacrificial, trimmed down to provide a nice flat surface for the planks to sit on.
Once dry all ribs were removed from the frames looking quite shabby, they were then cleaned up using a plane and sanded smooth mainly on the inside and side faces, as trying to do this once fitted would be difficult in the extreme.
Cheers,
Stephen.

Then work started on the keel.
I decided on a composite using ¼in aircraft quality ply as a core for strength, with Huon pine outer, this is to give the appearance of a solid Huon pine keel.
Making up the ½in thickness all glued together with a polyurethane adhesive that is fully waterproof, yeah I know total overkill, I found this adhesive very messy and ended up only using it for gluing the keel.
I intended to make the ribs by steam bending Huon pine, after several failed attempts with the wood breaking.
I abandoned Huon pine as a material, the problem in my opinion was this material is a Soft Wood therefore having a short grain which when bending is more likely to fracture or break, ok it also could be I didn’t know what I was doing when it comes to bending using steam, also I hadn’t made a purpose built steaming apparatus at that point.
In the end I think the type of material and thickness of material combined with the radius of bend were too great.
What to do, I then experimented with some Tasmanian Oak, a hard wood readily available in Australia, it became apparent that I could use Tas Oak for all the ribs except the ones with compound and sharp radius curves.
For sharp radius curves I used layers of thin plywood glued together using Titebond 3.
To bend strips of wood to the frames holes were drilled into frames for wire to pass through them.
When thicker pieces were steamed they were quickly tied tightly to each frame, these were left for around a week for the wood to dry and conform to its new shape, then removed glued and tied back on. All ribs had an outer layer of hard balsa;
this was added to be partly sacrificial, trimmed down to provide a nice flat surface for the planks to sit on.
Once dry all ribs were removed from the frames looking quite shabby, they were then cleaned up using a plane and sanded smooth mainly on the inside and side faces, as trying to do this once fitted would be difficult in the extreme.
Cheers,
Stephen.
▲
⟩⟩
RNinMunich
mturpin013
Colin H
Martin555
robbob
|
💬 Re: Scratch built, Working Steam powered Drifter trawler LT100, to 1:24th scale.
4 years ago by 🇦🇺 stevedownunder (
Captain)✧ 218 Views · 1 Like
Flag
No problem Martin, when you've got an itch it needs scratching.
Cheers, Stephen. ▲
⟩⟩
Martin555
|
|
Login To
Remove Ads 💬 Re: Scratch built, Working Steam powered Drifter trawler LT100, to 1:24th scale.
4 years ago by 🇬🇧 Martin555 (
Fleet Admiral)✧ 218 Views · 1 Like
Flag
Stephen,
That will teach me to ask questions. I knew you will be covering that at a later date. I must try and contain myself. LOL!!! Martin555. ▲
⟩⟩
stevedownunder
|
|
💬 Re: Scratch built, Working Steam powered Drifter trawler LT100, to 1:24th scale.
4 years ago by 🇦🇺 stevedownunder (
Captain)✧ 219 Views · 2 Likes
Flag
Hi Martin,
The ribs were removed completely and cleaned up. The sacrificial balsa was mainly for "fairing" before planking, this being done later. Cheers, Stephen. ▲
⟩⟩
Ianh
Martin555
|
|
💬 Re: Scratch built, Working Steam powered Drifter trawler LT100, to 1:24th scale.
4 years ago by 🇬🇧 Martin555 (
Fleet Admiral)✧ 218 Views · 1 Like
Flag
Hi Stephen,
REF :- All ribs had an outer layer of hard balsa; this was added to be partly sacrificial, trimmed down to provide a nice flat surface for the planks to sit on. I am assuming this was done by removing a few wires at a time and sanding or did you just hold them in place close to the build board ? Martin555. ▲
⟩⟩
stevedownunder
|
📝 Scratch built, Working Steam powered Drifter trawler LT100, to 1:24th scale.
4 years ago by 🇦🇺 stevedownunder ( Captain)
Captain)✧ 221 Views · 6 Likes · 1 Comment
Flag
💬 Add Comment
Part 5
At this point a change was decided on, I was no longer happy about trying to remove the larger steam plant through a deck cut out, remember the rash decision a while back!
Firstly I would need to cut the deck as there was no way my steam plant with cradle/frame was going to fit through the wheel house opening, secondly I would need to un-rig then re-rig the mizzen mast shrouds every time I steamed, or reposition the shrouds on the mizzen mast for easy removal of wheel house.
So what to do, in the end I chose to remove the entire deck and bulwarks with a small part of the hull all in one assembly, thus enabling correct rigging of mizzen mast, another benefit is all details are removed in one assembly that can be placed safely away from big thumbs, enabling un-restricted access for maintenance of steam plant.
Now to bring this idea to reality, this is probably a very good example of what not to do, as I probably couldn’t have picked a worse type of hull construction, by using bent frame method. There were two main points in considering what to do.
One was to camouflage any join lines, my hope being that when the model is on dry land it will be hard to tell it’s a working model.
Secondly to have a watertight seal along the join line, I decided to go with a fairly basic coaming with the possibility of including a flexible seal running in the bottom.
Firstly I studied the plans to find a suitable location for a join line, the best location was under the lower edge of the rubbing strake, hopefully the thicker rubbing strake will help to hide most of this line.
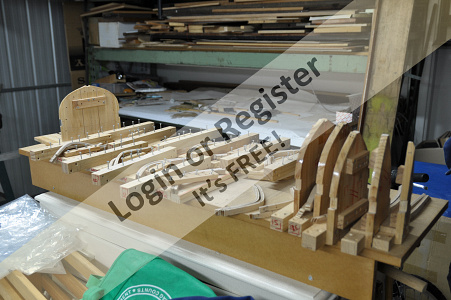
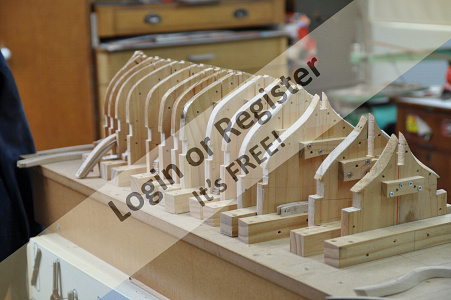
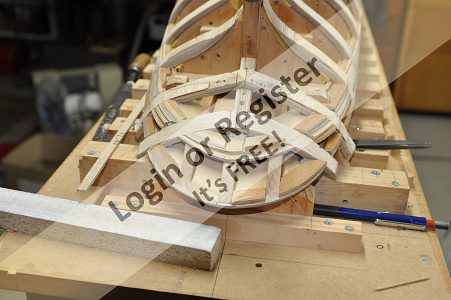
In the end I felt it was not possible to have an uninterrupted line therefore there is a point when the line forward raises one strake giving a broken line, then after marking some new lines on the plans, a couple of problems arose when trying to make this happen, one being an inability to remove the midsection pine former's once stringers, bent frames and planking were installed, this was overcome by making removable sections in the required former’s.
The former’s forward and aft could slide along to clear their respective cut outs before being removed, another problem was, at this point I struggled to figure out how to plank the stern, I couldn’t see how I could plank on my original pine former’s while having a parting line, in the end a pair of horizontal “frames” were my solution to this problem.
I next marked cut-outs on the pine former’s and cut them, then refitting all former’s back on the building board with the frames and carefully marking then cutting at the point of separation with a Japanese pull saw.
I carefully fitted Sellotape or Tamiya masking tape around any areas where I didn’t want things to be glued, yes the glue doesn’t stick to Sellotape or Tamiya tape I tested that! Spruce stringers were next fitted one continuous stringer at the shear/deck line, other stringers were short filler pieces between frames then using the off cut frame pieces carefully fitted in between, all very very tedious work.
Cheers,
Stephen.

At this point a change was decided on, I was no longer happy about trying to remove the larger steam plant through a deck cut out, remember the rash decision a while back!
Firstly I would need to cut the deck as there was no way my steam plant with cradle/frame was going to fit through the wheel house opening, secondly I would need to un-rig then re-rig the mizzen mast shrouds every time I steamed, or reposition the shrouds on the mizzen mast for easy removal of wheel house.
So what to do, in the end I chose to remove the entire deck and bulwarks with a small part of the hull all in one assembly, thus enabling correct rigging of mizzen mast, another benefit is all details are removed in one assembly that can be placed safely away from big thumbs, enabling un-restricted access for maintenance of steam plant.
Now to bring this idea to reality, this is probably a very good example of what not to do, as I probably couldn’t have picked a worse type of hull construction, by using bent frame method. There were two main points in considering what to do.
One was to camouflage any join lines, my hope being that when the model is on dry land it will be hard to tell it’s a working model.
Secondly to have a watertight seal along the join line, I decided to go with a fairly basic coaming with the possibility of including a flexible seal running in the bottom.
Firstly I studied the plans to find a suitable location for a join line, the best location was under the lower edge of the rubbing strake, hopefully the thicker rubbing strake will help to hide most of this line.
In the end I felt it was not possible to have an uninterrupted line therefore there is a point when the line forward raises one strake giving a broken line, then after marking some new lines on the plans, a couple of problems arose when trying to make this happen, one being an inability to remove the midsection pine former's once stringers, bent frames and planking were installed, this was overcome by making removable sections in the required former’s.
The former’s forward and aft could slide along to clear their respective cut outs before being removed, another problem was, at this point I struggled to figure out how to plank the stern, I couldn’t see how I could plank on my original pine former’s while having a parting line, in the end a pair of horizontal “frames” were my solution to this problem.
I next marked cut-outs on the pine former’s and cut them, then refitting all former’s back on the building board with the frames and carefully marking then cutting at the point of separation with a Japanese pull saw.
I carefully fitted Sellotape or Tamiya masking tape around any areas where I didn’t want things to be glued, yes the glue doesn’t stick to Sellotape or Tamiya tape I tested that! Spruce stringers were next fitted one continuous stringer at the shear/deck line, other stringers were short filler pieces between frames then using the off cut frame pieces carefully fitted in between, all very very tedious work.
Cheers,
Stephen.
▲
⟩⟩
RNinMunich
mturpin013
Colin H
redpmg
robbob
Martin555
|
💬 Re: Scratch built, Working Steam powered Drifter trawler LT100, to 1:24th scale.
4 years ago by 🇿🇦 redpmg (
Commodore)✧ 220 Views · 3 Likes
Flag
You were really doing it the hard way Stephen - lots of extra work to achieve the end result you wanted - where most of us are content to leave full width frames and only remove the parts that get in the way - unless it happens to be an open hull boat like most of the small steam launches.........
Lovely work and lots of persistence ▲
⟩⟩
RNinMunich
stevedownunder
Martin555
|
📝 Scratch built, Working Steam powered Drifter trawler LT100, to 1:24th scale.
4 years ago by 🇦🇺 stevedownunder ( Captain)
Captain)✧ 222 Views · 6 Likes · 5 Comments
Flag
💬 Add Comment
Part 6.
Before I had finished fitting off these little pieces for the removable section I reached a point where I needed a break from this work.
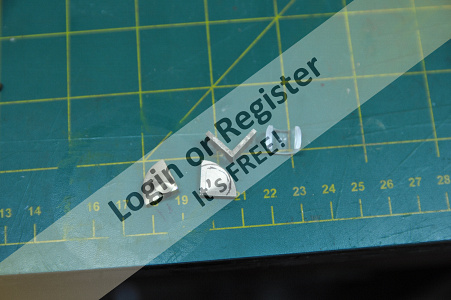
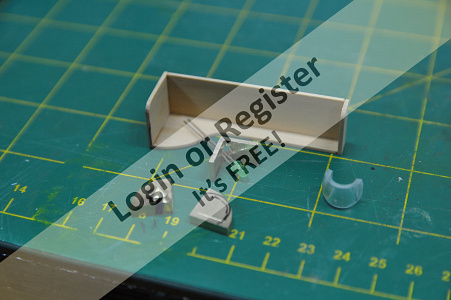
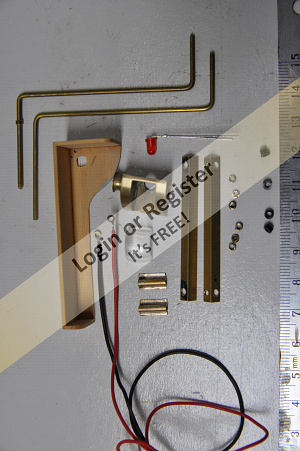
I decided to make the working Port and Starboard navigation lights, these were made from brass, perspex and wood.
Brass parts being machined to shape in the lathe and milled then silver soldered together to form the light housing.
Perspex was turned to shape polished then cut into segments to form the lens and fitted into the housing.
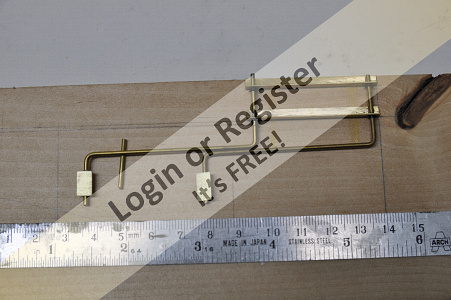
Backing boards were made of Huon pine glued together. Next came mounting pieces, I machined some brass bar into angle for mounting to the galley side, then bent some brass wire to shape, more parts were made to enable my working lights to look prototypical, while still operating.
I think these lights used either calcium carbide pellets in the light fitting or acetylene piped to the light from a central generator.
Though I think it more likely they were self contained therefore having no leads running to the light, this makes things a little more difficult when making them working.
What I came up with was to connect positive to one of the movable arms and negative to the other insulating each arm where required with small black nylon bushes and running very small wire to the LED, all being well I will have navigation lights that can be swung out into there working position or left stowed being turned on and off by an RC switch.
On reflection I am not 100 percent happy with the light housing or lens they may get scrapped, at a minimum the lenses will be painted the appropriate colour inside.
Cheers,
Stephen.


Before I had finished fitting off these little pieces for the removable section I reached a point where I needed a break from this work.
I decided to make the working Port and Starboard navigation lights, these were made from brass, perspex and wood.
Brass parts being machined to shape in the lathe and milled then silver soldered together to form the light housing.
Perspex was turned to shape polished then cut into segments to form the lens and fitted into the housing.
Backing boards were made of Huon pine glued together. Next came mounting pieces, I machined some brass bar into angle for mounting to the galley side, then bent some brass wire to shape, more parts were made to enable my working lights to look prototypical, while still operating.
I think these lights used either calcium carbide pellets in the light fitting or acetylene piped to the light from a central generator.
Though I think it more likely they were self contained therefore having no leads running to the light, this makes things a little more difficult when making them working.
What I came up with was to connect positive to one of the movable arms and negative to the other insulating each arm where required with small black nylon bushes and running very small wire to the LED, all being well I will have navigation lights that can be swung out into there working position or left stowed being turned on and off by an RC switch.
On reflection I am not 100 percent happy with the light housing or lens they may get scrapped, at a minimum the lenses will be painted the appropriate colour inside.
Cheers,
Stephen.
▲
⟩⟩
Ianh
RNinMunich
mturpin013
robbob
Colin H
redpmg
|
💬 Re: Scratch built, Working Steam powered Drifter trawler LT100, to 1:24th scale.
4 years ago by 🇦🇺 stevedownunder (
Captain)✧ 220 Views · 1 Like
Flag
Hi mturpin013,
I look forward to seeing that. Cheers, Stephen. ▲
⟩⟩
Martin555
|
|
Login To
Remove Ads 💬 Re: Scratch built, Working Steam powered Drifter trawler LT100, to 1:24th scale.
4 years ago by 🇬🇧 mturpin013 (
Admiral)✧ 220 Views · 2 Likes
Flag
Stephen, I'm just doing this same operation for my Police boat although they don't have to swing into position, the issue is getting the LED to light the whole of the surface of the lens, I have found it best to use a larger LED (with pre coloured plastic) in my case 8mm and very carefully shape the sides to 6mm x 6mm square and the end of the LED to that required of the finished radius of the ship lens but don't polish the surface leave it "brushed". I'll post some pictures when its finished
▲
⟩⟩
Martin555
stevedownunder
|
|
💬 Re: Scratch built, Working Steam powered Drifter trawler LT100, to 1:24th scale.
4 years ago by 🇨🇦 Newby7 (
Fleet Admiral)✧ 220 Views · 2 Likes
Flag
Holly smokes my fingers don't handle small parts well any more.Nice work.
Rick ▲
⟩⟩
stevedownunder
Martin555
|
|
💬 Re: Scratch built, Working Steam powered Drifter trawler LT100, to 1:24th scale.
4 years ago by 🇿🇦 redpmg (
Commodore)✧ 220 Views · 2 Likes
Flag
You really are giving us lessons on the amount of detail with these lights
▲
⟩⟩
stevedownunder
Martin555
|
|
💬 Re: Scratch built, Working Steam powered Drifter trawler LT100, to 1:24th scale.
4 years ago by 🇬🇧 Martin555 (
Fleet Admiral)✧ 220 Views · 1 Like
Flag
Some fine machine work Stephen.
Well done. Martin555. ▲
⟩⟩
stevedownunder
|
📝 Scratch built, Working Steam powered Drifter trawler LT100, to 1:24th scale.
4 years ago by 🇦🇺 stevedownunder ( Captain)
Captain)✧ 221 Views · 2 Likes
Flag
💬 Add Comment
Thanks to all those who have commented, liked and are following my build.
Cheers,
Stephen.
Cheers,
Stephen.
▲
⟩⟩
RNinMunich
Martin555
📝 Scratch built, Working Steam powered Drifter trawler LT100, to 1:24th scale.
4 years ago by 🇦🇺 stevedownunder ( Captain)
Captain)✧ 223 Views · 6 Likes · 3 Comments
Flag
💬 Add Comment
Part 7.
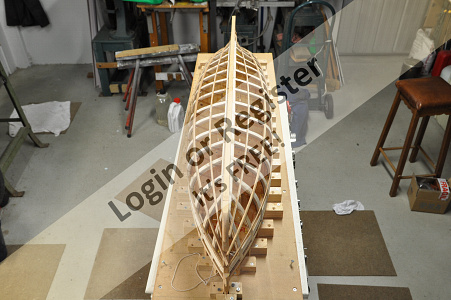
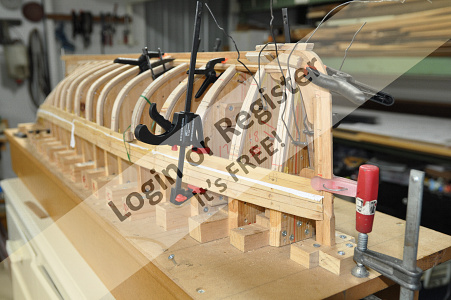
Returning to completing work on the removable section once that was done I could start on planking.
After adding some keel doublers, fairing the frame’s checking progress with a fairing batten until I was happy that my planking would sit flat on the frame’s and into the rabbet.
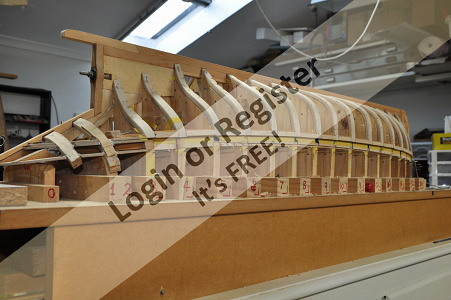
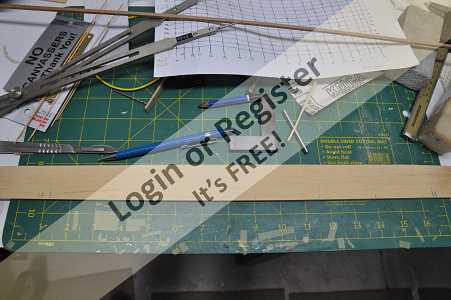
From Tree to Sea tells me that LT 100 had 22 strakes on each side of the hull. Following Harold Underhill’s instructions to work out the run of planks I ran 3 temporary battens starting around mid ships on the turn of the bulge on each side of the hull to divide it into 4 areas, the other two battens halving the area left.
The objective is to get these battens to sit flat on the frame doing this without bending up or down pull them around the hull so they sit nicely, a fair bit of fiddling around is required, adjusting looking from different angles until you are happy with there appearance, then walk away for a while come back and check again!
I ended up changing the run of these battens several times, ending up using a red pencil to mark the final run because there were too many pencil marks! Once these 4 areas had been marked out accurate measurements were taken along the circumference of the frames.
Two of the areas would have 6 strakes each, with the other two areas having 5 strakes. Proportional dividers were used to divide these areas to give the plank width at each frame.
Before going any farther a “butt diagram” was worked out to find where the plank ends would fall, as it turned out this was a very handy thing to have.
I made a plank holding clamp that made it easier for me to hold and trim down planks.
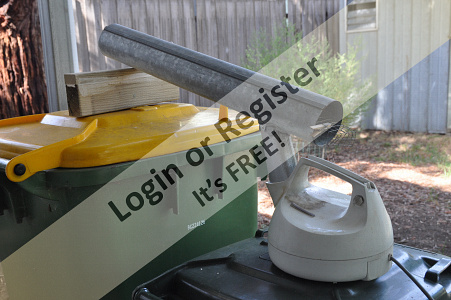
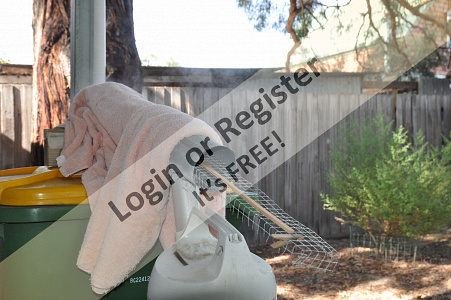
I also made a steaming apparatus, an old electric kettle being the steam source a length of galvanised down pipe with a “T” put into it at one end and a piece of mesh bent to form a shelf for planks to lay on while being steamed.
I intended to plank this model in a fashion similar to the real boat, for the most part I think I have achieved this.
Cheers,
Stephen.


Returning to completing work on the removable section once that was done I could start on planking.
After adding some keel doublers, fairing the frame’s checking progress with a fairing batten until I was happy that my planking would sit flat on the frame’s and into the rabbet.
From Tree to Sea tells me that LT 100 had 22 strakes on each side of the hull. Following Harold Underhill’s instructions to work out the run of planks I ran 3 temporary battens starting around mid ships on the turn of the bulge on each side of the hull to divide it into 4 areas, the other two battens halving the area left.
The objective is to get these battens to sit flat on the frame doing this without bending up or down pull them around the hull so they sit nicely, a fair bit of fiddling around is required, adjusting looking from different angles until you are happy with there appearance, then walk away for a while come back and check again!
I ended up changing the run of these battens several times, ending up using a red pencil to mark the final run because there were too many pencil marks! Once these 4 areas had been marked out accurate measurements were taken along the circumference of the frames.
Two of the areas would have 6 strakes each, with the other two areas having 5 strakes. Proportional dividers were used to divide these areas to give the plank width at each frame.
Before going any farther a “butt diagram” was worked out to find where the plank ends would fall, as it turned out this was a very handy thing to have.
I made a plank holding clamp that made it easier for me to hold and trim down planks.
I also made a steaming apparatus, an old electric kettle being the steam source a length of galvanised down pipe with a “T” put into it at one end and a piece of mesh bent to form a shelf for planks to lay on while being steamed.
I intended to plank this model in a fashion similar to the real boat, for the most part I think I have achieved this.
Cheers,
Stephen.
▲
⟩⟩
mturpin013
Ygagnon
Colin H
RNinMunich
robbob
figtree7nts
|
💬 Re: Scratch built, Working Steam powered Drifter trawler LT100, to 1:24th scale.
4 years ago by 🇬🇧 Martin555 (
Fleet Admiral)✧ 221 Views · 1 Like
Flag
Very nice work Stephen.
I bet when the neighbours saw your steamer that thought you were making Moonshine LOL!!! Martin555. ▲
⟩⟩
stevedownunder
|
|
Login To
Remove Ads 💬 Re: Scratch built, Working Steam powered Drifter trawler LT100, to 1:24th scale.
4 years ago by 🇦🇺 stevedownunder (
Captain)✧ 221 Views · 1 Like
Flag
Thanks Ed,
Cheers, Stephen. ▲
⟩⟩
Martin555
|
|
💬 Re: Scratch built, Working Steam powered Drifter trawler LT100, to 1:24th scale.
4 years ago by 🇺🇸 figtree7nts (
Admiral)✧ 221 Views · 2 Likes
Flag
Hi Stephen,
Your doing a great job on the build of your model! I must follow your blog with interest! Cheers, Ed ▲
⟩⟩
stevedownunder
Martin555
|
📝 Scratch built, Working Steam powered Drifter trawler LT100, to 1:24th scale.
4 years ago by 🇦🇺 stevedownunder ( Captain)
Captain)✧ 224 Views · 6 Likes · 11 Comments
Flag
💬 Add Comment
Part 8.
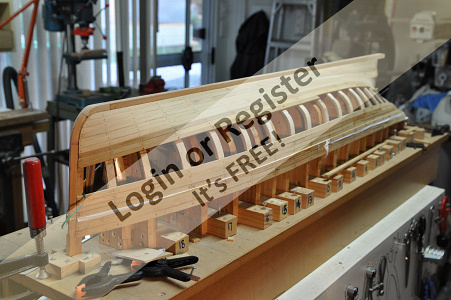
Planks are made of Huon pine, rubbing strakes being thicker than the normal planks, all to a scale thickness.
This wood has a unique aroma, I my opinion quite a pleasant smell it seems to permeate the workshop when sawing/sanding.
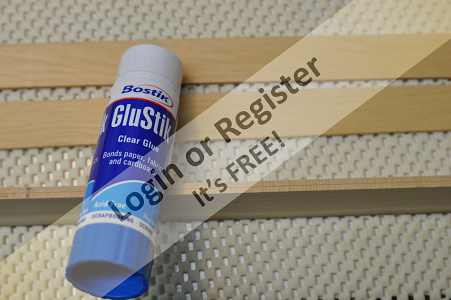
Planks were made in pairs being temporarily glued together using a Glue stick.
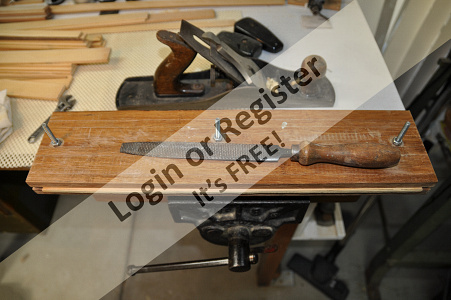
First the planking material would have a straight and square face planned on using a jack plane, then the width marks would be marked at each frame along with the overall length.
Next rough cut on a scroll saw finishing to the line with rasp and sand paper making sure the edge remained square, in the end it became a process and I got faster and better as I progressed.
I would go out to my workshop on a week night after dinner for an hour or so and from memory I could make steam then fix two pair of planks in a week.
I planked from the keel and deck edge meeting in the middle.
Planks were made and attached in pairs, when needed they were steamed, waiting a few days after steaming then glued, drilled and having bamboo tree nails knocked in.
The tree nails are a lot bigger than scale mainly to improve strength and seeing that the hull will be painted you probably wont see them.
Cheers,
Stephen.


Planks are made of Huon pine, rubbing strakes being thicker than the normal planks, all to a scale thickness.
This wood has a unique aroma, I my opinion quite a pleasant smell it seems to permeate the workshop when sawing/sanding.
Planks were made in pairs being temporarily glued together using a Glue stick.
First the planking material would have a straight and square face planned on using a jack plane, then the width marks would be marked at each frame along with the overall length.
Next rough cut on a scroll saw finishing to the line with rasp and sand paper making sure the edge remained square, in the end it became a process and I got faster and better as I progressed.
I would go out to my workshop on a week night after dinner for an hour or so and from memory I could make steam then fix two pair of planks in a week.
I planked from the keel and deck edge meeting in the middle.
Planks were made and attached in pairs, when needed they were steamed, waiting a few days after steaming then glued, drilled and having bamboo tree nails knocked in.
The tree nails are a lot bigger than scale mainly to improve strength and seeing that the hull will be painted you probably wont see them.
Cheers,
Stephen.
▲
⟩⟩
Colin H
Ianh
robbob
RNinMunich
redpmg
Martin555
|
💬 Re: Scratch built, Working Steam powered Drifter trawler LT100, to 1:24th scale.
4 years ago by 🇬🇧 Martin555 (
Fleet Admiral)✧ 222 Views · 0 Likes
Flag
Hi Stephen,
A "Thread" is what we call a new or existing post /article /Forum Topic. You have three choices. 'New Forum Topic'. A new 'How to' Or add it to your 'Blog' The choice is yours LOL!!! Martin555. ▲
⟩⟩
No likes yet
This member will receive 1 point for every like received |
|
Login To
Remove Ads 💬 Re: Scratch built, Working Steam powered Drifter trawler LT100, to 1:24th scale.
4 years ago by 🇦🇺 stevedownunder (
Captain)✧ 222 Views · 1 Like
Flag
Hi Martin555,
I don't quite know what a "thread" is and I am wondering if it is better to post an article on how to make pins using a draw plate in the, How to articles section or just tack it onto my build log? Cheers, Stephen. ▲
⟩⟩
Martin555
|
|
💬 Re: Scratch built, Working Steam powered Drifter trawler LT100, to 1:24th scale.
4 years ago by 🇦🇺 stevedownunder (
Captain)✧ 222 Views · 1 Like
Flag
No problem Martin,
Might take me a few days, due to a lack of time. Cheers, Stephen. ▲
⟩⟩
Martin555
|
|
💬 Re: Scratch built, Working Steam powered Drifter trawler LT100, to 1:24th scale.
4 years ago by 🇬🇧 Martin555 (
Fleet Admiral)✧ 222 Views · 1 Like
Flag
Hi Stephen,
Could you do a quick thread on how you use your draw plate to make your nails as other members would be interested. Martin555. ▲
⟩⟩
stevedownunder
|
|
💬 Re: Scratch built, Working Steam powered Drifter trawler LT100, to 1:24th scale.
4 years ago by 🇦🇺 stevedownunder (
Captain)✧ 222 Views · 1 Like
Flag
I agree mturpin013, I haven't tried brass pins.
Cheers, stephen. ▲
⟩⟩
Martin555
|
|
💬 Re: Scratch built, Working Steam powered Drifter trawler LT100, to 1:24th scale.
4 years ago by 🇬🇧 mturpin013 (
Admiral)✧ 222 Views · 2 Likes
Flag
I used bamboo pins on my Police boat and Crash Tender, and I found them quite easy to sand down after close trimming and they are very strong and once put in don't move as you sometimes get with brass pins.
Good progress and looking really good ▲
⟩⟩
Martin555
stevedownunder
|
|
💬 Re: Scratch built, Working Steam powered Drifter trawler LT100, to 1:24th scale.
4 years ago by 🇦🇺 stevedownunder (
Captain)✧ 222 Views · 1 Like
Flag
Hi Martin,
I used a draw plate to make the pins. Cheers, Stephen. ▲
⟩⟩
Martin555
|
|
💬 Re: Scratch built, Working Steam powered Drifter trawler LT100, to 1:24th scale.
4 years ago by 🇦🇺 stevedownunder (
Captain)✧ 222 Views · 1 Like
Flag
Hi Doug,
You are right bamboo is hard. I use a flush cutting saw to trim excess before sanding. Cheers, Stephen. ▲
⟩⟩
Martin555
|
|
💬 Re: Scratch built, Working Steam powered Drifter trawler LT100, to 1:24th scale.
4 years ago by 🇬🇧 Martin555 (
Fleet Admiral)✧ 222 Views · 2 Likes
Flag
I suppose you could use cocktail sticks.
Martin555. ▲
⟩⟩
RNinMunich
stevedownunder
|
|
💬 Re: Scratch built, Working Steam powered Drifter trawler LT100, to 1:24th scale.
4 years ago by 🇩🇪 RNinMunich (
Fleet Admiral)✧ 223 Views · 3 Likes
Flag
"I like the Bamboo Nail idea easer to sand down."
Ya reck'n Martin? In my experience bamboo IS 'as hard as nails', usually harder than the wood around it! I'd be tempted to punch 'em just under the surface of the wood being pinned. Like one does with brass or steel pins/nails. Cheers, Doug 😎 ▲
⟩⟩
stevedownunder
Ianh
Martin555
|
|
💬 Re: Scratch built, Working Steam powered Drifter trawler LT100, to 1:24th scale.
4 years ago by 🇬🇧 Martin555 (
Fleet Admiral)✧ 222 Views · 0 Likes
Flag
Hi Stephen,
I like the Bamboo Nail idea easer to sand down. Martin555. ▲
⟩⟩
No likes yet
This member will receive 1 point for every like received |
📝 Scratch built, Working Steam powered Drifter trawler LT100, to 1:24th scale.
4 years ago by 🇦🇺 stevedownunder ( Captain)
Captain)✧ 229 Views · 11 Likes · 8 Comments
Flag
💬 Add Comment
Part 9.
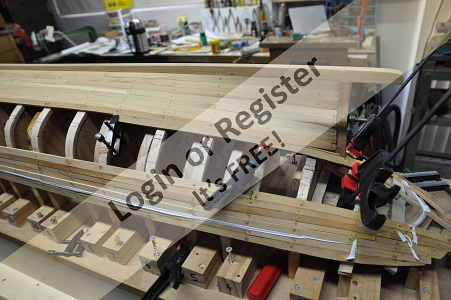
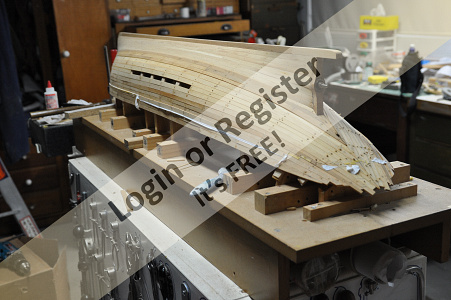
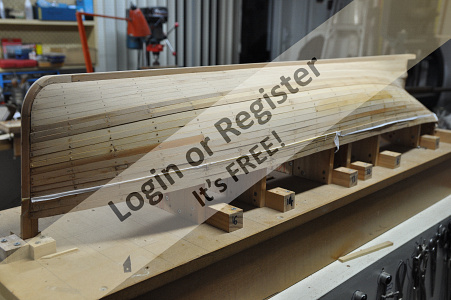
Some more planking photos….. I hope you enjoy them.
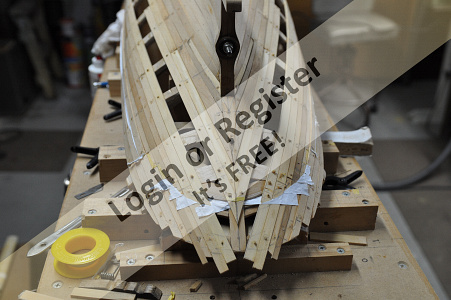
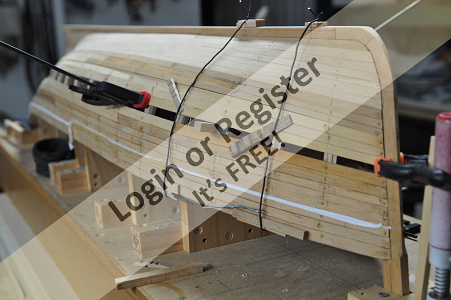
When it came to fitting the rubbing and bilge strakes I tapered the respective planks which are thicker than the rest of the planking material, before fitting them I felt that I would make a mess of it if I tried tapering them once fitted.
Planking around the stern I found to be the trickiest especially around the prop shaft. In one of those regrettable moments of “she will be right” and take the easy rout I will just make up a couple of wedge shaped planks to fill a hole, instead of making a proper “stealer”.
Later on I did go to the trouble of making a better “stealer” this can be seen in a couple of the photos.
When I got to the last plank ( quite a mile stone event ) I was very happy and relived that there were no large adjustments to be made.
I doubt anyone would be able to find it without referring to a photo first.
Somewhere in the 2 or 3 years that planking took me to do, I showed the model at a few shows.
One show in particular at Queenscliff maritime museum in Victoria Australia. I ran into a guy Les Lauder he had built 2 engines to the same design as I did, he told me that one of them ran beautifully without problems while the other had similar problems to mine.
He told me that he had fixed this problem by using a floating frame to push the cylinders onto the valve face. He very kindly sent me some photos of his modified engine.
This mention of steam engine problems and other steam related issues will be covered in the future.
Updates will slow considerably now that the pre-written stuff is depleted, also I work full time.
There is still quite a bit to catch up to the latest work.
Cheers,
Stephen.


Some more planking photos….. I hope you enjoy them.
When it came to fitting the rubbing and bilge strakes I tapered the respective planks which are thicker than the rest of the planking material, before fitting them I felt that I would make a mess of it if I tried tapering them once fitted.
Planking around the stern I found to be the trickiest especially around the prop shaft. In one of those regrettable moments of “she will be right” and take the easy rout I will just make up a couple of wedge shaped planks to fill a hole, instead of making a proper “stealer”.
Later on I did go to the trouble of making a better “stealer” this can be seen in a couple of the photos.
When I got to the last plank ( quite a mile stone event ) I was very happy and relived that there were no large adjustments to be made.
I doubt anyone would be able to find it without referring to a photo first.
Somewhere in the 2 or 3 years that planking took me to do, I showed the model at a few shows.
One show in particular at Queenscliff maritime museum in Victoria Australia. I ran into a guy Les Lauder he had built 2 engines to the same design as I did, he told me that one of them ran beautifully without problems while the other had similar problems to mine.
He told me that he had fixed this problem by using a floating frame to push the cylinders onto the valve face. He very kindly sent me some photos of his modified engine.
This mention of steam engine problems and other steam related issues will be covered in the future.
Updates will slow considerably now that the pre-written stuff is depleted, also I work full time.
There is still quite a bit to catch up to the latest work.
Cheers,
Stephen.
▲
⟩⟩
Jerry Todd
mturpin013
Julio
MouldBuilder
Joe727
marky
Graham93
robbob
Colin H
Martin555
RNinMunich
|
💬 Re: Scratch built, Working Steam powered Drifter trawler LT100, to 1:24th scale.
4 years ago by 🇦🇺 stevedownunder (
Captain)✧ 225 Views · 2 Likes
Flag
Hi Peter,
I don't intend to fiberglass the outside, just paint. I am hoping that the planking will be visible. Cheers, Stephen. ▲
⟩⟩
MouldBuilder
Martin555
|
|
Login To
Remove Ads 💬 Re: Scratch built, Working Steam powered Drifter trawler LT100, to 1:24th scale.
4 years ago by 🇭🇺 MouldBuilder (
 Vice Admiral) Vice Admiral)✧ 224 Views · 2 Likes
Flag
That looks really good. Do you seal the joints with resin after or is it glass fiber sheet covered.
Peter. ▲
⟩⟩
stevedownunder
Martin555
|
|
💬 Re: Scratch built, Working Steam powered Drifter trawler LT100, to 1:24th scale.
4 years ago by 🇺🇸 Joe727 (
 Commander) Commander)✧ 228 Views · 2 Likes
Flag
Stephen,
Your planking looks great! Joe😎 ▲
⟩⟩
stevedownunder
Martin555
|
|
💬 Re: Scratch built, Working Steam powered Drifter trawler LT100, to 1:24th scale.
4 years ago by 🇨🇦 Newby7 (
Fleet Admiral)✧ 224 Views · 2 Likes
Flag
Nice job on the planking.Very satisfying when done.
Rick ▲
⟩⟩
stevedownunder
Martin555
|
|
💬 Re: Scratch built, Working Steam powered Drifter trawler LT100, to 1:24th scale.
4 years ago by 🇬🇧 robbob (
Admiral)✧ 224 Views · 3 Likes
Flag
Amazing craftsmanship Stephen👍👍
Considering that what we are seeing now at this stage constitutes more than three years work then this boat is truly a labour of love. Looking forward to seeing more 😁 Rob. ▲
⟩⟩
hmsnostalgia
stevedownunder
Martin555
|
|
💬 Re: Scratch built, Working Steam powered Drifter trawler LT100, to 1:24th scale.
4 years ago by 🇬🇧 Colin H (
Fleet Admiral)✧ 224 Views · 2 Likes
Flag
Super bit of work, looks more like the real thing instead of a model.
Can't wait for your next instalment. Cheers Colin. ▲
⟩⟩
stevedownunder
Martin555
|
|
💬 Re: Scratch built, Working Steam powered Drifter trawler LT100, to 1:24th scale.
4 years ago by 🇬🇧 Martin555 (
Fleet Admiral)✧ 224 Views · 1 Like
Flag
Nicely done Stephen.
I have done a bit if this plank on frame work in my time and have to say it is not the easiest of jobs to do. Martin555. ▲
⟩⟩
stevedownunder
|
|
💬 Re: Scratch built, Working Steam powered Drifter trawler LT100, to 1:24th scale.
4 years ago by 🇩🇪 RNinMunich (
Fleet Admiral)✧ 224 Views · 2 Likes
Flag
A very tricky job very well executed Chief 👍
I salute you. BRAVO ZULU. I had enough trouble just restoring and correcting an old Billing Boats fish cutter hull, Gina 2. Cheers, Doug 😎 ▲
⟩⟩
stevedownunder
Martin555
|


Login To
Remove Ads
Remove Ads