Join Us On Social Media!

|

|

|
Download The App!
Login To
Remove Ads
Remove Ads
Login To
Remove Ads
Remove Ads
Model Boats Website
Gaff Rigged Pilot Cutter
44 Posts · 36 Followers · 434 Photos · 529 Likes
Began 3 years ago by
 United Kingdom
Follow This Thread
Not currently following
> Click to follow
> Click to follow
Latest Post 3 years ago by
| Oldest posts shown first (Show Newest First) | (Print Booklet) |
📝 Gaff Rigged Pilot Cutter
3 years ago by 🇬🇧 Graham93 ( Vice Admiral)
Vice Admiral)✧ 251 Views · 9 Likes · 15 Comments
Flag
💬 Add Comment
And so the story begins.......
A few days ago on the 'Jolie Brise' forum topic I stated "I have a plan". Well I meant this literally! While searching the Web for inspiration for my next model, I found a plan for a Pilot Cutter. I was searching for schooner plans, and came across this plan and was hooked.
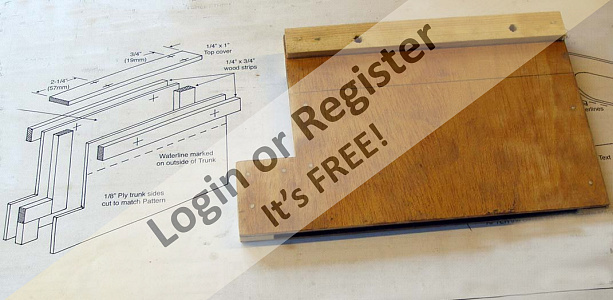
The plan was ordered on line (on my birthday) and was delivered electronically within a few hours (nice birthday present 👍). It comprises a large A0 sheet, six A2 sheets plus seven A4 pages of build instructions. All for $15 US. I had the plans printed using an on-line print shop (during lockdown). The printing cost was more than the plan cost 🙄 I could have printed at home by 'tiling' the large sheets onto multiple A4 pages and then glueing them together but didn't want the distortions that would inevitably occur using that approach.
The plans are very detailed with most parts being drawn full size. The build instructions are comprehensive. Time will tell how good they are in reality, but initial indications are promising.
The Cutter has a full suite of sails, mainsail, main topsail, stay sail, jib and jib topsail. There are two winch servos, one to control the mainsail and one for the foresails.
The plans do not have a lot of scale detail. Gary the designer states in the build instructions " This boat practically begs for more scale like detail" I intend to take him up on that challenge.
I'll let Garry Webb the designer tell you more about it in his video.
Graham93

A few days ago on the 'Jolie Brise' forum topic I stated "I have a plan". Well I meant this literally! While searching the Web for inspiration for my next model, I found a plan for a Pilot Cutter. I was searching for schooner plans, and came across this plan and was hooked.
The plan was ordered on line (on my birthday) and was delivered electronically within a few hours (nice birthday present 👍). It comprises a large A0 sheet, six A2 sheets plus seven A4 pages of build instructions. All for $15 US. I had the plans printed using an on-line print shop (during lockdown). The printing cost was more than the plan cost 🙄 I could have printed at home by 'tiling' the large sheets onto multiple A4 pages and then glueing them together but didn't want the distortions that would inevitably occur using that approach.
The plans are very detailed with most parts being drawn full size. The build instructions are comprehensive. Time will tell how good they are in reality, but initial indications are promising.
The Cutter has a full suite of sails, mainsail, main topsail, stay sail, jib and jib topsail. There are two winch servos, one to control the mainsail and one for the foresails.
The plans do not have a lot of scale detail. Gary the designer states in the build instructions " This boat practically begs for more scale like detail" I intend to take him up on that challenge.
I'll let Garry Webb the designer tell you more about it in his video.
Graham93
▲
⟩⟩
robbob
jbkiwi
Rookysailor
Peejay
Colin H
philcaretaker
Ianh
RNinMunich
Martin555
|
💬 Re: Gaff Rigged Pilot Cutter
3 years ago by 🇿🇦 Ianh (
 Commander) Commander)✧ 246 Views · 1 Like
Flag
OK Graham93,
Sunday brain is in neutral at the moment, due to the weather in SA ( Lots of rain and humidity) So I can't spray! I agree no question is stupid as I used to lecture part time on Thermodynamics and Turbines😊😊 ▲
⟩⟩
Martin555
|
|
Login To
Remove Ads 💬 Re: Gaff Rigged Pilot Cutter
3 years ago by 🇬🇧 Graham93 (
Vice Admiral)✧ 241 Views · 3 Likes
Flag
Ian,
I always tell my students there is no such thing as a ‘stupid question’. If you have a question, then it is valid, and others here may also be wondering about the same thing. One winch for the main sail and the second one for the jibs. The second winch tacks the fore sheets. While the main sail winch simply adjusts the main sheet as normal, whichever tack the boat is on, the foresail winch has to be set to opposite ends of it’s travel depending on which tack the boat is on. More on this later in the blog. You can see the fore sails being tacked in the ‘show and tell’ video at the beginning of this blog. Graham93 ▲
⟩⟩
robbob
Martin555
Ianh
|
|
💬 Re: Gaff Rigged Pilot Cutter
3 years ago by 🇿🇦 Ianh (
Commander)✧ 247 Views · 1 Like
Flag
Hi Graham 93
Stupid question? Why two Winches you should only need 1! ▲
⟩⟩
Martin555
|
|
💬 Re: Gaff Rigged Pilot Cutter
3 years ago by 🇿🇦 Ianh (
Commander)✧ 247 Views · 1 Like
Flag
Hi Graham 93,
At 3 1/2 turns your only option is Hitec and they are heavy duty! Good Luck with the build Regards Ian👍👍 ▲
⟩⟩
Martin555
|
|
💬 Re: Gaff Rigged Pilot Cutter
3 years ago by 🇬🇧 Graham93 (
Vice Admiral)✧ 242 Views · 2 Likes
Flag
Thanks Ian,
3 1/2 turn versions are used in the Cutter. I have written to Santa 🎁 Graham93 ▲
⟩⟩
Martin555
Ianh
|
|
💬 Re: Gaff Rigged Pilot Cutter
3 years ago by 🇿🇦 Ianh (
Commander)✧ 247 Views · 2 Likes
Flag
If you want a reliable sailwinch The Hitec ones are good. All depends on how many turns it has to make👍👍
▲
⟩⟩
Graham93
Martin555
|
|
💬 Re: Gaff Rigged Pilot Cutter
3 years ago by 🇳🇿 jbkiwi (
 Fleet Admiral) Fleet Admiral)✧ 244 Views · 1 Like
Flag
I'm sure Santa will bring them Graham, if you sit on her knee and ask nicely😂
They are not too bad for price, and should be reliable being Hitec. I've had no problems with their servos in planes. JB ▲
⟩⟩
Martin555
|
|
💬 Re: Gaff Rigged Pilot Cutter
3 years ago by 🇬🇧 Graham93 (
Vice Admiral)✧ 246 Views · 3 Likes
Flag
JB,
There are two drum winches to control the sheets. They are installed in a similar fashion to that shown in the video you found. The recommended servos are HiTec HS785 so I'm hoping to get a couple of those from Santa 🎁. ▲
⟩⟩
Ianh
jbkiwi
Martin555
|
|
💬 Re: Gaff Rigged Pilot Cutter
3 years ago by 🇳🇿 jbkiwi (
Fleet Admiral)✧ 246 Views · 3 Likes
Flag
That's a very nice sailing yacht Graham. It will keep you out of trouble for a while😁. Does it use servo/arm or drum winches? If it uses drums, don't waste your time with the cheap JX ones from Banggood as they are rubbish. I tried a couple and they won't centre properly, and sit there humming. Apart from that they work ok but will probably fry with use.
The King winch from AliExp looks interesting but a lot of money to take a chance on. They need to have a strong centering action to avoid stalling, and a lot of the cheap ones are not up to it. The top winches they use in the racing yachts are in the hundreds I was told. Just having a go at adapting an 18lb digital JX servo ($25) using an arm for my Optimist, (driving me mad trying to get the travel required)😁 Found a vid from your plans guy which gives a winch set-up which might be useful. I think JR made good winch servos, but I think they have gone now. JB 

▲
⟩⟩
Ianh
Graham93
Martin555
|
|
💬 Re: Gaff Rigged Pilot Cutter
3 years ago by 🇬🇧 Graham93 (
Vice Admiral)✧ 248 Views · 2 Likes
Flag
Thanks Nerys,
There are several videos on YouTube by Gary Webb the designer covering construction details, and his other models. Just search for 'sailtails'. I've been impressed with both the appearance and the way the models sail. That's not to say that I don't plan to make a few changes along the way... Graham93 ▲
⟩⟩
philcaretaker
Martin555
|
|
💬 Re: Gaff Rigged Pilot Cutter
3 years ago by 🇬🇧 Graham93 (
Vice Admiral)✧ 248 Views · 3 Likes
Flag
Thanks Martin,
I do hope you enjoy the blog. I'm certainly looking forward to spending some time in the workshop. Graham93 ▲
⟩⟩
Alain Pascal
philcaretaker
Martin555
|
|
Login To
Remove Ads 💬 Re: Gaff Rigged Pilot Cutter
3 years ago by 🇺🇸 Black Shoe (
 Sub-Lieutenant) Sub-Lieutenant)✧ 248 Views · 1 Like
Flag
I'm aboard!😊
▲
⟩⟩
Martin555
|
|
💬 Re: Gaff Rigged Pilot Cutter
3 years ago by 🇬🇧 philcaretaker (
 Commodore) Commodore)✧ 259 Views · 1 Like
Flag
Bring it on Graham !
Phil⛵ ▲
⟩⟩
Martin555
|
|
💬 Re: Gaff Rigged Pilot Cutter
3 years ago by 🇬🇧 Nerys (
Fleet Admiral)✧ 250 Views · 4 Likes
Flag
Graham, you have done very well in a very short time and I wish you well with what I am sure will be an interesting build and a great boat as the outcome.
I am very impressed after looking at the video, very accurate rigging details and she can certainly sail Cheers, Nerys ▲
⟩⟩
Ianh
Graham93
philcaretaker
Martin555
|
|
💬 Re: Gaff Rigged Pilot Cutter
3 years ago by 🇬🇧 Martin555 (
Fleet Admiral)✧ 252 Views · 2 Likes
Flag
Hi Graham.
This is going to be a fantastic project. With your skills i can imagine what she will look like when she is finished. I think you will thoroughly enjoy this build as much as we will be enjoying following your build log. Really looking forward to the next instalment already. Martin555. ▲
⟩⟩
Graham93
philcaretaker
|
Login To
Remove Ads
Remove Ads
📝 Hull components
3 years ago by 🇬🇧 Graham93 ( Vice Admiral)
Vice Admiral)✧ 246 Views · 13 Likes · 6 Comments
Flag
💬 Add Comment
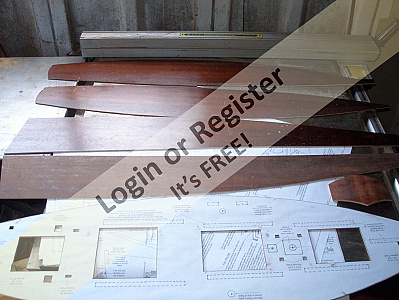
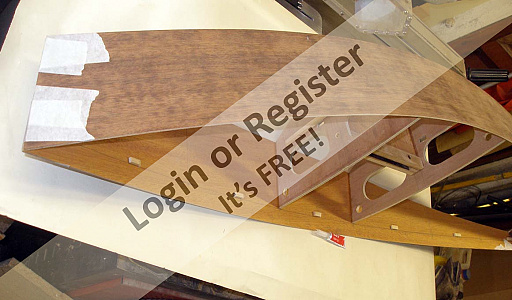
The hull is constructed from ply bulkheads covered with ply skins. The plan calls for 1/8th plywood for these parts. I have some salvaged 2.5mm ply which should be suitable. This ply is only smooth on one side, which is mahogany veneered and french polished.
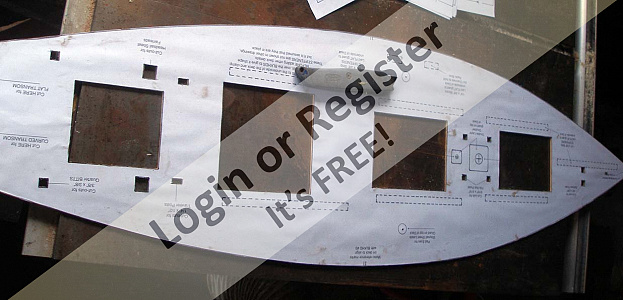
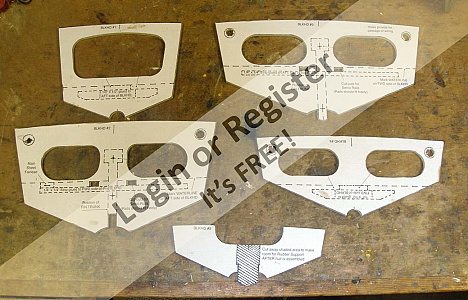
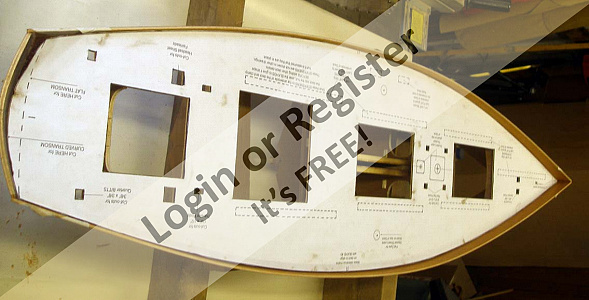
The large A0 plan sheet has full size drawings of the main hull components. Rather than having to trace these onto the plywood, I had two copies of this sheet printed. One of these sheets was cut up and the pieces were stuck to the ply using a glue stick. It was then a simple task to cut to the outlines using the bandsaw.
There is only one template for the hull side panels so once the first panel had been cut, this was then used to mark out and cut the second side, making sure that the second panel was a mirror image of the first. These two panels were then stuck together with double sided tape and the edges trimmed to ensure the two sides were identical. The same method was used for the two bottom panels, although these do not need trimming to be identical. They will be trimmed to size once attached to the hull.
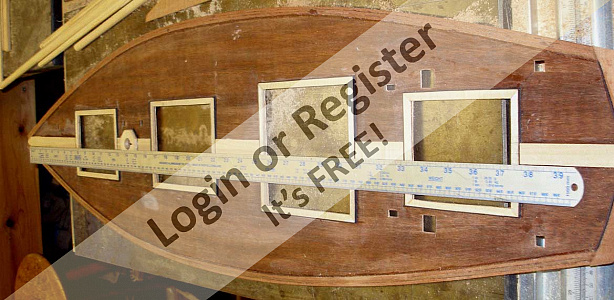
The outline of the deck was cut on the bandsaw and then the holes for the hatches, and other deck fittings were cut using a sharp craft knife and a steel straight edge.
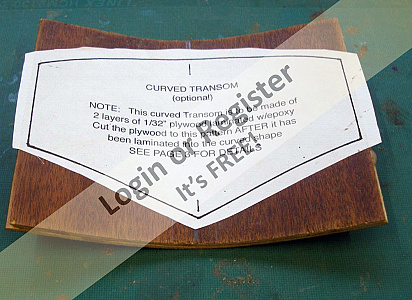
The plan has two options for the transom, flat or curved. I've opted for the curved version as it is more representative of the full sized Cutters. Following the plan instructions, two pieces of the 2.5 mm ply were cut and epoxied together in a simple jig. They were left clamped in the jig for a couple of days to give the epoxy plenty of time to set. The transom template was then glued to the curved panel and the panel cut to shape using the bandsaw.
Next job, cutting out the bulkheads....


The large A0 plan sheet has full size drawings of the main hull components. Rather than having to trace these onto the plywood, I had two copies of this sheet printed. One of these sheets was cut up and the pieces were stuck to the ply using a glue stick. It was then a simple task to cut to the outlines using the bandsaw.
There is only one template for the hull side panels so once the first panel had been cut, this was then used to mark out and cut the second side, making sure that the second panel was a mirror image of the first. These two panels were then stuck together with double sided tape and the edges trimmed to ensure the two sides were identical. The same method was used for the two bottom panels, although these do not need trimming to be identical. They will be trimmed to size once attached to the hull.
The outline of the deck was cut on the bandsaw and then the holes for the hatches, and other deck fittings were cut using a sharp craft knife and a steel straight edge.
The plan has two options for the transom, flat or curved. I've opted for the curved version as it is more representative of the full sized Cutters. Following the plan instructions, two pieces of the 2.5 mm ply were cut and epoxied together in a simple jig. They were left clamped in the jig for a couple of days to give the epoxy plenty of time to set. The transom template was then glued to the curved panel and the panel cut to shape using the bandsaw.
Next job, cutting out the bulkheads....
▲
⟩⟩
sirscapa
Inkoust
Ronald
robbob
jbkiwi
Ianh
stevedownunder
Rookysailor
RNinMunich
Martin555
Madwelshman
Colin H
philcaretaker
|
💬 Re: Hull components
3 years ago by 🇿🇦 Ianh (
Commander)✧ 247 Views · 0 Likes
Flag
In SA we would have to hunt for Record Tools. SA is a dumping ground for cheap stuff!
▲
⟩⟩
No likes yet
This member will receive 1 point for every like received |
|
Login To
Remove Ads 💬 Re: Hull components
3 years ago by 🇬🇧 Graham93 (
Vice Admiral)✧ 243 Views · 2 Likes
Flag
Hi Michael,
You could well be right about the 'door skin' plywood. It would be ideal for that purpose. It was salvaged from a 1980's flatpack bookcase. The plane is a Record 311 Bull Nose plane I bought around 30 years ago while in the middle of a woodworking project. It cost £55 which I thought was a lot at the time, but research this morning shows they are now selling for 2 - 3 times that amount 👍. Not that I would ever sell it. It is my 'go to' plane for most jobs, small, heavy, single hand use with a good quality cutter that keeps it's edge. Graham96 ▲
⟩⟩
Ianh
Martin555
|

|
💬 Re: Hull components
3 years ago by 🇬🇧 mturpin013 (
 Admiral) Admiral)✧ 245 Views · 1 Like
Flag
Hi Graham that ply looks like the door skins that were in abundance during the 90s, I had a company nearby that made mahogany doors using such skins and they use to cover the edges with veneer and any of cuts were dumped in a skip, where I duly liberated them for repurposing and I still have coils of it in my wood sock today.
I'm glad to see the use of a jig🤓 PS I do like the look of that plane, any details on it? ▲
⟩⟩
Martin555
|
|
💬 Re: Hull components
3 years ago by 🇬🇧 Martin555 (
Fleet Admiral)✧ 246 Views · 0 Likes
Flag
Hi Graham,
you are off to a brilliant start. Will be following with great interest. Martin555. ▲
⟩⟩
No likes yet
This member will receive 1 point for every like received |
|
💬 Re: Hull components
3 years ago by 🇬🇧 Graham93 (
Vice Admiral)✧ 246 Views · 3 Likes
Flag
Phil,
The weather is miserable, and I can't sail at Pavilion gardens as Buxton is in a different lockdown tier, so I may as well get on with the build.😉 Graham93 ▲
⟩⟩
jbkiwi
Ianh
Martin555
|
|
💬 Re: Hull components
3 years ago by 🇬🇧 philcaretaker (
Commodore)✧ 256 Views · 3 Likes
Flag
Yikes ! - that was quick !👍⛵
▲
⟩⟩
jbkiwi
Ianh
Martin555
|
📝 Bulkheads
3 years ago by 🇬🇧 Graham93 ( Vice Admiral)
Vice Admiral)✧ 247 Views · 14 Likes · 9 Comments
Flag
💬 Add Comment
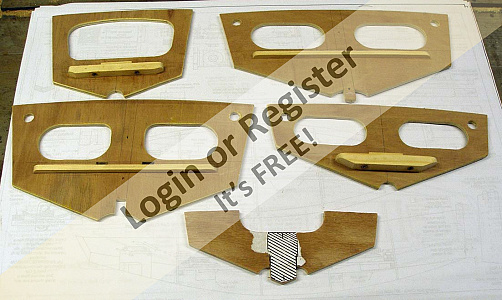
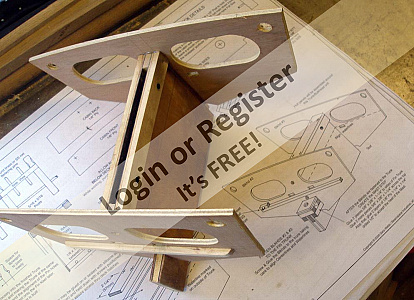
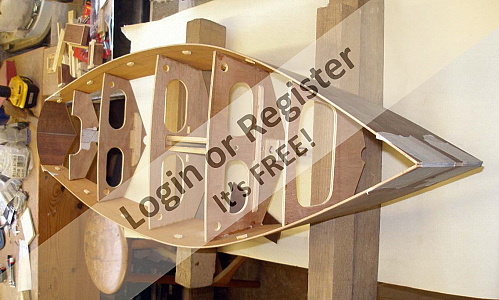
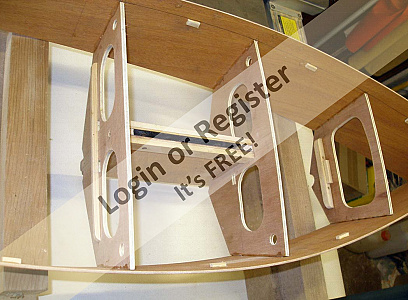
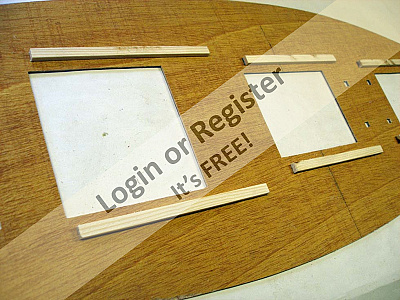
The plans suggest that the bulkheads are made from 1/8th ply the same as the hull skins. As the ply I've used for the skins is thinner than 1/8th and quite flexible I decided to use some thicker ply offcuts I had available. These are supposed to be 6mm but actually measure closer to 5mm.
The full size templates were glued to the ply to minimise waste and the parts were then cut out using the bandsaw. When positioning the templates I didn't think about the cutting lines which made separating the parts with the bandsaw a bit tricky, but I managed it in the end.
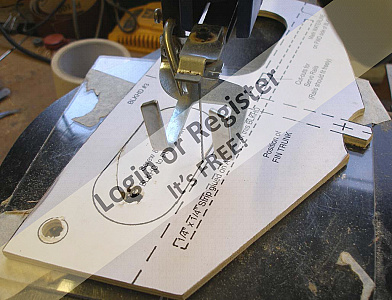
Four of the bulkheads have internal cutouts for the winch sheets to pass through. These were cut using the fretsaw. I bought this saw secondhand off Gumtree just before lockdown in February and it has been so useful both for the rowing boat and now for this model. The holes drilled in the top corners of the bulkheads are for routing cables to the servos.
Several of the bulkheads have bearers attached to support the winch servos. These were cut to the dimensions given on the plans and glued in place. Stainless steel M3 nuts were epoxied into a couple of the bearers to allow the winch support components to be easily fitted and removed later in the build.


The full size templates were glued to the ply to minimise waste and the parts were then cut out using the bandsaw. When positioning the templates I didn't think about the cutting lines which made separating the parts with the bandsaw a bit tricky, but I managed it in the end.
Four of the bulkheads have internal cutouts for the winch sheets to pass through. These were cut using the fretsaw. I bought this saw secondhand off Gumtree just before lockdown in February and it has been so useful both for the rowing boat and now for this model. The holes drilled in the top corners of the bulkheads are for routing cables to the servos.
Several of the bulkheads have bearers attached to support the winch servos. These were cut to the dimensions given on the plans and glued in place. Stainless steel M3 nuts were epoxied into a couple of the bearers to allow the winch support components to be easily fitted and removed later in the build.
▲
⟩⟩
sirscapa
Inkoust
Colin H
jbkiwi
MouldBuilder
stevedownunder
RNinMunich
mturpin013
Rookysailor
Ronald
Ianh
Black Shoe
Martin555
robbob
|
💬 Re: Bulkheads
3 years ago by 🇬🇧 robbob (
Admiral)✧ 242 Views · 3 Likes
Flag
"Hi Rob great progress".......
Mike...you really ought to congratulate Graham on his progress, but I'm happy to take the compliment too 🤣 Rob. ▲
⟩⟩
hmsnostalgia
Martin555
Graham93
|
|
Login To
Remove Ads 💬 Re: Bulkheads
3 years ago by 🇬🇧 mturpin013 (
Admiral)✧ 243 Views · 4 Likes
Flag
Hi Rob great progress, I have a fret saw, its one of the most useful tools in the work shop
▲
⟩⟩
Graham93
Ianh
Martin555
RNinMunich
|
|
💬 Re: Bulkheads
3 years ago by 🇬🇧 robbob (
Admiral)✧ 245 Views · 3 Likes
Flag
"There is also a note in the instructions giving Gary, the designer's email in case of difficulties".
It's reassuring to know that the designer has confidence in his design and will give personal support if required 👍👍 Rob. ▲
⟩⟩
hmsnostalgia
Graham93
Martin555
|
|
💬 Re: Bulkheads
3 years ago by 🇬🇧 Graham93 (
Vice Admiral)✧ 244 Views · 2 Likes
Flag
Hi Nerys,
Yes, it's hard chine. Not really representative of a real Cutter in terms of hull shape. It also has a fin and keel to help keep it upright in a breeze. I'm hoping it will look realistic above the waterline when out on the water. Graham93 ▲
⟩⟩
sirscapa
Martin555
|
|
💬 Re: Bulkheads
3 years ago by 🇬🇧 Graham93 (
Vice Admiral)✧ 244 Views · 2 Likes
Flag
Thanks Rob,
The plans and instructions are excellent and comprehensive. I haven't found any problems with them, ..yet. There is also a note in the instructions giving Gary, the designer's email in case of difficulties. Graham93 ▲
⟩⟩
robbob
Martin555
|
|
💬 Re: Bulkheads
3 years ago by 🇬🇧 Nerys (
Fleet Admiral)✧ 247 Views · 3 Likes
Flag
I was wondering why you were talking about 1/8 ply for the skin of your boat until I saw the frames and realise she is hard chine. Now there has never been a hard chine pilot cutter, but I do not doubt your hard chine gaff cutter will be a formidable boat on the water.
Cheers, Nerys ▲
⟩⟩
Ianh
Graham93
Martin555
|
|
💬 Re: Bulkheads
3 years ago by 🇳🇿 jbkiwi (
Fleet Admiral)✧ 246 Views · 2 Likes
Flag
Looks like you are really getting into it now Graham. They look like great instructions, very easy to follow.
JB ▲
⟩⟩
Graham93
Martin555
|
|
💬 Re: Bulkheads
3 years ago by 🇬🇧 robbob (
Admiral)✧ 246 Views · 3 Likes
Flag
Hi Graham.
Excellent progress so far. I have to say that the plans, drawings and instructions seem to be extremely well produced and will make construction a joy! Cutting out all of the parts would be a real task if not for your bandsaw. Following with great interest😁 Rob. ▲
⟩⟩
Graham93
hmsnostalgia
Martin555
|
|
💬 Re: Bulkheads
3 years ago by 🇬🇧 Martin555 (
Fleet Admiral)✧ 247 Views · 1 Like
Flag
Graham,
Looks like quite a bit of forward planning required for the internal components. With this model if you see smoke you will know it is not one of your smoker devices LOL!! Martin555. ▲
⟩⟩
Ianh
|
📝 Keel Box
3 years ago by 🇬🇧 Graham93 ( Vice Admiral)
Vice Admiral)✧ 239 Views · 8 Likes · 4 Comments
Flag
💬 Add Comment
Unlike the full sized Cutters, this model has a fin and external keel to help keep it upright in the wind. This can be a bit of a 'weed catcher' but the alternative is to build a lot more weight into the bottom of the hull.
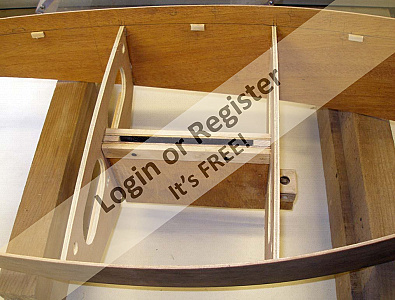
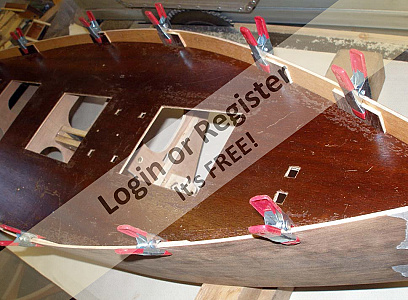
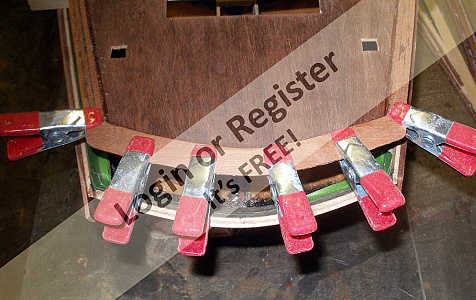
Construction of the hull starts with the Keel box. This houses the top of the fin and allows for it's removal. Two sides for the keel box were cut from 3mm ply and then covered on one side with fiberglass cloth and epoxy resin. The inside of the keel box is a 'wet' area when the boat is on the water and it has to be sealed now as access will be impossible once the keel box is assembled.
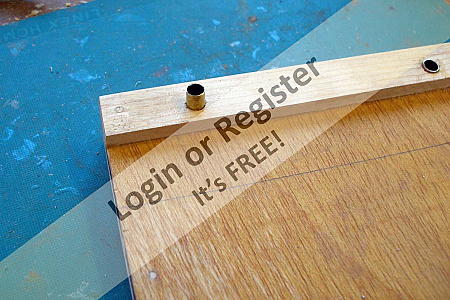
Once the epoxy resin was set, the two sides were assembled with spacers and more epoxy resin. Cocktail sticks in 2mm holes were used to hold everything in alignment. Two battens were also attached, one either side of the keel box at the top. These reinforce the top edge where the fin will be attached. The assembly was left overnight to set, and then the cocktail sticks were trimmed flush and the edges of the box were cleaned up. The two holes in the reinforcing strips at the top of the box are for locating pins which pass through the box, and the top edge of the fin, holding the fin in place on the hull. Removing these pins allows the fin and keel to be removed easily. Although not suggested on the plans, I fitted 6mm I/D brass tubes as liners to reinforce the pin holes.
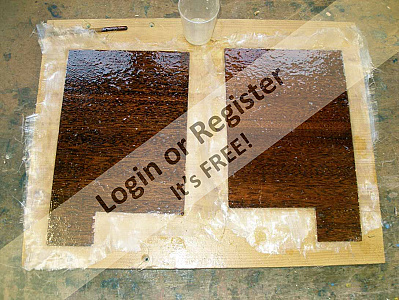
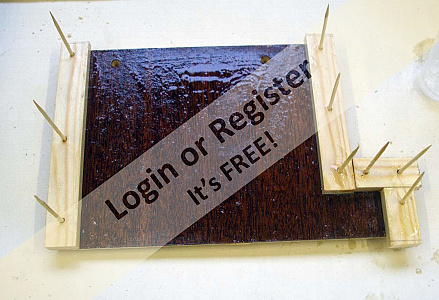


Construction of the hull starts with the Keel box. This houses the top of the fin and allows for it's removal. Two sides for the keel box were cut from 3mm ply and then covered on one side with fiberglass cloth and epoxy resin. The inside of the keel box is a 'wet' area when the boat is on the water and it has to be sealed now as access will be impossible once the keel box is assembled.
Once the epoxy resin was set, the two sides were assembled with spacers and more epoxy resin. Cocktail sticks in 2mm holes were used to hold everything in alignment. Two battens were also attached, one either side of the keel box at the top. These reinforce the top edge where the fin will be attached. The assembly was left overnight to set, and then the cocktail sticks were trimmed flush and the edges of the box were cleaned up. The two holes in the reinforcing strips at the top of the box are for locating pins which pass through the box, and the top edge of the fin, holding the fin in place on the hull. Removing these pins allows the fin and keel to be removed easily. Although not suggested on the plans, I fitted 6mm I/D brass tubes as liners to reinforce the pin holes.
▲
⟩⟩
robbob
Colin H
jbkiwi
stevedownunder
marky
RNinMunich
MouldBuilder
Martin555
|
💬 Re: Keel Box
3 years ago by 🇬🇧 Graham93 (
Vice Admiral)✧ 237 Views · 2 Likes
Flag
Michael,
The keel box fits entirely within the hull. The fin will slide into the box from below and hang down below the hull with the keel bulb at the bottom, in the usual way. The keel box in the post is approx. 180mm wide and 150mm deep. The fin is will extend around 350mm below the hull. Overall length of the model is similar to your Crash Tender at 44". As it isn't a scale copy of a real Pilot Cutter, there is no mention of 'scale' on the plans but I'm using an estimate of between 1:12 and 1:15 when I'm thinking about some of the details. I'll try to get an idea of scale of the model into some of the later photos. Graham93 ▲
⟩⟩
mturpin013
Martin555
|
|
Login To
Remove Ads 💬 Re: Keel Box
3 years ago by 🇬🇧 mturpin013 (
Admiral)✧ 240 Views · 2 Likes
Flag
Graham Its difficult to see how big this keel is and what its final shape is can we have a picture as it doesn't seem to look like the one in the video. I assume its much longer than the keel box
▲
⟩⟩
stevedownunder
Martin555
|
|
💬 Re: Keel Box
3 years ago by 🇬🇧 Graham93 (
Vice Admiral)✧ 239 Views · 3 Likes
Flag
Hi Nerys,
It’s not really my idea, I’m just following the plan 😉. I do think it is a good idea though. It should make transport easier and it will also enable trialing of alternative fin/keel weights. I’ll be using a piece of aluminium sheet for the fin. It’s been sat in the corner of the workshop for years, just waiting for the right project. Graham93 ▲
⟩⟩
robbob
stevedownunder
Martin555
|
|
💬 Re: Keel Box
3 years ago by 🇬🇧 Nerys (
Fleet Admiral)✧ 241 Views · 2 Likes
Flag
I think your idea for having a removable fin keel is a good one, I must admit I tried it in an American sharpie I built a while ago and found to be successful. I'm also doing the same in a Thames Barge, I am currently building. It helps with storage and transport amongst other things. I'm also considering having a piece of sheet mild steel for the fin
Cheers, Nerys ▲
⟩⟩
stevedownunder
Martin555
|
📝 Hull Assembly Part 1
3 years ago by 🇬🇧 Graham93 ( Vice Admiral)
Vice Admiral)✧ 242 Views · 10 Likes · 6 Comments
Flag
💬 Add Comment
With the keel box completed it is time to start building the hull around it. At last, it's time to see all these parts come together 👍
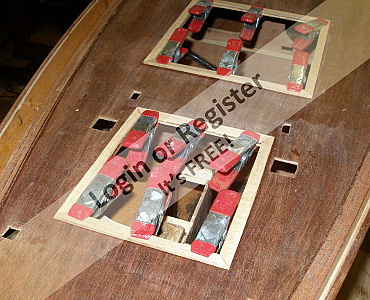
First bulkheads 2 and 3 are glued and screwed to the keel box. Both the bulkheads and the keel box have been marked up with locating lines as shown on the plan to ensure everything goes together in the correct place. Care is taken to ensure the two bulkheads are square to the keel box, and the assembly left for the glue to set.
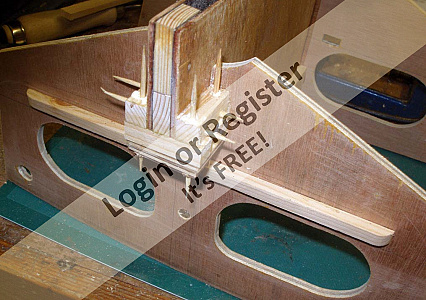
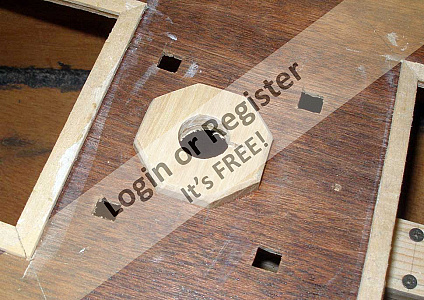
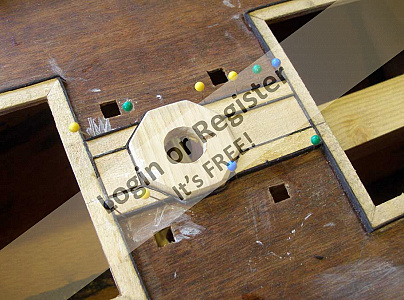
The mast step, to locate the base of the main mast is constructed next. It sits on a protrusion at the forward end of the keel box. The assembly is glued and pinned with cocktail sticks. Once the glue has set, it was cleaned up. All the corners are rounded off to reduce the risk of the rigging sheets passing through the hull becoming snagged. The hole in the top of the mast step is to locate the foot of the mast.
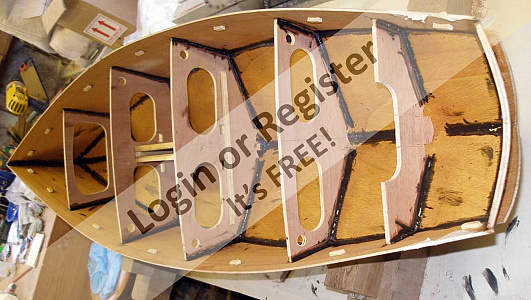
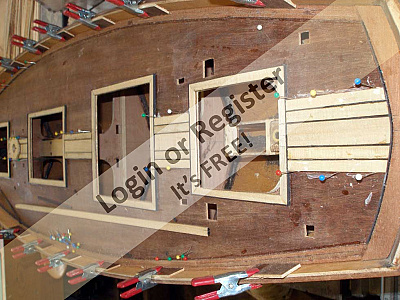
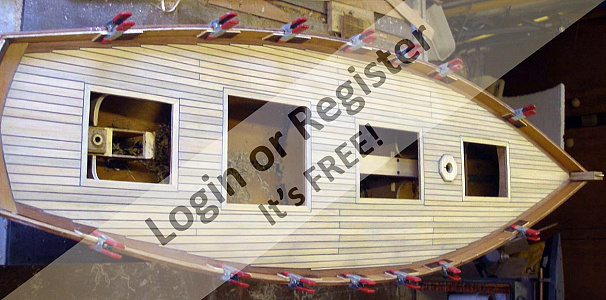
The hull sides and the transom are taped together. The inside faces of the panels have been marked up with the location of all the bulkheads. Small support blocks are glued along the deck line. The keel box assembly with its attached bulkheads is then placed between the side sheets and positioned using the marked bulkhead locations. The top edges of the bulkheads are aligned to the line showing the deck level. Once in the correct position, the bulkheads are tacked to the side panels with superglue.
The hull is supported on blocks to lift the keel box clear of the worktop taking care that everything is level and square and the remaining bulkheads are positioned on their locating marks and fixed with superglue. I managed to fit them all the right way round!
Now I get chance to stand back and realise just how big this model is 😮
Next, fitting the bottom panels...


First bulkheads 2 and 3 are glued and screwed to the keel box. Both the bulkheads and the keel box have been marked up with locating lines as shown on the plan to ensure everything goes together in the correct place. Care is taken to ensure the two bulkheads are square to the keel box, and the assembly left for the glue to set.
The mast step, to locate the base of the main mast is constructed next. It sits on a protrusion at the forward end of the keel box. The assembly is glued and pinned with cocktail sticks. Once the glue has set, it was cleaned up. All the corners are rounded off to reduce the risk of the rigging sheets passing through the hull becoming snagged. The hole in the top of the mast step is to locate the foot of the mast.
The hull sides and the transom are taped together. The inside faces of the panels have been marked up with the location of all the bulkheads. Small support blocks are glued along the deck line. The keel box assembly with its attached bulkheads is then placed between the side sheets and positioned using the marked bulkhead locations. The top edges of the bulkheads are aligned to the line showing the deck level. Once in the correct position, the bulkheads are tacked to the side panels with superglue.
The hull is supported on blocks to lift the keel box clear of the worktop taking care that everything is level and square and the remaining bulkheads are positioned on their locating marks and fixed with superglue. I managed to fit them all the right way round!
Now I get chance to stand back and realise just how big this model is 😮
Next, fitting the bottom panels...
▲
⟩⟩
Alain Pascal
MouldBuilder
Inkoust
robbob
Colin H
stevedownunder
RNinMunich
marky
philcaretaker
Martin555
|
💬 Re: Hull Assembly Part 1
3 years ago by 🇳🇿 jbkiwi (
Fleet Admiral)✧ 242 Views · 1 Like
Flag
I've got 4 projects on the go at the moment Graham, (3 individual pieces for 1 project)- don't think my brain could handle 5😂
JB ▲
⟩⟩
Martin555
|
|
Login To
Remove Ads 💬 Re: Hull Assembly Part 1
3 years ago by 🇬🇧 Graham93 (
Vice Admiral)✧ 242 Views · 4 Likes
Flag
Martin, Michael,
I prefer using ‘trenails’ when constructing a model as they don’t need hammering in, and the don’t blunt your tools when cleaning up the joints like metal nails do 😠. Cocktail sticks work well and are cheap and readily available. Haven’t tried bamboo barbecue sticks but they would be even stronger. Graham93 ▲
⟩⟩
hmsnostalgia
robbob
Ianh
Martin555
|
|
💬 Re: Hull Assembly Part 1
3 years ago by 🇬🇧 Graham93 (
Vice Admiral)✧ 242 Views · 2 Likes
Flag
Go on John, you know you want to...😂🤣
▲
⟩⟩
Martin555
jbkiwi
|
|
💬 Re: Hull Assembly Part 1
3 years ago by 🇳🇿 jbkiwi (
Fleet Admiral)✧ 242 Views · 3 Likes
Flag
Looking very nice so far Graham. I can see it's going to have your usual 'cabinetmakers' touch. Makes me want to start something now😁
JB ▲
⟩⟩
Martin555
stevedownunder
Graham93
|
|
💬 Re: Hull Assembly Part 1
3 years ago by 🇬🇧 mturpin013 (
Admiral)✧ 244 Views · 5 Likes
Flag
Don't you just love cocktail sticks 😀 don't forget the bamboo barbecue sticks for the bigger jobs.
▲
⟩⟩
Ianh
Martin555
stevedownunder
Graham93
RNinMunich
|
|
💬 Re: Hull Assembly Part 1
3 years ago by 🇬🇧 Martin555 (
Fleet Admiral)✧ 243 Views · 2 Likes
Flag
Hi Graham,
I like the wood nails. Even at this stage of the build you make it look so clean and tidy with that professional Finnish. Nice work. Martin555. ▲
⟩⟩
hmsnostalgia
stevedownunder
|
📝 Hull Assembly Part 2
3 years ago by 🇬🇧 Graham93 ( Vice Admiral)
Vice Admiral)✧ 244 Views · 11 Likes · 9 Comments
Flag
💬 Add Comment
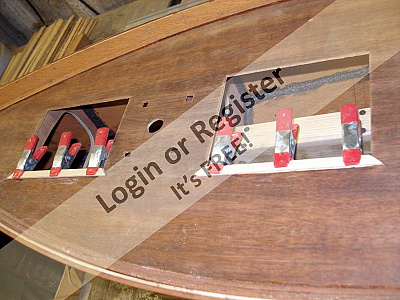
To continue with assembly of the hull, the deck panel was trimmed slightly until it would fit in the hull, resting on the top of the bulkheads and the support blocks that had been glued to the side walls. Very little trimming was needed to get this to fit, which is a testament to the quality of the plans. Stiffeners were added to the underside of the deck and it was then clamped back into position - but not glued. The hull is not yet rigid so clamping the deck into position helps ensure that everything is maintained square.
With the deck in position, the hull was inverted and supported on a flat surface so that the floor skins could be fitted. The skins needed to be trimmed to fit, especially around the protruding fin box. This took a while as I did not want to remove more than necessary. It was difficult to hold both skins in position and to tape one down while trimming the other to fit. Eventually an acceptable fit was achieved and both skins were tacked in place with superglue. The seam along the centerline and around the fin box was filled with epoxy.
Next the hull was turned the right way up, the deck was removed and all the internal seams reinforced with thickened epoxy resin. Finally, once the resin had been left to set, the bottom panels, and the protruding fin box, were trimmed flush.
▲
⟩⟩
philcaretaker
MouldBuilder
stevedownunder
RNinMunich
Inkoust
jbkiwi
robbob
Martin555
Ianh
Colin H
Nerys
|
💬 Re: Hull Assembly Part 2
3 years ago by 🇬🇧 Graham93 (
Vice Admiral)✧ 240 Views · 3 Likes
Flag
Michael,
“I recon at this rate it will be in the water before the end of the year” Yes, but which year? 😁 Certainly not 2020. Hopefully sometime in 2021. At present, as I think through the build, the list of bits to be made and fitted is growing every day. Can’t see an end to it. At least it will keep me busy as we move into Tier 3 lockdown on Saturday. Graham93 ▲
⟩⟩
jbkiwi
RNinMunich
Martin555
|
|
Login To
Remove Ads 💬 Re: Hull Assembly Part 2
3 years ago by 🇬🇧 mturpin013 (
Admiral)✧ 244 Views · 4 Likes
Flag
Hi Graham I recon at this rate it will be in the water before the end of the year, Your still rubbing it in with pictures of that really nice plane,
😁 How about giving it a fellow member as a Christmas present😁 ▲
⟩⟩
Graham93
Martin555
stevedownunder
RNinMunich
|
|
💬 Re: Hull Assembly Part 2
3 years ago by 🇬🇧 Graham93 (
Vice Admiral)✧ 243 Views · 4 Likes
Flag
Thanks Rob,
The basic hull has come together quite quickly, but there is still a long way to go. Might be ready to sail by the time we have all been vaccinated 🙄. I’m gradually sanding off the french polish. It’s not a good finish for surfaces that are going to get wet. 😆 I used ‘milled carbon fibre’ to thicken the epoxy resin, that’s why it is black. Bought it with the resin from Easy Composites. Graham93 ▲
⟩⟩
MouldBuilder
RNinMunich
Martin555
robbob
|
|
💬 Re: Hull Assembly Part 2
3 years ago by 🇳🇿 jbkiwi (
Fleet Admiral)✧ 243 Views · 5 Likes
Flag
Going great guns there Graham, looking good. Obviously designed to be a developable surface build. looks very similar to my 15ft, 1950s US Schock designed 'Sharon Potts' day sailer (just a bit broader). Will probably have similar sailing characteristics as well. I have never had mine planing, despite being out in around 18 knots down wind with jib and main up. The boat just sucks down and sails. Surprisingly fast in light winds as well (has the equivalent rig of a 2 man 470 Olympic dinghy) The guy who designed my boat, Edson I Schock, was a naval architect and did a lot of work on developable surfaces for small boats. He also wrote a book on the subject in the 50s.
I think it's going to be a real nice sailer. JB 


▲
⟩⟩
RNinMunich
stevedownunder
Inkoust
Graham93
Martin555
|
|
💬 Re: Hull Assembly Part 2
3 years ago by 🇬🇧 robbob (
Admiral)✧ 246 Views · 3 Likes
Flag
Hi Graham.
Excellent and rapid progress👍👍. I have to say that it's quite unique to see a 'French Polished' hull at such an early stage of construction 😆. What did you use to thicken the epoxy used on the internal seams? Rob. ▲
⟩⟩
hmsnostalgia
philcaretaker
Martin555
|
|
💬 Re: Hull Assembly Part 2
3 years ago by 🇬🇧 Graham93 (
Vice Admiral)✧ 244 Views · 2 Likes
Flag
Martin,
I don’t know much about sailboats either!, but I can follow a plan, and use a saw 😁. I do have a Wee Nip that I built this time last year. It has a single sail and rudder so couldn’t be much simpler to build or sail. I’ve enjoyed learning to sail with that, and I’m still learning. Sailing is a completely different challenge compared to a powered boat ( or a rowing boat 😆) as everything is dependant on the wind. I don’t have any prior experience with full sized sailboats so it’s been interesting spending time researching different Cutter designs to learn about the sail arrangement, rigging and deck fittings. I’m sure I’m going to need lots of advice on these from the members here as this build progresses. Graham93 ▲
⟩⟩
philcaretaker
Martin555
|
|
💬 Re: Hull Assembly Part 2
3 years ago by 🇬🇧 Graham93 (
Vice Admiral)✧ 244 Views · 2 Likes
Flag
Thanks Nerys,
It’s going together well so far. The plans have proven to be accurate and quite straightforward, despite being ‘hard chine’ 😠 Now I’m getting over the shock of how big she will be, the hull shape does look good. Graham93 ▲
⟩⟩
philcaretaker
Martin555
|
|
💬 Re: Hull Assembly Part 2
3 years ago by 🇬🇧 Martin555 (
Fleet Admiral)✧ 245 Views · 2 Likes
Flag
Hi Graham,
She is certainly coming along nicely. Altho i know absolutely nothing about sail boats i am finding this blog very interesting. Keep it coming. Martin555. ▲
⟩⟩
philcaretaker
Graham93
|
|
💬 Re: Hull Assembly Part 2
3 years ago by 🇬🇧 Nerys (
Fleet Admiral)✧ 245 Views · 5 Likes
Flag
I can't help being deeply impressed with every photo I see of this superb build. Despite being hard chine, she is a fine shape and gives me the impression she will sail well, keep up the good work and keep the pictures coming.
Cheers, Nerys ▲
⟩⟩
RNinMunich
philcaretaker
jbkiwi
Graham93
Martin555
|
📝 Stem
3 years ago by 🇬🇧 Graham93 ( Vice Admiral)
Vice Admiral)✧ 243 Views · 10 Likes · 6 Comments
Flag
💬 Add Comment
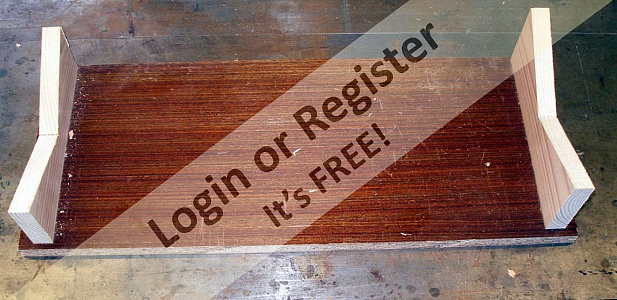
Now that the basic hull is complete, a simple stand was constructed on which to place the hull for the rest of the assembly.
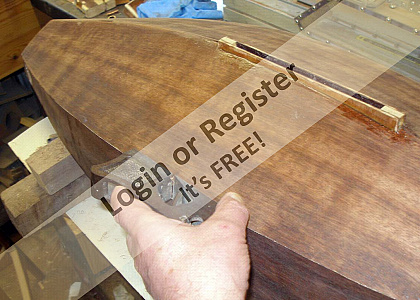
With the hull safely on the stand the first task was to add Gunnel strips to the top edge of the hull side panels to strengthen them and avoid damage during the remainder of the construction. A 20mm x 3mm strip was cut from the edge of a mahogany board. This strip was then split to give two gunnel strips, each 6mm x 3mm. These were glued to the hull side panels with waterproof PVA and clamped in place until the glue set. No joints were needed as each strip was long enough to fit as a single piece along either side.
A simple cutwater made from 3mm ply was added to the bottom of the hull and the shape flared in with two part wood filler.
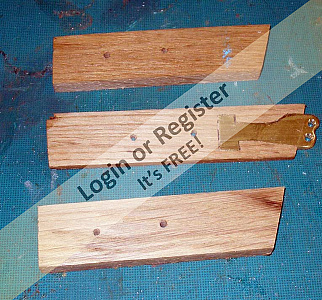
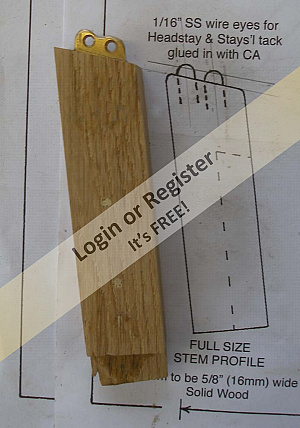
For the Stem itself, a 3mm piece of brass was cut and drilled to form the two eyes which will be needed to attach the Headstay and Jib stay. The brass was let into a piece of oak which was sandwiched between two more pieces. The whole assembly being glued and trenailed together using more cocktail sticks. Once set, it was cleaned up ready to be fitted to the hull. The location of the stem was marked on to the hull sides and that section of hull was carefully removed by sawing with a tenon saw (sorry no photo - I was concentrating too much on this and forgot !). With the hole made in the hull, the stem was tacked into position with superglue and then the joint reinforced on the inside with thickened epoxy resin.
Finally, two brass tubes were installed below the stem for later attachment of the bobstay fitting.
I hadn't been looking forward to cutting the hole in the hull for the stem, but it worked out OK in the end.
Time to take a break for Christmas. Whilst we won't be seeing family tomorrow, I don't think my wife will be too pleased if I disappear into the workshop for the day.🙄 Hopefully Santa will be bringing my winch servos so that is something to look forward to 😀.
Hope you all have a great day, stay safe
Graham93


With the hull safely on the stand the first task was to add Gunnel strips to the top edge of the hull side panels to strengthen them and avoid damage during the remainder of the construction. A 20mm x 3mm strip was cut from the edge of a mahogany board. This strip was then split to give two gunnel strips, each 6mm x 3mm. These were glued to the hull side panels with waterproof PVA and clamped in place until the glue set. No joints were needed as each strip was long enough to fit as a single piece along either side.
A simple cutwater made from 3mm ply was added to the bottom of the hull and the shape flared in with two part wood filler.
For the Stem itself, a 3mm piece of brass was cut and drilled to form the two eyes which will be needed to attach the Headstay and Jib stay. The brass was let into a piece of oak which was sandwiched between two more pieces. The whole assembly being glued and trenailed together using more cocktail sticks. Once set, it was cleaned up ready to be fitted to the hull. The location of the stem was marked on to the hull sides and that section of hull was carefully removed by sawing with a tenon saw (sorry no photo - I was concentrating too much on this and forgot !). With the hole made in the hull, the stem was tacked into position with superglue and then the joint reinforced on the inside with thickened epoxy resin.
Finally, two brass tubes were installed below the stem for later attachment of the bobstay fitting.
I hadn't been looking forward to cutting the hole in the hull for the stem, but it worked out OK in the end.
Time to take a break for Christmas. Whilst we won't be seeing family tomorrow, I don't think my wife will be too pleased if I disappear into the workshop for the day.🙄 Hopefully Santa will be bringing my winch servos so that is something to look forward to 😀.
Hope you all have a great day, stay safe
Graham93
▲
⟩⟩
Alain Pascal
stevedownunder
robbob
Ianh
jbkiwi
RNinMunich
philcaretaker
MouldBuilder
Martin555
Colin H
|
💬 Re: Stem
3 years ago by 🇬🇧 Graham93 (
Vice Admiral)✧ 242 Views · 2 Likes
Flag
JB,
I will need a few. I gave up counting when I got to 20😮 and that was just the single blocks. There are also several doubles needed. Still considering different ways of making them. Graham93 ▲
⟩⟩
Martin555
philcaretaker
|
|
Login To
Remove Ads 💬 Re: Stem
3 years ago by 🇳🇿 jbkiwi (
Fleet Admiral)✧ 243 Views · 4 Likes
Flag
Those will look nice once finished and varnished up Graham, guess you have to make a few. Just a suggestion, how about using a wad punch for the block outers, and cut them from thin ply and laminate them to the desired thickness. You could custom make a wad punch from thick wall brass tube squashed to shape and sharpened. That way they should be uniform and save a lot of 'blue air'😁. You could soak the ply first to soften it. pic- an example of some punches for leather available. (these were on the Wish website)
Think I've almost recovered from lunch yesterday, hope yours was good. JB 
▲
⟩⟩
stevedownunder
philcaretaker
Graham93
Martin555
|
|
💬 Re: Stem
3 years ago by 🇬🇧 Graham93 (
Vice Admiral)✧ 243 Views · 4 Likes
Flag
JB,
Thanks for the link, could come in useful. I plan to try and make most of the fittings from scratch if I can, but I'm not sure some of them will be possible with the equipment I have. I did have a play a couple of days ago at block making. Still some way to go with this before I'm happy with it. Sounds like you had a good Christmas lunch. Mine is in the oven. Hope your stomach recovers soon. 😴😴 Graham93 
▲
⟩⟩
stevedownunder
philcaretaker
Colin H
Martin555
|
|
💬 Re: Stem
3 years ago by 🇳🇿 jbkiwi (
Fleet Admiral)✧ 244 Views · 4 Likes
Flag
Like the custom chain plates Graham, nice touch!
These might be of interest? if they are the correct scale they might save some work. Have a great Xmas! JB 
▲
⟩⟩
stevedownunder
Colin H
Graham93
Martin555
|
|
💬 Re: Stem
3 years ago by 🇬🇧 philcaretaker (
Commodore)✧ 252 Views · 1 Like
Flag
Great progress Graham ! - Best wishes to you and your good lady ! 👍
▲
⟩⟩
Martin555
|
|
💬 Re: Stem
3 years ago by 🇬🇧 Martin555 (
Fleet Admiral)✧ 244 Views · 0 Likes
Flag
You don't hang about Graham.
Nice work. Have a Merry Christmas you deserve a bit of time off. Martin555. ▲
⟩⟩
No likes yet
This member will receive 1 point for every like received |
📝 Rudder
3 years ago by 🇬🇧 Graham93 ( Vice Admiral)
Vice Admiral)✧ 243 Views · 11 Likes · 4 Comments
Flag
💬 Add Comment
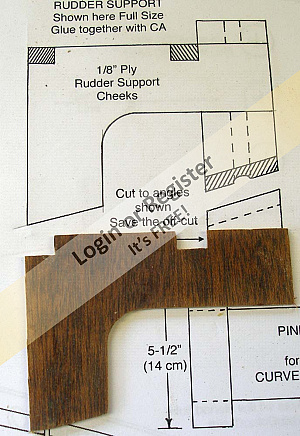
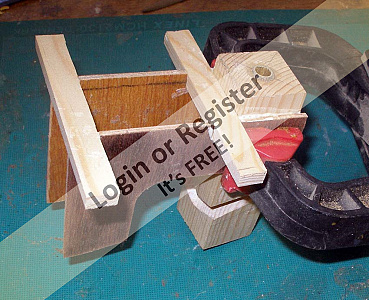
To support the rudder, a sub assembly comprising the rudder support block and servo mount was first assembled on the bench. According to the plans, the rudder shaft is supposed to run through a hole drilled through the support block - the assembly to be greased to protect the timber from water ingress. I decided instead to line the hole in the support block with a length of 6mm I/D brass tube. The bottom end of the support block was cut at an angle to match the hull shape.
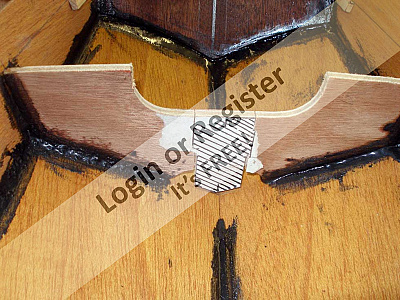
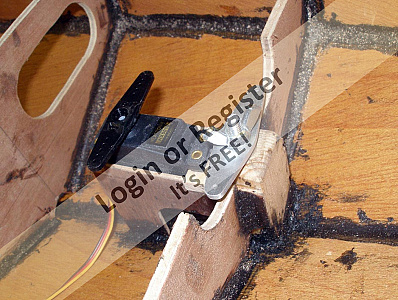
The center section of bulkhead 5 was cut away to make room for the sub assembly. This part of the bulkhead had not been reinforced with epoxy fillets, and the bulkhead was partly cut through before hull assembly to make removal of the center section easier. A hole was drilled through the bottom of the hull and the sub assembly was then glued into place. A length of threaded rod, together with the offcut from the bottom end of the support block were used to clamp the assembly into position while the glue set. A piece of polythene was used on the outside of the hull to prevent the offcut sticking to the hull.
Once set, the brass tube protruding through the hull was trimmed to length and a flanged brass collar added to give a flat bearing surface for an o-ring seal. A similar flanged collar was added to the top of the tube inside the hull. All the glued joints were reinforced with thickened epoxy resin.
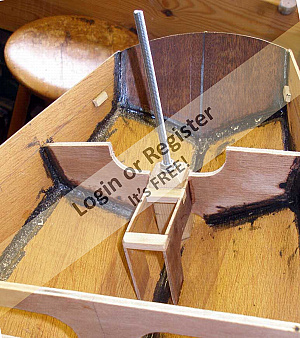
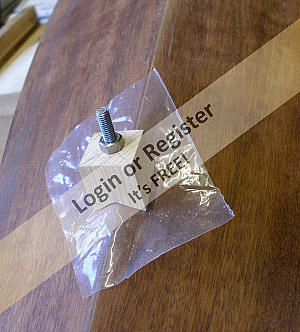
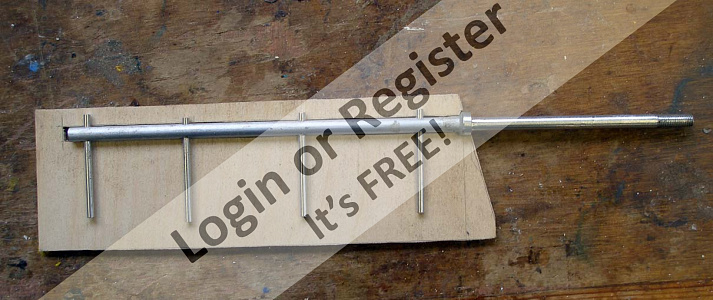
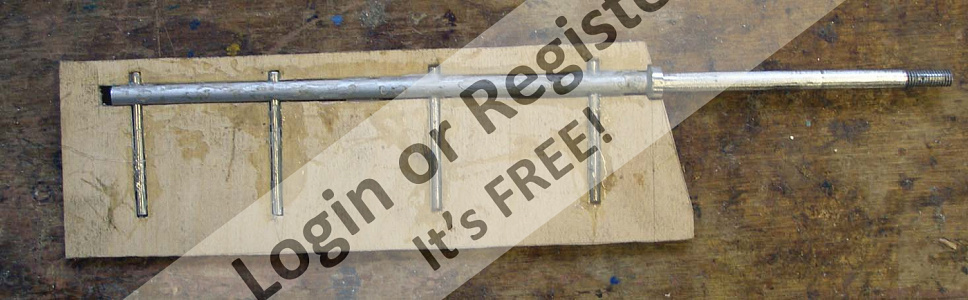
The rudder itself is constructed from a piece of 3mm ply and a 6mm aluminium shaft. The top end of the shaft was threaded for an M6 wingnut. 3mm aluminium cross pieces pass through holes drilled in the shaft. The profile of this assembly was traced onto the plywood and cut out so that the assembly could be glued in place. Both sides of the rudder were then filled with a two part wood filer and sanded to shape.
The completed rudder, together with an o-ring were trial fitted to the hull. Inside the hull, a second o-ring is fitted to the top of the rudder shaft followed by a tiller arm held in place with a wingnut. The threaded end of the rudder shaft has a flat filed on it, and the hole in the tiller arm was filed to a corresponding 'D' shape. Using a wingnut to hold the rudder in position makes it easy to remove for transport, if necessary.
Finally, the rudder servo was tried in position. The push/pull control rods are still to be made.


The center section of bulkhead 5 was cut away to make room for the sub assembly. This part of the bulkhead had not been reinforced with epoxy fillets, and the bulkhead was partly cut through before hull assembly to make removal of the center section easier. A hole was drilled through the bottom of the hull and the sub assembly was then glued into place. A length of threaded rod, together with the offcut from the bottom end of the support block were used to clamp the assembly into position while the glue set. A piece of polythene was used on the outside of the hull to prevent the offcut sticking to the hull.
Once set, the brass tube protruding through the hull was trimmed to length and a flanged brass collar added to give a flat bearing surface for an o-ring seal. A similar flanged collar was added to the top of the tube inside the hull. All the glued joints were reinforced with thickened epoxy resin.
The rudder itself is constructed from a piece of 3mm ply and a 6mm aluminium shaft. The top end of the shaft was threaded for an M6 wingnut. 3mm aluminium cross pieces pass through holes drilled in the shaft. The profile of this assembly was traced onto the plywood and cut out so that the assembly could be glued in place. Both sides of the rudder were then filled with a two part wood filer and sanded to shape.
The completed rudder, together with an o-ring were trial fitted to the hull. Inside the hull, a second o-ring is fitted to the top of the rudder shaft followed by a tiller arm held in place with a wingnut. The threaded end of the rudder shaft has a flat filed on it, and the hole in the tiller arm was filed to a corresponding 'D' shape. Using a wingnut to hold the rudder in position makes it easy to remove for transport, if necessary.
Finally, the rudder servo was tried in position. The push/pull control rods are still to be made.
▲
⟩⟩
Alain Pascal
stevedownunder
RNinMunich
Madwelshman
robbob
Martin555
MouldBuilder
jbkiwi
philcaretaker
Colin H
Ianh
|
💬 Re: Rudder
3 years ago by 🇬🇧 Graham93 (
Vice Admiral)✧ 240 Views · 3 Likes
Flag
JB,
With the latest announcement from the UK government I’m going to have plenty of time to work on this in January.☹️ Now in full lockdown (Tier 4). Shops, pubs, restaurants are closed. Only allowed to leave home for essential purposes. Fortunately, leaving home to go to my workshop in the garden is permitted 😉 Graham93 ▲
⟩⟩
Madwelshman
robbob
Martin555
|
|
Login To
Remove Ads 💬 Re: Rudder
3 years ago by 🇳🇿 jbkiwi (
Fleet Admiral)✧ 240 Views · 2 Likes
Flag
Don't worry Graham, at this rate you'll have it done by January 2021😂
JB ▲
⟩⟩
Martin555
Graham93
|
|
💬 Re: Rudder
3 years ago by 🇬🇧 Graham93 (
Vice Admiral)✧ 241 Views · 2 Likes
Flag
Thanks Martin,
Glad you are enjoying the blog. I’m certainly enjoying the build, although the more I do, the more I realise there is still to do. It feels a bit overwhelming at present. Graham93 ▲
⟩⟩
robbob
Martin555
|
|
💬 Re: Rudder
3 years ago by 🇬🇧 Martin555 (
Fleet Admiral)✧ 243 Views · 2 Likes
Flag
Hi Graham,
This blog gets more interesting every instalment. Your build is also school lessons for me. You never know with your tutelage i might be more knowledgable about sail boats by the time you have finished. Keep it coming. Martin555. ▲
⟩⟩
stevedownunder
Graham93
|
📝 Planking the Deck - Part 1
3 years ago by 🇬🇧 Graham93 ( Vice Admiral)
Vice Admiral)✧ 240 Views · 12 Likes · 12 Comments
Flag
💬 Add Comment
I decided to plank the deck for several reasons. The recycled ply I've used for the hull and deck is too dark to represent the typical deck found on Pilot Cutters. It is also too dark to be able to draw imitation planking on it. Finally, I like a challenge 😀
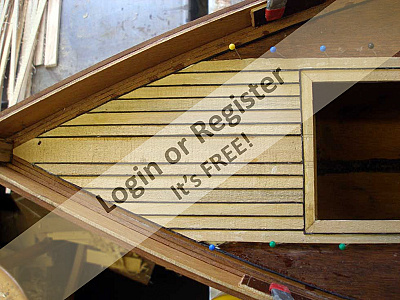
The first task was to add a contrasting border round the edge of the deck. I used mahogany for this. To follow the curve of the deck, I used three strips 3 x 2 mm glued side by side. This was easier than using a single wider strip which would have to have been fitted in multiple pieces each cut to a curve to follow the hull shape. At the stern, a wider strip of mahogany was cut to match the shape of the transom.
I am trying to build this boat using timber I have available in the workshop rather than buying any more. There is no point in storing it and not using it.🙄 For the deck planking I decided to use lime, and I just happened to have a large block of lime left over from the time, many years ago, when I took up wood carving as a hobby. This block is around 20" in length which, at the scale I'm working at, would give scale planks around 20 ft long which seems reasonable. With a heavy coarse blade fitted to the bandsaw, several boards were cut from the block. The bandsaw blade was then changed for a new fine cut blade and the planks were split down into strips measuring 7 x 2 mm.
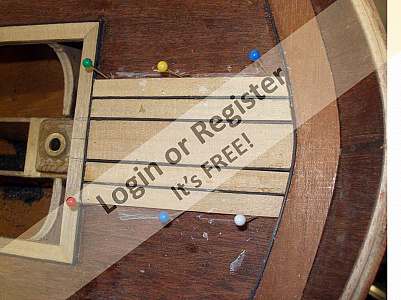
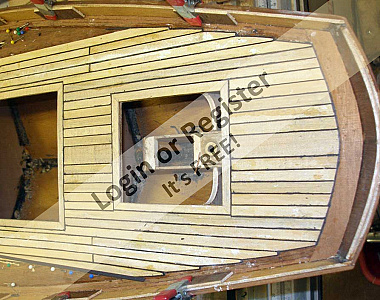
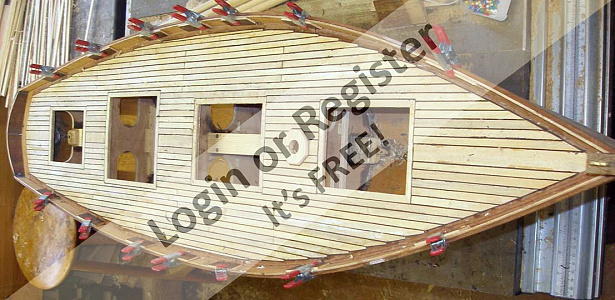
With the raw material prepared, and the deck clamped in position on the hull, a start was made on the planking by fitting planks to frame the openings in the deck. A 6mm piece of oak was shaped and glued in place to reinforce the hole in the deck for the mast. Next, strips of black card were glued to the edges of the planks to simulate caulking. Map pins holding the card in place while the glue sets. A wide plank was then fitted in pieces along the centerline of the deck to represent the king plank. The straightedge was used to ensure that the pieces were in line.
Finally a start was made on fitting the planks. Each plank is trimmed to length and glued in place with waterproof PVA. Once the glue has dried, a strip of black card is superglued to the exposed edge of the plank, and then the process is repeated. This is going to be a long, slow job.


The first task was to add a contrasting border round the edge of the deck. I used mahogany for this. To follow the curve of the deck, I used three strips 3 x 2 mm glued side by side. This was easier than using a single wider strip which would have to have been fitted in multiple pieces each cut to a curve to follow the hull shape. At the stern, a wider strip of mahogany was cut to match the shape of the transom.
I am trying to build this boat using timber I have available in the workshop rather than buying any more. There is no point in storing it and not using it.🙄 For the deck planking I decided to use lime, and I just happened to have a large block of lime left over from the time, many years ago, when I took up wood carving as a hobby. This block is around 20" in length which, at the scale I'm working at, would give scale planks around 20 ft long which seems reasonable. With a heavy coarse blade fitted to the bandsaw, several boards were cut from the block. The bandsaw blade was then changed for a new fine cut blade and the planks were split down into strips measuring 7 x 2 mm.
With the raw material prepared, and the deck clamped in position on the hull, a start was made on the planking by fitting planks to frame the openings in the deck. A 6mm piece of oak was shaped and glued in place to reinforce the hole in the deck for the mast. Next, strips of black card were glued to the edges of the planks to simulate caulking. Map pins holding the card in place while the glue sets. A wide plank was then fitted in pieces along the centerline of the deck to represent the king plank. The straightedge was used to ensure that the pieces were in line.
Finally a start was made on fitting the planks. Each plank is trimmed to length and glued in place with waterproof PVA. Once the glue has dried, a strip of black card is superglued to the exposed edge of the plank, and then the process is repeated. This is going to be a long, slow job.
▲
⟩⟩
Alain Pascal
stevedownunder
RNinMunich
Scamp
Peejay
Colin H
jbkiwi
philcaretaker
Madwelshman
robbob
Martin555
Ianh
|
💬 Re: Planking the Deck - Part 1
3 years ago by 🇬🇧 Graham93 (
Vice Admiral)✧ 235 Views · 3 Likes
Flag
Hi JB,
Three days on and I’m still adding planks🙄 At least now I can see some progress. 👍 still more to do.👎 Graham93 ▲
⟩⟩
sirscapa
jbkiwi
Martin555
|
|
Login To
Remove Ads 💬 Re: Planking the Deck - Part 1
3 years ago by 🇳🇿 jbkiwi (
Fleet Admiral)✧ 235 Views · 1 Like
Flag
Sounds familiar Graham, days of work with not much to show for it😁
JB ▲
⟩⟩
Martin555
|
|
💬 Re: Planking the Deck - Part 1
3 years ago by 🇬🇧 mturpin013 (
Admiral)✧ 237 Views · 3 Likes
Flag
Hi Graham I like the thought of using what is available rather than buying new all the time, you always seem to buy more than you need ending up with an excess of materials. I've just finished a few weeks ago the planking of the police boat but have not written it up yet.
My next post will detail the process I use. ▲
⟩⟩
Graham93
Peejay
Martin555
|
|
💬 Re: Planking the Deck - Part 1
3 years ago by 🇬🇧 Graham93 (
Vice Admiral)✧ 239 Views · 4 Likes
Flag
Hi JB,
I’m not ‘speed building’, I’m adding pieces slowly, but just spending a ridiculous number of hours doing it. 🤣😂 That gives the impression of a rapid build. Yesterday I spent 5 hours in the workshop planking, and I couldn’t see much difference at the end of the day. I’ll be glad when the planking is finished and I can get on with some of the more interesting stuff. Graham93 ▲
⟩⟩
Peejay
jbkiwi
Colin H
Martin555
|
|
💬 Re: Planking the Deck - Part 1
3 years ago by 🇳🇿 jbkiwi (
Fleet Admiral)✧ 239 Views · 2 Likes
Flag
Going to look very nice when finished Graham👍. Is speed building the latest thing in modelling?😁
JB ▲
⟩⟩
Martin555
Graham93
|
|
💬 Re: Planking the Deck - Part 1
3 years ago by 🇬🇧 Martin555 (
Fleet Admiral)✧ 240 Views · 3 Likes
Flag
Well Graham being a Captain definitely won't improve your model making skills LOL!!
There is not a rank high enough to match your skill level. Martin555. ▲
⟩⟩
Peejay
Colin H
Graham93
|
|
💬 Re: Planking the Deck - Part 1
3 years ago by 🇬🇧 Graham93 (
Vice Admiral)✧ 239 Views · 3 Likes
Flag
Hi Ian,
Planking isn’t difficult. It’s just very time consuming and repetitive. The key is to try and fit every plank as well, or better than the first. Don’t let errors creep in as you get more and more bored with doing the same task over and over 😂. Using strip wood available from the model boat suppliers makes it easier and quicker, if a bit more expensive. Graham93 ▲
⟩⟩
Peejay
Colin H
Martin555
|
|
💬 Re: Planking the Deck - Part 1
3 years ago by 🇬🇧 Graham93 (
Vice Admiral)✧ 239 Views · 3 Likes
Flag
Thanks Martin,
Not sure what difference being a Captain makes. I guess I’lol just keep plodding on 😆 Graham93 ▲
⟩⟩
RNinMunich
Colin H
Martin555
|
|
💬 Re: Planking the Deck - Part 1
3 years ago by 🇬🇧 Graham93 (
Vice Admiral)✧ 239 Views · 3 Likes
Flag
Hi Rob,
Glad you are enjoying the build. I learnt the planking technique from your Crash Tender blog. 👍 Fortunately (?) this deck is so large that by the time I’ve finished adding a set of planks from one end to the other, the glue has almost dried where I started and I can start the next set. 🙄 Graham93 ▲
⟩⟩
Peejay
Colin H
Martin555
|
|
💬 Re: Planking the Deck - Part 1
3 years ago by 🇿🇦 Ianh (
Commander)✧ 244 Views · 2 Likes
Flag
Hi Graham,
I like your post on planking as I have possibly three models to plank ( 2 are refurbishments). Very helpful and gives me a bit of insight into this black art😊😊 ▲
⟩⟩
Colin H
Martin555
|
|
💬 Re: Planking the Deck - Part 1
3 years ago by 🇬🇧 robbob (
Admiral)✧ 241 Views · 4 Likes
Flag
Hi Graham.
I'm really enjoying reading your build blog it's well written and photographed 👍👍 I've found the process of planking laborious but very satisfying when it's all sanded back and lacquered. As you say, the worst part is waiting for the glue to set ! Be positive ....perhaps a good thing that you've got a little more time to spend on it 😉 Rob. ▲
⟩⟩
hmsnostalgia
Colin H
Martin555
Graham93
|
|
💬 Re: Planking the Deck - Part 1
3 years ago by 🇬🇧 Martin555 (
Fleet Admiral)✧ 241 Views · 3 Likes
Flag
Congratulations Captain Graham93 On your well deserved promotion.
As for the deck planking it may take a bit of time but i think it will look fantastic when it is completed. Martin555. ▲
⟩⟩
Peejay
Colin H
Graham93
|
📝 Planking the Deck - Part 2
3 years ago by 🇬🇧 Graham93 ( Vice Admiral)
Vice Admiral)✧ 232 Views · 17 Likes · 16 Comments
Flag
💬 Add Comment
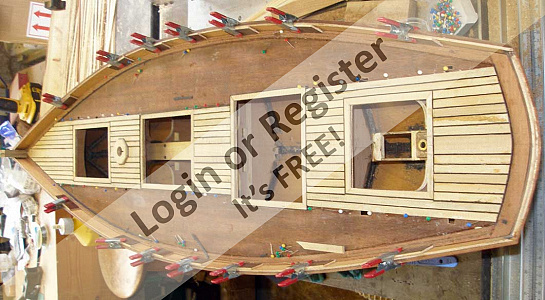
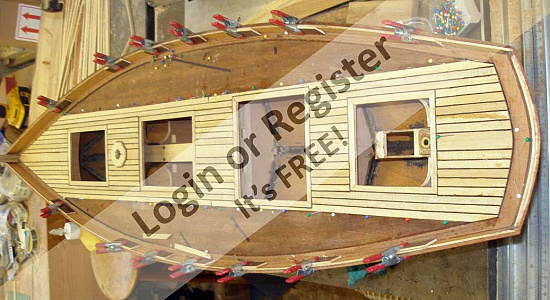
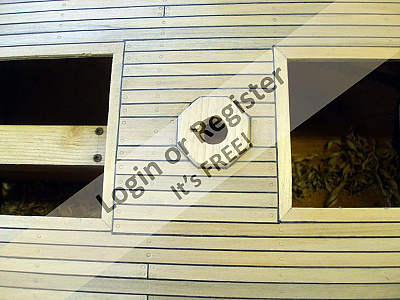
Planking continued working outwards by adding planks either side of the king plank. Initially short lengths of plank were fitted between the hatches. Some careful cutting and shaping was needed to fit around the hatch trims as the hatches turned out not to be exactly central on the deck. This probably reflects the situation on full sized Cutters as planking like this shows up every little discrepancy. (at least, that's how I convinced myself that it looks OK 😉)
Once the planks around the hatches were complete, I could move on to fitting longer lengths which speeded up the process somewhat. Where the ends of these longer planks reach the mahogany edging strip, the edge strip was cut to form a 'joggle' for the plank to fit into.
I had to butt joint the planks for the full length strips. Reading an article on-line about deck planking, the day after I had completed laying the deck, I discovered that I should have staggered the butt joints more than I have, ensuring that each joint is over a different bulkhead. Too late now! ☹️, but at least I know for next time (will there be a next time I wonder 😊)
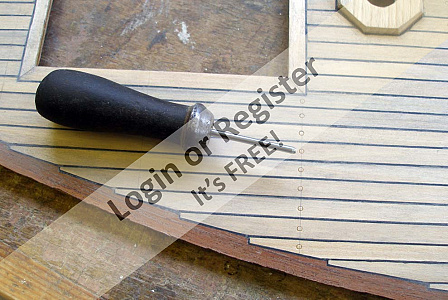
Once the planking was all in place, my trusty block plane was used to flatten the surface followed by sanding with progressively finer paper from 80 grit down to 240 grit.
Looking at photos of full sized Cutters, the deck planks are screwed or bolted down, with a matching wooden plug covering the bolt head. To simulate the appearance of this, I made an embossing tool to mark the planks to imitate the wooden plugs. This tool is simply a length of steel rod hollowed by drilling with a center drill. The outside of the rod was then tapered on the lathe to form a cutting edge. The (imaginary) bulkhead positions were marked on the deck with a pencil line and then the tool gently pressed in to form a ring in each plank.


Once the planks around the hatches were complete, I could move on to fitting longer lengths which speeded up the process somewhat. Where the ends of these longer planks reach the mahogany edging strip, the edge strip was cut to form a 'joggle' for the plank to fit into.
I had to butt joint the planks for the full length strips. Reading an article on-line about deck planking, the day after I had completed laying the deck, I discovered that I should have staggered the butt joints more than I have, ensuring that each joint is over a different bulkhead. Too late now! ☹️, but at least I know for next time (will there be a next time I wonder 😊)
Once the planking was all in place, my trusty block plane was used to flatten the surface followed by sanding with progressively finer paper from 80 grit down to 240 grit.
Looking at photos of full sized Cutters, the deck planks are screwed or bolted down, with a matching wooden plug covering the bolt head. To simulate the appearance of this, I made an embossing tool to mark the planks to imitate the wooden plugs. This tool is simply a length of steel rod hollowed by drilling with a center drill. The outside of the rod was then tapered on the lathe to form a cutting edge. The (imaginary) bulkhead positions were marked on the deck with a pencil line and then the tool gently pressed in to form a ring in each plank.
▲
⟩⟩
Alain Pascal
Lynx53
sirscapa
hmsnostalgia
Ronald
philcaretaker
stevedownunder
mturpin013
Martin555
jbkiwi
Nerys
Ianh
jacko
RNinMunich
Colin H
robbob
Black Shoe
|
💬 Re: Planking the Deck - Part 2
3 years ago by 🇬🇧 Graham93 (
Vice Admiral)✧ 214 Views · 1 Like
Flag
Michael,
I didn’t take it as a criticism 👍. The planking finish was a bit rough when I laid them and it took a lot of cleaning up as not all the planks were precisely the same thickness. I did think about it after the fact and thought if ever I do another one, I would do it differently next time. The planks need at least to be thicknessed before being laid. Graham93 ▲
⟩⟩
Martin555
|
|
Login To
Remove Ads 💬 Re: Planking the Deck - Part 2
3 years ago by 🇬🇧 mturpin013 (
Admiral)✧ 216 Views · 1 Like
Flag
Graham it wasn't a criticism (a bit rough) just an observation of all planking when its first laid down
▲
⟩⟩
Martin555
|
|
💬 Re: Planking the Deck - Part 2
3 years ago by 🇬🇧 hammer (
 Lieutenant) Lieutenant)✧ 228 Views · 3 Likes
Flag
The mast is self supporting, a brass pin fits in a wooden block above the keel. The deck is the other support. The ballast lead chips mixed in cement, and a large block of iron placed after transport. Tangles can be a problem. But when I pack up I roll the stay sails round stays holding with masking tape. I also remove top gaff sail if it has been used not that often. More likely just the one stay sail & the main reffed. Rolled around the boom. As full size. I normally blacken all the brass but on this one wanted a bit of bling. 😂
▲
⟩⟩
RNinMunich
Martin555
Graham93
|
|
💬 Re: Planking the Deck - Part 2
3 years ago by 🇬🇧 hammer (
Lieutenant)✧ 228 Views · 1 Like
Flag
The mast is self supporting, a brass pin fits in a wooden block above the keel. The deck is the other support. The ballast lead chips mixed in cement, and a large block of iron placed after transport.
▲
⟩⟩
Martin555
|
|
💬 Re: Planking the Deck - Part 2
3 years ago by 🇬🇧 Graham93 (
Vice Admiral)✧ 229 Views · 1 Like
Flag
Thanks Hammer,
That’s much closer to what I have in mind. I like the idea of fitting chainplates and dead eyes. Hadn’t thought about using elastic cord for the lanyards. Does it provide enough tension in the stays to support the mast? Very nice looking model 👍 Graham93 ▲
⟩⟩
Martin555
|
|
💬 Re: Planking the Deck - Part 2
3 years ago by 🇬🇧 hammer (
Lieutenant)✧ 228 Views · 4 Likes
Flag
I copied full size practice, but use elastic for the land-yards. To pack for transportation unscrew deck, drop the top mast, pull in bowsprit. This gives enough movement to lift the mast from the block, in the bottom of the boat. The mast is then laid forward and pulled back, so it doesn’t protrude beyond the hull. Not as neat as you model, but it is 10years old. PS I never marked the plank fixings on this model I must do that sometime.

▲
⟩⟩
hmsnostalgia
Graham93
Martin555
jbkiwi
|
|
💬 Re: Planking the Deck - Part 2
3 years ago by 🇳🇿 jbkiwi (
Fleet Admiral)✧ 227 Views · 2 Likes
Flag
Hi Graham, re the hooks, good idea not to use them, as I have them on the Optimist and they are a pain in the butt! They get hooked on everything when you are trying to rig the boat and cause stays etc to tangle. Almost impossible to keep everything separated, hence me leaving it rigged permanently.
If you could incorporate small jamming cleats on tensioners in your stay system it might make things easier to set up. You could make them from hardwood or brown formica (industrial linen/formica is a nice brown colour) it's like a fibre reinforced formica,- also used in full sized boat pulley blocks, - very tough, - machines well. A pic of the thought. JB 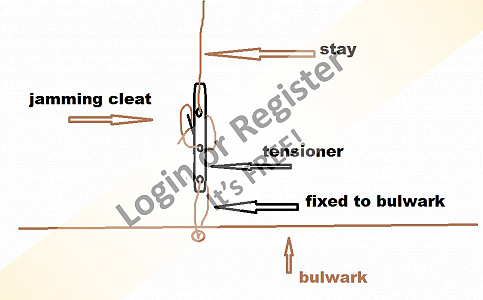
▲
⟩⟩
Graham93
Martin555
|
|
💬 Re: Planking the Deck - Part 2
3 years ago by 🇬🇧 robbob (
Admiral)✧ 227 Views · 3 Likes
Flag
Hi Graham
Excellent work 👍👍 I like the way you have joggled the planks into the perimeter planks, very authentic detailing. Also the way you have made up a special tool to 'emboss' the wood plug on the plank fixings...very very effective 😀 As for the planks not being absolutely symmetrical about the hatches...nothing to worry about !! As often said to me in similar circumstances.... " A blind man would love to see that".....😉 Rob. ▲
⟩⟩
hmsnostalgia
jbkiwi
Martin555
|
|
💬 Re: Planking the Deck - Part 2
3 years ago by 🇬🇧 Graham93 (
Vice Admiral)✧ 228 Views · 4 Likes
Flag
Hi JB,
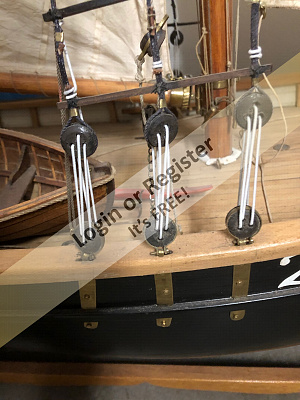
Thanks for the rigging suggestions, a few things for me to think about there. The plan calls for wire clips on the end of the stays. These are referred to as 'Pelican hooks'. These clip through holes in the bulwark. I'm not planning to do it this way as I would rather use something that looks a bit more true to scale. Graham93 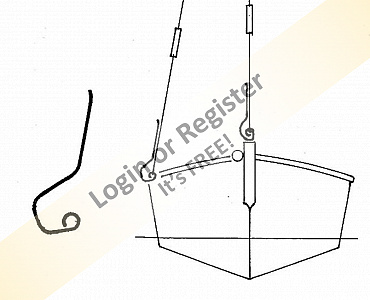
▲
⟩⟩
jbkiwi
hammer
Colin H
Martin555
|
|
💬 Re: Planking the Deck - Part 2
3 years ago by 🇳🇿 jbkiwi (
Fleet Admiral)✧ 228 Views · 3 Likes
Flag
Hi Graham, re rigging,- a few thoughts,- you could make your boom and gaff so they can swing upwards, and make quick release clips at the heads of your foresails. If you used tensioners (small 3 hole tent guy type) on your stays, you can slacken them off without removing anything, slacken and unclip the tops of the foresails, lay them back on the deck, -fold up the boom and gaff and tie them, then lift the mast out (given enough slack) and lay that on a crutch on the deck.
I did a similar thing on my 18ft A class cat, (25ft mast) using a double 2 sheave pulley system on the side stays, with a jamming cleat on the top pulley, so I could leave them attached to aid with stepping the mast (slackening them just enough to flip the mast round to the step). I've done the same sort of thing with the day-sailer and it works well Looked at your plan, but a bit hard to see everything. Guess it will be another challenge to sort out, (it'll keep you busy for a bit longer😁) Pic might give you an idea for something similar. I've used the stay tensioners on a model cat years ago and it made rigging it really quick and easy( just had the tensioners through hooks which attached to eyes in the deck. JB 
▲
⟩⟩
Colin H
Graham93
Martin555
|
|
💬 Re: Planking the Deck - Part 2
3 years ago by 🇬🇧 Graham93 (
Vice Admiral)✧ 229 Views · 4 Likes
Flag
Thanks everyone for the 'Likes' and the comments. It really is appreciated.
Martin: I'm enjoying the build, but not the temperature in the workshop first thing in the day. ☹️ It takes around 2 hours to become bearable once I have lit the stove 🔥 Nerys: Thanks for the reassurance on the butt offset on the planking. It's good to know some boats have it the way I have done. It won't be so obvious once all the rest of the deck fittings are in place. JB: thanks. I have a Wee Nip which I sailed whenever I could last year, but this beast is going to be a whole lot different. Because of it's size, I won't be able to transport it fully rigged so I'm trying to work out how to rig it quickly at the pond side. Michael: The initial planking looked very rough as the planks were just sawn, not planed, but it has cleaned up nicely. Stephen: "Anyone who never made a mistake, never made anything" I keep reminding myself of that 😆 Graham93 ▲
⟩⟩
philcaretaker
robbob
jbkiwi
Martin555
|
|
Login To
Remove Ads 💬 Re: Planking the Deck - Part 2
3 years ago by 🇦🇺 stevedownunder (
 Captain) Captain)✧ 229 Views · 2 Likes
Flag
Hi Graham,
Lovely work, your deck looks fantastic, I agree with Martin no one would have noticed the problem if you hadn't pointed it out. I am glad that I am not the only person who finds out what I have just done is not quite right. Life is full of little lessons... Cheers, Stephen. ▲
⟩⟩
Martin555
jbkiwi
|
|
💬 Re: Planking the Deck - Part 2
3 years ago by 🇬🇧 mturpin013 (
Admiral)✧ 230 Views · 2 Likes
Flag
Nice work Graham, planking is my favourite part of a build, its so satisfying seeing the initial laid planks looking "a bit rough" then the transformation when its sanded and lacquered
▲
⟩⟩
Martin555
stevedownunder
|
|
💬 Re: Planking the Deck - Part 2
3 years ago by 🇳🇿 jbkiwi (
Fleet Admiral)✧ 230 Views · 3 Likes
Flag
Would have expected nothing less Graham, beautifully done. Like the way you've done the nibbed ends on the margin plank, very smart! Love the contrasting woods, and also the clever 'fastening plug tool', looks very neat . This is going to look terrific, and I'm sure if you get the sailing bug (not the chinflu bug😀) there will be a next time😁.
JB ▲
⟩⟩
stevedownunder
RNinMunich
Martin555
|
|
💬 Re: Planking the Deck - Part 2
3 years ago by 🇬🇧 Nerys (
Fleet Admiral)✧ 231 Views · 3 Likes
Flag
Hi Graham,
What an excellent job you are making of the cutter. That's as good a laid deck as I've seen in a long time. Don't worry about having butts in alternate runs of planking, I have often seen decks laid like that on full size Thames Barges. I look forward to the rest of your build and certainly of the proof of the pudding when we see her sailing. Cheers, Nerys ▲
⟩⟩
stevedownunder
RNinMunich
Martin555
|
|
💬 Re: Planking the Deck - Part 2
3 years ago by 🇬🇧 Martin555 (
Fleet Admiral)✧ 231 Views · 2 Likes
Flag
Hi Graham,
The decking looks absolutely fantastic. As for the hatches not being central, i think if you had not mentioned it i doubt that anyone would of noticed. Excellent workmanship yet again. I am enjoying this build log, keep it coming. Martin555. ▲
⟩⟩
stevedownunder
Graham93
|


Login To
Remove Ads
Remove Ads