Join Us On Social Media!

|

|

|
Download The App!
Login To
Remove Ads
Remove Ads
Login To
Remove Ads
Remove Ads
Model Boats Website
Phantom Tug
8 Posts · 8 Followers · 64 Photos · 70 Likes
Began 3 years ago by
 United States
Follow This Thread
Not currently following
> Click to follow
> Click to follow
Latest Post 3 years ago by
| Oldest posts shown first (Show Newest First) | (Print Booklet) |
📝 Phantom Tug
3 years ago by 🇺🇸 Black Shoe ( Sub-Lieutenant)
Sub-Lieutenant)✧ 108 Views · 11 Likes · 8 Comments
Flag
💬 Add Comment
There isn't a formal name for this tug yet. There are a couple of names floating around, but I'm waiting for the personality to develop a little more before I commit.
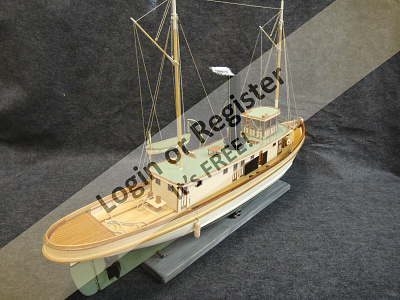
This build will hopefully represent a turn of the century harbor steam tug. She would have been employed shuttling barges around a local area and would usually tow her charge on the hip. It's totally scratch built and not representative of any particular boat, but of a class.
I gleaned photos of the grand old tugs and made notes of the details I wanted to incorporate and although an item here and there may be unlikely, that's the beauty of a phantom build...almost anything (within real possibility,) goes.
This build is 1:18 scale and represents a boat about 86 feet. Reverse stem, tumblehome counter, timber (barge) fenders, and a few extra's here and there. She's 55" long, 48-50 pounds ballasted, electric 2:1 reduction belt drive, to a 4 1/2" four blade wheel.
At this point the build is underway, so the first several "chapters" will bring the build up to date.
I'm a really slow builder. I often take two steps forward and one step back, but I do enjoy the journey.......
▲
⟩⟩
MouldBuilder
stevedownunder
RNinMunich
mturpin013
Skydive130
Ronald
jbkiwi
Martin555
Seanympth
Peejay
Ianh
|
💬 Re: Phantom Tug
3 years ago by 🇨🇦 Ronald (
 Admiral) Admiral)✧ 103 Views · 1 Like
Flag
Oh my, Mr. Krinkle, icy you 🤡
▲
⟩⟩
Martin555
|
|
Login To
Remove Ads 💬 Re: Phantom Tug
3 years ago by 🇺🇸 Black Shoe (
Sub-Lieutenant)✧ 100 Views · 1 Like
Flag
I don't think so, all the water around here is hard now. You probably heard a thud and some unkind words about the ice.😀
▲
⟩⟩
Martin555
|
|
💬 Re: Phantom Tug
3 years ago by 🇨🇦 Ronald (
Admiral)✧ 103 Views · 1 Like
Flag
Did I hear a SPLASH 💦
▲
⟩⟩
Martin555
|
|
💬 Re: Phantom Tug
3 years ago by 🇺🇸 Black Shoe (
Sub-Lieutenant)✧ 101 Views · 1 Like
Flag
Hi Ron, I'm mulling over a couple of ideas on how to do that. There are a few versions of launching methods that I've studied, and I'm trying to consolidate a vertical wall launch as well as a sloping sandy beach method into one device. I've come up with a couple of possibilities, but haven't proven either of them.
Will keep you posted. ▲
⟩⟩
Martin555
|
|
💬 Re: Phantom Tug
3 years ago by 🇨🇦 Ronald (
Admiral)✧ 104 Views · 4 Likes
Flag
I suggest you also make a launching cart that you can wheel into the pond. Much safer when dealing with that amount of ballast.
▲
⟩⟩
stevedownunder
Martin555
RNinMunich
Black Shoe
|
|
💬 Re: Phantom Tug
3 years ago by 🇺🇸 Black Shoe (
Sub-Lieutenant)✧ 102 Views · 2 Likes
Flag
You are right about that! My biggest fear is getting over center and following the boat into the pond.
My system has become launch then ballast, and hauling out take out the ballast then the hull. I use divers weight bags that are sewn into "bean bags". Red are five pounds, blue are three pounds, and yellow are one pound. They're compact, and won't shift in the bilge. There's no way I could do it any other way without damaging myself or worse, the boat! 😊 ▲
⟩⟩
RNinMunich
Martin555
|
|
💬 Re: Phantom Tug
3 years ago by 🇨🇦 Newby7 (
 Fleet Admiral) Fleet Admiral)✧ 106 Views · 2 Likes
Flag
Looks good so far.At 55" and 50 LB keep eating your Wheaties as you need to keep strength up for water testing.
Rick ▲
⟩⟩
Black Shoe
Martin555
|
|
💬 Re: Phantom Tug
3 years ago by 🇬🇧 Martin555 (
Fleet Admiral)✧ 105 Views · 1 Like
Flag
Hi Black Shoe,
Looking good so far. Keep it up. I will be following with great interest. Martin555. ▲
⟩⟩
Black Shoe
|
Login To
Remove Ads
Remove Ads
📝 Phantom Tug
3 years ago by 🇺🇸 Black Shoe ( Sub-Lieutenant)
Sub-Lieutenant)✧ 102 Views · 6 Likes · 3 Comments
Flag
💬 Add Comment
Chapter Two
I should submit a caveat before I get too deep into this. I know terminologies are a little different in some places, so I'll share an anecdote:
Back in the '70's my ship tied up in Chatham Yard and a kind local Coast Guardsman invited several of us to his home for some Watkins and a wonderful picnic. I met a young lady there and she offered to play tour guide if I'd like to travel to London for a day. We agreed to a date and she suggested I "knock her up" around 7 AM on the agreed day so we could get an early start. Well, I was caught in stays until someone told me she only meant to pick her up at 7. That phrase over here has an entirely different meaning!
I only bring this up in case I innocently use a phrase that may offend someone in another region. Let me know what I said and I'll add it to my DNU (Do Not Use) glossary.😊
I'm sure some brand names are different as well, but given the context I'm certain the intention will be known.
Photos:
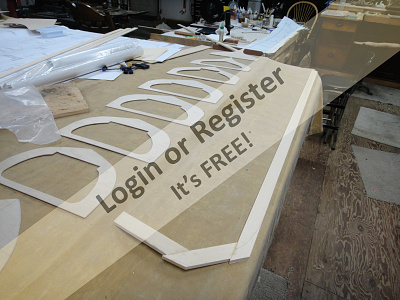
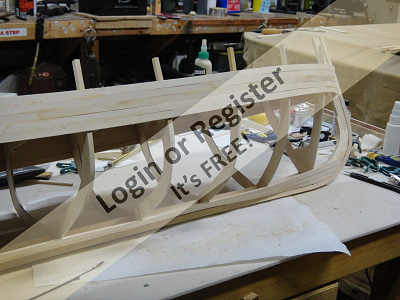
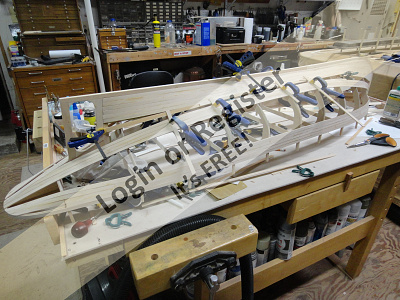
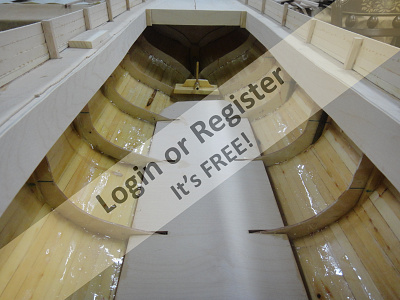
1. The planking in progress. Bass wood on birch ply frames. There could (should?) have been more frames, but I relied on the natural lay of the boards to come true without forcing them unnaturally.
2. More of the planking. Knowing I was going to 'glass this hull I didn't bother with proper plank hood ends and just cut them fair with their neighbor. All of this was using Titebond III. This is my "go to" for all heavy duty bare wood gluing.
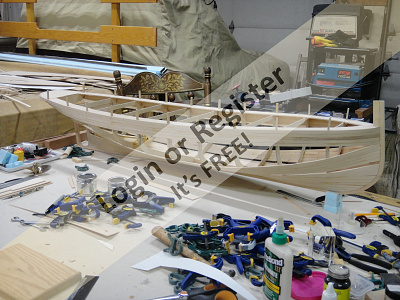
3. Getting ready to sand, fill, sand, fill, repeat......
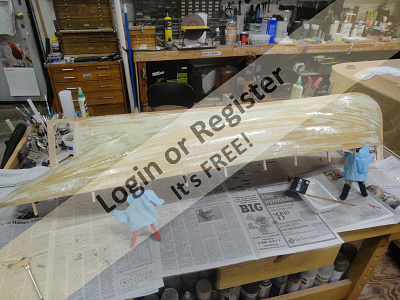
4. Fitting and cutting the 'glass cloth so there's a minimum of panic when it's time to wet out the fabric.
5. Cloth wetted out with West System epoxy. It's a personal choice to use West as the resin normally used for this bothers me even with adequate ventilation. The West is a little more expensive, but I used it in my 1:1 boat shop and am far more accustomed to it's properties. One point of note: West epoxy will stick to polyester resin, but the resin will not give a good bond to West.
6. Waiting for the cure......


I should submit a caveat before I get too deep into this. I know terminologies are a little different in some places, so I'll share an anecdote:
Back in the '70's my ship tied up in Chatham Yard and a kind local Coast Guardsman invited several of us to his home for some Watkins and a wonderful picnic. I met a young lady there and she offered to play tour guide if I'd like to travel to London for a day. We agreed to a date and she suggested I "knock her up" around 7 AM on the agreed day so we could get an early start. Well, I was caught in stays until someone told me she only meant to pick her up at 7. That phrase over here has an entirely different meaning!
I only bring this up in case I innocently use a phrase that may offend someone in another region. Let me know what I said and I'll add it to my DNU (Do Not Use) glossary.😊
I'm sure some brand names are different as well, but given the context I'm certain the intention will be known.
Photos:
1. The planking in progress. Bass wood on birch ply frames. There could (should?) have been more frames, but I relied on the natural lay of the boards to come true without forcing them unnaturally.
2. More of the planking. Knowing I was going to 'glass this hull I didn't bother with proper plank hood ends and just cut them fair with their neighbor. All of this was using Titebond III. This is my "go to" for all heavy duty bare wood gluing.
3. Getting ready to sand, fill, sand, fill, repeat......
4. Fitting and cutting the 'glass cloth so there's a minimum of panic when it's time to wet out the fabric.
5. Cloth wetted out with West System epoxy. It's a personal choice to use West as the resin normally used for this bothers me even with adequate ventilation. The West is a little more expensive, but I used it in my 1:1 boat shop and am far more accustomed to it's properties. One point of note: West epoxy will stick to polyester resin, but the resin will not give a good bond to West.
6. Waiting for the cure......
▲
⟩⟩
MouldBuilder
stevedownunder
jacko
RNinMunich
Martin555
mturpin013
|
💬 Re: Phantom Tug
3 years ago by 🇺🇸 Black Shoe (
Sub-Lieutenant)✧ 100 Views · 2 Likes
Flag
No Ron, I'm not that quick! I'm only a half-fast builder!
These next several hundred "chapters" will be catch ups. Just kidding, it won't be that many....😊 The boat is a long way from finished where the detailing and weathering is concerned, but has actually done sea trials and found to be very stable with smooth operation. One does have to anticipate where and how fast she's going because with the weight and size it won't stop on a dime, but I wouldn't want it any other way...a scale boat should act scale... I've done a few unorthodox things with the "machinery" which I'll describe as we get deeper into this saga. ▲
⟩⟩
Ronald
Martin555
|
|
Login To
Remove Ads 💬 Re: Phantom Tug
3 years ago by 🇨🇦 Ronald (
Admiral)✧ 103 Views · 1 Like
Flag
Wow!Quick build...or, maybe you are just catching us up with the build.
▲
⟩⟩
Martin555
|
|
💬 Re: Phantom Tug
3 years ago by 🇬🇧 Martin555 (
Fleet Admiral)✧ 101 Views · 0 Likes
Flag
Hi Black Shoe.
The hull is looking really good. Well done. Martin555. ▲
⟩⟩
No likes yet
This member will receive 1 point for every like received |
📝 Phantom Tug
3 years ago by 🇺🇸 Black Shoe ( Sub-Lieutenant)
Sub-Lieutenant)✧ 90 Views · 9 Likes · 4 Comments
Flag
💬 Add Comment
Three
Moving along on the catch up, the hull is 'glassed, sanded, and ready for some paint, plus have to figure out the rudder and how to activate it.
The first coats of paint are rattle-can automotive primer from the parts store. My thoughts are it makes a good barrier between the epoxy/'glass surface and gives a good foundation for the acrylic paints I like to use. I use rattle cans, good brushes designed for water colors and the foam brushes with the wooden handles. I get all of my paints in "big box stores" (over here it's Lowe's, Home Depot, and Sherwin Williams.) The acrylics are water based, easy clean up, low/no obnoxious odors house paints. They are tough enough for my purposes, easy touch up, and any color under the sun can be mixed up in an 8 oz. sample for less than $5 US. I've turned to using it exclusively and have no regrets. You can get the color gloss, matte, or flat, which for general purposes is usually matte or occasionally flat.
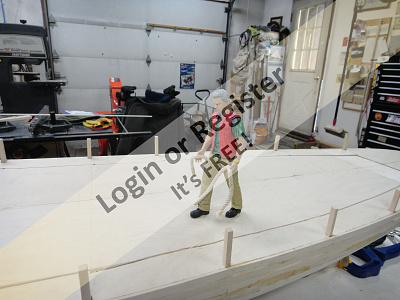
I mentioned earlier that this was 1:18 scale which is 5/8" to a foot. I find it easier sometimes to create a "ruler" for a build and use a figure for the ergonomics. Not to be exact to the fraction of an inch, but to at least be close to what the size of an item would actually be.
The ruler and a chart helps in this regard. I mark off a stick (in this case a piece of styrene plastic,) in segments of 5/8" with the first "foot" graduated in scale 3" sections.
The chart is drawn with the measurements written out to a one foot length. 5/8" = .0652 divided by 12 (inches) = .052 per inch. thus 1/2 scale inches is .026, 1" = .052, 2" = .0104, 3" = .156 and so on up to .6250 (the scale 1 foot). An inexpensive digital caliper ($14-16 US that reads in thousanths and mm) is used to check the size of the item in question. I certainly don't build to the fraction of an inch, but this does allow me to prevent putting a 4" diameter scale hand rail where a 1 1/2" should be.
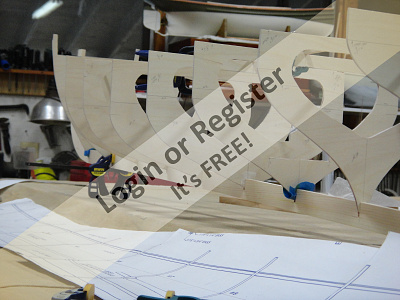
The photos:
1. The scale ruler made specifically for this 1:18 (5/8" per foot ) build.
2. The chart allowing real dimensions for items under a scale foot.
3. The quickest, easiest tool to determine the size of an item. Checking the reading on this, then consulting the chart tells me what the item's scale size is in scale inches.
4. This guy is 1:12 (six inches.) During the hull build I didn't know if I wanted a smaller tug at a bigger scale, or a bigger tug at a smaller scale. Placing these figures helps me visualize much easier.
5. Same guy, different angle.
6,7,8,9. The progression of the rudder. The rudder planks were bored to accept the rods which accomplished two things; they prevented the rudder planks from warping too bad, and if the planks soaked up water and separated the rods still kept the rudder intact. (I had a real boat whose rudder would dry out in the winter months allowing as much as a quarter inch gap to develop. In the spring a maul closed the gaps. I never attempted to epoxy the planks together because I'd rather have the controlled separation then a plank split along the grain.)
10. After some studying, and exploring options I decided to go with the 1:18 scale for an 86' tug. You'll see this fellow and a couple of his crew throughout the build and as I mentioned they give a perspective as to whether an item is true to size.


Moving along on the catch up, the hull is 'glassed, sanded, and ready for some paint, plus have to figure out the rudder and how to activate it.
The first coats of paint are rattle-can automotive primer from the parts store. My thoughts are it makes a good barrier between the epoxy/'glass surface and gives a good foundation for the acrylic paints I like to use. I use rattle cans, good brushes designed for water colors and the foam brushes with the wooden handles. I get all of my paints in "big box stores" (over here it's Lowe's, Home Depot, and Sherwin Williams.) The acrylics are water based, easy clean up, low/no obnoxious odors house paints. They are tough enough for my purposes, easy touch up, and any color under the sun can be mixed up in an 8 oz. sample for less than $5 US. I've turned to using it exclusively and have no regrets. You can get the color gloss, matte, or flat, which for general purposes is usually matte or occasionally flat.
I mentioned earlier that this was 1:18 scale which is 5/8" to a foot. I find it easier sometimes to create a "ruler" for a build and use a figure for the ergonomics. Not to be exact to the fraction of an inch, but to at least be close to what the size of an item would actually be.
The ruler and a chart helps in this regard. I mark off a stick (in this case a piece of styrene plastic,) in segments of 5/8" with the first "foot" graduated in scale 3" sections.
The chart is drawn with the measurements written out to a one foot length. 5/8" = .0652 divided by 12 (inches) = .052 per inch. thus 1/2 scale inches is .026, 1" = .052, 2" = .0104, 3" = .156 and so on up to .6250 (the scale 1 foot). An inexpensive digital caliper ($14-16 US that reads in thousanths and mm) is used to check the size of the item in question. I certainly don't build to the fraction of an inch, but this does allow me to prevent putting a 4" diameter scale hand rail where a 1 1/2" should be.
The photos:
1. The scale ruler made specifically for this 1:18 (5/8" per foot ) build.
2. The chart allowing real dimensions for items under a scale foot.
3. The quickest, easiest tool to determine the size of an item. Checking the reading on this, then consulting the chart tells me what the item's scale size is in scale inches.
4. This guy is 1:12 (six inches.) During the hull build I didn't know if I wanted a smaller tug at a bigger scale, or a bigger tug at a smaller scale. Placing these figures helps me visualize much easier.
5. Same guy, different angle.
6,7,8,9. The progression of the rudder. The rudder planks were bored to accept the rods which accomplished two things; they prevented the rudder planks from warping too bad, and if the planks soaked up water and separated the rods still kept the rudder intact. (I had a real boat whose rudder would dry out in the winter months allowing as much as a quarter inch gap to develop. In the spring a maul closed the gaps. I never attempted to epoxy the planks together because I'd rather have the controlled separation then a plank split along the grain.)
10. After some studying, and exploring options I decided to go with the 1:18 scale for an 86' tug. You'll see this fellow and a couple of his crew throughout the build and as I mentioned they give a perspective as to whether an item is true to size.
▲
⟩⟩
MouldBuilder
stevedownunder
mturpin013
shamrok
ToraDog
Colin H
Martin555
Skydive130
Ronald
|
💬 Re: Phantom Tug
3 years ago by 🇺🇸 Black Shoe (
Sub-Lieutenant)✧ 85 Views · 1 Like
Flag
Thank you ToraDog,
Thinking seriously about what kind of tow. It won't be a hawser tow, or a pusher, most likely on the hip for some kind of harbor work.... the jury is still out.😊 ▲
⟩⟩
Martin555
|
|
Login To
Remove Ads 💬 Re: Phantom Tug
3 years ago by 🇺🇸 Black Shoe (
Sub-Lieutenant)✧ 85 Views · 1 Like
Flag
Hi Ron,
The rudder is actually red oak, drilled and pinned to keep it true. The green clamps are actually garden clips used to train vines to a lattice. They're very inexpensive, light weight, and only moderate pressure. (Ebay) ▲
⟩⟩
Martin555
|
|
💬 Re: Phantom Tug
3 years ago by 🇨🇦 Ronald (
Admiral)✧ 91 Views · 1 Like
Flag
Is that white Oak or Ash you used for the rudder?
Where did you find those green spring clamps? Do you like them better than other styles? Cool figures! ▲
⟩⟩
Martin555
|
|
💬 Re: Phantom Tug
3 years ago by 🇺🇸 ToraDog (
 Captain) Captain)✧ 92 Views · 1 Like
Flag
Wicked nice work, as usual.Your patience and attention to detail is impressive. You do, of course, have a tow job in mind for her, yes?
▲
⟩⟩
Martin555
|
📝 Phantom Tug
3 years ago by 🇺🇸 Black Shoe ( Sub-Lieutenant)
Sub-Lieutenant)✧ 81 Views · 10 Likes · 8 Comments
Flag
💬 Add Comment
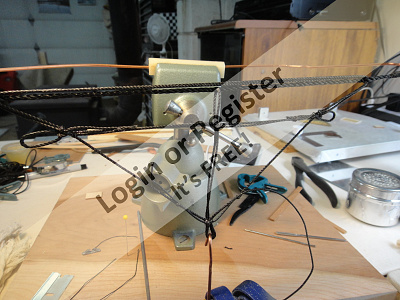
Four
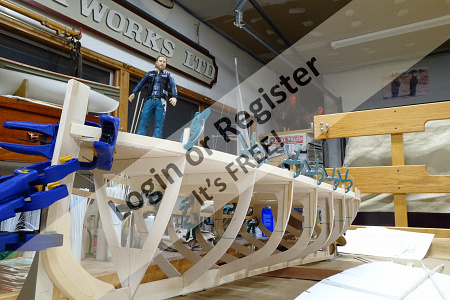
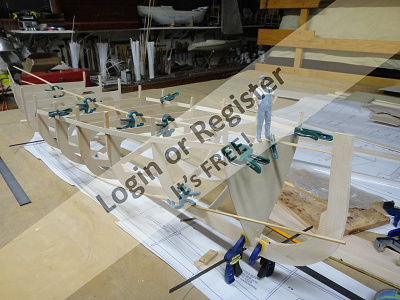
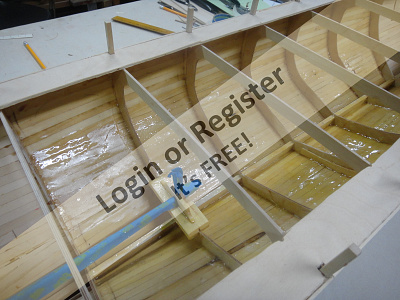
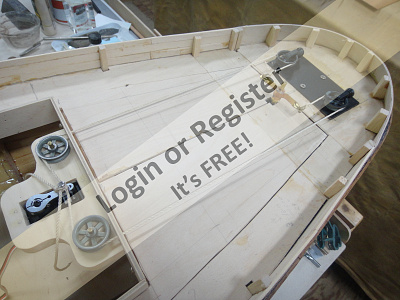
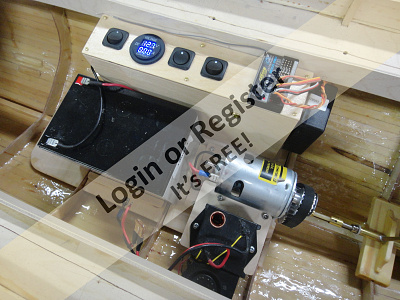
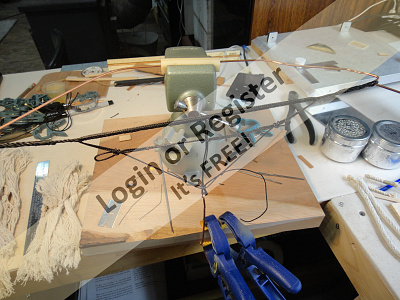
The tug is evolving. The hull was 'glassed outside, and epoxied inside. Where the battery, motor, and electronics mounts reside the hull planking was 'glassed. The main platform was fitted and the rudder operation addressed.
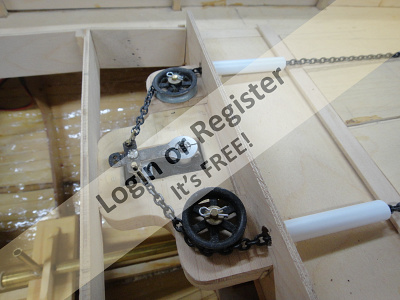
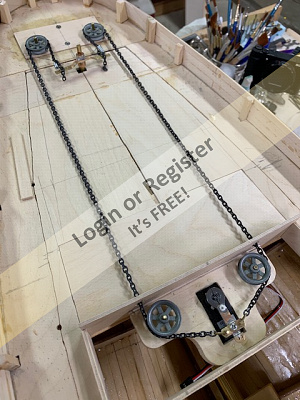
The counter being long and shallow I thought a servo with a rod may have been problematic as there was very little room between the deck and the hull. An alternative proved to be an arrangement above deck but under the hawser drying rack. I had seen images of old steam tugs that used chains and steam engines for the steering apparatus and decided the chain idea was worth pursuing.
The initial problem was a quadrant for the rudder post head. The post was at an angle tilted aft and because of the rudder and wheel size the quadrant had to be large enough to add some mechanical advantage. This didn't prove practical. The radius required would have interfered with the deck aft of the post due to the angle. The solution seemed to be a yoke and a servo pull - pull arrangement. What happened here under experimenting was as the yoke was pulled to one side or the other, the "chain track" would narrow because of the effective width of the yoke narrowing in relation to the center line, so then I discovered connecting directly to the yoke wouldn't work if I wanted the chains to move precisely fore and aft. The solution was to add turning sheaves aft of the yoke. This was fine for the stern, but there had to be a corresponding set of wheels forward to give the chains the constant track required. Experimenting with several configurations the servo was finally mounted at deck level on a platform that also supported the forward turning wheels. A custom arm was fabricated for the servo arm and the arm was mounted backwards in relation to the servo to keep the action of the radio stick intuitive with the rudder response.
Another problem presented itself. The size of the rudder, weight of the boat, and wash from the large wheel may have induced stresses on all the parts that the (too quick) response of the servo may not have tolerated. This and the servo action being far too fast for scale required a "servo slow" device be added into the signal between the receiver and the servo. This slowed the rudder action down to a scale movement and lessened the stresses that may have been induced plus added a dimension of realism to the responses to rudder input.
A couple of "waster boards" incorporated into the deck give the chains a bed to slide on. Speaking of the chains, the jewelry chains found in crafts shops didn't have the strength I thought was necessary as I could pull them apart with little effort. I ended up going to "Etsy" on the web and found some stainless steel chains the proper scale size in Germany. The links profile isn't 100% accurate, but the paint and observer's distance should make them close enough.
The photos:
1 & 2, 'Glassing/epoxy of interior.
3 & 4, Shows relative width of the chain track with the yoke perpendicular to the centerline, then with rudder induced, the track narrows creating a sideways scrubbing effect on the deck.
5 & 6, Effect of turning wheels regardless of the yoke's position.
7 General arrangement.
8. Another experiment gone bad... I wanted a shock absorber built into the system and used extending springs
at first, but was afraid they'd slacken to useless after a while allowing the servo to move, but having no effect on the rudder.
9. By using compression springs I could go a little heavier, and if they did fail, at least the margin of error would be smaller with the steering being minimal, but at least failed safe. These were made with "T" pins cut off, a hook bent into the end and inserted through the spring to engage the first several coils on the opposite end creating a compression spring. This has since been refined to a much more compact unit.
10 The servo slow device. One end into the receiver, and the servo plugs into this end. The tiny screw allows a degree of rate adjustment.
11 - 15 Various shots of the install. (Photo #14 is the final set up of the rudder end.)
I'm very pleased with the scale operation of this and the only thing I had to modify after trials was to drill the axles of the turning wheels, add a washer and a retaining pin as the torque on the wheel tended to lift it up the axle.
The slack of a little excess chain is tied out of the way, and the springs provide for a constant light pressure keeping the chains in the wheel grooves, but not so much as to pre-load the system when the rudder is amidships.


The tug is evolving. The hull was 'glassed outside, and epoxied inside. Where the battery, motor, and electronics mounts reside the hull planking was 'glassed. The main platform was fitted and the rudder operation addressed.
The counter being long and shallow I thought a servo with a rod may have been problematic as there was very little room between the deck and the hull. An alternative proved to be an arrangement above deck but under the hawser drying rack. I had seen images of old steam tugs that used chains and steam engines for the steering apparatus and decided the chain idea was worth pursuing.
The initial problem was a quadrant for the rudder post head. The post was at an angle tilted aft and because of the rudder and wheel size the quadrant had to be large enough to add some mechanical advantage. This didn't prove practical. The radius required would have interfered with the deck aft of the post due to the angle. The solution seemed to be a yoke and a servo pull - pull arrangement. What happened here under experimenting was as the yoke was pulled to one side or the other, the "chain track" would narrow because of the effective width of the yoke narrowing in relation to the center line, so then I discovered connecting directly to the yoke wouldn't work if I wanted the chains to move precisely fore and aft. The solution was to add turning sheaves aft of the yoke. This was fine for the stern, but there had to be a corresponding set of wheels forward to give the chains the constant track required. Experimenting with several configurations the servo was finally mounted at deck level on a platform that also supported the forward turning wheels. A custom arm was fabricated for the servo arm and the arm was mounted backwards in relation to the servo to keep the action of the radio stick intuitive with the rudder response.
Another problem presented itself. The size of the rudder, weight of the boat, and wash from the large wheel may have induced stresses on all the parts that the (too quick) response of the servo may not have tolerated. This and the servo action being far too fast for scale required a "servo slow" device be added into the signal between the receiver and the servo. This slowed the rudder action down to a scale movement and lessened the stresses that may have been induced plus added a dimension of realism to the responses to rudder input.
A couple of "waster boards" incorporated into the deck give the chains a bed to slide on. Speaking of the chains, the jewelry chains found in crafts shops didn't have the strength I thought was necessary as I could pull them apart with little effort. I ended up going to "Etsy" on the web and found some stainless steel chains the proper scale size in Germany. The links profile isn't 100% accurate, but the paint and observer's distance should make them close enough.
The photos:
1 & 2, 'Glassing/epoxy of interior.
3 & 4, Shows relative width of the chain track with the yoke perpendicular to the centerline, then with rudder induced, the track narrows creating a sideways scrubbing effect on the deck.
5 & 6, Effect of turning wheels regardless of the yoke's position.
7 General arrangement.
8. Another experiment gone bad... I wanted a shock absorber built into the system and used extending springs
at first, but was afraid they'd slacken to useless after a while allowing the servo to move, but having no effect on the rudder.
9. By using compression springs I could go a little heavier, and if they did fail, at least the margin of error would be smaller with the steering being minimal, but at least failed safe. These were made with "T" pins cut off, a hook bent into the end and inserted through the spring to engage the first several coils on the opposite end creating a compression spring. This has since been refined to a much more compact unit.
10 The servo slow device. One end into the receiver, and the servo plugs into this end. The tiny screw allows a degree of rate adjustment.
11 - 15 Various shots of the install. (Photo #14 is the final set up of the rudder end.)
I'm very pleased with the scale operation of this and the only thing I had to modify after trials was to drill the axles of the turning wheels, add a washer and a retaining pin as the torque on the wheel tended to lift it up the axle.
The slack of a little excess chain is tied out of the way, and the springs provide for a constant light pressure keeping the chains in the wheel grooves, but not so much as to pre-load the system when the rudder is amidships.
▲
⟩⟩
Colin H
RNinMunich
jbkiwi
Graham93
stevedownunder
Ronald
Peejay
ToraDog
Martin555
Skydive130
|
💬 Re: Phantom Tug
3 years ago by 🇺🇸 Black Shoe (
Sub-Lieutenant)✧ 72 Views · 2 Likes
Flag
Thank you Graham! The springs under compression were an experiment, but far superior to a tension spring.
▲
⟩⟩
Martin555
Ronald
|
|
Login To
Remove Ads 💬 Re: Phantom Tug
3 years ago by 🇺🇸 Black Shoe (
Sub-Lieutenant)✧ 72 Views · 2 Likes
Flag
JB, Thank you for the photos and particularly the links! Excellent resource and a very handsome tug!
▲
⟩⟩
jbkiwi
Martin555
|
|
💬 Re: Phantom Tug
3 years ago by 🇬🇧 Graham93 (
 Vice Admiral) Vice Admiral)✧ 76 Views · 2 Likes
Flag
Nicely thought out solution. 👍 I like the chain tensioners/shock absorbers. Might try something similar for the helm on my Cutter build.
Graham93 ▲
⟩⟩
Black Shoe
Martin555
|
|
💬 Re: Phantom Tug
3 years ago by 🇳🇿 jbkiwi (
Fleet Admiral)✧ 78 Views · 7 Likes
Flag
Hi, the Preserved NZ steam tug, William C Daldy has this type of steering system, with chains running round the deck under covers, from the quadrant to the steering motor, ( pictured is the aux steering station behind the engine room, with the steering motor.)

▲
⟩⟩
Commodore-H
Colin H
MouldBuilder
RNinMunich
Black Shoe
Martin555
stevedownunder
|


|
💬 Re: Phantom Tug
3 years ago by 🇨🇦 Ronald (
Admiral)✧ 81 Views · 1 Like
Flag
Super build Tim
▲
⟩⟩
Martin555
|
|
💬 Re: Phantom Tug
3 years ago by 🇺🇸 Black Shoe (
Sub-Lieutenant)✧ 77 Views · 4 Likes
Flag
MTurpin013, The distance from the rudder to the servo is to scale. The old steam tugs that used chains here in the US had them run from the quadrant on the rudder post to a steam engine dedicated to the steering. This engine was housed in the aft end of the engine room or a space in the aft end of the deckhouse. The tugs that had chains across the deck like this also had a longitudinal box that covered the chains preventing the crew from stumbling over them. Seguin a once iconic tug in the NE US had them in this configuration. S.S. Master in the Pacific NW has chains that go from the quadrant directly outboard to a turning sheave, run forward outside of the bulwarks, then turn back inboard at the after end of the house and engage the steering engine.
I don't know how many vessels used them, but I thought they were interesting enough to figure a way to incorporate them in this build. The images show a recent model of Seguin with the boxes installed ToraDog, you're too kind! Thank you! 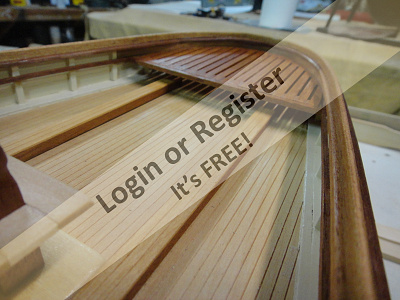
▲
⟩⟩
Colin H
Martin555
stevedownunder
Ronald
|
|
💬 Re: Phantom Tug
3 years ago by 🇺🇸 ToraDog (
Captain)✧ 78 Views · 1 Like
Flag
Great blog, but for those from "away", it is much more fun to see this build in person.❄️
▲
⟩⟩
Black Shoe
|
|
💬 Re: Phantom Tug
3 years ago by 🇬🇧 mturpin013 (
Admiral)✧ 79 Views · 2 Likes
Flag
That's a fine mechanism you've built there, is there any reason you've put the servo so far away from the rudder?
▲
⟩⟩
Black Shoe
Martin555
|
📝 Phantom Tug
3 years ago by 🇺🇸 Black Shoe ( Sub-Lieutenant)
Sub-Lieutenant)✧ 63 Views · 10 Likes
Flag
💬 Add Comment
Five
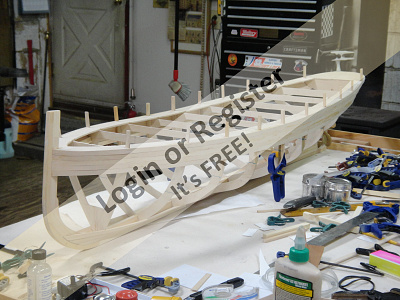
Fast forward to launching, ballasting, and test runs.
I knew this hull would take some weight to bring it down to it's marks, but was a little surprised at the amount.
I launched it first to confirm the water-tight aspect while the hull was still just a shell. Loading in bricks in plastic sandwich bags until the hull settled to the water line took seven bricks that averaged a little over seven pounds each. Knowing the ball-park amount of weight required I ordered some diver's weights in "bean bag" type pouches. These are color coded with red being five pounds, blue three pounds and yellow one pound. I prefer these to hard weights that are location specific within the hull because these can be shifted slightly if need be, they won't mar the inside, and still remain where they're laid.
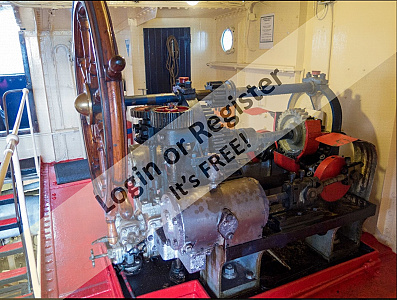
Laying out the running gear was next. Because of the size of the wheel, and weight involved a reduction of 2:1 belt drive was decided on for a starting point for speed and power. I have pulleys that will allow 2.5 and 3:1, but the original guess doesn't try to push beyond hull speed, and the motor doesn't get hot so for time being it'll remain as installed.
Accommodating all of the parts in a hull this spacious is a delight compared to the crowded conditions in smaller builds.
After I found the total weight needed (within a pound or two,) I started weighing all of the required equipment piece by piece on a kitchen counter scale that lives in the shop and measures in ounces up to 30 lbs. (These are inexpensive and come in handy,) then started subtracting total brick weight to compensate. The 12V 14Ah battery was the major consideration, then the motor, the speaker for the sound system, and accessories that were negligible. Allowing for the deckhouse, and items above deck didn't pose much of a problem with the amount of weight in her bottom. (?)
The photo's:
1. Tender and very high without any ballast.
2, 3, 4, Testing for any leaks. I let the hull sit for an hour to be sure there were no leaks that needed attention before installing the running gear.
5. Part of the running gear arrangement. More on this later.
6. The light indicates the ESC is on line.


Fast forward to launching, ballasting, and test runs.
I knew this hull would take some weight to bring it down to it's marks, but was a little surprised at the amount.
I launched it first to confirm the water-tight aspect while the hull was still just a shell. Loading in bricks in plastic sandwich bags until the hull settled to the water line took seven bricks that averaged a little over seven pounds each. Knowing the ball-park amount of weight required I ordered some diver's weights in "bean bag" type pouches. These are color coded with red being five pounds, blue three pounds and yellow one pound. I prefer these to hard weights that are location specific within the hull because these can be shifted slightly if need be, they won't mar the inside, and still remain where they're laid.
Laying out the running gear was next. Because of the size of the wheel, and weight involved a reduction of 2:1 belt drive was decided on for a starting point for speed and power. I have pulleys that will allow 2.5 and 3:1, but the original guess doesn't try to push beyond hull speed, and the motor doesn't get hot so for time being it'll remain as installed.
Accommodating all of the parts in a hull this spacious is a delight compared to the crowded conditions in smaller builds.
After I found the total weight needed (within a pound or two,) I started weighing all of the required equipment piece by piece on a kitchen counter scale that lives in the shop and measures in ounces up to 30 lbs. (These are inexpensive and come in handy,) then started subtracting total brick weight to compensate. The 12V 14Ah battery was the major consideration, then the motor, the speaker for the sound system, and accessories that were negligible. Allowing for the deckhouse, and items above deck didn't pose much of a problem with the amount of weight in her bottom. (?)
The photo's:
1. Tender and very high without any ballast.
2, 3, 4, Testing for any leaks. I let the hull sit for an hour to be sure there were no leaks that needed attention before installing the running gear.
5. Part of the running gear arrangement. More on this later.
6. The light indicates the ESC is on line.
▲
⟩⟩
stevedownunder
Colin H
mturpin013
Nonsuch
Martin555
Skydive130
jbkiwi
RNinMunich
ToraDog
Ronald
📝 Phantom Tug - "Fort Valley"
3 years ago by 🇺🇸 Black Shoe ( Sub-Lieutenant)
Sub-Lieutenant)✧ 56 Views · 12 Likes · 4 Comments
Flag
💬 Add Comment
Six
The jury is back, and the consensus is the tug's name should be "Fort Valley" named for a place in VA. USA I knew as a kid.
As this is a "catch-up" blog for the moment, I'll skip some of the boring details and bring this up to the current status in short order. Sea trials were run several times last year......they weren't necessarily sea trials for testing, more like just opportunities to run the boat.
I did learn with certainty that the boat must be launched then ballasted. Not only is it easier on the hull, but this old man isn't as steady as he used to be and fifty pounds is more than I want to deal with at one time.
Several outings helped me learn how she moved and appreciate what the extra weight meant for her characteristics. Obviously, it takes a little longer to get up to speed, longer stopping distance, and I was grateful I had installed the servo-slow in the steering system. There may have been some pretty high stresses on the mechanical as well as the electrical side if the servo were allowed to "slam" over at it's normal rate.
Another positive side of the operation is it performs more to scale in the slower reactions, and makes the whole experience more interactive. Try as I might, I couldn't get it to get up on plane...........😊
I had installed a smoker in the "engine room" and although the instructions suggested wiring the unit into the main ESC so the smoke was consistent with the motor RPM, it worried me a little not having more control over the unit. If your boat is on the far side of the pond and the smoke diminishes, does that mean the fluid is low? How do you get the boat back without burning out the bottom of the smoker? This particular unit works well, but there is no fail-safe built in. This came up in a general conversation with ToraDog. He had been talking with the manufacturer of this unit and through their conversation it came up that a stand alone ESC would work if there were a means of controlling it. It happens that my Carson radio has a rheostat knob that does exactly that. The tug can sit at the dock with no turns on the wheel, yet a whiff of smoke can be dialed in to give the indication of the boilers being on line. Once underway the volume of smoke can be dialed back to a "clean fired" boiler. On the other hand, if it appears the smoker is out of fluid it can be turned off thus preventing a problem. More on the smoker in a later chapter.
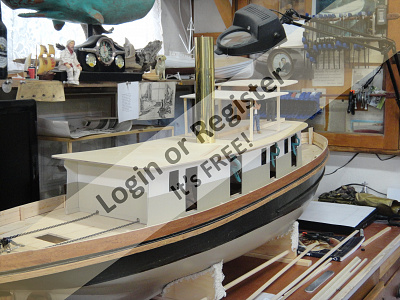
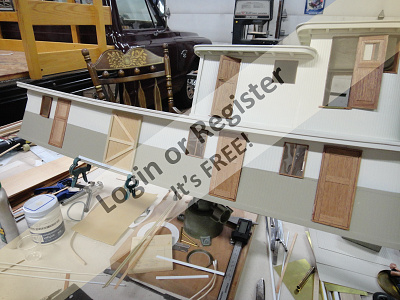
The deck house and pilot house were built. The interiors of both will be furnished. Counting the doors on the main house; forward is the mess deck, then the galley, engine room, and starboard aft engineer's storage - port aft will be deck storage. The engine room door is a sliding barn door. This is because the engine room access is wider to make it easier to get equipment in and out, and a wider regular door would interfere with the bulwarks.
The build continues.....
Photos:
1. Starboard quarter of roughed in deckhouse and the beginning of the pilot house.
2. Stbd side of deckhouse.
3. Galley door and window.
4. Engine room door.
5. Pilot house door and grab-rail.
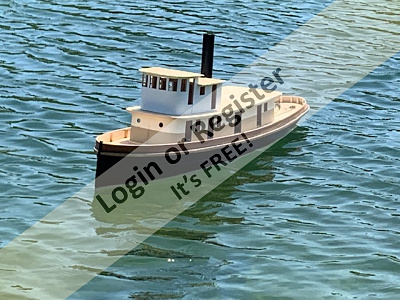
6. My favorite image from last season's runs. This was
taken relatively early in the day. Note the smoke is
obvious, but the tug is standing still....no wake at all.
7. Not much in the detail department, but it does run, and
doesn't make water.


The jury is back, and the consensus is the tug's name should be "Fort Valley" named for a place in VA. USA I knew as a kid.
As this is a "catch-up" blog for the moment, I'll skip some of the boring details and bring this up to the current status in short order. Sea trials were run several times last year......they weren't necessarily sea trials for testing, more like just opportunities to run the boat.
I did learn with certainty that the boat must be launched then ballasted. Not only is it easier on the hull, but this old man isn't as steady as he used to be and fifty pounds is more than I want to deal with at one time.
Several outings helped me learn how she moved and appreciate what the extra weight meant for her characteristics. Obviously, it takes a little longer to get up to speed, longer stopping distance, and I was grateful I had installed the servo-slow in the steering system. There may have been some pretty high stresses on the mechanical as well as the electrical side if the servo were allowed to "slam" over at it's normal rate.
Another positive side of the operation is it performs more to scale in the slower reactions, and makes the whole experience more interactive. Try as I might, I couldn't get it to get up on plane...........😊
I had installed a smoker in the "engine room" and although the instructions suggested wiring the unit into the main ESC so the smoke was consistent with the motor RPM, it worried me a little not having more control over the unit. If your boat is on the far side of the pond and the smoke diminishes, does that mean the fluid is low? How do you get the boat back without burning out the bottom of the smoker? This particular unit works well, but there is no fail-safe built in. This came up in a general conversation with ToraDog. He had been talking with the manufacturer of this unit and through their conversation it came up that a stand alone ESC would work if there were a means of controlling it. It happens that my Carson radio has a rheostat knob that does exactly that. The tug can sit at the dock with no turns on the wheel, yet a whiff of smoke can be dialed in to give the indication of the boilers being on line. Once underway the volume of smoke can be dialed back to a "clean fired" boiler. On the other hand, if it appears the smoker is out of fluid it can be turned off thus preventing a problem. More on the smoker in a later chapter.
The deck house and pilot house were built. The interiors of both will be furnished. Counting the doors on the main house; forward is the mess deck, then the galley, engine room, and starboard aft engineer's storage - port aft will be deck storage. The engine room door is a sliding barn door. This is because the engine room access is wider to make it easier to get equipment in and out, and a wider regular door would interfere with the bulwarks.
The build continues.....
Photos:
1. Starboard quarter of roughed in deckhouse and the beginning of the pilot house.
2. Stbd side of deckhouse.
3. Galley door and window.
4. Engine room door.
5. Pilot house door and grab-rail.
6. My favorite image from last season's runs. This was
taken relatively early in the day. Note the smoke is
obvious, but the tug is standing still....no wake at all.
7. Not much in the detail department, but it does run, and
doesn't make water.
▲
⟩⟩
Martin555
Peejay
Commodore-H
Ianh
stevedownunder
Colin H
jacko
MouldBuilder
Graham93
jbkiwi
ToraDog
RNinMunich
|
💬 Re: Phantom Tug - "Fort Valley"
3 years ago by 🇬🇧 mturpin013 (
Admiral)✧ 51 Views · 3 Likes
Flag
Hi there, some really great modelling skills there, a beautiful boat well built.
▲
⟩⟩
Martin555
stevedownunder
Black Shoe
|
|
Login To
Remove Ads 💬 Re: Phantom Tug - "Fort Valley"
3 years ago by 🇨🇦 Ronald (
Admiral)✧ 55 Views · 3 Likes
Flag
Impressive work! The clarity of the wood grain, the mullions around inside of the windows, the panels in the doors, hinged and sliders. Quality detail workmanship Tim.
A+ you graduate 👨🎓 ▲
⟩⟩
Martin555
Black Shoe
RNinMunich
|
|
💬 Re: Phantom Tug - "Fort Valley"
3 years ago by 🇨🇦 Newby7 (
Fleet Admiral)✧ 58 Views · 4 Likes
Flag
Nice job I like the doors. looks good on the water.
Rick ▲
⟩⟩
Martin555
Black Shoe
Ronald
jbkiwi
|
|
💬 Re: Phantom Tug - "Fort Valley"
3 years ago by 🇩🇪 RNinMunich (
Fleet Admiral)✧ 61 Views · 2 Likes
Flag
Magnificent BS 👍
Looking forward to the 'Smoker' chapter. Cheers, Doug 😎 ▲
⟩⟩
Martin555
Black Shoe
|
📝 Fort Valley
3 years ago by 🇺🇸 Black Shoe ( Sub-Lieutenant)
Sub-Lieutenant)✧ 45 Views · 6 Likes · 3 Comments
Flag
💬 Add Comment
Seven
Thank you all for the comments! They're very much appreciated!
I've never been accused of thinking a project through and following to the letter what my mind had proposed. Indeed, this tug is another build that was modified from the original vision and for better or worse had several "Shipalts" along the way. While I'm working on one facet an idea may come along and before long that distraction becomes the focus of yet another project within the build that takes over and I find myself on a tangent.
This is one of those tangents;
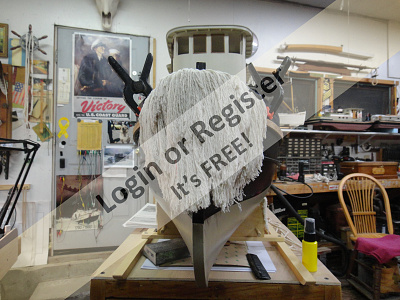
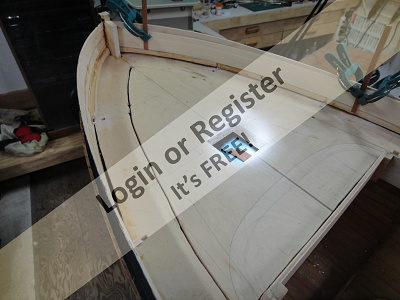
When I was developing the idea of this boat I wanted to incorporate a reverse stem. Seeing photo's of the old stately steam tugs of the late 1800's and early 1900's I thought it would be a subtle enhancement to have the stem reflect the slight angle that the deck house and pilot houses seem to have. So the hull was built, the stem reversed, and I thought it looked pretty good.
While I was idly looking through a couple of tug photo books for fender arrangements I became interested in the shaggy "beard" bow fenders (puddings). Doing some experimenting with different types of line, it became apparent that synthetic line generally had too much hysteresis and none of them had "the look". After trying everything on hand, and getting discouraged I spied a piece of cotton clothesline. This line is about 3/8" diameter, the outside is woven (similar coach whipping) and being cotton held a little promise.
By withdrawing the core and using a large needle to fag out the outer layer to strands, then dampened and combed out a couple of times, the cotton stayed straight. This may work!
The main support "cable" length was determined and a couple lengths of the clothesline was seized to it parallel to start the bulking up of the pudding. After deciding how long the pudding wanted to be top to bottom, several pieces of line twice that distance were cut, the core pulled out, the piece tied off in the middle, then fagged out and combed straight. These long ones became the first layer on the "cable". another set a little shorter were made up the same way, laid over the long ones, then a third layer shorter still were done and laid over the second layer.
Once I thought I had enough bulk built up and it seemed to look like I had imagined, they all came off then were glued a layer at a time at the middle (where it was tied,) with some fabric glue called "Fabric Fusion". This glue is designed for fabrics, is claimed to be waterproof and remains flexible.
After looking at the pudding for several weeks now, I think it may be a little large. It needs to be trimmed up from the bottom, and from each side towards the stem, but I'll wait to do that until the build is farther along. The beauty of this pudding is it can be added to, cut back, and modified very easily without redoing the whole thing.
By the way.....that reversed stem I was so enamored with? One can't even tell it was done with this beard covering it up.😊
The photos:
1. Pieces of line cut for the last (top) layer.
2. The jig that was made up to hold the "cable" while the
line was added. This was a length of wire with hooks
bent into the ends to stretch the "cable" straight,
captured in a small vise on the work bench.
3. I had added a second "cable" a little lower for another
mounting point, but subsequently found it to be
unnecessary and cut off everything but the vertical line
which will be fixed to the stem.
4. & 5. The inside and outside of the laid up line.
6. & 7. The pudding hung for it's first critique. I suspect
it's too long, and maybe a little too wide. I'll trim it
back, and dirty/weather it a bit further along in the
build.


Thank you all for the comments! They're very much appreciated!
I've never been accused of thinking a project through and following to the letter what my mind had proposed. Indeed, this tug is another build that was modified from the original vision and for better or worse had several "Shipalts" along the way. While I'm working on one facet an idea may come along and before long that distraction becomes the focus of yet another project within the build that takes over and I find myself on a tangent.
This is one of those tangents;
When I was developing the idea of this boat I wanted to incorporate a reverse stem. Seeing photo's of the old stately steam tugs of the late 1800's and early 1900's I thought it would be a subtle enhancement to have the stem reflect the slight angle that the deck house and pilot houses seem to have. So the hull was built, the stem reversed, and I thought it looked pretty good.
While I was idly looking through a couple of tug photo books for fender arrangements I became interested in the shaggy "beard" bow fenders (puddings). Doing some experimenting with different types of line, it became apparent that synthetic line generally had too much hysteresis and none of them had "the look". After trying everything on hand, and getting discouraged I spied a piece of cotton clothesline. This line is about 3/8" diameter, the outside is woven (similar coach whipping) and being cotton held a little promise.
By withdrawing the core and using a large needle to fag out the outer layer to strands, then dampened and combed out a couple of times, the cotton stayed straight. This may work!
The main support "cable" length was determined and a couple lengths of the clothesline was seized to it parallel to start the bulking up of the pudding. After deciding how long the pudding wanted to be top to bottom, several pieces of line twice that distance were cut, the core pulled out, the piece tied off in the middle, then fagged out and combed straight. These long ones became the first layer on the "cable". another set a little shorter were made up the same way, laid over the long ones, then a third layer shorter still were done and laid over the second layer.
Once I thought I had enough bulk built up and it seemed to look like I had imagined, they all came off then were glued a layer at a time at the middle (where it was tied,) with some fabric glue called "Fabric Fusion". This glue is designed for fabrics, is claimed to be waterproof and remains flexible.
After looking at the pudding for several weeks now, I think it may be a little large. It needs to be trimmed up from the bottom, and from each side towards the stem, but I'll wait to do that until the build is farther along. The beauty of this pudding is it can be added to, cut back, and modified very easily without redoing the whole thing.
By the way.....that reversed stem I was so enamored with? One can't even tell it was done with this beard covering it up.😊
The photos:
1. Pieces of line cut for the last (top) layer.
2. The jig that was made up to hold the "cable" while the
line was added. This was a length of wire with hooks
bent into the ends to stretch the "cable" straight,
captured in a small vise on the work bench.
3. I had added a second "cable" a little lower for another
mounting point, but subsequently found it to be
unnecessary and cut off everything but the vertical line
which will be fixed to the stem.
4. & 5. The inside and outside of the laid up line.
6. & 7. The pudding hung for it's first critique. I suspect
it's too long, and maybe a little too wide. I'll trim it
back, and dirty/weather it a bit further along in the
build.
▲
⟩⟩
Martin555
Ianh
jbkiwi
RNinMunich
Colin H
ToraDog
|
💬 Re: Fort Valley
3 years ago by 🇨🇦 Ronald (
Admiral)✧ 41 Views · 1 Like
Flag
You Funny Douglas 🤓🤠🥴😉😂🤣😁🥸
▲
⟩⟩
Martin555
|
|
Login To
Remove Ads 💬 Re: Fort Valley
3 years ago by 🇺🇸 Black Shoe (
Sub-Lieutenant)✧ 35 Views · 1 Like
Flag
I was thinking weed eater, but I'll give the trimmer a go, it may have a little more finesse.👍😊
▲
⟩⟩
Martin555
|
|
💬 Re: Fort Valley
3 years ago by 🇩🇪 RNinMunich (
Fleet Admiral)✧ 40 Views · 3 Likes
Flag
Can recommend a Panasonic Hair and Beard Trimmer Black Shoe 👍
Get the washable one with adjustable head and cut length 😁 Fuzz on Man 👍 Cheers, Doug 😎 ▲
⟩⟩
Martin555
Rookysailor
Ronald
|
📝 Tug Fort Valley
3 years ago by 🇺🇸 Black Shoe ( Sub-Lieutenant)
Sub-Lieutenant)✧ 37 Views · 6 Likes · 6 Comments
Flag
💬 Add Comment
Eight
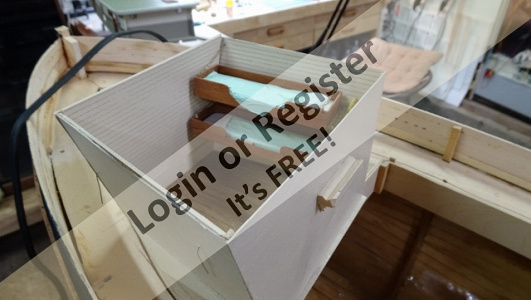
Here's another short diversion on this build.
Before I did the initial float test and learned how much ballast this hull would take, I thought I would fill up the bow with chunks of rigid foam for floatation. Once I discovered the total weight required I quickly realized that even if I was able to fill every little nook and cranny with foam the best I could hope for was a slower rate of acceleration to the bottom should I have a catastrophic failure.
Not wanting to waste this space it seemed like a good location for the crews berthing. This would have been easy to accomplish while the deck was open, but once it was all closed in, if anything went adrift there would have been no way to effect a repair. The only way I could figure to accomplish this was with a removable module. The main battery was far enough into the "engine room" that there was room to insert or remove a drawer-type construction that would contain a couple of bunks, and some personal items the crew may have brought aboard.
The shape of this compartment was a trick to figure out, but with poster board, tape, and trial and error a box evolved that fit nicely, then it was a matter of fitting bunks to this unusual shape.
The viewing window into this space is very limited, but with a couple of lights installed it may create a little curiosity as to what's in there.
The photo's:
1. Looking forward into the bow. The horizontal flat on the
forward frame will play a part in the module location.
2. A strange shape to accommodate the space available.
3. The bunks being built.
4. One of the bunks. I know it's not made up properly,
but at least it's clean.
5. Starboard side bunks. The pillow should be forward, as
in my memory I can't recall a bunk made up head aft.
The pillow was placed here because looking down the
companion it adds a little interest as the field of
vision is so narrow. (Makes one wonder "why bother?")
6. This cleat is what hooks over the horizontal flat of the
forward frame and keeps the whole unit from shifting
aft.
7. Narrow field of vision even without the companion on
deck.
8. Module installed.
▲
⟩⟩
Martin555
jbkiwi
Peejay
Ronald
Colin H
RNinMunich
|
💬 Re: Tug Fort Valley
3 years ago by 🇬🇧 Martin555 (
Fleet Admiral)✧ 23 Views · 0 Likes
Flag
Very nice work.
Love the bunks. The forward fender reminded me of a mop, LOL!! Looking forward to the next instalment. Martin555. ▲
⟩⟩
No likes yet
This member will receive 1 point for every like received |
|
Login To
Remove Ads 💬 Re: Tug Fort Valley
3 years ago by 🇺🇸 Peejay (
 Midshipman) Midshipman)✧ 42 Views · 1 Like
Flag
Those are great photos. In addition to showing your lowering sling, the second one really shows the size of your tug.
▲
⟩⟩
Martin555
|
|
💬 Re: Tug Fort Valley
3 years ago by 🇺🇸 Black Shoe (
Sub-Lieutenant)✧ 33 Views · 3 Likes
Flag
Thank you Peejay.
You're right about the weight being a hurdle. Using a wagon to launch on an easy slope is one thing, but leaning over a wall or from a dock is another matter. I've taken to using slings to launch the hull, then ballast with diver's "bean bags" I found on Ebay. These are soft sided and can be moved around vs having form fitting weights that are restricted to a particular space in the hull. The bags don't move, and don't need to be contained by structure. I just place them to maintain a true waterline. (From experimenting.) Photo: Here's the ballast I use... Four 5 lb bags Two 4 lb bags Two 1 lb bags Main propulsion battery (12Ah SLA @9.5 lbs) Tug 13 lbs +/- 52.5 total The second photo is the sling affair I've been using to launch the hull. They're the rubber tie- down straps with some nylon line spliced through holes where the metal hooks were removed and a piece of closet pole for a strong back. A hole is drilled through the pole so the line doesn't tend to twist the pole handle. 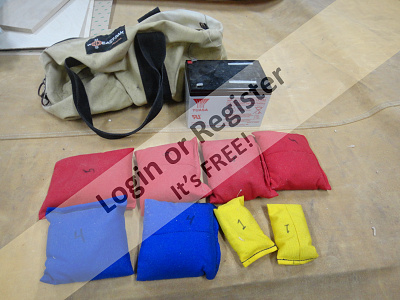
▲
⟩⟩
Colin H
Martin555
RNinMunich
|
|
💬 Re: Tug Fort Valley
3 years ago by 🇺🇸 Black Shoe (
Sub-Lieutenant)✧ 35 Views · 2 Likes
Flag
Thank you Doug...that's a pretty high bar!
As far as the lunacy is concerned, one doesn't have to be, but it does help! ▲
⟩⟩
Martin555
RNinMunich
|
|
💬 Re: Tug Fort Valley
3 years ago by 🇺🇸 Peejay (
Midshipman)✧ 46 Views · 2 Likes
Flag
This is a very well imagined and well executed build. Taking notes for a future tug build. I do have a plan for the interior of the actual tug, which should be helpful for placing the bunks.
In view of your comment that you will ballast after floating the tug, what are you (or did you) use for ballast, and where do you put it in. I think that is a great idea, so the fun of running the tug isn’t impaired by back pain. 😊 ▲
⟩⟩
Martin555
RNinMunich
|
|
💬 Re: Tug Fort Valley
3 years ago by 🇩🇪 RNinMunich (
Fleet Admiral)✧ 39 Views · 2 Likes
Flag
Fascinating lunacy Black Shoe 😀👍
Well made, something worthy of our mate Martin! How about some portholes for a side peek inside?? Cheers, Doug 😎 ▲
⟩⟩
Martin555
Ronald
|


Login To
Remove Ads
Remove Ads