Join Us On Social Media!

|

|

|
Download The App!
Login To
Remove Ads
Remove Ads
Login To
Remove Ads
Remove Ads
Model Boats Website
HMS Cruiser. 1/64 scale 18 gun brig of war
11 Posts · 11 Followers · 43 Photos · 77 Likes
Began 3 years ago by
 United Kingdom
Follow This Thread
Not currently following
> Click to follow
> Click to follow
Latest Post 2 years ago by
| Oldest posts shown first (Show Newest First) | (Print Booklet) |
📝 HMS Cruiser. 1/64 scale 18 gun brig of war
3 years ago by 🇬🇧 cormorant ( Lieutenant Commander)
Lieutenant Commander)✧ 134 Views · 6 Likes · 2 Comments
Flag
💬 Add Comment
Having been thoroughly disappointed, almost disgusted, with the overpriced Deans Marine warship kits (of which I have built two), I decided upon a change of tack.
I have already built Caldercraft's tug, Resolve, and impressed with the quality of the kit and the opportunity to learn new skills, I decided to have a go at a plank on bulkhead model.
I chose Cruiser because she is aimed at beginner/intermediate and also, to me, pleasing to the eye.
Once again, the kit is made up of very good quality materials, with all the wooden structure parts CNC cut, the wooden fittings nicely detailed and the cannons made of turned brass.
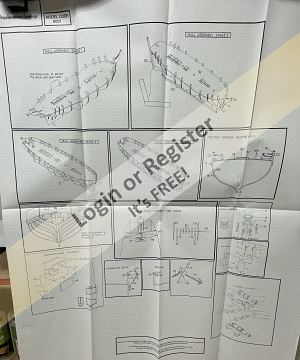
The instruction manual is adequate, but there are seven sheets of full sized plans.
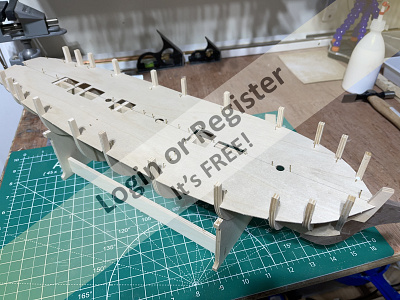
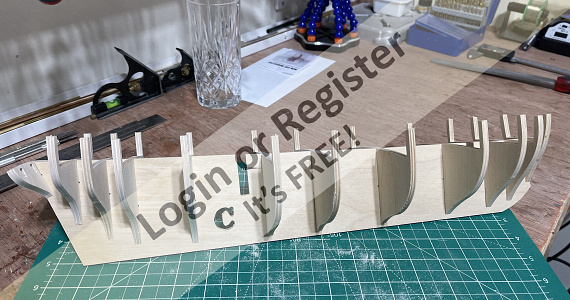
I am in the process of building the basic hull, the easy bit. The wooden parts have been accurately cut and require very little fettling.
However, the first skill I have to practice is bevelling, the stern bulkhead to enable the deck to fit flush, but mainly the bulkheads to enable the planks to fit flush.
My main concern was, and still is, planking the hull. M B Website member Nonsuch has been of great help with this and plank bending, but more of that later.
So far , so good.
I have already built Caldercraft's tug, Resolve, and impressed with the quality of the kit and the opportunity to learn new skills, I decided to have a go at a plank on bulkhead model.
I chose Cruiser because she is aimed at beginner/intermediate and also, to me, pleasing to the eye.
Once again, the kit is made up of very good quality materials, with all the wooden structure parts CNC cut, the wooden fittings nicely detailed and the cannons made of turned brass.
The instruction manual is adequate, but there are seven sheets of full sized plans.
I am in the process of building the basic hull, the easy bit. The wooden parts have been accurately cut and require very little fettling.
However, the first skill I have to practice is bevelling, the stern bulkhead to enable the deck to fit flush, but mainly the bulkheads to enable the planks to fit flush.
My main concern was, and still is, planking the hull. M B Website member Nonsuch has been of great help with this and plank bending, but more of that later.
So far , so good.

▲
⟩⟩
RNinMunich
Colin H
Ianh
Peejay
Scratchbuilder
Martin555
|
💬 Re: HMS Cruiser. 1/64 scale 18 gun brig of war
3 years ago by 🇬🇧 cormorant (
Lieutenant Commander)✧ 126 Views · 4 Likes
Flag
Thanks Martin. I have already picked this one up and found it to be of great assistance.
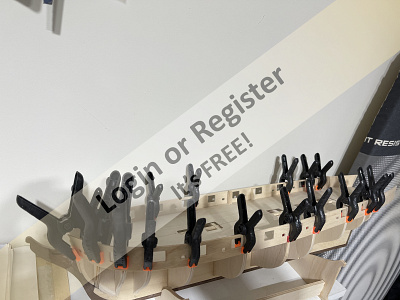
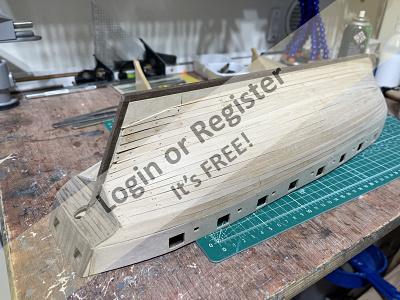
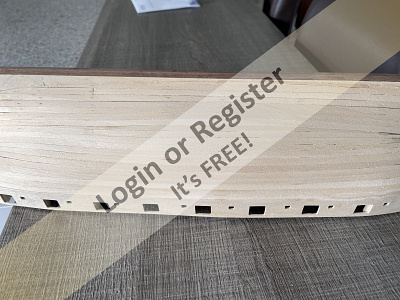
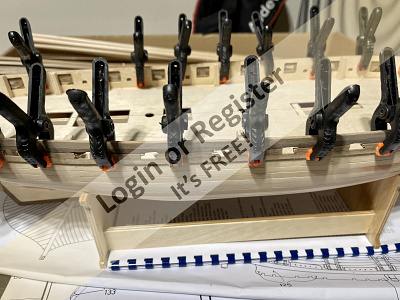
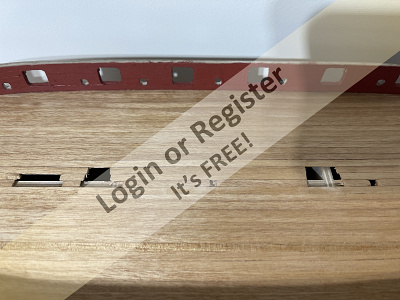
I am making steady progress but have already learned two valuable lessons. 1. Despite the fact that the parts appear to have been accurately cut, I need to take more time in preparation and dry fitting before applying the glue. This became apparent when I decided to glue the false deck onto the bulkheads. I should have sanded the knees on the bulkheads and the slots in the false deck more accurately. 2. The equivalent of 'measure twice, cut once'. I am embarrassed to admit, but I attempted to fit the first gunport bulwark the wrong way round, i.e. the front bit at the back and the back bit at the front ! This involved bevelling and cutting the wrong end to the 'correct' angle to fit at the bow. Luckily I noticed my mistake before glueing and only had to fit a small wedge into the back end where the bulwark joins the transom.. I put this bo**ock down to my age (again)! The next job on the build was to bevel the bulkheads to allow the planks to fit flat on them. Quite a time consuming task. I found that moving a plank down the bulkheads and sanding or filing each one and moving down about an inch at a time was the best way. I then needed to bend and fit the gunport bulwarks. Having researched various methods of bending the wood, I decided to follow the instructions which suggested soaking in warm water for an hour or so. Having done this I dry fitted and clamped them to the bulkheads, leaving overnight. (picture 3) This worked very satisfactorily (picture 1) and they are now glued in place, including the wedge mentioned above! (picture 2). I have dry fitted the pre-formed bulwark capping strips and I seem to have got the shape and curve of the bulwarks pretty well. Next job is the first planking of the hull, so if I haven't bored you too much with my ramblings, please stay tuned. 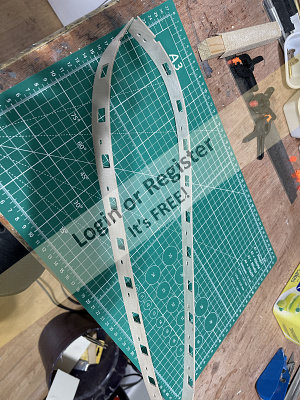
▲
⟩⟩
Colin H
Peejay
mturpin013
Graham93
|
|
💬 Re: HMS Cruiser. 1/64 scale 18 gun brig of war
3 years ago by 🇬🇧 Martin555 (
 Fleet Admiral) Fleet Admiral)✧ 133 Views · 2 Likes
Flag
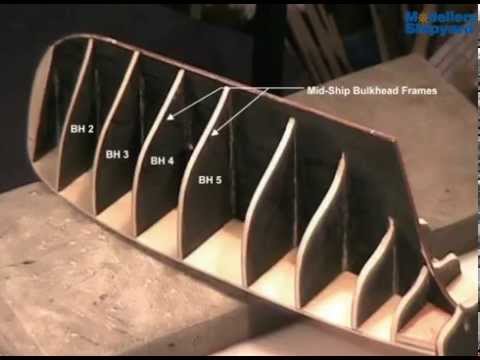
This utube video might help you.
▲
⟩⟩
Colin H
cormorant
|
Login To
Remove Ads
Remove Ads
📝 First Planking
3 years ago by 🇬🇧 cormorant ( Lieutenant Commander)
Lieutenant Commander)✧ 140 Views · 6 Likes · 7 Comments
Flag
💬 Add Comment
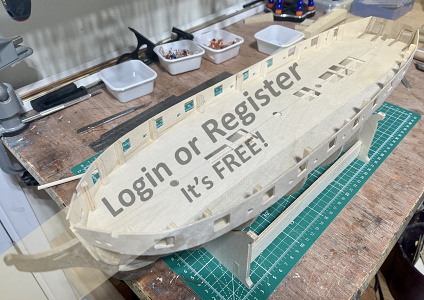
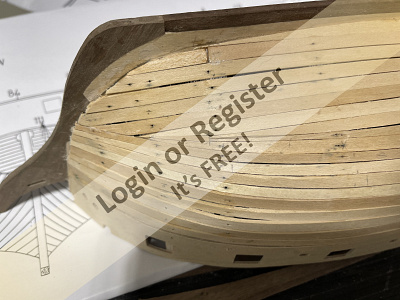
I thought the first planking would be a tester for me and I was right. My main problem is getting the planks around the bow to stick flat to the bulkheads as you can see from the photo. However, having seen first planking on other blogs, before and after fettling, I feel I am not doing too badly.
On the premise that bits can be glued in and then sanded back and the very comforting comment by Nonsuch, that this is only a dress rehearsal for the second planking, I am feeling quietly confident.
I decided to follow the kit instructions and plank from top to bottom. Soaking in warm water aids bending and when tapering the knife blade is less likely to follow the grain of the wood.
As I am writing this log, I have the hull next to me and I think I have found why the planks are not lying flat on the bulkheads.
I did not start tapering the first planks soon enough! I am sure you experienced builders will put me right. Once again, a lesson learned for the second planking perhaps?
I am only fixing two planks per day at the moment, one port and one starboard. This allows me to use modified foldback clips and only brass tack at the bow and stern.Yes, it will take time, but I'm in no rush.
In the meantime I have started to build some of the deck fittings.
Next instalment on completion of first planking, which will hopefully be 'alright on the night'.
▲
⟩⟩
Martin555
Colin H
RNinMunich
Peejay
mturpin013
Graham93
|
💬 Re: First Planking
3 years ago by 🇬🇧 jacko (
Lieutenant Commander)✧ 134 Views · 4 Likes
Flag
my first attempt at planking

▲
⟩⟩
RNinMunich
Martin555
Colin H
cormorant
|
|
Login To
Remove Ads 💬 Re: First Planking
3 years ago by 🇩🇪 RNinMunich (
Fleet Admiral)✧ 135 Views · 2 Likes
Flag
Good luck Steve,🤞
My Panasonic Beard Trimmer sorts out my Bearding Line quite well. 😁 What I really need is a better Butt Shifting System ... to get it off the armchair more often!! 🤔 The 3 or 4 Butt systems seem a bit extravagant somehow 😮 Happy Butting! Cheers, Doug 😎 ▲
⟩⟩
Martin555
cormorant
|
|
💬 Re: First Planking
3 years ago by 🇬🇧 cormorant (
Lieutenant Commander)✧ 132 Views · 2 Likes
Flag
Thanks Doug. I have me Bearding Line and Butt Shift System to contend with next, but the more I do the easier it becomes.
Steve. ▲
⟩⟩
Martin555
RNinMunich
|
|
💬 Re: First Planking
3 years ago by 🇩🇪 RNinMunich (
Fleet Admiral)✧ 135 Views · 2 Likes
Flag
Well 'fettle me trunnions' Steve 😮
Bit of a switch for you. I'm intrigued to see how you get on. Good luck 🤞 above all 'enjoy the ride' 👍 Cheers, Doug ▲
⟩⟩
Martin555
cormorant
|
|
💬 Re: First Planking
3 years ago by 🇦🇺 Lyle (
 Petty Officer 2nd Class) Petty Officer 2nd Class)✧ 137 Views · 4 Likes
Flag
Planking and more Planking. I live in OZ and I learnt from a heritage furniture specialist and have used this for years. THE plank is painted with Phenyll from the supermarket. I remember my Grandmother sterilised the toilet with stinky Phenyll. The furniture man said it came into use as early as the historical no supermarkets , then, Napolionic furniture makers for bending veneer and WOOD.Is is so good.The strips are painted both sides with phenyll , just a model paintbrush straight from the bottle. Then I apply simple Hardware wood white furniture glue PVAto the plank and the hull former ( poly vinyl acetate) " Selleys, etc " and after some moments the SUPPLE plank is pinned , braced , tied whatever in place. I do so gently and as it is "wet " no splits cracks etc . I recently did hull and back planking on the Louise Heloise with half inch planks 1/16 thick, 1/32 thick 1/8 thick of Cedar , teak, Mahogany and Huon Pine woods and NO DRYING STAINS. I have then always properly sealed my model hulls etc. I leave to dry 24 hours till the next day, very dried as normal to remove the fasteners. I have done this over 30 years now , power boats ply , sail wood boats ALL . IT is very easy over the years in salt water as I boat in the local sea lake channel. Regards Lyle.
▲
⟩⟩
Martin555
cormorant
Ianh
Peejay
|
|
💬 Re: First Planking
3 years ago by 🇬🇧 cormorant (
Lieutenant Commander)✧ 140 Views · 2 Likes
Flag
No, just soaked them for about an hour. They become very flexible, but I'm now pretty certain that the problem around the bow is my own fault for not tapering them soon enough after the first planks.
I've just put two more on since writing, paying more attention to the taper, and they seem to be laying better. ▲
⟩⟩
Martin555
Peejay
|
|
💬 Re: First Planking
3 years ago by 🇬🇧 jacko (
Lieutenant Commander)✧ 143 Views · 1 Like
Flag
did you steam the planks first
▲
⟩⟩
Martin555
|
📝 First Planking Finished
3 years ago by 🇬🇧 cormorant ( Lieutenant Commander)
Lieutenant Commander)✧ 127 Views · 6 Likes · 3 Comments
Flag
💬 Add Comment
The part of the build I most dreaded is now finished.
Lessons Learned.
1. Spend more time bevelling me bulkheads. I ended up using a needle file on the bulkheads for each plank. Not ideal and I still didn't get a good bevel resulting in gaps between the planks.
2. Tapering. Following the instructions I started just below the gunport bulwarks but did not start tapering until the seventh plank down. This meant that I was forcing the planks upwards around the bow, again causing gaps and almost 'kinks'. Pure laziness on my part, or was I afraid of tapering?
3. Bevelling. Once again, more time taken would have resulted in a closer fit of the planks.
4. Even allowing for my mistakes, I found the best method of plank bending (for me), is by soaking in warm water for an hour or so (length of soak depends upon how much bend is required) rather than steaming. And certainly not crimpers.
If I have a difficult place to get to where clamps or brass pins are difficult, eg round the bow, and I want an instant bond, then I use superglue.
The photos show that even a rough first plank can be smoothed with patient sanding, coarse grit followed by medium, and yes, a small amount of filler in places. This has hopefully set me up for a much better second planking.
A dear friend of mine says that this exercise will make me a better planker or a complete planker.
▲
⟩⟩
Martin555
mturpin013
Colin H
Ianh
RNinMunich
Scratchbuilder
|
💬 Re: First Planking Finished
3 years ago by 🇩🇪 RNinMunich (
Fleet Admiral)✧ 128 Views · 3 Likes
Flag
"A dear friend of mine says that this exercise will make me a better planker or a complete planker. "
'Only faals and harses' eh Steve? 🐴😁 So far so good, and much learned Next layer should be a piece of cake!👍 Cheers, Doug 😎 PS Practise your bevelling - use a chunk of 2x1 wrapped with 180 grit, ca 6" long, i.e. enough to always cover at least two formers. 😉 ▲
⟩⟩
Martin555
Ianh
cormorant
|
|
Login To
Remove Ads 💬 Re: First Planking Finished
3 years ago by 🇨🇦 Newby7 (
Fleet Admiral)✧ 127 Views · 3 Likes
Flag
Looks good and it is a lot of work.
Rick ▲
⟩⟩
Martin555
GaryLC
cormorant
|
|
💬 Re: First Planking Finished
3 years ago by 🇬🇧 Scratchbuilder (
 Vice Admiral) Vice Admiral)✧ 131 Views · 2 Likes
Flag
Steve.
Well done.You should be quite proud of your planking. Re the last sentence 😂😂😂😂😂 Looking forward to the next instalment. Regards Bill. ▲
⟩⟩
Martin555
cormorant
|
📝 Second Planking
3 years ago by 🇬🇧 cormorant ( Lieutenant Commander)
Lieutenant Commander)✧ 123 Views · 8 Likes · 14 Comments
Flag
💬 Add Comment
I have started my second planking and I'm so far, happy with the result.
As per instructions, I have started level with the top of the gunport bulwarks, but on reaching the bottom of the bulwarks, I have nowhere to attach the clamps whilst the glue is drying.
The instructions recommend the use of thick superglue, with the warning that the wet plank will accelerate activation. Even without this, I fear I would have very little time to position the plank, which of course is critical. There is also the added annoyance of sticking plank to fingers, fingers to fingers, fingers to thumbs, and upsetting the wife with the resultant screams of frustration.
Another method seems to be the use of dressmakers pins. Apparently subsequent wetting of the wood swells it and closes the pinholes upon removal.
The third, and so far my preferred method, is to use brass pins. Mix the sawdust from the sanded wood with PVA to fill the holes left by the pins.
I respectfully call upon you fellow plankers for any further advice.
Ps. The gunport in the photo need fettling.
▲
⟩⟩
Martin555
Peejay
RNinMunich
GaryLC
figtree7nts
mturpin013
jbkiwi
Colin H
|
💬 Re: Second Planking
3 years ago by 🇩🇪 RNinMunich (
Fleet Admiral)✧ 110 Views · 2 Likes
Flag
Wot a planker! 😮😁
Persevere Steve 👍 This looks like being a 'Copper Bottomed' project. Hat off to you for tackling it. Main thing; You don't glue yourself to it 😭 Cheers, Doug 😎 PS "though not being encouraged by my wife wondering why I am filling the sink with water and floating twigs in it!" Tell the Missus you are experimenting with new recipes for herbal teas - to prevent Covid19 and the Common Cold! 😉 ▲
⟩⟩
Martin555
cormorant
|
|
Login To
Remove Ads 💬 Re: Second Planking
3 years ago by 🇬🇧 cormorant (
Lieutenant Commander)✧ 109 Views · 4 Likes
Flag
My left thumb is cracked and bleeding, my right forefinger has an extra skin of superglue and my left thumb seems to have PVA poisoning.
On the premise that everything will be alright in the end, I continue, though not being encouraged by my wife wondering why I am filling the sink with water and floating twigs in it! Once again, the bow section is causing problems. I had read in a different publication, of 'drop strakes', which I tried, but removed the planks before the glue dried, as I couldn't get it to line up properly. To get myself back on track I used a filler, though technically not a stealer I suppose, it doesn't look too bad. As you can see, I will have gaps between the planks and also pin holes (which I have not yet been able to invisibly fill). My thoughts are to leave the sawdust in the cracks when I finally sand down, which will act as a filler. Careful application of a matt varnish will seal it? Any observations chaps? I optimistically estimate that I have got about half way. I will soon be down to the waterline, (there's a song there somewhere), after which I will not have to bother about filling as the copper plates will cover it. I am assuming of course, that fitting 900 copper plates will be easier than planking! 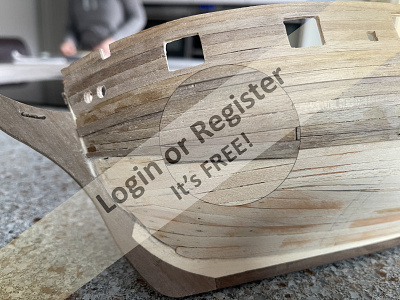
▲
⟩⟩
Martin555
Colin H
RNinMunich
jbkiwi
|
|
💬 Re: Second Planking
3 years ago by 🇬🇧 GaryLC (
 Captain) Captain)✧ 120 Views · 2 Likes
Flag
Very nice planking job there, congratulations. Regards, Gary.
▲
⟩⟩
Martin555
cormorant
|
|
💬 Re: Second Planking
3 years ago by 🇬🇧 cormorant (
Lieutenant Commander)✧ 114 Views · 3 Likes
Flag
Both planks went on ok and, yes , of course, the drilling is to stop the plank splitting, as I found when I put an extra pin in without.
A bit of sawdust mixed with pva and gently sanded back when dry, fills the holes nicely. The use of masking tape on the after end of the planks was also successful. Thanks for your advice chaps. Much appreciated. I have now decided to copper plate the hull below the water line, so the pressure will soon be off, for planking, anyway! 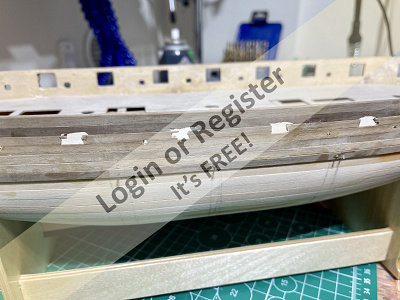

▲
⟩⟩
Martin555
Colin H
jbkiwi
|
|
💬 Re: Second Planking
3 years ago by 🇺🇸 figtree7nts (
 Admiral) Admiral)✧ 117 Views · 2 Likes
Flag
Hi Steve,
Your doing a real good job! Of the Planking of your model! Cheers, Ed ▲
⟩⟩
Martin555
cormorant
|
|
💬 Re: Second Planking
3 years ago by 🇬🇧 cormorant (
Lieutenant Commander)✧ 116 Views · 2 Likes
Flag
I've just put a couple more planks on, one each side, using the brass pins, and pre-drilling the holes with a 0.5mm drill (as recommended in the instructions, I assume to stop the wood splitting).
At the aft end of the planks I am trying Nonsuch's suggestion of masking tape, which seems to be working also. I will let you both know how it turns out in the morning🤞. ▲
⟩⟩
Martin555
mturpin013
|
|
💬 Re: Second Planking
3 years ago by 🇨🇦 Newby7 (
Fleet Admiral)✧ 117 Views · 2 Likes
Flag
As I understand gorilla wood glue is PVA type of glue.I find I have good success with gorilla glue .
Rick ▲
⟩⟩
Martin555
cormorant
|
|
💬 Re: Second Planking
3 years ago by 🇬🇧 cormorant (
Lieutenant Commander)✧ 117 Views · 1 Like
Flag
Thanks Rick, that's encouraging. Any reason for the use of Gorilla as opposed to PVA?
Steve ▲
⟩⟩
Martin555
|
|
💬 Re: Second Planking
3 years ago by 🇨🇦 Newby7 (
Fleet Admiral)✧ 119 Views · 2 Likes
Flag
I find supper glue for me is hard to use . My preference is gorilla wood glue and small pin nails and clamps. The holes fill easily when sanding
Rick ▲
⟩⟩
Martin555
cormorant
|
|
💬 Re: Second Planking
3 years ago by 🇬🇧 Nonsuch (
 Chief Petty Officer 2nd Class) Chief Petty Officer 2nd Class)✧ 124 Views · 2 Likes
Flag
Perfect. You don't need the precision of Moore and Wright to hold a plank on.
Be warned though, you'll soon be using them for everything! ▲
⟩⟩
Martin555
cormorant
|
|
💬 Re: Second Planking
3 years ago by 🇬🇧 cormorant (
Lieutenant Commander)✧ 122 Views · 2 Likes
Flag
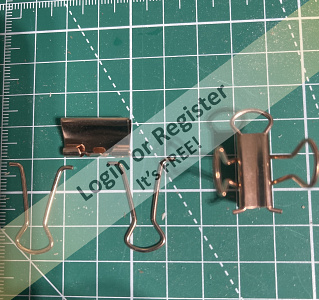
Thanks for that. I admit to not owning any.
Would this be a good starter pack? ▲
⟩⟩
Martin555
Colin H
|

|
Login To
Remove Ads 💬 Re: Second Planking
3 years ago by 🇬🇧 Nonsuch (
Chief Petty Officer 2nd Class)✧ 124 Views · 3 Likes
Flag
The tool makers clamp also works while trial fitting a plank. It effectively gives you an extra hand so you can lock a plank in place and still have two hands for manipulating the rest of the plank while adjusting the fit. You can't use CA to test fit.
Tool makers clamps can be adjusted so the jaws are parallel to the wood, avoiding unsightly compression marks. I have about ten of them in various sizes. ▲
⟩⟩
Martin555
shamrok
cormorant
|
|
💬 Re: Second Planking
3 years ago by 🇬🇧 cormorant (
Lieutenant Commander)✧ 122 Views · 1 Like
Flag
That does make sense and I hadn't thought of masking tape.
Thank you. Perhaps superglue on the first inch at the bow to get an instant bond? ▲
⟩⟩
Martin555
|
|
💬 Re: Second Planking
3 years ago by 🇬🇧 Nonsuch (
Chief Petty Officer 2nd Class)✧ 125 Views · 3 Likes
Flag
I'm not a fan of superglue for planking, prefering more "wet" working time.
One method of holding planks in place, that I find useful sometimes, is masking tape. Simply place masking tape along the plank being fitted. Press the tape to the adjacent plank and at the other edge, which steps down to the first layer of planking, use your finger nail to make the tape contact as close to the new plank edge as possible. This is OK for planks requiring little force to hold them down, but often not up to holding them at the bow where the curves are tighter. The problem here is keeping the very tip of the new plank from lifting away from the stem. On the full size, there would be a groove in the stem to accept the tip of the new plank. You can add a temporary edge to hold the tip of the plank by fitting a toolmakers clamp onto the stem. Place the end of the clamp parallel to the planking line, leaving a gap equal to the plank thickness. The new plank then "slots" into your temporary planking groove. This method is far more solid than pins and does not inflict any damage to the plank. A pin can be inserted next to the new plank, to hold it against your previous plank. I don't have anything at this building stage to photograph for you. If it doesn't make sense, let me know and I'll try and make some illustrations. ▲
⟩⟩
Martin555
Colin H
cormorant
|
📝 Copper Plating the Hull
3 years ago by 🇬🇧 cormorant ( Lieutenant Commander)
Lieutenant Commander)✧ 108 Views · 10 Likes · 5 Comments
Flag
💬 Add Comment
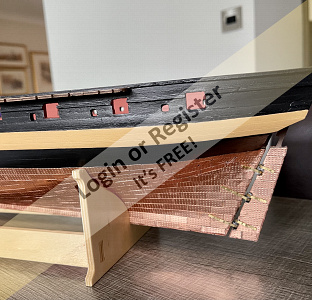
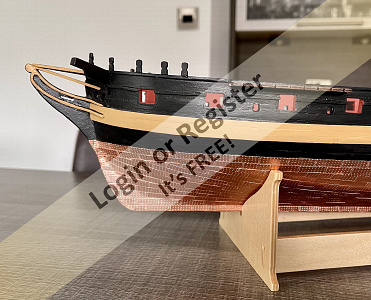
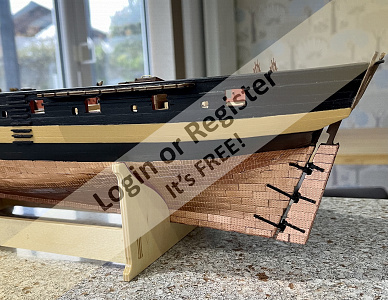
Having second planked to the waterline (more about the waterline later!), the pressure was off and I found I was able to crack on down to the keel, without having to be too precise.
I started to enjoy the process and far from having to use the 'f' word, filler, I just needed to use stealers at the stern.
Now for an easy bit, I thought! Just mark the waterline with my newly purchased marker and stick on a few copper plates.
The first problem was the waterline. I have marked many waterlines on modern day hulls, but it took three attempts before I got anywhere close to this one. In the end, I used the two dimensional plan and measured down from the top of the bulwarks. I transferred these measurements onto the hull, taking in to account the tumblehome. I then joined up the dots with masking tape. I think I got reasonably close.
I had read up and watched various youtube videos on plating and it looked pretty straightforward.
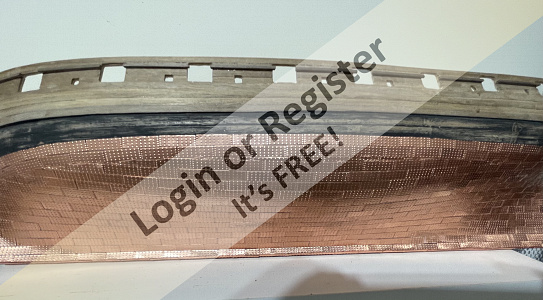
I decided to run two rows of plates just below the waterline and then work up from the keel. It was a bit tricky filling the gaps where the two lines joined as, although the plates are malleable, they are quite difficult to cut.
The other problem was finishing off around the keel, due to the size of the plates. They were just too big for the base and the sides of the keel so I had to fold them over by tapping each one with a small hammer.
Lastly, I found it very difficult to keep the dreaded superglue off the plates (and my fingers!), however careful I tried to be.
I am just coming to the end of a very interesting and often frustrating phase of the build. I am not sure if I have made a passable job of the plating as I have nothing to compare it with. However, I am hoping that as things progress, the upper works will be of more interest to the observer.

I started to enjoy the process and far from having to use the 'f' word, filler, I just needed to use stealers at the stern.
Now for an easy bit, I thought! Just mark the waterline with my newly purchased marker and stick on a few copper plates.
The first problem was the waterline. I have marked many waterlines on modern day hulls, but it took three attempts before I got anywhere close to this one. In the end, I used the two dimensional plan and measured down from the top of the bulwarks. I transferred these measurements onto the hull, taking in to account the tumblehome. I then joined up the dots with masking tape. I think I got reasonably close.
I had read up and watched various youtube videos on plating and it looked pretty straightforward.
I decided to run two rows of plates just below the waterline and then work up from the keel. It was a bit tricky filling the gaps where the two lines joined as, although the plates are malleable, they are quite difficult to cut.
The other problem was finishing off around the keel, due to the size of the plates. They were just too big for the base and the sides of the keel so I had to fold them over by tapping each one with a small hammer.
Lastly, I found it very difficult to keep the dreaded superglue off the plates (and my fingers!), however careful I tried to be.
I am just coming to the end of a very interesting and often frustrating phase of the build. I am not sure if I have made a passable job of the plating as I have nothing to compare it with. However, I am hoping that as things progress, the upper works will be of more interest to the observer.
▲
⟩⟩
mturpin013
Martin555
octman
robbob
TonyAsh
Colin H
JOHN
billmcl61
GaryLC
Nonsuch
|
💬 Re: Copper Plating the Hull
3 years ago by 🇬🇧 cormorant (
Lieutenant Commander)✧ 106 Views · 1 Like
Flag
Thanks Martin and for the tip about the green paint. It is 'in your face' at the moment and I can't really wait for the verdigris to form naturally.
I will try that before starting on the masts etc. ▲
⟩⟩
Martin555
|
|
Login To
Remove Ads 💬 Re: Copper Plating the Hull
3 years ago by 🇬🇧 Martin555 (
Fleet Admiral)✧ 98 Views · 1 Like
Flag
Hi Steve,
Great work so far, you have become a good Planker and part time coppersmith. Later in the build you might want to dull down the copper so that it dose not look new. Some different shades of green paint rubbed on with a rag should do the trick. Martin555. ▲
⟩⟩
cormorant
|
|
💬 Re: Copper Plating the Hull
3 years ago by 🇬🇧 jimdogge (
 Warrant Officer) Warrant Officer)✧ 109 Views · 3 Likes
Flag
Hi cormorant only just seen your post about clamps l have a couple of moore and wright clamps and hardly use them l invested in the pistol squeeze type they come in all sizes mine range from 20 ins down to 4ins they are great one handed use and can be reversed so they can be used as a spreader.
goodluck stay safe Jim. ▲
⟩⟩
Martin555
billmcl61
cormorant
|
|
💬 Re: Copper Plating the Hull
3 years ago by 🇬🇧 cormorant (
Lieutenant Commander)✧ 109 Views · 2 Likes
Flag
Thanks for the vote of confidence Bill, it means a lot.
Steve ▲
⟩⟩
Martin555
billmcl61
|
|
💬 Re: Copper Plating the Hull
3 years ago by 🇮🇪 billmcl61 (
Warrant Officer)✧ 108 Views · 2 Likes
Flag
Hi Steve,
I might be strange but I think I would be more interested in the copper plating 😊, it looks great .. good job Bill ▲
⟩⟩
Martin555
cormorant
|
📝 And Even More Planking
3 years ago by 🇬🇧 cormorant ( Lieutenant Commander)
Lieutenant Commander)✧ 108 Views · 6 Likes · 3 Comments
Flag
💬 Add Comment
The next stage is the bulwark inner planking and the deck planking.
Instructions say to plank the bulwarks first, but I thought I would be clever and do the deck first, so I could cover any minor errors in the trimming with the first bulwark plank.
To do this successfully of course, the deck needs to be completely flat, which mine wasn't. However, I think I've got away with it using the good old 2 foot rule.
I was somewhat disappointed with the deck, but I put this down (it's my story and I"m sticking to it!), to the Tanganyika strip supplied. It wasn't very straight and even though I sanded it before fixing, was still rough around the edges. I have planked decks in the past and got a much better result with lime.
I was also disappointed with the way the matt varnish 'coloured' the deck quite dark.
The inner bulwarks went ok, but I have had to use the dreaded filler in some places.
My main problem was the gun and oar ports. These are pre cut in the bulwarks, but by the time I had cut back the second, and inner bulwark planking, and then filed, they have all ended up about 1mm (that's being optimistic), too big. Some of you may know the feeling, just file a bit off here to get that straight, which puts the other side out, so file a bit more off here to get that straight and so on. Once again, the 2 foot rule!
I have come to the conclusion that this model will not turn out as good as I would have hoped, so to cheer me up a bit I have started to paint the hull. And no more floating twigs in the kitchen sink, as my wife describes my careful soaking of the planks!
▲
⟩⟩
jbkiwi
Scratchbuilder
mturpin013
Colin H
Nonsuch
Martin555
|
💬 Re: And Even More Planking
3 years ago by 🇬🇧 cormorant (
Lieutenant Commander)✧ 107 Views · 2 Likes
Flag
Thank you Nonsuch. I will bear your tips in mind for future builds, particularly the deck planking. I have tried using a sharp pencil for the caulking lines in the past but it has never worked.
Also, lining the gun ports may also get me out of trouble. Thank you. ▲
⟩⟩
Scratchbuilder
Martin555
|
|
Login To
Remove Ads 💬 Re: And Even More Planking
3 years ago by 🇬🇧 Nonsuch (
Chief Petty Officer 2nd Class)✧ 99 Views · 3 Likes
Flag
For your first "static" she's looking good.
I agree on doing the deck first. I even take it a stage further and paint the inside of the bulwark planks before fitting them. Any chips and scratches can easily be touched up later. No masking required. I'm very bad at buying a kit and then not using over half of it! I usually use sapele veneer for decks. One edge of the strip is wiped with an artists charcoal block before glueing in place. When "sanded" it gives the finest black caulking line imaginable. Note I say "sanded" as I finish decks with a small cabinet scraper, after first locking the grain down with thinned polyurethane varnish. Don't start scraping until the coats of varnish stop soaking in. Then just go with the grain, adding more coats and scraping each until perfectly smooth. If your gun ports are too big, consider lining them with veneer strips. ....but well done! ▲
⟩⟩
cormorant
Colin H
Martin555
|
|
💬 Re: And Even More Planking
3 years ago by 🇬🇧 Martin555 (
Fleet Admiral)✧ 96 Views · 1 Like
Flag
I still say that for your first plank on frame build you are doing a grate job.
Plank on frame builds get better the more you do. Keep going it's looking good. Martin555. ▲
⟩⟩
cormorant
|
📝 Hull Complete
3 years ago by 🇬🇧 cormorant ( Lieutenant Commander)
Lieutenant Commander)✧ 98 Views · 5 Likes · 9 Comments
Flag
💬 Add Comment
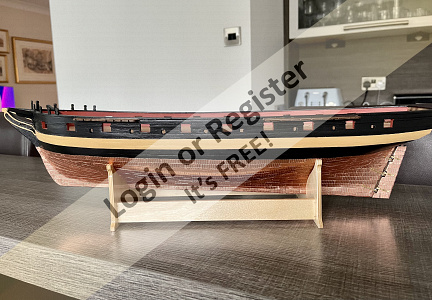
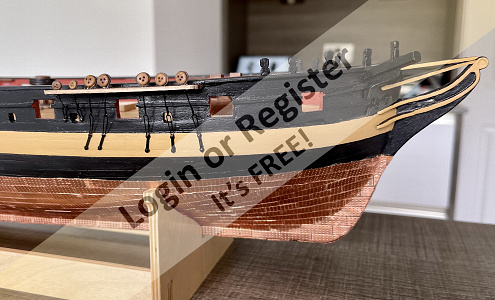
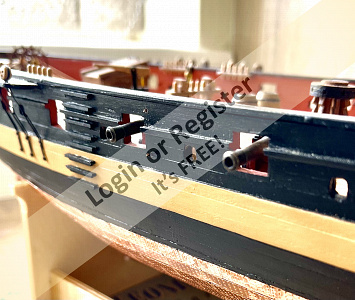
Following advice from Nonsuch, I lined the gunports with left over 4 x 1 mm planking. Although not all exactly the same size, they look much better.
The oar ports are also somewhat uneven.
For some reason, the bulwark capping rails did not follow the line of the bulwarks, particularly at the stern, where they curved in too much. I was unable to reshape them very much due to the run of the grain. Not sure why this should be and as the error was on both sides, could this be a design fault? My inexperience suggests otherwise.
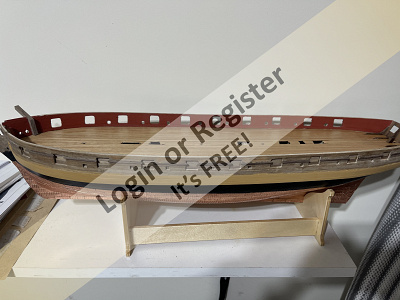
However, I was unable to "ensure the rail was equally spaced on the inner and outer sides". You will see from the pictures that it doesn't look too bad after a coat of paint and I'm hoping that it will be even less visible on the completed model.
I don't know whether to be disappointed or not with the second and inner bulwark planking. There are many irregularities, even under my carefully applied paintwork. so I think I will put it down to the realism of a hard worked and hard fought warship - and hope the upper works draws more attention than the hull.

The oar ports are also somewhat uneven.
For some reason, the bulwark capping rails did not follow the line of the bulwarks, particularly at the stern, where they curved in too much. I was unable to reshape them very much due to the run of the grain. Not sure why this should be and as the error was on both sides, could this be a design fault? My inexperience suggests otherwise.
However, I was unable to "ensure the rail was equally spaced on the inner and outer sides". You will see from the pictures that it doesn't look too bad after a coat of paint and I'm hoping that it will be even less visible on the completed model.
I don't know whether to be disappointed or not with the second and inner bulwark planking. There are many irregularities, even under my carefully applied paintwork. so I think I will put it down to the realism of a hard worked and hard fought warship - and hope the upper works draws more attention than the hull.
▲
⟩⟩
jbkiwi
RNinMunich
Scratchbuilder
Martin555
Colin H
|
💬 Re: Hull Complete
3 years ago by 🇬🇧 cormorant (
Lieutenant Commander)✧ 96 Views · 1 Like
Flag
Thanks Mike, very helpful. The xacto number 11 is very similar in shape to the Swann Morton scalpel blades I normally use.
I should now get much better ports in my next model! Steve ▲
⟩⟩
Martin555
|
|
Login To
Remove Ads 💬 Re: Hull Complete
3 years ago by 🇳🇿 jbkiwi (
Fleet Admiral)✧ 84 Views · 3 Likes
Flag
Looking great so far Steve, takes a lot of patience to tackle those projects, with so many parts to them. If I tried one of those, it would very quickly become a 'flying boat'😁
JB ▲
⟩⟩
RNinMunich
Martin555
cormorant
|
|
💬 Re: Hull Complete
3 years ago by 🇬🇧 Nonsuch (
Chief Petty Officer 2nd Class)✧ 85 Views · 2 Likes
Flag
Once I have the approximate position marked, I drill a small centre hole. I choose the centre, rather than a corner because unless I make a total horlicks of it, the hole will always be within the cut out area. I then place the metal strip (whose width is equal to the height of the gun port over the deck) an hold it inside the bulwark with a couple of clips. Then from the outside, using an X-Acto number 11, I cut a triangle from the pilot hole down to the baseline, but not quite the full width so I have some safety margin. The brass template then goes on and the port is "shaved" out with the X-Acto.
The X-Acto number 11 is a long wedge shaped blade and basically the only one I use. Being a straight cutting edge, if you know where the tip is then you know just where the rest of the blade is, unlike curved blades that can be causing damage whilst you are watching the tip. Never use a curved blade to cut off excess rigging.....you will regret it! Mike👍 ▲
⟩⟩
Martin555
cormorant
|
|
💬 Re: Hull Complete
3 years ago by 🇬🇧 cormorant (
Lieutenant Commander)✧ 99 Views · 2 Likes
Flag
Thanks so much for the comments Doug!
I was going to put her aside for a few months and get back into my comfort zone with a semi kit of a 77ft Elco which I have in the loft. However, you have encouraged me to keep going. Steve ▲
⟩⟩
RNinMunich
Martin555
|
|
💬 Re: Hull Complete
3 years ago by 🇩🇪 RNinMunich (
Fleet Admiral)✧ 91 Views · 2 Likes
Flag
"I don't know whether to be disappointed or not ..."
I do Steve DEFINITELY NOT!! 😀 Bl***y fantastic result, first or eleventy-first such model. When I was about 15 (many many moons ago🙄) I foolishly bought a Spanish galleon kit 🤔 Consisted of a pile of planks and bags and bags of twiddly bits. I.e. rough cut the hull profile on six 3/4" planks, glue 'em all together with two 1/2" dowels through guide holes to line 'em up. THEN, hours and hours and days and days of chiselling, planing, rasping to try and get near the hull shape! Needless to say I gave up after 3 or 4 weeks 🤔 Never touched such a 'sandwich' build kit or vintage sailing ship again. Still have the cannons and the rigging cord though 😉 But lost me trunnions somewhere!☹️ I admire your guts for taking on such a task so far outside your normal comfort zone, and the skill and perseverance you have put into her! Your copper bottom is magnificent 👍 (😮🙈) A millenary shop-full of Hat's Off's Sir 👍 Keep it up 👍 Cheers, Doug 😎 ▲
⟩⟩
Martin555
cormorant
|
|
💬 Re: Hull Complete
3 years ago by 🇬🇧 cormorant (
Lieutenant Commander)✧ 100 Views · 2 Likes
Flag
Hi Nonsuch.
Having completed the outer planking, I drilled small holes in it through the pre-cut gunports in the bulwark. I then opened up the holes into the shape of the pre-cuts from the outside. I then did the same thing once I had planked the inner bulwarks. By the time I had opened the ports from both sides, I had no definitive guide and I tended to follow the line of the planks, hence some/many of them are not the correct height above the deck. Your practice of using a metal strip placed on the deck and then your treasured brass strip, would help me immensely. My main question, what tool/s do you use to cut the bottom edge and the ports? Thanks. Steve ▲
⟩⟩
Martin555
RNinMunich
|
|
💬 Re: Hull Complete
3 years ago by 🇬🇧 Nonsuch (
Chief Petty Officer 2nd Class)✧ 89 Views · 3 Likes
Flag
Well done. A splendid result for a first static.
I know it's a bit late now, but..... I have an old treasured brass strip which has various sizes of square cut outs along it's length. Once gun port positions are marked out, I cut the bottom edge of the port using a metal strip placed on the deck (inside the bulwark) as a spacer and cutting guide. Once the bottom edge is established, I line up an appropriately sized square cut out in the brass strip (on the outside) and clamp it to the bulwark. The port can then be cut to the brass template. The process is simply repeated for each port. ▲
⟩⟩
RNinMunich
cormorant
Martin555
|
|
💬 Re: Hull Complete
3 years ago by 🇬🇧 Scratchbuilder (
Vice Admiral)✧ 91 Views · 2 Likes
Flag
Hi Steve.
As always splendid craftsmanship on your part. A pleasure to read your blogs. Regards Bill. ▲
⟩⟩
Martin555
cormorant
|
|
💬 Re: Hull Complete
3 years ago by 🇬🇧 Martin555 (
Fleet Admiral)✧ 88 Views · 2 Likes
Flag
I think you are doing a great job.
She looks good to me. These are not easy boat's to make. Keep up the good work. Martin555. ▲
⟩⟩
cormorant
Scratchbuilder
|
📝 Deck Fittings
3 years ago by 🇬🇧 cormorant ( Lieutenant Commander)
Lieutenant Commander)✧ 92 Views · 8 Likes · 3 Comments
Flag
💬 Add Comment
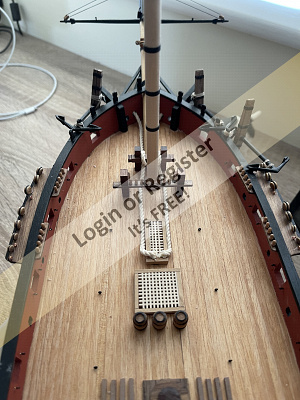
There are items I feel I could have made a better job of, one of these being cutting the gratings to size and jointing the borders.
This was, I think, mainly trying to cut the gratings with a scalpel. Once I had obtained an Xacto knife with a number 11 blade (thanks once again to Nonsuch), it became a lot easier. (Yes, I know, a bad workman always blames his tools!)
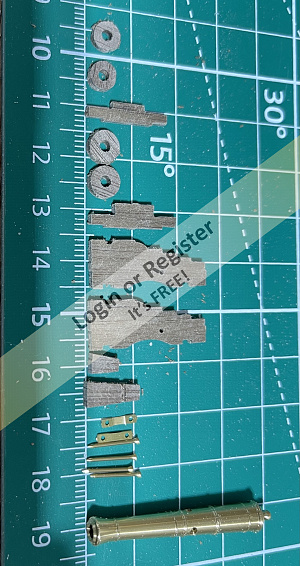
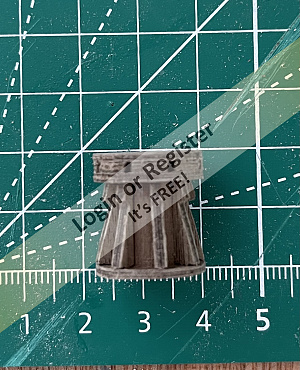
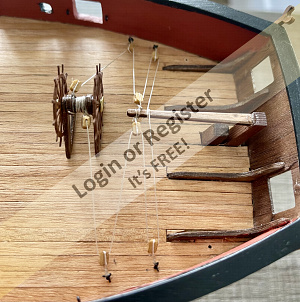
However, the elm tree pumps, companionway and bowsprit bracket assembly came together much better. I was also quite pleased with the wheel assembly.
I have glued the the main and fore channels in place. Instructions say to pin as well as glue, as they will have to take the strain of the shrouds and backstays.
I need to be very precise when drilling and pinning as the channels are only 2mm thick.
Having run a filet of thick cyano on the underside of the channels, I am wondering if this will be enough.
Any thoughts Mike?
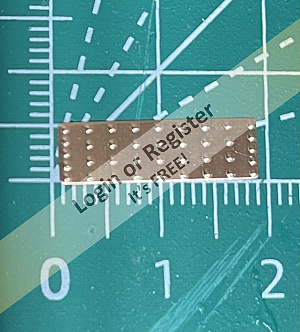
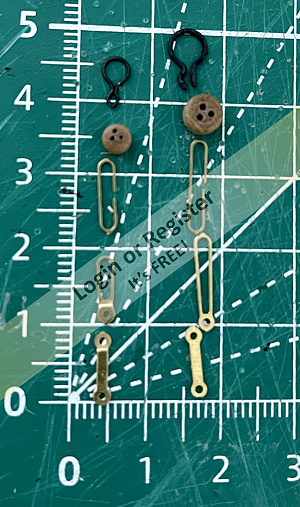
The chain plates are fiddly to assemble as you can perhaps see from the photo of the components. The deadeye strops, which are shaped wire, have to be prized apart to accept the deadeyes, then closed up again. Too much pressure will split the wooden deadeyes, as I have found. There are no 'spares', so I have added one to my shopping list.
Next on the list is the assembly of the guns. Jotika suggested the use of etching fluid on the barrels as they looked much better than painting.
Instructions say to dilute the fluid with water one to one and after degreasing the barrels, leave them to soak for about 30 minutes.
I ended up leaving them in overnight and they still came out a green brown colour, (instead of black), even though I had emptied the remainder of the neat fluid into the mix for fear that the solution was too weak.
Nether Krick, the suppliers of the fluid, nor Jotika, the seller, could offer an explanation.
However, Jotika have offered to put my barrels into a batch of their items and have another go.
I will let you know the result.
That's it for now. Next job will be the Masts and Yards.
This was, I think, mainly trying to cut the gratings with a scalpel. Once I had obtained an Xacto knife with a number 11 blade (thanks once again to Nonsuch), it became a lot easier. (Yes, I know, a bad workman always blames his tools!)
However, the elm tree pumps, companionway and bowsprit bracket assembly came together much better. I was also quite pleased with the wheel assembly.
I have glued the the main and fore channels in place. Instructions say to pin as well as glue, as they will have to take the strain of the shrouds and backstays.
I need to be very precise when drilling and pinning as the channels are only 2mm thick.
Having run a filet of thick cyano on the underside of the channels, I am wondering if this will be enough.
Any thoughts Mike?
The chain plates are fiddly to assemble as you can perhaps see from the photo of the components. The deadeye strops, which are shaped wire, have to be prized apart to accept the deadeyes, then closed up again. Too much pressure will split the wooden deadeyes, as I have found. There are no 'spares', so I have added one to my shopping list.
Next on the list is the assembly of the guns. Jotika suggested the use of etching fluid on the barrels as they looked much better than painting.
Instructions say to dilute the fluid with water one to one and after degreasing the barrels, leave them to soak for about 30 minutes.
I ended up leaving them in overnight and they still came out a green brown colour, (instead of black), even though I had emptied the remainder of the neat fluid into the mix for fear that the solution was too weak.
Nether Krick, the suppliers of the fluid, nor Jotika, the seller, could offer an explanation.
However, Jotika have offered to put my barrels into a batch of their items and have another go.
I will let you know the result.
That's it for now. Next job will be the Masts and Yards.
▲
⟩⟩
MouldBuilder
T33CNO
RNinMunich
mturpin013
Nonsuch
Martin555
Graham93
Colin H
|
💬 Re: Deck Fittings
3 years ago by 🇬🇧 cormorant (
Lieutenant Commander)✧ 86 Views · 1 Like
Flag
More excellent advice and tips. Thank you once again Mike.
I purchased an airbrush some time ago and have never used it in 'anger', so I will certainly consider that option on future builds. Steve ▲
⟩⟩
Martin555
|
|
Login To
Remove Ads 💬 Re: Deck Fittings
3 years ago by 🇬🇧 Nonsuch (
Chief Petty Officer 2nd Class)✧ 77 Views · 5 Likes
Flag
Remember mistakes are not mistakes unless you do the same thing again. Make them only once and they're the learning curve.
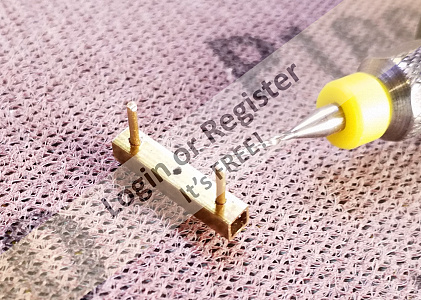
You're doing fine. The scalpel issue isn't you. They're designed for surgery, not whittling wood. X-acto are much thicker blades in a solid clamp handle - no comparison. Having said this I sand my gratings on the famous Aldi mini bench disc sander. As standard the platform to disc gap is far too high and it breaks things, so I clamp a piece of 5mm ply to the platform so it nearly touches the sanding disc. The channels should not be taking much tension, other than compressive against the ships side. I do however use edge pins. Drilling the edge is easy if you make a simple jig. See photos. The jig is square brass tube with three equally spaced holes. Straddle the edge of the channel so the pins are against opposite sides and the "drilling hole" is exactly central every time. Chain plate anchors need to be more solid, but not much. Rigging tension needs to be surprisingly low. You're not holding up a mast and fighting a sail in a storm, merely making the cord taught, as in not sagging. Over tight rigging will give problems as you add further cordage. The mast or yard should be straight without correcting it with rigging tension. Wire components for chainstays are "difficult" in several ways, specially for getting visually matching results. Some kit manufacturers offer an etched brass upgrade option. This usually includes chainplates, which are far easier to work with. Gun colour, I've tried most things and they nearly all have problems. If you add etched brass gun detail, like flintlock triggers and royal crests, the problem gets worse! My solution is light airbrushing with Mr Color black primer. It looks like the barrel has been very thinnly plastic dipped with a satin sheen. Hope this helps. Keep up your good work. Mike👍 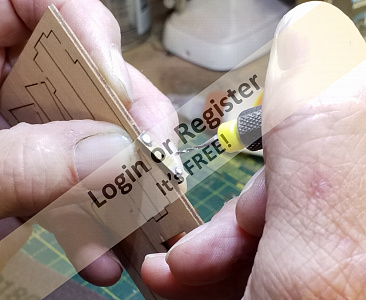
▲
⟩⟩
T33CNO
RNinMunich
cormorant
Martin555
Graham93
|
|
💬 Re: Deck Fittings
3 years ago by 🇬🇧 Martin555 (
Fleet Admiral)✧ 78 Views · 1 Like
Flag
You are doing a great job,
She is coming along nicely. Martin555. ▲
⟩⟩
cormorant
|
📝 Masts and Spars
3 years ago by 🇬🇧 cormorant ( Lieutenant Commander)
Lieutenant Commander)✧ 82 Views · 7 Likes · 8 Comments
Flag
💬 Add Comment
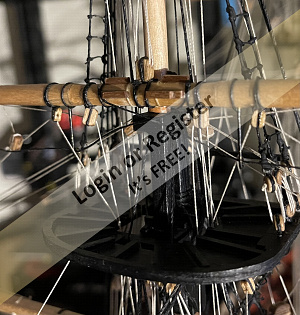
I seem to have spent the last six months gammoning and puddening, fitting deadeyes, single blocks, double blocks, sisters, closed hearts, not to mention the odd martingale and dolphin striker, with nothing really to see.
However, I am now on the masts and spars and things have started moving again.
I started with the bowsprit, which seemed to go quite well and I have made a start on the rigging, having attached the various blocks etc.
Working with dowel to get squares and tapers and hounds is quite a challenge for me, particularly getting the squares lined up on the top and bottom of the topmast.
I was therefore pleased that I had manage to assemble all three components of the foremast in a straight line. Hopefully the same will be true of the mainmast, having been able to practice.
I anticipated that shaping the masthead cap would be quite a problem, until I thought of cutting a piece of dowel of a slightly larger diameter and gluing it on.
One thing I haven't yet worked out is how to fit the spars to the masts!
The instructions are not at all helpful and searching the internet has not helped much either. A close up picture of the fitting would help but I cannot find one.
It is suggested by some, that a hole is drilled in both mast and spar and the joint is made by pushing a brass rod through.
I attached the spritsail yard to the bowsprit by filing a half round grove in each and then gluing.
Do I have to lash/gammon it?
Can I use a similar method with the spars?
Mike, you have some advice please?
I mentioned the last time problems with black etching the gun barrels.
As promised, Jotika dipped them with a batch of their stuff and the result you can see from the attached picture. Although not 'black', I am quite happy with the result. In all fairness, Jotika said that if I was not happy, they would replace the barrels with a new set.
Thank you
Steve
▲
⟩⟩
Colin H
Brucep
Martin555
Scratchbuilder
jbkiwi
T33CNO
RNinMunich
|
💬 Re: Masts and Spars
3 years ago by 🇬🇧 Nerys (
Fleet Admiral)✧ 60 Views · 3 Likes
Flag
Steve's comments made me think of the complexity of rigging a ship in Nelson's navy (and before and after) Weeks of work, making the spars , stepping the masts, sending up the yards, splicing wire, splicing rope, whipping, making blocks, deadeyes, cleats, belaying pins, all the thousand and one jobs before she is ready for sea, then a few days at sea, run into a Frenchman trying to beat the Brest blockade, bang! bang! an unlucky French cannon ball in the wrong place and it all comes tumbling down.
Nerys ▲
⟩⟩
Martin555
cormorant
Colin H
|
|
Login To
Remove Ads 💬 Re: Masts and Spars
3 years ago by 🇬🇧 Martin555 (
Fleet Admiral)✧ 62 Views · 1 Like
Flag
Steve,
All your hard work is paying off. She is really looking good. Congratulations on your promotion Lieutenant Commander Cormorant. Martin555. ▲
⟩⟩
cormorant
|
|
💬 Re: Masts and Spars
3 years ago by 🇬🇧 cormorant (
Lieutenant Commander)✧ 79 Views · 1 Like
Flag
Thanks so much for the photos, all is a lot clearer now! Together with the comments from Nerys and Martin 555 (thank you both), it should come together nicely.
I have also been thinking about your comments on making a round mast square or a square mast round. I made my 'squares' by initiating the flats with a small electric drill fitted with a circular sander (see picture), and finishing off with needle file and sanding block. I take your point about getting a crisp transition between round and square. Thank you again for your advice. Steve 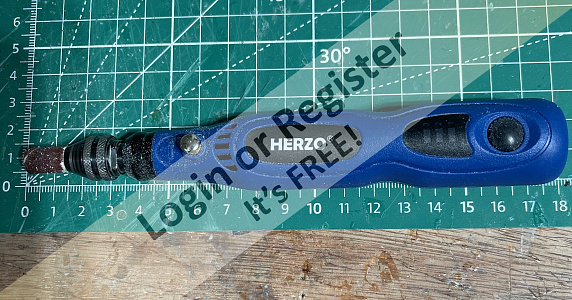
▲
⟩⟩
Scratchbuilder
|
|
💬 Re: Masts and Spars
3 years ago by 🇳🇿 jbkiwi (
Fleet Admiral)✧ 59 Views · 3 Likes
Flag
looking fantastic Steve, obviously a lot of work going into it, 👍
JB ▲
⟩⟩
Scratchbuilder
cormorant
Martin555
|
|
💬 Re: Masts and Spars
3 years ago by 🇬🇧 Nerys (
Fleet Admiral)✧ 62 Views · 3 Likes
Flag
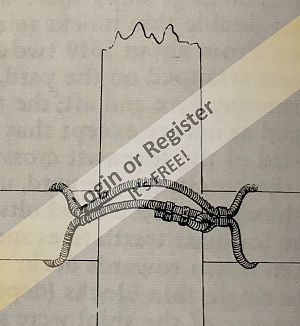
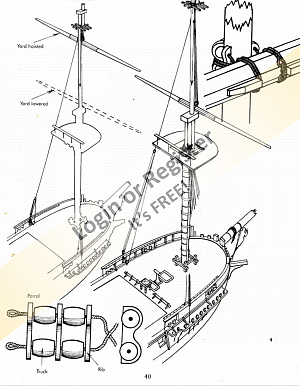
It's a long time since I built a static model with squaresails, but if I remember correctly I drilled two holes in the yard, either side of the mast, then threaded yarn through the holes and around the mast, tyeing off neatly, then fixing with a blob of glue. This then simulated the way it would have been done on a real ship with parrel balls on a rope around the mast allowing it to be hoisted ans swung when tacking.
Nerys ▲
⟩⟩
Scratchbuilder
cormorant
Martin555
|
|
💬 Re: Masts and Spars
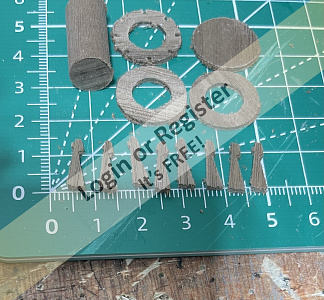
3 years ago by 🇬🇧 Nonsuch (
Chief Petty Officer 2nd Class)✧ 66 Views · 4 Likes
Flag
Welcome to the perverse world of static sail!
Have you noticed how kit manufacturers think that you can sand a 6mm round dowel into a 6x6mm square? I cheat and make masts from square stock in the first place. The topmast is obviously the most critical as it has square sections top and bottom. These must be parrallel otherwise the mast will have a twist in it. Starting with square allows top and bottom square sections to be easily alligned before rounding the middle part. I am fortunate to have a milling machine with spindexer, plus a lathe with a four jaw chuck. Without machinery, the simplest way us to make a tapered square mast (like a long skinny obelisk) then taping off the square sections to protect them from the sandpaper as you create the round section. Try and concentrate on getting crisp square to round transisions, over as short a distance as possible. Yards are attached by trusses which may be a plain rope sling or have parrels (a type of wooden bearing made of parrel ribs and wooden beads called trucks). See attached photos. Good luck, Mike 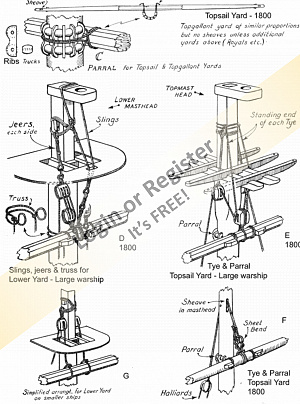
▲
⟩⟩
cormorant
MouldBuilder
RNinMunich
Martin555
|
|
💬 Re: Masts and Spars
3 years ago by 🇬🇧 Martin555 (
Fleet Admiral)✧ 68 Views · 1 Like
Flag
Hi Steve,
I know the yards were hoisted up the masts using blocks and tackles and stayed attached the same way. I found this sketch if it is any use. Great work she is coming together nicely Keep it up. Martin555. 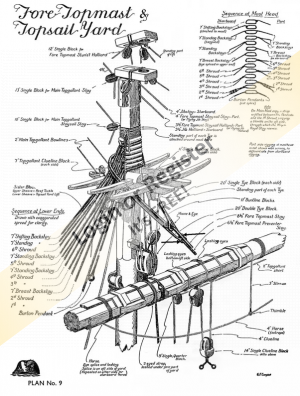
▲
⟩⟩
cormorant
|
|
💬 Re: Masts and Spars
3 years ago by 🇨🇦 Newby7 (
Fleet Admiral)✧ 65 Views · 2 Likes
Flag
Steve keep up the good work. I do think the cannons are good.
Rick ▲
⟩⟩
cormorant
Martin555
|
📝 Masts and Spars 2
2 years ago by 🇬🇧 cormorant ( Lieutenant Commander)
Lieutenant Commander)✧ 72 Views · 7 Likes · 3 Comments
Flag
💬 Add Comment
My last entry is showing 5 months ago - how times flies!
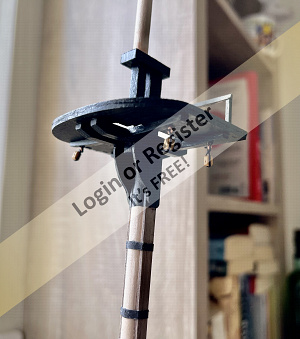
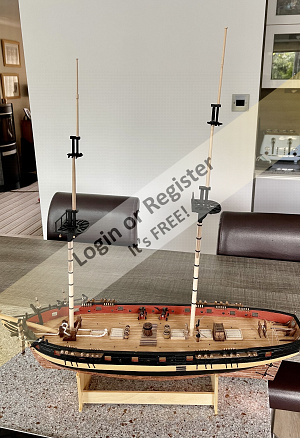
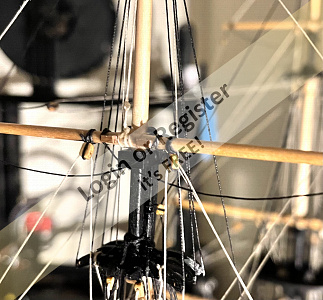
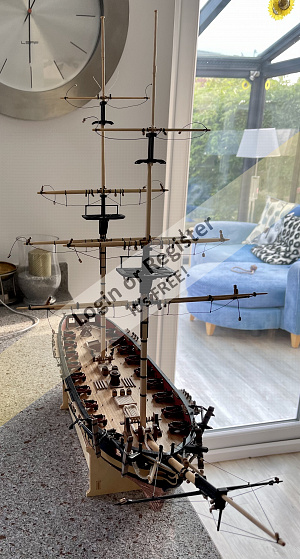
The mainmast went together as well as the foremast and thanks to the hints and tips from Mike and Martin (which also helped me understand the plans), I managed to rig the spars and boom more or less correctly. This entailed lashings, parral beads and various blocks.
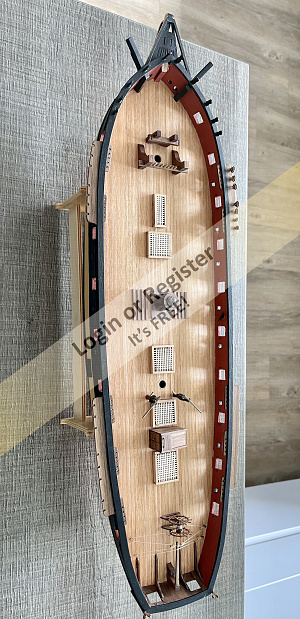
With all spars in place I stepped the masts ensuring they were upright and had a slight rake, according to the plan.
It was pleasing to see that when looking fore and aft all spars were parallel.
You will see from some of the images that there is some rigging already in place. All will become clear in my next post, which will relate to the comment made by Nerys.
I note particularly his remark of "an unlucky French cannon ball in the wrong place".
For cannon ball read "overenthusiastic use of clippers"!


The mainmast went together as well as the foremast and thanks to the hints and tips from Mike and Martin (which also helped me understand the plans), I managed to rig the spars and boom more or less correctly. This entailed lashings, parral beads and various blocks.
With all spars in place I stepped the masts ensuring they were upright and had a slight rake, according to the plan.
It was pleasing to see that when looking fore and aft all spars were parallel.
You will see from some of the images that there is some rigging already in place. All will become clear in my next post, which will relate to the comment made by Nerys.
I note particularly his remark of "an unlucky French cannon ball in the wrong place".
For cannon ball read "overenthusiastic use of clippers"!
▲
⟩⟩
dave976
mturpin013
fireboat
Colin H
Scratchbuilder
GaryLC
Martin555
|
💬 Re: Masts and Spars 2
2 years ago by 🇬🇧 Colin H (
Fleet Admiral)✧ 54 Views · 2 Likes
Flag
Welcome back Steve, that's some very nice rigging. You must have steady hands, good eyesight and vast amounts of talent.
Cheers Colin. ▲
⟩⟩
cormorant
Martin555
|
|
Login To
Remove Ads 💬 Re: Masts and Spars 2
2 years ago by 🇬🇧 Scratchbuilder (
Vice Admiral)✧ 55 Views · 2 Likes
Flag
Great to see you back Steve.
Looking forward to the next input. Regards Bill ▲
⟩⟩
cormorant
Martin555
|
|
💬 Re: Masts and Spars 2
2 years ago by 🇬🇧 Martin555 (
Fleet Admiral)✧ 61 Views · 2 Likes
Flag
Hi Steve,
I am glad to see you back on the site it has been a while. Absolutely awesome work. I have made one or two of these stick and string boats before so i know what a real time consuming tricky job you have been doing. Well done Sir. Martin555. ▲
⟩⟩
cormorant
Scratchbuilder
|


Login To
Remove Ads
Remove Ads