Join Us On Social Media!

|

|

|
Download The App!
Login To
Remove Ads
Remove Ads
Login To
Remove Ads
Remove Ads
Model Boats Website
New Build
23 Posts · 8 Followers · 73 Photos · 125 Likes
Began 3 years ago by
 Canada
Follow This Thread
Not currently following
> Click to follow
> Click to follow
Latest Post 3 years ago by
| Oldest posts shown first (Show Newest First) | (Print Booklet) |
📝 New Build
3 years ago by 🇨🇦 Newby7 ( Fleet Admiral)
Fleet Admiral)✧ 119 Views · 12 Likes · 7 Comments
Flag
💬 Add Comment
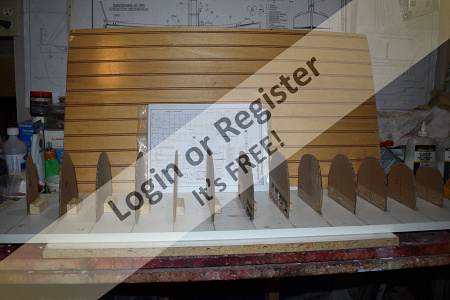
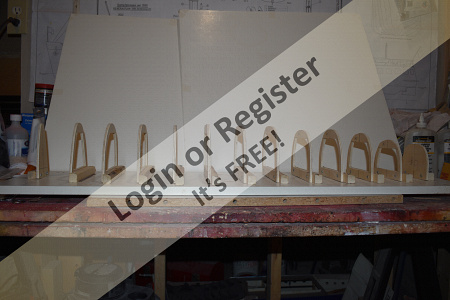
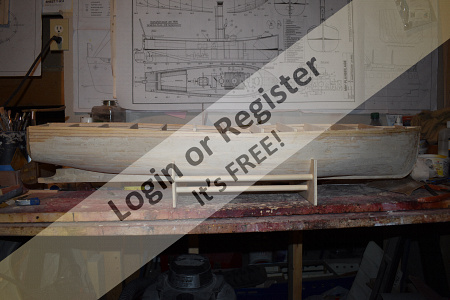
Started the work by getting the plan enlarged. Today I cut out cardboard frames setting them up on the building board.
Frames are 2-3/4 " spacing making the boat 36" long and 7" wide.
Need to get wood to proceed.
Rick
Frames are 2-3/4 " spacing making the boat 36" long and 7" wide.
Need to get wood to proceed.
Rick
▲
⟩⟩
Martin555
stevedownunder
Ygagnon
GaryLC
Seanympth
JOHN
Ianh
RNinMunich
Ronald
Madwelshman
Colin H
Peejay
|
💬 Re: New Build
3 years ago by 🇩🇪 RNinMunich (
Fleet Admiral)✧ 116 Views · 2 Likes
Flag
Scroll on Man 👍
😎 ▲
⟩⟩
Martin555
stevedownunder
|
|
Login To
Remove Ads 💬 Re: New Build
3 years ago by 🇨🇦 Newby7 (
Fleet Admiral)✧ 115 Views · 3 Likes
Flag
I use a scroll saw to make my frames. Looking at 1/16 x1/4 basswood strips for planking.
Rick ▲
⟩⟩
Martin555
stevedownunder
GaryLC
|
|
💬 Re: New Build
3 years ago by 🇨🇦 Newby7 (
Fleet Admiral)✧ 115 Views · 4 Likes
Flag
Doug the plan was from a member of my club. My thinking is to move the steam plant from my first build.
The one I took apart to make it look better bow and stern. Will make the call when the build progress. Rick ▲
⟩⟩
Martin555
stevedownunder
GaryLC
RNinMunich
|
|
💬 Re: New Build
3 years ago by 🇩🇪 RNinMunich (
Fleet Admiral)✧ 116 Views · 2 Likes
Flag
Mein Gott Rick 😎
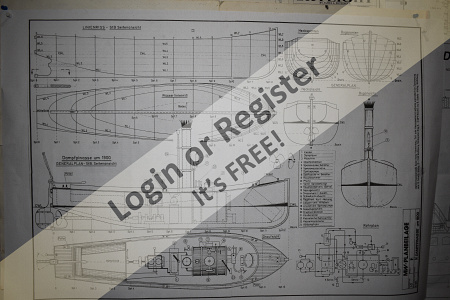
Where'd you find that jewel of a plan ? It's from the April 1985 issue of ModellWerft (=Model Shipyard). A mag I've subscribed to since 1986. Only moved here in Sept. '85. Looking forward to this blog. Are you going to build the steam plant as well? Cheers, Doug 😎 ▲
⟩⟩
Martin555
stevedownunder
|
|
💬 Re: New Build
3 years ago by 🇨🇦 Ronald (
 Admiral) Admiral)✧ 117 Views · 2 Likes
Flag
How do you cut your frames? What about the basswood? What thickness is the basswood?
▲
⟩⟩
Martin555
stevedownunder
|
|
💬 Re: New Build
3 years ago by 🇨🇦 Newby7 (
Fleet Admiral)✧ 115 Views · 3 Likes
Flag
Will be using 1/4 " ply for the frames and basswood for planking the hull.
Rick ▲
⟩⟩
Martin555
stevedownunder
GaryLC
|
|
💬 Re: New Build
3 years ago by 🇨🇦 Ronald (
Admiral)✧ 116 Views · 2 Likes
Flag
What wood do you plan to use for the frames? Looking forward to seeing the progress.
▲
⟩⟩
Martin555
stevedownunder
|
Login To
Remove Ads
Remove Ads
📝 Building board set-up
3 years ago by 🇨🇦 Newby7 ( Fleet Admiral)
Fleet Admiral)✧ 114 Views · 6 Likes
Flag
💬 Add Comment
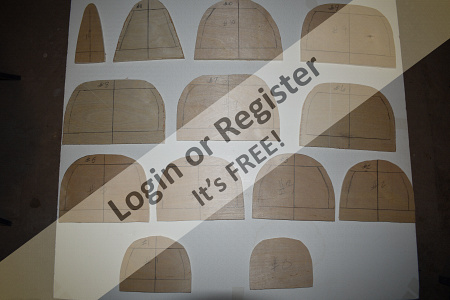
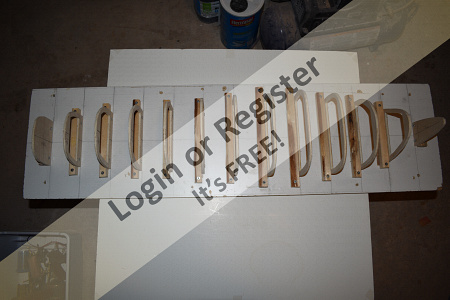
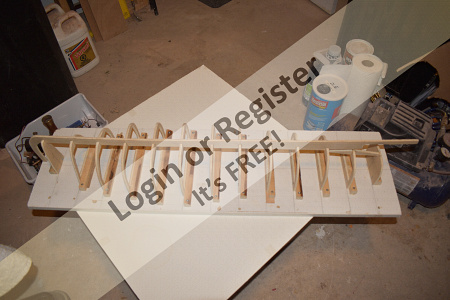
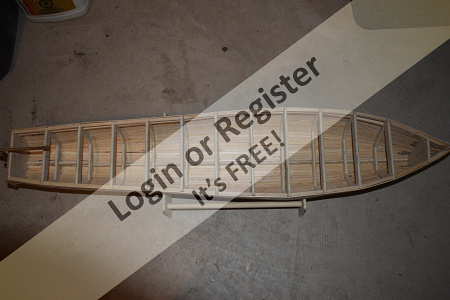
Satisfied with the cardboard frames. They were transferred to the plywood. Frames numbered and cut out. Marked the center line on the frames. Then marked inside to be cut out With frame cutting finished mounted the frames to building board .keel next to do.
Rick

Rick
▲
⟩⟩
Martin555
Colin H
stevedownunder
peterd
mturpin013
Graham93
📝 Keel
3 years ago by 🇨🇦 Newby7 ( Fleet Admiral)
Fleet Admiral)✧ 116 Views · 6 Likes · 6 Comments
Flag
💬 Add Comment
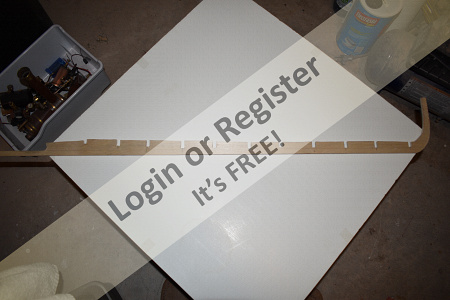
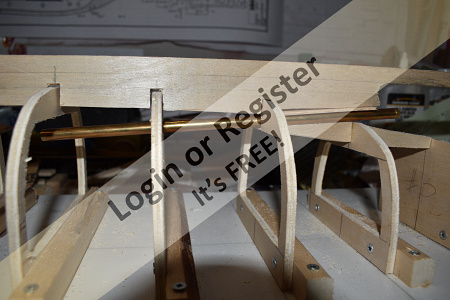
Progressing well able to get the keel cutout. Cut the slots to fit over the frames fine tuned the depth to fit the frames. Set up the slot to put the stuffing box in.
Rick

Rick
▲
⟩⟩
Martin555
Colin H
stevedownunder
RNinMunich
jacko
Ronald
|
💬 Re: Keel
3 years ago by 🇩🇪 RNinMunich (
Fleet Admiral)✧ 110 Views · 1 Like
Flag
I agree with you Ron 👍
I've always had the feeling that if I notch the keel it weakens it unnecessarily 😮 But then, I laminate the keel on both sides anyway 😁 Belt and braces! Cheers, Doug 😎 ▲
⟩⟩
Martin555
|
|
Login To
Remove Ads 💬 Re: Keel
3 years ago by 🇨🇦 Newby7 (
Fleet Admiral)✧ 111 Views · 1 Like
Flag
Have done both notched the frame and keel. Notched only the keel.
Rick ▲
⟩⟩
Martin555
|
|
💬 Re: Keel
3 years ago by 🇨🇦 Ronald (
Admiral)✧ 114 Views · 2 Likes
Flag
Better take those cardboard cutouts and put in the desired notch.
▲
⟩⟩
Martin555
RNinMunich
|
|
💬 Re: Keel
3 years ago by 🇨🇦 Ronald (
Admiral)✧ 114 Views · 1 Like
Flag
Yes, it will all workout in the end. How, do you generally do it?
▲
⟩⟩
Martin555
|
|
💬 Re: Keel
3 years ago by 🇨🇦 Newby7 (
Fleet Admiral)✧ 112 Views · 2 Likes
Flag
The problem was I didn't think ahead for the the frames and keel notches and had taken to much from the keel side of the frame.Rather the take the frames off the building board and notching the it worked out to only notch the keel.It did work out well just a lot slower.Good thing I didn't have to pay for my time. LOL
Rick ▲
⟩⟩
Martin555
Ronald
|
|
💬 Re: Keel
3 years ago by 🇨🇦 Ronald (
Admiral)✧ 118 Views · 2 Likes
Flag
Interesting that you do not notch the frames to fit the notch in the keel. I always notch me frames to fit over the keel. Or 50/50 notch keel and notch frame.
▲
⟩⟩
Martin555
RNinMunich
|
📝 Rudder Plan shown on 1st post
3 years ago by 🇨🇦 Newby7 ( Fleet Admiral)
Fleet Admiral)✧ 110 Views · 2 Likes · 5 Comments
Flag
💬 Add Comment
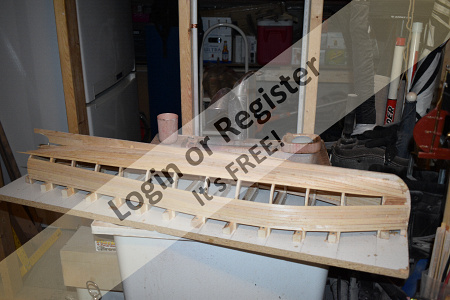
Started to plank the boat and while waiting for the glue to dry to be able to use clamps on next row.
Looked at the rudder and I'm lost as I don't know how to build it to make it look as it is on the plan.
Has anyone seen a design as this.If I could figure it out not sure of what material to use.
Rick
Looked at the rudder and I'm lost as I don't know how to build it to make it look as it is on the plan.
Has anyone seen a design as this.If I could figure it out not sure of what material to use.
Rick
▲
⟩⟩
Martin555
RNinMunich
|
💬 Re: Rudder Plan shown on 1st post
3 years ago by 🇨🇦 Newby7 (
Fleet Admiral)✧ 111 Views · 1 Like
Flag
Thanks for the info Doug and Nerys .Will reread this post tomorrow and right down your how to .
Rick ▲
⟩⟩
Martin555
|
|
Login To
Remove Ads 💬 Re: Rudder Plan shown on 1st post
3 years ago by 🇩🇪 RNinMunich (
Fleet Admiral)✧ 110 Views · 1 Like
Flag
BTW Rick,
I forgot the two metal bands holding the 3 planks (of the original) together. I'd cut 'em from 0.5mm brass strip. Drill the rivet / bolt holes before cutting into narrow strips. I learned that the hard way! 🤕 Rivets from brass wire? Have fun, 🤞 Cheers Doug 😎 ▲
⟩⟩
Martin555
|
|
💬 Re: Rudder Plan shown on 1st post
3 years ago by 🇩🇪 RNinMunich (
Fleet Admiral)✧ 110 Views · 1 Like
Flag
Ah jus knowed you'd know Nerys 👍
😎😴💤 ▲
⟩⟩
Martin555
|
|
💬 Re: Rudder Plan shown on 1st post
3 years ago by 🇬🇧 Nerys (
Fleet Admiral)✧ 113 Views · 3 Likes
Flag
Yes Doug, the correct terms for the rudder hanging bits are gudgeons and pintles. The gudgeon is the bit with the round hole in it (the female side) and the pintle has a rod that sticks into the gudgeon, thus allowing the rudder to swing easily.
Cheers, Nerys ▲
⟩⟩
Martin555
Ianh
RNinMunich
|
|
💬 Re: Rudder Plan shown on 1st post
3 years ago by 🇩🇪 RNinMunich (
Fleet Admiral)✧ 110 Views · 2 Likes
Flag
Hmm! See what you mean Rick. 😮
The rudder apparently of wood and is hung on 3 pins rather than a continuous stock. I think I would tackle it this way. I'd make it in two halves so that I could cut slots for the pins. Would be impossible to drill straight holes for the pins in a single piece rudder. I'd trace the rudder form onto 1/8" wood sheet. TWICE! Preferably not ply if you can find something else, otherwise the edge might look a bit odd. Even balsa sheet would do, can later be hardened using EzeKote diluted with about 10 to 15% water. Then two coats of pure EzeKote (or similar😉). When you have the two halves cut it is relatively easy to cut / mill the slots for pins. I used a Dremel type engraving tool and a round (ball) engraving bit to cut the slots. Make the pins from suitable brass or ally rod and glue the halves together with the pins in place. Take care cutting the slots so that they are all in a line to align with the hangers. On the hull you will need the three 'hangers'! (Nerys will know the correct technical name!😁) I would make the hangers from 3mm (or whatever suits your scale) brass or ally sheet with long tails that I could epoxy into the hull. Use a suitable size rod to keep 'em in line while the epoxy hardens! Line them all up so that the rudder just drops in and turns easily. Main thing, use the same metal for both pins and hangers, to prevent electrolytic corrosion when they get wet. I recently used this sort of technique to make a balsa rudder with 1mm shaft for a micro Springer tug, and to make the keel with a 2mm slot cut for the prop shaft toob. Drilling it was a no go! They don't make 2mm drill bits that long 😁 If a 1/4" rudder is too thick for scale you can always sand it down and shape it when the EzeKote has hardened, or before you apply the EzeKote, as you wish. Then score it to simulate the three planks it seems to have been made of. Should look nice all fettled up and varnished. Hope this helps. Cheers, Doug 😎 ▲
⟩⟩
Martin555
Nerys
|
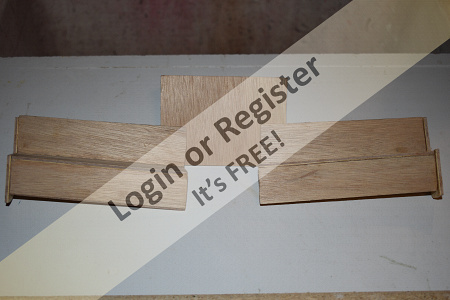
📝 Rudder
3 years ago by 🇨🇦 Newby7 ( Fleet Admiral)
Fleet Admiral)✧ 110 Views · 7 Likes
Flag
💬 Add Comment
With help I started the rudder and tiller arm. The tiller was made from shaft of a paint brush.
The rudder is 8 pieces (basswood 4 pcs 1/4x1/4)(3pcs basswood 1/4x1/2) 1 pc main shaft .All pieces were glued then drill and pined .Need shape and add brass stripe to finish.
Rick


The rudder is 8 pieces (basswood 4 pcs 1/4x1/4)(3pcs basswood 1/4x1/2) 1 pc main shaft .All pieces were glued then drill and pined .Need shape and add brass stripe to finish.
Rick
▲
⟩⟩
Martin555
RNinMunich
Colin H
stevedownunder
GaryLC
jbkiwi
fireboat
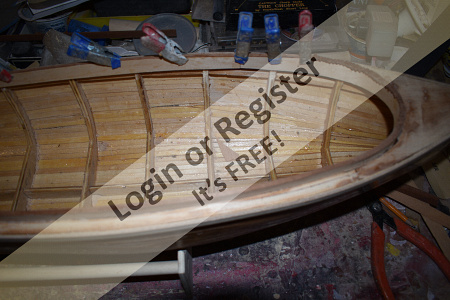
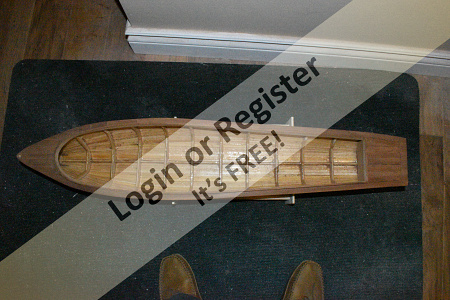
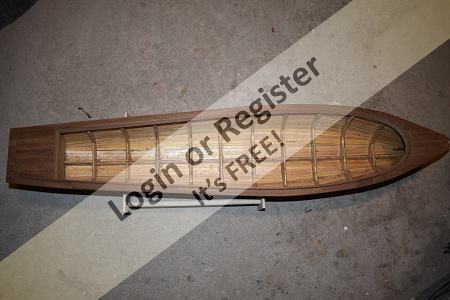
📝 Planking done
3 years ago by 🇨🇦 Newby7 ( Fleet Admiral)
Fleet Admiral)✧ 108 Views · 10 Likes · 2 Comments
Flag
💬 Add Comment
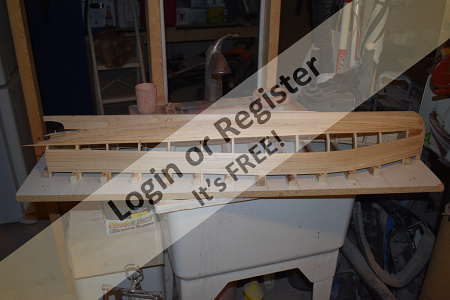
With the last plank done have been filling in spots and sanding the hull. Slow progress as this is my least favorite part of the build. In between filling and letting it cure I worked on the rudder assembly. The brackets were made for the rudder mount. Using brass tube the tiller bracket was built. Put the rudder on the stern to see how it fit.
Rick


Rick
▲
⟩⟩
Martin555
RNinMunich
Colin H
tubeampdeano
stevedownunder
GaryLC
cormorant
Nonsuch
Graham93
jbkiwi
|
💬 Re: Planking done
3 years ago by 🇨🇦 Newby7 (
Fleet Admiral)✧ 106 Views · 2 Likes
Flag
Hi Steve Thank you for the comment.The filler looks more than it is.Will not have a second planking will fiberglass the hull and seal inside to help keep water tight.
Rick ▲
⟩⟩
Martin555
cormorant
|
|
💬 Re: Planking done
3 years ago by 🇬🇧 cormorant (
 Lieutenant Commander) Lieutenant Commander)✧ 109 Views · 1 Like
Flag
Hi Rick
I have been so engrossed in my own travails that I have only just spotted your blog. I must admit, your planking looks far better than mine and I am surprised you needed so much filler? Are you second planking like me or fibreglassing perhaps? Steve ▲
⟩⟩
Martin555
|
📝 Sealing inside
3 years ago by 🇨🇦 Newby7 ( Fleet Admiral)
Fleet Admiral)✧ 106 Views · 2 Likes · 1 Comment
Flag
💬 Add Comment
In between filling and sanding set up two part finishing epoxy and painted on to the inside of the hull. A good coat went on and will need to set up. touch ups may be need for some areas .
Rick
Rick
▲
⟩⟩
Martin555
stevedownunder
|
💬 Re: Sealing inside
3 years ago by 🇬🇧 mturpin013 (
Admiral)✧ 100 Views · 1 Like
Flag
That's a good move waterproofing the internals is so important, its those areas that get covered up during the build that sometimes get forgotten and those are the bits that will come back to bite you in the future
▲
⟩⟩
Martin555
|
📝 Forgetting to check
3 years ago by 🇨🇦 Newby7 ( Fleet Admiral)
Fleet Admiral)✧ 100 Views · 5 Likes · 4 Comments
Flag
💬 Add Comment
Boy did I mess up.The dimensions of the build looked good. I had the hole for the shaft in place while I was building the hull. Made sure the stuffing box and shaft were in line before and after planking.
Did the same thing after fiberglass and epoxy. Only then did I think about the propeller that's where I missed the boat LOL .The prop would have been to small with the space and angle I had built.With that it was take wood file and trim down the stern to fit the prop.Will beef up the area from inside and refinish the area outside with fiberglass cloth.
Rick
▲
⟩⟩
Martin555
jbkiwi
cormorant
RNinMunich
stevedownunder
|
💬 Re: Forgetting to check
3 years ago by 🇨🇦 Newby7 (
Fleet Admiral)✧ 93 Views · 2 Likes
Flag
A smaller prop would not have worked to power the boat. Have shaved down the stern and now have a working prop.Reinforcing and filling in now.
Rick ▲
⟩⟩
Martin555
RNinMunich
|
|
Login To
Remove Ads 💬 Re: Forgetting to check
3 years ago by 🇨🇦 AustinG (
 Chief Petty Officer 2nd Class) Chief Petty Officer 2nd Class)✧ 92 Views · 1 Like
Flag
would a smaler prop be any use.😀
▲
⟩⟩
Martin555
|
|
💬 Re: Forgetting to check
3 years ago by 🇬🇧 mturpin013 (
Admiral)✧ 93 Views · 3 Likes
Flag
No one ever made anything without a mistake so sit back evaluate and think of the solution , I rather like Doug's idea of tunnel, you see a lot lifeboats with a tunnels
▲
⟩⟩
Martin555
stevedownunder
RNinMunich
|
|
💬 Re: Forgetting to check
3 years ago by 🇩🇪 RNinMunich (
Fleet Admiral)✧ 97 Views · 1 Like
Flag
"Only then did I think about the propeller that's where I missed the boat LOL"
Oops! 😭 Well Rick, How about filing / moulding a 'tunnel' in front of the prop and passing it off as 'an experimental hull'? 😉 Many great 'inventions' came about as the result of what was at first thought to be a 'cock up' 👍 Cheers, Doug 😎 ▲
⟩⟩
Martin555
|
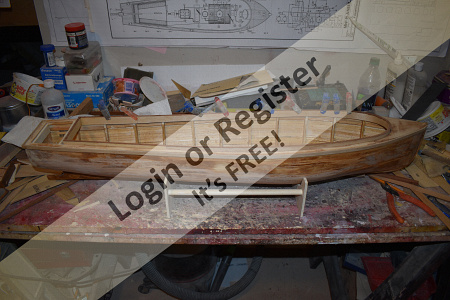
📝 Coaming and seats
3 years ago by 🇨🇦 Newby7 ( Fleet Admiral)
Fleet Admiral)✧ 86 Views · 6 Likes · 2 Comments
Flag
💬 Add Comment
With the stern fixed the coaming was next . Wrapped a towel around a 1/2 "x 1/8" x 48"strip of plywood soaked in hot water slowly bending until ready to put in place . Seats were built in place to be able to remove and work on coupling. The back cover was built . The rub rail was put on. Mahogany will be next.
Rick

Rick
▲
⟩⟩
Martin555
Colin H
RNinMunich
stevedownunder
jbkiwi
Ronald
|
💬 Re: Coaming and seats
3 years ago by 🇨🇦 Newby7 (
Fleet Admiral)✧ 85 Views · 1 Like
Flag
Thanks JB I wish spelling were as easy as me working on my boats.
Rick ▲
⟩⟩
Martin555
|
|
💬 Re: Coming and seats
3 years ago by 🇳🇿 jbkiwi (
Fleet Admiral)✧ 84 Views · 3 Likes
Flag
Coming along well Rick
JB ▲
⟩⟩
Martin555
Newby7
stevedownunder
|
📝 Mahogany
3 years ago by 🇨🇦 Newby7 ( Fleet Admiral)
Fleet Admiral)✧ 88 Views · 4 Likes · 1 Comment
Flag
💬 Add Comment
In my wood bins I found strips of 1/2 x 1/16 mahogany left over from the Dumas Cobra build to do the top deck. Had to cut in a few small pieces in spots to finish the job. After seeing the out come I'm wishing I had enough strips to do the hull.
Cost and wishful thinking on my part .On to the next job.
Rick
Pictures to show the mahogany finished on cover and deck.
Cost and wishful thinking on my part .On to the next job.
Rick
Pictures to show the mahogany finished on cover and deck.
▲
⟩⟩
Martin555
Colin H
stevedownunder
RNinMunich
|
💬 Re: Mahogany
3 years ago by 🇩🇪 RNinMunich (
Fleet Admiral)✧ 87 Views · 2 Likes
Flag
'Tell and Show' Rick 👍
😎 ▲
⟩⟩
Martin555
stevedownunder
|


Login To
Remove Ads
Remove Ads