Join Us On Social Media!

|

|

|
Download The App!
Login To
Remove Ads
Remove Ads
Login To
Remove Ads
Remove Ads
Model Boats Website
Bill's H A Kits Morston build - prep
5 Posts · 4 Followers · 5 Photos · 20 Likes
Began 3 years ago by
 Ireland
Follow This Thread
Not currently following
> Click to follow
> Click to follow
Latest Post 3 years ago by
| Oldest posts shown first (Show Newest First) | (Print Booklet) |
📝 Bill's H A Kits Morston build - prep
3 years ago by 🇮🇪 billmcl61 ( Warrant Officer)
Warrant Officer)✧ 67 Views · 5 Likes · 4 Comments
Flag
💬 Add Comment
Hi Everyone,
I'm just getting things ready while I'm (im)patiently waiting on the postman to arrive with the kit Bob (cargoman) sold to me (with our Dougs help), Bob and I had a good old natter on the phone beforehand, and I'm now in the hands of the post office, An post and HM/Irish customs as we are now "post"-brexit (hah - how apt is that😊).
So nothing of note to post just yet, I've got eze-kote ordered and that should arrive soon-certainly before I need it😊, once I've started the build I'll figure out what I need in running gear batteries etc once I see what space I have.
I will of course be using the 2 excellent build blogs of mistyoptic and seanympth as reference and guides.
I'm already thinking of ways to make this a wee bit different, although as a beginner I should really be building this straight out of the box - ach we'll see.
More soon hopefully.
Bill
▲
⟩⟩
mturpin013
Martin555
Ianh
Seanympth
RNinMunich
|
💬 Re: Bill's H A Kits Morston build - prep
3 years ago by 🇬🇧 mistyoptic (
 Midshipman) Midshipman)✧ 69 Views · 3 Likes
Flag
Hello Bill, Hope you enjoy your build, and do think ahead as you go through, fit the motor and trial fit all the radio gear, before you put the side skins on, other wise you will be very much encumbered! You will find that the hull will be very sturdy as all of the laser cut parts fit together immaculately, always pleased to help if requested.
Best wishes Geoff. ▲
⟩⟩
Martin555
Seanympth
RNinMunich
|
|
Login To
Remove Ads 💬 Re: Bill's H A Kits Morston build - prep
3 years ago by 🇮🇪 billmcl61 (
Warrant Officer)✧ 67 Views · 4 Likes
Flag
Thanks Rick and Doug, I'll be taking your advice and concentrate on initially getting the model built, then I can think of ways of personalising it, I think the changes I'll be contemplating will mostly be cosmetic in nature but as you say first things first.
Although I'm eager to produce something stunning with this kit, I have to remember that I still haven't managed to complete a model boat yet, so I need to keep my feet on the ground and concentrate on learning the basics as I go along😊. I'm really looking forward to getting started with this kit, and I'm sure that although this is a relatively basic kit designed for people like myself, it will have it's challenges. Hold nose and jump 🙈 Take care and stay safe Bill ▲
⟩⟩
Martin555
Seanympth
RNinMunich
mistyoptic
|
|
💬 Re: Bill's H A Kits Morston build - prep
3 years ago by 🇩🇪 RNinMunich (
 Fleet Admiral) Fleet Admiral)✧ 66 Views · 3 Likes
Flag
Quite so Rick 👍
😎 ▲
⟩⟩
Martin555
Seanympth
billmcl61
|
|
💬 Re: Bill's H A Kits Morston build - prep
3 years ago by 🇨🇦 Newby7 (
Fleet Admiral)✧ 70 Views · 4 Likes
Flag
Bill whether you build out of the box or do color outside the lines the boat will still be your build .Good luck
Rick ▲
⟩⟩
Martin555
Seanympth
billmcl61
RNinMunich
|
Login To
Remove Ads
Remove Ads
📝 It's here
3 years ago by 🇮🇪 billmcl61 ( Warrant Officer)
Warrant Officer)✧ 55 Views · 5 Likes · 5 Comments
Flag
💬 Add Comment
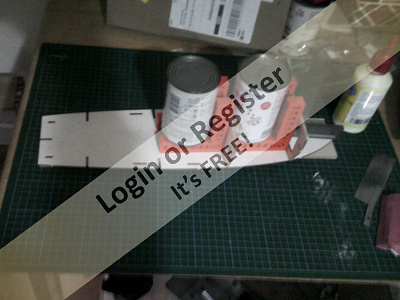
Ah finally it's arrived, well actually it arrived a few days ago but I've been a wee bit busy so just got the first opportunity to have a look at the kit.
Overall I'm impressed with the kit, laser cut good quality ply on 3 sheets, window frames and other bits n bobs, no unnecessary fancy box or packaging to throw out, so far so good.
Unfortunately one of the sheets got damaged during transit, but nothing major, the break on one of the keel plates will be sandwiched between 2 reinforcing plates - so it's easily fixed and once glued up you'd never be any the wiser 😊.
I've removed all the main structural parts from their sheet and put the rest back in their bag in a safe place🤞, ready to start putting some bits together.
I've tried test fitting a few parts together and the fit is snug without being overtight.
So cleared the kitchen table of all the accumulated junk and got my A3 cutting mat out (yep been there - done that, ain't doing it again 😊) ready to make a start tomorrow.
Bill
▲
⟩⟩
Martin555
Ianh
mistyoptic
Seanympth
RNinMunich
|
💬 Re: It's here
3 years ago by 🇬🇧 Cargoman (
 Chief Petty Officer 1st Class) Chief Petty Officer 1st Class)✧ 49 Views · 1 Like
Flag
Really glad you received the boat ok the post office tracking shows it to be still in transit, looking forward to keeping an eye on the build, been good to make contact with you happy building.
Regards Cargoman ▲
⟩⟩
Martin555
|
|
Login To
Remove Ads 💬 Re: It's here
3 years ago by 🇮🇪 billmcl61 (
Warrant Officer)✧ 55 Views · 1 Like
Flag
Hi Geoff,
I've just read both Treve and your builds again, going for a snooze now then I'll make a start, the more I look at it the more I'm impressed by the thought that's gone into the design and the overall quality of the kit. I'm dying to start it but I've purposely held off overnight, so that I have a clear idea of how I'm going to tackle it. I like the additional items you've added and I might borrow some of your ideas. Bill ▲
⟩⟩
Martin555
|
|
💬 Re: It's here
3 years ago by 🇮🇪 billmcl61 (
Warrant Officer)✧ 55 Views · 1 Like
Flag
Thanks Doug, bed first then I'll start.
Bill ▲
⟩⟩
Martin555
|
|
💬 Re: It's here
3 years ago by 🇬🇧 mistyoptic (
Midshipman)✧ 56 Views · 2 Likes
Flag
Bill,
Just Relax and enjoy it, you will become enthralled, and as the build progresses you will find that it compels you to keep going, the accuracy of the laser cutting and the fit as it builds up will encourage you, as the builder, to maintain the same level of accuracy as is already established in the kit. I have just about finished my second HA kits and must say they build into much nicer boats than you would have thought from the 'picture on the packet'. All good wishes Geoff ▲
⟩⟩
Martin555
billmcl61
|
|
💬 Re: It's here
3 years ago by 🇩🇪 RNinMunich (
Fleet Admiral)✧ 56 Views · 3 Likes
Flag
Go Man Go! More power to your Xacto Bill 👍
😎 ▲
⟩⟩
Martin555
billmcl61
mistyoptic
|
📝 And we're off
3 years ago by 🇮🇪 billmcl61 ( Warrant Officer)
Warrant Officer)✧ 55 Views · 5 Likes · 7 Comments
Flag
💬 Add Comment
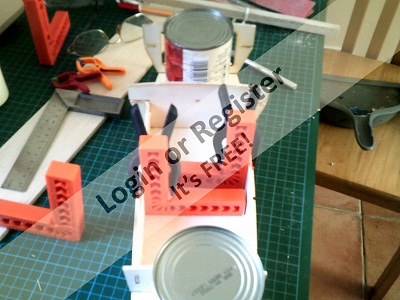
At last, I've finally glued something together, I sanded the edges of the 2 forward bulkhead plates and using aliphalatic glue, stuck them to the main deck, I noticed that the bulkhead plates protrude through the deck a wee bit, so I cut up a sheet of balsa to use as spacers underneath.
One thing I didn't count on was the glue going off so quickly in the nozzle, on the second plate gave the bottle a squeeze-nothing, so gave it another slightly harder squeeze-nothing, after a few increasingly harder squeezes the wee congealed lump popped out the end of the nozzle followed by a fair amount of the glue I was looking for, unfortunately it landed just about everywhere apart from where I wanted it, but at least I had glue now 😊, lesson learned? nah probably not
I got a set of right angles from amazon which worked out better than I could have hoped, they fill the gap between the 2 bulkheads perfectly, they just needed a bit of extra weight to help them... so raided the cupboards as I'm working in the kitchen anyway 😊 and found a couple of suitable weights
▲
⟩⟩
Martin555
mturpin013
Colin H
RNinMunich
Seanympth
|
💬 Re: And we're off
3 years ago by 🇮🇪 billmcl61 (
Warrant Officer)✧ 50 Views · 1 Like
Flag
Hi Doug,
luckily I somehow managed to avoid that pitfall😊. Yeah I read both the build blogs last night and there was no mention of anything like that, funnily enough I noticed later that I hadn't left a gap below the 2nd bulkhead and that sat down no problem, so it's probably me😆 I'll have a closer look tomorrow. That's strange Doug, I've just had a look and they seem to have a stock of them, handy things to have and pretty cheap, I like the wee recess in the corner to stop them sticking to any glue that squeezes out - well that's the theory anyway - we'll soon know tomorrow. Bill ▲
⟩⟩
Martin555
|
|
Login To
Remove Ads 💬 Re: And we're off
3 years ago by 🇮🇪 billmcl61 (
Warrant Officer)✧ 50 Views · 1 Like
Flag
Ah good idea Geoff, I'll dig something out for that.
The bulkhead fitted ok but the tabs protruded slightly so I just raised the deck so that I could get the bulkhead all the way home. I did a dry fit of the parts and they seated ok in my hand but when I laid the deck on the mat the bulkhead sat up a wee bit. Bill ▲
⟩⟩
Martin555
|
|
💬 Re: And we're off
3 years ago by 🇩🇪 RNinMunich (
Fleet Admiral)✧ 54 Views · 0 Likes
Flag
"The right angles are available here ..."
Seems like you bought up the whole stock Bill 🤔 '4 Pcs Positioning Square Clamps Right Angle Clamps, 90 Degree Type L Corner Clamp for Boxes,Picture Frames, Cabinets, Drawers, Carpenter Tool Brand: Cyleibe 4.8 out of 5 stars 9 ratings Amazon's Choice for "positioning squares" Currently unavailable. We don't know when or if this item will be back in stock. ' ▲
⟩⟩
No likes yet
This member will receive 1 point for every like received |
|
💬 Re: And we're off
3 years ago by 🇩🇪 RNinMunich (
Fleet Admiral)✧ 54 Views · 2 Likes
Flag
Off - and running 👍
As long as you haven't glued your feet to the floor Bill! 😮😁 Cheers, Doug 😎 BTW "I noticed that the bulkhead plates protrude through the deck a wee bit, so I cut up a sheet of balsa to use as spacers underneath. " Did you check the other two Morston Blogs to check if they had such a problem, and if so what they did about it? ▲
⟩⟩
Martin555
billmcl61
|
|
💬 Re: And we're off
3 years ago by 🇬🇧 mistyoptic (
Midshipman)✧ 54 Views · 3 Likes
Flag
See my build blog, 2 months ago on Pilot Launch (Thinking about Twin rudders) where I show a means of using glue from a small lidded pot rather than from the bottle, this saves the sort of dilemma you have just experienced. Be careful if you think things are not lining up or not fitting properly, before you interfere with them, HA kits accuracy is almost beyond question. Regards Geoff.
▲
⟩⟩
Martin555
billmcl61
RNinMunich
|
|
💬 Re: And we're off
3 years ago by 🇬🇧 Seanympth (
 Chief Petty Officer 2nd Class) Chief Petty Officer 2nd Class)✧ 60 Views · 1 Like
Flag
Well Done👍
▲
⟩⟩
Martin555
|
|
💬 Re: And we're off
3 years ago by 🇮🇪 billmcl61 (
Warrant Officer)✧ 54 Views · 1 Like
Flag
The right angles are available here - forgot to add them to the post.
▲
⟩⟩
Martin555
|

📝 Day 2
3 years ago by 🇮🇪 billmcl61 ( Warrant Officer)
Warrant Officer)✧ 39 Views · 2 Likes · 2 Comments
Flag
💬 Add Comment
After leaving things overnight to let the glue fully dry, I had another look to see why the bulkhead wouldn't sit fully home the night before, and found that I hadn't sanded the bottom of the tabs where they were connected to the sheet, it wasn't much... but it was enough, so I'll put that down to operator error (and laziness) lesson learned.
Day 2
I made sure not to repeat the mistake of the night before, and sanded all the edges to remove the charring from the laser cutting, parts fitted perfectly. So glued everything up and clamped the squares to the side pieces to make sure they were perfectly straight, I'll leave everything overnight again to let the glue dry.
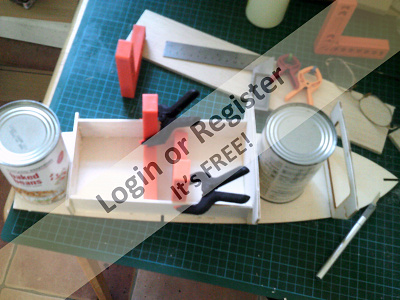
▲
⟩⟩
Colin H
Martin555
|
💬 Re: Day 2
3 years ago by 🇬🇧 Martin555 (
Fleet Admiral)✧ 31 Views · 0 Likes
Flag
Hi Bill,
You have made a good start to this build. It pays to take your time and do plenty of dry fitting and if possible look at it at all different angles. Hopefully you will then spot any potential future problems. Keep up the good work. Martin555. ▲
⟩⟩
No likes yet
This member will receive 1 point for every like received |
|
💬 Re: Day 2
3 years ago by 🇬🇧 Seanympth (
Chief Petty Officer 2nd Class)✧ 45 Views · 2 Likes
Flag
Enjoy it , well done!
▲
⟩⟩
Martin555
billmcl61
|
📝 Day em lets call it 3ish
3 years ago by 🇮🇪 billmcl61 ( Warrant Officer)
Warrant Officer)✧ 22 Views · 3 Likes · 2 Comments
Flag
💬 Add Comment
After a minor setback where I managed to break off the stem, threw a tantrum a 3 year old in a supermarket would applaud and say "now that's how it should be done", I went in the huff with my partly built boat.
I was still using my welding magnets to line everything up, and they were working pretty well albeit a little heavy for the task, when the doorbell rang, surprised I spun round with the boat in my hands-unfortunately due to the laws of physics the magnets wanted to stay where they were and snap the stem parted company with the rest of the craft, who was at the door - a salesman ... during a pandemic !!, as politely as I could muster I simply said "no thank you" and closed the door while he was in full flow. Several weeks later I finally got back to it, mixed up some epoxy and lined it up as best I could, I think it's straight and in line 😊, after pondering for so long it took all of 5-10 mins to fix, so I'll leave it overnight to allow the epoxy to fully cure and I'll see how we got on tomorrow.
Unfortunately I put my camera down in a safe place - away from the epoxy - and now I can't find it, should turn up soon and I'll post the photos then.
P.S. finally getting the vaccine tomorrow.
Take care all
Bill
▲
⟩⟩
Colin H
Seanympth
Martin555
|
💬 Re: Day em lets call it 3ish
3 years ago by 🇬🇧 Seanympth (
Chief Petty Officer 2nd Class)✧ 29 Views · 2 Likes
Flag
Glad you have found a way to start again, I'm sure it will be okay
▲
⟩⟩
billmcl61
Martin555
|
|
💬 Re: Day em lets call it 3ish
3 years ago by 🇨🇦 Newby7 (
Fleet Admiral)✧ 26 Views · 3 Likes
Flag
All's well that cures well. Hope the camera shows soon. Nothing more aggravating then to put something away in a safe place. I DO KNOW IT'S SAFE BUT WHERE .
Rick ▲
⟩⟩
billmcl61
Seanympth
Martin555
|


Login To
Remove Ads
Remove Ads