Join Us On Social Media!

|

|

|
Download The App!
Login To
Remove Ads
Remove Ads
Login To
Remove Ads
Remove Ads
Model Boats Website
C.C.G.S Norman McLeod Rogers
46 Posts · 10 Followers · 190 Photos · 118 Likes
Began 3 years ago by
 United Kingdom
Follow This Thread
Not currently following
> Click to follow
> Click to follow
Latest Post 2 years ago by
| Oldest posts shown first (Show Newest First) | (Print Booklet) |
📝 C.C.G.S Norman McLeod Rogers
3 years ago by 🇬🇧 Seaspray ( Warrant Officer)
Warrant Officer)✧ 190 Views · 5 Likes · 8 Comments
Flag
💬 Add Comment
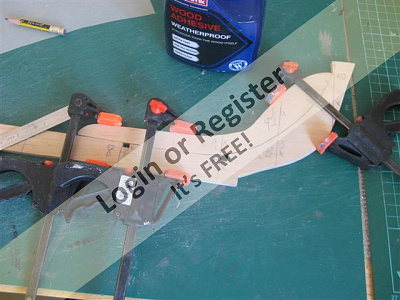
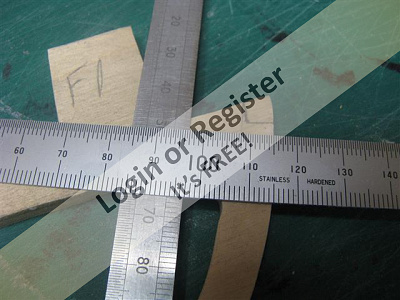
Having the choice of 3 icebreakers models to build. I settled for the above. She is now is service at Chile. Building to a scale of 1:100 the model is 89.8 cm in length and 20 cm wide. The plan was drawn by Jim Pottinger (hope I've spelt his name right) and was an article in Marine Model Magazine December 2010. of Tom Gorman's model build. Also with the plan came a 2 part build copy of the article in MMM Pictures to follow as just browsing over plan. The last picture is her in Chilean colours


▲
⟩⟩
Colin H
MouldBuilder
Ygagnon
JOHN
Martin555
|
💬 Re: C.C.G.S Norman McLeod Rogers
3 years ago by 🇬🇧 Seaspray (
Warrant Officer)✧ 163 Views · 0 Likes
Flag
John I found the NMR icebreaker under icebreakers by Solo Ta
▲
⟩⟩
No likes yet
This member will receive 1 point for every like received |
|
Login To
Remove Ads 💬 Re: C.C.G.S Norman McLeod Rogers
3 years ago by 🇬🇧 Seaspray (
Warrant Officer)✧ 180 Views · 1 Like
Flag
Martin 555
There one or two I haven't Cheers ▲
⟩⟩
Martin555
|
|
💬 Re: C.C.G.S Norman McLeod Rogers
3 years ago by 🇬🇧 Martin555 (
 Fleet Admiral) Fleet Admiral)✧ 181 Views · 0 Likes
Flag
Hi Seaspray,
You probably Already have these. If you click on the photos and zoom in for a better look. ▲
⟩⟩
No likes yet
This member will receive 1 point for every like received |

|
💬 Re: C.C.G.S Norman McLeod Rogers
3 years ago by 🇬🇧 Seaspray (
Warrant Officer)✧ 181 Views · 1 Like
Flag
Can't find the NMR on a search but there is a few others of this class with other names Cheers for the like 👍 Like the Meteor a jungle to get pics of boat. Its the mast on the forward deck that seems to be the difference between the boats
▲
⟩⟩
Martin555
|
|
💬 Re: C.C.G.S Norman McLeod Rogers
3 years ago by 🇬🇧 JOHN (
 Midshipman) Midshipman)✧ 190 Views · 1 Like
Flag
Hi there
If you do a search of this Forum, I am sure there is a build of this particular icebreaker on here - as I seem to recall it. ▲
⟩⟩
Martin555
|
|
💬 Re: C.C.G.S Norman McLeod Rogers
3 years ago by 🇬🇧 Seaspray (
Warrant Officer)✧ 183 Views · 1 Like
Flag
Thanks Martin555 It was either the Kontio or Pierre Radisson or Norman McLeod Rogers Icebreakers to choose from to build. So I decided to build the NMR
▲
⟩⟩
Martin555
|
|
💬 Re: C.C.G.S Norman McLeod Rogers
3 years ago by 🇨🇦 Newby7 (
Fleet Admiral)✧ 189 Views · 1 Like
Flag
Looks a good project.Good luck with the build.
Rick ▲
⟩⟩
Martin555
|
|
💬 Re: C.C.G.S Norman McLeod Rogers
3 years ago by 🇬🇧 Martin555 (
Fleet Admiral)✧ 191 Views · 0 Likes
Flag
That looks like a nice model to make.
I will be following this build log with interest. Good luck with the build. Martin555. ▲
⟩⟩
No likes yet
This member will receive 1 point for every like received |
Login To
Remove Ads
Remove Ads
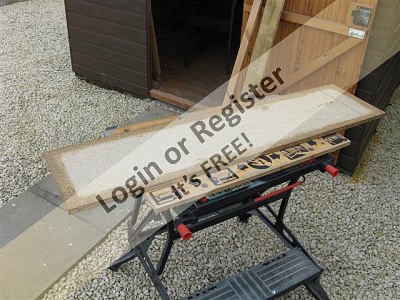
📝 The Frames
3 years ago by 🇬🇧 Seaspray ( Warrant Officer)
Warrant Officer)✧ 182 Views · 9 Likes · 3 Comments
Flag
💬 Add Comment
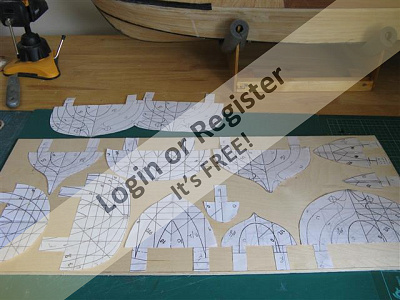
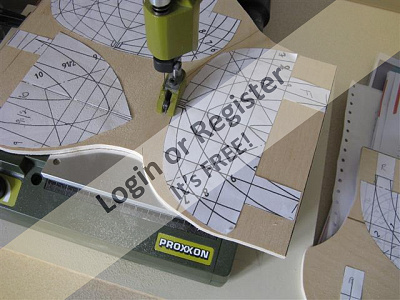
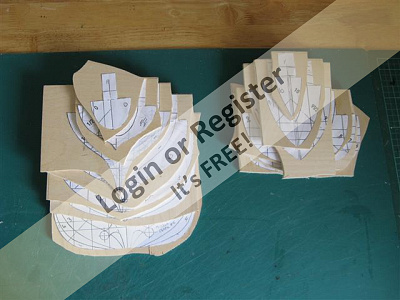
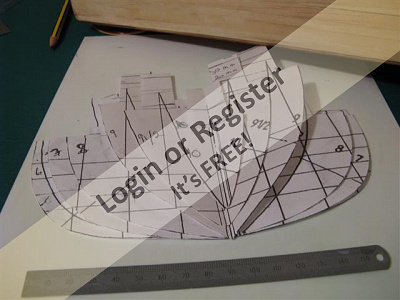
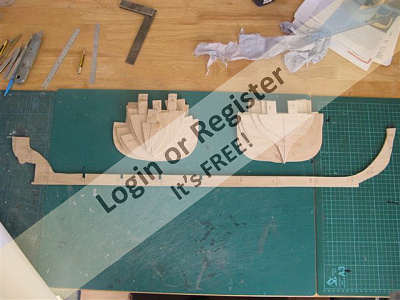
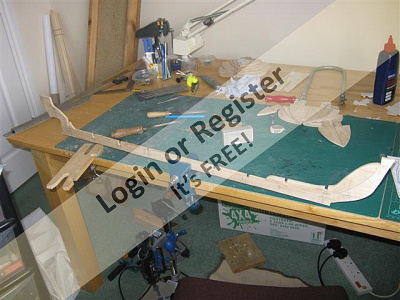
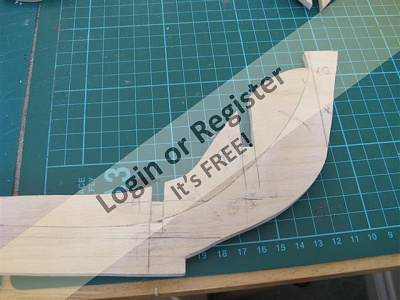
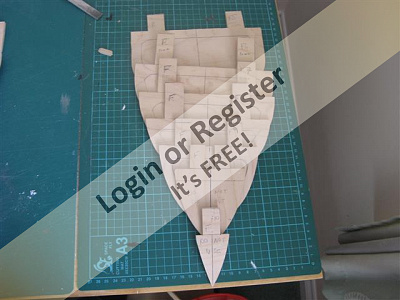
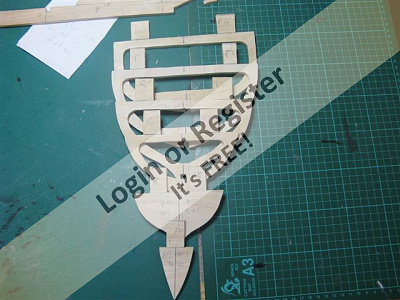
Not much happening never thought retirement would be so busy A few pictures to get started with the first picture is the 2 part article of the build which came with the plan. Next is the plan blown up to 1:100. Next the frames flipped and photo copied to give 10 full frame to cut out. Attempting to get as many frames on to the ply saves on wood. Glue on to the ply and being cut to a workable size. All cut up didn't think I saved as much wood as I thought. Next I always keep a spare set comes in handy. With the dremel trimming off the edges to the edge of the paper. This build will contain a blow by blow of the build and mistakes included.


▲
⟩⟩
Colin H
MouldBuilder
GaryLC
JOHN
Ronald
RNinMunich
mturpin013
jbkiwi
Martin555
|
💬 Re: The Frames
3 years ago by 🇬🇧 Seaspray (
Warrant Officer)✧ 181 Views · 1 Like
Flag
Newby7 It does take me a long time for my builds
Cheers ▲
⟩⟩
Martin555
|
|
Login To
Remove Ads 💬 Re: The Frames
3 years ago by 🇨🇦 Newby7 (
Fleet Admiral)✧ 180 Views · 2 Likes
Flag
As Martin has said now the fun begins. Good part is being retired time is your friend you don't need to hurry any part of the build. Good luck.
Rick ▲
⟩⟩
jbkiwi
Martin555
|
|
💬 Re: The Frames
3 years ago by 🇬🇧 Martin555 (
Fleet Admiral)✧ 182 Views · 0 Likes
Flag
Hi Seaspray.
Now the fun starts. Good luck with the build. Martin555. ▲
⟩⟩
No likes yet
This member will receive 1 point for every like received |
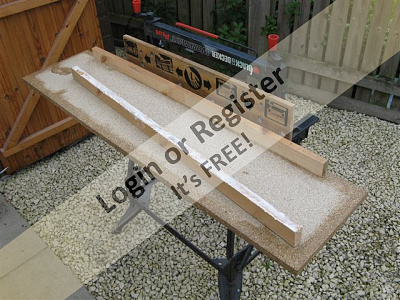
📝 Frames Scrapped
3 years ago by 🇬🇧 Seaspray ( Warrant Officer)
Warrant Officer)✧ 182 Views · 3 Likes · 18 Comments
Flag
💬 Add Comment
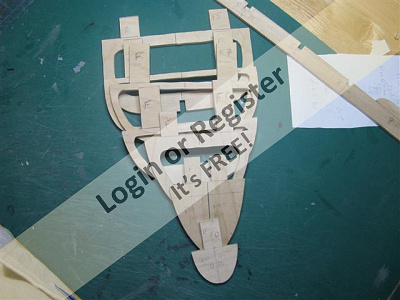
The first picture is the old frames which I shrunk in size to allow for thick frames and the tissue and resin. They were too small. Didn't realise all four sides would be shrunk and not near the deck height on the plan. Next picture. Rather than copy and paste them again, I did a print out from plan for each frame them folded the paper over and trimmed it to the shape giving a correct profile. Next picture is all forward frames trimmed ready for gluing to the ply. Next picture that looks like a correct size frame. Next the 1st keel was cut out and some of the slots cut out. This is what drew my attention to the frames being too small. The box of the wrong frames I'll use them in the future as there good quality. TMO new keel no2 with a modification and the building board


▲
⟩⟩
Martin555
Colin H
MouldBuilder
|
💬 Re: Frames Scrapped
3 years ago by 🇬🇧 Seaspray (
Warrant Officer)✧ 172 Views · 1 Like
Flag
Thats a good idea as I would be practising joining planks with some scrape obechi I have. Thinking of splitting the 3.15 mm thick planks in the band saw but those days of looking for trouble are over. Anyway its centres cut out of the frames today and mount them on the building board tomorrow.
▲
⟩⟩
Martin555
|
|
Login To
Remove Ads 💬 Re: Frames Scrapped
3 years ago by 🇬🇧 JOHN (
Midshipman)✧ 179 Views · 3 Likes
Flag
Hi ya, just to throw the cat amongst the pigeons -😁😁 why not add extra stringers around the outside of the hull and diagonally plank it - then you can go and break real ice with it in the Scots lake. The hull will be really strong and you wont have to worry about putting joints in the planking.
John 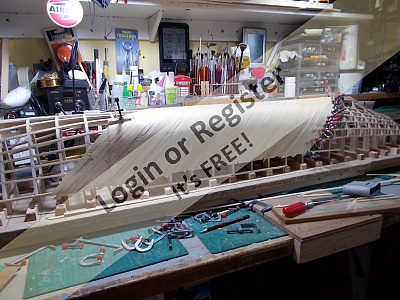
▲
⟩⟩
Seaspray
Martin555
RNinMunich
|
|
💬 Re: Frames Scrapped
3 years ago by 🇬🇧 Seaspray (
Warrant Officer)✧ 173 Views · 2 Likes
Flag
Re building board good ideas but I am in no mansland here. The boards were in the shed over winter and there was only one dead straight. Did think of coming in from the side as I went for maximum distance for to clear the screws on the support blocks. Screw from underneath and cutting the planks at 60 degrees with backing support good ideas. Do see the joints on Exeter they'll be strong Big learning curve the now and still trying to get round this site. You mentioned Maple and I just went for obechi as I thought that was the wood to go for. (ideas please)Tom Gorman did his model with thin ply then filler as he was putting plastic plates on his model. I hope to resin and mat ( got some Deluxe Materials 34 g/m2 1.0 oz /y2 )but will not be putting plastic plates on but do have an idea to simulate them. Got a picture of Tom's model. I'll have to sleep on it regards shorter planks with joints, challenging but I do like a challenge and might be easier as first time planking.
Ta 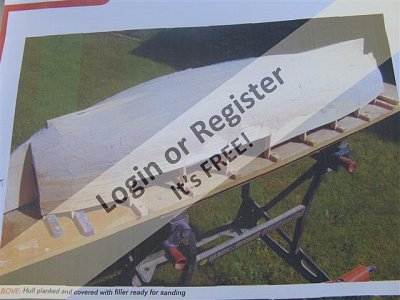
▲
⟩⟩
Martin555
RNinMunich
|
|
💬 Re: Frames Scrapped
3 years ago by 🇬🇧 JOHN (
Midshipman)✧ 180 Views · 3 Likes
Flag
hoo yee ya tight Scot - last time I called you by your Sunday name me post was tampered with for evidence :-) so.....if you want longer lengths of Obechi try SLEC - they are pretty good - I tend to use Cornwall Model Boats for the hard timber such as Maple and stuff -
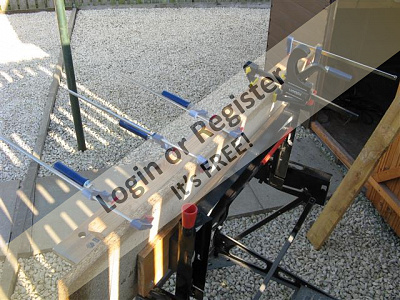
just a thought about your building board would it not be better to have the strengthening battens glued/screwed on roughtly 1 1/2 inches inboard of the edge of the actual chipboard either side. This allows you to use little clamps to hold your support blocks in place while you screw them. Also, if you ever build a wider hull on the building board which overlaps the edges of your building board you can screw from underneath into your support blocks - just a thought. As far as joining short planks - when I build the Exeter - which is canny long - I had to join many planks and the way I did it; I cut the end of the planks at roughly about 60 degrees and mated the 2 end planks like that and then placed the backing plank on the inside of the join obviously glued in place - I also tend to make the joints in the middle of two frames. Couple of pics one of the Exeter hull (I dont know if you can make out the joints in the planking and one of the present hull which is on the board) of the support straps on the inside of the planks. John 


▲
⟩⟩
Martin555
RNinMunich
Seaspray
|
|
💬 Re: Frames Scrapped
3 years ago by 🇬🇧 Seaspray (
Warrant Officer)✧ 173 Views · 1 Like
Flag
Hi John The keel is 89 cm long would I buy these and join them when planking. Now I know the thickness Ta
▲
⟩⟩
Martin555
|

|
💬 Re: Frames Scrapped
3 years ago by 🇬🇧 Seaspray (
Warrant Officer)✧ 173 Views · 2 Likes
Flag
We Scots are that tight we never throw anything away. Usually it goes to the charity shops or down to the market
▲
⟩⟩
RNinMunich
Martin555
|
|
💬 Re: Frames Scrapped
3 years ago by 🇬🇧 Seaspray (
Warrant Officer)✧ 173 Views · 1 Like
Flag
HI RNinMunich Know what you are saying during building the Meteor and Scotia. Some of the parts were redone up to 5,6,7, times. Just a lack of experience
Cheers ▲
⟩⟩
Martin555
|
|
💬 Re: Frames Scrapped
3 years ago by 🇬🇧 Seaspray (
Warrant Officer)✧ 173 Views · 1 Like
Flag
Thanks RNinMunich I either ordered wrong or I was sent what was available. There seems to be only 3 importers of obeshi in this country (Scotland) Having trouble at the moment getting smaller size
▲
⟩⟩
Martin555
|
|
💬 Re: Frames Scrapped
3 years ago by 🇬🇧 Seaspray (
Warrant Officer)✧ 172 Views · 1 Like
Flag
Hi Newby7 I've learnt more by my mistakes than any other way.
Cheers ▲
⟩⟩
Martin555
|
|
💬 Re: Frames Scrapped
3 years ago by 🇩🇪 RNinMunich (
Fleet Admiral)✧ 173 Views · 1 Like
Flag
"I think the planks are too thick at 3.25mm "
I'm inclined to agree Seaspray 🤔 They are likely to be somewhat stubborn and unforgiving. I would have thought, and I'm no expert planker (or Plonker for you fellow ancient UK TV addicts😠), that about 2mm thickness would be the max for easy bending and shaping. Good luck 🤞 Cheers, Doug 😎 ▲
⟩⟩
Martin555
|
|
Login To
Remove Ads 💬 Re: Frames Scrapped
3 years ago by 🇩🇪 RNinMunich (
Fleet Admiral)✧ 173 Views · 1 Like
Flag
"I like to try and do it right or don't bother "
We all want to get it right Seaspray. But perfectionism is the anathema of progress. Ask me how I'm so sure 🤔 The other side of the coin- If at first you don't succeed ... give up and go home! Oh! 😮 I am home, so I'll give it another crack 😉 😎 ▲
⟩⟩
Martin555
|
|
💬 Re: Frames Scrapped
3 years ago by 🇩🇪 RNinMunich (
Fleet Admiral)✧ 173 Views · 1 Like
Flag
That's the best form of recycling for us modellers Rick 👍👍👍
Shucks! It don't fit. Never mind it'll come in handy for ..... 😉 Never throw ANYTHING away ... that won't start to stink in a week or so 🙊 😎 ▲
⟩⟩
Martin555
|
|
💬 Re: Frames Scrapped
3 years ago by 🇨🇦 Newby7 (
Fleet Admiral)✧ 171 Views · 2 Likes
Flag
I find when I build a mistake will happen.The good thing is I know it can be fixed and most times the mistake gets used in another place.
Rick ▲
⟩⟩
Martin555
RNinMunich
|
|
💬 Re: Frames Scrapped
3 years ago by 🇬🇧 Seaspray (
Warrant Officer)✧ 174 Views · 1 Like
Flag
Cheers Martin The old frames will be used in time on a smaller model. I like to try and do it right or don't bother
▲
⟩⟩
Martin555
|
|
💬 Re: Frames Scrapped
3 years ago by 🇬🇧 Seaspray (
Warrant Officer)✧ 174 Views · 2 Likes
Flag
Ta John I am dreading when the planking has to be started I think the planks are too thick at 3.25mm
▲
⟩⟩
RNinMunich
Martin555
|
|
💬 Re: Frames Scrapped
3 years ago by 🇬🇧 JOHN (
Midshipman)✧ 184 Views · 2 Likes
Flag
looking good
▲
⟩⟩
Ronald
Martin555
|
|
💬 Re: Frames Scrapped
3 years ago by 🇬🇧 Martin555 (
Fleet Admiral)✧ 177 Views · 1 Like
Flag
It's a shame you had to redo them but i looked like you are on your way with the build now.
Keep up the good work. Martin555. ▲
⟩⟩
AustinG
|
📝 New Keel and Building board
3 years ago by 🇬🇧 Seaspray ( Warrant Officer)
Warrant Officer)✧ 176 Views · 2 Likes · 6 Comments
Flag
💬 Add Comment
As I have said I built another Keel a bit more bigger in height with an added piece of wood in the turn of the up at the bow. Here is picture of the building board stages Notice I have put a few coats of varnish around the edges of the board to stop chipping/ splintering. The last picture of the building board is when the centre line and frame lines are marked up. Also closely looking at this board you'll se I have penciled in the motor/coupling and shaft Next picture I'll show the beefed up keel


▲
⟩⟩
Colin H
Martin555
|
💬 Re: New Keel and Building board
3 years ago by 🇬🇧 Seaspray (
Warrant Officer)✧ 173 Views · 1 Like
Flag
Membership card on the way
▲
⟩⟩
Martin555
|
|
Login To
Remove Ads 💬 Re: New Keel and Building board
3 years ago by 🇬🇧 Martin555 (
Fleet Admiral)✧ 175 Views · 0 Likes
Flag
That makes two of us then Seaspray,
Martin555. ▲
⟩⟩
No likes yet
This member will receive 1 point for every like received |
|
💬 Re: New Keel and Building board
3 years ago by 🇬🇧 Seaspray (
Warrant Officer)✧ 176 Views · 1 Like
Flag
Martin 555 Just a little thick at the age I am Ta
▲
⟩⟩
Martin555
|
|
💬 Re: New Keel and Building board
3 years ago by 🇬🇧 Martin555 (
Fleet Admiral)✧ 176 Views · 0 Likes
Flag
Hi Seaspray,
There is a Quick Site Guide that you can access by looking in the How-To section for it and if you need more help just shout. Martin555. ▲
⟩⟩
No likes yet
This member will receive 1 point for every like received |
|
💬 Re: New Keel and Building board
3 years ago by 🇬🇧 Seaspray (
Warrant Officer)✧ 176 Views · 1 Like
Flag
Early days Martin 555 Still trying to find my way around the site.
▲
⟩⟩
Martin555
|
|
💬 Re: New Keel and Building board
3 years ago by 🇬🇧 Martin555 (
Fleet Admiral)✧ 176 Views · 0 Likes
Flag
So it is all systems go now Seaspray.
Martin555. ▲
⟩⟩
No likes yet
This member will receive 1 point for every like received |
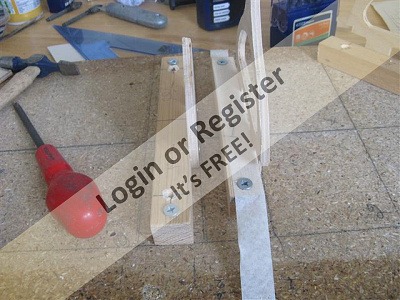
📝 Strengthened Keel & Mark out Frames
3 years ago by 🇬🇧 Seaspray ( Warrant Officer)
Warrant Officer)✧ 181 Views · 3 Likes
Flag
💬 Add Comment
The first four pictures are the keel modified to the support frame 9, 9 1/2.Will strengthen this area with some resin mat. I won't be fitting frame 10. Hopefully I will be using balsa or some other wood to fill and shape this area. Like wise the stern which I increased the ply width just before the rudder. The next two pictures are all the frames penciled up for removing their centres


▲
⟩⟩
Colin H
RNinMunich
Martin555
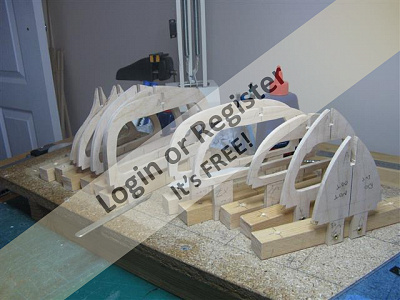
📝 Frame centres cut out
3 years ago by 🇬🇧 Seaspray ( Warrant Officer)
Warrant Officer)✧ 183 Views · 3 Likes · 3 Comments
Flag
💬 Add Comment
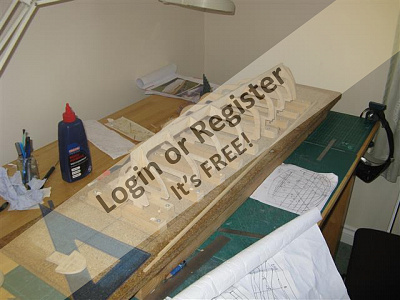
Here is an update of the centres cut out of the frames and offered up to the keel. Still have to mark up and cut out stringers slots. Off on a little break.
▲
⟩⟩
Colin H
RNinMunich
Martin555
|
💬 Re: Frame centres cut out
3 years ago by 🇨🇦 Newby7 (
Fleet Admiral)✧ 181 Views · 1 Like
Flag
Time is on your side with retirement .It is surprising how fast a build does go.
Rick ▲
⟩⟩
Martin555
|
|
Login To
Remove Ads 💬 Re: Frame centres cut out
3 years ago by 🇬🇧 Seaspray (
Warrant Officer)✧ 182 Views · 1 Like
Flag
Newby7 Surprised how fast it is being built but have more time now Iam retired. Can't wait till it is off the building board.
▲
⟩⟩
Martin555
|
|
💬 Re: Frame centres cut out
3 years ago by 🇨🇦 Newby7 (
Fleet Admiral)✧ 182 Views · 2 Likes
Flag
Good work onward and upward to the building.Nice looking work.
Rick ▲
⟩⟩
Seaspray
Martin555
|
📝 Stringer Angles
3 years ago by 🇬🇧 Seaspray ( Warrant Officer)
Warrant Officer)✧ 180 Views · 3 Likes · 8 Comments
Flag
💬 Add Comment
Tricky one this for me. See the pictures Its the stringers they have at least 3 angles to fit in their right position. Kind of stumped how to tackle this problem.
Angel 1 flush with side of frame
Angel 2 flush with top of frame the deck
Angel 3 the cut for the turn on the bow and stern
The frames that have straight edges are an easy square cut as there are 4/5 amidships. ( last picture )


Angel 1 flush with side of frame
Angel 2 flush with top of frame the deck
Angel 3 the cut for the turn on the bow and stern
The frames that have straight edges are an easy square cut as there are 4/5 amidships. ( last picture )
▲
⟩⟩
Colin H
RNinMunich
Martin555
|
💬 Re: Stringer Angles
3 years ago by 🇨🇦 Newby7 (
Fleet Admiral)✧ 179 Views · 2 Likes
Flag
Never to old. Just a number.Carry on carrying on.Well done.
Rick ▲
⟩⟩
Seaspray
Martin555
|
|
Login To
Remove Ads 💬 Re: Stringer Angles
3 years ago by 🇬🇧 Seaspray (
Warrant Officer)✧ 180 Views · 1 Like
Flag
John
I'll have a good look at it tmo many thanks again Seen (cheeks) like these on one of your builds on MBM but didn't twig Ta ▲
⟩⟩
Martin555
|
|
💬 Re: Stringer Angles
3 years ago by 🇬🇧 Seaspray (
Warrant Officer)✧ 180 Views · 1 Like
Flag
No problem Doug. See G.C.H.Q is recruiting Dyslexia personal. Might try but too old at 70 odd
▲
⟩⟩
RNinMunich
|
|
💬 Re: Stringer Angles
3 years ago by 🇩🇪 RNinMunich (
Fleet Admiral)✧ 183 Views · 3 Likes
Flag
Heartily agree on the cheek pieces John👍
Much much easier 😀 😎 ▲
⟩⟩
Seaspray
JOHN
Martin555
|
|
💬 Re: Stringer Angles
3 years ago by 🇬🇧 JOHN (
Midshipman)✧ 186 Views · 5 Likes
Flag
hi there
In the past the deck stringer I normally laminate is from 2 - 3 pieces. If say you are going to use a 5mm square piece of timber for your deck stringers, what I myself would do, is, substitute it with 2 pieces of timber 2.5 mm x 5 mm laminated. As for the bend of the deck stringer at the bow and stern; I would make 2 cheek pieces of the correct shape from either the 1st and 2nd rib to the bow and the same at the stern. This eases the bend of the deck stringer. John 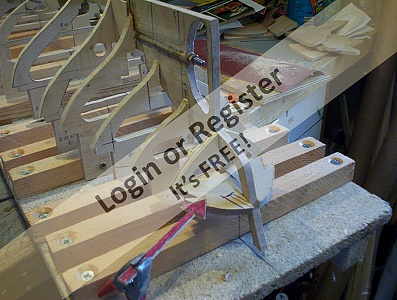

▲
⟩⟩
Seanympth
Colin H
Seaspray
RNinMunich
Martin555
|
|
💬 Re: Stringer Angles
3 years ago by 🇩🇪 RNinMunich (
Fleet Admiral)✧ 183 Views · 1 Like
Flag
Dyslexia😮
Ooops, sorry about that Seaspray😔 No offence meant! Onest injun. A building board is a very good idea, stops things twisting / getting out of line. Cheers, Doug 😎 ▲
⟩⟩
Martin555
|
|
💬 Re: Stringer Angles
3 years ago by 🇬🇧 Seaspray (
Warrant Officer)✧ 180 Views · 0 Likes
Flag
AHHHH The price of being Dyslexia. Another one is the difference between Bs and Ds I've had to use two words to help suss out the difference B for baby and D for daddy On the computer is a nightmare. Do a lot of thinking out of the box to.
Thanks for the info on the stringers. I thought of building frames / keel on building board then you would have a solid hull to work with. ▲
⟩⟩
No likes yet
This member will receive 1 point for every like received |
|
💬 Re: Stringer Angels
3 years ago by 🇩🇪 RNinMunich (
Fleet Admiral)✧ 183 Views · 1 Like
Flag
Easy peasy Seaspray😉
The top (deck level) stringer slot is cut so that the deck sits flat on it. For stringers further down the frame the slots are cut tangential to the curve of the frame. When all stringers are fitted the excess protruding wood (corners) is sanded off. Use a sanding block (like a chunk of 2x1") long enough to always cover at least two frames. Hope that helps. Good luck 🤞 Cheers, Doug 😎 PS Added a couple of Angels to help you along the way 😁 

▲
⟩⟩
Seaspray
|
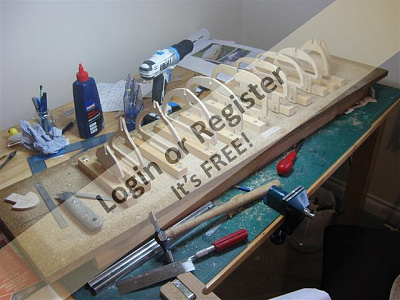
📝 Frames on to building board
3 years ago by 🇬🇧 Seaspray ( Warrant Officer)
Warrant Officer)✧ 176 Views · 3 Likes · 4 Comments
Flag
💬 Add Comment
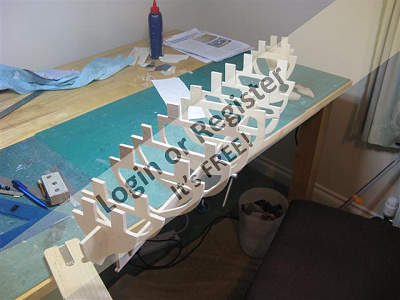
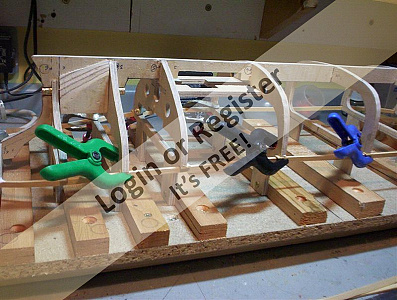
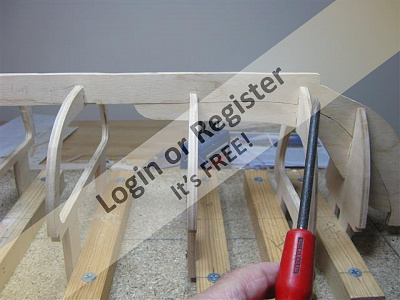
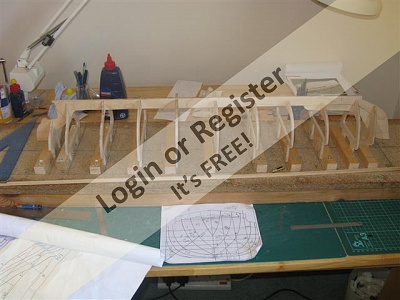
Working on the frames all cut out and mounted on to the building board. Quite a lot to learn here. Offered the keel on the frames half way thro I think the keel has a little bend. Things might need a wee tweak here an there. First picture is drilling the holes for the mounting. Picture two I didn't leave enough room on the edge of the building board to get a clamp to catch on so the tape did the trick Picture 3 some frames on their supporting block. Problems here as I don't think they were square. last two picture all frames mounted on board. Didn't twig the forward deck is lower than the rear deck and I had to modify the height on the frames 6,7,8 I'll investigate the keel tmo.

▲
⟩⟩
Colin H
Martin555
jbkiwi
|
💬 Re: Frames on to building board
3 years ago by 🇬🇧 Seaspray (
Warrant Officer)✧ 176 Views · 1 Like
Flag
A little adjustment here and there will be needed Cheers
▲
⟩⟩
Martin555
|
|
Login To
Remove Ads 💬 Re: Frames on to building board
3 years ago by 🇬🇧 Seaspray (
Warrant Officer)✧ 176 Views · 1 Like
Flag
Thanks I find it that way to cheers
▲
⟩⟩
Martin555
|
|
💬 Re: Frames on to building board
3 years ago by 🇬🇧 mturpin013 (
 Admiral) Admiral)✧ 179 Views · 2 Likes
Flag
A great start, this method of building and attention to alignment brings accuracy to the final structure and ease of building from this point.
▲
⟩⟩
Seaspray
Martin555
|
|
💬 Re: Frames on to building board
3 years ago by 🇨🇦 Newby7 (
Fleet Admiral)✧ 177 Views · 2 Likes
Flag
Good start with the building board. Making frames square to the board will give everything the start you want. Take your time with this setup as every thing builds from here.Good luck.
Rick ▲
⟩⟩
Seaspray
Martin555
|
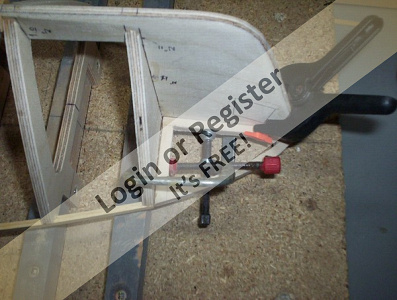
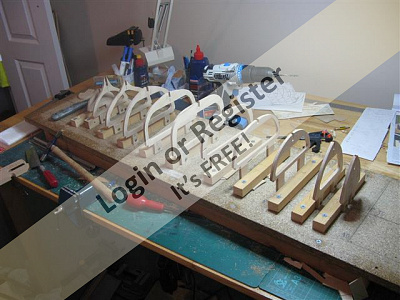
📝 Keel fitted
3 years ago by 🇬🇧 Seaspray ( Warrant Officer)
Warrant Officer)✧ 177 Views · 3 Likes · 7 Comments
Flag
💬 Add Comment
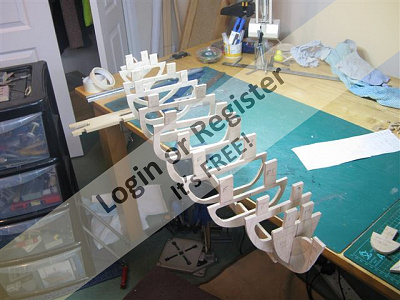
Fitted the keel yesterday few tweaks here an there. Just discovered the front of the keel wasn't trimmed off at the right height see picture one. Other pictures show a little problem with frame 9 second one from the bow. Seems too high to me ??
3rd and 4 frame near enough at the right height see the pencil mark on the frame.


3rd and 4 frame near enough at the right height see the pencil mark on the frame.
▲
⟩⟩
mturpin013
Colin H
Martin555
|
💬 Re: Keel fitted
3 years ago by 🇬🇧 Seaspray (
Warrant Officer)✧ 175 Views · 0 Likes
Flag
John
I did as you said with the obechi on the frame and they looked good till I got 3/4 the way up and a gap started to appear. Your right it is a height problem. Ta ▲
⟩⟩
No likes yet
This member will receive 1 point for every like received |
|
Login To
Remove Ads 💬 Re: Keel fitted
3 years ago by 🇨🇦 Newby7 (
Fleet Admiral)✧ 178 Views · 1 Like
Flag
Getting the frames and keel in the correct position will pay dividends through out the build.
Rick ▲
⟩⟩
Martin555
|
|
💬 Re: Keel fitted
3 years ago by 🇬🇧 JOHN (
Midshipman)✧ 186 Views · 3 Likes
Flag
Seaspray,
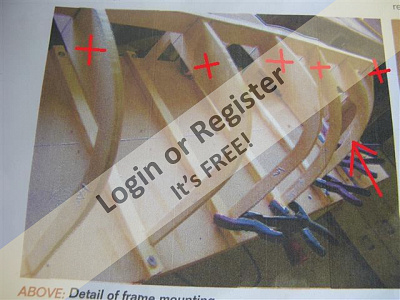
According to the plan I have - the prop tubes are parallel to the keel - and not at an angle - make sure you have enough room. Also, in the past a few of Jim Pottinger plans which I have used - the frame drawings aren't 100% - so be careful. I am sure this is something to do with distortion when the original plans go to the Printers. What I have done previously is built up the edge of the frame using 1.5 mm x 5.00 mm Obechi & before I attach the strip to the edge of the frame I soak the strip in boiling water - making it easy to bend and follow the shape of the frame. So, as long as your deck edge looks straight and right - look for the low frames which are out of line and build them up. I have just been going through some files to see if I can find a photograph of where I needed to alter the frames - and the only one I can find at the current time is from MV Duburg which is also from James Pottinger plans. The worst frame alteration I needed to do was when I did the little tug, MSC Archer. It was a free plan that one from Model Boats - I had to do a lot of alterations to the frames. It's not an uncommon thing to have to double check and redraw some frames, especially with modern day technology - it's supposed to be much more accurate on printing but I have had a good few plans with a lot of distortion to them. Have a look at this picture - where I am laying the batten over the frames to work out which ones are high and which ones are low - you can just see the gap on the first frame on the picture if you look closely. Dont let it get you down either - I have spent many many a day fitting frames and lifting them off the building board - a little tweak here and a tweak there end up taking all the frames off the board - and start again. It's worth it in the end. John 
▲
⟩⟩
Colin H
Martin555
Seaspray
|
|
💬 Re: Keel fitted
3 years ago by 🇬🇧 Seaspray (
Warrant Officer)✧ 178 Views · 2 Likes
Flag
John I looked at the motor mounting position/shaft/prop when cutting the frame I think I've enough room to get the shaft thru frames see pic. Can't find any info on plan the angles the prop shafts tappers out from the hull. Did see the solid block from the hull on plan. I cut the keel with it on. Frame 6/7/8 are the decks for the workdeck its lower than the forecastle deck by 25 mm and all other deck to the rear. So it'll be a case of lowering the keel rather than raising the frames I remember you saying you were speaking to J.P. about a drawing mistake. He said on another site that he drew the plan from a small G.A. drawing on Shipping World & Shipbuilders


▲
⟩⟩
Colin H
Martin555
|
|
💬 Re: Keel fitted
3 years ago by 🇬🇧 Seaspray (
Warrant Officer)✧ 178 Views · 2 Likes
Flag
Martin I was on it all day yesterday and at 9p.m. just walk away from it. Start a new day tmo with a fresh look at it cheers
▲
⟩⟩
Martin555
JOHN
|
|
💬 Re: Keel fitted
3 years ago by 🇬🇧 JOHN (
Midshipman)✧ 184 Views · 3 Likes
Flag
hi there
I think you will find it isnt frame 9 that looks too high but frame 8 that looks a little too low. The lump on the end (I am unsure if you know) is like a solid block which protrudes from the keel on the real ship to help crack the ice. Just as a side note are you not going to put the holes in frames 2, 3 and 4 to take the prop tubes? You may find it a bit awkward once you have assembled the frames on the board and also if you have skinned the hull. A lot easier to put oversize holes in the frames to allow you a bit wiggle room for aligning the tubes up. john 
▲
⟩⟩
Colin H
Seaspray
Martin555
|
|
💬 Re: Keel fitted
3 years ago by 🇬🇧 Martin555 (
Fleet Admiral)✧ 181 Views · 1 Like
Flag
Seaspray,
Have you double checked the frame with the drawings ? Dose the deck line look right ? You have a pencil mark above frame 8 dose that also mean that frame 8 will have to be tweaked. It is important to get everything right at this stage so really take your time and tweak it as much as is needed. If you use a thin strip of wood across several frames and look at the curve it will also help to see what needs doing. When you are happy with it don't forget to chamfer the frames before planking. Martin555. ▲
⟩⟩
Seaspray
|
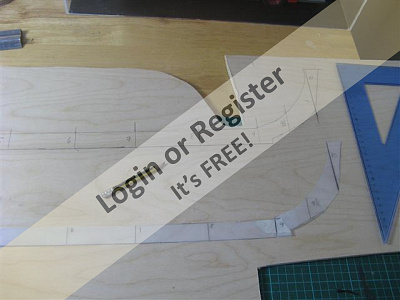
📝 Height difference in frames
3 years ago by 🇬🇧 Seaspray ( Warrant Officer)
Warrant Officer)✧ 175 Views · 4 Likes · 4 Comments
Flag
💬 Add Comment
If you look at Tom's keel and frames you see that frame 8 is slightly down from the keel. All the rest are up to the top of keel ( X s). Also the piece of steel for helping brake up the ice isn't on the keel like mine. I am going to cut frame 8 higher so there is a slight camber down to frame 9 or equal. The next picture shows the frame is miss cut. I am now in future going to trace using tracing paper from the original plan. Using a printer and cheap photo coping paper then gluing it to the wood it either shrinks or expands. I'll cut a cardboard template offering it up before I cut the wooden frame 8. Tracing paper on plan to trace frame 8. Hmmm how do you transfer the traced frame on the tracing paper to the wood. hopefully its not carbon paper.


▲
⟩⟩
mturpin013
Martin555
JOHN
Colin H
|
💬 Re: Height difference in frames
3 years ago by 🇬🇧 Martin555 (
Fleet Admiral)✧ 177 Views · 1 Like
Flag
That's good to hear.
Glad i could help. Keep the updates coming. Martin555. ▲
⟩⟩
Seaspray
|
|
Login To
Remove Ads 💬 Re: Height difference in frames
3 years ago by 🇬🇧 Seaspray (
Warrant Officer)✧ 175 Views · 1 Like
Flag
Hi Martin555 I did the trace and pencil No 1 on your list. worked a treat. Did find there was a difference in sizes of the photo copies I made at home compare to the printers in Ayr. I'll stick with the printer's copy from now on. Thanks again.
▲
⟩⟩
Martin555
|
|
💬 Re: Height difference in frames
3 years ago by 🇬🇧 Seaspray (
Warrant Officer)✧ 175 Views · 1 Like
Flag
Cheers Martin555 I think the problem was the Pritt Stick I used to glue the whole lot of the paper frame to the wood distorted the paper. Many thanks
▲
⟩⟩
Martin555
|
|
💬 Re: Height difference in frames
3 years ago by 🇬🇧 Martin555 (
Fleet Admiral)✧ 176 Views · 1 Like
Flag
Hi Seaspray,
RE :- Hmmm how do you transfer the traced frame on the tracing paper to the wood. There a several ways to do this. 1) on the side that will be put on the wood you shade the lines to be drawn with a soft pencil then place the tracing paper on the wood and then draw on your original lines. The soft pencil shading will stick to the wood then go over them again with your pencil. 2) Place your tracing paper on the wood and prick through the lines with something sharp like a scriber. Then remove the paper and join the dots with your pencil. 3) cut around the image on the tracing paper place it on the wood then carefully draw around it. Martin555. ▲
⟩⟩
Seaspray
|


Login To
Remove Ads
Remove Ads