Join Us On Social Media!

|

|

|
Download The App!
Login To
Remove Ads
Remove Ads
Login To
Remove Ads
Remove Ads
Model Boats Website
American river Springer pusher Tug
4 Posts · 8 Followers · 39 Photos · 40 Likes
Began 3 years ago by
 United Kingdom
Follow This Thread
Not currently following
> Click to follow
> Click to follow
Latest Post 3 years ago by
| Oldest posts shown first (Show Newest First) | (Print Booklet) |
📝 American river Springer pusher Tug
3 years ago by 🇬🇧 Skydive130 ( Rear Admiral)
Rear Admiral)✧ 92 Views · 12 Likes · 12 Comments
Flag
💬 Add Comment
And now for something different! I know that I suggested my next build would be the Dumas Motor lifeboat 36500, bu a week ago this little gem popped up on Facebook and I just had to hit the buy now button......
So, what we have here is an American River Springer Tug, used for pushing stuff up and down the river. The laser cut kit was a bargain at £80 inc postage from a very nice guy called Kevin who now owns www.Mastman.co.U.K. Or better still contact him through his Facebook page, search “mastman Model Boats”. He has a few limited kits available, I believe are new old stock and once gone they are gone!
What you get is all the quality laser cut plywood parts (no instructions) but all a superb fit and a little trial and error saw the basic model pieced together in about 15minutes. Overall length is about 18” long by about 8” beam, I haven’t worked out the scale yet as need to do a little research on the real thing. I believe you get a lot of bang for your buck and £80 I thought was good value.
The scope here is to add a wealth of scratch built details although these vessels are quite simple in real life. Items on order are a 500 sized brushed motor, 50mm 4 blade prop, steering servo, coupling, esc and a steerable kort nozzle. I shall be adding basic lights and still need to order 2x6v lead acid batteries and propshaft when I’ve worked out what length I need.
Onwards with the start of the build.......
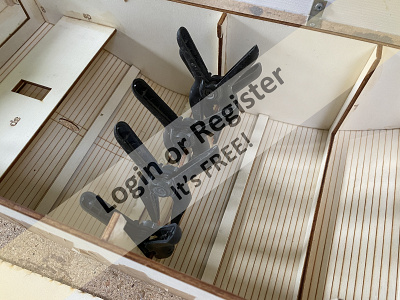
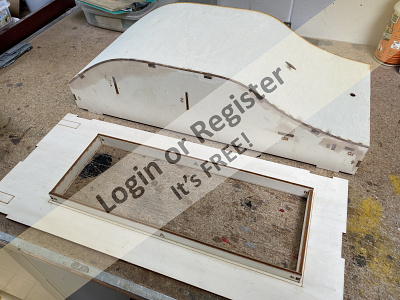
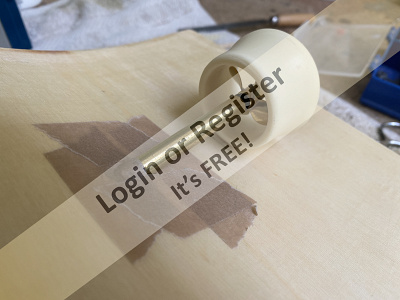
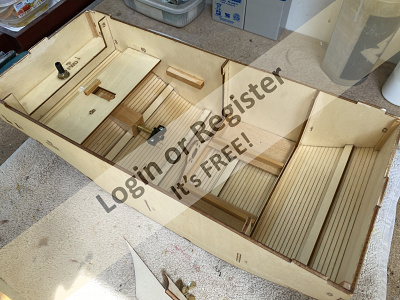
First job was to identify the basic hull components which include the sides, various formers, servo mount, rudder plate, bow and stern pieces. All were given a gentle sand, nothing major as the quality of the wood is so nice and then the basic frame was glued and squared up with Gorrilla waterproof PVA. This was then checked for square and weighted down to set.
Next pieces will be the hull bottom sheet supports x5 and the hull sheet.....


So, what we have here is an American River Springer Tug, used for pushing stuff up and down the river. The laser cut kit was a bargain at £80 inc postage from a very nice guy called Kevin who now owns www.Mastman.co.U.K. Or better still contact him through his Facebook page, search “mastman Model Boats”. He has a few limited kits available, I believe are new old stock and once gone they are gone!
What you get is all the quality laser cut plywood parts (no instructions) but all a superb fit and a little trial and error saw the basic model pieced together in about 15minutes. Overall length is about 18” long by about 8” beam, I haven’t worked out the scale yet as need to do a little research on the real thing. I believe you get a lot of bang for your buck and £80 I thought was good value.
The scope here is to add a wealth of scratch built details although these vessels are quite simple in real life. Items on order are a 500 sized brushed motor, 50mm 4 blade prop, steering servo, coupling, esc and a steerable kort nozzle. I shall be adding basic lights and still need to order 2x6v lead acid batteries and propshaft when I’ve worked out what length I need.
Onwards with the start of the build.......
First job was to identify the basic hull components which include the sides, various formers, servo mount, rudder plate, bow and stern pieces. All were given a gentle sand, nothing major as the quality of the wood is so nice and then the basic frame was glued and squared up with Gorrilla waterproof PVA. This was then checked for square and weighted down to set.
Next pieces will be the hull bottom sheet supports x5 and the hull sheet.....
▲
⟩⟩
chugalone100
Colin H
RNinMunich
robbob
mturpin013
jacko
jbkiwi
Ronald
MouldBuilder
Scratchbuilder
T33CNO
Martin555
|
💬 Re: American river Springer pusher Tug
11 months ago by 🇺🇸 chugalone100 (
 Sub-Lieutenant) Sub-Lieutenant)✧ 35 Views · 1 Like
Flag
Skydive:
I know it’s been two years that you posted the making of your Springer tug and if you don’t mind, I would like to ask the question that many asked you before but I haven’t find the answer. The question is ?Where can I find mastman models to purchase a model like yours? I have looked all over without any luck. Maybe he is out of business, and if that is the case, the next question is: ?Do you have the blueprints or plans that I could purchase from you? Your help will be very well appreciated. By the way, I’m also a skydiver with 175 jumps and can fly Cessna 152, 172, Skippers and Sundowners. Thank You Jul ▲
⟩⟩
Skydive130
|
|
Login To
Remove Ads 💬 Re: American river Springer pusher Tug
3 years ago by 🇬🇧 Skydive130 (
Rear Admiral)✧ 88 Views · 3 Likes
Flag
Cheers JB, I’ll try and keep things interesting once we get beyond building the basic hull, which will remain fairly basic as they are in real life!
Kind regards Sy ▲
⟩⟩
Scratchbuilder
jbkiwi
Martin555
|
|
💬 Re: American river Springer pusher Tug
3 years ago by 🇳🇿 jbkiwi (
 Fleet Admiral) Fleet Admiral)✧ 88 Views · 3 Likes
Flag
You'll have to slow down Sy, you're building faster than I can read😂 This one is going to be interesting, I'm sure!
JB ▲
⟩⟩
Scratchbuilder
Skydive130
Martin555
|
|
💬 Re: American river Springer pusher Tug
3 years ago by 🇨🇦 Newby7 (
Fleet Admiral)✧ 91 Views · 2 Likes
Flag
Must say Sy I crack myself up sometimes. Glad you liked it.
Rick ▲
⟩⟩
Martin555
Skydive130
|
|
💬 Re: American river Springer pusher Tug
3 years ago by 🇬🇧 Skydive130 (
Rear Admiral)✧ 90 Views · 1 Like
Flag
Oh dear Rick, you crack me up 😂😂😂
▲
⟩⟩
Martin555
|
|
💬 Re: American river Springer pusher Tug
3 years ago by 🇨🇦 Newby7 (
Fleet Admiral)✧ 91 Views · 2 Likes
Flag
Was I pushing that to much. LOL
Rick ▲
⟩⟩
Skydive130
Martin555
|
|
💬 Re: American river Springer pusher Tug
3 years ago by 🇬🇧 Skydive130 (
Rear Admiral)✧ 91 Views · 1 Like
Flag
Was there a pun there Rick, “pushing along” like a springer tug does 👍😂
▲
⟩⟩
Martin555
|
|
💬 Re: American river Springer pusher Tug
3 years ago by 🇬🇧 Skydive130 (
Rear Admiral)✧ 91 Views · 1 Like
Flag
Me too Martin, should be a fun build 👍
▲
⟩⟩
Martin555
|
|
💬 Re: American river Springer pusher Tug
3 years ago by 🇬🇧 Skydive130 (
Rear Admiral)✧ 91 Views · 3 Likes
Flag
Never enough hours in the day Bill!
▲
⟩⟩
chugalone100
Scratchbuilder
Martin555
|
|
💬 Re: American river Springer pusher Tug
3 years ago by 🇬🇧 Scratchbuilder (
 Vice Admiral) Vice Admiral)✧ 93 Views · 2 Likes
Flag
Hi SY.
Your a glutton for punishment. I just havn’t got the time to do all you do. Don’t you ever sleep.😂😂 Good luck,keep it coming. Regards Bill ▲
⟩⟩
Skydive130
Martin555
|
|
💬 Re: American river Springer pusher Tug
3 years ago by 🇬🇧 Martin555 (
Fleet Admiral)✧ 94 Views · 2 Likes
Flag
SY,
This is definitely a different project for you. This could be interesting and as you say a lot of scratch building. I am very interested to see how this comes out. Martin555. ▲
⟩⟩
Skydive130
Scratchbuilder
|
|
💬 Re: American river Springer pusher Tug
3 years ago by 🇨🇦 Newby7 (
Fleet Admiral)✧ 92 Views · 3 Likes
Flag
A new build Sy I see you are pushing along nicely.
Rick ▲
⟩⟩
Scratchbuilder
Skydive130
Martin555
|
Login To
Remove Ads
Remove Ads
📝 More hull work .....
3 years ago by 🇬🇧 Skydive130 ( Rear Admiral)
Rear Admiral)✧ 88 Views · 11 Likes · 4 Comments
Flag
💬 Add Comment
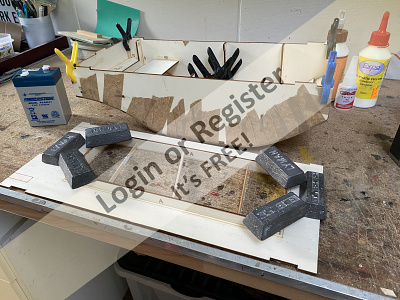
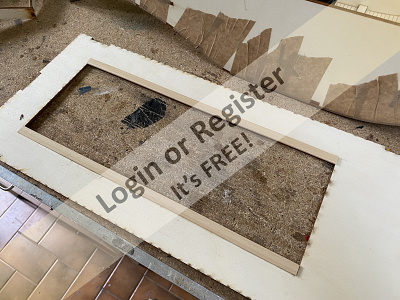
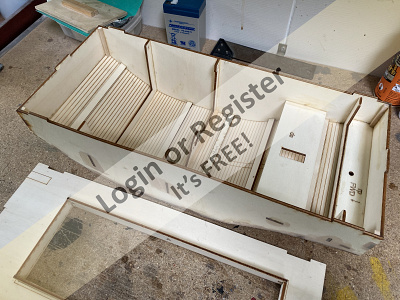
Last thing yesterday was to glue in the bottom hull stringers which add some more strength and bonding areas for the hull sheet.
At the same time, I was happy enough to install the hull sheet which to aid bending around the complex curves of the hull had been part depth laser cut every 3-4mm. Although this made bending the hull sheet into position a lot easier, I still felt the need to hit the sheet with the heat gun for a few minutes to soften the ply glue and aid behind even easier. Once I was happy with the fit I PVA glued the hull sheet down and with loads of non stretch picture framing tape it was on! I put the deck piece on at the same time but not glued just to ensure everything was true and square.
This morning has see the tape removed and a solid hull requiring very little sanding and prep before glass clothing. I shall cloth it once the prop shaft is in place.
Last couple of jobs before a weekend “up Norf” was to put some 1:8 square obechi in the corners to strengthen the joints and a couple of pieces of 1:8 obechi strip either side of the motor mount former for a little more belt and braces.
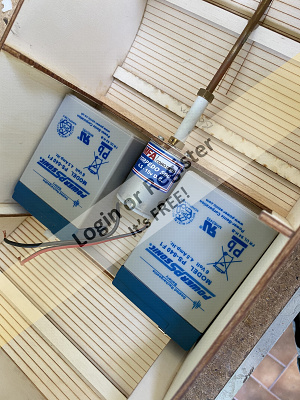
Due to the very nature of the shape of the hull, it will need a considerable amount of ballast to get her down to the water line. Better to use batteries in lieu of lead, I will be using 2x 6v lead acid 4.5ah mounted. Either side of the motor. According to the seller, this little model runs well on 6v and 12v so I have the option of both via parallel or series and can make a wiring loom to suit both easily enough.
More next week.......

At the same time, I was happy enough to install the hull sheet which to aid bending around the complex curves of the hull had been part depth laser cut every 3-4mm. Although this made bending the hull sheet into position a lot easier, I still felt the need to hit the sheet with the heat gun for a few minutes to soften the ply glue and aid behind even easier. Once I was happy with the fit I PVA glued the hull sheet down and with loads of non stretch picture framing tape it was on! I put the deck piece on at the same time but not glued just to ensure everything was true and square.
This morning has see the tape removed and a solid hull requiring very little sanding and prep before glass clothing. I shall cloth it once the prop shaft is in place.
Last couple of jobs before a weekend “up Norf” was to put some 1:8 square obechi in the corners to strengthen the joints and a couple of pieces of 1:8 obechi strip either side of the motor mount former for a little more belt and braces.
Due to the very nature of the shape of the hull, it will need a considerable amount of ballast to get her down to the water line. Better to use batteries in lieu of lead, I will be using 2x 6v lead acid 4.5ah mounted. Either side of the motor. According to the seller, this little model runs well on 6v and 12v so I have the option of both via parallel or series and can make a wiring loom to suit both easily enough.
More next week.......
▲
⟩⟩
chugalone100
T33CNO
Colin H
MouldBuilder
robbob
RNinMunich
mturpin013
Scratchbuilder
jbkiwi
SimpleSailor
Martin555
|
💬 Re: More hull work .....
3 years ago by 🇬🇧 Skydive130 (
Rear Admiral)✧ 86 Views · 1 Like
Flag
It is Alan, I’ve not done much apart from glass cloth the hull this week as I’ve been busy decorating the new kitchen. However, should get a bit done Sunday and Monday before work Tuesday 👍
▲
⟩⟩
Martin555
|
|
Login To
Remove Ads 💬 Re: More hull work .....
3 years ago by 🇬🇧 alan44 (
 Chief Petty Officer 2nd Class) Chief Petty Officer 2nd Class)✧ 89 Views · 2 Likes
Flag
Looking like a stress free build Sy 👍
▲
⟩⟩
Skydive130
Martin555
|
|
💬 Re: More hull work .....
3 years ago by 🇬🇧 Skydive130 (
Rear Admiral)✧ 88 Views · 2 Likes
Flag
Hi Martin,
I see it as a nice relaxing blank canvas. I think it’s nice every now and again to have something relatively simple and stress free to build in between harder projects. But yes, adding all the home made bits n pieces will bring this to life Kind regards Sy ▲
⟩⟩
Scratchbuilder
Martin555
|
|
💬 Re: More hull work .....
3 years ago by 🇬🇧 Martin555 (
Fleet Admiral)✧ 90 Views · 2 Likes
Flag
Hi Sy,
After seeing your other masterpieces this part must vary boring for you. I bet you cannot wait to get on to the scratch building and interesting detail work. Martin555. ▲
⟩⟩
Scratchbuilder
Skydive130
|
📝 Glass cloth and internal fittings
3 years ago by 🇬🇧 Skydive130 ( Rear Admiral)
Rear Admiral)✧ 80 Views · 7 Likes · 7 Comments
Flag
💬 Add Comment
Sorry it’s been a while since my last update, but having had a new kitchen installed by a well known company followed by all the decorating, the model has partially taken a back seat, although I did a couple of jobs at the same time…
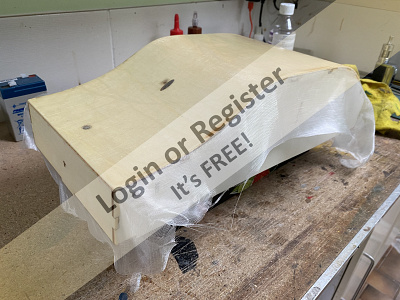
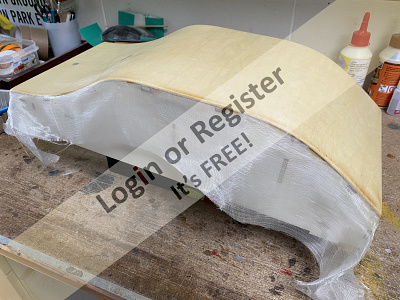
So, first job over the space of a few days was to prepare the bare hull ready for cloth. Nice and easy to cloth this model due the slab sided nature, all that was required was a sheet of ultra lightweight cloth for the hull bottom which covered the transom and flat from bow and a single piece for each side. This was put on over the space of 3 days using slightly thinned finishing resin (always used meths to dilute and it works for me). I will give the whole hull a second and if really need a third coat next week once I’ve fitted the deck sheet. Still to add on the hull are the side wales and 4 strip strakes on the flat hull sheet after final resin coats and sanding.
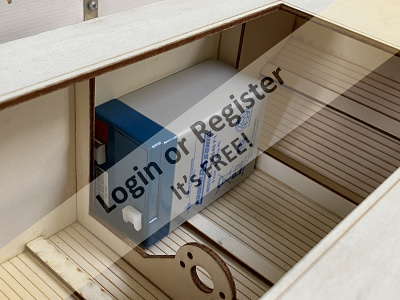
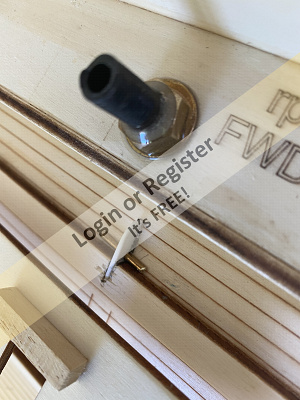
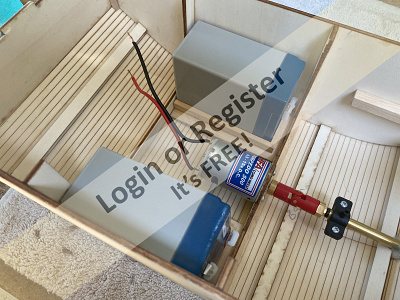
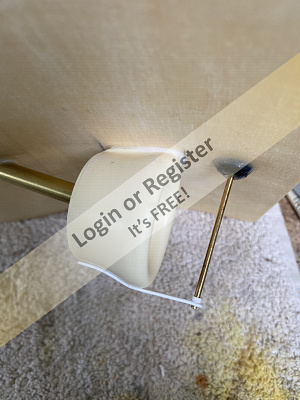
Internally I’ve now fitted the propshaft which was set up using my rigid coupling for alignment with the motor and then epoxied to set in position. Once set I then built a box around the prop shaft hull position and filled the box with liquid metal for an ultra string and watertight seal, finished with a lid for neatness.
other jobs inside were to built 2x battery trays for the 6v lead acid batteries, install an oiler tube on the prop shaft and fit a rudder post. The servo mount will be packed for a slightly higher servo position ensuring it’s way above the waterline.
I decided early on in the build I wanted to fit a Kort nozzle. I ordered one of 50mm internal dia along with a 50mm 4 blade prop (£40 well spent-not!)but as soon as that arrived it was obvious that was never going to fit because of the thrust line on the prop and shaft. Back to the measuring board (I know, measure twice, cut once!) and I could then see that I would get away with a 35mm kort and prop, another £35 spent and they duly arrived. Fitting the Kort took a little work to get it to the right position in relation to the prop, but is now fitted and braced internally with epoxy for a solid fit. Last job was to give the whole of the internal woodwork a coat of resin to seal it all in.
That’s it for a few days as back at work (unfortunately I won’t be doing anything on Saturday as it’s my 57th birthday and I’ve got a date at Duxford to have a little jolly in a “Spit”, a bucket list moment is coming!


So, first job over the space of a few days was to prepare the bare hull ready for cloth. Nice and easy to cloth this model due the slab sided nature, all that was required was a sheet of ultra lightweight cloth for the hull bottom which covered the transom and flat from bow and a single piece for each side. This was put on over the space of 3 days using slightly thinned finishing resin (always used meths to dilute and it works for me). I will give the whole hull a second and if really need a third coat next week once I’ve fitted the deck sheet. Still to add on the hull are the side wales and 4 strip strakes on the flat hull sheet after final resin coats and sanding.
Internally I’ve now fitted the propshaft which was set up using my rigid coupling for alignment with the motor and then epoxied to set in position. Once set I then built a box around the prop shaft hull position and filled the box with liquid metal for an ultra string and watertight seal, finished with a lid for neatness.
other jobs inside were to built 2x battery trays for the 6v lead acid batteries, install an oiler tube on the prop shaft and fit a rudder post. The servo mount will be packed for a slightly higher servo position ensuring it’s way above the waterline.
I decided early on in the build I wanted to fit a Kort nozzle. I ordered one of 50mm internal dia along with a 50mm 4 blade prop (£40 well spent-not!)but as soon as that arrived it was obvious that was never going to fit because of the thrust line on the prop and shaft. Back to the measuring board (I know, measure twice, cut once!) and I could then see that I would get away with a 35mm kort and prop, another £35 spent and they duly arrived. Fitting the Kort took a little work to get it to the right position in relation to the prop, but is now fitted and braced internally with epoxy for a solid fit. Last job was to give the whole of the internal woodwork a coat of resin to seal it all in.
That’s it for a few days as back at work (unfortunately I won’t be doing anything on Saturday as it’s my 57th birthday and I’ve got a date at Duxford to have a little jolly in a “Spit”, a bucket list moment is coming!
▲
⟩⟩
chugalone100
Rookysailor
jbkiwi
T33CNO
Colin H
robbob
RNinMunich
|
💬 Re: Glass cloth and internal fittings
3 years ago by 🇬🇧 Skydive130 (
Rear Admiral)✧ 75 Views · 2 Likes
Flag
Re: the bigger Kort Doug, I was thinking exactly the same if I can find a suitable donor tug for it! 😂
▲
⟩⟩
Martin555
RNinMunich
|
|
Login To
Remove Ads 💬 Re: Glass cloth and internal fittings
3 years ago by 🇬🇧 Skydive130 (
Rear Admiral)✧ 75 Views · 3 Likes
Flag
Hi Doug, the resin I use is Z-poxy finishing resin. It’s quite expensive but has always given me good results. It’s similar in mixing to normal epoxy in that it comes as a 2 part bottle set and is mixed 50/50
As for the eazycoat stuff you use. I have actually got a bottle to try at some point, but was going to finish my current stock of Z-Poxy before I try something new. I Belive Rob recommended your stuff a while back and that’s why I’ve got a bottle. Why haven’t I used it on this model, because I forgot I had it in my vast cupboard of paints, glues, resins, thinners, spray paints ect ect ect! 😂😂😂 Kind regards Sy ▲
⟩⟩
chugalone100
Martin555
RNinMunich
|
|
💬 Re: Glass cloth and internal fittings
3 years ago by 🇩🇪 RNinMunich (
Fleet Admiral)✧ 80 Views · 5 Likes
Flag
"The import thing is 50/50 on resin and hardener ratios."
Don't know what type of resin you are using Sy but that sounds a bit extravagant to me! With that amount of hardener I would expect the mix to generate mucho heat and go off in minutes and maybe even setting fire to your brush💥🔥 For some years now I have only used the Deluxe Materials Ezekote water based resin. No hardener needed, dilute with H2O, no heat generated and no pong🙊😁 I no longer use cloth, too heavy for smaller projects, so I just use tissue now. Martin; Don't know about others but I've never bothered to try and 'work out' the amount of resin needed. I just 'paint' it on until I'm finished. Then with EzeKote you can just put any rest back in the bottle and seal it 'til next time 😊 No worries about it setting off the whole bottle. Cheers, Doug 😎 ▲
⟩⟩
chugalone100
Rookysailor
Colin H
Skydive130
Martin555
|
|
💬 Re: Glass cloth and internal fittings
3 years ago by 🇩🇪 RNinMunich (
Fleet Admiral)✧ 80 Views · 1 Like
Flag
So far so good Sy 👍
"unfortunately I won’t be doing anything on Saturday as it’s my 57th birthday" Young whipper-snapper! Have a good day 😀 "I’ve got a date at Duxford to have a little jolly in a “Spit”, " You jammy so n so 😮😋😋 'Bandits Angels one high 11 o'clock chaps. Tally Hoooo' 😁 Nearest I got to that was a few lessons on a Grumman-American Tiger. But at least I got some 'Hands On' 😀 Did once get a birthday present of a day out with the then BMW Formula One team though, including a thrash round the Nürburgring track. Vroom vroom Maisy 😁😮🙈 😎 BTW Ref the 50mm Kort; now you'll just have to build a bigger tug 😁🤣 
▲
⟩⟩
Martin555
|
|
💬 Re: Glass cloth and internal fittings
3 years ago by 🇬🇧 Martin555 (
Fleet Admiral)✧ 78 Views · 1 Like
Flag
Thank's for the information Sy.
Martin555. ▲
⟩⟩
Skydive130
|
|
💬 Re: Glass cloth and internal fittings
3 years ago by 🇬🇧 Skydive130 (
Rear Admiral)✧ 79 Views · 1 Like
Flag
Hi Martin, I’ve zero experience working with GF apart from ready made hulls. When I cloth a model I guesstimate what weight of cloth to use depending on size of model but mainly use the lighter weights simply because they require less resin to fill the weave.
As for mixing resin? The import thing is 50/50 on resin and hardener ratios. Using neat resin i find it too thick and I use methylated spirit to water it down to a milk like thickness. I think the Americans use denatured alcohol and it may well be the same as meths? I use those cheap disposable brushes to mix and paint the resin on. The first coat bonds the cloth to the wood, and I squeegee the first layer with an old credit card once the cloth has been soaked. the next one or two coats to fill the weave and give a smooth finish. The quality of the finish is then dependant on how much effort is put in with sandpaper and wet n dry between coats. I’ve only been using glass cloth the last couple of years but have found a process that no longer scares me as it did the first time I did it! Kind regards Sy ▲
⟩⟩
Martin555
|
|
💬 Re: Glass cloth and internal fittings
3 years ago by 🇬🇧 Martin555 (
Fleet Admiral)✧ 79 Views · 2 Likes
Flag
Hi Sy,
Many years ago i use to do a bit of Fibre Glass Laminating and i seem to remember the resin weight was twice the weight of the glass cloth. It that how you work out the amount of resin need to cloth on models ? Martin555. ▲
⟩⟩
Skydive130
Colin H
|
📝 Electronics installed and spitfire sortie completed….
3 years ago by 🇬🇧 Skydive130 ( Rear Admiral)
Rear Admiral)✧ 70 Views · 10 Likes · 9 Comments
Flag
💬 Add Comment
What a week!
Having had to work all week, the model making has taken a back seat. However, Saturday dawned and I full filled my life long ambition of taking to the skies in a mk IX 2 seat Spitfire at Duxford taking my late father along for the ride in what was the biggest grin moment ever! Very surreal looking out of the cockpit just after take off looking at the elliptical wings with the chatter of the RR Merlin upfront thinking, I’m really doing this! I got 15 minutes hands on flying, a few Aeros but limited by the low cloud base followed by a victory roll, high speed pass and break over the airfield for landing.
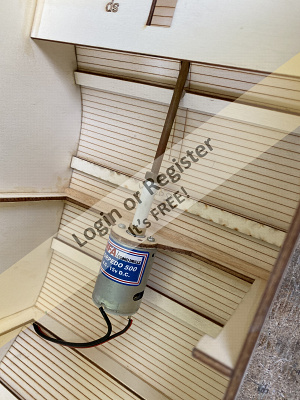
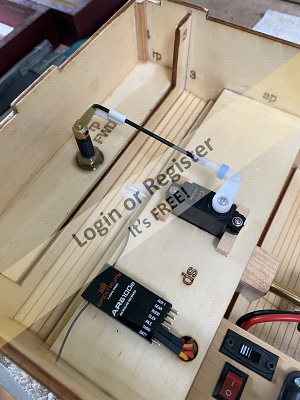
Anyway, I’ve managed to get a little done on the springer. I’ve made up the rudder linkage using a commercial rudder mount but with a couple of smaller diameters of brass tube inside to reduce the diameter of the tube to take a 2.5mm rudder bar. I will be making the rudder with layers of plasticard next week.
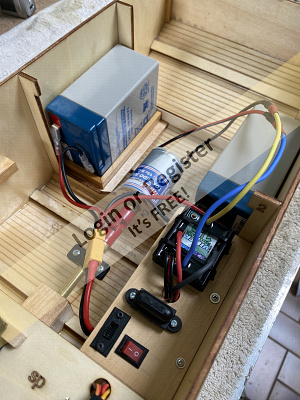
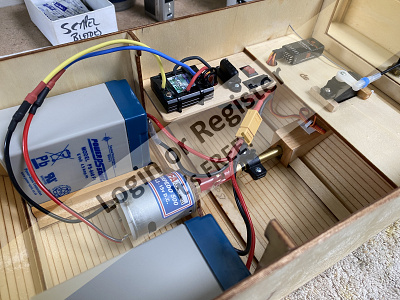
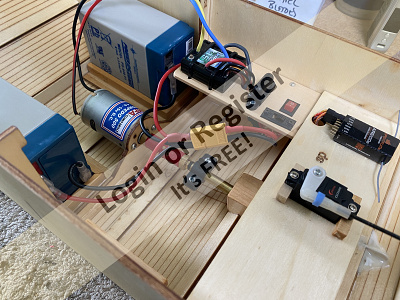
The main work has been making up the electronics board using an mtroniks 15amp ESC, 15amp inline fuse holder and and a separate on/off switch to power it up from the 2x 6v batteries connected in parallel via a lead to XT60 connector. I intend fitting navigation lights but will be keeping them simple by just having them connected to a 9v battery.
Everything has been connected up and the receiver bound to my transmitter, rudder and motor are running in the correct directions.

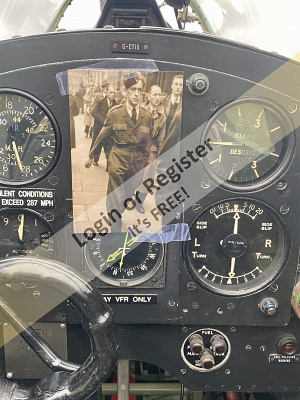


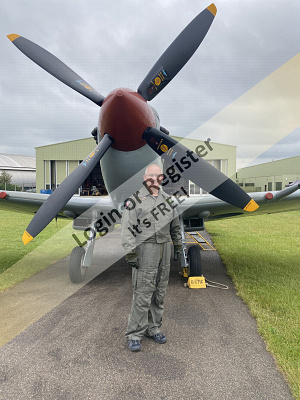
Having had to work all week, the model making has taken a back seat. However, Saturday dawned and I full filled my life long ambition of taking to the skies in a mk IX 2 seat Spitfire at Duxford taking my late father along for the ride in what was the biggest grin moment ever! Very surreal looking out of the cockpit just after take off looking at the elliptical wings with the chatter of the RR Merlin upfront thinking, I’m really doing this! I got 15 minutes hands on flying, a few Aeros but limited by the low cloud base followed by a victory roll, high speed pass and break over the airfield for landing.
Anyway, I’ve managed to get a little done on the springer. I’ve made up the rudder linkage using a commercial rudder mount but with a couple of smaller diameters of brass tube inside to reduce the diameter of the tube to take a 2.5mm rudder bar. I will be making the rudder with layers of plasticard next week.
The main work has been making up the electronics board using an mtroniks 15amp ESC, 15amp inline fuse holder and and a separate on/off switch to power it up from the 2x 6v batteries connected in parallel via a lead to XT60 connector. I intend fitting navigation lights but will be keeping them simple by just having them connected to a 9v battery.
Everything has been connected up and the receiver bound to my transmitter, rudder and motor are running in the correct directions.
▲
⟩⟩
chugalone100
neilmc
redpmg
Rookysailor
mturpin013
T33CNO
Colin H
jbkiwi
robbob
Martin555
|
💬 Re: Electronics installed and spitfire sortie completed….
3 years ago by 🇬🇧 Skydive130 (
Rear Admiral)✧ 57 Views · 2 Likes
Flag
I flew in my Spit at Duxford with the company Aerial Collective. It was priced at £2700 which whilst not cheap was still in my mind money well spent. There are a couple of other airfields offering Spitfire, Mustang flights in U.K. for similar prices and more depending on what you want, Biggin Hill has a lot of different packages.
Kind regards simon ▲
⟩⟩
chugalone100
Martin555
|
|
Login To
Remove Ads 💬 Re: Electronics installed and spitfire sortie completed….
3 years ago by 🇿🇦 redpmg (
 Commodore) Commodore)✧ 69 Views · 2 Likes
Flag
Wow - Green with envy - closest I ever came was a 30 second taxi in a MK22 with an engine fitter on each wing making sure I did not overdo it - we were working on the aircraft at Thornhill air base an ex WW2 Empire Pilot Training Station. The plane in question was used for years as a display piece on a pedestal at the main gate. It was fully restored as there were still plenty of spares in the stores plus a couple of other derelicts that were scavenged from - lots of the regular RhodAF techs & TF's donated their spare time to do so. Not sure what financial arrangements there were with RhodAF.
It was owned and flown by Jack Malloch who ran a airfreight company Air Trans Africa - (one of his clients was Biafra during the Nigerian civil war). Sadly he was last seen flying into Cumulus-Nimbus and only pieces of the Spitfire came out. How did you manage to arrange the flight ? The sound of that Merlin is magic itself - the Griffin in the Mk22 was the same.......... And as usual you are making a magnificent job of the Pusher - always so very neat & tidy as well. ▲
⟩⟩
Martin555
Skydive130
|
|
💬 Re: Electronics installed and spitfire sortie completed….
3 years ago by 🇨🇦 Newby7 (
Fleet Admiral)✧ 70 Views · 2 Likes
Flag
Hi Sy If it is the top still room for more into the bucket.
Rick ▲
⟩⟩
Martin555
Skydive130
|
|
💬 Re: Electronics installed and spitfire sortie completed….
3 years ago by 🇬🇧 Skydive130 (
Rear Admiral)✧ 70 Views · 1 Like
Flag
I think that was top of the bucket list Rick, not sure I can find anything that would beat it!
▲
⟩⟩
Martin555
|
|
💬 Re: Electronics installed and spitfire sortie completed….
3 years ago by 🇨🇦 Newby7 (
Fleet Admiral)✧ 70 Views · 2 Likes
Flag
Exceptional Sy Talk about an entry for your bucket list .
Rick ▲
⟩⟩
Skydive130
Martin555
|
|
💬 Re: Electronics installed and spitfire sortie completed….
3 years ago by 🇬🇧 Skydive130 (
Rear Admiral)✧ 70 Views · 1 Like
Flag
Cheers Rob,
the springer is a stress free build. I’ve just managed to source a Model Slipway Loyal Fleet Tender off eBay after a long time hunting a kit, picking up from Devon in a couple of weeks, that will be more of a challenge ha ha! ▲
⟩⟩
Martin555
|
|
💬 Re: Electronics installed and spitfire sortie completed….
3 years ago by 🇬🇧 Skydive130 (
Rear Admiral)✧ 70 Views · 1 Like
Flag
Cheers Martin, and yes, silly grin still attached to face 😂😂👍
▲
⟩⟩
Martin555
|
|
💬 Re: Electronics installed and spitfire sortie completed….
3 years ago by 🇬🇧 robbob (
 Admiral) Admiral)✧ 93 Views · 2 Likes
Flag
Hi Sy.
What a week indeed! I'm so jealous of your Spitfire flight as will be most on here too 🤗! The springer is coming on really well, keep up the great work 👍. Rob. ▲
⟩⟩
Skydive130
Martin555
|
|
💬 Re: Electronics installed and spitfire sortie completed….
3 years ago by 🇬🇧 Martin555 (
Fleet Admiral)✧ 70 Views · 1 Like
Flag
Hi Sy,
I bet you still have that big smile on your face even now. That is a very neat and tidy installation. Martin555. ▲
⟩⟩
Skydive130
|


Login To
Remove Ads
Remove Ads