Join Us On Social Media!

|

|

|
Download The App!
Login To
Remove Ads
Remove Ads
Login To
Remove Ads
Remove Ads
Model Boats Website
Rescue Launch
12 Posts · 17 Followers · 80 Photos · 151 Likes
Began 3 years ago by
 United Kingdom
Follow This Thread
Not currently following
> Click to follow
> Click to follow
Latest Post 2 years ago by
| Oldest posts shown first (Show Newest First) | (Print Booklet) |
📝 Rescue Launch
3 years ago by 🇬🇧 Graham93 ( Vice Admiral)
Vice Admiral)✧ 186 Views · 12 Likes · 6 Comments
Flag
💬 Add Comment
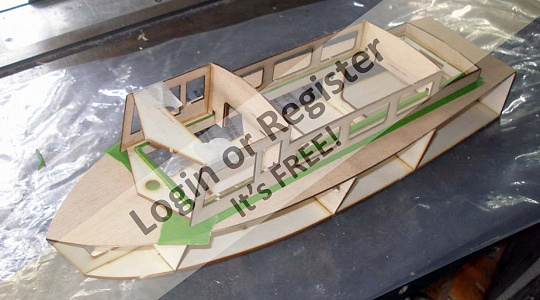
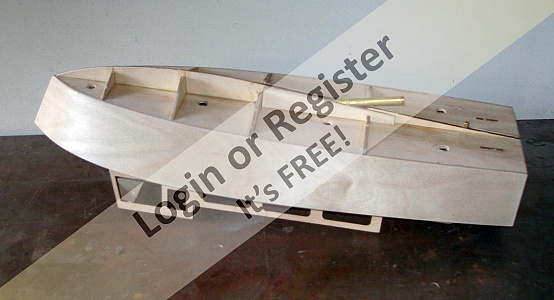
A few weeks ago, while looking after our 7 year old grandson for the day while his mum and dad were at work he asked (several times) if he could help me building my boats. As I'm not currently building anything, we had to find other things to do build (Lego) for the day. After he had gone home, I started to think about a boat he could help build.
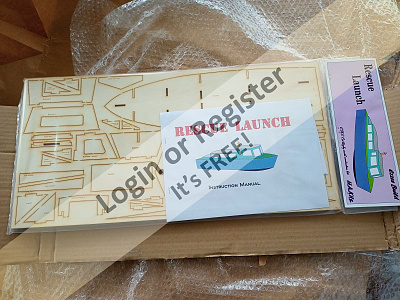
I had come across HAkits in a couple of blogs on this site so found their website and decided that their Rescue Launch would make a nice model for a 7 year old. The kit was duly ordered and arrived a few days later.
Building from a kit like this is a bit of a departure for me as I usually scratch build my models. The kit was well packaged but there didn't seem to be much in the bag. Three sheets of laser cut ply, a few sticks (rubbing strakes), some plastic window frames, a sheet of clear acetate with a template for the windows and an instruction manual.
The instruction manual will look familiar to any 7 year old who is used to building Lego kits. It has numbered steps, each with a drawing of the assembly showing the next piece to be fitted. Each of the laser cut parts is identified with it's name etched into the surface. However I did notice that in some cases the name of the part used in the instructions is different to the name etched into it. For example assembly step 3 says 'glue the bow former .. in place'. The required piece is etched with 'bulkhead 1 support'. Guaranteed to confuse a 7 year old (and his grandad occasionally 😉).
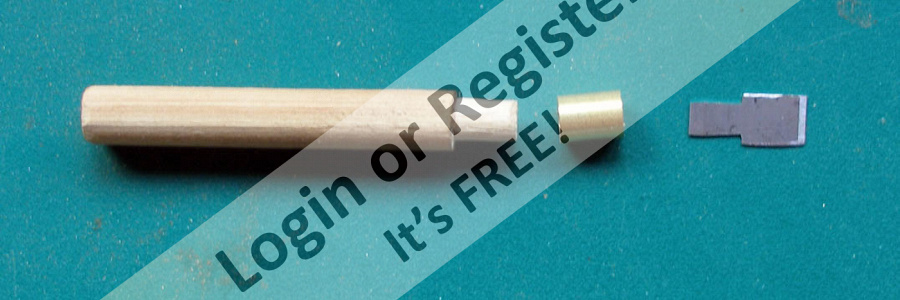
The pieces need to be cut from the ply sheets with a Stanley knife. I didn't like the idea of sending my grandson home with bandaged fingers at the end of the day so decided to make a thin 'chisel' from a snap-off blade mounted in a dowel handle. This should allow the pieces to be freed from the ply sheet using a hammer with less risk to little fingers.
So now I'm ready, waiting for the return of Finley....


I had come across HAkits in a couple of blogs on this site so found their website and decided that their Rescue Launch would make a nice model for a 7 year old. The kit was duly ordered and arrived a few days later.
Building from a kit like this is a bit of a departure for me as I usually scratch build my models. The kit was well packaged but there didn't seem to be much in the bag. Three sheets of laser cut ply, a few sticks (rubbing strakes), some plastic window frames, a sheet of clear acetate with a template for the windows and an instruction manual.
The instruction manual will look familiar to any 7 year old who is used to building Lego kits. It has numbered steps, each with a drawing of the assembly showing the next piece to be fitted. Each of the laser cut parts is identified with it's name etched into the surface. However I did notice that in some cases the name of the part used in the instructions is different to the name etched into it. For example assembly step 3 says 'glue the bow former .. in place'. The required piece is etched with 'bulkhead 1 support'. Guaranteed to confuse a 7 year old (and his grandad occasionally 😉).
The pieces need to be cut from the ply sheets with a Stanley knife. I didn't like the idea of sending my grandson home with bandaged fingers at the end of the day so decided to make a thin 'chisel' from a snap-off blade mounted in a dowel handle. This should allow the pieces to be freed from the ply sheet using a hammer with less risk to little fingers.
So now I'm ready, waiting for the return of Finley....
▲
⟩⟩
Seanympth
dave976
Martin555
jbkiwi
robbob
Newby7
Colin H
Nerys
stevedownunder
Mike Stoney
RNinMunich
philcaretaker
|
💬 Re: Rescue Launch
3 years ago by 🇬🇧 Nerys (
 Fleet Admiral) Fleet Admiral)✧ 178 Views · 2 Likes
Flag
Hi Rick,
Excellent idea to get the kids interested. One of our local clubs, at open days etc. takes a number of simple boats for kids to try out. It's always very popular both with the kids and their parents. I think they charge a small fee, 50p a go comes to mind. Nerys ▲
⟩⟩
Seanympth
Martin555
|
|
Login To
Remove Ads 💬 Re: Rescue Launch
3 years ago by 🇬🇧 Nerys (
Fleet Admiral)✧ 178 Views · 2 Likes
Flag
That paddle boat looks fun, I've looked at it on Ebay and there are umpteen sellers, mainly in China. The price seems to vary between about £5 and £11 with the dearer ones in UK. There was also one listed from Sri Lanka with a price of £50 something and £22 postage. I've a vague recollection of having something similar working off elastic bands in my dim and distant past. I think I might even buy one. Keep me amused for an hour or two.
Nerys ▲
⟩⟩
Seanympth
Martin555
|
|
💬 Re: Rescue Launch
3 years ago by 🇨🇦 Newby7 (
Fleet Admiral)✧ 182 Views · 4 Likes
Flag
When my boat club was able to have an open house and set up our pool. We have pusher tugs we let children run. The joy of watching them run the boats trying to dock them or racing one another they giggle and laugh the hole time.I'm sure we all smile at there fun.
Along with the pusher tugs we have made small sailing kits for them to build. We make 3 or 4 hundred kits for the show. We sell out all kits at 2$ a kit and donate the funds to help kids organizations. For me the joy of watching them build and run the boat is a lifting feeling . Rick ▲
⟩⟩
Martin555
Colin H
Graham93
jbkiwi
|
|
💬 Re: Rescue Launch
3 years ago by 🇬🇧 Graham93 (
Vice Admiral)✧ 185 Views · 3 Likes
Flag
Michael,
That’s an unbelievable low price. I’ll be interested to hear how well it works. It’s surprising how the costs add up when you add motor, esc, etc to the price of the kit. I’ve probably spent 10x the cost of your kit. Graham93 ▲
⟩⟩
Seanympth
Martin555
jbkiwi
|
|
💬 Re: Rescue Launch
3 years ago by 🇬🇧 Nerys (
Fleet Admiral)✧ 181 Views · 8 Likes
Flag
It's an excellent idea to get children using tools at an early age and the simple kit is a good way to start doing it. When I was young, my father, whenever he was home from sea spent a lot of time with me doing just that. I think the first thing he taught me to do was to carve little figures from the wood from butter boxes. (Butter came in bulk in boxes in those days and was cut up into whatever weight the customer required) The wood was always a good knot free close grained wood. I think the first major thing I carved was a little man on a horse. He often brought model boats home for me, hours of off watch work, so it wasn't long before I was working on waterline models. This stood me in good stead because by the time I was twelve, I was making toy model boats and selling them to local shops, this was of course during the war and toys were in short supply. I was also the lead soldier baron of the school, I had a set of moulds to make lead soldiers and sold the result in school for 1 1/2 old pence each.
As far as my own son was concerned, he was brought up helping me build real boats, he learnt to use tools at an early age including such things as draw knives and an adze. At fourteen, he made all the spars for my 43ft. schooner . This he always said got him his first job as an apprentice joiner by telling his interviewer about the tools and what he had done with them. He went on to have a successful business converting horse boxes into vehicles for motor racing and horse eventing. So, all praise to anyone who teaches children to use tools. Catch 'em young is the answer. Cheers, Nerys ▲
⟩⟩
Seanympth
Martin555
alan44
GaryLC
jbkiwi
Newby7
Graham93
Colin H
|
|
💬 Re: Rescue Launch
3 years ago by 🇬🇧 mturpin013 (
 Admiral) Admiral)✧ 183 Views · 10 Likes
Flag
Hi Graham I found myself in a similar position and on a day when my eldest son (45) was helping me with some electronics, my 8yr old grandson was occupying himself cutting up small cardboard boxes trying to make a paddle boat. It did float and he enjoyed making it but I felt as if I'd let him down not being involved.
So what did I do, I made a similar purchase, I could hardly believe what value for money £6:89 inc P&P for this radio controlled model, I have since seen them for as little as £5:15 free P&P DIY Paddle Wheel Ship Model Kids Students Remote Control Assembling Toys UK 
▲
⟩⟩
Seanympth
Martin555
MouldBuilder
jbkiwi
GaryLC
Graham93
Hillro
Colin H
Nerys
stevedownunder
|

Login To
Remove Ads
Remove Ads
📝 Starting the assembly
3 years ago by 🇬🇧 Graham93 ( Vice Admiral)
Vice Admiral)✧ 181 Views · 11 Likes · 4 Comments
Flag
💬 Add Comment
The first thing to do is "Read the Instructions" and study the parts to work out what goes where😉.
The micro chisel works well to release the laser cut parts from the plywood sheets. Less risk of cut fingers and somehow we managed to avoid any bruises.
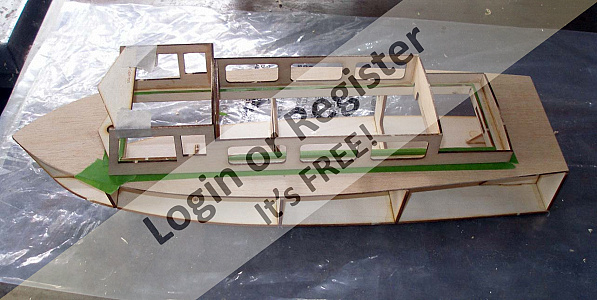
The parts are accurate and easy to fit together with very little cleaning up required. The first challenge came when fitting the centre keel to the underside of the hull bottom. The keel is in two pieces which are spaced to leave a gap for the propshaft. There is no hole in the hull bottom for the propshaft to pass through so the keel pieces were used to work out where to cut the hole. A length of 7mm dia. brass tube was used to ensure that the hole was big enough and in the right place. The keel doublers were added to strengthen the area around the shaft tube. Additional keel doublers were needed to accommodate the 7mm tube. These were cut from scrap ply.
Having completed the basic hull framework, the next instruction in the manual is to fit the side skins. However doing that at this stage would make fitting and aligning the motor much more difficult. Better to sort out the motor mounting while there is access through the sides of the hull. It is a shame that there isn't a note in the instructions explaining this as an inexperienced builder would likely press on at this stage and then have the challenge of having to fit and align the motor through the restricted deck access hatch.
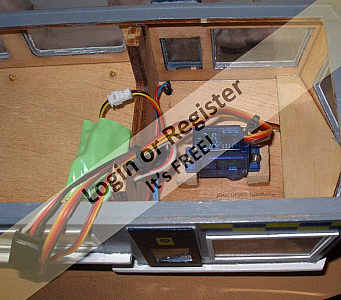
As I needed some time, (and peace and quiet 😁) to sort out the motor mount, 'we' decided to move on to assembling the cabin. Finley cut out the parts using the chisel, I held them in place while he applied the superglue. I didn't end up with too much on my fingers and managed to peel them off the model several times. 😊
The cabin is built in situ but needs to be removable to gain access to the inside of the hull. Masking tape was applied around the access hatch before the cabin pieces were glued in place to ensure that it didn't end up permanently attached, despite the liberal application of superglue!
By the end of the day we had made good progress. Finley went home and wouldn't stop telling his Mum and Dad about the boat. He wanted to come back the next day to carry on construction, but I need time to sort out the motor mount, and the rudder servo mount, before he returns.
Sorry there aren't so many photos, but I had my hands full!


The micro chisel works well to release the laser cut parts from the plywood sheets. Less risk of cut fingers and somehow we managed to avoid any bruises.
The parts are accurate and easy to fit together with very little cleaning up required. The first challenge came when fitting the centre keel to the underside of the hull bottom. The keel is in two pieces which are spaced to leave a gap for the propshaft. There is no hole in the hull bottom for the propshaft to pass through so the keel pieces were used to work out where to cut the hole. A length of 7mm dia. brass tube was used to ensure that the hole was big enough and in the right place. The keel doublers were added to strengthen the area around the shaft tube. Additional keel doublers were needed to accommodate the 7mm tube. These were cut from scrap ply.
Having completed the basic hull framework, the next instruction in the manual is to fit the side skins. However doing that at this stage would make fitting and aligning the motor much more difficult. Better to sort out the motor mounting while there is access through the sides of the hull. It is a shame that there isn't a note in the instructions explaining this as an inexperienced builder would likely press on at this stage and then have the challenge of having to fit and align the motor through the restricted deck access hatch.
As I needed some time, (and peace and quiet 😁) to sort out the motor mount, 'we' decided to move on to assembling the cabin. Finley cut out the parts using the chisel, I held them in place while he applied the superglue. I didn't end up with too much on my fingers and managed to peel them off the model several times. 😊
The cabin is built in situ but needs to be removable to gain access to the inside of the hull. Masking tape was applied around the access hatch before the cabin pieces were glued in place to ensure that it didn't end up permanently attached, despite the liberal application of superglue!
By the end of the day we had made good progress. Finley went home and wouldn't stop telling his Mum and Dad about the boat. He wanted to come back the next day to carry on construction, but I need time to sort out the motor mount, and the rudder servo mount, before he returns.
Sorry there aren't so many photos, but I had my hands full!
▲
⟩⟩
Seanympth
Martin555
Rover
stevedownunder
Colin H
GaryLC
jbkiwi
RNinMunich
Newby7
philcaretaker
robbob
|
💬 Re: Starting the assembly
3 years ago by 🇬🇧 mturpin013 (
Admiral)✧ 175 Views · 3 Likes
Flag
That's great to see a young modeller getting to grips with a model
▲
⟩⟩
Martin555
stevedownunder
Graham93
|
|
Login To
Remove Ads 💬 Re: Starting the assembly
3 years ago by 🇬🇧 GaryLC (
 Captain) Captain)✧ 179 Views · 3 Likes
Flag
Well done Graham and young Findley, I found your blog both interesting and enterprising and pleasantly different from the majority of the stuff on here. Very best wishes to both of you especially your young apprentice. Regards, Gary. (Looking forward to the next installment.)
▲
⟩⟩
Martin555
Graham93
stevedownunder
|
|
💬 Re: Starting the assembly
3 years ago by 🇬🇧 Graham93 (
Vice Admiral)✧ 181 Views · 2 Likes
Flag
Hi Rick,
Yes, he did enjoy it. So did I, but it was exhausting having to keep watch over him every second and having to answer the endless questions "What's that for Grandad?" 😍 Graham93 ▲
⟩⟩
Martin555
stevedownunder
|
|
💬 Re: Starting the assembly
3 years ago by 🇨🇦 Newby7 (
Fleet Admiral)✧ 178 Views · 2 Likes
Flag
Well done Graham.👍👍👍Sounds and looks like Finley enjoyed the day .
Rick ▲
⟩⟩
Martin555
stevedownunder
|
📝 Motor and Propshaft
3 years ago by 🇬🇧 Graham93 ( Vice Admiral)
Vice Admiral)✧ 238 Views · 11 Likes · 11 Comments
Flag
💬 Add Comment
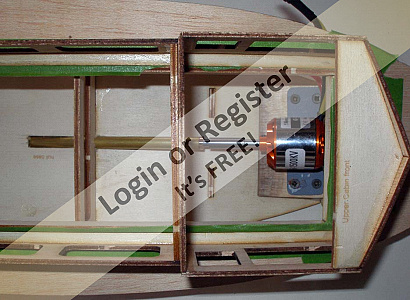
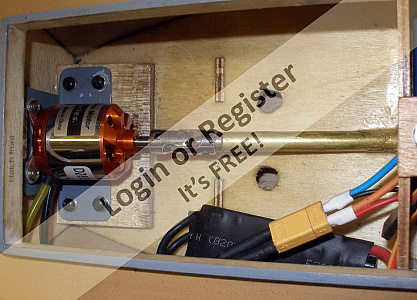
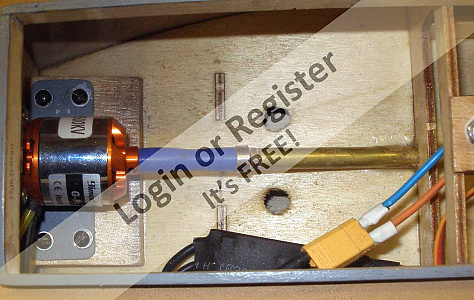
Before Finley returns to continue with the construction. I need to install and align the motor and propshaft.
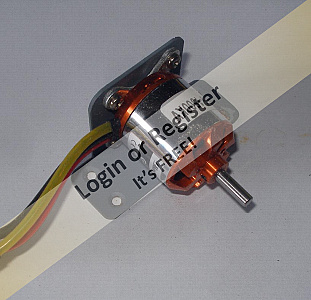
The instruction booklet suggests fitting a 1500kV brushless motor which surprised me as I was expecting it to call for a brushed motor, but I thought 'why not?' so a suitable motor and ESC were ordered.
First job once the motor arrived was to make a mounting bracket. I found an old domestic radiator mounting bracket in the scrap box. A short length cut from this gave a strong, lightweight right angled bracket. Four holes were drilled and tapped for the motor mount, and another four holes drilled and countersunk for screwing the bracket into the hull.
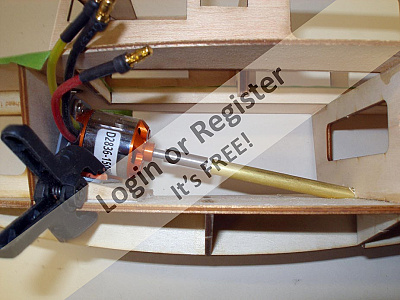
The motor has a 4mm dia. shaft and I'd already found a 30mm propeller, left over from Crash Tender commissioning, which had an M4 thread. Based on these part dimensions, I decided to use a 4mm propshaft and a 7mm dia. outer tube. With the tube in situ, but not glued, a hardwood wedge was made to match the angle of the tube. To align the motor shaft with the tube, an alignment tool was made. This is simply a length of steel which was turned to be a sliding fit in the propshaft tube, and with a 4mm hole to slip over the motor shaft. With this tool, it was a simple matter to adjust the heights of the wooden wedge to align the motor shaft with the propshaft tube. The wedge was then glued into position.
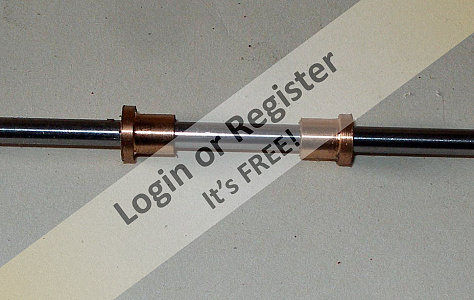
While the glue was drying, two phosphor bronze bushes were turned for the propshaft. With these fitted, and the alignment tool used to ensure everything was in line, the propshaft tube was epoxied into position.
Finally, the alignment tool was replaced with a universal coupling, and the other end of the shaft was threaded M4 so that the propeller could be attached. A quick check was carried out with the ESC attached and powered up. All seems to be OK so far. 🤞


The instruction booklet suggests fitting a 1500kV brushless motor which surprised me as I was expecting it to call for a brushed motor, but I thought 'why not?' so a suitable motor and ESC were ordered.
First job once the motor arrived was to make a mounting bracket. I found an old domestic radiator mounting bracket in the scrap box. A short length cut from this gave a strong, lightweight right angled bracket. Four holes were drilled and tapped for the motor mount, and another four holes drilled and countersunk for screwing the bracket into the hull.
The motor has a 4mm dia. shaft and I'd already found a 30mm propeller, left over from Crash Tender commissioning, which had an M4 thread. Based on these part dimensions, I decided to use a 4mm propshaft and a 7mm dia. outer tube. With the tube in situ, but not glued, a hardwood wedge was made to match the angle of the tube. To align the motor shaft with the tube, an alignment tool was made. This is simply a length of steel which was turned to be a sliding fit in the propshaft tube, and with a 4mm hole to slip over the motor shaft. With this tool, it was a simple matter to adjust the heights of the wooden wedge to align the motor shaft with the propshaft tube. The wedge was then glued into position.
While the glue was drying, two phosphor bronze bushes were turned for the propshaft. With these fitted, and the alignment tool used to ensure everything was in line, the propshaft tube was epoxied into position.
Finally, the alignment tool was replaced with a universal coupling, and the other end of the shaft was threaded M4 so that the propeller could be attached. A quick check was carried out with the ESC attached and powered up. All seems to be OK so far. 🤞
▲
⟩⟩
Seanympth
dave976
Colin H
philcaretaker
redpmg
Martin555
Newby7
mturpin013
stevedownunder
jbkiwi
RNinMunich
|
💬 Re: Motor and Propshaft
3 years ago by 🇬🇧 Martin555 (
Fleet Admiral)✧ 214 Views · 1 Like
Flag
Thank's Graham.
I am looking forward to seeing your next project. Your build logs are really interesting so i really hope you do another log soon. Martin555. ▲
⟩⟩
Graham93
|
|
Login To
Remove Ads 💬 Re: Motor and Propshaft
3 years ago by 🇬🇧 Graham93 (
Vice Admiral)✧ 218 Views · 4 Likes
Flag
Hi Red,
It has worked out well for the grandson to build, or at least to help with the build. I think it would be something of a challenge for a novice without any experience as there is missing guidance on fitting the RC gear, and the best stages during construction to carry out some of the equipment installation. Looking at the Bobby plan, it does look very similar. Graham93 ▲
⟩⟩
Seanympth
Colin H
jbkiwi
Martin555
|
|
💬 Re: Motor and Propshaft
3 years ago by 🇬🇧 Graham93 (
Vice Admiral)✧ 218 Views · 2 Likes
Flag
Thanks Martin,
Unfortunately, now he is back at school, I'm not seeing as much of Finley, so progress is very slow. (Really pleased you are back on the site with us!) Graham93 ▲
⟩⟩
Seanympth
Martin555
|
|
💬 Re: Motor and Propshaft
3 years ago by 🇿🇦 redpmg (
 Commodore) Commodore)✧ 218 Views · 4 Likes
Flag
Great build blog Graham - wish my grandson lived a bit closer (1000 odd miles) so we could finish his boat.
Good choice of kit for a child as its designed on the EeZeBilt method - simple lock together construction . Looks like it was based on the Bobby which was a free plan in MB many years ago. One good thing about brushless motors is the aircraft ESC's are cheap - and with your knowledge of electrics you should be able to sort out a reverse switch easily............ Will be following your blog with interest 
▲
⟩⟩
Colin H
jbkiwi
Martin555
Graham93
|
|
💬 Re: Motor and Propshaft
3 years ago by 🇬🇧 Martin555 (
Fleet Admiral)✧ 216 Views · 3 Likes
Flag
Hi Graham,
I nearly missed this log. Please tell young Finley that i am following his build, and to keep up the good work. Young Finley cannot ask for a more excellent teacher. Martin555. ▲
⟩⟩
Seanympth
jbkiwi
Graham93
|
|
💬 Re: Motor and Propshaft
3 years ago by 🇬🇧 Graham93 (
Vice Admiral)✧ 223 Views · 2 Likes
Flag
Rick,
Yes he will. Trouble is that he is now back at school so not sure when he will have time. His diary is busier than mine 🙄 ▲
⟩⟩
Martin555
RNinMunich
|
|
💬 Re: Motor and Propshaft
3 years ago by 🇨🇦 Newby7 (
Fleet Admiral)✧ 223 Views · 2 Likes
Flag
Nice job Graham.With power in Finley will be able to proceed to all the good parts of the build.
Rick ▲
⟩⟩
Martin555
Graham93
|
|
💬 Re: Motor and Propshaft
3 years ago by 🇬🇧 Graham93 (
Vice Admiral)✧ 228 Views · 3 Likes
Flag
Exactly right Michael. Wood moves with changes in temperature/humidity. I thinks some sort of flexible joint is essential.
Graham93 ▲
⟩⟩
Seanympth
Martin555
RNinMunich
|
|
💬 Re: Motor and Propshaft
3 years ago by 🇬🇧 mturpin013 (
Admiral)✧ 227 Views · 2 Likes
Flag
Removed as its Duplicated below
▲
⟩⟩
Martin555
stevedownunder
|
|
💬 Re: Motor and Propshaft
3 years ago by 🇬🇧 mturpin013 (
Admiral)✧ 227 Views · 5 Likes
Flag
Hi Graham that looks a nice assembly, in particular the modified Phosphor bronze bushes, I see a joint in the drive chain, a lot of modelers go for a solid connector taking great care to align the motor and prop shaft, I personally think this isn't the best option, the reason being having done this myself and gone to the trouble of using a dial indicator to align the shafts in the workshop (workshop heated) I later went to the test tank (in the garage cold) and found the alignment was no longer ! this was due to temperature change when wood has a habit of moving around at different temperatures.
I'm sure that some sort of universal joint is the way to go, It may be with some types they are a little noisier but still probably not as noisy as a brushless motor anyway. I still go to the trouble of aligning the shaft and motor with a solid joint first and then replace it with an appropriate flexible joint. As demonstrated in Grahams description😊 ▲
⟩⟩
Seanympth
Martin555
RNinMunich
Graham93
stevedownunder
|
|
💬 Re: Motor and Propshaft
3 years ago by 🇦🇺 stevedownunder (
Captain)✧ 230 Views · 3 Likes
Flag
Hi Graham,
I bet Finley will be eager to get cracking on this boat, can't start them too young. Cheers, Stephen. ▲
⟩⟩
jbkiwi
Martin555
Graham93
|
📝 Rudder and servo
3 years ago by 🇬🇧 Graham93 ( Vice Admiral)
Vice Admiral)✧ 215 Views · 11 Likes · 6 Comments
Flag
💬 Add Comment
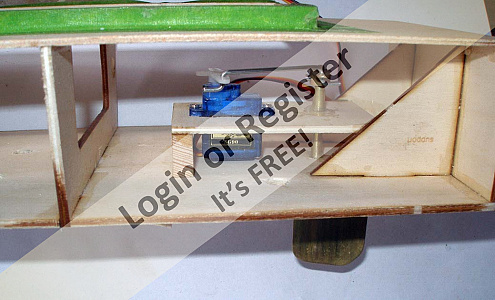
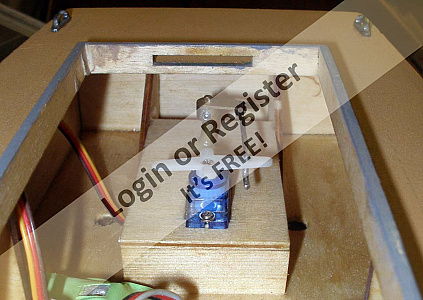
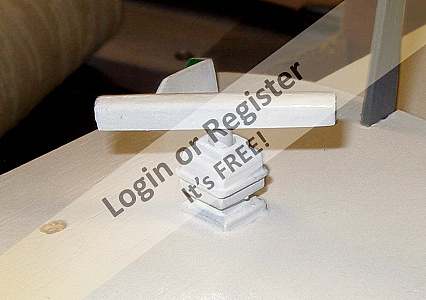
Another part of the RC installation best completed before the skins are applied to the hull is the rudder and associated servo.
A simple rudder was first made from some thin brass sheet and a length of 3mm brass rod. I think it may be a bit on the large size, but better that than too small. I can always trim it down if it proves to be overly effective.
There is no information with the kit about locating the rudder. A laser etched marking for the recommended position would be helpful for a novice building the kit. I chose a position to give plenty of clearance behind the prop on the basis that 'if it looks right, it probably is'... time will tell.
A brass tube was installed through the bottom of the hull. A servo mount was cut from spare ply that came with the kit. The top of the rudder tube passes through this ply panel and is epoxied in place to provide plenty of support.
Now that the motor and rudder installation are complete, it is time to fit the side and bottom skins. I just need to wait for Finley's return....
▲
⟩⟩
Seanympth
philcaretaker
dave976
RNinMunich
Colin H
mturpin013
stevedownunder
redpmg
Martin555
jbkiwi
Scratchbuilder
|
💬 Re: Rudder and servo
3 years ago by 🇬🇧 Graham93 (
Vice Admiral)✧ 211 Views · 3 Likes
Flag
Hi Martin, Red,
I have a rule that I will only have one build on the go at a time. Trying to build more than one at a time just makes it stressful.There are plenty of other (non modelling) tasks to keep me busy during pauses in the build. I do have a few ideas about what to build next, but I have to help Finley finish this build first 😉 ▲
⟩⟩
Seanympth
Martin555
redpmg
|
|
Login To
Remove Ads 💬 Re: Rudder and servo
3 years ago by 🇿🇦 redpmg (
Commodore)✧ 213 Views · 2 Likes
Flag
Hi Graham - difficult not to do too much - the urge to take over is strong - but you have to remember how we all started - lots of blunders - some of them irreparable until some kind expert helped - that's the sort of role we have to adopt if we are to interest them in what we do.
Perhaps you should start another smaller kit for yourself apart from any other new build - only work on that when you are together - that way some of the temptation will be avoided - seem to be plenty of other kits on offer from SLEC - Cornwall MB online shop also has a few listed - similar sort of prices to HA . Perkins have a couple listed on their website too if memory serves. ▲
⟩⟩
Seanympth
Martin555
|
|
💬 Re: Rudder and servo
3 years ago by 🇬🇧 Martin555 (
Fleet Admiral)✧ 210 Views · 1 Like
Flag
Graham.
Great i am glad you are managing to leave plenty for Finley to do. I do hope you are giving it some thought as to what your next project will be as we all really look forward to your build logs. Martin555. ▲
⟩⟩
Graham93
|
|
💬 Re: Rudder and servo
3 years ago by 🇬🇧 Graham93 (
Vice Admiral)✧ 212 Views · 3 Likes
Flag
Hi Martin,
I don’t think so, at least I hope not! He is keen to help, which is great as I want him to feel like he’s built it, rather than it being something that Granddad made and gave him. So far it’s working out OK although progress is slow. I’ve been trying not to do too much without him, which is difficult, so I have been making all sorts of bits and pieces which will be added as the build progresses. ▲
⟩⟩
Martin555
jbkiwi
Colin H
|
|
💬 Re: Rudder and servo
3 years ago by 🇬🇧 Martin555 (
Fleet Admiral)✧ 212 Views · 4 Likes
Flag
Nice work Graham.
I think Finley has wised up. He knows that you will not be able to just sit there without doing something to his boat.LOL!! He is also probably thinking to him self ' if i keep away for a month or two most of the boat will be done' LOL!! Martin555. ▲
⟩⟩
Colin H
jbkiwi
Graham93
stevedownunder
|
|
💬 Re: Rudder and servo
3 years ago by 🇳🇿 jbkiwi (
Fleet Admiral)✧ 212 Views · 4 Likes
Flag
Hi Graham, agree with you about fitting internals (or at least setting them up for later) without the sheeting, - makes life a lot easier when you are not having to work blind at times, or having to use mirrors.
JB ▲
⟩⟩
Colin H
Graham93
stevedownunder
Martin555
|
📝 Skinning the hull
3 years ago by 🇬🇧 Graham93 ( Vice Admiral)
Vice Admiral)✧ 204 Views · 13 Likes · 7 Comments
Flag
💬 Add Comment
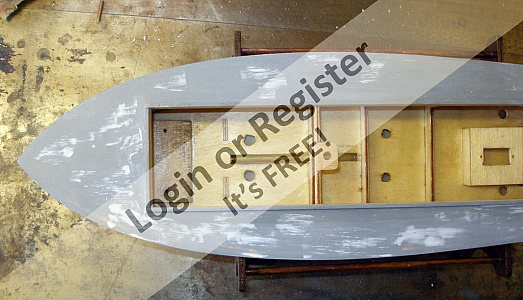
The hull sides and bottom are skinned with 1mm ply. This is supplied laser cut to size.
I held the first side in place while Finley applied the superglue. I'd bought some superglue from the local pound store which came with a long flexible nozzle which was ideal as it allowed me to keep my fingers away from the liberal application of glue by Finley 😉. I'm amused by the wording on the package and haven't yet worked out how to 'reuse' the glue that didn't go in the right place! 😂🤣
Finley's younger sister decided she would like to be involved 🙄 Unfortunately her idea of helping was to grab anything she could in the workshop that was within reach, so we had to cut the session short.
I used my trusty block plane to trim the side to size, and then fitted the other side. Before fitting the bottom panels holes were drilled in the framework so that it would be possible to seal all the internal ply once the hull was complete. The bottom sheets were glued in place and held with masking tape while the glue set. These sheets were barely long enough or wide enough at the transom. A few more mm in length and width would have helped. The gaps were filled with epoxy and smoothed to shape.
I also made a simple stand for the completed model which Finley helped to paint with 'quick drying woodstain'. This is ideal for this application as it is water based and washes off little sticky fingers quite easily 👍
▲
⟩⟩
Seanympth
mturpin013
dave976
dads boat
RNinMunich
philcaretaker
redpmg
GaryLC
stevedownunder
jbkiwi
Colin H
Scratchbuilder
Martin555
|
💬 Re: Skinning the hull
3 years ago by 🇬🇧 Graham93 (
Vice Admiral)✧ 200 Views · 1 Like
Flag
Thanks Red,
Yes, it is a combined water based stain/varnish. Comes in several colours, touch dry in 30 minutes, and the brush ( and little fingers) clean in water 👍 ▲
⟩⟩
Martin555
|
|
Login To
Remove Ads 💬 Re: Skinning the hull
3 years ago by 🇿🇦 redpmg (
Commodore)✧ 201 Views · 2 Likes
Flag
Coming along nicely Graham - sure Finley is enjoying it - sister sounds like our cat - except he tries to sit on whatever it is you are working on..............
Is that a combined Stain/Varnish you gave Finley to use ? Hopefully you will later have a convert to our hobby.......... Definitely good to share with them. ▲
⟩⟩
Martin555
Graham93
|
|
💬 Re: Skinning the hull
3 years ago by 🇬🇧 Graham93 (
Vice Admiral)✧ 203 Views · 2 Likes
Flag
Thanks everyone for the comments. It’s fun working with the grandson, although progress is slow.
No Mike, the plane isn’t for sale😀 it is far too useful . ▲
⟩⟩
Martin555
stevedownunder
|
|
💬 Re: Skinning the hull
3 years ago by 🇬🇧 mturpin013 (
Admiral)✧ 205 Views · 4 Likes
Flag
Some really good progress, its great to work with children who are not afraid of anything including sharp knives and super glue😜
I notice that your still using that trusty block plane, are you sure its not for sale.😁 ▲
⟩⟩
RNinMunich
Martin555
stevedownunder
Graham93
|
|
💬 Re: Skinning the hull
3 years ago by 🇬🇧 Colin H (
Fleet Admiral)✧ 203 Views · 3 Likes
Flag
Well done sir, looks like the youngster is enjoying the build with you. Tell the lad well done from me.
Cheers Colin. ▲
⟩⟩
Graham93
stevedownunder
Martin555
|
|
💬 Re: Skinning the hull
3 years ago by 🇬🇧 Scratchbuilder (
Vice Admiral)✧ 207 Views · 3 Likes
Flag
Graham.
Looking good,congratulations. Good to see you have the workshop Forman there to help you and make sure Grandad gets it right. Let’s hope that he carries on the good work. Regards Bill. ▲
⟩⟩
Graham93
stevedownunder
Martin555
|
|
💬 Re: Skinning the hull
3 years ago by 🇬🇧 Martin555 (
Fleet Admiral)✧ 203 Views · 2 Likes
Flag
Hi Finley and Graham,
Finley you are doing a really good job on your boat. It is good that you have your grandad there to help you and i am looking forward to seeing more of your build. Keep up the good work Finley. Graham, I have some of that reusable glue and like you i don't know how to reuse it ether. LOL!! Martin555. ▲
⟩⟩
Graham93
stevedownunder
|
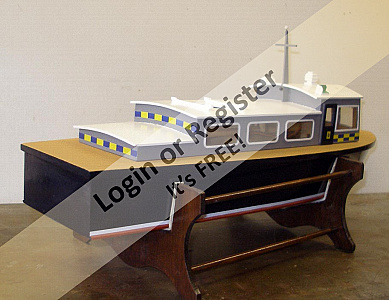
📝 Painting the hull
3 years ago by 🇬🇧 Graham93 ( Vice Admiral)
Vice Admiral)✧ 195 Views · 13 Likes · 8 Comments
Flag
💬 Add Comment
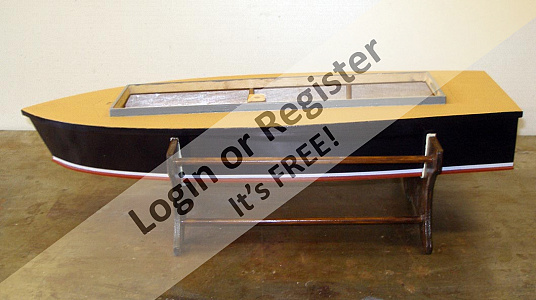
With the hull assembly complete, its time to get painting!
The hull was first coated with epoxy resin and fibreglass cloth.
Once set, the rubbing strips were shaped and fitted to the gunwales. A former to bend these strips was cut from some scrap MDF using the top deck outline left in the laser cut ply as a template. The rubbing strips were soaked in hot water, clamped in the former until dry and then glued in place.
Grey primer and knifing putty were used to prepare the hull for the finish coats of paint. The deck was been painted with a textured paint to give a non-slip appearance. The hull sides are dark blue (left over from the Gaff Cutter). Below the waterline is red primer.
A white pinstripe was added to separate the two colours.
The kit comes with 3D printed window frames. These were primed with an etch primer and then painted white. Windows are glazed with clear plastic sheet which was also supplied with the kit. The superstructure was painted grey and the completed windows glued in place.
Finally a few decals complete the overall effect.
Finley has been back at school so he hasn't seen the recent progress but it is half term this week. He's going to be a bit surprised when he sees it!
Now it's time to start adding the electronics..
▲
⟩⟩
Seanympth
robbob
mturpin013
Scratchbuilder
RNinMunich
philcaretaker
dave976
jbkiwi
stevedownunder
Newby7
Martin555
Madwelshman
Colin H
|
💬 Re: Painting the hull
3 years ago by 🇬🇧 Scratchbuilder (
Vice Admiral)✧ 194 Views · 2 Likes
Flag
Looking good Graham.
The electronics will be an interesting read. Keep it coming. Regards Bill ▲
⟩⟩
Martin555
Graham93
|
|
Login To
Remove Ads 💬 Re: Painting the hull
3 years ago by 🇩🇪 RNinMunich (
Fleet Admiral)✧ 191 Views · 4 Likes
Flag
MODEL BOAT TREK:
COMMODORE'S LOG: YARD DATE 2021 POINT 10 POINT 27: MY CONTINUING MISSION: TO EXPLORE THE MODEL BOAT UNIVERSE; DISCOVER NEW BOATS AND TAKE YOUNG ENSIGN FINLEY WHERE HE HAS NEVER BEEN BEFORE: Absorbing stuff Graham. With some good tips n tricks along the way. Can hardly wait for Ensign Finley's next furlough from Model Boat Fleet Academy and his response to developments on board! 👍 Cheers, Doug 😎 Possible registration number: MPB1701F (Metropolitan Police Boat) Name: HMPB FINLEY (Her Majesty's Police Boat) 😉 ▲
⟩⟩
Seanympth
Martin555
Graham93
Rookysailor
|
|
💬 Re: Painting the hull
3 years ago by 🇬🇧 Graham93 (
Vice Admiral)✧ 193 Views · 6 Likes
Flag
JB,
I’m sure he will find plenty of opportunities to create unintentional smoke in the future. I know I did ( and still do )🤗😠 Graham93 ▲
⟩⟩
mturpin013
Scratchbuilder
dave976
RNinMunich
jbkiwi
Martin555
|
|
💬 Re: Painting the hull
3 years ago by 🇳🇿 jbkiwi (
Fleet Admiral)✧ 191 Views · 4 Likes
Flag
You'll have to let him blow something up Graham,- how's he going to learn otherwise. ⚡⚡⚡🔥😮🙈 That's how most of us did it, (at least I did)😂
JB ▲
⟩⟩
Scratchbuilder
dave976
Graham93
Martin555
|
|
💬 Re: Painting the hull
3 years ago by 🇬🇧 Graham93 (
Vice Admiral)✧ 193 Views · 5 Likes
Flag
Hi JB,
I don't think he'll be able to help with the wiring, but there are lights and other bits and pieces to be fitted which he can help with. I'll wire them up once he has gone home 😂🤣 Graham93 ▲
⟩⟩
mturpin013
Scratchbuilder
dave976
Martin555
jbkiwi
|
|
💬 Re: Painting the hull
3 years ago by 🇳🇿 jbkiwi (
Fleet Admiral)✧ 193 Views · 3 Likes
Flag
Looking good Graham, (couldn't help yourself I see)😁😉 The young fella should be happy! Are you going to get him involved in the electrical side,?
JB ▲
⟩⟩
dave976
Graham93
Martin555
|
|
💬 Re: Painting the hull
3 years ago by 🇨🇦 Newby7 (
Fleet Admiral)✧ 194 Views · 3 Likes
Flag
So right Graham. Finley will be surprised by the build. Nicely done.
Rick ▲
⟩⟩
dave976
Martin555
stevedownunder
|
|
💬 Re: Painting the hull
3 years ago by 🇬🇧 Martin555 (
Fleet Admiral)✧ 195 Views · 2 Likes
Flag
Great work Graham.
I bet young Finley will be over the moon with his boat. It won't be long and Finley will be asking grandad "when can we put the Police boat in the water." Martin555. ▲
⟩⟩
dave976
stevedownunder
|
📝 Fitting the motor and rudder
3 years ago by 🇬🇧 Graham93 ( Vice Admiral)
Vice Admiral)✧ 185 Views · 13 Likes · 6 Comments
Flag
💬 Add Comment
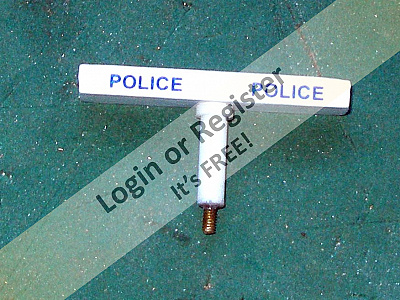
Before fitting the motor, Finley added vinyl decals to each side of the hull. I'd sourced these from ebay and it was a simple task to position them and rub them down onto the hull before peeling off the protective film. The hull will be lacquered later to seal and protect the decals.
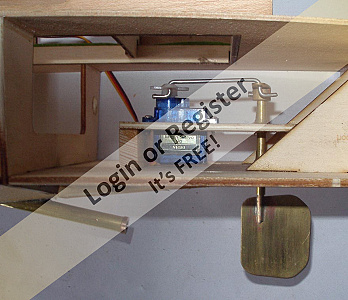
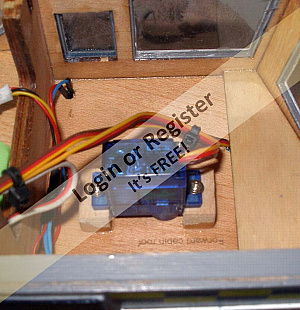
The motor was screwed into position on the previously installed mounting block. Small fingers are definitely an advantage when placing the screws into position 😉. The propshaft was coupled to the motor with a metal flexible joint. Connecting the ESC, battery and a servo tester allowed for a quick test of the installation. The noise was terrible !🙉 Despite the care taken earlier in the build to align the motor and propshaft, something was not right. Loosening the motor mount screws and wiggling the motor mount resulted in better alignment and slightly less noise 🤔.
Moving on to the rudder, the 9g servo was fitted to the mounting plate and a wire link connected between the rudder horn and servo. Again small fingers made this easier. A quick test showed the rudder works smoothly - and without any significant noise! 👍
Once Finley had gone home I decided to revisit the motor coupling issue. JBkiwi uses rubber tubing to link his motors to propshafts so a length of 3mm bore silicone vacuum hose was ordered to replace the metal coupling. This turned out to be a bargain. A 500mm length of silicone tube, 3mm bore with 2mm thick walls sent by First Class post for a total cost of 99p. There is enough tube for at least 10 couplings for less than 10p each 👍👍
Fitting the new coupling was straightforward. The motor shaft and propshaft are both 4mm dia so the silicone is a tight fit. I did have to shorten the propshaft tube by 5mm to give enough exposed shaft to slide the coupling onto as well as having enough room to fit a brass collar between the coupling and the propshaft. This collar is held in place with a grubscrew and ensures that the propshaft cannot slide out of the tube should there be any slippage of the coupling on the shaft.
I'm pleased to be able to report that there is now an acceptable level of noise when the motor is running. All of the noise is now the usual high pitched whine from the motor, with no sound from the coupling.😁
▲
⟩⟩
Seanympth
robbob
mturpin013
RNinMunich
Rowen
Scratchbuilder
redpmg
dave976
jbkiwi
stevedownunder
GaryLC
Colin H
philcaretaker
|
💬 Re: Fitting the motor and rudder
3 years ago by 🇨🇦 Rowen (
Captain)✧ 188 Views · 1 Like
Flag
Have had similar experiences of excess noise using that style of coupling. If you push a length of plastic type tubing over the whole assembly it stiffens and damps the noise
▲
⟩⟩
Graham93
|
|
Login To
Remove Ads 💬 Re: Fitting the motor and rudder
3 years ago by 🇬🇧 Scratchbuilder (
Vice Admiral)✧ 188 Views · 3 Likes
Flag
Graham.
Trust me.I know.😤😂😂😂😂 Your right,but it’s great fun. Trouble is,when it comes to computing and various modern skills there way above me 🤔😅. Great to see the youngsters taking on the older skills we love. Regards Bill. ▲
⟩⟩
Seanympth
Martin555
Colin H
|
|
💬 Re: Fitting the motor and rudder
3 years ago by 🇬🇧 Graham93 (
Vice Admiral)✧ 185 Views · 4 Likes
Flag
Bill,
🤣😂 That’s exactly what it’s like 🙄 Graham93 ▲
⟩⟩
Seanympth
mturpin013
Martin555
Scratchbuilder
|
|
💬 Re: Fitting the motor and rudder
3 years ago by 🇬🇧 Scratchbuilder (
Vice Admiral)✧ 187 Views · 3 Likes
Flag
Now then Grandad !
This is the way we do it. I know you have done it before,but….times have moved on,so….just watch and learn. Great,so nice to see. Regards Bill. ▲
⟩⟩
Colin H
Graham93
Martin555
|
|
💬 Re: Fitting the motor and rudder
3 years ago by 🇬🇧 Martin555 (
Fleet Admiral)✧ 183 Views · 3 Likes
Flag
Hi Graham,
I hope you are picking up a few tips from young Finley. He looks as though he knows what he is doing. Martin555. ▲
⟩⟩
RNinMunich
Colin H
Graham93
|
|
💬 Re: Fitting the motor and rudder
3 years ago by 🇳🇿 jbkiwi (
Fleet Admiral)✧ 183 Views · 7 Likes
Flag
Hi Graham, boat's coming along well, and small more flexible fingers must be a big help with small screws.😁 Glad you found the tube coupling idea useful,- I've given up on any Chinese couplings, they are all rubbish for anything high speed and the type you tried are especially bad, as the center crosses have too much side play, and get thrown off center at speed. The shaft holes usually have too much clearance as well, making it worse. The tube by itself is perfect for smaller motors or as I've found, with a firm plastic tube covering for more powerful motors.
Once the lathe is sorted, I'm going to try out an idea for stepped shaft adaptors with silicone in between, (similar to the moulded ones or rubber type from CMB) but with the tubing being able to be replaced if it starts slipping due to oil getting in, or whatever. The best thing about the tubing is that if you get something tangling the prop, it will usually just let go and squeal, but grip again when you stop. As long as you have a collet or similar against each end of it, it shouldn't migrate up the shaft towards the motor (hence the idea of the stepped adaptors) won't matter with outrunners, more inrunners/brushed motors. Interested to see how it runs with that set-up. I'm going to try and find some thicker walled tube for my adaptor idea, as I'm only using 2m wall fuel tubing at the moment. JB ▲
⟩⟩
Seanympth
Colin H
Scratchbuilder
redpmg
dave976
Graham93
Martin555
|
📝 Radar
3 years ago by 🇬🇧 Graham93 ( Vice Admiral)
Vice Admiral)✧ 185 Views · 13 Likes · 8 Comments
Flag
💬 Add Comment
I want to add as many 'bells and whistles' to the boat as I reasonably can to give my grandson plenty of controls to operate. That should make it more interesting (and challenging) for him to operate.
First up is the radar. Martin recently posted in his blog an excellent write-up of how to build and motorise a radar:


First up is the radar. Martin recently posted in his blog an excellent write-up of how to build and motorise a radar:
▲
⟩⟩
Seanympth
robbob
mturpin013
philcaretaker
redpmg
stevedownunder
Scratchbuilder
dave976
Mike Stoney
GaryLC
Rowen
Colin H
jbkiwi
|
💬 Re: Radar
3 years ago by 🇬🇧 Martin555 (
Fleet Admiral)✧ 175 Views · 0 Likes
Flag
Thank's Graham.
I will take a look. Martin555. ▲
⟩⟩
No likes yet
This member will receive 1 point for every like received |
|
Login To
Remove Ads 💬 Re: Radar
3 years ago by 🇬🇧 Graham93 (
Vice Admiral)✧ 180 Views · 5 Likes
Flag
Martin,
Microchip ( ▲
⟩⟩
Seanympth
philcaretaker
Mike Stoney
stevedownunder
Martin555
|
)
|
💬 Re: Radar
3 years ago by 🇬🇧 Martin555 (
Fleet Admiral)✧ 179 Views · 1 Like
Flag
Thank you Graham.
Not quite as simple as i had expected. What software do you use to program the PIC ? Martin555. ▲
⟩⟩
stevedownunder
|
|
💬 Re: Radar
3 years ago by 🇬🇧 Graham93 (
Vice Admiral)✧ 183 Views · 5 Likes
Flag
Hi Martin,
As you have probably seen in my previous blogs I like to build my own RC mixers, switches, smokers etc. The pulse generator/RCswitch is built from just 3 components, a potentiometer to adjust the pulse width (motor speed), a PIC microchip, and a decoupling capacitor ( mounted on the back of the board). I wrote some software which is programmed into the PIC to monitor the incoming signal from the Rx channel. If the incoming pulse width is greater than 1.5mS then the RCswitch is ‘on’. While the switch is ‘on’, the PIC generates a repeating string of pulses for the radar servo. The width of these pulses is set by the potentiometer. Hope that’s clear and understandable 🤔 Graham93 ▲
⟩⟩
philcaretaker
mturpin013
stevedownunder
dave976
Martin555
|
|
💬 Re: Radar
3 years ago by 🇨🇭 Mike Stoney (
 Commander) Commander)✧ 180 Views · 3 Likes
Flag
Hello Graham!
Graham, you saved me! Soon wanted to buy an expensive motor with gearbox for my radar! I have so many old servos that I can easily convert! **** What I learned from you in a short time is amazing! Handicraft greetings from Heidiland. .😁😁😁 Michel-Claude ▲
⟩⟩
stevedownunder
dave976
Graham93
|
|
💬 Re: Radar
3 years ago by 🇨🇦 Rowen (
Captain)✧ 188 Views · 2 Likes
Flag
Have done something similar on previous radars. Found a cheap, geared 6V motor available from our usual Far Eastern sources though.
Found the servo approach bulky, noisy and heavy. ▲
⟩⟩
dave976
Graham93
|
|
💬 Re: Radar
3 years ago by 🇳🇿 jbkiwi (
Fleet Admiral)✧ 185 Views · 2 Likes
Flag
Good idea with the 'fiddle limiter' Graham 👍
JB ▲
⟩⟩
Graham93
Martin555
|
|
💬 Re: Radar
3 years ago by 🇬🇧 Martin555 (
Fleet Admiral)✧ 182 Views · 2 Likes
Flag
Hi Graham,
Thank you for the comments and posting the links. The transfers really add that extra professional Finnish to what is already a Professional job. Great work. I would be very interested in knowing more about the adjustable pulse generator that you have made (photo five). Martin555. ▲
⟩⟩
dave976
Graham93
|
📝 Lights
2 years ago by 🇬🇧 Graham93 ( Vice Admiral)
Vice Admiral)✧ 173 Views · 12 Likes · 3 Comments
Flag
💬 Add Comment
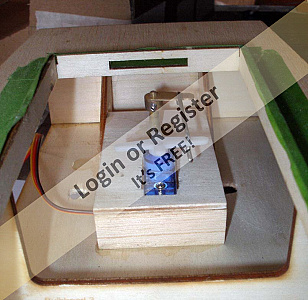
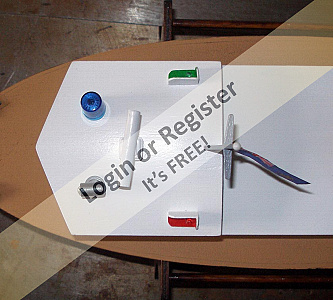
The navigation lights are simply red and green leds fitted through holes in the cabin roof. The leds are wired in series and connected to one port of a two port RCswitch.
A simple searchlight was built from bits of plastic tube and fitted with a 5mm white led. This is connected to the second port of the two port RCswitch.
The RCswitch is homemade based on a PIC microchip programmed to allow control of the two outputs from the Ch4 joystick on the Tx. From centre position, pushing the joystick to one side turns on the nav lights. Pushing it to the other side turns on the spotlight. Repeating these movements turns off the lights. The RCswitch, protected with green heatshrink, is attached to the underside of the cabin roof with velcro.
▲
⟩⟩
Seanympth
robbob
RNinMunich
Colin H
mturpin013
philcaretaker
redpmg
dave976
jbkiwi
Martin555
Mike Stoney
stevedownunder
|
💬 Re: Lights
2 years ago by 🇬🇧 Graham93 (
Vice Admiral)✧ 164 Views · 2 Likes
Flag
JB,
I'm not sure who is getting the most fun out of this build, me or Finley 🤔 He hasn't been here to help with the electronics, but I'm sure he will be here for the maiden voyage 😀 Graham93 ▲
⟩⟩
RNinMunich
Martin555
|
|
Login To
Remove Ads 💬 Re: Lights
2 years ago by 🇳🇿 jbkiwi (
Fleet Admiral)✧ 167 Views · 3 Likes
Flag
Hi Graham, young Finley's done a great job of building the model and fitting all the electronics 😁, I'm sure he'll be wanting to do another one soon😉🙄
JB ▲
⟩⟩
Seanympth
Graham93
Martin555
|
|
💬 Re: Lights
2 years ago by 🇬🇧 mturpin013 (
Admiral)✧ 174 Views · 3 Likes
Flag
Hi Graham I'm sorry I've not commented on this build since a month ago but for some reason a whole load of updates have just come through not just yours but some others as well.
Anyway its looking great and ready for a "wetting"? The blue police light looks good I think its the same as one I picked up at Blackpool show last month, it has different settings? so keep up the good work and lets see what Finley decides to build next 🤔. ▲
⟩⟩
Seanympth
Graham93
Martin555
|
📝 Blues and Twos
2 years ago by 🇬🇧 Graham93 ( Vice Admiral)
Vice Admiral)✧ 164 Views · 12 Likes · 2 Comments
Flag
💬 Add Comment
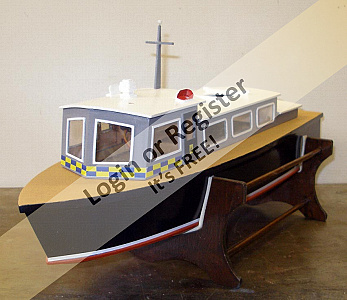
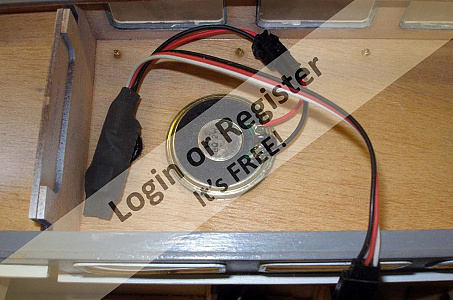
As Michael noticed in the last post, there is a blue Police light on the cabin roof. This is one half of the 'blues and twos' installation on the boat.
The light was bought on-line and simply plugs into a spare channel on the Rx. Using the corresponding switch channel on the Tx allows four different flashing patterns to be selected in sequence.
The two tone horn is provided by a small waterproof speaker mounted on the underside of the main cabin roof. This is driven by a two tone oscillator (yes, another PIC!) plugged into another Rx channel. To disguise the hole for the speaker in the cabin roof, a lifeboat is mounted on spacers above the hole. The lifeboat was bought as a 3D printed item and painted appropriately.
With all the bits and pieces fitted, time for a short video:
▲
⟩⟩
Seanympth
robbob
Colin H
mturpin013
philcaretaker
Rock
jbkiwi
dave976
redpmg
DWBrinkman
stevedownunder
Martin555
|
💬 Re: Blues and Twos
2 years ago by 🇳🇿 jbkiwi (
Fleet Admiral)✧ 153 Views · 2 Likes
Flag
That's pretty cool Graham, I'm sure he's going to have a lot of fun with that, (as long as he's not horn happy 😁)
JB ▲
⟩⟩
Graham93
Martin555
|
|
💬 Re: Blues and Twos
2 years ago by 🇬🇧 Martin555 (
Fleet Admiral)✧ 166 Views · 3 Likes
Flag
Hi Graham,
I think Finley is really going to love it. Martin555. ▲
⟩⟩
Graham93
dave976
stevedownunder
|


Login To
Remove Ads
Remove Ads