Join Us On Social Media!

|

|

|
Download The App!
Login To
Remove Ads
Remove Ads
Login To
Remove Ads
Remove Ads
Model Boats Website
 Liked Re: (Other) RAF Range Safety Launch 1 year ago
 Liked HMS Diamond Build Update Eight 6 years ago
 Liked First build 8 years ago
 Liked One Twelfth Scale Speedline Severn Lifeboat try out 8 years ago
 Liked Progress on my Build 9 years ago
 Liked Paddle box construction. 9 years ago
 Liked Trials 9 years ago


United Kingdom

Recent Posts
💬 Re: (Other) RAF Range Safety Launch
1 year ago by 🇬🇧 McCluskey ( Chief Petty Officer 2nd Class)
Chief Petty Officer 2nd Class)✧ 33 Views · 1 Like
Flag
💬 Add Comment
Look me up on Face Book or messenger Roy McCluskey I think it’s difficult here to share private details
Roy😌
Roy😌
▲
⟩⟩
PeterJ
Login To
Remove Ads
Remove Ads
💬 Re: (Other) RAF Range Safety Launch
1 year ago by 🇬🇧 McCluskey ( Chief Petty Officer 2nd Class)
Chief Petty Officer 2nd Class)✧ 33 Views · 0 Likes
Flag
💬 Add Comment
Yes I still have the plans
▲
⟩⟩
No likes yet
This member will receive 1 point
for every like received
This member will receive 1 point
for every like received
📝 First build
8 years ago by 🇬🇧 McCluskey ( Chief Petty Officer 2nd Class)
Chief Petty Officer 2nd Class)✧ 6 Views · 0 Likes
Flag
📝 Reply
Hi
I've just seen your post and not too sure of your name. However, there are no hard and fast rules of what to select for your first build. Common sense and experience is critical. if you feel that you are able to apply the necessary skills to your selected build then do it. The Kawkab sounds ideal.
If it's any help My First build was a simple ply speed boat around 24" in length from plans. I cut all the necessary templates and then glued it all together. it taught me a lot about getting things square and aligned too.
I then built an RAF range safety Launch 36" 10" beam with loads of different building techniques required but once again this was for me an easy build. You can view my RSL on my pages.
Good luck with your build and don't forget to start a blog I would be very interested like others to see it.
Kind regards
Roy
▲
⟩⟩
No likes yet
This member will receive 1 point
for every like received
This member will receive 1 point
for every like received
💬 HMS DIAMOND D35 Destroyer
8 years ago by 🇬🇧 McCluskey ( Chief Petty Officer 2nd Class)
Chief Petty Officer 2nd Class)✧ 11 Views · 0 Likes
Flag
💬 Add Comment
The hull is in its final rubbing down stage after having three coats of white primer paint. This was then rubbed down using very fine wet and dry paper. it becomes like glass ready for the sea going paint Lee.
Roy
Roy
▲
⟩⟩
No likes yet
This member will receive 1 point
for every like received
This member will receive 1 point
for every like received
💬 HMS DIAMOND D35 Destroyer
8 years ago by 🇬🇧 McCluskey ( Chief Petty Officer 2nd Class)
Chief Petty Officer 2nd Class)✧ 11 Views · 0 Likes
Flag
💬 Add Comment
Hi Lee,
I used a teak ronseal and a coat of satin varnish for the inside. it was something I had leafy over in a tin but I do use lots of ronseal because the dry time is short.
Kind regards
Roy
I used a teak ronseal and a coat of satin varnish for the inside. it was something I had leafy over in a tin but I do use lots of ronseal because the dry time is short.
Kind regards
Roy
▲
⟩⟩
No likes yet
This member will receive 1 point
for every like received
This member will receive 1 point
for every like received
📝 HMS Diamond D35 Destroyer
8 years ago by 🇬🇧 McCluskey ( Chief Petty Officer 2nd Class)
Chief Petty Officer 2nd Class)✧ 11 Views · 0 Likes · 5 Comments
Flag
💬 Add Comment
Hello all of my followers. I must apologise that there has been limited activity on my project but.....
I took seriously ill some months ago. I was not able to do anything let alone build my project.
So, I will be back soon with further posts and I will also be starting a few other blog builds that I had started but failed to finish.
Kind regards to all of you.
Roy
I took seriously ill some months ago. I was not able to do anything let alone build my project.
So, I will be back soon with further posts and I will also be starting a few other blog builds that I had started but failed to finish.
Kind regards to all of you.
Roy
▲
⟩⟩
No likes yet
This member will receive 1 point
for every like received
This member will receive 1 point
for every like received
💬 HMS Diamond D35 - Build update Twelve
9 years ago by 🇬🇧 McCluskey ( Chief Petty Officer 2nd Class)
Chief Petty Officer 2nd Class)✧ 12 Views · 1 Like
Flag
💬 Add Comment
Tony you should have by now received the plans for the building jig. Could you please confirm via private message that you have received them please.
Roy
Roy
▲
⟩⟩
Inkoust
💬 Progress on my Build
9 years ago by 🇬🇧 McCluskey ( Chief Petty Officer 2nd Class)
Chief Petty Officer 2nd Class)✧ 11 Views · 0 Likes
Flag
💬 Add Comment
The deck colour looks fine Dave I must admit I'm trying to find paint for mine to no avail and I'm now considering having it mixed.
Keep going and good luck with the bits and bobs there's lots of fiddly small items to scratch build.
TIP: Build small portions of railings these are fragile and easily replaced if damaged in transit etc.
Looking good
Roy
Keep going and good luck with the bits and bobs there's lots of fiddly small items to scratch build.
TIP: Build small portions of railings these are fragile and easily replaced if damaged in transit etc.
Looking good
Roy
▲
⟩⟩
No likes yet
This member will receive 1 point
for every like received
This member will receive 1 point
for every like received
📝 New Server
9 years ago by 🇬🇧 McCluskey ( Chief Petty Officer 2nd Class)
Chief Petty Officer 2nd Class)✧ 8 Views · 1 Like
Flag
📝 Reply
Stephen this seems fine and pictures are much clearer too.
Roy
Roy
▲
⟩⟩
fireboat
💬 Build a simple Railings jig for 1/96th Scale ships.
9 years ago by 🇬🇧 McCluskey ( Chief Petty Officer 2nd Class)
Chief Petty Officer 2nd Class)✧ 11 Views · 0 Likes
Flag
💬 Add Comment
HI could you text me private message with your email and I will send you the pdf. it seems here that you email ha been removed.
Kind regards Roy
Kind regards Roy
▲
⟩⟩
No likes yet
This member will receive 1 point
for every like received
This member will receive 1 point
for every like received
📝 HMS Diamond D35 - Build update Twelve
9 years ago by 🇬🇧 McCluskey ( Chief Petty Officer 2nd Class)
Chief Petty Officer 2nd Class)✧ 15 Views · 4 Likes · 4 Comments
Flag
💬 Add Comment
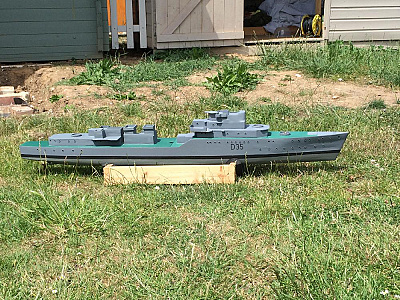
I'm nearly ready to give the hull it's first coat of sea going paint. I'm pleased with the lines and shape. I must admit I have spent a little more time on this particular build than I have other projects for some reason and this is not a Difficult hull to construct.
I'm still trying to locate a supplier for the light Admiralty Grey paint and I will visit a couple of my local Newcastle Model Shops this week.
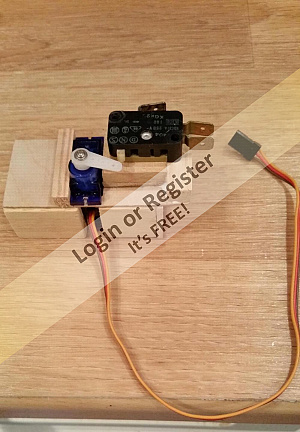
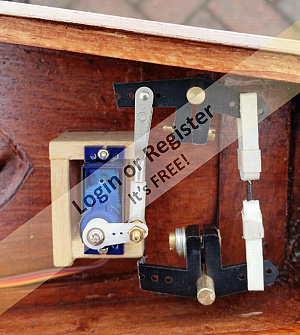
The inside of the hull has now been given it's final coat of varnish and I have decided to use micro servos throughout this build. A test set up proved successful today.
I have made a start on the mast section today and I will post pictures later this week. There is a lot of work in this particular part of the build and, once again small parts all cut from brass sheet..... I'm Still trying to master cutting this stuff.
PS if you're interested in my Railings Jig plans I can only send them via pdf format in an email.... Send a private message to me through the message pages with your email to enable me to get them to you.
Roy 😊

I'm still trying to locate a supplier for the light Admiralty Grey paint and I will visit a couple of my local Newcastle Model Shops this week.
The inside of the hull has now been given it's final coat of varnish and I have decided to use micro servos throughout this build. A test set up proved successful today.
I have made a start on the mast section today and I will post pictures later this week. There is a lot of work in this particular part of the build and, once again small parts all cut from brass sheet..... I'm Still trying to master cutting this stuff.
PS if you're interested in my Railings Jig plans I can only send them via pdf format in an email.... Send a private message to me through the message pages with your email to enable me to get them to you.
Roy 😊
▲
⟩⟩
John2
sandkb
dodgessharks
Pav403
Login To
Remove Ads
Remove Ads
💬 Build a simple Railings jig for 1/96th Scale ships.
9 years ago by 🇬🇧 McCluskey ( Chief Petty Officer 2nd Class)
Chief Petty Officer 2nd Class)✧ 11 Views · 0 Likes
Flag
💬 Add Comment
HI Julio please text me your email this is the only way I can get plans to you. Roy
▲
⟩⟩
No likes yet
This member will receive 1 point
for every like received
This member will receive 1 point
for every like received
📝 Build a simple Railings jig for 1/96th Scale ships.
9 years ago by 🇬🇧 McCluskey ( Chief Petty Officer 2nd Class)
Chief Petty Officer 2nd Class)✧ 14 Views · 3 Likes · 8 Comments
Flag
💬 Add Comment
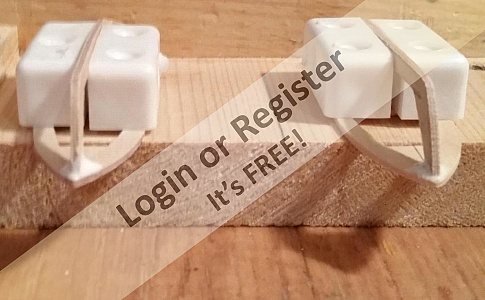
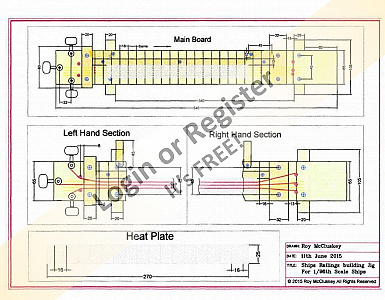
My 1/96th Scale HMS Diamond D35 Destroyer building the railings...
I finished a complete set of instructions, building materials list and detailed plans today.
If you would like a copy of these plans and drawings please send me a private message with your email address and I will forward a Pdf file complete. I have not found a way of uploading a pdf file to this site yet.
The pictures presented here are just an example of what to expect.
Kind regards
Roy
▲
⟩⟩
sandkb
taffy
Pav403
📝 How to get / who has plans?
9 years ago by 🇬🇧 McCluskey ( Chief Petty Officer 2nd Class)
Chief Petty Officer 2nd Class)✧ 6 Views · 0 Likes
Flag
📝 Reply
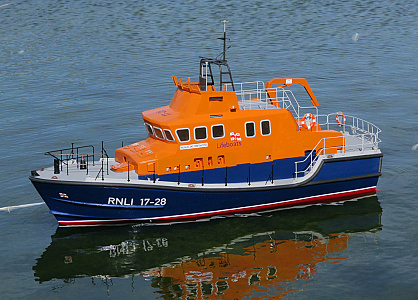
HI there I have a set of plans for a RAF RSL you can view the boat on my pages under Roy McCluskey.
It is not a difficult boat to build either. Kind regards Roy
It is not a difficult boat to build either. Kind regards Roy
▲
⟩⟩
No likes yet
This member will receive 1 point
for every like received
This member will receive 1 point
for every like received
💬 HMS Diamond D35 - Railings jig plans and Instructions
9 years ago by 🇬🇧 McCluskey ( Chief Petty Officer 2nd Class)
Chief Petty Officer 2nd Class)✧ 11 Views · 0 Likes
Flag
💬 Add Comment
Dave I taught AutoCAD at college so I'm familiar with the processes and it's always nice to have stuff like this to share.
I'm going to share it with several mags.
I'll email the whole package across shortly for you. Hope the baby and mum are doing well.
Kind regards
Roy
I'm going to share it with several mags.
I'll email the whole package across shortly for you. Hope the baby and mum are doing well.
Kind regards
Roy
▲
⟩⟩
No likes yet
This member will receive 1 point
for every like received
This member will receive 1 point
for every like received
📝 HMS Diamond D35 - Railings jig plans and Instructions
9 years ago by 🇬🇧 McCluskey ( Chief Petty Officer 2nd Class)
Chief Petty Officer 2nd Class)✧ 12 Views · 1 Like · 3 Comments
Flag
💬 Add Comment
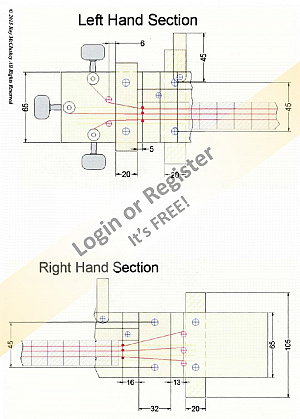
Nearly ready to share the plans and instructions for building this.
The picture is a sample of what I have produced so far.
Roy
The picture is a sample of what I have produced so far.
Roy
▲
⟩⟩
Pav403
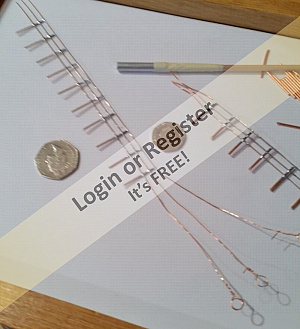
📝 HMS Diamond D35 - build update Eleven
9 years ago by 🇬🇧 McCluskey ( Chief Petty Officer 2nd Class)
Chief Petty Officer 2nd Class)✧ 14 Views · 3 Likes
Flag
💬 Add Comment
I spent some time today building (Soldering) the life raft shoot supports and once again at this scale it is tedious work. The pictures explain it all.....
I just need to square and tidy the solder up with a file.
I made some 0.5mm saw cuts in the block of hard wood used to allow the 1mm wire to sit in. I drilled small holes to feed retaining wire through to keep everything from moving around. it took around 15 mins to make one frame from cutting wire, positioning, fluxing and soldering.
There are around ten of these and unfortunately three different sizes!
Keep watching folks
▲
⟩⟩
sandkb
Pav403
cenbeth
💬 HMS Diamond D35 - building the 1/96th Railings 3
9 years ago by 🇬🇧 McCluskey ( Chief Petty Officer 2nd Class)
Chief Petty Officer 2nd Class)✧ 12 Views · 1 Like
Flag
💬 Add Comment
Nice to hear everything is in order there Dave..... No problem with the drawing once done. I plan to draw this in the next few days using AutoCAD.
I'm going to post some pictures of the completed Raft shoot supports and once again I built a small wooden aid to assist me very simple to make too.
Roy
I'm going to post some pictures of the completed Raft shoot supports and once again I built a small wooden aid to assist me very simple to make too.
Roy
▲
⟩⟩
Pav403
📝 HMS Diamond D35 - building the 1/96th Railings 3
9 years ago by 🇬🇧 McCluskey ( Chief Petty Officer 2nd Class)
Chief Petty Officer 2nd Class)✧ 14 Views · 3 Likes · 2 Comments
Flag
💬 Add Comment
Amendment to jig
The building jig for the 1/96th scale railings is working really well and I'm building one set of railings a day at the moment. Seemingly the more I do the better and easier it becomes.
I've made one minor addition to the jig since my last post and that's a small swivel arm to keep the support block up while feeding and connecting the wire.
I will be producing a detailed building sheet in AutoCAD soon so if anyone would like a copy please send me a private message.
Roy
▲
⟩⟩
sandkb
cenbeth
Pav403
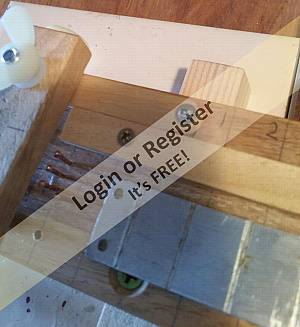
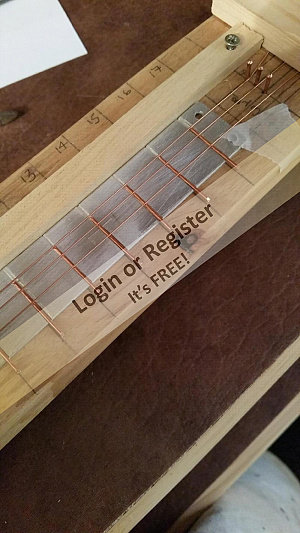
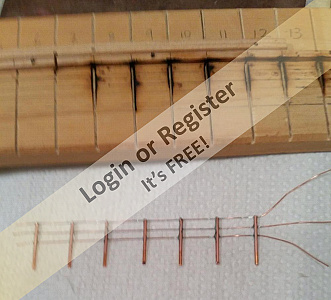
📝 HMS Diamond D35 - building the 1/96th Railings 2
9 years ago by 🇬🇧 McCluskey ( Chief Petty Officer 2nd Class)
Chief Petty Officer 2nd Class)✧ 14 Views · 3 Likes
Flag
💬 Add Comment
Continued from the last build blog....
The first picture shows a piece of wood dowel pushed into a length of alloy tube 6mm in this case. I measured the post length I needed for the railing and positioned the dowel and once happy that the wire Imbedded at the correct depth I secured this with tape. Easy now just push the wire into the hole and cut off at end. You can make the posts very quickly.
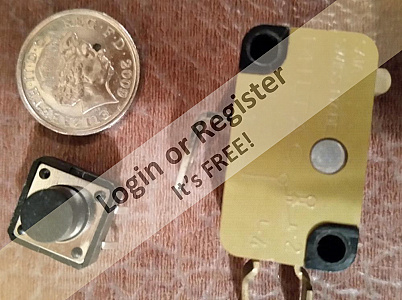
The second picture shows a small length of completed railing with the coins giving perspective. The jig described in my last post really does work very well.
Incidentally, the alloy heat plate as I call it allows the hot solder to cure quickly allowing enough time to work.

The first picture shows a piece of wood dowel pushed into a length of alloy tube 6mm in this case. I measured the post length I needed for the railing and positioned the dowel and once happy that the wire Imbedded at the correct depth I secured this with tape. Easy now just push the wire into the hole and cut off at end. You can make the posts very quickly.
The second picture shows a small length of completed railing with the coins giving perspective. The jig described in my last post really does work very well.
Incidentally, the alloy heat plate as I call it allows the hot solder to cure quickly allowing enough time to work.
▲
⟩⟩
Inkoust
sandkb
cenbeth
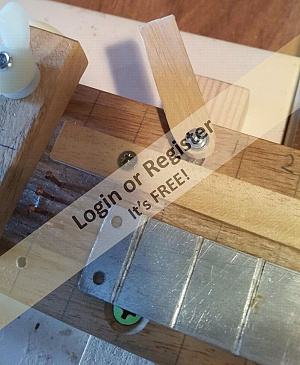
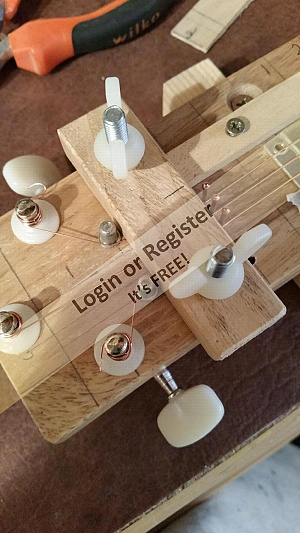
📝 HMS Diamond D35 - building the 1/96th Railings
9 years ago by 🇬🇧 McCluskey ( Chief Petty Officer 2nd Class)
Chief Petty Officer 2nd Class)✧ 13 Views · 2 Likes
Flag
💬 Add Comment
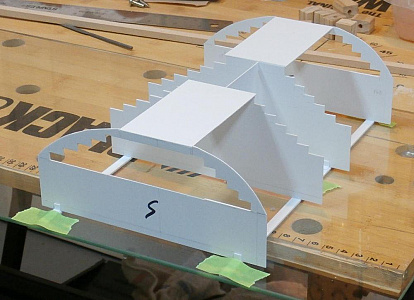
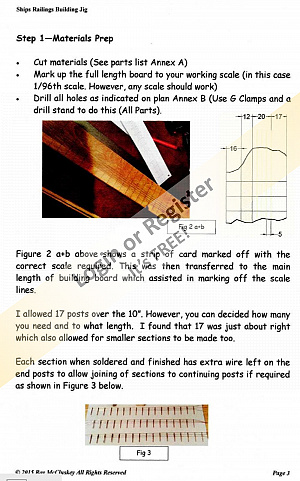
Building the 1/96th scale railings has been made a lot easier using my home brew building jig described here with enough information for others to use. incidentally this started off with a small prototype mentioned on these pages a few days ago.
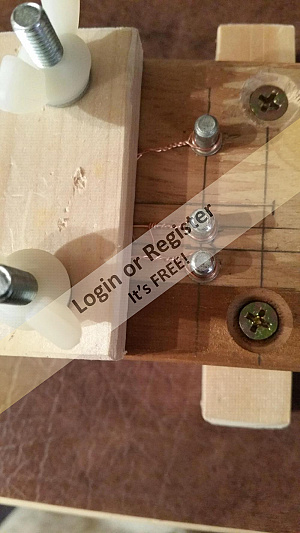
I started off with a length of hard wood around 20" x 4" 3/4" thick and marked out the guidelines for the railings. The actual length can be of your choice. I used hard wood because it will be a more tolerant in handling the heat. incidentally the pictures show some soft wood the length of the mid section which once wasted can be replace. This is used solely for guides.
I purchased some guitar head screws x6 for around £5 on eBay which are used to tighten the very thin 0.5mm wire when soldering to the posts. The pictures show how I have set this up at the turnbuckle end. There are 3 copper pins to guide the wire and there are some shelf pin supports just to direct the wire in the correct path to the two outside turnbuckles.
It may be worthwhile mentioning at this stage that I incorporated a small block across the wires at each end of the board with M6 bolts and wing nuts to ensure the the wire was pushed nice and flush with the alloy heat plate, and, to help the posts remain still too.
The alloy heat plate requires groves for the post pins to sit in. I used a 'V' file this. This removable part can be constructed for different scale railings too.
The other end (see picture) uses three shelf support pins guided by three copper pins and the wood block explained above which keeps the wire flush on the board. This end is the starting point when laying the thin wire. Just feed one at a time to the guitar screw and tighten (NOT TOO MUCH).
Once you have them all in place you can position the pins. I made a thin slider which I used to lifted up the wire off the alloy heat plate enough to slide the posts to the stopper. it can take a while to position everything, but at least nothing moves once you have it all tight!
The pictures should be enough to make one of these. Not very expensive and certainly a nice simple tool to construct and have available in the workshop.
The next blog contains a very simple little too to cut the 1mm copper wire post all exactly the same length along with some completed railings using this jig.
I hope this is useful.
▲
⟩⟩
sandkb
cenbeth
Login To
Remove Ads
Remove Ads
📝 HMS Diamond Build Update Eleven - Railings
9 years ago by 🇬🇧 McCluskey ( Chief Petty Officer 2nd Class)
Chief Petty Officer 2nd Class)✧ 14 Views · 3 Likes
Flag
💬 Add Comment
1/96 th Scale Railings this made me think how I was going to build these and therefore I came up with an idea that has assisted me enormously in making them.
I made a simple jig (prototype) in order to build a small section of railings at the required scale. Marking out the railings on a piece of Hard wood first and then sawing a grove for each of the posts to sit in. This stops them from moving about (Incidentally these posts are NOT the correct thickness but used to test the jig..... The correct wire is on order). I also applied a little strip of tape along the lower section to help keep the in place.
The jig uses tensioning at each end to ensure the 0.5mm wire does not bow/bend. I used elastic bands terminating on small pins. The master board I construct will be completed with a turnbuckle.
Once the wire is in place a little flux helps the solder to bind to the copper wire. I expect I need to practise a little more but I'm pleased with the outcome. Please do watch this space for pictures of the finished jig.
I've included a picture of the worm motors for Dave who was asking where to purchase them... I hope this helps you Dave.
Well underway with the primer paint.
▲
⟩⟩
sandkb
cenbeth
Pav403
💬 HMS Diamond D35 - Build update Ten
9 years ago by 🇬🇧 McCluskey ( Chief Petty Officer 2nd Class)
Chief Petty Officer 2nd Class)✧ 11 Views · 0 Likes
Flag
💬 Add Comment
HI Dave I'll dig out the company they're in Hong Kong. I've not posted the video yet but will do.
▲
⟩⟩
No likes yet
This member will receive 1 point
for every like received
This member will receive 1 point
for every like received
📝 HMS Diamond D35 - Build update Ten
9 years ago by 🇬🇧 McCluskey ( Chief Petty Officer 2nd Class)
Chief Petty Officer 2nd Class)✧ 13 Views · 2 Likes · 2 Comments
Flag
💬 Add Comment
There has been a slight delay in updating the blog here due to a horrid bout of flu which lasted some two weeks.
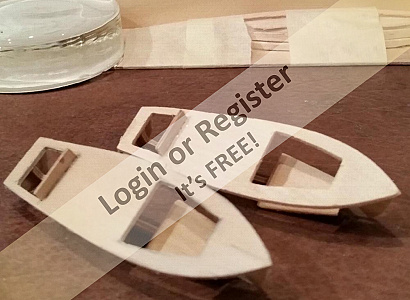
So... Today has been the second day back in the workshop and I've nearly completed the two life boats and the small Whaler. I just need to add a bit more filler and a further coat of primer to these before I build the upper cabin detail.
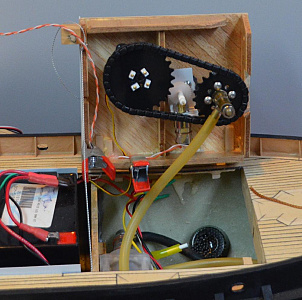
I have been experimenting with the worm motor electrics that will drive the gun turrets and the speed is just a tad too quick running 4.8 Volt. I can't post the video here so I will try and post it in the video section pages.
The whole internal hull cavity has been varnished ready to start fitting power pack platforms etc. I'll post a wiring diagram in due course along with details of the motors, batteries, ESC and Radio Gear.
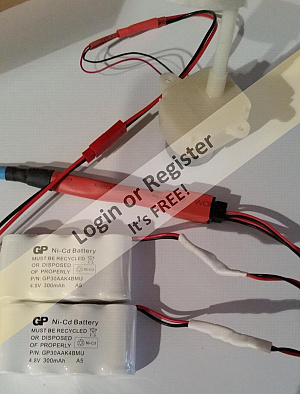
The two pictures of the worm motor batteries are wired in Series. These are extremely light and sufficient for running two low drain motors. 😊
So... Today has been the second day back in the workshop and I've nearly completed the two life boats and the small Whaler. I just need to add a bit more filler and a further coat of primer to these before I build the upper cabin detail.
I have been experimenting with the worm motor electrics that will drive the gun turrets and the speed is just a tad too quick running 4.8 Volt. I can't post the video here so I will try and post it in the video section pages.
The whole internal hull cavity has been varnished ready to start fitting power pack platforms etc. I'll post a wiring diagram in due course along with details of the motors, batteries, ESC and Radio Gear.
The two pictures of the worm motor batteries are wired in Series. These are extremely light and sufficient for running two low drain motors. 😊
▲
⟩⟩
sandkb
Pav403
📝 Brass Fittings
9 years ago by 🇬🇧 McCluskey ( Chief Petty Officer 2nd Class)
Chief Petty Officer 2nd Class)✧ 6 Views · 0 Likes
Flag
📝 Reply
HI there, I agree with Mark in all my experience that epoxy is very secure and sensible for most applications.
I have also used a contact adhesive which works on most surfaces too.
Good luck with the project
Roy
I have also used a contact adhesive which works on most surfaces too.
Good luck with the project
Roy
▲
⟩⟩
No likes yet
This member will receive 1 point
for every like received
This member will receive 1 point
for every like received
💬 Coast Guard Lifeboat build continuem
9 years ago by 🇬🇧 McCluskey ( Chief Petty Officer 2nd Class)
Chief Petty Officer 2nd Class)✧ 8 Views · 0 Likes
Flag
💬 Add Comment
Looking good and good luck. Roy
▲
⟩⟩
No likes yet
This member will receive 1 point
for every like received
This member will receive 1 point
for every like received
💬 HMS Diamond D35 - Gun Turret Detail
9 years ago by 🇬🇧 McCluskey ( Chief Petty Officer 2nd Class)
Chief Petty Officer 2nd Class)✧ 7 Views · 0 Likes
Flag
💬 Add Comment
Dave of Facebook HMS Diamond pages. There are a few nice pics there worth looking at.
▲
⟩⟩
No likes yet
This member will receive 1 point
for every like received
This member will receive 1 point
for every like received
📝 HMS Diamond D35 - Gun Turret Detail
9 years ago by 🇬🇧 McCluskey ( Chief Petty Officer 2nd Class)
Chief Petty Officer 2nd Class)✧ 8 Views · 1 Like · 2 Comments
Flag
💬 Add Comment
I have lost a week of my life with dreaded flu and after seven days I am just starting to feel a little more human. Perhaps I will be back in the building yard soon. in the mean time....
I found this shot of the gun turrets and has provided me with a little more detail which isn't shown on the plan. The main bits for me are the ladder at rear and some side panel plates.
The other photos are also handy for extracting some building information relating to the depth charges and torpedo-tubes.
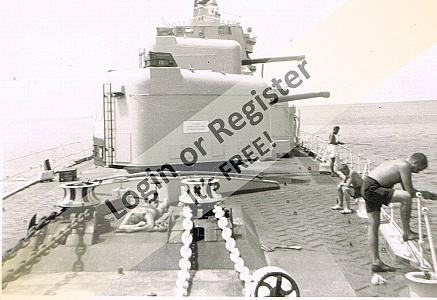
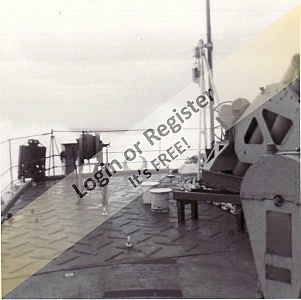
▲
⟩⟩
Pav403
📝 HMS Diamond D35 - Light Admiralty Grey paint
9 years ago by 🇬🇧 McCluskey ( Chief Petty Officer 2nd Class)
Chief Petty Officer 2nd Class)✧ 8 Views · 1 Like
Flag
💬 Add Comment
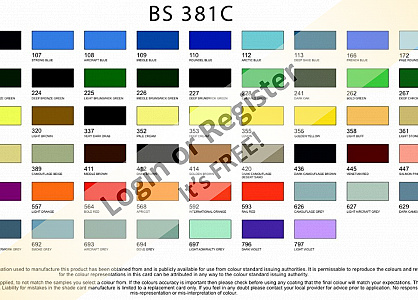
It seems to me that there are frequently many questions required in getting what you want in model boat building... So is there anyone out there that can help me with the correct hull paint for my build?
LIGHT ADMIRALTY GREY
I've included pictures of the paint required for this and I am struggling to find anything larger that a pathetic 5mm tin!
Any comments will be greatly appreciated too.


LIGHT ADMIRALTY GREY
I've included pictures of the paint required for this and I am struggling to find anything larger that a pathetic 5mm tin!
Any comments will be greatly appreciated too.
▲
⟩⟩
Pav403
📝 Connecting ESP ?
9 years ago by 🇬🇧 McCluskey ( Chief Petty Officer 2nd Class)
Chief Petty Officer 2nd Class)✧ 7 Views · 0 Likes
Flag
📝 Reply
HI there
The light coloured wire needs to go to the top pin as you look down on your RX.
Naturally the red and black are your power so you can try connecting the power lead to RX and observe which pins they use.
Hope this helps you.
Roy
The light coloured wire needs to go to the top pin as you look down on your RX.
Naturally the red and black are your power so you can try connecting the power lead to RX and observe which pins they use.
Hope this helps you.
Roy
▲
⟩⟩
No likes yet
This member will receive 1 point
for every like received
This member will receive 1 point
for every like received
Login To
Remove Ads
Remove Ads