|||
|
|
🗝 Login
🤖 Create Account
Main Menu
🚤 Model Boats
• Forum
• Build Blogs
• Media Gallery
• Boat Clubs & Lakes
• Events
• Boat Harbour
• How-To Articles
• Plans & Docs
• Useful Links
• The Games Chest
This Website
🔍 Search
📝 Guestbook
👨👩👧👦 Members (1,759)
📖 Quick Site Guide
📣 Support
👥 Membership
Hobby Supplies
🛍️ Online Shop
Not Registered
Go AD FREE & get your membership medal
BRONZE
Less Ads
SILVER
GOLD
Ad Free
Cancel
Anytime
Anytime
£2.50
£4.50
£6.50
Subscribe
Go AD FREE & get your membership medal
BRONZE
Less Ads
SILVER
GOLD
Ad Free
For A Whole Year!
£25
£45
£65
Donate
You Will Be Helping Towards:
Domain Fees
Security Certificates
iOS & Android App Fees
Website Hosting
Fast Servers
Data Backups
Upkeep & Maintenance
Administration Costs
Without your support the website wouldn't be what it is today.
Please consider donating towards these fees to help keep us afloat.
Read more
All donations are securely managed through PayPal.
Many thanks for your kind support
Without your support the website wouldn't be what it is today.
Please consider donating towards these fees to help keep us afloat.
Read more
All donations are securely managed through PayPal.
Many thanks for your kind support
Join Us On Social Media!

|

|

|
Download The App!
Login To
Remove Ads
Remove Ads
Login To
Remove Ads
Remove Ads
🏝️ About This Website
☝️ Terms of Service
🔏 Privacy Policy
Model Boats Website
Model Boats Website
Home
Forum
Build Blogs
Media Gallery
Boat Clubs & Lakes
Events
Boat Harbour
How-To Articles
Plans & Docs
Useful Links
The Games Chest
Welcome to the Model Boats Website! A place for all model boaters!
Feel free to browse through the website, ask your questions, upload your photos or even start your own blog!
Feel free to browse through the website, ask your questions, upload your photos or even start your own blog!
Login To
Remove Ads
Remove Ads
Trending Now
Forum
Hoist the sails, a new site is on the horizon!
Stephen; unlike the others I have no knowledge of website design. However I do have some beta testing background so perhaps I could help from that perspective. Sounds like an interesting & certainly a challenging project. If I could provide worthwhile assistance I would like to participate in your project.
🇺🇸 Chum444

4 hours ago
Blog
Re: Classic Model Power Boats
Hi Duncan,
Thanks for sharing the pictures of your old Sea Commander with us here.
Your model has unique features that should help to identify it by anyone that sees it.
The metal wave breaker is quite an unusual feature - especially if you made it yourself.
Likewise the pulpit that does look really good and suites the shape of the boat perfectly.
The transom mounted grab handle and the short additional “side bumpers” that you added to the sides of the hull at the rear are also not standard - although I did see a Sea Commander at our Southport club sometime last year that I remember also having these in the same place!
I will certainly keep an eye open for you - just in case this Sea Commander has any of your other features on it that help to identify it as being your old model.
I hope your pictures help to locate your Classic Model Power Boat for you.
Your pictures have been repeated here as I don’t want them to get lost to anyone reading my comments without them.
Bob.
🇬🇧 zooma

7 hours ago
Forum
A new naval project. What to do now?
Great, Jock, reviving the Blue Nose seems like a great idea.
If I'm not mistaken, it's a schooner, so it requires fewer standing and running rigging than square-rigged ships.
If it's a static model just for display, you shouldn't have any major problems, and it's a great satisfaction.
However, for a sailing RC model, controlling gaff sails (i.e., with the boom) poses pitfalls that square-rigged sails don't. I discovered this while building the models.
I'm obviously only referring to scale models, not real sailing ships (I can go into more detail on this topic if you're interested).
I'm still looking for the ideal solution. When I thought of mine, I wasn't yet familiar with the Robbe Valdivia scale model or Gary Webb's models.
To gain more inspiration and solutions, I'm waiting for the completion and launch of RossM's RC naval model.
🇮🇹 AlessandroSPQR

7 hours ago
Gallery
Re: Real images vs. AI-altered images
Hi Chris, I agree with everything you said, and I've noticed exactly what you've noticed.
It does indeed make a lot of mistakes and doesn't always follow commands, but there are various AIs (as you said), from those available free of charge to the most sophisticated. However, I think the most surprising thing is that AIs learn and improve.
Even if you're not an expert, it's true that I've seen the modifications to your boats, and they've really impressed me.
Perhaps EdW could tell us more.
🇮🇹 AlessandroSPQR
10 hours ago
Forum
TVR1A Steam Engine.
Hi Gary,
Thanks for sharing your pictures of the Royal Enfields and the Ariel’s too.
The original Royal Enfield Continental GT was a 250cc single cylinder motorcycle that at the time it was introduced was legal to ride with an “L” plate.
As far as I was concerned it was the ultimate first motorcycle that was also the best looker too!
Several of my classmates that left school when I did bought them new, but as a poorly paid apprentice, I never earned enough to cover the HP payments!
I ended up with an old Matchless 250 that I bought for £20 that ran OK but had a repaired rear swinging arm that needed changing ….and was better than a BSA C11G or possibly a rough C15 that my twenty quad may have been able to buy instead.
A trip to a scrap merchant in Bristol resulted in a replacement swinging arm being found and fitted to make the bike “straight ”….but it could never be a match for the Continental GT.
The Kawasaki 250cc two stroke triple was the only other motorcycle that I would have liked to learn to ride on (if funds permitted) at the time, although the Ducati 250 Desmo had some appeal too, but by the time I was earning enough to have a choice I was able to buy a car instead so I missed out on owning the Continental GT that I had dreamed about since the day it was first launched.
I seldom get to see any Continental GT motorcycles these days, but when I do I always stop to look at them as they have the same appeal to me now as they did back then in the 1960’s.
Bob.
🇬🇧 zooma
11 hours ago
Blog
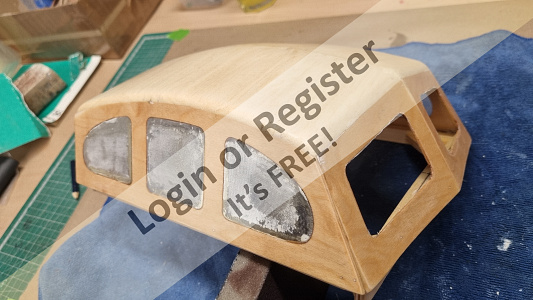
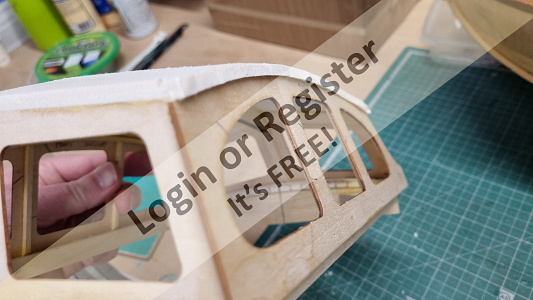
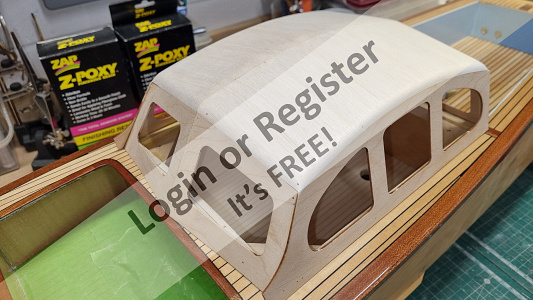
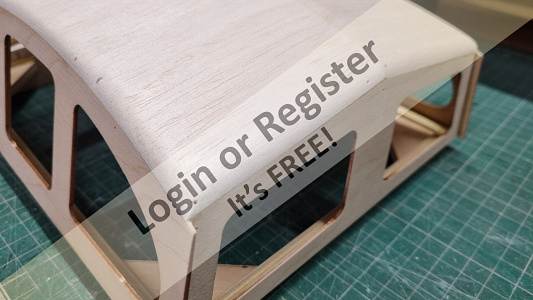
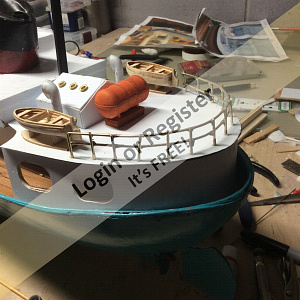
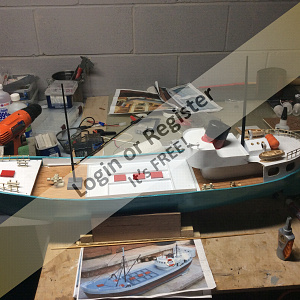
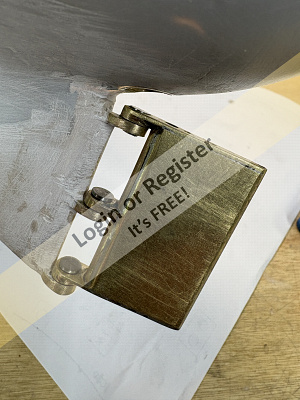
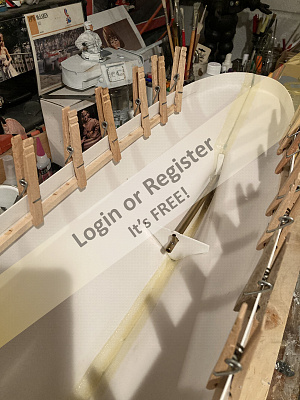
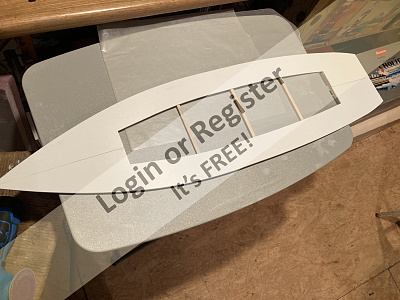
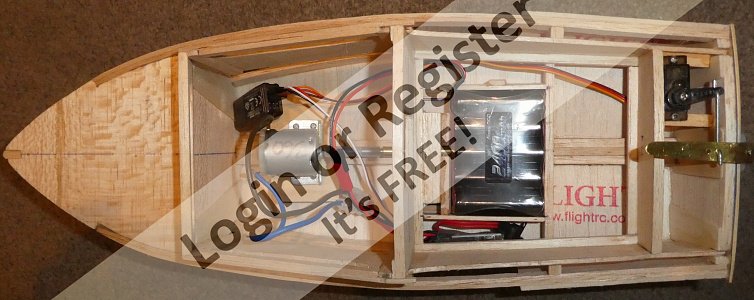
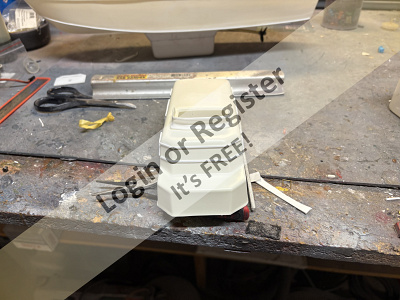
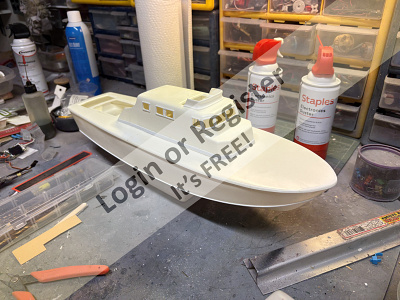
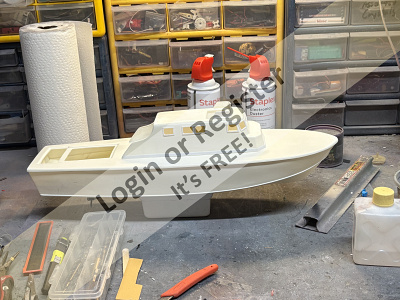
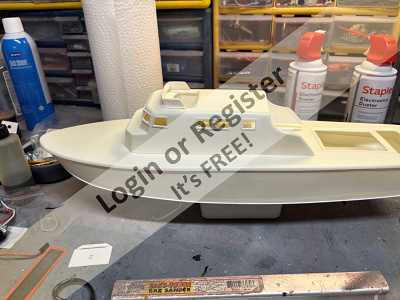
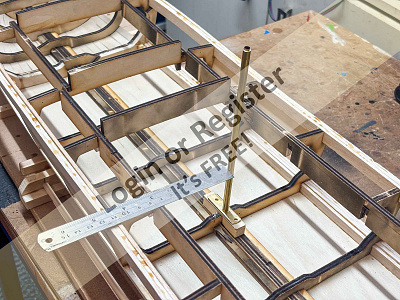
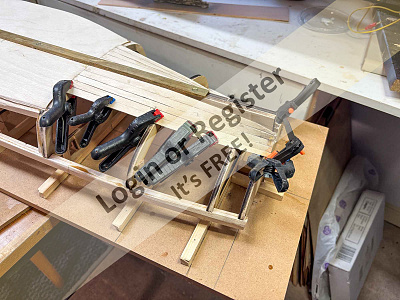
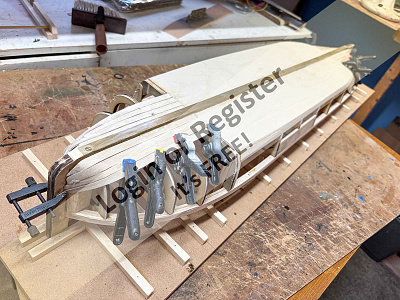
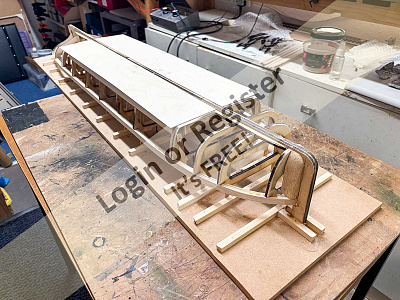
Finishing the Cabin with glass cloth.
The cabin is now ready for the fibreglass cloth and epoxy resin coats to strengthen it and give a good surface for the high gloss white paint finish.
I used the same weight of glass cloth as on the hull for the cabin and the Z-Poxy finishing resin too. The cloth was cut and applied over the whole cabin surface including over the window apertures as these will be trimmed out later.
The first coat of resin was thinned by about 20% to ensure that it soaked well into the balsa roof panels through the 50gsm cloth.
Two additional coats were required to get the depth of coating I needed and, as always, I rubbed each coat down with wet & dry abrasive to refine the surface.
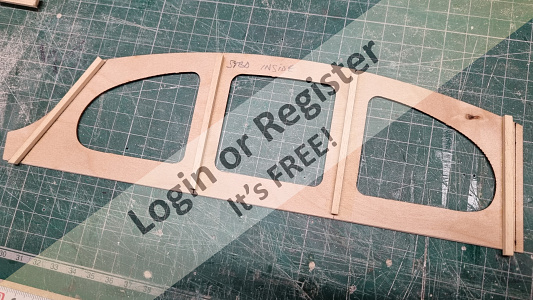
The next bits to fabricate are the rear extensions to the cabin.
🇬🇧 robbob
13 hours ago
Forum
They are "Wooden Boats", but not scale models ...
Hsailer,
I'm afraid he knows where I live.
If one of those came up missing after a visit by me, I'm afraid I'd be found out in a hurry.
I know how much he gets ($$$) to bring those boats back to that level of quality.
I'm afraid visiting his shop, and drooling is as close as I'll ever get.
However, he did indicate that he'd like to take my wife and I out on his 31' boat this summer.
I'm not sure what his boat is, but I'm anxious to find out!!
Dave B
🇺🇸 DWBrinkman
13 hours ago
Gallery
RC Florida (rcflorida.org) site is available
It is taking a lot of work (like building another medium size detailed RC scale model boat), but I am getting the new site running. It is not complete but the basics are in place.
The opening video is also on YouTube with the link below. Short and to the point, it has model boat videos in it if you are interested.
Lew
https://youtu.be/Gn6EM3fY1sQ
🇺🇸 LewZ

21 hours ago
Blog
Re: Fin
The sails were laid out with panel lines aligned to the run of the cloth. At the moment the heads'ls aren't attached to stays, but have a bit of cord attached at the head and tack to hang them up - ie, they're jury-rigged.
🇺🇸 Jerry Todd

23 hours ago
Harbour
Re: Legend Models #702 1939 Century Thunderbolt
Last year, I put the running and RC gear in this boat.
I had it at one of the events where we were invited to join and display at a local Classic Boat Club event.
One of my fellow club members commented that it was "nice", but asked if he could have it over the winter to "clean it up a little". Seeing as his boats are always gorgeous, how could I refuse?
I got it back from him last week. He did a lot of repairs/improvements. It is hard to tell from the photo, but the clearcoat looks about 1/2" deep. I'm extremely happy with the result.
Dave B
PS Hudson is my 10.5 year old Morkie, who has cancer. This boat will be his legacy ....
🇺🇸 DWBrinkman
1 day ago
Forum
Sprite
Another vote for spirit based gloss paint .
It’s what us traditional brush painters need for use on our Classic Model Powe Boats.
Bob.
🇬🇧 zooma
1 day ago
Harbour
Re: Bristol pilot cutter - Three Daughters
Finally with the skills of a fellow sailing group member, I have some photos of 3 Daughters enjoying a breeze. He has rightly labelled the first photo as a 'Perfect Morning', couldn't agree more
🇬🇧 luckyduck

2 days ago
Harbour
Re: Port Area
Hey everyone!
The harbor is being inaugurated today. The weather’s perfect, and everyone’s in high spirits.
We’ll start setting up in about an hour. Let’s see how people react. Half the club doesn’t even know about it…
Your Michel-C.
🇨🇭 Mike Stoney

2 days ago
Forum
HMS Dorsetshire
By a simple twist of fate (thank you Bob Dylan) "Model Boats" magazine that came in today's post has a news item about a book "County Class Cruisers" from Pen and Sword. Release date 30 June 2026
ISBN 9781036157043
https://www.pen-and-sword.co.uk/Shipcraft-19-County-Class-Cruisers/p/61508
Usual disclaimer, I've bought a few books from them and they've all been good.
🇺🇸 VictorC

2 days ago
Forum
Question of the Day?
Well, Roy I hoped you weren't going to ask me that!.
You have given me a right headache..
When I was 20 years young on board the Golden Hind with Drake, circumnavigating the World, in 1580, that meant I was 245 years old on HMS Victory when we defeated the French and Spanish at the Battle of Trafalgar, in 1805, so now I must be.... 466 I think ?. That was harder than Q-O-T-D.
When I mentioned the MLC rules to Admiral Nelson he nearly had me keelhauled..
🇬🇧 Steves-s

2 days ago
Blog
Re: part 5
How did you build that stand? I'm new to this type of model building.
🇺🇸 JasonP

3 days ago
|

New Member
United Kingdom
john Clayton7 hours ago
New Member
United Kingdom
liamm10 hours ago
New Member
United Kingdom
michaelc612 hours ago
New Promotion
Petty Officer 1st Class
 IGinBasel
13 hours ago
New Member
Netherlands
Hansv11 day ago
New Member
United States
jrjandcole1 day ago
New Member
United States
Algonquin2 days ago
New Member
Australia
Beammer2 days ago
New Member
Sweden
DanialD2 days ago
New Member
United Kingdom
GuyC2 days ago
New Member
United Kingdom
MikeP33 days ago
New Member
United States
JohnB93 days ago
New Member
Hong Kong
bingl3 days ago
New Member
United Kingdom
andrewf14 days ago
New Member
United Kingdom
davidm114 days ago
New Member
United Kingdom
TonySC5 days ago
New Member
United Kingdom
kougarman5 days ago
New Member
United Kingdom
JohnC95 days ago
New Promotion
Leading Seaman
VictorC5 days ago
New Member
United Kingdom
Mojay6 days ago
Birthday This Week
Turns 72
 RossM
RossM6 days ago
New Member
United States
JasonP6 days ago
New Member
New Zealand
wdjacques6 days ago
New Promotion
Able Seaman
 PeterN
7 days ago
New Member
Australia
jr7 days ago
New Member
Austria
WolfgangF8 days ago
Birthday This Week
Turns 79
Lauriem8 days ago
Birthday This Week
Turns 69
Stephen T8 days ago
New Member
United Kingdom
TonyG8 days ago
New Promotion
Able Seaman
GageHunt8 days ago
New Promotion
Captain
BOATSHED8 days ago
New Member
Norway
janh9 days ago
New Promotion
Chief Petty Officer 1st Class
Northernflotsam9 days ago
New Member
United States
thecadman201710 days ago
New Promotion
Master Seaman
 Yabbie1
11 days ago
New Promotion
Commodore
chugalone10011 days ago
New Promotion
Master Seaman
Hsailer12 days ago
New Promotion
Lieutenant Commander
 Madwelshman
12 days ago
New Member
Spain
JoseMN12 days ago
New Member
Canada
GageHunt12 days ago
New Member
United Kingdom
MickH13 days ago
New Member
Belgium
Jmand14 days ago
New Member
Germany
Maphan14 days ago
New Member
Canada
SandyR14 days ago
New Member
United Kingdom
IanH614 days ago
New Promotion
Able Seaman
GrantH14 days ago
New Member
Belgium
JacquesM15 days ago
New Member
United States
SteveR515 days ago
See More
Forum Topics
Hoist the sails, a new site is on the horizon!
Stephen; unlike the others I have no knowledge of website design. However I do have some beta testing background so perhaps I could help from that perspective. Sounds like an interesting & certainly a challenging project. If I could provide worthwhile assistance I would like to participate in your project.
4 hours ago by 🇺🇸 Chum444 ( Commodore)
Commodore)
Website Related
8 Posts
35 Likes
35 Likes
Started
19 hours ago
by fireboat
19 hours ago
by fireboat
Latest
4 hours ago
by Chum444
4 hours ago
by Chum444
A new naval project. What to do now?
Great, Jock, reviving the Blue Nose seems like a great idea.
If I'm not mistaken, it's a schooner, so it requires fewer standing and running rigging than square-rigged ships.
If it's a static model just for display, you shouldn't have any major problems, and it's a great satisfaction.
However, for a sailing RC model, controlling gaff sails (i.e., with the boom) poses pitfalls that square-rigged sails don't. I discovered this while building the models.
I'm obviously only referring to scale models, not real sailing ships (I can go into more detail on this topic if you're interested).
I'm still looking for the ideal solution. When I thought of mine, I wasn't yet familiar with the Robbe Valdivia scale model or Gary Webb's models.
To gain more inspiration and solutions, I'm waiting for the completion and launch of RossM's RC naval model.
7 hours ago by 🇮🇹 AlessandroSPQR ( Fleet Admiral)
Fleet Admiral)
Building Related
34 Posts
134 Likes
134 Likes
Started
7 days ago
by AlessandroSPQR
7 days ago
by AlessandroSPQR
Latest
7 hours ago
by AlessandroSPQR
7 hours ago
by AlessandroSPQR
TVR1A Steam Engine.
Hi Gary,
Thanks for sharing your pictures of the Royal Enfields and the Ariel’s too.
The original Royal Enfield Continental GT was a 250cc single cylinder motorcycle that at the time it was introduced was legal to ride with an “L” plate.
As far as I was concerned it was the ultimate first motorcycle that was also the best looker too!
Several of my classmates that left school when I did bought them new, but as a poorly paid apprentice, I never earned enough to cover the HP payments!
I ended up with an old Matchless 250 that I bought for £20 that ran OK but had a repaired rear swinging arm that needed changing ….and was better than a BSA C11G or possibly a rough C15 that my twenty quad may have been able to buy instead.
A trip to a scrap merchant in Bristol resulted in a replacement swinging arm being found and fitted to make the bike “straight ”….but it could never be a match for the Continental GT.
The Kawasaki 250cc two stroke triple was the only other motorcycle that I would have liked to learn to ride on (if funds permitted) at the time, although the Ducati 250 Desmo had some appeal too, but by the time I was earning enough to have a choice I was able to buy a car instead so I missed out on owning the Continental GT that I had dreamed about since the day it was first launched.
I seldom get to see any Continental GT motorcycles these days, but when I do I always stop to look at them as they have the same appeal to me now as they did back then in the 1960’s.
Bob.
11 hours ago by 🇬🇧 zooma ( Vice Admiral)
Vice Admiral)
Building Related
27 Posts
153 Likes
153 Likes
Started
5 months ago
by GaryLC
5 months ago
by GaryLC
Latest
11 hours ago
by zooma
11 hours ago
by zooma
They are "Wooden Boats", but not scale models ...
Hsailer,
I'm afraid he knows where I live. 🙄
If one of those came up missing after a visit by me, I'm afraid I'd be found out in a hurry. 🤕
I know how much he gets ($$$) to bring those boats back to that level of quality.
I'm afraid visiting his shop, and drooling is as close as I'll ever get.
However, he did indicate that he'd like to take my wife and I out on his 31' boat 🚤 this summer.
I'm not sure what his boat is, but I'm anxious to find out!!
Dave B
13 hours ago by 🇺🇸 DWBrinkman ( Commodore)
Commodore)
Non-Hobby Chat
8 Posts
58 Likes
58 Likes
Started
1 day ago
by DWBrinkman
1 day ago
by DWBrinkman
Latest
13 hours ago
by DWBrinkman
13 hours ago
by DWBrinkman
Sprite
Another vote for spirit based gloss paint 👍.
It’s what us traditional brush painters need for use on our Classic Model Powe Boats.
Bob.
1 day ago by 🇬🇧 zooma ( Vice Admiral)
Vice Admiral)
Building Related
249 Posts
611 Likes
611 Likes
Started
7 months ago
by ChrisF
7 months ago
by ChrisF
Latest
1 day ago
by zooma
1 day ago
by zooma
|
|
Login To
Remove Ads
Remove Ads
Build Blogs
37 Posts
31 Followers
513 Likes
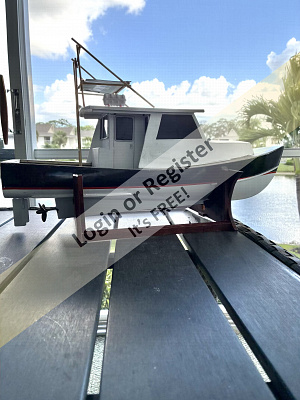
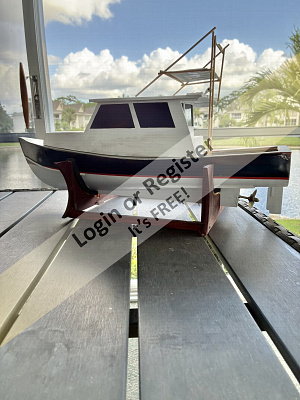
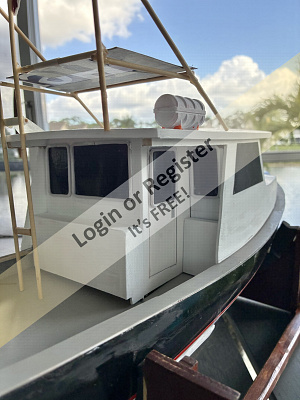
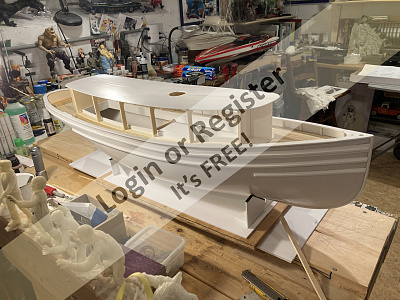
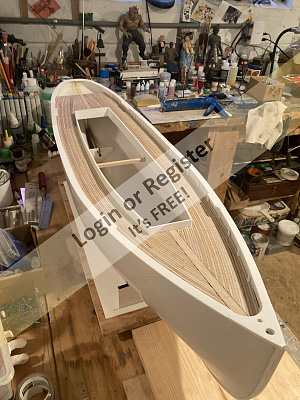
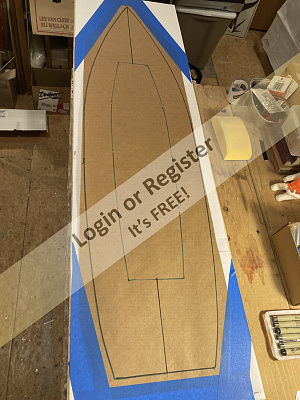
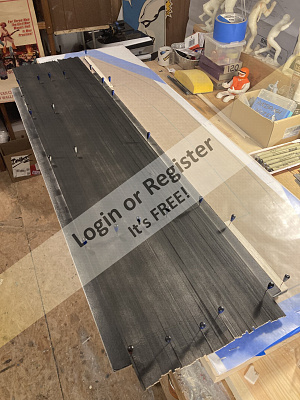
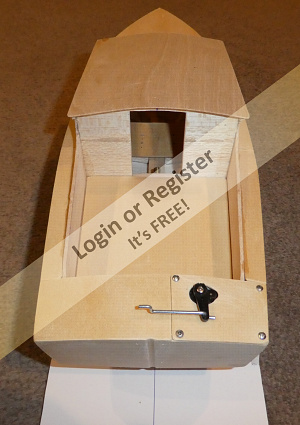
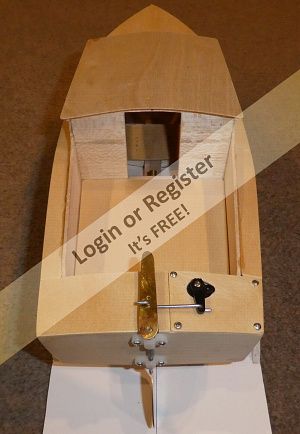
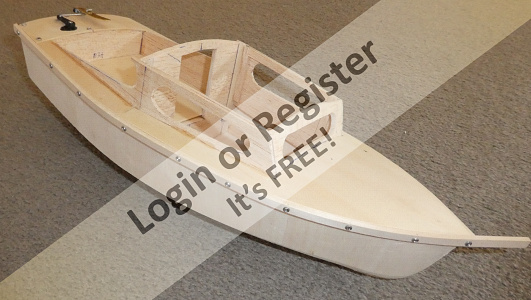
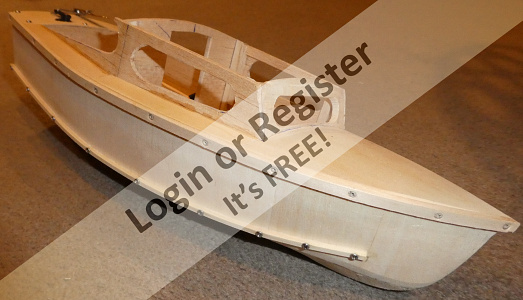
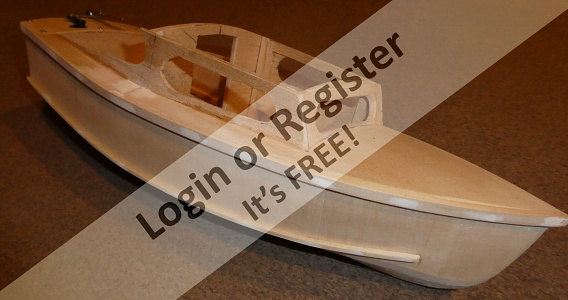
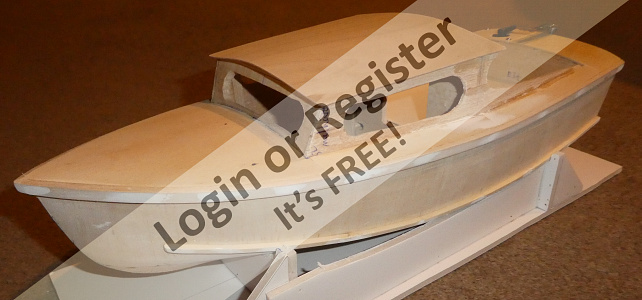
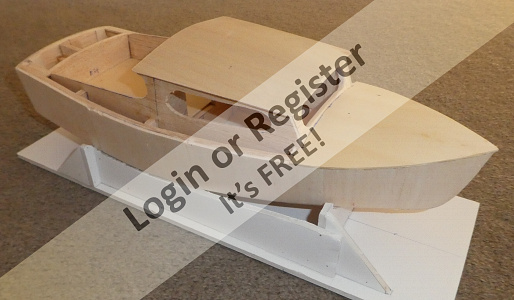
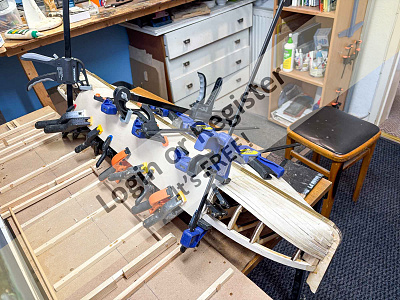
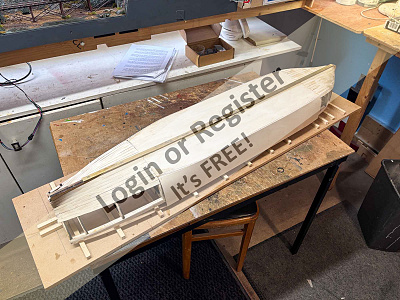
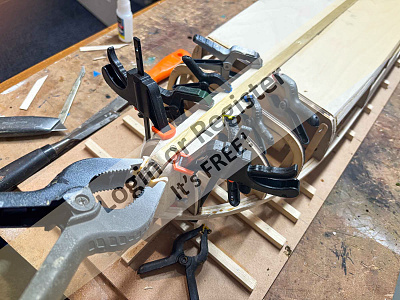
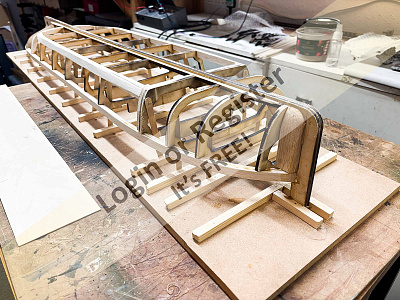
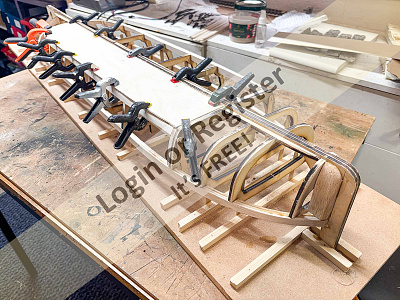
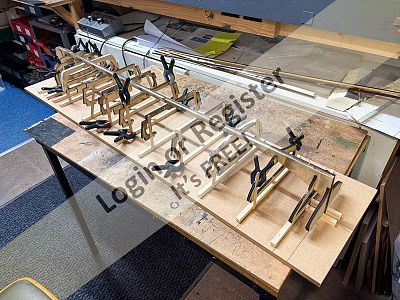
The VMW Marlin Cabin Cruiser by Robbob
The VMW Marlin Cabin Cruiser by Robbob
Preface.
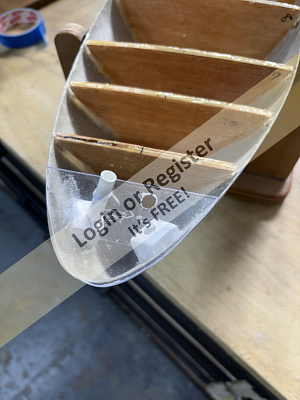
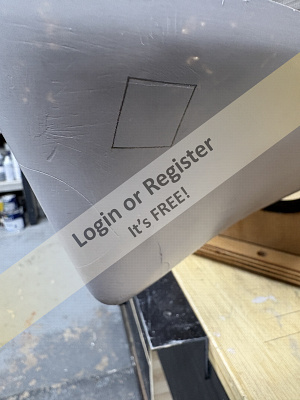
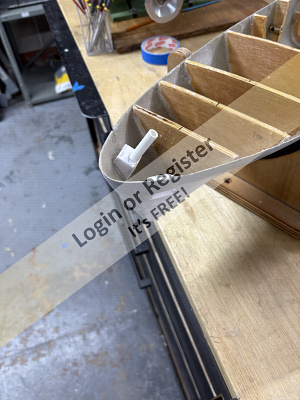
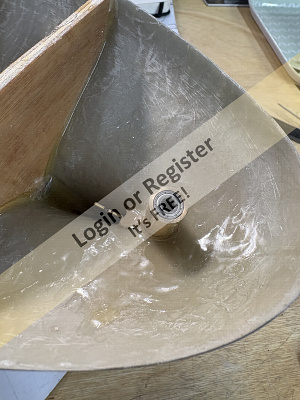
At the time of writing, I’ve had the construction of this boat on ‘the back burner’ since July 2022. By then I had spent about two months on and off constructing the boat to a stage where I could consider applying a glassfibre cloth and epoxy finish to the hull. However I couldn’t spend any more time on the Marlin project as I had a more important project to undertake, which was to paint, decorate, refurbish and prepare our house for sale so that we could downsize and move to a new area now that our kids had all fled the nest.
Fast forward to today (mid-April 2025) and it’s taken a while to get the new house and gardens into shape and settle in, with the emphasis on converting my internal garage into a great new workshop, I can finally pick up from where I left off.
Introduction to the kit.
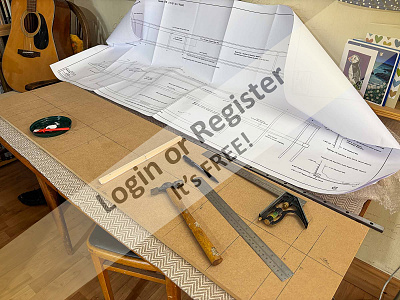
This new model is the latest undertaking by Vintage Model Works, now famous for their very popular models of the RAF Crash Rescue Tender and Thames River Police Boat kits which are based on old Aerokits and Veron designs.
The Marlin is a re-working of an original Veron design by the late Phil Smith in 1953. His son Colin Smith, who was also responsible for the re-design of the Thames River Police Boat, has made some changes to his father’s design to take advantage of more modern materials and production methods such as CNC and laser cutting.
The photograph below is of a prototype built by Colin Smith to give you an idea of how the boat looks in finished form. And there is also a review of the Marlin that appeared in Model Maker magazine, November 1953.
The size remains at 36” and it employs the same construction method as the original. The spacious cabins of the boat makes it very easy to accommodate all the latest control hardware required, not that the original was lacking in that area even when the radio systems used valves and large batteries and the propulsion was usually IC or a large electric motor.
Even the pre-production sample the Vintage Model Works kit supplied to me is well presented with a full size drawing including a pictorial construction sequence and separate pages of building instructions.
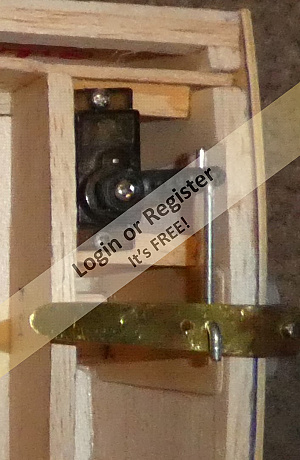
All the required materials are supplied in quality ply, balsa, strip-wood and dowel including clear plastic sheets for the windscreens, and various white metal deck fittings. The builder is of course required to supply their own adhesives and paint of choice, as well as the propulsion, drive train and radio control gear. In the latter respect I will likely restrict control to throttle and rudder and not add any lighting or other features. That has already been done magnificently by Mike Turpin.
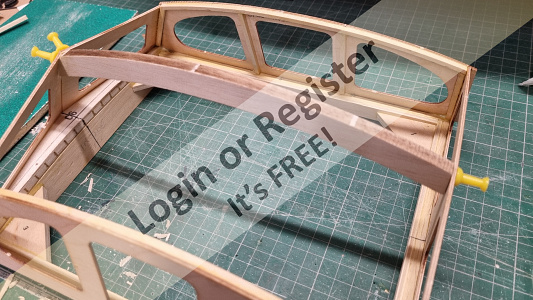
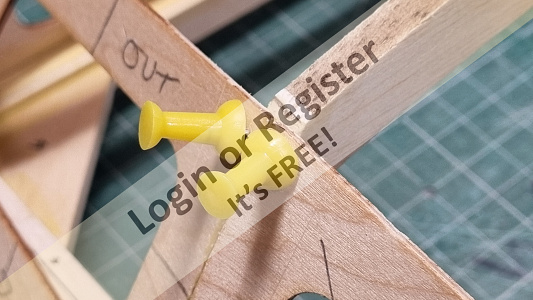
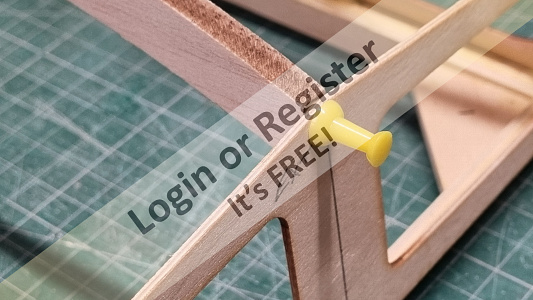
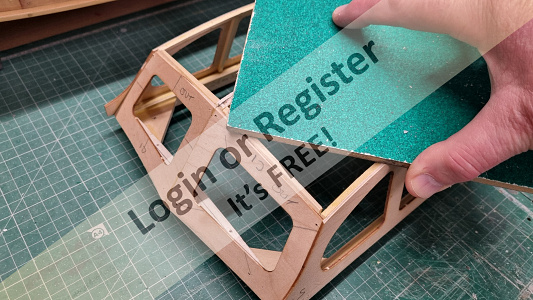
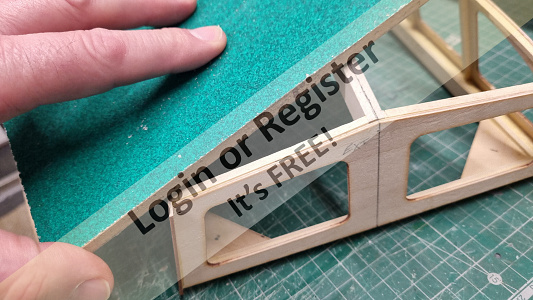
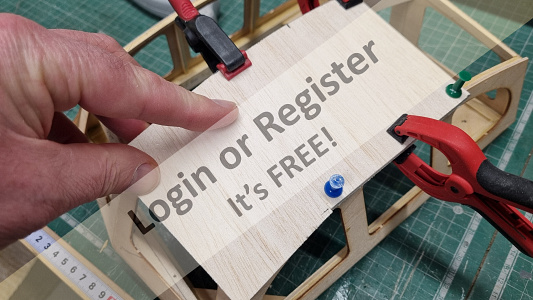
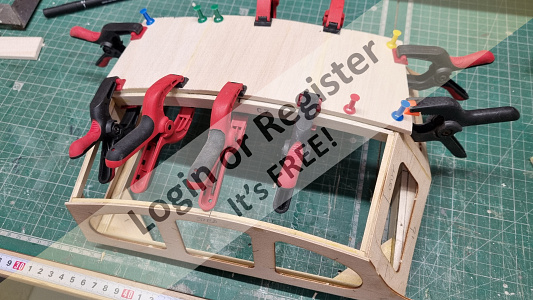
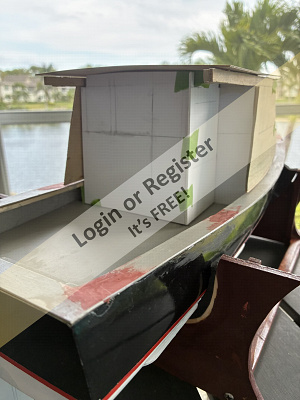
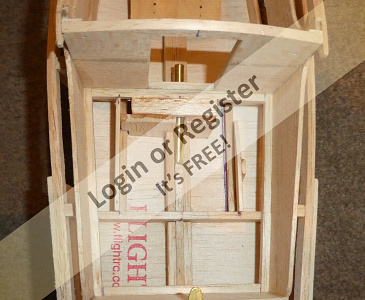
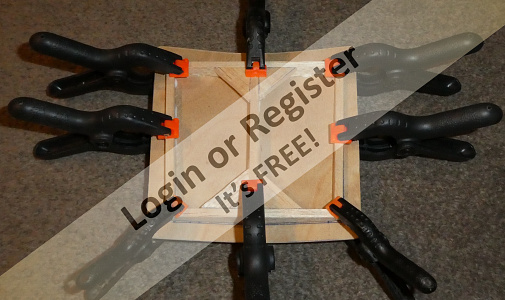
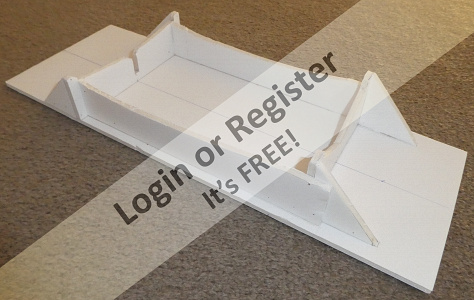
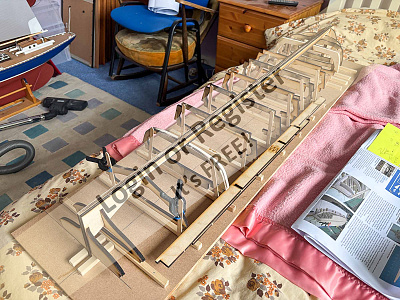
Construction.
As with the Thames river police boat, another Veron design, construction starts with the assembly of a box structure onto which formers and bulkheads are attached to make the basic hull shape.
I will be tackling this in the first part of my build blog which I hope you will enjoy following and I encourage you to ask questions, leave comments and hopefully some ‘likes’ as I make progress.
Robbob.
🇬🇧 robbob
13 hours ago


18 Posts
15 Followers
136 Likes
Pride of Baltimore 1981
My first official job, when I was 16, was working on the construction of the Baltimore Clipper schooner Pride of Baltimore.
On my 21st birthday I reported on board as a member of the crew. After that I acquired the plans from Thomas Gilmer who designed the vessel, with the intent to build an RC model. After a false start then, I changed the scale and started again in September of 2010.
The model represents the boat as she was when I was crewing aboard her in September-October 1981. I had a certification from the National Park Service to handle black powder cannon, so I was put in charge of Pride's guns which was handy when we went to the bicentennial of the Siege of Yorktown, what it really meant is I slept with 25pds of black powder at the foot on my bunk.
I cooked right along with construction while also working on Constellation and starting a third model, until July of 2012. She was basically a static display model since then, with an attempt to work out her controls that didn't work out in 2015. Trying to set up her steering uncovered a design flaw that I resolved by moving the rudder servo forward. Life has a habit of getting in the way of my hobbies, and several changes in jobs and homes put a damper on all three models.
She's pretty much just sat till now, going on display a few times, getting floated in a pool in 2019 and capsizing, which was a bit eerie considering the fate of the original.
The model is 1:20 scale making her
Hull length: 54" (137.16cm)
Length on deck: 48" (121.9cm)
Length on waterline w/o rudder: 46.75" (118.75cm)
Length over the rig: 81.5" (207cm)
Beam: 13.625" (34.6cm)
Draft without ballast keel: 5.875" (14.9cm)
Total height (top of jack-yard to bottom of keel): 61.6" (156.5cm)
Total Sail area: 2,049.13 square inches in 7 sails as shown above, 2,205.13 with the flying jib.
Her keel is plywood and she was planked with white pine strips over plywood forms, which were removed. The hull has a layer of 4oz glass cloth and poly resin outside, and several coats of just resin inside.
As mentions she capsized in the pool when a slight gust caught her, despite being weighted to the waterline. She's designed to have a removable fin with a lead bulb making up most of her ballast, but that hasn't been made yet, so it wasn't fitted in the pool that day.
Her lower masts are white pin made with the "birds-mouth" method so they're hollow and weigh next to nothing, but are strong.
Sails are made of a Dupont cloth called Supplex which is a polyester that makes excellent sails. All lines will be nylon or polyester Dacron walked up from thread acquired from a sail-maker's supplier. All the sails have bolt-ropes hand-sewn on. There's no stitching to represent seams because I think it looks like crap, and it's a lot of work to do to ruin your sails. The seam lines on Pride are drawn on on with an .005 permanent marker.
Originally her controls were going to be a Mega-arm sail servo and a winch servo, with the winch driving a loop. That was changed to two arm servo controlling my Semaphore-Sheeting system used successfully in Constellation for the over-lapping heads'ls. That wasn't going to work on Pride mostly because space limitations (vertically inside the hull).
A friend recently launched his four foot schooner in which he used two winch-driven loops to control the sails. It's success, especially with the over-lapping jib, got me re-thinking Pride controls and reverting to the loop-sail-control system, with changes.
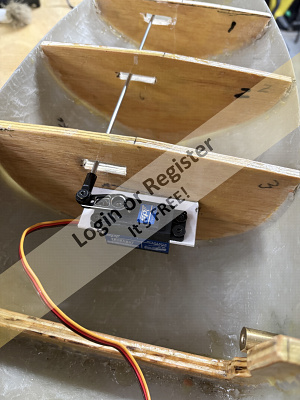
So I'm working on the model again, this time removing everything inside the hull. I removed the motor and my homemade 1 inch prop because there's no way that little prop can over-power all that sail in the lightest of wind. The rudder servo will be moved aft of where the motor was and be accessible through the cabin hatch. One winch will be mounted where the motor was, under the engine hatch, just aft of the mainmast, and another winch will be mounted just aft of the foremast and be accessible through the main hatch.
This is where things stand at the moment (June 25 2022). The pic with the gun is a 3D printed test of a gun for my Macedonian model (1:36 scale) which seems to be just right for the 1:20 scale Pride, which will benefit from 3D printing with guns, gunport lids, a much crisper name board on her stern, along with the Baltimore emblem that was back there.
The last pic is the actual boat in the Pacific in 1982. I edited in the main tops'l to show the rig I plan to set. She also had a ringtail, stuns'ls, and a main topmast stays'l, none of which I plan to use.
Hopefully, this approach to her controls will work out and I can actually get her sailing at last.
🇺🇸 Jerry Todd
2 days ago


5 Posts
9 Followers
33 Likes
Trawler
Haven't been working on my deep- sea trawler for a while. I needed to build some railings on the deck, but didn't want to wait and buy them and pay tariffs on them at an American hobby store, so I got some brass rod here at a local hobby store and soldered some up. I also decided to use the lifeboat kits for the ship. Next step: painting railings. Also need to do all the rigging yet.
🇨🇦 GARTH
5 days ago


11 Posts
2 Followers
44 Likes
The Galilee Boat Circa 40-50 BC Scale 1:24
Hello everyone,
I’d like to share a project I completed some time ago—a Galilee boat from around 40–50 BC, built at 1:24 scale. It was a very enjoyable build, mainly because of its historical background and straightforward construction.
I think it’s always important to mention the story behind a model, and this kit comes from SE Miller Guitars, owned by Scott Miller:
http://www.semillerguitars.com/sea-of-galilee-boats/
He originally developed this model after researching the Kinneret boat discovery, using plans published by Shelly Wachsmann.
Starting from a small 16" scratch-built version, his work gained recognition after winning Gold Awards at a model competition, which eventually led him to produce these kits for others to build.
What I liked most about this model is how it combines history with a simple, hands-on building approach—something different from more complex ships.
I hope you find it interesting, and I’ll be glad to share more details of the build.
Julian
🇺🇸 chugalone100
5 days ago


16 Posts
13 Followers
122 Likes
Forceful Directors Class Paddle tug
In the process of building a Directors class - Forceful paddle tug.
Brought the fibreglass hull.
Directors class - Forceful paddle tug plan drawing number 1292
Two magazines Marine modelling international jan 2017 & feb 2017 have been used as reference.
Paddle wheel drawing number 1293
All of the paddle wheel components have been machined by me from raw materials. Bearings and fixings are purchased as required.
So far I have Completed the feathering paddle wheels and drive. I have set up a test tank for a paddle wheel to ensure all is well before proceeding with the rest of the build.
I hope you find my efforts interesting
🇬🇧 Kevin55
5 days ago


17 Posts
9 Followers
122 Likes
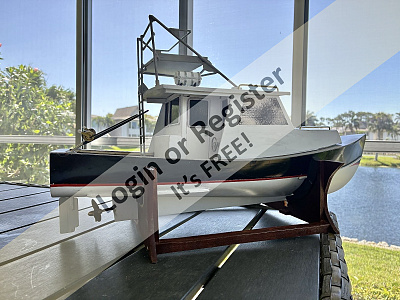
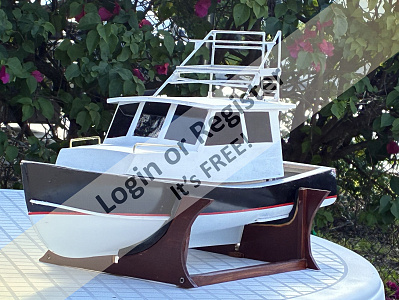
36 ft Northern Bay sport fisherman
The Northern Bay lobster and sport fishing boats are built in Qgunquit, Maine. Known as Down East boats they are semi-displacement hulls. They are very good sea boats stable in heavy seas. Compared to semi-vee hulls common to many other sport fisherman boats in the U.S. the Down East hulls tend to be wet boats. As with everything else, boat design is always a compromise.
1&2 The inspiration
3&4 Beginning steps
🇺🇸 Chum444
6 days ago


4 Posts
4 Followers
38 Likes
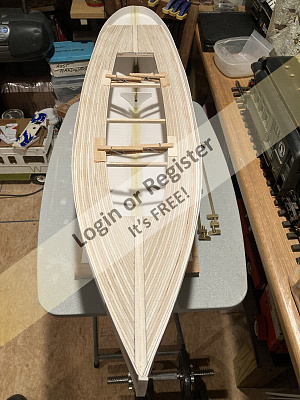
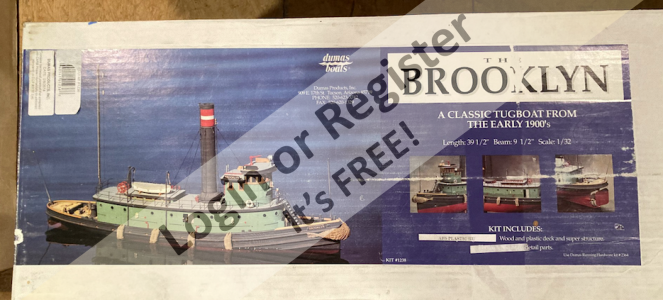
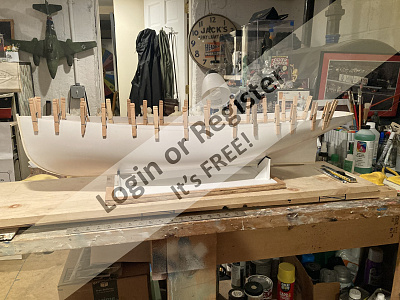
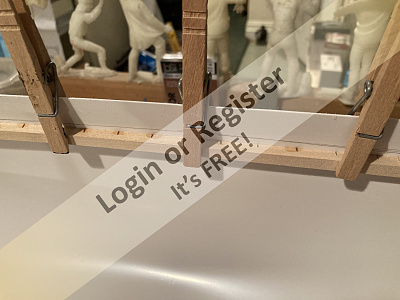
The Brooklyn Tug
Well my friends, I've gone and done it again.
Through some dumb luck I stumbled upon a reasonably priced discontinued bucket-list kit that I've always had my eyes on and took the plunge. Even a blind squirrel finds a nut once in a while! The Dumas Brooklyn Tug was one of their best kits and much to my surprise it came with a very strong set of directions...unusual for Dumas in my humble opinion.
Be that as it may, it's a large (40 inches) and quite a beautiful kit. The version I was lucky enough to find was the final version before Dumas dropped it. The first version (I understand) from way back in the day was meant to be a plank- on-frame build. But it seems Dumas felt it would not sell well, not to mention the wood production problems it would incur. So they engineered a fiberglass hull that became highly prized to builders. My version is the last version with a PVC hull.
The hull is nice, but the two hull molds come with a ton of excess PVC and feel like wobbly bathtub parts coming out of the box. Very worrisome to start, as cutting the mold flanges away was not a simple task, no to mention Bondo and a ton of sanding...yes, with mask on and vacuum at the ready.
Next came a heavy inner fiberglass keel inlay, an addition PVC skeg support. Then an outer long false keel is installed with the stuffing box installation...more Bondo and sanding. Uggh.
Worrisome or not, the instructions have a tongue-and-cheek feel about them as the writer and engineers slip in comments like "no need to worry" and "now don't panic!"
Sheesh!!!!
So, after a couple of days of bitching and worry I managed to get the two halves joined and on the stand.
The next issue is the PVC deck with the basswood supports. The joining of these two deck halves was not the "issue," but the total lack of wood decking aggravated me. I want a more scale appearance, so I have to have a planked deck! As a result of my own needs I lowered the deck supports 1/8th of an inch to accommodate my planking. I did a scale deck test shot to get an idea of what I'm after.
Believe or not, the PVC hull will not be fully "true" until you squeeze the deck halves with the bass cross-members into it.
I know, it's weird.
So I will trace the deck shape onto paper and do my planking as a side project to begin this weekend. Call me crazy, but my instinct is pushing me in that direction. I am going to give it a go.
My wife, Mary is like, "Where are you going to put that one?" "In the water!" I shoot back, "then on the mantle, because it's going to be a like museum scale!" Don't you get it?" I think she's glad I have this hobby...it keeps me from pestering her for other things.
Onwards and upwards and more to follow.
Best -- Guy
🇺🇸 jumpugly
7 days ago


5 Posts
5 Followers
18 Likes
LESRO/AEROKITS/SLEC SEA URCHIN
I decided to start this following a suggestion from one of you on this website, that the smaller Lesro designs such as the Sea Urchin, Sea Nymph and Fast Patrol Boat would perhaps be able to be sailed relatively safely on my backyard pond with reduced power settings.
As I have most of the plans for these designs, it stood to reason that my severe building addiction could be somewhat satisfied in the background whist trying to solve arising issues on another much larger build I had already embarked on but which had stalled for the time being (namely Vivacity).
So here goes with just a few pics to set the ball rolling;
1) 20FEB2026 - measuring and transferring shape of parts onto paper templates and balsa - I decided to use balsa for most of the frame as I had plenty, and I find it much easier to work with on smaller boats. And the model was for modest electric power, not small diesel, so it should be plenty strong enough if the outer hull is covered with tissue, as on the Knocker White Tug model completed earlier.
2)&3) Keel and bulkhead parts cut from 3/16" balsa. Keel doublers glued on first side using exterior grade PVA, all excess 'splurge' immediately wiped away using damp rag - I cannot stress enough the importance of this, as it really minimises/eases the 'fettling' required to fit bulkhead/other parts as the build progresses.
4)Keel assembly turned over and propshaft 'slot' cut away/filed.
5)Remaining keel doublers glued with PVA, as well as 5 minute epoxy around prop shaft/keel/doubler sandwich.
6)Bulkhead shapes reinforced with scrap 1/16" balsa crossgrain at edges where slots are to be cut, creating a sort of 'liteply'.
7)Keel assembly completed with proptube reinforcement and bow doublers glued. Bulkhead slots for cabin sides/keel cut.
8)Fettling and test fitting bulkheads to keel - and a celebratory glass of Henkell Trocken to mark the progress to date - 01MAR2026.
More to come once I've done this weekend's property jobs!
Best regards to all reading,
Nick
🇳🇿 Nick Ward

7 days ago


5 Posts
4 Followers
38 Likes
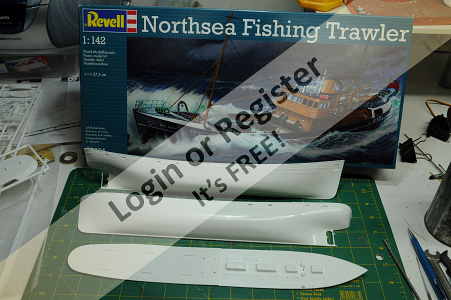
Revell 1:142, Northsea Fishing Trawler build & RC conversion.
Part 1.
This project is already finished, the following is a discription of what was done to build and convert the kit to RC.
Because of severe time restraints at the end of 2022 and foreseeing a similar problem during 2023 and beyond, I decided to stop working on my LT100 trawler build. I thought a plastic kit might be a good idea.
I then had an add pop up from a hobby shop in Australia for this little Trawler kit that has been around for a very long time.
Long enough ago that my father had converted this kit to a working model for my brother and myself to play with when we were kids, all be it a simple electric motor battery and switch, about all you would expect in the mid 1970s, fond memory's of this came back when I saw the kit.
After a quick look on You Tube to see if anyone had put RC into this model successfully, I quickly found a couple of videos of converted models getting around on ponds.
A kit was ordered and quickly came to my house, on opening the box I found a fairly simple kit not much flash the hull halves fitted together quite well. The main complaint I had was how some of the details are quite “blobby” then considering the age of the kit this is justifiable. A quick search on Scalemates tells me that the kit was originally released in 1970 and has had multiple updates to decals and paint schemes, in it’s latest form it represents the Ross Jackal. I also found a couple of build logs on the net these helped me with looking at what might be some good things to alter.
Next I ordered some micro servos a speed controller a small amount of Photo Etch and had a look at how I might implement a conversion.
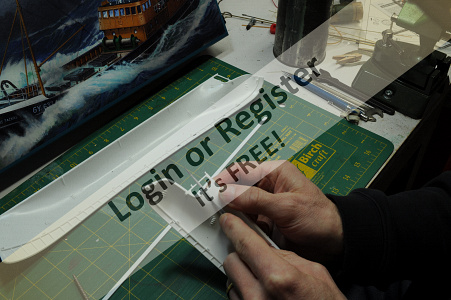
I had some 3mm thin walled Stainless Steel tube that looked like the right size for a custom made prop-shaft, so I started filing the hull halves to open up the prop-shaft area and see if I could fit the tube in. I was very careful while doing this as there was no real room for error.
Once I was satisfied with the result I started making bushes for the shaft.
While I was using the lathe I made up an aligning tool to align the shaft and motor, this simply being a good fit in both the motor and prop-shaft. I made this a little on the long side as I didn’t quite know where the motor would sit or how long the shaft would end up, easier to shorten than lengthen.
Some tube was cut, one for the shaft the other for an oiling tube.
The 2 pieces of tube were silver soldered together using my new micro torch, with LPG and oxygen.
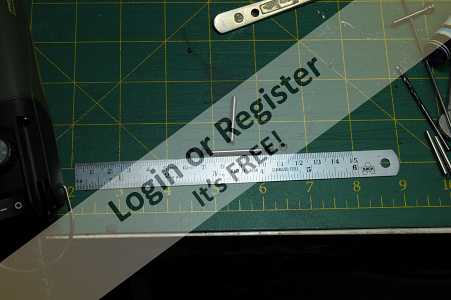
Next job was to make a rudder post and rudder with an actuating lever, brass being used for these components.
Actuating lever and bush along with rudder to rudder post were soft soldered together.
Next thing was to add another anchor recess, modifying a plastic kit in this way is something I haven’t done before, it turned out to be a fairly simple job and quite rewarding.
Another mod was to add some more freeing ports along the bulwarks to at least get something closer to the appropriate number, with the help of a build log that explained how to do this I had a go at it and was quite happy with the result. Using a piece of Brass shaped to roughly the right shape it was heated up and pushed into the pre-marked locations to produce a freeing port.
Due to the fact that I like my models to be able to handle heavy weather without fear of sinking, I wanted to seal the deck to the hull. To do this I removed the tabs that are there to help support the deck and replaced them with a continuous ledge, with the hope this will help me make a water tight seal between the deck and hull.
Before gluing the hull halves together I masked and painted the bulwarks, I felt this would be difficult to do later. I also added the new deck supports.
Thank you for reading this post.
Please feel free to comment.
Cheers,
Stephen.
🇦🇺 stevedownunder
10 days ago


47 Posts
25 Followers
356 Likes
A new build
I will, most likely, have to rename this Blog, at some point.
In the mean time...please do not expect much for a while as she is in her very early stages.
First a disclosure: This hull was built for me by another gentleman. It was delivered in a not quite completed state. Therefore I have spent the last two month working on it to get to it's present state.
So.. what is it? She is one of four ships in a class that was later enlarged to around eight maybe ten members of the class. Her main armament was eight 5"/38 caliber twin turrets. She and her class namesake sister were both lost during the Naval Battle of Guadalcanal. This ship is most noted due to the loss of an entire generation of one family, five brothers.
This should be enough for identification.
She is being built in my preferred scale, 1/48th or 1/4"=1'.
This ship was used for numerous camouflage scheme experiments and, sadly, there is little definitive documentation to pinpoint her second to last and last schemes carried. That said, my plan, subject to change without notice or reason, is to present her as she appeared following her New York Navy Yard overhaul, or perhaps as she may have appeared after repainting in Placentia Bay NewFoundland, 1942.
She measures out to 11' 3" and her power plant is to be two 24 volt Buehler motors.
Pictures of her and the build to follow.
Wish me luck please, she will not fit in my van....
🇺🇸 ToraDog
14 days ago


2 Posts
5 Followers
17 Likes
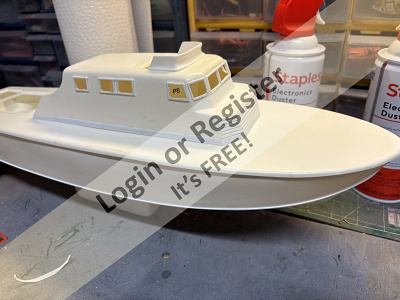
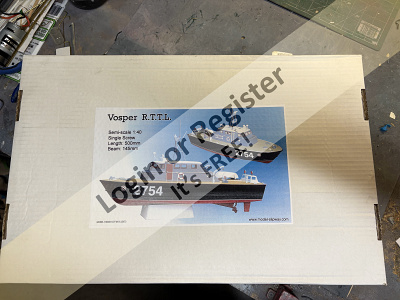
Model Slipway Vosper RTTL
Hi y’all. The Tug formerly known as Harbor is now in her berth, flagged, and is now known as the O Wulf 8. She’s done!! Well..mostly. Got a couple more things to do to her, but she’s out of the shipyard, which means another project must commence. Union rules Y’know…I’m not union, but the gremlins in my garage are…
Anyway, I WAS going to start one of the kits that’s been in my hoard for a while, but I decided to build a birthday kit. She’s the Model Slipway Vosper RTTL. It was in my wishlist on Ages of Sail, my wife picked it out of a list I gave her. Woman knows my heart. Anyway, I wanted something relatively simple, although the kit does have some head scratching moments.
To start off, it’s a nice kit. Molded hull, deck and superstructure, good brass and plastic, printed plastic parts and white metal fittings. The downside is the 2mm shaft and tube, press on propeller and a rubber tube coupling. First thing I did was find a suitable tube and shaft in my stash, I like 4mm and 1/8th inch. Found an unused Dumas 1/8 tube and shaft that was just a wee bit longer, so I chose that and a 3 blades prop with a 3mm hole that I gently cleaned out to 1/8.
The kit is designed to be powered by a 6 volt Speed 400, and one was included, but I’m going brushless with this build.
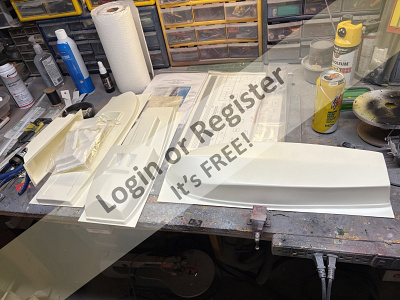
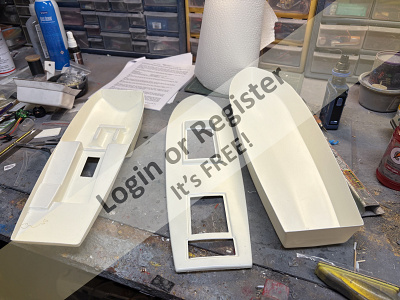
First thing after cutting out the hull, deck and interior liner is to clean up and trim, then you’re supposed to build up the rudder from 2 abs halves and a metal shaft. I had a commercially made rudder that was the right shape and size, so I chose that and a 3mm ID tube. Now, the builder is supposed to make sure the liner fits, then tape it in place so one can drill the rudder tube hole thru the hull and up into the aft part of the liner. I thought I’d be able to just hold it in place. And, of course, it slipped leaving me with an elongated hole too far forward. Looking at the plans, the tube comes thru the bottom of the hull and is glued ther and at the liner. No reinforcements on the hull bottom. So, me being me, I found a nice piece of hard balsa, drilled to fit, and then slid that over the tube, and used black ca on the bottom of the hull and used epoxy to glue the tube and block inside. I made the offending hole in the liner a little bigger, and once it was glued in i made up a plate to go over the tube, the glue the plate to the tube and topside of the liner. Before I could accomplish that, I had to mod the liner to accept my choice of brushless outrunner. Plus I had to cut the slot for the stuffing box. Once I had all that done, I tacked the tube in place with ca, made sure it was lined up, the used tape on the bottoms of the hull to keep excess epoxy from running out and then glued it home.skeg was installed at this time. Then I installed the modified liner. I made up my motor mount and installed it and the motor. I tacked the mount in place with the motor installed to make darn sure the motor, shaft and coupler were a slip fit with no binding, then I bonded the mount to the hull and liner. After that I installed the deck, and the spray rails. You’re supposed to cut the strip from tha plastic sheet, but I cheated and used some strip styrene I already had.
The superstructure has been started. I’ve got the aft bulkhead, aft bulkhead outside fairing doublers, cockpit and windbreak installed. At this point I have to measure the drawing on the plans to mark the windows, then tape 2mm strips in position, glue the strips and uprights at the window locations, cut away the unglued excess strip, then cut the windows out. I’ll probably get the locations marked this week, and get the horizontal strips taped down, then wait till this weekend to finish that job.
Cash
🇺🇸 Cashrc
14 days ago


4 Posts
3 Followers
32 Likes
Thames Barge - Veronica
This is a well know model. I think there used to be an active group of TB modellers, this seems to have been maintained through a Facebook page - However, I don't use FB ! But Sarik models have put the original DVD on YouTube, which does help.
https://www.youtube.com/watch?v=Z4QeGUQ2KKg&t=4711s
Any experience or advice about making this model - always welcome and appreicated.
🇬🇧 AndyB2
14 days ago


|
|

Media Gallery
RC Florida (rcflorida.org) site is available
21 hours ago by LewZ
Real images vs. AI-altered images
1 day ago by AlessandroSPQR
Suncoast Scale Model Boat Club meet on April 19, 2024
7 days ago by LewZ
Making my Model Paddle Steamer
30 days ago by BrianD3
Suncoast Scale Model Boat - March 15, 2026 meet
1 month ago by LewZ
Suncoast Scale Model Boat Club - March 1, 2026 meet
2 months ago by LewZ
Media Gallery
2 months ago by philcaretaker
Suncoast Scale Model Boat Club
2 months ago by LewZ
Towboat pushing a large barge.
3 months ago by LewZ
Fishing Trawler build
3 months ago by lukeH
Christmas theme
5 months ago by GARTH
SSMBC (Florida) meet: 12/7/2025 military focus
5 months ago by LewZ
|
|

Login To
Remove Ads
Remove Ads
Boat Clubs & Lakes
Recent Updates In Places

|
Southport Model Boat Club
1 month ago by 🇬🇧 SouthportPat (
Commodore) |
|
|
Buxton Model Boat Club
2 months ago by 🇬🇧 philcaretaker (
Rear Admiral) |
|
|
Clube de Aeromodelismo de Setúbal
2 months ago by 🇺🇸 PhilS1 (
Recruit) |
|
|
Aberdeen Model Boat Club
3 months ago by 🇬🇧 tim morland (
Chief Petty Officer 1st Class) |
|
|
Black Mountain Radio Sailing Club
3 months ago by 🇺🇸 oefranz (
Master Seaman) |
|
|

Upcoming Events

|
Sep
26 2026
|
Sep
27 2026
|
The BIG St.Albans Model Show
Starts 5 months time
|
|
|
Boat Harbour
25 Photos
10 Likes
A GUNBOAT FROM THE SECOND HALF OF THE 19TH CENTURY, ARMED SCHOONER (1/60 SCALE)
Name: Not yet established
Scale: 1/60.
Flag: none at the moment.
Type of ship
Type: Steam gunboat from the second half of the 19th century, propeller-driven.
Sailing rig: Schooner. Gaff rig with two mainsails, two counter-mainsails, two jibs.
Reference vessel: There is no reference vessel. It is not a scale reproduction of a real-life ship.
Reference ship type: It is freely inspired by the "Unadilla" class ships, also known as "90-day gunboats", are gunboats that fought for the Union against the Confederates during the American Civil War.
Major differences with the reference ship:
1. The bowsprit is a little longer than it should be for having a single spindle; initially it was designed correctly, then I gradually added a few centimeters (but it's a personal obsession to increase every time I reconsider the piece).
2. All four lifeboats were arranged laterally in the reference class, whereas in the model there are two lateral and two central.
3. The hull has a totally different size and shape as it is completely invented. The model has no equal in any existing ship. Compared to the reference ones it has a greater displacement as the central ordinates are wider. Although it maintains a harmonious and slender line, it is reminiscent (limited to the hull) more of a commercial ship than a warship.
4. The cannons (in a completely independent way I tried to reproduce the Dahlgren typical of that period) in the model are all placed in battery, i.e. on the sides, while on the ships of the reference class they were also placed in fighter (at the bow) or amidships, of larger caliber.
5 Rudder: The rudder is different from the original ones of the period, both in size and shape. It also lacks construction details such as the gudgeons and pintles. A faithfully reproduced rudder would have had little or no effectiveness in RC navigation. In hindsight, I could have faithfully reproduced it and, only during navigation, I could have applied a removable addition (perhaps made of transparent plastic) that would be invisible once underwater.
6 Propeller: The propeller is different from the original ones of the period, in terms of its shape and number of blades.
Dimensions.
Overall length: 111.5cm (1115mm).
Length on perpendiculars: 94cm (940mm).
Length at waterline: 84cm (840mm).
Width (maximum beam): 17cm (170mm).
Maximum lateral dimensions (including side lifeboats): 25.5 cm (255 mm).
Draft (distance between the waterline and the deepest end of the keel): 8.5 cm (85 mm).
Maximum height (distance between the deepest end of the keel and the highest tip of the mainmast): 65 cm (650 mm).
Height of masts from main deck: 51.5cm (515mm)
Predicted theoretical displacement: 5 dm3 (submerged volume at the drawn waterline) = 5kg
Displacement (total weight) without batteries: 4900 -720-720=3460 gr.
Displacement (total weight) with batteries: 4900 gr. (4.9kg)
Dynamic features:
Propeller type: plastic (with internal brass core) with three blades.
Propeller diameter: 40 mm.
Propeller pitch: not known precisely, however medium short.
Commercial reference of the one currently applied to the model: Graupner.
Direction of rotation of the propeller: right-handed.
Axle fixing system: metal thread with steel cotter.
RC features.
Transmission system:
The electric motor is directly connected to the propeller shaft without reduction gears.
The transmission axis is made up of a brass rod, on one end directly connected to the propeller via thread and on the other end connected to the motor pinion via a fixed joint.
The transmission axis rotates inside an aluminum tube thanks to three ball bearings placed two at the ends and one in the center.
The axis line is parallel to the keel and therefore has zero inclination. In this way all the thrust is used for propulsion and there is no component that is dispersed downwards; furthermore the hull, especially at the start, does not undergo the typical bowing (the bow sinks during the start or sudden accelerations).
Rudder: The rudder is made of a piece shaped with a 3D printer pivoted on a brass axis.
The brass axis rotates inside a vertical aluminum tube thanks to microbearings.
Electric motor:
Currently it is a Graupner Speed 600 brush motor with the following characteristics:
Rated voltage:7.2
Operating voltage: 3.6 - 8.4 V
Speed: 18200 rpm
No-load output current: 2A
Output current at maximum efficiency: 12 A
Output current at lock: 85 A
Length (excluding shaft): 57 mm
Diameter: 35.8mm
Shaft diameter: 3.17 mm
Weight: 195g
Gear: forward and backward.
Positioned as low as possible under the main mast (in fact the mast does not reach the bottom of the bilge but stops before).
Radio receiver:
Currently it is a Turnighy 9x 2.4 Ghz 8 channel with the following characteristics:
Frequency: 2.4Ghz.
supply voltage: 4.8 – 6.5 Volts.
dimensions: 52x35x15 mm
weight 18 g.
positioned immediately under the deck in a central position, forward of the funnel.
ESC with integrated BEC:
ESC for commercial-type RC cars, very economical and widespread, with a fairly standardized shape and size. In this way you can easily find an identical spare part in the event of failure and subsequent replacement:
It has the following characteristics:
Brushed ESC 320A:
Direct Current: 320A
Reverse Current: 240A
Braking Current: 250A
Voltage range: 4.8-8.4V
PWM Frequency: 1.5KHZ
BEC Voltage: 5.6V, 2A
Size: approx. 34x34x16mm/1.34x1.34x0.63in (without heatsink)
Reference brand: bought on Amazon.
Located high up immediately under the deck in a central position forward of the mainmast.
Rudder servo mechanism:
Analogic Servo 6001 MG da HobbyKing
Features:
Torque(4.8V): 6.0 kg-cm (83.3 oz/in)
Torque(6.0V): 7.0 kg-cm (97.2 oz/in)
Speed: 0.16 sec (4.8V) │ 0.14 sec (6.0V)
Operating Voltage:4.8 ~ 6.0 DC Volts
Weight: 56.0 g (1.98 oz)
Bearing Type:Ball Bearing x 2
Motor Type:DC Motor
Gear Type:Copper
Operating Temperature:-20℃~60℃
Working frequence:1520μs / 50hz
Size:40.7 x 20.5 x 39.5 mm ( 1.60 x 0.81 x 1.56 in)
Winch 1:
Sail Winch Servo 13 kg / 0.7 sec (360 deg) /55 gr. from HobbyKing
Specifications:
weight: 55 gr.
dimensions 40.5 x 20, 2 x 38 mm
speed: 0.9 sec. / 360 deg (4.8 Volt) – 0.7 sec / 360 deg (6.0 Volt)
torque: 11 Kg (4.8 V) – 13 kg (6.0 Volt)
operating voltage: 4.8 Volts – 6.0 Volts
gear train: metal
Positioned abaft the foremast, it controls the foremast boom and the two jibs.
Winch 2:
Same features as the first.
Positioned forward of the rudder winch immediately below the deck, it controls the mainmast boom.
Batteries:
two AGM batteries, voltage 6 Volt, charge 4.5 Ah.
The compartment is configured for batteries with the same dimensional characteristics as the FIAMM FG 10451 which has the following dimensions: 70 x 47 x 100 mm, weight: 720 grams each.
The compartment allows you to move the batteries a little further forward or backwards in order to adjust the longitudinal attitude of the ship. It is advisable to position them all forward for correct alignment. If, however, you use the small compartment further forward, then it is better to move them backwards. The small room is currently not used and is empty.
Instead of the AGM batteries described above (which do not fully exploit the electrical power of the engine) it is possible to use batteries of different types, such as 7.2 Volt, 5 Ah NiMh battery, with the following dimensions 47 x 24.5 x 139.5 mm, because space allows it.
It is also possible to place one or more batteries above the AGM batteries or in the other free compartment forward. In this case the overall weight will increase slightly and the lateral righting thrust will decrease (as the ship's center of gravity will rise) but still in completely acceptable terms.
The configuration should be changed.
Current electrical configuration:
One of the two batteries described above is connected to the ESC and therefore powers the electric motor. It does not power the receiver because the ESC BEC positive lead has been isolated. The receiver with the winches and the rudder servo are powered by the other battery.
There is a fuse between the motor and ESC.
It is easily reconfigurable by placing both batteries in parallel and resetting the positive cable of the BEC.
Or the two 6 volt AGM batteries that power the ESC can be placed in parallel (with isolated BEC positive) and dedicate a small battery pack to the receiver and servos.
Alternatively, one or even two (because there is space) 7.2 Volt, 5 Ah batteries can be dedicated to the ESC; in this way the power of the Speed 600 motor will be fully exploited (7.2 Volts instead of 6 Volts). If only these two batteries are used, it will be necessary to use the BEC of the ESC (not isolating the positive) to power the receiver and servos. I would prefer to use the remaining space for a smaller 6 volt battery to dedicate to the receiver and servos; a 6 Volt 3.2 Ah AGM battery, measuring 34 x 67 x 103 mm, or an even smaller and lighter NiMh battery would be fine.
As another alternative, you can use a 6-volt, 6-ah LiFePO4 (Lithium-Iron-Phosphate) battery. As I recently discovered, batteries are sold that are the same size as the 6-volt, 4.5-ah AGM ones (i.e., 70 x 47 x 100 mm) and with the same faston connectors. In practice, the two cylindrical LiFePO4 batteries are inserted into the same container as the AGM ones. This way, while taking up the same amount of space, we can increase the electrical charge by 3,000 to 4,000 mAh (12 Ah instead of 8 or 9 Ah).
Other solutions, aimed at introducing an electricity reserve, involve the use of an exchange relay and a remote control switch that engages a channel on the radio receiver (which has three free).
Construction Details
The hull is built using the classic frame-and-plank method, starting from a completely new design. The planking is made of double overlapping battens. The hull has 32 frames, connected to each other by longitudinal reinforcements (made of wooden squares) as well as the hull and decks.
In addition to the hull, the following parts were built from scratch (with drawings and independent design inspired by images and videos): masts (including the cheek, mast cap, asthead, cross tress, spars, moorings, spreaders, gooseneck [parrel, boom claw, jae-rope]), both standing and running rigging, sails, ladders between the two decks, davits, compass, rudder, propeller shaft, pegs, gratings, skylight, cannons, lifeboats, lifeboat davits, anchor bit, large cleats, funnel and rear structure, baskets, sail hoops, rings, and padeyes, fife rail, cathead and pin rail.
The following components were purchased and already complete: bow winch, anchors, blocks, deadeyes, belay pin, rings, steering wheel, propeller, hawsehole, cleats, and fairleads.
Maintenance and repair details.
The deck has four access points, starting from the bow and going aft: a small one forward of the foremast, one aft of the foremast, one forward of the mainmast near the funnel, and the last one aft of the mainmast.
The first cover (the one forward of the foremast) can be opened by unscrewing four hidden screws.
After removing the screws to hold the cover, the capstan can be used as a knob. The compartment is empty. There is no need to open it unless you decide to use this space.
The second cover (the one aft of the foremast) provides access to the battery compartment and the first winch. This is the only cover that will need to be constantly opened and closed to allow navigation for battery insertion and removal.
To open it, you need to remove the four cannons above it (the cannons are secured to the deck with a small nail inserted into the wood and four hooks) and the six screws.
After removing the cannons and screws, you can use the large skylight in front of the lifeboat for support.
The third cover (the one forward of the mainmast, near the funnel) provides access to the radio receiver, fuse, and ESC. It does not need to be opened for normal navigation, but only in the event of a malfunction. This compartment should be opened if you need to check or replace the ESC, receiver, fuse, and related wiring.
To open it, you need to remove the two cannons above it (the cannons are secured to the deck with a small nail inserted into the wood and four hooks) and the four screws.
After removing the cannons and screws, you can grab the black superstructure just behind the funnel.
The fourth cover (aft of the mainmast) provides access to the second winch, rudder servo, electric motor, rudder shaft, fixed coupling, and propeller shaft. It does not need to be opened for normal navigation, but only in the event of a malfunction. This compartment should be opened if you need to check or replace the second winch, rudder servo, electric motor, rudder shaft, fixed coupling, or propeller shaft.
To open it, you must remove the two cannons above it (the cannons are secured to the deck with a small nail that penetrates the wood and four hooks) and the six screws.
After removing the cannons and screws, you can grab the superstructure behind the rudder wheel.
There are 20 hidden screws in total.
All the screws are hidden under the deck (a section of the floorboard near the screw is removable). Above the piece of floorboard near the screw is usually a ship component, such as cannons, cannonball boxes, or rigging.
A small manual with explanatory images and videos has been prepared to help you remove the individual parts. Some parts, such as the ESC, require freeing the wooden cotter pins and joints before replacing them. The most difficult part to reach is the electric motor. To remove it, you must first remove the winch.
To replace the propeller, remove a piece of wood aft of the propeller. It's not necessary to break it because it's secured with a wooden cotter pin, but the paint may have bonded the pieces together, and the cuts may need to be refinished. Before unscrewing the propeller, you must remove the spring steel cotter pin. A dedicated guide with text and images has been created for replacing the propeller.
Replacing the rudder is possible, but requires removing the vertical pin and a spring steel cotter pin. A dedicated replacement guide with text and images has been created.
Summary of materials used (excluding electrical equipment)
4 mm plywood for keel, frames, decks, and internal supports (for the servomechanism, winches, and ESC)
Basswood strips (first planking)
Mahogany strips (second planking)
Tanganyika walnut strips (deck covering and gunwale)
Walnut rods (all mast spindles, booms, and gaffs)
Walnut strips, rods, and squares (internal hull reinforcements, cathead, fife rail, pin rail, bitts, mooring bitt, truck carriage and gunwale, skylight, gratings, compass, ladders).
Other walnut materials (deadeyes, belay pins, blocks, capstans)
Bass squares (internal longitudinal hull reinforcements, gratings)
Brass (hawsehole, boom gooseneck [parrel, boom claw, jae-rope], various hinges, various rings, nails, handles, propeller shaft, rudder shaft, ballast bar, compass, chain plate, etc.)
Miscellaneous metals (anchors, chains, fairleads, horn cleat, screws, hooks, bearings, steering wheel, fixed joint)
Aluminum: Propeller shaft tube, rudder shaft tube, funnel.
Spring steel (connecting bar between rudder and servomechanism)
3D-printed ABS and PLA for gun carriages and rudder.
Plastic sheeting (side cranes, hawsehole, gooseneck [parrel, boom claw, jae-rope] for the gaff and reinforcement of other wooden pieces, funnel rings, gun carriages reinforcing the walnut wood)
Plastic (cannon balls, propeller)
Rope (of various thicknesses for the standing and running rigging, single and double tackle).
Polyester thread (sail seams).
Cyanoacrylate glue, various brands.
Mastic glue, various brands.
Paint: Spinnaker Wood Protection (all exterior surfaces except the sails).
Humbrol enamels (hull above the waterline combination HUM104 = 7 ml; HUM33 = 6 ml; HUM230 = 3 ml, lifeboats, guns, mast caps, rings, padeyes and hooks, funnel cables, funnel and superstructure aft of the funnel, chain plate, compass)
Poxylam 125 epoxy resin. Used inside the hull, in the hulls of all lifeboats, and on the side lifeboat canvases.
Lithium grease.
Reserve Buoyancy: It does not have sufficient reserve buoyancy to make it unsinkable.
If water enters the hold, the model is destined to sink.
It was not possible to create non-flooding volumes (with lightweight, non-waterproof materials such as polystyrene) due to lack of available space.
The only measure to prevent water from entering the hold is to close the lids with stepped stops. The seal is also ensured by the presence of grease between the contact surfaces and the tight closure achieved with the screws.
No water infiltration was detected anywhere, not even near the propeller shaft.
It goes without saying that in the event of a hull leak, sinking is unavoidable.
🇮🇹 AlessandroSPQR
12 days ago
10 Attributes
4 Comments
8 Photos
7 Likes
Schuylkill River Dragon Boat
In Philadelphia where I live we have several rowing clubs on the Schuylkill ("Skoo-kill") River, including 1, 2, 4 and 8 oar crew skulls and 10 and 20 oar Dragon Boats. This is a model based on the club colors of the Schuylkill (Lady) Dragons, which are also the club colors of our Philadelphia Eagles (American) football team. There are a number of regattas in Philly each year, including the Dad Vail Regatta, the Head of the Schuylkill Regatta, and the Independence Dragon Boat Regatta.
🇺🇸 MarkS3
24 days ago
0 Attributes
1 Comment
2 Photos
9 Likes
Canal boat
I know little about this boat it has fibre glass hull the aft cabin is bit makeshift and the whole rudder post is hidden under the deck its 53 x7and half wide 1/12th?
🇬🇧 Stephen T
24 days ago
10 Attributes
5 Comments
5 Photos
14 Likes
Möwe - Trawler
This was my first build, present from the wife.
Not complex but it was interesting to start my hobby..
I think it was an Aero-Naut kit
🇬🇧 Kevin55
2 months ago
0 Attributes
8 Comments
10 Photos
19 Likes
I finished my Seaspan "Hawk"
I just finished building my SeaSpan Hawk RC model 40" long with 2 "Z" drives.
1 Year build. Early version.
Now waiting to launch her when weather is right, (The hull has been in the water checking out the "Z" Drives for operation.
it has been a fun and interesting build.
My 1st tug Built from the deck up is all scratch built, there were no real drawings.
Also found a cart to transport it on.
🇺🇸 bruce1946
2 months ago
0 Attributes
3 Comments
4 Photos
14 Likes
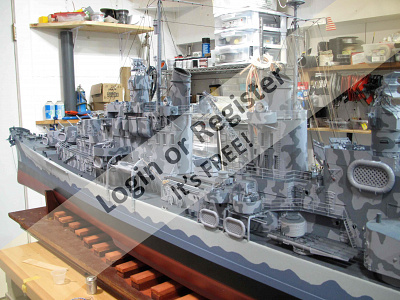
IRON EXECUTIONER
A new design and at just over 1 metre and 45cm tall she's a fairly good sized vessel. Twin motor with a gyro to help her track. Twin working stabiliser fins, bow thruster, spinning radar, ballast tank in the bow.
Twin 545 brushed motors with 2 x 80amp esc spinning 2 x 30mm 6 blade props
Last photo is Ai of what I'm aiming for as an end result
🇬🇧 HappyHaggis
2 months ago
11 Attributes
9 Comments
14 Photos
16 Likes
Victorian Steam Launch
Built from scratch having just the vacuum formed hull from an old model.
The boiler and steam engine are faux as our club does not have permission from the local authorities to run real steam boats.
The Steam engine has been made to suit the space available. It runs via a 12v motor gearbox hidden behind the bulkhead see video.
The boiler has also been made with some specific requirements to house the smoke generator. Filling the smoke generator with distilled water is via a removable screw cap.
The boiler sits on a base unit. when the unit is installed into the boat power is via Magnetic Pogo Pin Connectors.
🇬🇧 Kevin55
2 months ago
5 Attributes
6 Comments
4 Photos
9 Likes
AIRBOAT No 2
Another airboat, this time made from a 33" x 18" foam body board, and powered by a TGY3542 1000kv 38A outrunner with a pusher prop, and 3s 4000mah LiPo
🇳🇿 jbkiwi
2 months ago
9 Attributes
4 Comments
6 Photos
16 Likes
SEMI SCALE 1953 EDSON SCHOCK 15FT DAY SAILER
A 1/5 semi scale model of my 15ft day sailer,- designed by US naval architect Edson I Schock in 1953. The original was built in NZ in the late 80s and I bought and restored it in 2008. Thought it would be nice to have an RC model of it, so measured the boat and made the model 1/5 scale.
Model is made from polystyrene foam, shaped and f/glassed with a ply deck and ply lined cockpit and ply transom. Uses a HiTec winch with a floor mounted sheet hauler pulley system.
The skipper is servo powered and ducks under the boom when tacking
🇳🇿 jbkiwi
2 months ago
2 Attributes
8 Comments
|
|
How-To Articles
Why not go back to school?!
Revised 1 month ago
By IGinBasel
LED – SERIES AND PARALLEL CIRCUITS – FLASHING CIRCUITS - Compendium of information
Revised 2 months ago
By AlessandroSPQR
Led Resister chart
Revised 2 months ago
By GARTH
Electric Boat Engine Etc Etc
Revised 5 months ago
By Guy O
Essential or useful tools and utensils for the ship modeler. A final appendix lists the most common
Revised 6 months ago
By AlessandroSPQR
stop email notifications
Revised 6 months ago
By Ace23
painting epoxy over Humbrol and varnish enamels
Revised 9 months ago
By roycv
Cardan joint, Homokinetic joint, universal joint. Problems related to the junction between the engin
Revised 10 months ago
By AlessandroSPQR
various electrical connection diagrams for two motors
Revised 12 months ago
By tomarack
Lifeboats or work boats?
Revised 1 year ago
By AlessandroSPQR
|
|

Login To
Remove Ads
Remove Ads
Model Boats Website
This is the alert text. You can customize this text to be as long or short as needed. The modal height will adjust accordingly.
🛍️ Basket
Main menu transported here on mobile
Login
Create New Account
Trending Topics
Members Online
Forum
Hoist the sails, a new site is on the horizon!
Chum444
4 hours ago
Blog
Re: Classic Model Power Boats
zooma
7 hours ago
Forum
A new naval project. What to do now?
AlessandroSPQR
7 hours ago
Gallery
Re: Real images vs. AI-altered images
AlessandroSPQR
10 hours ago
Forum
TVR1A Steam Engine.
zooma
11 hours ago
Blog
Finishing the Cabin with glass cloth.
robbob
13 hours ago
Forum
They are "Wooden Boats", but not scale models ...
DWBrinkman
13 hours ago
Gallery
RC Florida (rcflorida.org) site is available
LewZ
21 hours ago
Blog
Re: Fin
Jerry Todd
23 hours ago
Harbour
Re: Legend Models #702 1939 Century Thunderbolt
DWBrinkman
1 day ago
Forum
Sprite
zooma
1 day ago
Harbour
Re: Bristol pilot cutter - Three Daughters
luckyduck
2 days ago
Harbour
Re: Port Area
Mike Stoney
2 days ago
Forum
HMS Dorsetshire
VictorC
2 days ago
Forum
Question of the Day?
Steves-s
2 days ago
Blog
Re: part 5
JasonP
3 days ago
Forum
Adding a Reverse to Forwards Only ESC?
zooma
3 days ago
Forum
Building from plans
ChrisF
4 days ago
Forum
Model Recovered from Davey Jones Locker
IGinBasel
4 days ago
Forum
Animal and nature photos to enjoy.
jumpugly
4 days ago
Blog
Trawler
GARTH
5 days ago
Forum
Water-jet drive
EdW
5 days ago
Blog
Re: now the real fun begins......
JockScott
5 days ago
Blog
THE GALILEE BOAT
chugalone100
5 days ago
Blog
Fire monitor water intake
Kevin55
5 days ago
Forum
Modello RC scala 1/60, di piroscafo armato a goletta, liberamente ispirato alle cannoniere classe US
AlessandroSPQR
5 days ago
Harbour
Re: RSO Steyr 1/6th German ww2 field tractor (yes not another NONE boat) although it could do a smal
zooma
6 days ago
Forum
Sealing a horizontal prop shaft
zooma
6 days ago
roycv
Fleet Admiral
10,682 Points
6 seconds ago
JSS4
Petty Officer 2nd Class
161 Points
17 seconds ago

RossM
Captain
3,304 Points
34 seconds ago
DWBrinkman
Commodore
4,977 Points
42 seconds ago
BOATSHED
Captain
3,012 Points
42 seconds ago
Steamrod
Recruit
13 Points
7 minutes ago
Algonquin
Recruit
0 Points
17 minutes ago
ROBINS
Recruit
3 Points
22 minutes ago
Harwind
Leading Seaman
93 Points
24 minutes ago
algon
Chief Petty Officer 1st Class
522 Points
29 minutes ago
Newby7
Fleet Admiral
10,934 Points
51 minutes ago
Shanghist
Recruit
0 Points
58 minutes ago
IanL1
Midshipman
956 Points
1 hour ago

SouthportPat
Commodore
4,918 Points
2 hours ago
ScouterChil
Master Seaman
107 Points
2 hours ago
LeeA
Able Seaman
25 Points
2 hours ago
Steves-s
Chief Petty Officer 1st Class
586 Points
2 hours ago
LewZ
Admiral
8,473 Points
3 hours ago
melian
Recruit
0 Points
3 hours ago
KevinH
Warrant Officer
853 Points
3 hours ago

ekoral
Master Seaman
139 Points
4 hours ago
RonH
Warrant Officer
828 Points
4 hours ago
GARTH
Commodore
4,268 Points
4 hours ago
Rowen
Captain
3,547 Points
4 hours ago
Chum444
Commodore
4,560 Points
4 hours ago
VictorC
Leading Seaman
61 Points
4 hours ago
je8031ej
Recruit
0 Points
4 hours ago
zooma
Vice Admiral
7,474 Points
4 hours ago
wdjacques
Recruit
0 Points
5 hours ago
Hhager2
Sub-Lieutenant
1,565 Points
5 hours ago
GaryLC
Captain
3,798 Points
5 hours ago
jumpugly
Admiral
9,672 Points
5 hours ago
jrjandcole
Recruit
0 Points
5 hours ago
Alan329
Recruit
0 Points
5 hours ago
ukengineman
Leading Seaman
82 Points
5 hours ago
jr
Recruit
0 Points
6 hours ago
StephenS
Recruit
5 Points
6 hours ago
BillF2
Recruit
0 Points
6 hours ago
Stephen T
Captain
3,364 Points
6 hours ago
Softie
Able Seaman
22 Points
6 hours ago
chugalone100
Commodore
4,144 Points
6 hours ago
RNinMunich
Fleet Admiral
40,989 Points
7 hours ago
Beemerboy
Recruit
5 Points
7 hours ago
gcastleman1
Recruit
0 Points
7 hours ago
JimB2
Recruit
0 Points
7 hours ago
john Clayton
Recruit
0 Points
7 hours ago
ChrisF
Vice Admiral
6,760 Points
7 hours ago
Rookysailor
Rear Admiral
5,099 Points
7 hours ago
Cpt-Pugwash
Midshipman
915 Points
7 hours ago
Eraser5661
Able Seaman
20 Points
7 hours ago
Login To
Remove Ads
Remove Ads
🏠
Home
Home
📰
Trending
Trending
💬
Forum
Forum
🗝
Login / Join
Login / Join
|
Cookies are used for ads personalisation.
By using this website you agree to our use of cookies. More Info |
Main Menu
🚤 Model Boats
• Forum
• Build Blogs
• Media Gallery
• Boat Clubs & Lakes
• Events
• Boat Harbour
• How-To Articles
• Useful Links
• The Games Chest
This Website
🔍 Search
📝 Guestbook
👨👩👧👦 Members (1,759)
📣 Support
Hobby Supplies
🛍️ Online Shop
Login
🗝 Login
🗝 Create New Account
▼
Media Gallery
X
1 of 4
► |
◄ |
Media Viewer
^
_
X
Share
X
Flag Inappropriate Post
X
| Select Reason | |
| Sexual content Includes graphic sexual activity, nudity, and other sexual content. | |
| Violent or repulsive content Violent or graphic content, or content posted to shock viewers. | |
| Hateful or abusive content Content that promotes hatred against protected groups, abuses vulnerable individuals, or engages in cyberbullying. | |
| Harmful dangerous acts Content that includes acts that may result in physical harm. | |
| Child abuse Content that includes sexual, predatory or abusive communications towards minors. | |
| Promotes terrorism Content intended to recruit for terrorist organisations, incite violence, glorify terrorist attacks, or otherwise promote acts of terrorism. | |
| Spam or misleading Content that is massively posted or otherwise misleading in nature. | |
| Infringes my rights Privacy, copyright and other legal complaints. | |
Basket Updated
X
Loading...
Loading
Loading Uploader...