|||
|
|
🗝 Login
🤖 Create Account
Main Menu
🚤 Model Boats
• Forum
• Build Blogs
• Media Gallery
• Boat Clubs & Lakes
• Events
• Boat Harbour
• How-To Articles
• Plans & Docs
• Useful Links
• The Games Chest
This Website
🔍 Search
📝 Guestbook
👨👩👧👦 Members (1,791)
📖 Quick Site Guide
📣 Support
👥 Membership
Hobby Supplies
🛍️ Online Shop
Not Registered
Go AD FREE & get your membership medal
BRONZE
Less Ads
SILVER
GOLD
Ad Free
Cancel
Anytime
Anytime
£2.50
£4.50
£6.50
Subscribe
Go AD FREE & get your membership medal
BRONZE
Less Ads
SILVER
GOLD
Ad Free
For A Whole Year!
£25
£45
£65
Donate
You Will Be Helping Towards:
Domain Fees
Security Certificates
iOS & Android App Fees
Website Hosting
Fast Servers
Data Backups
Upkeep & Maintenance
Administration Costs
Without your support the website wouldn't be what it is today.
Please consider donating towards these fees to help keep us afloat.
Read more
All donations are securely managed through PayPal.
Many thanks for your kind support
Without your support the website wouldn't be what it is today.
Please consider donating towards these fees to help keep us afloat.
Read more
All donations are securely managed through PayPal.
Many thanks for your kind support
Join Us On Social Media!

|

|

|
Download The App!
Login To
Remove Ads
Remove Ads
Login To
Remove Ads
Remove Ads
🏝️ About This Website
☝️ Terms of Service
🔏 Privacy Policy
Model Boats Website
Model Boats Website
Home
Forum
Build Blogs
Media Gallery
Boat Clubs & Lakes
Events
Boat Harbour
How-To Articles
Plans & Docs
Useful Links
The Games Chest
Welcome to the Model Boats Website! A place for all model boaters!
Feel free to browse through the website, ask your questions, upload your photos or even start your own blog!
Feel free to browse through the website, ask your questions, upload your photos or even start your own blog!
Login To
Remove Ads
Remove Ads
Trending Now
Forum
120 years of modelboat history
Hi Tom - I had an unstarted Spearfish kit as well which I sold a couple of years ago, like you I regretted selling it as it didn't fit in with my plans to build all the classic Faireys to the same scale. If you ever decide to sell one of your fibreglass Huntsman hulls I'd be interested though.
The Jersey police were very well looked after to have a Swordsman as a police boat! The early Fairey Marine Swordsman boats in timber were very different to the post Fairey Marine fibreglass Swordsman boats that Will and myself have mentioned.
Chris
🇬🇧 ChrisF

3 hours ago
Blog
Re: Classic Model Power Boats
Hi canabus,
I have just tried to look at your video and all is show s is the camera view of some riding a bicycle.
Do you have a correct youtube link so that it can be seen please.
I would love to see it.
Regards
BOATSHED (Thomas, Tom)
🇬🇧 BOATSHED

4 hours ago
Forum
Question of the Day?
The confeti is getting a bit weak struggles to come down
Philuk
🇬🇧 PhilH

11 hours ago
Blog
Re: Planking the deck. Part 2.
Nicely done!
🇨🇦 Ronald

21 hours ago
Forum
Waterproof servos
Hi Eric. I'd take statements on Ebay for cheap waterproof servos with a pinch of salt. Splashproof for vehicles maybe but that's about it.
Hitec make servos that are waterproof to the IP67 rating that means that they can be used underwater to a depth of 1 metre for up to 30 minutes. More expensive but if you want truly waterproof then this is the type of servo you need and from a trusted quality manufacturer like Hitec.
Are you looking to actually run the servo in the water or is this just in case of water ingress? Can you mount the servo in a box or housing as they do in submarines?
🇬🇧 ChrisF
1 day ago
Blog
Put done if the ships on Ebay
I will put some like the Sir Winston on EBay with a few more. I will finish building the Hercules tug Boat. I started to build the row boats and some detail parts. I will make a case for the Sterling Scout and display it next to my 5 foot other ships. If anyone interested in them contact me direct. I’m good at shipping fragile ships n aircraft over seas too. I want to thank all you who helped me identify the ships. Also happy holidays n stay safe to all my ship mates on here!
🇺🇸 Hhager2

1 day ago
Harbour
Re: Fire Crash Tender
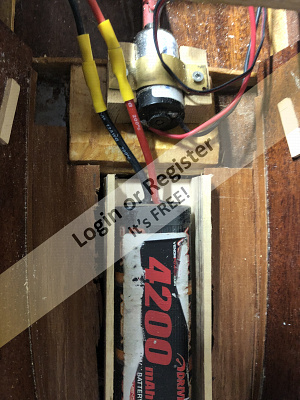
I have my twin Lipo batteries mounted under the stern deck. If you look at the original boats all the motor pumps, etc are at the stern of the boat.
🇦🇺 canabus
1 day ago
Forum
Bluebird
Yessir Ed! I downloaded them and they are beautiful!!!
🇺🇸 jumpugly

2 days ago
Harbour
Re: R.A.F Crash Tender
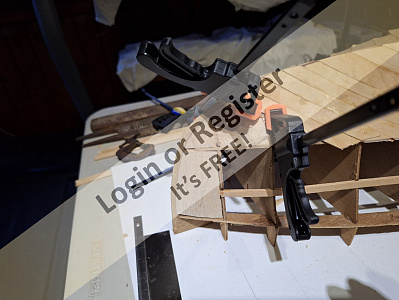
This is a reduced model down to 28" from the 34" Crash Tender.
I then built it out of balsa wood and covere the bottom balsa skin with 1/16th ply.
I will get around to finishing it one day. Only part painted up to now.
The propellor on it in the picture is not the one that it will be run on it will have
a 25mm 3 bladed brass one on it. But I do also have a 20mm as a back up incase thats too big.
🇬🇧 BOATSHED
2 days ago
Forum
Holiday greetings from the seaside
Hey Gang!!!!! To all my friends on the best site on the internet. Keep building and Bless Us All!!!!!
🇺🇸 jumpugly
2 days ago
Blog
Re: Midwest/Model Expo Fireboat
Good morning, Chugalone.
I've spotted a few tips on assembling a winch or ladder... at your place.
Simple tools were used, like I did back then with the clothes pegs. . .
My sincere regards for the perfect details. . . !!
Sunny greetings from cold Switzerland,
Your Michel-C.
Ps: Old photograph taken during assembly testing of the Dolores,
the sternwheel steamboat with the clothes pegs turned upside down. ️
🇨🇭 Mike Stoney
2 days ago
Blog
Re: PDS Episode 1 (how the dock sections are connected)
Phil, my design on the docks. My son helped me build them and also suggested the truss head screws and I added the printed spool shaped piece that goes under the screw.
Alison, I am working on the ramp for the dock to shore which will improve the attachment/anchoring of the docks.
Lew
🇺🇸 LewZ

3 days ago
Forum
Mary Ann 472
Coming together what other works have got planned
Philuk
🇬🇧 PhilH
3 days ago
Forum
Movie rust and aging...
I am glad you like it.
It's about 9 feet long! Notice the tracking dots along the hull and the blue screen background. Those are for the motion graphics animators to refer to in order to help create the ocean waves.
🇺🇸 jumpugly
5 days ago
Guestbook
Re: Guestbook
I'd still like to 'beg borrow or buy' an Elan, 7.7, 8 or 9.2M MODEL of a Dragon - Firefly Trimaran. With large deposit paid for safe return, (if loaned). 'B J', Mental Health Pensioner.
🇦🇺 B rian J ames

5 days ago
Harbour
Re: Fairmount Alpine
No Worries Check out the other boat in my harbour, my aerokits 46’’ fire crash tender. I have put a video of it on.
🇬🇧 Heners2332

5 days ago
|

New Member
France
 LaurentL1
10 hours ago
New Promotion
Able Seaman
 PEI
PEI23 hours ago
New Member
United Kingdom
GeorgeD1 day ago
New Member
United Kingdom
DavidF41 day ago
New Member
Portugal
FranciscoC2 days ago
New Member
Netherlands
Andreas2 days ago
New Member
United Kingdom
PA3122 days ago
Birthday This Week
Turns 67
oddjob583 days ago
New Promotion
Able Seaman
Hsailer3 days ago
Birthday This Week
Turns 84
 TonyAsh
3 days ago
Birthday This Week
Turns 74
 DWBrinkman
3 days ago
Account Updated
Updated 'About Me'
Kenothomo3 days ago
Birthday This Week
Turns 59
 neilw
neilw4 days ago
New Member
United Kingdom
GrahamF4 days ago
New Member
United Kingdom
chrisB34 days ago
New Member
United Kingdom
NickK5 days ago
Birthday This Week
Turns 81
chiffs5 days ago
New Promotion
Leading Seaman
Heners23325 days ago
Account Updated
Changed Avatar
Heners23325 days ago
New Member
United Kingdom
EsterP6 days ago
New Member
United Kingdom
IanR16 days ago
New Member
United Kingdom
Heners23327 days ago
New Member
Germany
WalterB7 days ago
New Member
Canada
WallaceG7 days ago
New Member
United Kingdom
PeterG57 days ago
New Member
Bermuda
JonandSusanT8 days ago
New Member
United Kingdom
MR H 178 days ago
New Member
United Kingdom
davef8 days ago
Birthday This Week
Turns 65
Hook9 days ago
Birthday This Week
Turns 68
MouldBuilder9 days ago
New Member
United Kingdom
ShaunS10 days ago
Birthday This Week
Turns 74
JEANFRANCOIS G11 days ago
New Member
Bermuda
ArnoldP11 days ago
New Member
Germany
PeterW211 days ago
Birthday This Week
Turns 68
Oxford-Dave12 days ago
New Member
United Kingdom
RoyB112 days ago
New Member
Denmark
Arly12 days ago
New Member
United Kingdom
PatrickB113 days ago
New Member
United States
John L13 days ago
New Member
United Kingdom
NigelP113 days ago
New Member
United Kingdom
Bigun15 days ago
New Member
Canada
philipG15 days ago
New Member
United Kingdom
PhilipP115 days ago
New Promotion
Fleet Admiral
roycv15 days ago
New Promotion
Chief Petty Officer 1st Class
Steves-s16 days ago
New Promotion
Able Seaman
Dutton7316 days ago
New Promotion
Chief Petty Officer 2nd Class
 thadlietz
17 days ago
New Member
United Kingdom
Dutton7317 days ago
See More
Forum Topics
120 years of modelboat history
Hi Tom - I had an unstarted Spearfish kit as well which I sold a couple of years ago, like you I regretted selling it as it didn't fit in with my plans to build all the classic Faireys to the same scale. If you ever decide to sell one of your fibreglass Huntsman hulls I'd be interested though.
The Jersey police were very well looked after to have a Swordsman as a police boat! The early Fairey Marine Swordsman boats in timber were very different to the post Fairey Marine fibreglass Swordsman boats that Will and myself have mentioned.
Chris
3 hours ago by 🇬🇧 ChrisF ( Rear Admiral)
Rear Admiral)
Building Related
23 Posts
63 Likes
63 Likes
Started
1 month ago
by hermank
1 month ago
by hermank
Latest
3 hours ago
by ChrisF
3 hours ago
by ChrisF
Question of the Day?
The confeti is getting a bit weak 🤣🤣 struggles to come down
Philuk👍
11 hours ago by 🇬🇧 PhilH ( Lieutenant)
Lieutenant)
Website Related
5293 Posts
13354 Likes
13354 Likes
Started
3 years ago
by fireboat
3 years ago
by fireboat
Latest
11 hours ago
by PhilH
11 hours ago
by PhilH
Waterproof servos
Hi Eric. I'd take statements on Ebay for cheap waterproof servos with a pinch of salt. Splashproof for vehicles maybe but that's about it.
Hitec make servos that are waterproof to the IP67 rating that means that they can be used underwater to a depth of 1 metre for up to 30 minutes. More expensive but if you want truly waterproof then this is the type of servo you need and from a trusted quality manufacturer like Hitec.
Are you looking to actually run the servo in the water or is this just in case of water ingress? Can you mount the servo in a box or housing as they do in submarines?
1 day ago by 🇬🇧 ChrisF ( Rear Admiral)
Rear Admiral)
RC & Electrics
5 Posts
4 Likes
4 Likes
Started
3 days ago
by EricMB
3 days ago
by EricMB
Latest
1 day ago
by ChrisF
1 day ago
by ChrisF
Bluebird
Yessir Ed! I downloaded them and they are beautiful!!!
😊👍
2 days ago by 🇺🇸 jumpugly ( Admiral)
Admiral)
General Resources
18 Posts
54 Likes
54 Likes
Started
22 days ago
by EdW
22 days ago
by EdW
Latest
2 days ago
by jumpugly
2 days ago
by jumpugly
Holiday greetings from the seaside
Hey Gang!!!!! To all my friends on the best site on the internet. Keep building and Bless Us All!!!!!
👍😊😉
2 days ago by 🇺🇸 jumpugly ( Admiral)
Admiral)
Non-Hobby Chat
5 Posts
40 Likes
40 Likes
Started
3 days ago
by Chum444
3 days ago
by Chum444
Latest
2 days ago
by jumpugly
2 days ago
by jumpugly
|
|
Login To
Remove Ads
Remove Ads
Build Blogs
3 Posts
5 Followers
14 Likes
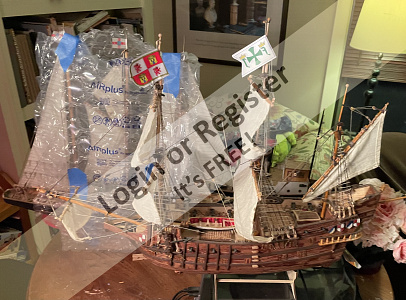
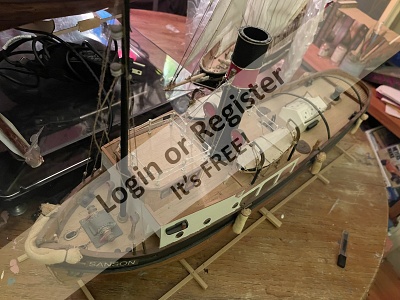
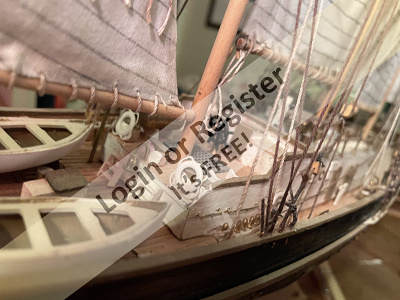
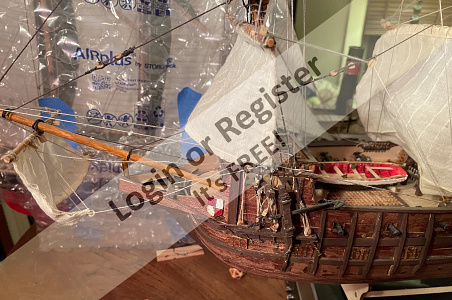
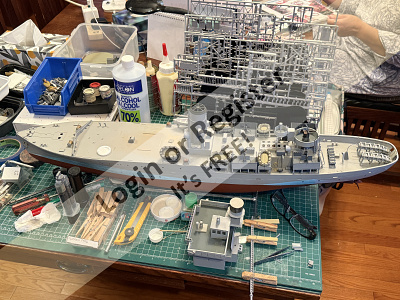
Need info on what these ships are
My Uncle in NY passed away a few months ago. He was 96 n a model builder since a kid. He got me into it n we both were in the Navy. At one time he was my boss on a minesweeper. I inherited some of the ships he built. One is the last he worked on I will complete. Another is the same one I built n lost in a fire a Sterling Scout. The tall ships I have no info on n would like if anyone recognizes them? I will sell them as they are complete n all are display ships. I may RC the Hercules tugboat as it’s the unfinished one. His grankids bought it for him at price of $500. He still has more at his house the Robert e Lee, two rear paddle wheels and several multicast sailing ships. Here are pics I took of the four I have brought home.
🇺🇸 Hhager2
1 day ago


24 Posts
26 Followers
329 Likes
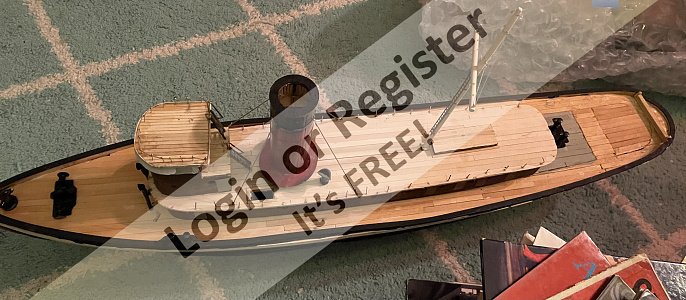
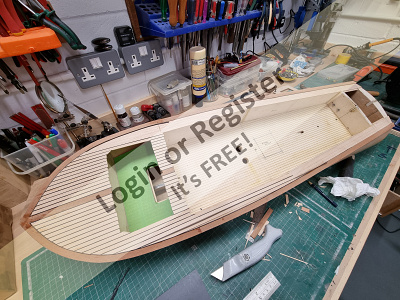
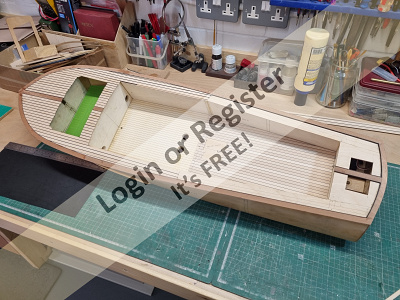
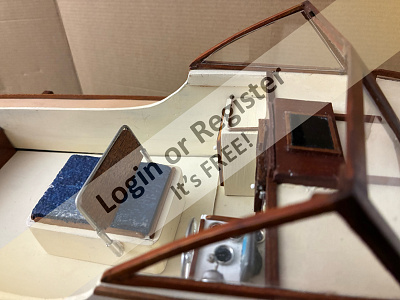
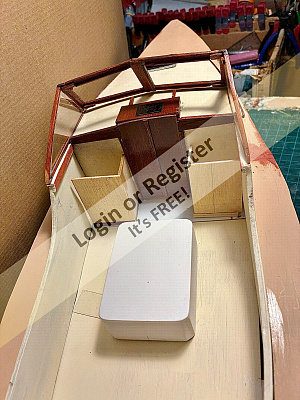
The VMW Marlin Cabin Cruiser by Robbob
The VMW Marlin Cabin Cruiser by Robbob
Preface.
At the time of writing, I’ve had the construction of this boat on ‘the back burner’ since July 2022. By then I had spent about two months on and off constructing the boat to a stage where I could consider applying a glassfibre cloth and epoxy finish to the hull. However I couldn’t spend any more time on the Marlin project as I had a more important project to undertake, which was to paint, decorate, refurbish and prepare our house for sale so that we could downsize and move to a new area now that our kids had all fled the nest.
Fast forward to today (mid-April 2025) and it’s taken a while to get the new house and gardens into shape and settle in, with the emphasis on converting my internal garage into a great new workshop, I can finally pick up from where I left off.
Introduction to the kit.
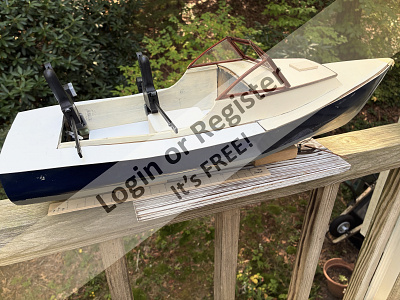
This new model is the latest undertaking by Vintage Model Works, now famous for their very popular models of the RAF Crash Rescue Tender and Thames River Police Boat kits which are based on old Aerokits and Veron designs.
The Marlin is a re-working of an original Veron design by the late Phil Smith in 1953. His son Colin Smith, who was also responsible for the re-design of the Thames River Police Boat, has made some changes to his father’s design to take advantage of more modern materials and production methods such as CNC and laser cutting.
The photograph below is of a prototype built by Colin Smith to give you an idea of how the boat looks in finished form. And there is also a review of the Marlin that appeared in Model Maker magazine, November 1953.
The size remains at 36” and it employs the same construction method as the original. The spacious cabins of the boat makes it very easy to accommodate all the latest control hardware required, not that the original was lacking in that area even when the radio systems used valves and large batteries and the propulsion was usually IC or a large electric motor.
Even the pre-production sample the Vintage Model Works kit supplied to me is well presented with a full size drawing including a pictorial construction sequence and separate pages of building instructions.
All the required materials are supplied in quality ply, balsa, strip-wood and dowel including clear plastic sheets for the windscreens, and various white metal deck fittings. The builder is of course required to supply their own adhesives and paint of choice, as well as the propulsion, drive train and radio control gear. In the latter respect I will likely restrict control to throttle and rudder and not add any lighting or other features. That has already been done magnificently by Mike Turpin.
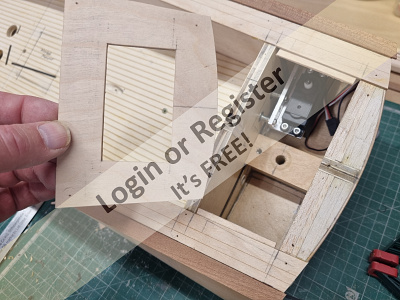
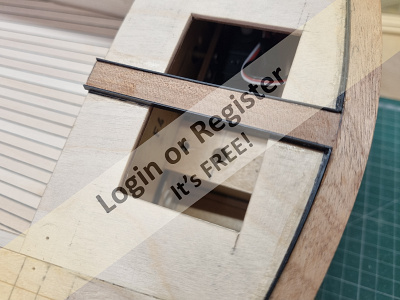
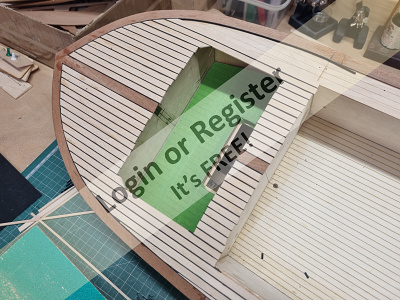
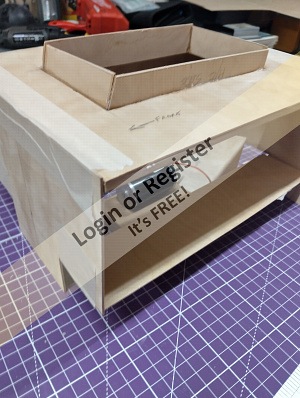
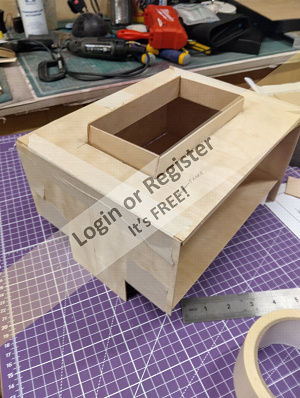
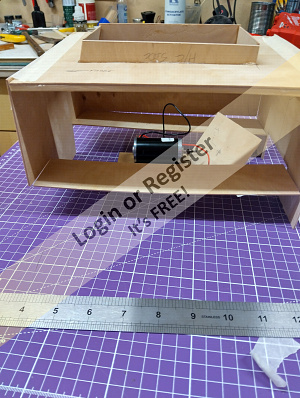
Construction.
As with the Thames river police boat, another Veron design, construction starts with the assembly of a box structure onto which formers and bulkheads are attached to make the basic hull shape.
I will be tackling this in the first part of my build blog which I hope you will enjoy following and I encourage you to ask questions, leave comments and hopefully some ‘likes’ as I make progress.
Robbob.
🇬🇧 robbob
1 day ago


4 Posts
9 Followers
27 Likes
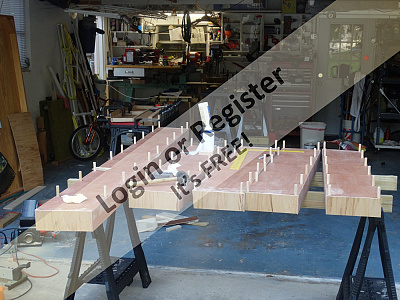
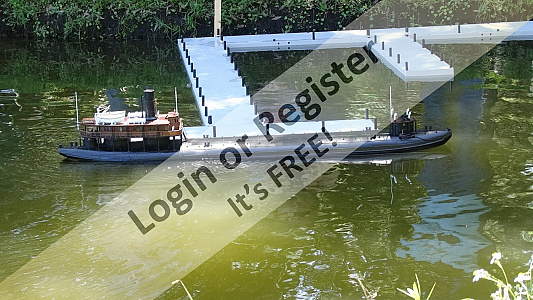
"Port Seminole" a SSMBC portable dock system for R/C model boats
Episode: Introduction
This is series of episodes will be about the features and updates of the SSMBC (Tampa Bay Area, Florida) Portable Dock System (PDS) I will post information on the original design and build of the PDS as well as requirements of have a PDS for the SSMBC.
First is why. Operating (R/C) model boats are fun to build and run. But take that to the next level. How do we improve that? We have a pond, OK? We have a floating dock for launching and retrieval; Nice. Every once and a while we have a few buoys (markers); Getting a little better. Now comes docks! Wow, how many of you "captains" out there would like to maneuver through a docking system? I know I like it. (Think it we ignite some of our casual members to come or entice new members to join?)
In March of 2014 I built most of the PDS with my son's help. There we no videos or even instructions on how to build a PDS back then. Only a few photos and videos that showed little to no detail on they were built.
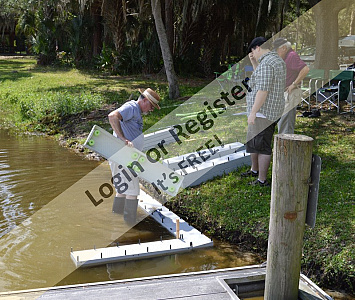
It was fun to operate the boats but what a headache to setup for our two hour meets. Trudging through thick mud on the ponds bottom was very difficult. Trying to flat the sections out and attach them together while leaning over the docks edge was still an issue. ("No swimming".)
Thought: Why not assemble them on land gradually pushing them into the pond? How about a better way to attach them to the shore? I already made them stackable to ease storage and transport.
And that folks is where I am today. Most of the thinking was done. Now I am in the update phase. For two days (I'm 81, not as fast as I used to be) I have been not only updating the PDS but doing some badly need maintenance and strengthening.
The photos I am posting now are the original build of the PDS. They are simplistic, no additional details. (Some details may be added later.) You can see that the sections can be positioned for a variety of configurations.
In upcoming episodes I will add more information and photos. so others can see what we have done. Nothing hidden, all information. And, of course, suggestions are welcomed.
Lew
SSMBC event coordinator
🇺🇸 LewZ
4 days ago


26 Posts
10 Followers
181 Likes
Lindsay M a scratch built Wasque 26 ft
Awaiting graphics to finish off THUNDER& METEOR so pulled this one off the shelf to resume the build. I’ll start at the beginning posting highlights so as not to take up too much time.
Photo 1&2 One of the many real boats. These are iconic around Cape Cod, Martha’s Vineyard, Nantucket, & other Atlantic bordering states.
Photo 3 Starting the frame & keel.
🇺🇸 Chum444

7 days ago


11 Posts
6 Followers
60 Likes
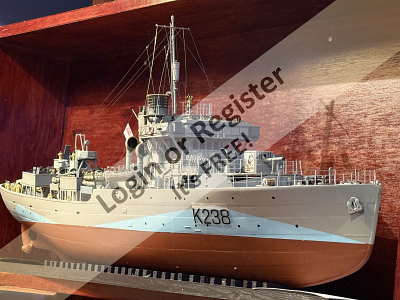
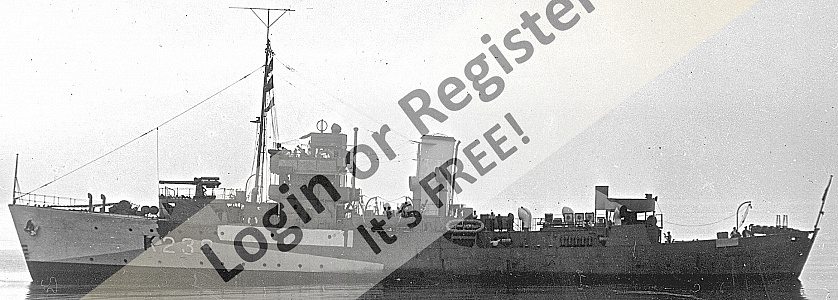
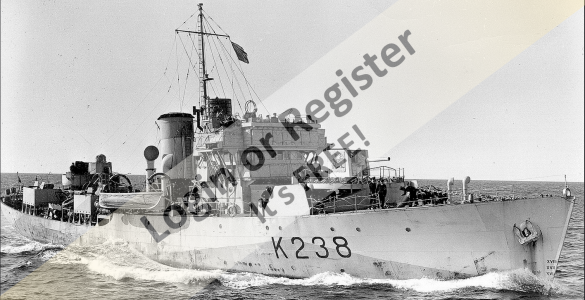
HMCS Woodstock from a Kitbashed Revell Flower Class Corvette
Starting the dig into the Ottawa Archives and The Great Lakes Museum in Kingston:
🇨🇦 RPLedm
9 days ago


6 Posts
7 Followers
22 Likes
Another Pusher Tug
While doing research for my Springer/Pusher tug I discovered these drawings David Metcalf’s Motorflot Pusher Tug and I had all the materials to build it so I put the other pusher I am building aside and started on this one. I am easily distracted
All the hull parts have been cut out one after yesterdays power outage, I will stat the assembly today.
Pictures to follow.
🇬🇧 EdW
12 days ago


1 Post
5 Followers
19 Likes
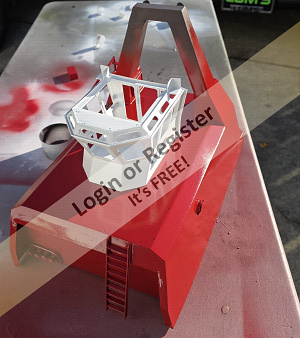
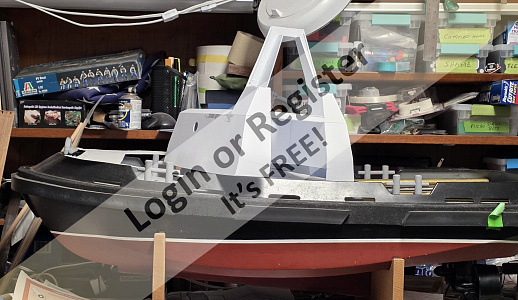
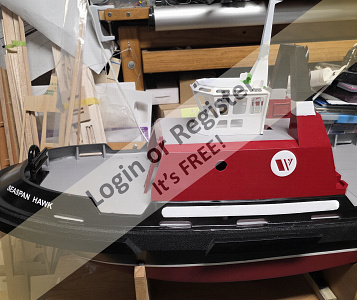
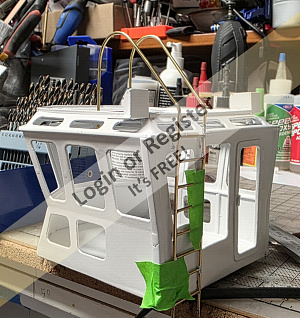
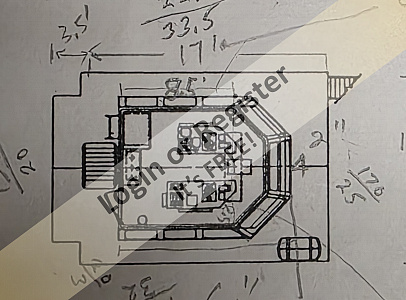
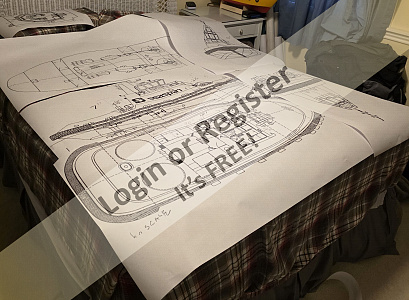
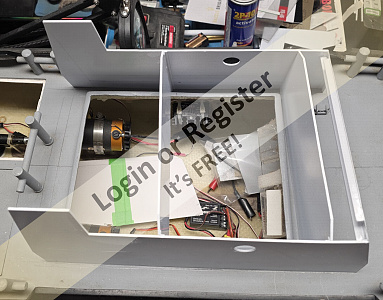
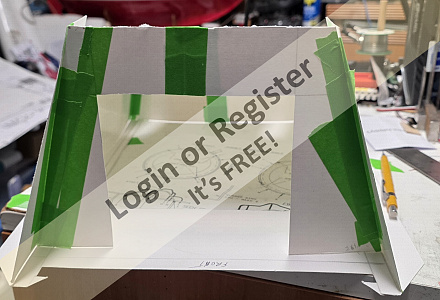
Seaspan HAWK with "Z" drive build
Progress on my Seaspan Hawk. this boat was just the hull and deck, with 2 Z drive motors. Everything from the deck up was destroyed. the drawing I could find had lines that were 1/8" thick so trying to get everything in proportion was interesting and challenging. it has been a fun build and challenged my old mind.
🇺🇸 bruce1946

12 days ago


2 Posts
6 Followers
22 Likes
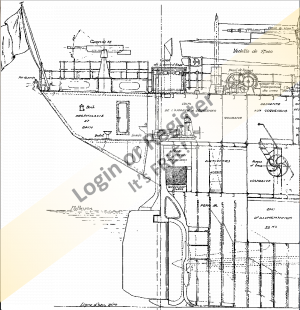
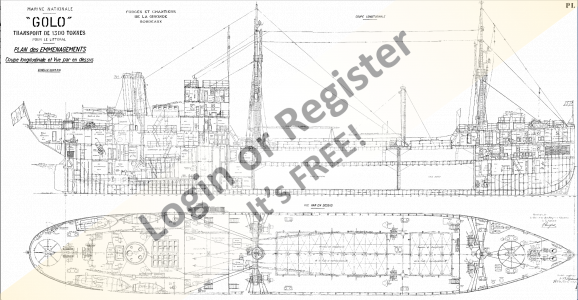
M. N. Golo, 1300 Tonne Coastal Freighter
This might be my next Build. Note that the 3inch gun is positioned right above the toilet. Do you think they yell "CLEAR" down into the toilet. Do customers "evacuate" when it goes off? Do their toe nails scratch through the linoleum?
🇨🇦 RPLedm
15 days ago
4 Posts
2 Followers
22 Likes
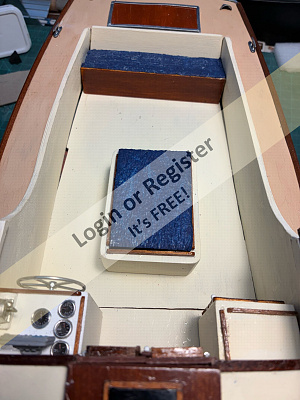
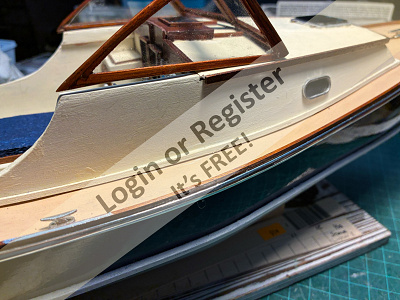
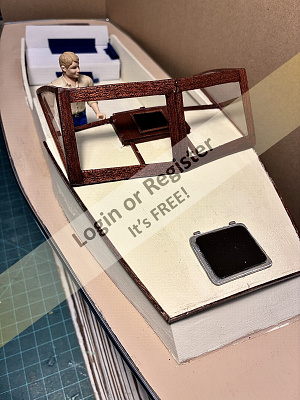
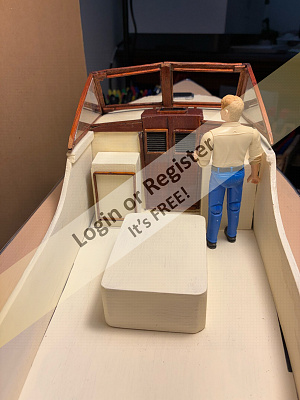
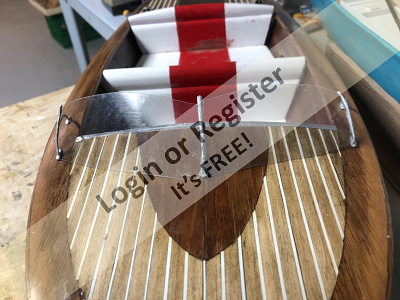
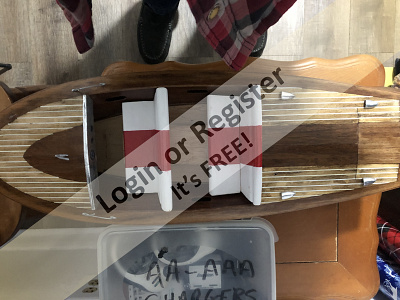
Chris-Craft Style
I think I mentioned this model on another blog.And now it's become a Build Blog. So here we go. This model required a battery box, so I had to make some modifications.So a few cuts were required to find a spot for a 7.2-volt NMH battery so see some photos.
🇨🇦 GARTH
17 days ago


1 Post
2 Followers
12 Likes
Vintage sea scout ?
Hi I’ve just bought a secondhand model wooden boat looks like an aero kit sea scout 24.5 inches long it has a very old made in Japan electric motor it smells old inside the boat and the paint is heavily crazed .i would like to know my about it / age etc if anyone could help me before I restore it many thanks Kraig. it also has a manual brass rudder knob it the back
🇬🇧 Dutton73
17 days ago


3 Posts
2 Followers
28 Likes
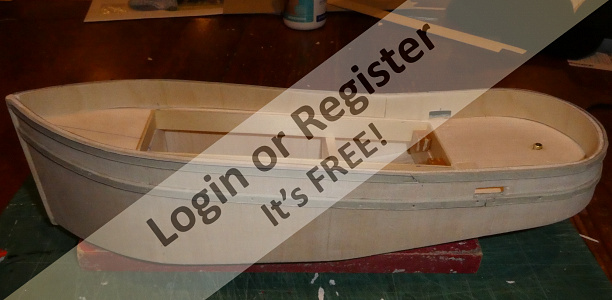
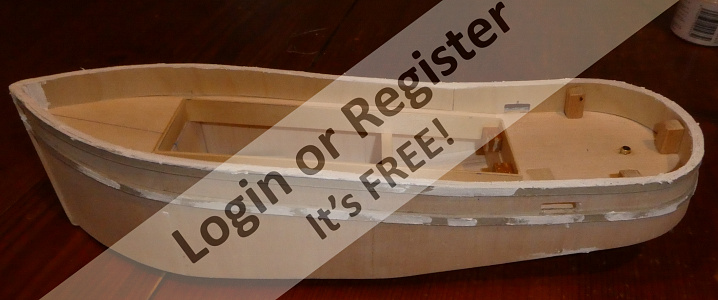
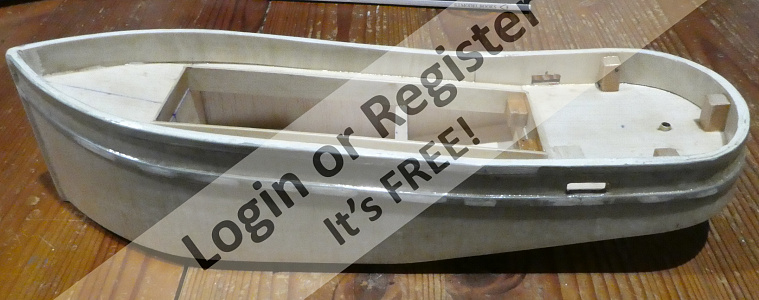
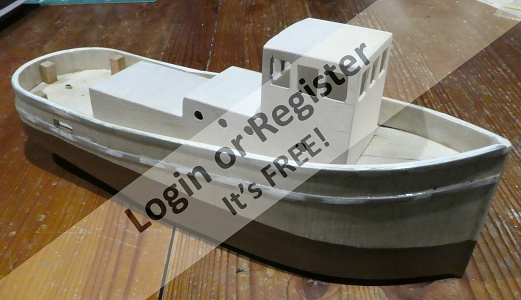
GLYNN GUEST KNOCKER WHITE TUG
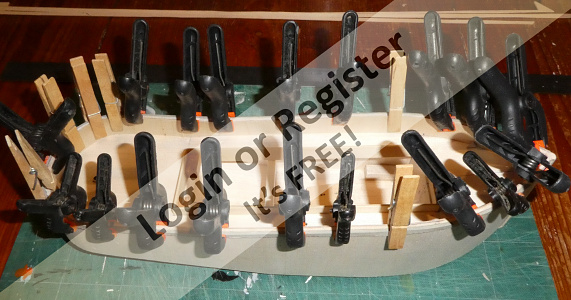
I mentioned in the Vic Smeed Vivacity forum I would do a few smaller builds while chugging through the Vivacity project; the first of these I have started (while waiting on certain components/materials for Vivacity), based on Glynn Guest's Knocker White tugboat plan from his book 'Small Radio Control Boats'.
The Driving force behind choosing this particular design was the fact I had just filled my Backyard Model Boating Pond for the first time and sailed a couple of small free-running boats in it.
I had already made Arcady and Bredette many years ago when they were first issued as free plans in Model Boats, so Knocker White was the next project from the book with the necessary compact dimensions to sail happily on my pond, the first of (hopefully) several small such boat projects.
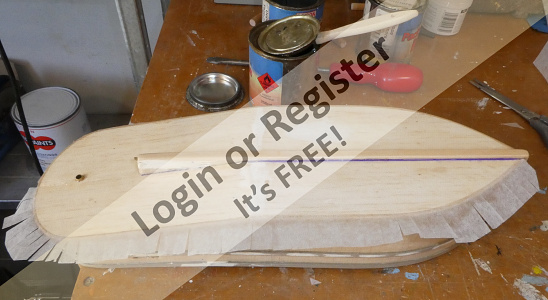
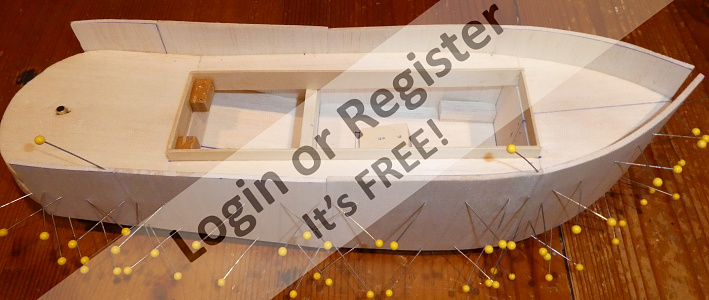
Here are the first stages of the build shown in the photos;
1) Paper template traced/assembled from the book - a little 'guestimation' was required as the plan was over two pages that didn't quite align...
2)Carcass pieces (deck, bottom, bulkheads, stem) marked out on 1/4" sheet
3)Carcass pieces cut out
4 & 5) carcass glued together, care taken to get as square as possible - note extra piece placed in stern to support rudder tube, making stern slightly deeper than original
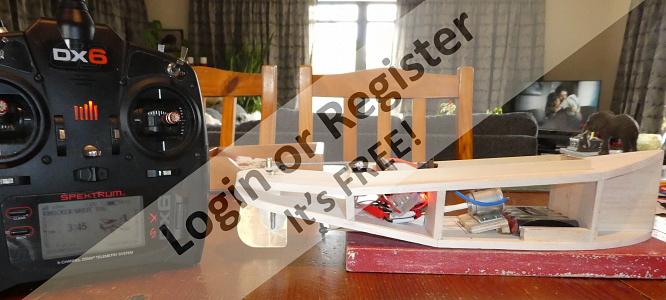
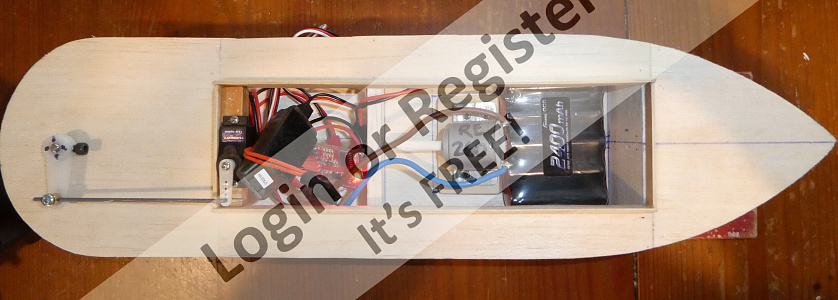
6)Power train/RC components; Specktrum 410 RX, Ali Express 20A esc, RS 280 motor (was eventually replaced with an RS260 type when I clumsily broke off one of the contacts while trying to fit the battery), 100mm prop shaft/tube assembly with 25mm 3-blade prop.
7)Power train set up & tested on the bench to ensure everything worked
8)Prop tube skeg/support added
9)Prop tube epoxied in place, sandwiched between skeg support and lower skeg piece.
10)6mm ply motor mount glued into position after checking alignment.
More pics and comments to follow soon,
Best regards to all following this,
Nick
🇳🇿 Nick Ward

19 days ago


1 Post
1 Follower
12 Likes
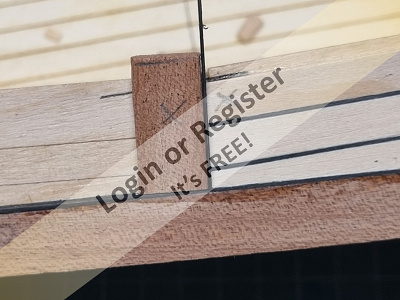
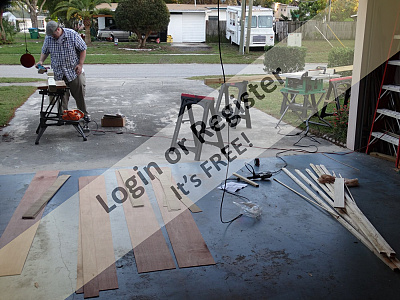
1930 Cris Craft Runabout Dumas Kit 1230
Started the Runabout.
Using my Lion Miter trimmer to cut the planks, and my block plane to
trim to the chine. Then a sanding block for the final fit.
🇺🇸 pressonreguardless
21 days ago


|
|

Media Gallery
Christmas theme
11 days ago by GARTH
SSMBC (Florida) meet: 12/7/2025 military focus
13 days ago by LewZ
SSMBC (Seminole, Florida) meet, Nov 16, 2025
1 month ago by LewZ
SSMBC (Seminole, Florida) meet, Nov. 2, 2025
2 months ago by LewZ
Spooky - (Evening sail November)
2 months ago by philcaretaker
Gaff Rigged Bristol Pilot Cutter Autumn / Fall
2 months ago by philcaretaker
Only 2 days left
2 months ago by GARTH
Professional Photographer at Southport
2 months ago by SouthportPat
Filming over water
3 months ago by philcaretaker
"Sailor Sam" greets onlookers at the Sunday morning "Run In The Park".
3 months ago by philcaretaker
Light up the Night on the September 25th 2025 including safety cautions
3 months ago by GARTH
Second navigation (4 September 2025) to Lake Turano.
3 months ago by AlessandroSPQR
|
|

Login To
Remove Ads
Remove Ads
Boat Clubs & Lakes
Recent Updates In Places

|
Buxton Model Boat Club
21 days ago by 🇬🇧 philcaretaker (
Commodore) |
|
|
Schiffsmodellclub Sömmerda/OT leubingen
25 days ago by 🇨🇭 Mike Stoney (
Rear Admiral) |
|
|
Southport Model Boat Club
2 months ago by 🇬🇧 SouthportPat (
Commodore) |
|
|
BUXTON MODEL BOAT CLUB
2 months ago by 🇬🇧 philcaretaker (
Commodore) |
|
|
New Brighton Model Boat Club
2 months ago by 🇬🇧 zooma (
Vice Admiral) |
|
|

Upcoming Events
|
(No Upcoming Events)
|

Boat Harbour
11 Photos
7 Likes
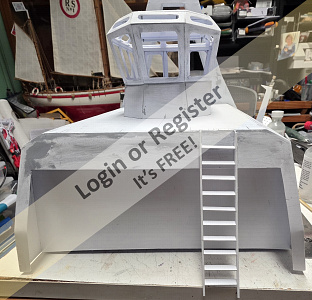
Re: R.A.F Crash Tender
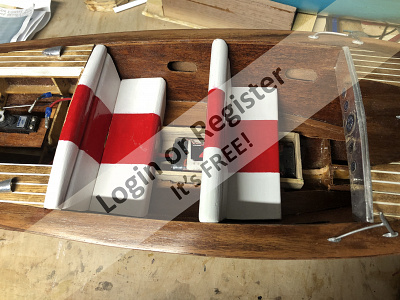
This is a reduced model down to 28" from the 34" Crash Tender.
I then built it out of balsa wood and covere the bottom balsa skin with 1/16th ply.
I will get around to finishing it one day. Only part painted up to now.
The propellor on it in the picture is not the one that it will be run on it will have
a 25mm 3 bladed brass one on it. But I do also have a 20mm as a back up incase thats too big.
🇬🇧 BOATSHED
2 days ago
6 Attributes
1 Comment
1 Photo
7 Likes
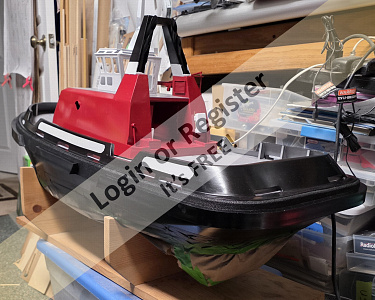
Fire Crash Tender
Original Aerokits 46’’
850 motor
🇬🇧 Heners2332
6 days ago
6 Attributes
16 Comments
2 Photos
5 Likes
Fairmount Alpine
Purchased Built
🇬🇧 Heners2332
6 days ago
6 Attributes
3 Comments
1 Photo
4 Likes
Schaufahren
Schaufahren des Schleppers "Smith"
🇩🇪 BernhardP

27 days ago
0 Attributes
1 Comment
1 Photo
4 Likes
Sumpfboot
Das Sumpfboot mußte mal sein. Fährt sehr stabil durch eine 15mm große Heckflosse.
🇩🇪 BernhardP
27 days ago
0 Attributes
5 Comments
1 Photo
4 Likes
Ponton
Der Ponton ist für den Hafenschlepper.
🇩🇪 BernhardP
27 days ago
0 Attributes
1 Comment
1 Photo
3 Likes
Regattaklasse
M-Boot kurz vor dem Start zur Regatta in unserem Verein.
🇩🇪 BernhardP
27 days ago
0 Attributes
1 Comment
1 Photo
2 Likes
Rennboot
Sehr schönes und schnelles Rennboot.
🇩🇪 BernhardP
27 days ago
0 Attributes
1 Comment
1 Photo
9 Likes
Yacht
Modell "Destriro"
🇩🇪 BernhardP
27 days ago
0 Attributes
3 Comments
|
|
How-To Articles
Electric Boat Engine Etc Etc
Revised 12 days ago
By Guy O
Essential or useful tools and utensils for the ship modeler. A final appendix lists the most common
Revised 2 months ago
By AlessandroSPQR
stop email notifications
Revised 2 months ago
By Ace23
painting epoxy over Humbrol and varnish enamels
Revised 4 months ago
By roycv
Cardan joint, Homokinetic joint, universal joint. Problems related to the junction between the engin
Revised 6 months ago
By AlessandroSPQR
various electrical connection diagrams for two motors
Revised 8 months ago
By tomarack
Lifeboats or work boats?
Revised 11 months ago
By AlessandroSPQR
Permanent magnet brushed electric motors. Main features. Basic elements of distinction. How to evalu
Revised 11 months ago
By AlessandroSPQR
When wooden planking the sides of hulls What Glues are you using?
Revised 1 year ago
By bruce1946
Fibreglassing a wooden hull
Revised 1 year ago
By DuncanP
|
|

Login To
Remove Ads
Remove Ads
Model Boats Website
This is the alert text. You can customize this text to be as long or short as needed. The modal height will adjust accordingly.
🛍️ Basket
Main menu transported here on mobile
Login
Create New Account
Trending Topics
Members Online
Forum
120 years of modelboat history
ChrisF
3 hours ago
Blog
Re: Classic Model Power Boats
BOATSHED
4 hours ago
Forum
Question of the Day?
PhilH
11 hours ago
Blog
Re: Planking the deck. Part 2.
Ronald
21 hours ago
Forum
Waterproof servos
ChrisF
1 day ago
Blog
Put done if the ships on Ebay
Hhager2
1 day ago
Harbour
Re: Fire Crash Tender
canabus
1 day ago
Forum
Bluebird
jumpugly
2 days ago
Harbour
Re: R.A.F Crash Tender
BOATSHED
2 days ago
Forum
Holiday greetings from the seaside
jumpugly
2 days ago
Blog
Re: Midwest/Model Expo Fireboat
Mike Stoney
2 days ago
Blog
Re: PDS Episode 1 (how the dock sections are connected)
LewZ
3 days ago
Forum
Mary Ann 472
PhilH
3 days ago
Forum
Movie rust and aging...
jumpugly
5 days ago
Guestbook
Re: Guestbook
B rian J ames
5 days ago
Harbour
Re: Fairmount Alpine
Heners2332
5 days ago
Blog
Re: A bit more final finishing.
LewZ
6 days ago
Forum
Before and after..
LewZ
6 days ago
Forum
Animal and nature photos to enjoy.
Ronald
6 days ago
Blog
Re: She’s done!!
Heners2332
6 days ago
Harbour
Re: Port Area
Mike Stoney
7 days ago
Gallery
Re: Christmas theme
BOATSHED
8 days ago
Guestbook
Re: Guestbook
Chuck
8 days ago
Blog
Re: HMCS Woodstock Crew From Etsy 3Djson
Ronald
8 days ago
Forum
TVR1A Steam Engine.
GaryLC
9 days ago
Gallery
Re: SSMBC (Seminole, Florida) meet, Nov. 2, 2025
Mike Stoney
10 days ago
Blog
Re: Seaspan HAWK with "Z" drive build
bruce1946
10 days ago
Forum
engine etc etc
Guy O
11 days ago
melian
Recruit
0 Points
14 seconds ago
LewZ
Vice Admiral
7,146 Points
24 seconds ago
thadlietz
Chief Petty Officer 2nd Class
308 Points
28 seconds ago
BOATSHED
Commander
2,778 Points
44 seconds ago
premecekcz
Master Seaman
117 Points
3 minutes ago
Ronald
Fleet Admiral
12,790 Points
17 minutes ago
RogerA1
Warrant Officer
690 Points
27 minutes ago

dash8man
Able Seaman
33 Points
36 minutes ago
zooma
Vice Admiral
6,188 Points
44 minutes ago
roycv
Fleet Admiral
10,096 Points
60 minutes ago
DenisA
Leading Seaman
70 Points
1 hour ago
Oxford-Dave
Sub-Lieutenant
1,304 Points
1 hour ago
Steves-s
Chief Petty Officer 1st Class
454 Points
2 hours ago
hermank
Rear Admiral
5,288 Points
2 hours ago
RossM
Captain
3,167 Points
2 hours ago
Mike Stoney
Rear Admiral
5,276 Points
2 hours ago
gergelypalla
Recruit
0 Points
2 hours ago
Aerodecked
Able Seaman
31 Points
2 hours ago
Heners2332
Leading Seaman
84 Points
2 hours ago
ChrisF
Rear Admiral
5,806 Points
3 hours ago
RNinMunich
Fleet Admiral
40,136 Points
3 hours ago
PhilH
Lieutenant
1,876 Points
3 hours ago
luckyduck
Lieutenant
1,869 Points
3 hours ago
SouthportPat
Commodore
4,804 Points
4 hours ago
JOHN
Midshipman
1,136 Points
5 hours ago
DaveWhittaker
Recruit
12 Points
5 hours ago
Chum444
Captain
3,930 Points
5 hours ago
Alan R
Recruit
2 Points
5 hours ago
PeteJev
Petty Officer 2nd Class
162 Points
5 hours ago
tomarack
Sub-Lieutenant
1,299 Points
6 hours ago
Steve P
Master Seaman
133 Points
6 hours ago
RichardH3
Recruit
0 Points
7 hours ago
DuncanP
Commander
2,538 Points
7 hours ago
chugalone100
Lieutenant Commander
2,381 Points
7 hours ago
Harwind
Leading Seaman
87 Points
8 hours ago
GaryLC
Captain
3,592 Points
8 hours ago
jumpugly
Admiral
8,441 Points
9 hours ago
AlessandroSPQR
Fleet Admiral
12,337 Points
9 hours ago
robertc3
Recruit
3 Points
9 hours ago
LaurentL1
Recruit
0 Points
10 hours ago
JeremyF
Recruit
0 Points
10 hours ago
EdW
Captain
3,108 Points
10 hours ago
Nickthesteam
Rear Admiral
5,090 Points
11 hours ago
TonyAsh
Chief Petty Officer 1st Class
456 Points
11 hours ago
AndyN
Warrant Officer
785 Points
11 hours ago
DerekS1
Recruit
0 Points
11 hours ago
IanW2
Recruit
0 Points
12 hours ago
eddyc
Recruit
6 Points
12 hours ago
Alain
Able Seaman
29 Points
12 hours ago
SimpleSailor
Lieutenant
1,716 Points
12 hours ago
Login To
Remove Ads
Remove Ads
🏠
Home
Home
📰
Trending
Trending
💬
Forum
Forum
🗝
Login / Join
Login / Join
|
Cookies are used for ads personalisation.
By using this website you agree to our use of cookies. More Info |
Main Menu
🚤 Model Boats
• Forum
• Build Blogs
• Media Gallery
• Boat Clubs & Lakes
• Events
• Boat Harbour
• How-To Articles
• Useful Links
• The Games Chest
This Website
🔍 Search
📝 Guestbook
👨👩👧👦 Members (1,791)
📣 Support
Hobby Supplies
🛍️ Online Shop
Login
🗝 Login
🗝 Create New Account
▼
Media Gallery
X
1 of 4
► |
◄ |
Media Viewer
^
_
X
Share
X
Flag Inappropriate Post
X
| Select Reason | |
| Sexual content Includes graphic sexual activity, nudity, and other sexual content. | |
| Violent or repulsive content Violent or graphic content, or content posted to shock viewers. | |
| Hateful or abusive content Content that promotes hatred against protected groups, abuses vulnerable individuals, or engages in cyberbullying. | |
| Harmful dangerous acts Content that includes acts that may result in physical harm. | |
| Child abuse Content that includes sexual, predatory or abusive communications towards minors. | |
| Promotes terrorism Content intended to recruit for terrorist organisations, incite violence, glorify terrorist attacks, or otherwise promote acts of terrorism. | |
| Spam or misleading Content that is massively posted or otherwise misleading in nature. | |
| Infringes my rights Privacy, copyright and other legal complaints. | |
Basket Updated
X
Loading...
Loading
Loading Uploader...