Join Us On Social Media!

|

|

|
Download The App!
Login To
Remove Ads
Remove Ads
Login To
Remove Ads
Remove Ads
Model Boats Website
 Liked Re: JUANITA STERB WHEELER 2 months ago
 Liked JUANITA STERN WHEELER 2 months ago
 Liked Re: JUANITA STERN WHEELER 2 months ago
 Liked Re: JUANITA STERN WHEELER 2 months ago
 Liked Re: JUANITA STERN WHEELER 2 months ago
 Liked JUANITA STERN WHEELER 2 months ago
 Liked JUANITA STERN WHEELER 2 months ago


Spain
Recent Posts
📝 Sailing at Madrid
2 years ago by 🇪🇸 ARL58 ( Petty Officer 1st Class)
Petty Officer 1st Class)✧ 43 Views · 5 Likes
Flag
📝 Reply
I will check if somebody has an underwater camera....
In the meanwhile, I managed to clip a couple of videos, so the site was happy with their size.


In the meanwhile, I managed to clip a couple of videos, so the site was happy with their size.
▲
⟩⟩
pressonreguardless
chugalone100
Len1
Ray
AlessandroSPQR
Login To
Remove Ads
Remove Ads
📝 Sailing at Madrid
2 years ago by 🇪🇸 ARL58 ( Petty Officer 1st Class)
Petty Officer 1st Class)✧ 46 Views · 1 Like
Flag
📝 Reply
I tried to get big videos uploaded one by one, but doesnt't work 😭.
▲
⟩⟩
Len1
📝 Sailing at Madrid
2 years ago by 🇪🇸 ARL58 ( Petty Officer 1st Class)
Petty Officer 1st Class)✧ 43 Views · 8 Likes
Flag
📝 Reply
And now, some pics and one video of boats in the water...
Unfortunately, it seems that a couple of videos are too big for the site. I will try to edit them to reduce "weight". Or post as YouTube links.
Weather had been warm in the previous weeks. Water was not as clean as desirable. There was a lot of weed, and that caused issues to pumps.
It seems that something went into the intake of submarine ballast pump, and immersion was much slower than expected. In the case of the PRMB, the monitor did not work.
However, Eduardo managed to have a dynamic immersion, and the result was not bad.
Today I will join them again. I was told that Eduardo will bring an steam-driven side wheeler.
▲
⟩⟩
pressonreguardless
chugalone100
Ray
hermank
Isaac
Len1
AlessandroSPQR
boatmam
📝 Sailing at Madrid
2 years ago by 🇪🇸 ARL58 ( Petty Officer 1st Class)
Petty Officer 1st Class)✧ 36 Views · 7 Likes
Flag
📝 Reply
As far as I know, there is no active Model Club in the city of Madrid. But some fellow modellers use to gather on Sunday mornings at a pond in a municipal park. Last Sunday (2024-04-21), we had a pleasant spring day, sunny but fresh, no wind.
So, I went to the lake to watch what was going on. There were three fellows. My good friend Eduardo with his type VII U-Boot. Vicente with a Guardia Civil Patrol and Rescue Motor Boat. And Angel with a fast racing boat.
A lot of people joined to watch and to pose questions. A nice day, indeed.


So, I went to the lake to watch what was going on. There were three fellows. My good friend Eduardo with his type VII U-Boot. Vicente with a Guardia Civil Patrol and Rescue Motor Boat. And Angel with a fast racing boat.
A lot of people joined to watch and to pose questions. A nice day, indeed.
▲
⟩⟩
chugalone100
Ray
hermank
Isaac
Len1
AlessandroSPQR
boatmam
📝 Guestbook
2 years ago by 🇪🇸 ARL58 ( Petty Officer 1st Class)
Petty Officer 1st Class)✧ 268 Views · 15 Likes · 2 Comments
Flag
💬 Add Comment
Cheers from Madrid!
Last Sunday (2024-04-21) we had a pleasant spring day. I went to our local pond to watch some fellow modellers sailing their ships.
A Type VII U-Boot, a Guardia Civil Patrol and Rescue Motor Boat and a small fast craft were there.
Unfortunately, weather was warm for one month, and water was not as clean as desirable, causing issues with small pumps. I will add more pictures and some videos in other sections.
▲
⟩⟩
EdW
Peejay
Ray
Mike Stoney
AlessandroSPQR
GaryLC
hermank
Frankiesays1953
jumpugly
DWBrinkman
PhilH
Len1
boatmam
SimpleSailor
Wolle
💬 Re: Sailing at Madrid (Spain)
2 years ago by 🇪🇸 ARL58 ( Petty Officer 1st Class)
Petty Officer 1st Class)✧ 226 Views · 3 Likes
Flag
💬 Add Comment
I have to rectify. There is still an active modellers' club at Madrid: Club RC Naval de Madrid. Their webpage is.... not the best I've ever seen, so I will not link it. I will try to find out more next Sunday. The pond is supposed to be managed by the Club. I plan to go there with my friend Eduardo, to see his new submarine.
▲
⟩⟩
AlessandroSPQR
Peejay
Len1
📝 Testing propulsion. Part IV (final): Water trial.
2 years ago by 🇪🇸 ARL58 ( Petty Officer 1st Class)
Petty Officer 1st Class)✧ 31 Views · 3 Likes
Flag
💬 Add Comment
Then I moved to freshwater trials. I filled a bucket with water and placed it in the bathtub. The battery was re-installed (again, never use a mains-powered device in a wet place!!!), and the motor started with the propeller underwater. Water "boiled" satisfactorily. Power needed rose greatly, to 82 W (8,8 A @ 9,8 V). Perceived thrust was satisfactory, too. So, I judged the propulsion system, as it was, satisfactory for the application, dismantled the test rig, and carefully mothballed all test gear.


▲
⟩⟩
AlessandroSPQR
Len1
Trident73
📝 Testing propulsion. Part III: testing stuffing box temperature.
2 years ago by 🇪🇸 ARL58 ( Petty Officer 1st Class)
Petty Officer 1st Class)✧ 32 Views · 3 Likes
Flag
💬 Add Comment
38 W (see previous post) was the starting power, of course. Energy conservation laws indicate that excess power would go to heat the grease. More than 30 W is a respectable amount of power for a system of small size, and grease would heat up quickly. This in turn would reduce grease’s viscosity and decrease friction (and power) needs.
I didn’t wish to drain the battery, so I switched to a mains-powered power supply for extended testing. This is safe approach in dry tests (Safety First: never do that in a wet location!).
I placed a pair of type K thermocouples on the SB and read them with a prototype controller I’m currently working on (it is unfinished, but sensors’ interfaces work properly).
While the stuffing box got pretty hot (measured almost 60 centigrade degrees after 10 minutes at full speed), power needs decreased to 18,2 W (1,55 A @ 12 V). Some grease went out through the bearings, probably due to a volume increase (dilation) induced by high temperature. This will be a point to watch.
This is a waste of energy, but there was some good news: the motor and ESC did not heat-up significantly.
▲
⟩⟩
AlessandroSPQR
kevins
Len1
📝 Testing propulsion. Part II: Filling the stuffing box.
2 years ago by 🇪🇸 ARL58 ( Petty Officer 1st Class)
Petty Officer 1st Class)✧ 34 Views · 4 Likes
Flag
💬 Add Comment
I then filled with grease the stuffing box (SB). I had some concerns on this operation. Also, some fellow mariners raised similar issues. These were on i) how to purge air when filling with grease and ii) the possibility of bearings popping out under pressure. However, I quickly dismissed them. Ball bearings aren’t sealed, and therefore aren’t air or watertight. So, air would escape swiftly. Regarding the second point, I will not bore you with the details, but -given the shear strength of the thread/jointlocker that I used-, I estimated than more than 100 bar would be needed to pop-out the bearings. More than 1000 m of water head! But SB material would fail far before reaching such pressure. Yield stress of brass is between 120 and 310 MPa (or N/mm2). Taking an average value of 200 MPa, a brass pipe 0,5 mm thick, with 7 mm inner diameter would yield at 2,8 bar.
Moreover, my experience when greasing my lathe spindle is that grease would overflow through the shaft / inner race interface. This was the case when filling up the stuffing box. It was an easy task. I pumped grease until it started to appear at both ends of the SB. Cleaned the excess grease to be sure that bearings were still in place (they were) and started dry testing.
First “surprise” was that the power required to spin the shaft increased significantly. Viscous friction of a cylinder (the shaft) spinning in a highly viscous medium like grease is really high! I will try to test oil, but I have concerns about leakage through bearings.
Before greasing, power was around 5,4 W (0,45A @ 12 V). It increased to 38 W (3,2 A @ 11,9 V) after filling the SB with grease (To be continued).
▲
⟩⟩
AlessandroSPQR
Len1
RNinMunich
Peejay
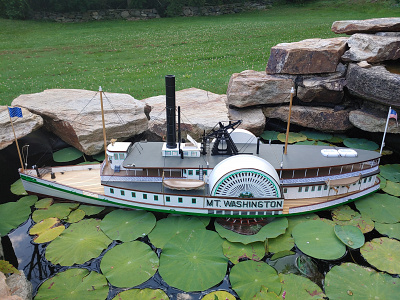
📝 Sailing at Madrid (Spain)
2 years ago by 🇪🇸 ARL58 ( Petty Officer 1st Class)
Petty Officer 1st Class)✧ 229 Views · 16 Likes · 5 Comments
Flag
💬 Add Comment
As far as I know, there is not a model boat club at Madrid. However, modellers gather Sundays at 10:30 to sail at a pond -actually a set of four connected ponds-, located in a municipal park, in the south of the city. Access is free.
The boat in the video is a sidewheeler, scratch built by my good friend Eduardo Yraola, who is a far more accomplished modeller than I am. She has steam propulsion, and sails at a majestuous pace.


The boat in the video is a sidewheeler, scratch built by my good friend Eduardo Yraola, who is a far more accomplished modeller than I am. She has steam propulsion, and sails at a majestuous pace.
▲
⟩⟩
Isaac
jumpugly
Mike Stoney
RNinMunich
ToraDog
Rogal118
Trident73
Len1
Peejay
RogerA1
roycv
AlessandroSPQR
boatmam
hermank
Colin H
Wolle
📝 Back to work: Testing propulsion. Part I.
2 years ago by 🇪🇸 ARL58 ( Petty Officer 1st Class)
Petty Officer 1st Class)✧ 37 Views · 4 Likes
Flag
💬 Add Comment
After the weekend and previous digression (not much real work can be done while the one who must be obeyed is at home), I resumed work.
According to Wikipedia, S-100 basic data are:
Displacement 100 tons (max)
78.9 tons (standard)
Length 34.94 m (114.6 ft) [1]
Beam 5.28 m (17.3 ft)
Draught 1.67 m (5 ft 6 in)
Speed 43.8 knots (81.1 km/h; 50.4 mph)
Important factors are scale displacement and scale speed. Applying the rule of thumb that scale speed = Actual speed / Square root (scale factor), scale speed should be 13,71 Km/h or 3,81 m/s. Scale displacement should be the actual displacement divided by the cube of scale factor, resulting in 1840 g standard and 2332 g maximum.
As I said in a previous post, currently the Lady is a bit overweight. Now she is 1313 g, leaving a margin of only 500 g for motors, battery, servos and other gear, and superstructure. But I will deal with this issue at a later stage.
Regarding propellers, in 2017 I ordered from China several sets that looked appropriate, in left and right versions. I did not make any calculation, as Chinese vendors did not supply data. Among then, there were a set very similar to the ones in the kit. They pleased me, so I selected them. However, the motors shall be adapted to these propellers. I made a rough measurement of their pitch, resulting in an angle of some 12.5 degrees. Diameter is 40 mm, so their theoretical advance is around 28 mm/rev, requiring around 8150 rpm for the nominal scale speed. I always use brushless motors. For these and a 2S Li-Ion battery, Kv would be 1131 (minimum). For a 3S bat, Kv should be 754 (minimum). Let’s say that Kv should range between 900 and 1300.
I had ordered long time ago an assortment of motors, with different sizes and Kv. Among them, I did find a set of quite light outrunners, Kv=1290, which looked appropriate. So, first trials will be done with these. I also did find a set of light ESC. Ugly, but efficient. These are of the reversible type, with stop in the mid-point.
I then de-dusted testing gear: a 3S battery, a volt-ammeter, a servo controller simulator, and a contraption intended to hold together a motor, a stuffing box and its shaft/propeller. I made some dry tests, and everything seemed to work fine. At this point I had to stop work. Tomorrow I will fill with grease the stuffing box and carry out some water tests.
▲
⟩⟩
Peejay
Len1
RossM
AlessandroSPQR
Login To
Remove Ads
Remove Ads
💬 Re: Digression: S-Boote in Spain (Part II. "Made in Spain")
2 years ago by 🇪🇸 ARL58 ( Petty Officer 1st Class)
Petty Officer 1st Class)✧ 51 Views · 2 Likes
Flag
💬 Add Comment
Acknowledgements: The text of this and previous posts are my free translation of a publication made in the magazine "Revista Serga-Noviembre 2003", by Dionisio García.
Spanish S-38 drawings were obtained from Spanish Navy website, hosted in Ministry of Defence website, where they are publicly available.
Spanish S-38 drawings were obtained from Spanish Navy website, hosted in Ministry of Defence website, where they are publicly available.
▲
⟩⟩
Len1
Peejay
📝 Digression: S-Boote in Spain (Part II. "Made in Spain")
2 years ago by 🇪🇸 ARL58 ( Petty Officer 1st Class)
Petty Officer 1st Class)✧ 51 Views · 2 Likes · 1 Comment
Flag
💬 Add Comment
In parallel with the purchase of German-built S-38, several commissions were sent to Germany in the second half of 1942 to negotiate a licensing agreement with Lürssen, to build some S-38 in Spanish shipyards. The German shipyard would provide construction drawings and technical advice. At the same time, it was signed a contract with Daimler-Benz for supplying 40 MB501 (2.000 HP) engines. The government approved quickly the contracts, and appropriated sufficient funds: 2 payments of 1,736 Million Pesetas (ESP) to Lürssen, and three payments of 56,816 Million ESP to Daimler-Benz.
By January 1943 the first drawings were received, and materials started to be stocked. However, this operation was hampered by the amount of aluminium needed (12 tons each vessel). At that time, Unobtainium was a synonym of Aluminium in Spain.
By November 1943, it was approved the construction of 12 units, but construction delays reduced that number to 10, which would be built in La Carraca shipyard (Cádiz). The keel of the first one was laid-out in May 1944, but work progressed slowly due to the scarcity of materials in post-war Spain. A further issue was the delay in the delivery of engines -only 27 were supplied from Germany before the end of WWII-.
These issues caused in 1945 a second reduction in the number of units to be built, to 6. The first two vessels (LT-28 and LT 29) were launched in 1949; but were not delivered to the Navy... until 1953!
The construction of the last three units was also severely delayed. It was not started until 1952, when it was allowed that Germany delivered the remainder of the engines purchased during WWII.
By that time, the Navy had lost interest in S-38s, which were obsolescent. As the units were commissioned, they were sent to Tarifa Naval Station, where they joined the fast launch flotilla, supplementing or replacing the German-built ones. By 1961 LT-29 was decommissioned. The only retrofitting carried out was the replacement of LT-32 mast by one with a navigation radar. Finally, the last three surviving ones were decommissioned by mid ’70s. That was the end of S-Boote story in Spanish Navy.
▲
⟩⟩
Len1
Peejay
📝 Digression: S-Boote in Spain (Part I)
2 years ago by 🇪🇸 ARL58 ( Petty Officer 1st Class)
Petty Officer 1st Class)✧ 55 Views · 2 Likes
Flag
💬 Add Comment
I’m still pondering how I will finish this build. While looking for information on S-Boote, I discovered that they saw service in the Spanish Navy. So, I’m tempted to build her to a Spanish layout. But this approach would require a lot of modelling work, and I’m afraid that my modelling skills are below what it would be required. Moreover, information is scarce. This is the story:
When our last civil war broke-out in 1936, the Nationalist Navy was underpowered. Most ships remained in Republican hands, often after murdering the officers. In an effort to offset this unbalance, it was tried to secure some ships from Germany and Italy. As result, 5 Schnelboote were lent. However, they were early prototypes, powered by petrol motors, and performance was not brilliant. Therefore, they were quickly decommissioned after the end of our war, and negotiations for buying upgraded models were started.
These negotiations were long, and it wasn’t until 1943 than a deal was closed. It resulted in the purchase of 12 S-38 units, at a cost of 2 Million Reichsmark. However, the Kriegsmarine had not plenty of S-Boote, and finally only 6 were supplied.
Crews were trained in Swinemunde, including some actions against Russian Navy. Boats were delivered at Bourdeaux between July 15 and August 31, 1943; together with 6 spare engines. They were armed with 2 torpedoes and 2 Flak 38 20 mm anti-aircraft guns. They were painted in Spanish Naval Grey, with big Spanish flags on the sides, to clearly identify them as neutral crafts. They travelled by pairs to Pasajes (a harbour in Spain’s north coast, close to France). When arriving, they were rafted-up to Minelayer Eolo, designated as their mothership. When all arrived, the flotilla moved to Puntales base in Cádiz, and Gibraltar strait became a natural habitat for them. They were named LT-21 to LT-26 (LT: Lancha Torpedera, Torpedo Launch)
During WWII, they patrolled Gibraltar strait waters, on police duties. After WWII end, they moved to Tarifa, together with their new mothership, gunboat “Calvo Sotelo”. By mid ’50 they were so worn-out that had to be decommissioned (to be continued).
▲
⟩⟩
Len1
Peejay
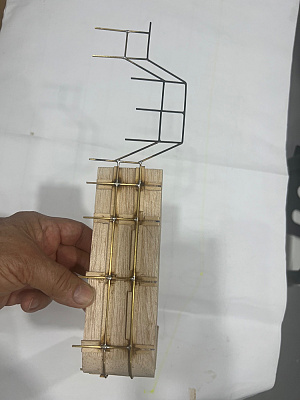
📝 Stuffing boxes temporary installation (trial fit)
2 years ago by 🇪🇸 ARL58 ( Petty Officer 1st Class)
Petty Officer 1st Class)✧ 55 Views · 1 Like · 1 Comment
Flag
💬 Add Comment
Having finished the work on stuffing boxes (SBs), they were trial-fitted in the hull. Central one was just eye balled on keel’s centreline. Outer ones were located and levelled with the help of an improvised ruler, made by cello-taping millimetre paper (similar to engineering paper) on a brass strip cut to 120 mm (propeller’s end was held by the plastic supports included in the kit). When I was satisfied with the alignment, I poured some “polystyrene putty” on SBs. A few drops of CA glue helped to hold them in place while polystyrene putty was drying.
Polystyrene adhesion to brass is simply null (this was a known fact). Just a slight twist and SBs were loose. But polystyrene formed a guide cylinder that allows mounting and dismounting SBs while still maintaining a consistent alignment. At a later stage I will flood this area with epoxy, probably with some glass or carbon fibre reinforcement, to seal and strengthen it. Also, plastic propeller’s supports will be replaced by brass ones.
I also decided to install an aluminium alloy deck to hold motors, servos, and other equipment. First, I prepared a plywood template, and then I ordered a waterjet cut deck, in AW-6062 alloy, 3 mm thick, with slots for shaft ends and oil tubes pre-cut. Slots for motors and servos will be cut later, as well as other slots for decreasing weight (First weighting did show that the vessel was overweight, so some “surgery” will be needed. More on this in a future post)
▲
⟩⟩
Len1
💬 Re: Oil or grease? Stuffing box preparation
2 years ago by 🇪🇸 ARL58 ( Petty Officer 1st Class)
Petty Officer 1st Class)✧ 55 Views · 1 Like
Flag
💬 Add Comment
Bearings are cheap Chinese ones and are not sealed. Probably not the best option, but not being air/watertight will have an advantage. Air will be easily purged/vented through the bushing/shaft interface when filling the stuffing boxes with grease. I'm crossing fingers and relying on the grease to keep bearingsalive. Anyway, I don't plan to operate her on salty water. This will be less aggressive to bearings.
▲
⟩⟩
Len1
💬 Re: Sinking !!!
2 years ago by 🇪🇸 ARL58 ( Petty Officer 1st Class)
Petty Officer 1st Class)✧ 231 Views · 6 Likes
Flag
💬 Add Comment
😂Impressive! I was wondering if he sculted her, or if something went wrong! But I see that her bilge pumps are very efficient!😂😂😂
▲
⟩⟩
Len1
Mike Stoney
jumpugly
Colin H
Doogle
AlessandroSPQR
📝 Patelo Engines: The works of a mechanical genius.
2 years ago by 🇪🇸 ARL58 ( Petty Officer 1st Class)
Petty Officer 1st Class)✧ 83 Views · 18 Likes
Flag
📝 Reply
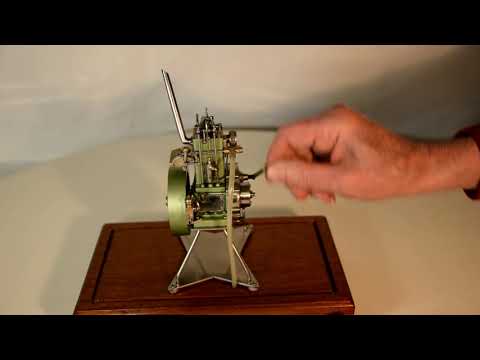
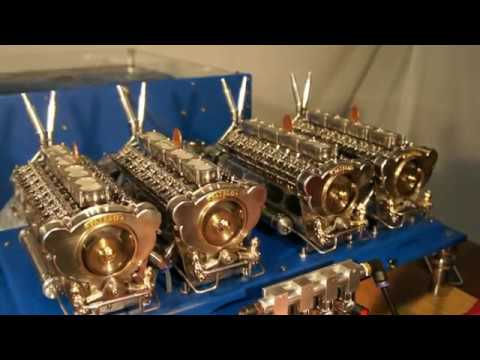
I don't know if any of you did ever heard of "Patelo". This is the nickname of José Manuel Hermo Barreiro. He is a retired chief engineer who sailed in fishing and merchant ships, living in Galicia, NW of Spain. He should be now 83 or 84, as I didn't find his obituary. He is a mechanical genius and a superb full size and model machinist. I'd wish having a mere 10% of his machinist skills. Some could feel jealous. I can only take my [non-existent] hat off and bow.
It is worth to spend half an hour watching a video on his mechanical works of art. It is absolutely captivating, at least for me.
There are full size and model engines, all built from scratch. Titles are in Spanish and English. Sound is only music and engines noise -which is another kind of music-.
One of his pieces of art was a transatlantic liner engine room, including propellers in a water tank. Wow!. There is a series of 6 youtube videos on it. This is the last one.
▲
⟩⟩
PeteJev
jbkiwi
stevedownunder
Ray
ChrisF
Rookysailor
EdW
Len1
RogerA1
JockScott
Colin H
Wolle
hermank
jumpugly
GaryLC
Mike Stoney
AlessandroSPQR
Rogal118
📝 Oil or grease? Stuffing box preparation
2 years ago by 🇪🇸 ARL58 ( Petty Officer 1st Class)
Petty Officer 1st Class)✧ 71 Views · 5 Likes · 4 Comments
Flag
💬 Add Comment
Len, you may find the answer in this post! Cheers!
Back in 2017, in preparation for The Build, I ordered from a well-known Chinese dealer a set of 4mm shafts with 8 mm plain stuffing boxes (SB), with ball bearings at both ends. I also ordered assorted propellers, couplings, bellies, servos, motors and ESCs (more on these in a future post)
I ordered SBs longer than needed, to be able to cut them to size. Also, it was necessary to install the oiling tubes.
Removing ball bearings at one end of each SB was not difficult. After a bit of fiddling with a knife, the sealant was loose, and extraction was easy. They were carefully cleaned and stored in a closed plastic recipient.
SBs were cut to size and faced in the lathe. Then I drilled 3.5 mm holes for the oiling tubes and taped them to M4. Why taping them, you may ask?
When installed, SBs will not be horizontal. I measured as accurately as possible the angle, resulting in 3.5 degrees for the central one, and 3 degrees for the outer ones. As I wanted the oiling tubes to be vertical, I had to solder them at 86.5 / 87 degrees respectively.
Moreover, I did not yet decide if I will fill SBs with oil or grease. So, the assembly should be “open enough”. After long cogitation (what a word!), I decided to solder a short fitting with M6 inner thread. This would allow to mount a M6 greasing nipple or a 6/4 mm oiling tube.
Said and done! I drilled and taped a length of 8 mm brass rod. I placed it in the vise of the milling machine, holding it with a square collet block. The collet was positioned at 3.5/3 degrees using precision angle blocks. Finally, using an 8 mm end mill, a cylindrical seating was milled, and the fitting was cut from the rod in the lathe.
I attached the fittings to SBs using M4 stainless steel (SS) machine screws (stainless steel is supposed to be non-solderable, or at least, difficult to solder), to hold them tightly in place while silver-soldering.
Seating was perfect, and soldering was easy, with the help of a Dremel torch.
I tried to use flux sparingly. However, it reached the screws. I was surprised to find out that it was able to make SS solderable! Fortunately, even if soldered at one point to the SB, it was not difficult to extract them.
Final step was to re-install ball bearings, using Loctite’s 638 block press anaerobic locker (a strong one), and leaving the assemblies to cure overnight in vertical position.
Currently I'm more inclined towards grease than to oil, so I installed M6 greasing nipples, to be able -in due time- to fill the SBs using a regular grease gun. If I ever change my mind, preparing and fitting an oiling tube would be an easy task.
▲
⟩⟩
Cashrc
Fred
EdW
Len1
Graham93
📝 Measure ten times and cut once: Cutting slots for stuffing boxes.
2 years ago by 🇪🇸 ARL58 ( Petty Officer 1st Class)
Petty Officer 1st Class)✧ 80 Views · 8 Likes · 1 Comment
Flag
💬 Add Comment
Thanks to all for the kind advice and comments received so far.
Before continuing, I apologize if my English is not good enough. I started learning this language in my thirties, and the result is not the same as when one starts at 5 o 6.
Next step was cutting the slots for propeller’s shafts stuffing boxes. A risky job, as aligning was not… straightforward. So, I did take it easy and used an approach that usually worked: Long, long time ago I heard a carpenter that knew very well his trade to say, “measure ten times, and cut once”. When I applied this advice, usually the work was rightly done. When I deviated from it, sometimes the result was not so good.
Dave: I like to maintain as much as possible the original layout of any device or vessel. So, I decided to install 3 propellers and 3 rudders. I will decide at a later stage how to deal with ESC and servos, if independent, coordinated or simply in parallel.
Stuffing boxes should have the same layout than the original design. So, they will not enclose shafts in full, but leave some shaft’s length exposed on propeller’s side.
I used propeller’s supports provided in the kit as an alignment aid. I reamed them carefully to 4 mm (shaft diameter) and marked the slots on the hull. I also eye-balled central shaft, and marked some tentative lines.
Finally, after the tenth check, I Dremel-led the slots. Not a perfect job -Dremel tools tend to be “temperamental”-, but good enough for me.
▲
⟩⟩
Boiler Bri
Fred
Graham93
EdW
BarryS
Len1
Mike Stoney
Rogal118
📝 Glueing the Hull: Back to College chemistry lab
2 years ago by 🇪🇸 ARL58 ( Petty Officer 1st Class)
Petty Officer 1st Class)✧ 107 Views · 9 Likes · 2 Comments
Flag
💬 Add Comment
But no evil lasts forever! By mid-2023 I had become a pensioneer, so I had some spare time and was able to un-shelve the S-100.
The first step was glueing the hull. But… wait a minute… With which glue? I was never happy with these “modelling” glues. Expensive, in very small doses, and not strong enough. Also, I wanted to use the glue as filler for obtaining strong joints, able to bear motor’s and other stresses.
In the past, I had obtained good results glueing PMMA (AKA Plexiglass) with a glue obtained dissolving PMMA scraps in Chloroform. Chloroform is a non-toxic solvent, although it may become addictive if inhaled (check the story of the death of Robert Mortimer Glover, the discoverer of its anaesthetics properties). Also, its low boiling point (61.15 ºC) facilitates a rapid hardening of the “glue”. So, it was a perfect candidate to prepare a polystyrene glue by solving polystyrene scraps in it. There are plenty of them in any kit. They “melt” quickly, and in less than one day you will have a useable glue and filler. Moreover, the colour of hardened glue is the same than model’s parts.
However, Chloroform’s low boiling point is an issue in hot weather. If its container is not perfectly sealed, it evaporates quickly. I had two cases of evaporated 1 litre containers in less than 6 months. Now I place Chloroform in a glass bottle closed with a PE cap as soon as I purchase it.
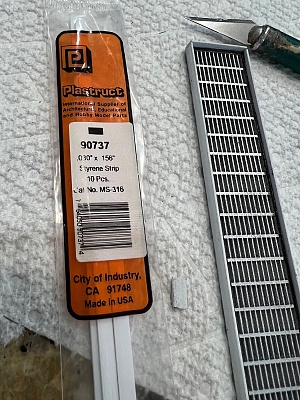
So, I decided to give a try to other solvents. A Google search suggested several candidates. Then I narrowed the search to products available at a local chemicals shop. Finalists were Acetone (nail’s polish remover, boiling point 56.08 ºC), Cyclohexanone (A Nylon precursor, boiling point 155.65 ºC) and Toluene (glue and paint solvent, boiling point 110.60 ºC). I placed polystyrene scraps in these solvents. Results:
Acetone: It is the worst option. It takes ages “melting” the scraps. Getting a homogeneous mix was difficult (took up to 1 week). Moreover, its boiling point is lower than Chloroform’s.
Cyclohexanone: It also takes long time to solve the scraps, but a homogeneous mix can be obtained after 4-5 days. Can be an option in extremely hot weather, due to its high boiling point.
Toluene: Dissolving scraps takes longer than in Chloroform but less than in Cyclohexanone (2 days). It is the best option for use in hot weather. Boiling point is high, but not too high.
Conclusions: Chloroform is the best solvent to prepare “Polystytene model glue”. The mix can be also used as a filler. It is not toxic to humans and does not accumulate in aquatic organisms. Quoting Wikipedia: “The total global flux of chloroform through the environment is approximately 660000 tonnes per year, and about 90% of emissions are natural in origin. Many kinds of seaweed produce chloroform”.
Toluene is a second option, maybe first if Chloroform is not available. But in some jurisdictions, it is difficult to purchase it (I had to provide my ID number when purchasing it) due to its use as recreational drug (glue sniffers!)
After finishing chemical experimenting, I went ahead. I glued and installed the props (One of them was warped, so it needed some help, in the form of copper wire, to straighten it) and the small screws that hold hull’s halves. Then, I glued hull’s halves and transom. As I applied glue in non-visible areas, I didn’t bother to do a perfect and clean job.
I was pleased with the result: The hull felt strong enough to continue the build.


The first step was glueing the hull. But… wait a minute… With which glue? I was never happy with these “modelling” glues. Expensive, in very small doses, and not strong enough. Also, I wanted to use the glue as filler for obtaining strong joints, able to bear motor’s and other stresses.
In the past, I had obtained good results glueing PMMA (AKA Plexiglass) with a glue obtained dissolving PMMA scraps in Chloroform. Chloroform is a non-toxic solvent, although it may become addictive if inhaled (check the story of the death of Robert Mortimer Glover, the discoverer of its anaesthetics properties). Also, its low boiling point (61.15 ºC) facilitates a rapid hardening of the “glue”. So, it was a perfect candidate to prepare a polystyrene glue by solving polystyrene scraps in it. There are plenty of them in any kit. They “melt” quickly, and in less than one day you will have a useable glue and filler. Moreover, the colour of hardened glue is the same than model’s parts.
However, Chloroform’s low boiling point is an issue in hot weather. If its container is not perfectly sealed, it evaporates quickly. I had two cases of evaporated 1 litre containers in less than 6 months. Now I place Chloroform in a glass bottle closed with a PE cap as soon as I purchase it.
So, I decided to give a try to other solvents. A Google search suggested several candidates. Then I narrowed the search to products available at a local chemicals shop. Finalists were Acetone (nail’s polish remover, boiling point 56.08 ºC), Cyclohexanone (A Nylon precursor, boiling point 155.65 ºC) and Toluene (glue and paint solvent, boiling point 110.60 ºC). I placed polystyrene scraps in these solvents. Results:
Acetone: It is the worst option. It takes ages “melting” the scraps. Getting a homogeneous mix was difficult (took up to 1 week). Moreover, its boiling point is lower than Chloroform’s.
Cyclohexanone: It also takes long time to solve the scraps, but a homogeneous mix can be obtained after 4-5 days. Can be an option in extremely hot weather, due to its high boiling point.
Toluene: Dissolving scraps takes longer than in Chloroform but less than in Cyclohexanone (2 days). It is the best option for use in hot weather. Boiling point is high, but not too high.
Conclusions: Chloroform is the best solvent to prepare “Polystytene model glue”. The mix can be also used as a filler. It is not toxic to humans and does not accumulate in aquatic organisms. Quoting Wikipedia: “The total global flux of chloroform through the environment is approximately 660000 tonnes per year, and about 90% of emissions are natural in origin. Many kinds of seaweed produce chloroform”.
Toluene is a second option, maybe first if Chloroform is not available. But in some jurisdictions, it is difficult to purchase it (I had to provide my ID number when purchasing it) due to its use as recreational drug (glue sniffers!)
After finishing chemical experimenting, I went ahead. I glued and installed the props (One of them was warped, so it needed some help, in the form of copper wire, to straighten it) and the small screws that hold hull’s halves. Then, I glued hull’s halves and transom. As I applied glue in non-visible areas, I didn’t bother to do a perfect and clean job.
I was pleased with the result: The hull felt strong enough to continue the build.
▲
⟩⟩
Fred
EdW
Len1
Mike Stoney
BarryS
RNinMunich
Peejay
hermank
Colin H
Login To
Remove Ads
Remove Ads
📝 Yet another Italeri’s S-100 Schnellboot (AKA E-Boat) RC conversion
2 years ago by 🇪🇸 ARL58 ( Petty Officer 1st Class)
Petty Officer 1st Class)✧ 103 Views · 12 Likes · 1 Comment
Flag
💬 Add Comment
Background:
I always had the desire of building a Radio-Controlled MTB. One of good size, 1m or more long. But, for many years, I never had nor the space neither the time needed for such build. So, this desire was carefully mothballed.
Then, back in 2014, it was pretty clear that the Organization for which I worked for more than 30 years was heading to go out of business. In this situation I decided to finish my long-shelved Ph.D. Thesis, to be able to apply for a position in a University, in case that such situation materialized. By mid of 2016, situation was worsening quickly, and I was looking for a job. I was quite lucky, and by the day the judge decided to liquidate the organization and dismiss the last employees (I among them), I had secured a researcher (a non-teaching) position in one of the Universities in Madrid.
Well, I have to say that I had plenty of time to do things that I had delayed “until retirement”. By the beginning of 2017 I started research on available MTB kits, and I felt in love with Italeri’s S-100 Schnellboot, AKA E-Boat. BTW, it was looking for guidance on her RC conversion that I did find Model Boats Website! Tons of information and ideas here!
I went to a local model shop, but they only had PT-109 and Vosper 77 MTBs. So, I ordered it directly from Italeri, and as a bonus, I got a complimentary complement.
However… There is always a “However”! Work in the University was not exhausting, but salary was correspondingly low. Far less than I was used to get. So, I started a consulting activity in a very specialised field of Electrical and Electronics design. Moreover, I did get a few consulting jobs from the European Union. Enough to eat all available time. With deep sorrow, I carefully shelved Italeri’s kit, waiting for better times.
▲
⟩⟩
Len1
Rogal118
Fred
Mike Stoney
RNinMunich
hermank
EdW
jumpugly
Colin H
roycv
MouldBuilder
Trident73
📝 XT60 CONNECTORS
2 years ago by 🇪🇸 ARL58 ( Petty Officer 1st Class)
Petty Officer 1st Class)✧ 36 Views · 5 Likes
Flag
📝 Reply
Although this thread is a bit old, well, I may have a small contribution to it.
Long time ago, I came to the same conclusion tan most mates, and I settled on XT-60. I use them whenever supply voltage is between 6 and 24 V, including my radio gear (I’m also a ham radio operator and tinkerer)
However, soldering them was not easy at first. After spoiling some of them, I came to the same procedure recommended by jonhnf and others:
1.- Always solder connectors mated. I've found pretty convenient to hold them in a mini vise.
2.- I always use 60Pb/40Sn solder, with 3-3.5% core rosin flux. I do a lot of electronics tinkering, including SMD hand soldering, and I never use Pb-free solder.
3.- I first tin the wire, and check that the tinned end fits in the pocket.
4.-Then I tin the pocket. When solder is melted, I quickly insert the tinned end of the wire while keeping the soldering iron in in good contact with wire and pocket. If you feel that there is not enough solder, add more.
5.- Apply some traction to the wire when the joint is cool. Sometimes you get a “dry joint” if not enough heat was applied.
6.- Repeat the same procedure with the other wire.
A closing note: Currently, I settled on subtype XT60-H. No need to deal with heath-shrink tube, resulting in a neater job!
Good luck!
▲
⟩⟩
Graham93
RodC
Len1
cenbeth
AlessandroSPQR
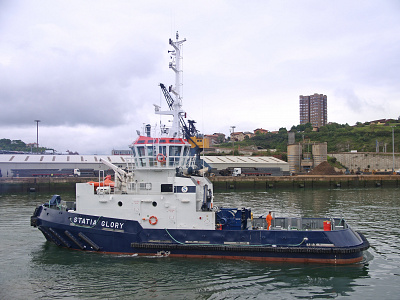
📝 Yet another FB Marketplace purchase
2 years ago by 🇪🇸 ARL58 ( Petty Officer 1st Class)
Petty Officer 1st Class)✧ 45 Views · 0 Likes
Flag
📝 Reply
Excuse my ignorance.... I have a [probably silly] question: Which is the purpose of the piece of material that seems cork attached to the stem? Some sort of bumper?
▲
⟩⟩
No likes yet
This member will receive 1 point
for every like received
This member will receive 1 point
for every like received
📝 Brushed motor capacitors
2 years ago by 🇪🇸 ARL58 ( Petty Officer 1st Class)
Petty Officer 1st Class)✧ 79 Views · 5 Likes
Flag
📝 Reply
I'd stay on the safe side. It would do no harm to install them. Not installing them may cause some harm. And cost and space are negligible. So, the decision should be clear.
▲
⟩⟩
Spence
Len1
Ray
AlessandroSPQR
Peejay
📝 Fuse position Rttl installation mod
3 years ago by 🇪🇸 ARL58 ( Petty Officer 1st Class)
Petty Officer 1st Class)✧ 68 Views · 4 Likes
Flag
📝 Reply
I'd fit 2x fuses, one between Bat+ and each ESC. This way:
1.- Battery will be protected if one ESC decides to "go away" (inserting it between ESC and motor will not cater for this type of fault).
2.- If one fuse blows, you will still have one motor left to try to go back port.
1.- Battery will be protected if one ESC decides to "go away" (inserting it between ESC and motor will not cater for this type of fault).
2.- If one fuse blows, you will still have one motor left to try to go back port.
▲
⟩⟩
MouldBuilder
Colin H
Rogal118
AlessandroSPQR
📝 ROBBE U47
3 years ago by 🇪🇸 ARL58 ( Petty Officer 1st Class)
Petty Officer 1st Class)✧ 84 Views · 3 Likes
Flag
📝 Reply
He even did sell a kit. But that was 10 years ago. Now he is more interested in other topics, like steam propulsion.
▲
⟩⟩
AlessandroSPQR
GaryLC
quattroo
📝 ROBBE U47
3 years ago by 🇪🇸 ARL58 ( Petty Officer 1st Class)
Petty Officer 1st Class)✧ 73 Views · 3 Likes
Flag
📝 Reply
I'm afraid that if you want static dive, you will have to engineer it. My good friend Eduardo Yraola did some scratch builds of static dive submarines. For example, this of L.A. Class:

▲
⟩⟩
Colin H
quattroo
pressonreguardless
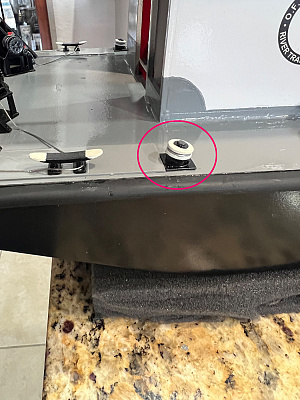
📝 Help De-bonding factory installed nuts...?
3 years ago by 🇪🇸 ARL58 ( Petty Officer 1st Class)
Petty Officer 1st Class)✧ 75 Views · 4 Likes
Flag
📝 Reply
An educated guess.... They used some kind of anaerobic threadlocker, like Loctite's Threadlocker Blue 242. Applying enough torque may loose them. If not, usually applying some heath may help. Either with a solder iron, a heath gun, a hair dryer...

▲
⟩⟩
AlessandroSPQR
Colin H
Doogle
jumpugly
📝 Speed controller
3 years ago by 🇪🇸 ARL58 ( Petty Officer 1st Class)
Petty Officer 1st Class)✧ 90 Views · 5 Likes
Flag
📝 Reply
I'd start "dry testing" it. Connect the servo to a suitable output of a RC receiver, apply power to it, and check if the wiper moves when acting transmitter's control. Check movement limits, too. It seems that the wiper can move 180º, but 90º should be sufficient.
If all is OK, you can add a suitable motor and its battery (if different from the one powering the RC receiver). And check if the motor moves, and if speed can be controlled.
Motor shall have the same voltage rating than the output of the battery (don't plug a 6V motor to a 12V battery)
If all is OK, you can add a suitable motor and its battery (if different from the one powering the RC receiver). And check if the motor moves, and if speed can be controlled.
Motor shall have the same voltage rating than the output of the battery (don't plug a 6V motor to a 12V battery)
▲
⟩⟩
JockScott
AlessandroSPQR
Colin H
RodC
Doogle
Login To
Remove Ads
Remove Ads