Join Us On Social Media!

|

|

|
Download The App!
Login To
Remove Ads
Remove Ads
Login To
Remove Ads
Remove Ads
Model Boats Website
 Commodore)

 Rear Admiral)

 Fleet Admiral)

 Liked Hoist the sails, a new site is on the horizon! 2 days ago


United States


Recent Posts
📝 U.S. Easter Rivers - Towboats
15 days ago by 🇺🇸 Black Shoe ( Sub-Lieutenant)
Sub-Lieutenant)✧ 30 Views · 3 Likes
Flag
📝 Reply
Agreed, hence the "diesel stack" phrase.
As for the steam smoke, I recall reading some historical accounts of the old wood or coal fired steam driven stern wheelers pushing barges upstream and also having a deck load of cotton bales of their own. These boats would employ watchmen who's responsibility it was to put out any sparks that may have found their way to their own deck load.
As for the steam smoke, I recall reading some historical accounts of the old wood or coal fired steam driven stern wheelers pushing barges upstream and also having a deck load of cotton bales of their own. These boats would employ watchmen who's responsibility it was to put out any sparks that may have found their way to their own deck load.
▲
⟩⟩
hermank
Ronald
pressonreguardless
Login To
Remove Ads
Remove Ads
📝 U.S. Easter Rivers - Towboats
15 days ago by 🇺🇸 Black Shoe ( Sub-Lieutenant)
Sub-Lieutenant)✧ 32 Views · 6 Likes
Flag
📝 Reply
Just an observation:
From a scale standpoint using a smoker that operates all the time, and belches copious amounts of smoke out of a modern diesel stack would in real life indicate a "sick" engine. Typically when the engine first starts or is accelerated there would be some visible exhaust, but under a constant load there may be just a hint of smoke as evidenced in these videos.👍
Speed is another scale killer. Fast doesn't necessarily mean accurate. Nit picky perhaps, but it's JMHO.😊
▲
⟩⟩
stevedownunder
pressonreguardless
LewZ
hermank
chugalone100
Ronald
📝 U.S. Easter Rivers - Towboats
16 days ago by 🇺🇸 Black Shoe ( Sub-Lieutenant)
Sub-Lieutenant)✧ 30 Views · 5 Likes
Flag
📝 Reply
A couple of thoughts on towboats and the Dumas American Beauty in particular.
Because towboats generally don't need the typical sea-keeping qualities of her ocean going sisters, the vast majority of them are flat bottomed with the aft portion kicked up to house the wheels, steering and (in some cases) flanking rudders or Korts. This allows the boat to run in "shallower" water and lessening the danger of ripping out the propulsion and steering systems. Using a search engine to look up images, check out the profiles of boats in dry dock or on the ways and this tuck up is apparent.
As for Dumas' American Beauty, the plywood they used and the dies to punch out the deckhouse parts leaves a little to be desired. Keeping in mind the wooden pieces should all be sealed against moisture, and to provide a smooth surface (her deckhouse is metal) a work around was discussed years ago here on this site.
The outcome of that was to obtain a sheet or two of .020 or .030 styrene and trace the wooden parts onto it and cut the parts out of the plastic. This of course is your choice and by no means mandatory. It would be tedious yes, but the end result may be much more satisfying than wrestling with the substandard ply and the finish would be much easier.
Do read through the instructions a couple of times before you embark on this journey.
Patience.
▲
⟩⟩
stevedownunder
chugalone100
pressonreguardless
hermank
RodC
📝 two motors one esc
16 days ago by 🇺🇸 Black Shoe ( Sub-Lieutenant)
Sub-Lieutenant)✧ 51 Views · 5 Likes
Flag
📝 Reply
Greg and Lew, I agree completely. The motors I use are mutts bought off the 'net with no pedigree, label, brand, or spec sheet, so manufacturer tech is non-existent. When I have a new build and after I've proven the watertightness, I put the boat in my small pond, put the bow against the edge and run the boat (single or twin screw) at full throttle with an ammeter hooked up in series with the motor(s) for an extended period of time. Monitoring the amp draw and feeling the motors for temperature occasionally I can garner enough information in real time without a lot of theory behind the build. (Theory is good, but someone telling you the stove is hot, is not the same as drawing close to it and discovering for yourself indeed, it's hot.)
Once I know the loaded amp value of the system, I simply install a breaker around double the running amp load and call it good. (I am an advocate of the "KISS" principle. I also don't use any artificially over priced marine bottom paint, but that's another subject.😊)
This is after all a hobby and as such should be enjoyed rather than getting bogged down with a myriad of principles and over-the-top confusing data unless of course that's the part of the hobby someone thrives on.
▲
⟩⟩
pressonreguardless
stevedownunder
AlessandroSPQR
hermank
LewZ
📝 two motors one esc
16 days ago by 🇺🇸 Black Shoe ( Sub-Lieutenant)
Sub-Lieutenant)✧ 45 Views · 2 Likes
Flag
📝 Reply
Thank you.
Having revisited the thread I either missed it, or neither the proper gauge wire or the fuse value was mentioned for these potential amp loads.
Having revisited the thread I either missed it, or neither the proper gauge wire or the fuse value was mentioned for these potential amp loads.
▲
⟩⟩
hermank
AlessandroSPQR
📝 two motors one esc
17 days ago by 🇺🇸 Black Shoe ( Sub-Lieutenant)
Sub-Lieutenant)✧ 44 Views · 4 Likes
Flag
📝 Reply
Victor and Alessandro, sorry, I wasn't trying to be controversial, I was just sharing a couple of methods that work for me. I understand what the ramifications are of a stalled/disabled RC boat and what the potential results are.
My boats are slow, not very sophisticated, and pretty basic. SLA batteries, and brushed motors in every one with the exception of one that uses a LiFePO4 12.8V, but still brushed motors.
One point of confusion on my part.....with the high amp potential of the systems you advocate, what value fuse do you install?
▲
⟩⟩
Stephen T
stevedownunder
AlessandroSPQR
hermank
📝 two motors one esc
18 days ago by 🇺🇸 Black Shoe ( Sub-Lieutenant)
Sub-Lieutenant)✧ 44 Views · 4 Likes
Flag
📝 Reply
I'm sure you're right in an industrial scenario. I was thinking more in the automotive realm and using a 12V 6A breaker between the motor and the ESC. The cost of the motors I've been using run far less than the cost of a good ESC and are more expendable to me than the ESC - although I have yet to burn a motor out. If something goes sideways between the wheel and motor I'd much rather protect whatever is upstream of the motor.
I have not considered how many times the auto breaker will trip before it "times out", but if it's three or four times would the motor develop a melt down at 6A that quickly?
Seems even if the breaker has a reset number limit (say 3) with a little finesse that's 3 chances to escape whereas a one time fuse is terminal.
▲
⟩⟩
pressonreguardless
stevedownunder
chugalone100
hermank
📝 U.S. Easter Rivers - Towboats
19 days ago by 🇺🇸 Black Shoe ( Sub-Lieutenant)
Sub-Lieutenant)✧ 53 Views · 9 Likes
Flag
📝 Reply
One of my favorite subjects! 😊
I worked on the Ohio and Mississippi rivers in the late 60's to middle '70s.
You're right Lew, the Corps dredged where necessary, but in the interim we'd maintain the buoys, daymarks, and mile number markers. The CG was charged with maintaining the 9' channel depth. This meant if the river levels rose, we'd move the buoys out. When the river went down, we'd have to move them back in toward the center.
The amount of commerce moved on the river systems is amazing and hard to describe without sounding like an exaggeration.
▲
⟩⟩
pressonreguardless
ColinJ2
stevedownunder
hermank
RodC
Chum444
jumpugly
chugalone100
Ronald
📝 Model Boat Show in Switzerland
19 days ago by 🇺🇸 Black Shoe ( Sub-Lieutenant)
Sub-Lieutenant)✧ 40 Views · 5 Likes
Flag
📝 Reply
Incredible models!👍
▲
⟩⟩
chugalone100
Hsailer
jumpugly
hermank
GaryLC
📝 Smoke generator - question
19 days ago by 🇺🇸 Black Shoe ( Sub-Lieutenant)
Sub-Lieutenant)✧ 52 Views · 5 Likes
Flag
📝 Reply
Hi Yab,
The brand is "Costranica" and they can be found on Etsy. ( I have no connection with them other than purchases occasionally.)
They have a few different configurations and appliances, the most of which we wouldn't use, but some of the "hardware" as in the 90* tubing holder prevents kinks in the tubing but allows the unit to be placed remotely and the tubing run to the outlet. I didn't have room for the whole unit (including the batt compartment in one build), so pulled the wires from the compartment, cut it off the "business end" of the unit and hooked the wires to a switched buck converter set to 4.5V which lessened the volume that was much more consistent with the boat it was installed in.
▲
⟩⟩
Julio
thadlietz
hermank
stevedownunder
RodC
📝 two motors one esc
20 days ago by 🇺🇸 Black Shoe ( Sub-Lieutenant)
Sub-Lieutenant)✧ 66 Views · 4 Likes
Flag
📝 Reply
A 320 amp ESC? Seems a lot of other stuff will "smoke" first.
I'm not sure why one would install two motors and not take advantage of what they're capable of....
On the subject of fuses: if your boat is across the pond and it ends up in the weeds causing your fuse to blow, you're dead in the water. If you have two motors, two ESC's, each one operating independently, you would have redundancy and a better chance of escaping. Another possibility is using self resetting breakers instead of fuses. If the breaker opens, one just has to wait a few moments for it to cool off and it'll be ready to go again. It may take a few cycles to get out of a bad situation, but they're not as final as a blown fuse.
▲
⟩⟩
pressonreguardless
LIBERTY CAPTAIN
hermank
stevedownunder
Login To
Remove Ads
Remove Ads
📝 Smoke generator - question
20 days ago by 🇺🇸 Black Shoe ( Sub-Lieutenant)
Sub-Lieutenant)✧ 54 Views · 10 Likes
Flag
📝 Reply
I'm a little late in this discussion, but have read the thread and no one mentioned the Cosplay Actor's fog machines.
These are pocket held little devices operating on four AA batteries which are contained within the device. Obviously they use heat to create the "fog", but it's not so hot it can't be hidden in a jacket pocket.
A real plus for them is they can push the fog down three feet of plastic hose and not loose any volume. This translates to remote mounting and not needing to be mounted under the stack. They operate in any position, and can be controlled by an ESC so long as their voltage remains under 6V. I don't operate mine all the time hence a channel activated switch to turn them on and off in short usage periods.
There are two in my tug, one for the main stack and one for Maude's cook stove. The one for Maude's stove has a drop of cinnamon roll baking essence (a candle making essence,) so if we're on the pond and an observer gets a whiff of it they're not offended.
In the video the air was stock still, but on the pond the slightest air makes the smoke more realistic.
▲
⟩⟩
hermank
EdW
RodC
Yabbie1
Mike Stoney
Northernflotsam
Rookysailor
stevedownunder
chugalone100
Ronald
📝 Is it 100% real or is it AI modified?
21 days ago by 🇺🇸 Black Shoe ( Sub-Lieutenant)
Sub-Lieutenant)✧ 36 Views · 6 Likes
Flag
📝 Reply
That's just a painted "canvas cover" over the compass. We'd put that on at the dock in the evening to keep the dew off of the compass. During the day if we were doing harbor or inshore patrols we'd just leave it on.
▲
⟩⟩
jumpugly
Olly999
stevedownunder
hermank
Ronald
chugalone100
📝 Is it 100% real or is it AI modified?
22 days ago by 🇺🇸 Black Shoe ( Sub-Lieutenant)
Sub-Lieutenant)✧ 44 Views · 9 Likes
Flag
📝 Reply
Thank you Lew.
I was introduced to the "40 boat" back in 1963. It was always one of my favorite boats. Mine is 1:12 scale and has a lot of hours on it.
My second favorite was the 82ft Point Class. Not sure I have the courage to build that in 1:12!😀

I was introduced to the "40 boat" back in 1963. It was always one of my favorite boats. Mine is 1:12 scale and has a lot of hours on it.
My second favorite was the 82ft Point Class. Not sure I have the courage to build that in 1:12!😀
▲
⟩⟩
zooma
chugalone100
jumpugly
Mike Stoney
hermank
stevedownunder
jbkiwi
DWBrinkman
LewZ
📝 Is it 100% real or is it AI modified?
22 days ago by 🇺🇸 Black Shoe ( Sub-Lieutenant)
Sub-Lieutenant)✧ 47 Views · 13 Likes
Flag
📝 Reply
Thank you all!
The camera I've been using is a Sony DSC-HX80, and a dedicated small tripod that has extendable legs which allows it to stand on uneven ground. It's not the only camera with wifi capability, but I've had pretty fair results with it. The prices are all over the place for these type of cameras and may seem excessive for a hobby camera, but if the price is extended over several years of use it becomes a useful tool for our purposes.
I prefer the wifi to the bluetooth because the range is better and not as likely to disconnect if the phone gets too far away.
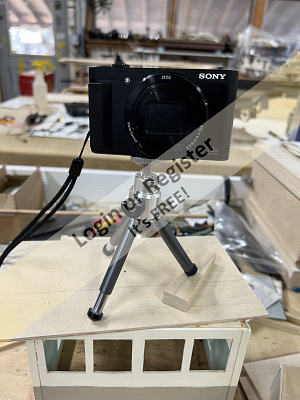
▲
⟩⟩
Chum444
chugalone100
jumpugly
Mike Stoney
hermank
jbkiwi
DWBrinkman
stevedownunder
Commodore-H
RodC
GaryLC
LewZ
Ronald
📝 Is it 100% real or is it AI modified?
22 days ago by 🇺🇸 Black Shoe ( Sub-Lieutenant)
Sub-Lieutenant)✧ 39 Views · 8 Likes
Flag
📝 Reply
Thank you JB.
There are some relatively inexpensive digital cameras that have wifi capability and can "talk" to a smart phone. I put the camera on a makeshift tripod at water's edge and monitor what the camera sees through my phone which is mounted to the transmitter. When the boat is in position clicking the button on the phone triggers the camera.
There are some relatively inexpensive digital cameras that have wifi capability and can "talk" to a smart phone. I put the camera on a makeshift tripod at water's edge and monitor what the camera sees through my phone which is mounted to the transmitter. When the boat is in position clicking the button on the phone triggers the camera.
▲
⟩⟩
Mike Stoney
RodC
chugalone100
jumpugly
hermank
stevedownunder
jbkiwi
Ronald
📝 Is it 100% real or is it AI modified?
22 days ago by 🇺🇸 Black Shoe ( Sub-Lieutenant)
Sub-Lieutenant)✧ 39 Views · 15 Likes
Flag
📝 Reply
JBKiwi, The closer to water level you can get, the better.


▲
⟩⟩
Mike Stoney
RodC
chugalone100
Madwelshman
GaryLC
jumpugly
hermank
Olly999
EdW
DWBrinkman
LewZ
stevedownunder
Ronald
Chum444
jbkiwi
📝 Calling it a day.
2 years ago by 🇺🇸 Black Shoe ( Sub-Lieutenant)
Sub-Lieutenant)✧ 90 Views · 11 Likes
Flag
📝 Reply
It's difficult to find the correct words in circumstances like this, particularly when it involves friends not met.
Thank you for the many modeling insights you have, and will continue to provide.
I wish you peace and comfort in knowing you have friends all over the world.
Thank you for the many modeling insights you have, and will continue to provide.
I wish you peace and comfort in knowing you have friends all over the world.
▲
⟩⟩
Brightwork
BOATSHED
GaryLC
Len1
stevedownunder
Trident73
Wolle
Peejay
Colin H
hermank
Newby7
📝 Death of a member.
2 years ago by 🇺🇸 Black Shoe ( Sub-Lieutenant)
Sub-Lieutenant)✧ 81 Views · 11 Likes
Flag
📝 Reply
It's a difficult time when one loses a son or daughter.
My heart-felt condolences to you and your family.
My heart-felt condolences to you and your family.
▲
⟩⟩
Ronald
Scratchbuilder
jumpugly
BOATSHED
Colin H
stevedownunder
Mike Stoney
Doogle
Peejay
Len1
hermank
💬 Re: Encore
2 years ago by 🇺🇸 Black Shoe ( Sub-Lieutenant)
Sub-Lieutenant)✧ 36 Views · 1 Like
Flag
💬 Add Comment
Thank you all!
Chum, it'll be there! Already looking forward to the combined float.
Ron, we'll pin down the day as we get closer! 👍
Hermank, the figures came from a printer on Etsy.
Chum, it'll be there! Already looking forward to the combined float.
Ron, we'll pin down the day as we get closer! 👍
Hermank, the figures came from a printer on Etsy.
▲
⟩⟩
Len1
📝 Encore
2 years ago by 🇺🇸 Black Shoe ( Sub-Lieutenant)
Sub-Lieutenant)✧ 47 Views · 15 Likes · 4 Comments
Flag
💬 Add Comment
I thought the last entry was the last entry. 😊
After shelving the launch to wait for the ice to go out and thinking about it a little, it seemed like a good time to add a few lights and a couple more details. I also didn't like having to remove the cabin roof to turn on and off the power. It seemed like an opportunity to break something particularly at pond-side, so moving the power switch was added to the list.
Interior, running, cockpit, and instrument lights were added. The main power switch was moved to a mount under the small hatch forward.
The anchor and boathook was also added.
The boat has been launched and run albeit in a very small area of a very small pond, but I suspect even with a six volt system it'll still operate at speeds somewhat above scale.
▲
⟩⟩
Commodore-H
AlessandroSPQR
Rookysailor
roycv
stevedownunder
Graham93
Doogle
Wolle
Len1
peterd
Ronald
EdW
Mike Stoney
Colin H
Chum444
Login To
Remove Ads
Remove Ads
📝 Boat colors
2 years ago by 🇺🇸 Black Shoe ( Sub-Lieutenant)
Sub-Lieutenant)✧ 45 Views · 4 Likes
Flag
📝 Reply
If you're going to paint the entire bottom, matching a particular color isn't real critical. I've found any reddish-brown ("hot rod") primer to work in the majority of cases. I would agree with Jumpugly that test patches off the boat should be done in any case.
I also understand that enamel will work over lacquer, but lacquer won't do as well over enamel because of the different rates of expansion/contraction enamel being more forgiving.
I also understand that enamel will work over lacquer, but lacquer won't do as well over enamel because of the different rates of expansion/contraction enamel being more forgiving.
▲
⟩⟩
Len1
stevedownunder
Isaac
Colin H
📝 Launch cushions
2 years ago by 🇺🇸 Black Shoe ( Sub-Lieutenant)
Sub-Lieutenant)✧ 60 Views · 9 Likes · 3 Comments
Flag
💬 Add Comment
Hi Steve,
Glad you found the (probably) last installment of this build. I inadvertently posted it as a comment to a previous installment instead of a new "chapter" of the build log.
The cushions:
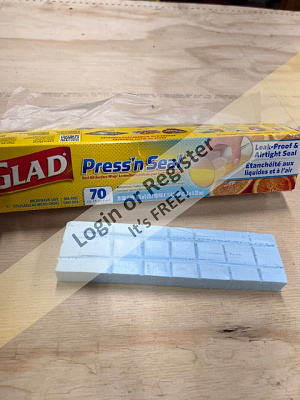
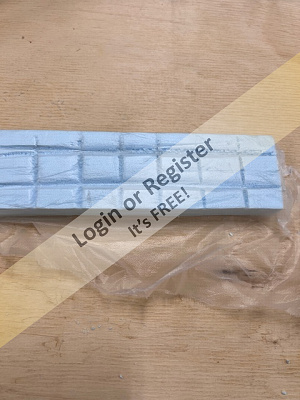
All they are is a piece of rigid closed cell foam used for insulation from a big box store or lumber yard. (I use it cut up and installed in voids for floatation as well.) It can also be found on construction sites as cut-offs in sizes good for our hobby.
The photos:
After a bit of experimenting, here's a quick summary of how these cushions came to be.
Cutting the cushions to size and shape, marking off, filing and sanding the grooves to create the pattern of the sections, rounding off the rough edges, wrapping the part with a kitchen wrapping product. (I have no stake in this company, it just happens to have a little texture to it, sticks well during this process, takes rattle-can paint well, and above all was available in the kitchen cabinet.👍 Some of the spray paints are too "hot" for the foam, but this wrap provides a barrier so the foam isn't effected. I recommend experimenting with the materials at hand to be sure they're compatible. )
Once the wrap is applied the pins were installed to simulate the buttons, CA glued on the backside and cut off if too long. A piece of cord is glued to the outside edge of the cushions to simulate the piping.
A couple light coats of primer, then a color coat.


Glad you found the (probably) last installment of this build. I inadvertently posted it as a comment to a previous installment instead of a new "chapter" of the build log.
The cushions:
All they are is a piece of rigid closed cell foam used for insulation from a big box store or lumber yard. (I use it cut up and installed in voids for floatation as well.) It can also be found on construction sites as cut-offs in sizes good for our hobby.
The photos:
After a bit of experimenting, here's a quick summary of how these cushions came to be.
Cutting the cushions to size and shape, marking off, filing and sanding the grooves to create the pattern of the sections, rounding off the rough edges, wrapping the part with a kitchen wrapping product. (I have no stake in this company, it just happens to have a little texture to it, sticks well during this process, takes rattle-can paint well, and above all was available in the kitchen cabinet.👍 Some of the spray paints are too "hot" for the foam, but this wrap provides a barrier so the foam isn't effected. I recommend experimenting with the materials at hand to be sure they're compatible. )
Once the wrap is applied the pins were installed to simulate the buttons, CA glued on the backside and cut off if too long. A piece of cord is glued to the outside edge of the cushions to simulate the piping.
A couple light coats of primer, then a color coat.
▲
⟩⟩
Mike Stoney
pressonreguardless
Len1
EdW
stevedownunder
River Rat
GaryLC
Colin H
RNinMunich
💬 Re: Harbor Launch
2 years ago by 🇺🇸 Black Shoe ( Sub-Lieutenant)
Sub-Lieutenant)✧ 63 Views · 6 Likes
Flag
💬 Add Comment
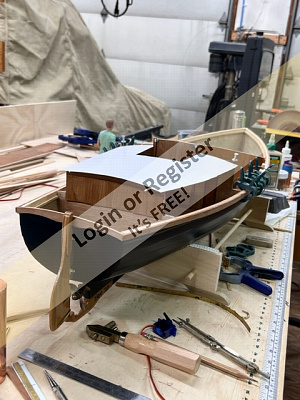
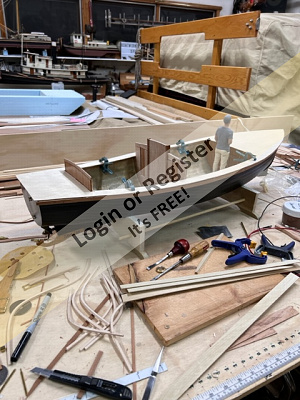
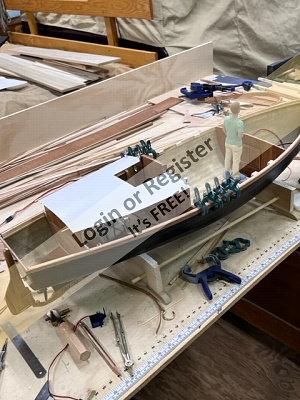
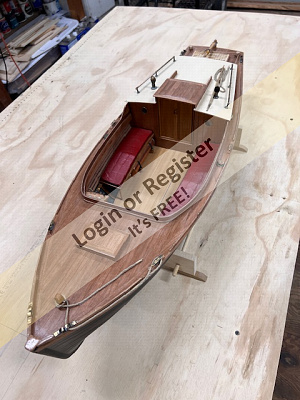
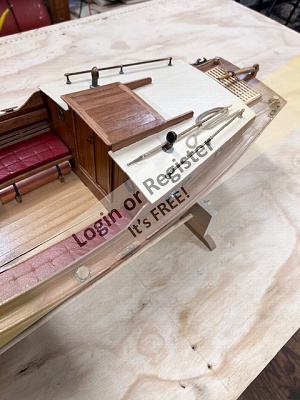
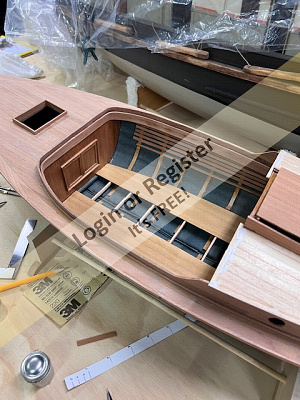
Things are wrapping up on the launch. Other than a "shake-down cruise" (delayed because of ice in the thoroughfare,) and a few added details this project is about as ready as it will be for a spring float.
There were a couple of experiments trying to get the cushions looking like I thought they should. A little more finessing and they should be OK.
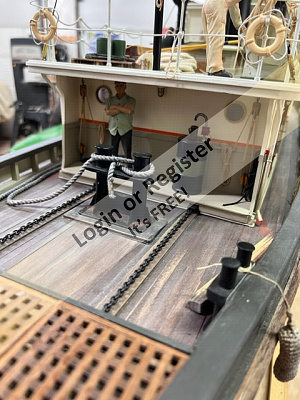
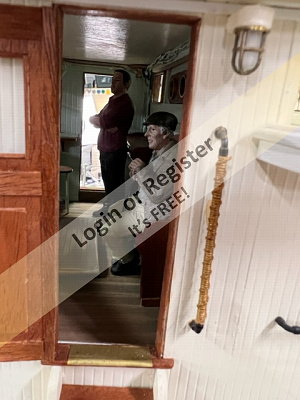
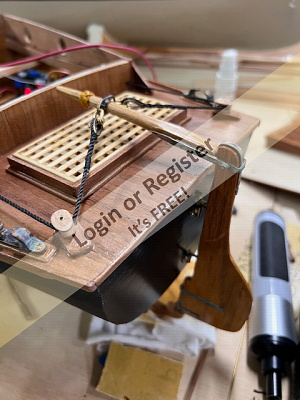
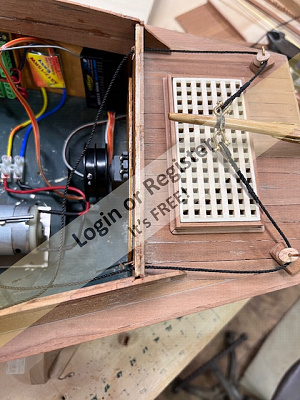
The photos:
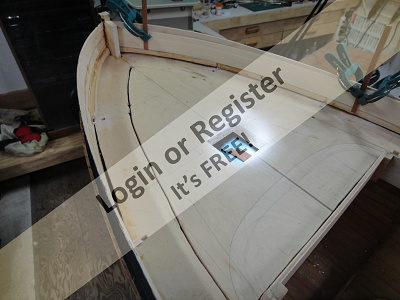
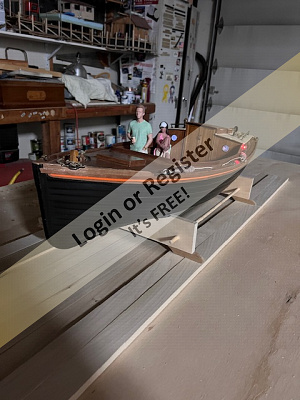
1. Overall shot of the cockpit.
2. The engine room roof.
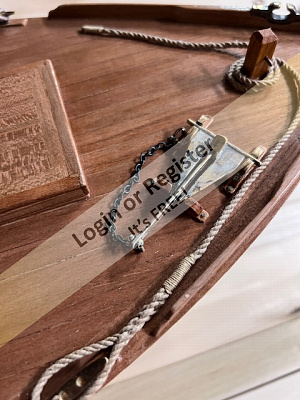
3. Cushions
4. Cocks combing on the boat hook, and spliced
stern mooring line.
5. Forward deck and mooring line.
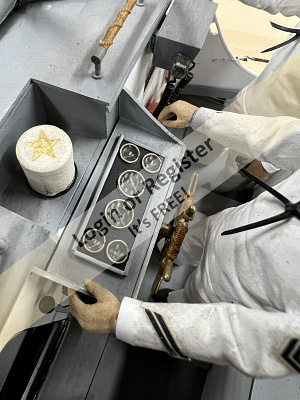
6. Control console. (The toggle switches are
actually very small scale belaying pins
mounted through an #090 nut and a .025"
hole drilled through the console panel.)
7. Rudder, gudgeons, pintles, and tiller mount.
It's difficult to pick out, but there had to be a
lock fabricated to keep the rudder from
floating up under wheel pressure and
disengaging from the gudgeons.
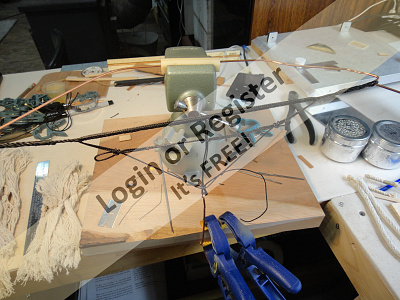
8. The "engine room" which is still being sorted
out. It's functional, but there's a couple more
electrical circuits that need to be added.
9., 10., & 11. Overall shots of the launch.


There were a couple of experiments trying to get the cushions looking like I thought they should. A little more finessing and they should be OK.
The photos:
1. Overall shot of the cockpit.
2. The engine room roof.
3. Cushions
4. Cocks combing on the boat hook, and spliced
stern mooring line.
5. Forward deck and mooring line.
6. Control console. (The toggle switches are
actually very small scale belaying pins
mounted through an #090 nut and a .025"
hole drilled through the console panel.)
7. Rudder, gudgeons, pintles, and tiller mount.
It's difficult to pick out, but there had to be a
lock fabricated to keep the rudder from
floating up under wheel pressure and
disengaging from the gudgeons.
8. The "engine room" which is still being sorted
out. It's functional, but there's a couple more
electrical circuits that need to be added.
9., 10., & 11. Overall shots of the launch.
▲
⟩⟩
Mike Stoney
MartinH2
Peejay
jbkiwi
stevedownunder
RNinMunich
💬 Re: Clinker built sailing dinghy
2 years ago by 🇺🇸 Black Shoe ( Sub-Lieutenant)
Sub-Lieutenant)✧ 155 Views · 5 Likes
Flag
💬 Add Comment
A good size for some intricate detail!
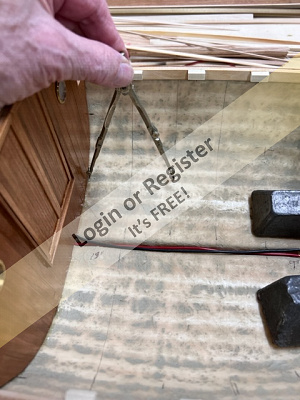
In my limited skill-set I've found that transferring measurements and particularly converting from one system to another provide me with too many opportunities to go adrift. If I'm working from a set of plans that are correct for the scale I'm using I seldom know (or care,) what the numerical dimension is. Using a pair of navigation dividers I lift the size of a given timber directly from the plan and transfer the points to the material without trying to read a ruler where (for me ) there's too much room for error.😊
In my limited skill-set I've found that transferring measurements and particularly converting from one system to another provide me with too many opportunities to go adrift. If I'm working from a set of plans that are correct for the scale I'm using I seldom know (or care,) what the numerical dimension is. Using a pair of navigation dividers I lift the size of a given timber directly from the plan and transfer the points to the material without trying to read a ruler where (for me ) there's too much room for error.😊
▲
⟩⟩
philcaretaker
Ronald
Graham93
stevedownunder
Peejay
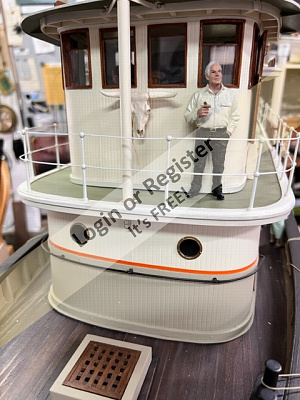
💬 Re: Harbor Launch
2 years ago by 🇺🇸 Black Shoe ( Sub-Lieutenant)
Sub-Lieutenant)✧ 85 Views · 4 Likes
Flag
💬 Add Comment
Thank you all for the comments!
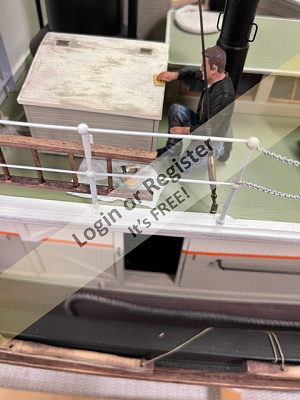
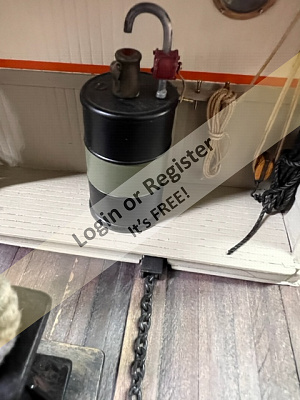
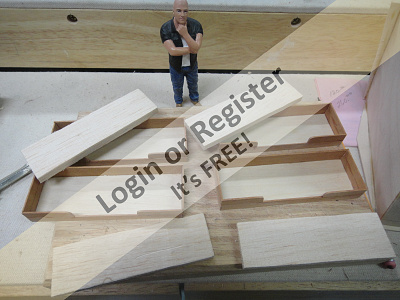
I spoke with the guy in the photos and shared the concerns posted by Doug. He responded;
"Please relay to Mr. Doug that even though my posture suggests otherwise, I am not enjoying the relief he suggests ~ although two more of these cans and I WILL be ready to pump bilges!
Carry on.....👍"
😊
I spoke with the guy in the photos and shared the concerns posted by Doug. He responded;
"Please relay to Mr. Doug that even though my posture suggests otherwise, I am not enjoying the relief he suggests ~ although two more of these cans and I WILL be ready to pump bilges!
Carry on.....👍"
😊
▲
⟩⟩
Peejay
stevedownunder
Ronald
RNinMunich
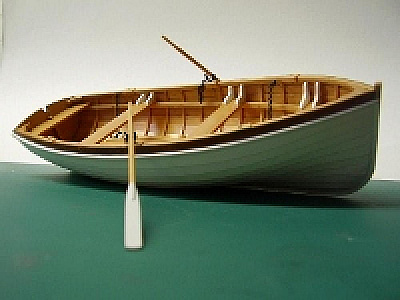
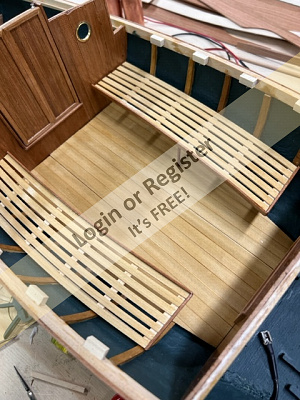
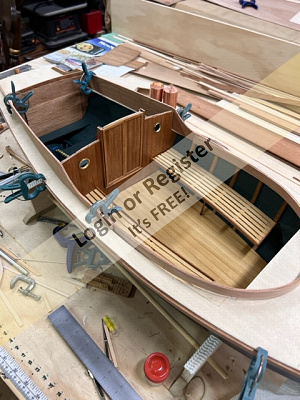
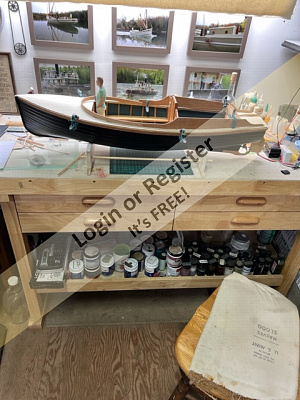
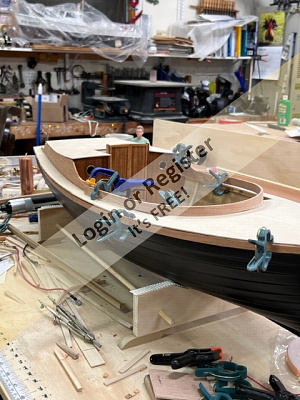
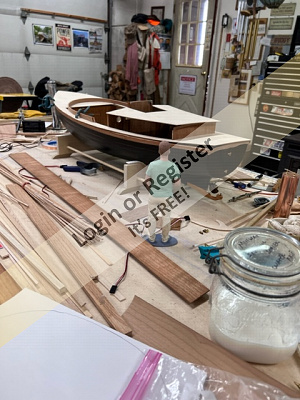
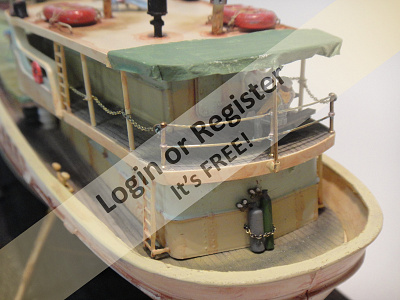
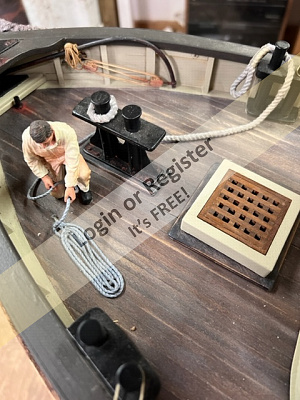
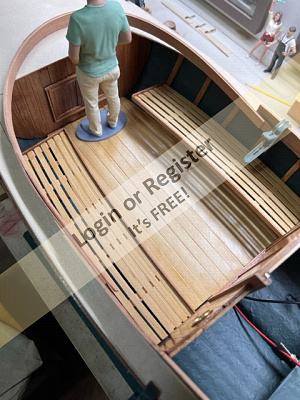
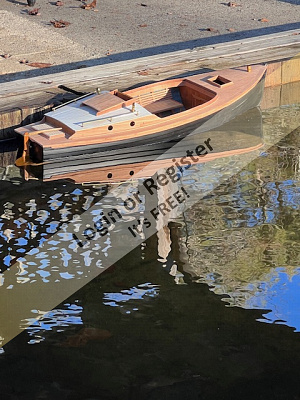
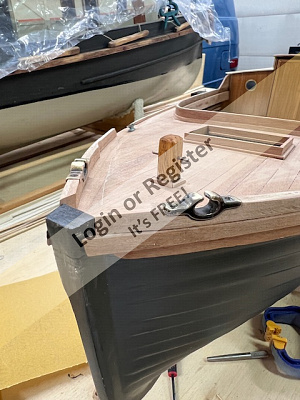
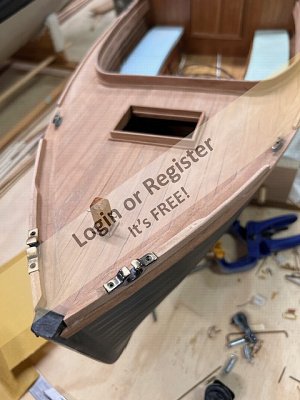
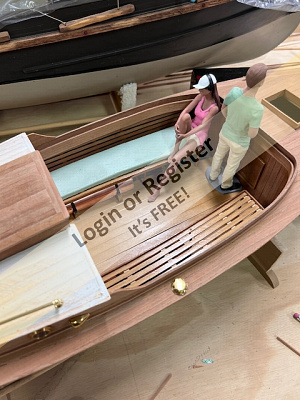
📝 Harbor Launch
2 years ago by 🇺🇸 Black Shoe ( Sub-Lieutenant)
Sub-Lieutenant)✧ 92 Views · 20 Likes · 8 Comments
Flag
💬 Add Comment
Back to The bench.
A summer of projects around the house, gardens, an old van, and the holidays used a lot of 2023. There were occasional evenings on the bench, but the weather has turned with the calendar and it's time to dust off the launch.
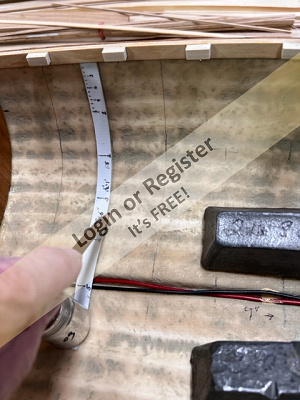
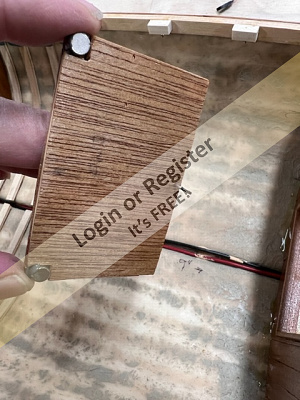
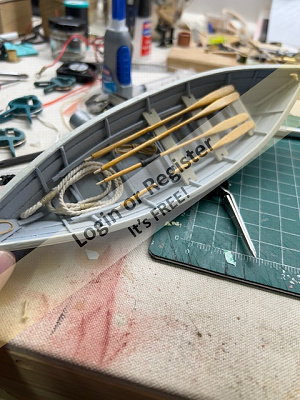
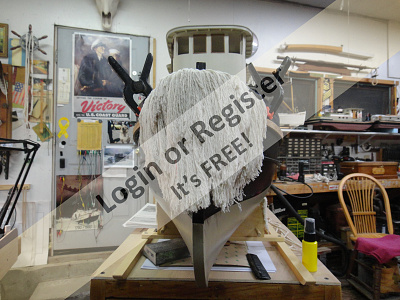
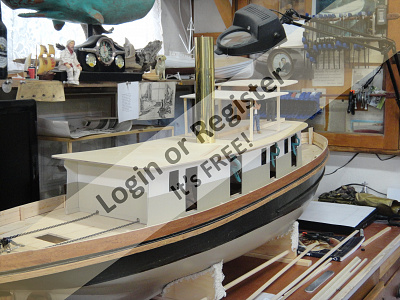
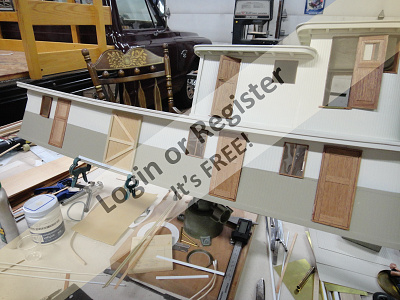
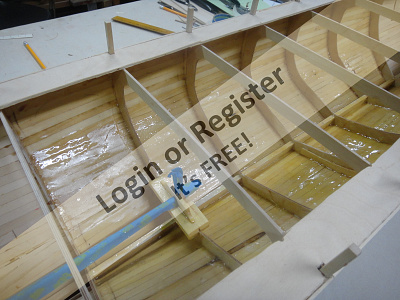
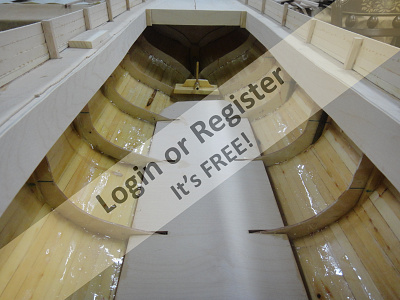
The original design had a sweeping arc as a coaming around the cockpit (shown in an earlier photo) and the foredeck continued under this and terminated in a straight horizontal line. To me it made the coaming look like an after-thought. I used a wall paper steamer and built a steam box to try some pretty severe curves in the cherry wood at the forward corners of the cockpit. There were a couple of pieces that split, but paying close attention to the grain of the wood enhanced the success of the bending. I built a buck just slightly smaller than the contour I needed and clamped the steamed strakes to it allowing them to cool and take a set for a day.
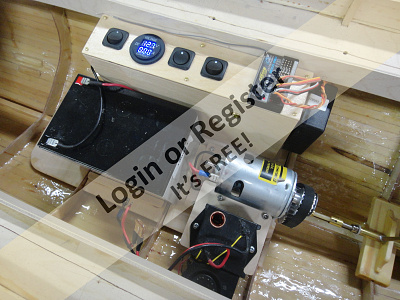
Most of the electronics and electrical components have been temporarily installed in order to prove their effectiveness and determine the trim/ballast requirements.
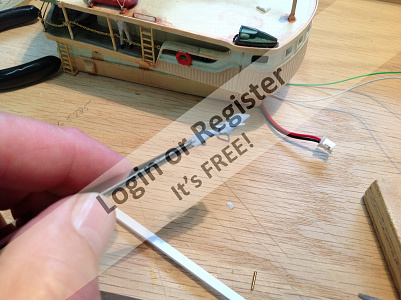
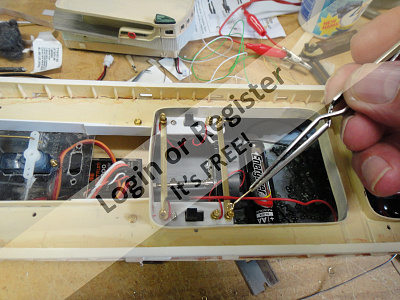
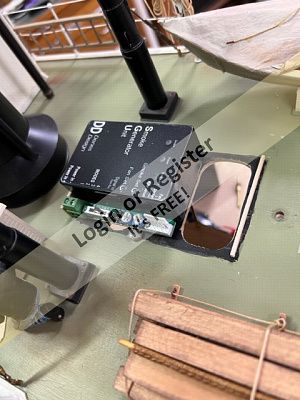
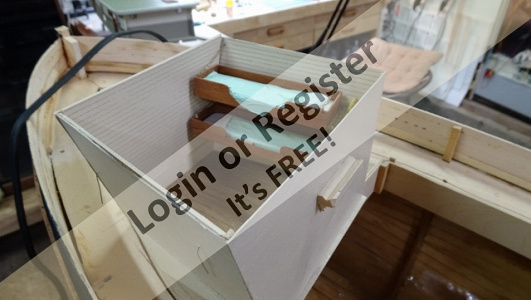
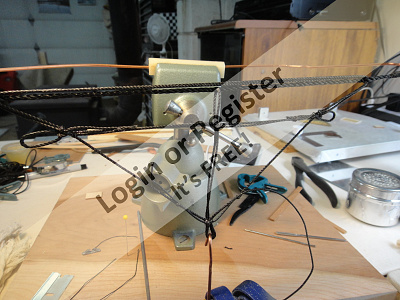
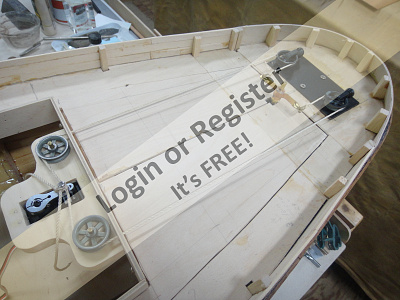
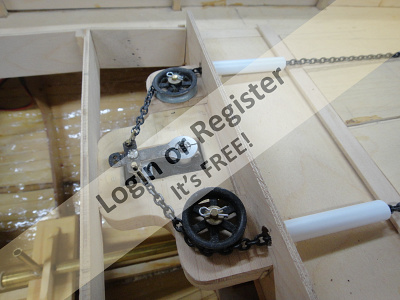
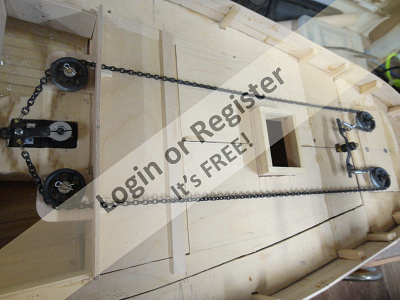
The steering apparatus is a little unusual, in that with an outboard rudder and tiller a conventional rudder post and quadrant inboard forward of the transom wasn't possible. A system of turning blocks and a vertically mounted servo answers to operate the tiller. I used the stock servo arm and although it's relatively short still provides close to the 35 degree rudder port and starboard which is considered maximum effectiveness. (The image below shows the winch pulleys which proved unnecessary. The original thought was a two part purchase that would have needed more line, but the rudder action and size has proved the single line to be sufficient.)
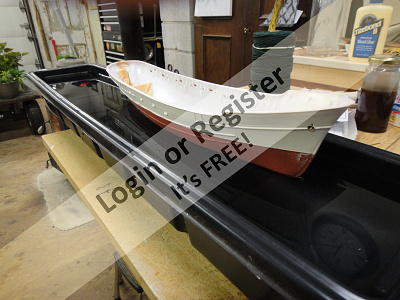
A float test has proven successful in the trim department although a full test under power couldn't be done as at that time the rudder rig wasn't sorted out yet.
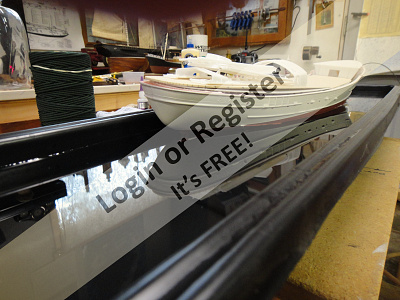
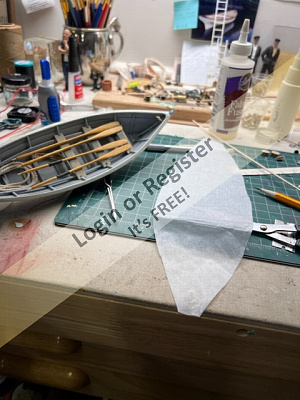
Several coats of satin finish have been applied and weathering and fitting the hardware is in the process now. After this is completed it'll be disassembled, sanded, and final finish applied.
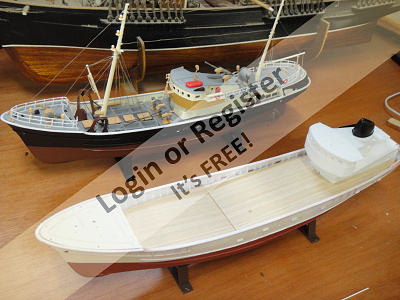
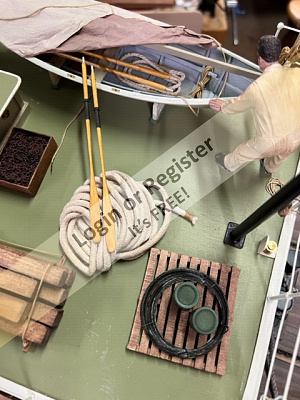
The detailing will follow with lines, "stuff", and perhaps running lights.

A summer of projects around the house, gardens, an old van, and the holidays used a lot of 2023. There were occasional evenings on the bench, but the weather has turned with the calendar and it's time to dust off the launch.
The original design had a sweeping arc as a coaming around the cockpit (shown in an earlier photo) and the foredeck continued under this and terminated in a straight horizontal line. To me it made the coaming look like an after-thought. I used a wall paper steamer and built a steam box to try some pretty severe curves in the cherry wood at the forward corners of the cockpit. There were a couple of pieces that split, but paying close attention to the grain of the wood enhanced the success of the bending. I built a buck just slightly smaller than the contour I needed and clamped the steamed strakes to it allowing them to cool and take a set for a day.
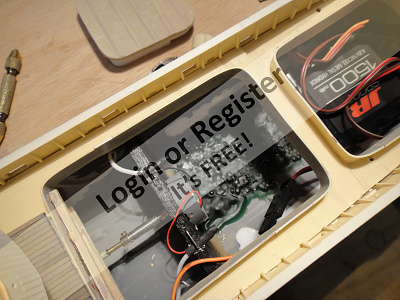
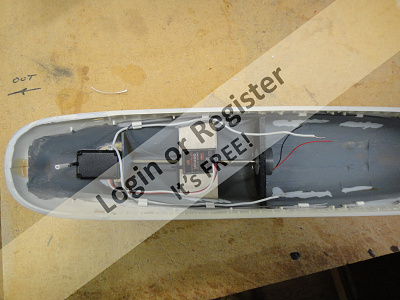
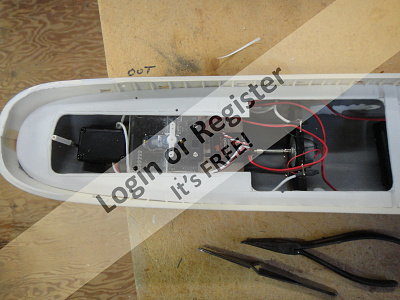
Most of the electronics and electrical components have been temporarily installed in order to prove their effectiveness and determine the trim/ballast requirements.
The steering apparatus is a little unusual, in that with an outboard rudder and tiller a conventional rudder post and quadrant inboard forward of the transom wasn't possible. A system of turning blocks and a vertically mounted servo answers to operate the tiller. I used the stock servo arm and although it's relatively short still provides close to the 35 degree rudder port and starboard which is considered maximum effectiveness. (The image below shows the winch pulleys which proved unnecessary. The original thought was a two part purchase that would have needed more line, but the rudder action and size has proved the single line to be sufficient.)
A float test has proven successful in the trim department although a full test under power couldn't be done as at that time the rudder rig wasn't sorted out yet.
Several coats of satin finish have been applied and weathering and fitting the hardware is in the process now. After this is completed it'll be disassembled, sanded, and final finish applied.
The detailing will follow with lines, "stuff", and perhaps running lights.
▲
⟩⟩
MartinH2
Mike Stoney
jbkiwi
Commodore-H
luckyduck
DuncanP
Wolle
mturpin013
EdW
Len1
River Rat
boatmam
Colin H
stevedownunder
hermank
Peejay
RNinMunich
Doogle
Ronald
AlessandroSPQR
💬 Re: A Tug Fort Valley Modification
3 years ago by 🇺🇸 Black Shoe ( Sub-Lieutenant)
Sub-Lieutenant)✧ 47 Views · 1 Like
Flag
💬 Add Comment
Guessing the format was OK, but when I tried to link the youtube address I used the opposing arrows on either end like I do in an email and the site didn't like them.
Just the address was sufficient.
Just the address was sufficient.
▲
⟩⟩
RNinMunich
💬 Re: A Tug Fort Valley Modification
3 years ago by 🇺🇸 Black Shoe ( Sub-Lieutenant)
Sub-Lieutenant)✧ 54 Views · 1 Like
Flag
💬 Add Comment
Here you go Doug...👍😊 \/ \/
▲
⟩⟩
RNinMunich
💬 Re: A Tug Fort Valley Modification
3 years ago by 🇺🇸 Black Shoe ( Sub-Lieutenant)
Sub-Lieutenant)✧ 55 Views · 5 Likes
Flag
💬 Add Comment
Sorry, apparently I have to modify the format to have the forum recognize it.
Working on it...🤞

Working on it...🤞
▲
⟩⟩
Fred
Ronald
River Rat
stevedownunder
Scratchbuilder
Login To
Remove Ads
Remove Ads