Join Us On Social Media!

|

|

|
Download The App!
Login To
Remove Ads
Remove Ads
Login To
Remove Ads
Remove Ads
Model Boats Website
 Lieutenant Commander)

 Fleet Admiral)
 Liked Re: The Maiden Voyage 8 months ago
 Liked Re: The Maiden Voyage 8 months ago


United States
Recent Posts
📝 More Videos
7 months ago by 🇺🇸 Collie ( Petty Officer 1st Class)
Petty Officer 1st Class)✧ 23 Views · 4 Likes · 1 Comment
Flag
💬 Add Comment
I got to go sailing again and managed to get a couple more videos. Turns out it's really hard to record and operate RC controls at the same time, so my sailing isn't the best. I'm very impressed with how maneuverable the T37 is, and how fantastic it is at close hauled sailing.
I only had about 4mph winds today, I can't wait to see how this little boat does with 10+mph!


I only had about 4mph winds today, I can't wait to see how this little boat does with 10+mph!
▲
⟩⟩
Ronald
jumpugly
EdW
peterd
Login To
Remove Ads
Remove Ads
💬 Re: The Maiden Voyage
8 months ago by 🇺🇸 Collie ( Petty Officer 1st Class)
Petty Officer 1st Class)✧ 32 Views · 0 Likes
Flag
💬 Add Comment
Alessandro,
This is a local pond here in Huntsville, Alabama. We're fortunate to have some beautiful parks in this area.
I'm hoping to get more video sometime soon, whenever I have both free time and favorable wind conditions.
This is a local pond here in Huntsville, Alabama. We're fortunate to have some beautiful parks in this area.
I'm hoping to get more video sometime soon, whenever I have both free time and favorable wind conditions.
▲
⟩⟩
No likes yet
This member will receive 1 point
for every like received
This member will receive 1 point
for every like received
💬 Re: The Maiden Voyage
8 months ago by 🇺🇸 Collie ( Petty Officer 1st Class)
Petty Officer 1st Class)✧ 32 Views · 1 Like
Flag
💬 Add Comment
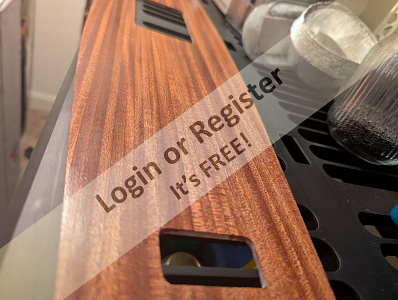
Mike,
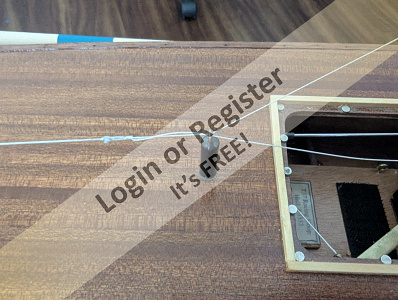
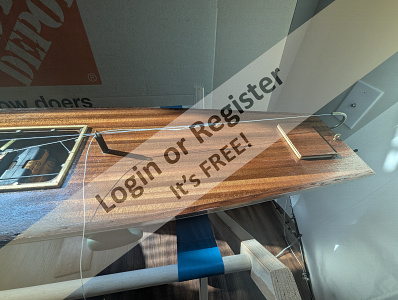
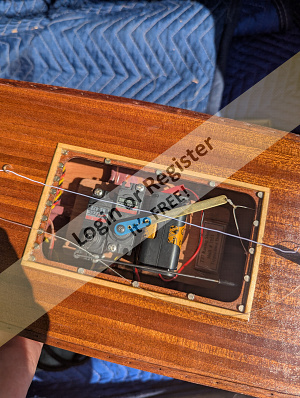
The T37 is designed as a one class racing boat, so it has a pretty clever sheeting system in my opinion. It starts at a loop under the deck, then goes through this brass servo arm and to the back of the boat. From there it goes through a brass tub that takes it topsides to a post, then to the booms themselves. Controlling the swing of the servo arm controls how far in the sails are sheeted. I programmed the servo so that it swings in an arc that has the sails fully sheeted in when the radio stick is down all the way, and the sails are fully out when the stick is up all the way. Hope this helps.
The T37 is designed as a one class racing boat, so it has a pretty clever sheeting system in my opinion. It starts at a loop under the deck, then goes through this brass servo arm and to the back of the boat. From there it goes through a brass tub that takes it topsides to a post, then to the booms themselves. Controlling the swing of the servo arm controls how far in the sails are sheeted. I programmed the servo so that it swings in an arc that has the sails fully sheeted in when the radio stick is down all the way, and the sails are fully out when the stick is up all the way. Hope this helps.
▲
⟩⟩
EdW
📝 The Maiden Voyage
8 months ago by 🇺🇸 Collie ( Petty Officer 1st Class)
Petty Officer 1st Class)✧ 45 Views · 13 Likes · 8 Comments
Flag
💬 Add Comment
After about four months of building, I finally had my maiden voyage! It was a very gusty day which was not ideal, my boat ended up heeling over more than I would like and getting just a little water in it, but nothing major. I'll be coating the inside of the hatches with a light layer of petroleum jelly out of an abundance of caution, but I don't think it's really necessary. Overall, I'm very happy with my kit from Tippecanoe and would highly recommend them to anyone looking for a kit like this!


▲
⟩⟩
AndyB2
RNinMunich
luckyduck
DWBrinkman
hermank
Mike Stoney
roycv
SouthportPat
jumpugly
EdW
AlessandroSPQR
Ronald
peterd
📝 Rigging and Painting
8 months ago by 🇺🇸 Collie ( Petty Officer 1st Class)
Petty Officer 1st Class)✧ 45 Views · 4 Likes · 1 Comment
Flag
💬 Add Comment
I've been moving lately and pretty bad at posting updates, but over the past few weeks I got the boat painted (don't judge me I used rattle cans) with a cool looking green and white striped patterns. I also got all of the rigging for the sails done and the servos set up to control them.


▲
⟩⟩
jumpugly
EdW
peterd
Ronald
📝 Day 19
9 months ago by 🇺🇸 Collie ( Petty Officer 1st Class)
Petty Officer 1st Class)✧ 47 Views · 4 Likes
Flag
💬 Add Comment
August 10, 2025
Today was an exciting day! I always dread the step of varnishing woodworking projects, but I can't deny that the results are incredibly satisfying. I sanded down the hull sides, deck and deck hatches all the way to 320 grit and thoroughly tack-clothed all of the dust of, then I very carefully applied the first coats of varnish to the boat. It needs to cure overnight, but I plan to do several coats throughout the week after work if I can find the time.
While the varnish dries, I attached the main boom to the sail and added the carbon fiber collars to keep the boom ring and vang from sliding around the mast. Bending these wires out of the stainless steel rod was a bit of a pain, but with some patience I got them in placed. The main boom also has the vinyl grommets for rigging adjustments just like the jib boom.
▲
⟩⟩
peterd
EdW
hermank
jumpugly
📝 Day 18
9 months ago by 🇺🇸 Collie ( Petty Officer 1st Class)
Petty Officer 1st Class)✧ 47 Views · 4 Likes
Flag
💬 Add Comment
August 3rd, 2025
I forgot to take pictures, but I did a little bit of work last Sunday. I waterproofed the hatches by putting a thin coat of epoxy all over the top and bottoms. Then I applied a coat around the coamings, making sure to coat over the tops of the small magnets to hopefully keep them in place a little better over time. I put a layer of plastic wrap over the coamings, then weighed down the hatches on top. This made sure the epoxy set up in a way that the hatches would still fit and even gave me a really good seal. We'll see just how good of a fit it is when she takes sail for the first time
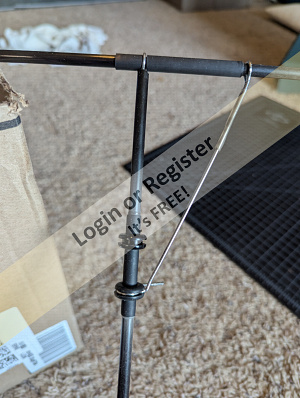
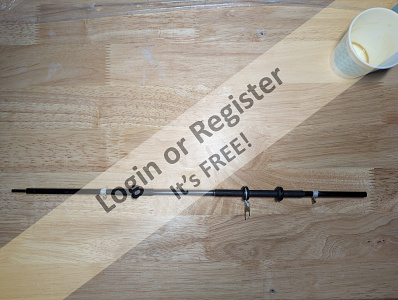
While that set up, I assembled the booms per the instructions. This was the first bit of rigging I got to do and it was kind of exciting! The booms are made of carbon fiber with vinyl grommets used for adjustment points for the rigging. A couple brass rings are lashed to the underside as well. I only have a picture of the jib boom for this update.
I forgot to take pictures, but I did a little bit of work last Sunday. I waterproofed the hatches by putting a thin coat of epoxy all over the top and bottoms. Then I applied a coat around the coamings, making sure to coat over the tops of the small magnets to hopefully keep them in place a little better over time. I put a layer of plastic wrap over the coamings, then weighed down the hatches on top. This made sure the epoxy set up in a way that the hatches would still fit and even gave me a really good seal. We'll see just how good of a fit it is when she takes sail for the first time
While that set up, I assembled the booms per the instructions. This was the first bit of rigging I got to do and it was kind of exciting! The booms are made of carbon fiber with vinyl grommets used for adjustment points for the rigging. A couple brass rings are lashed to the underside as well. I only have a picture of the jib boom for this update.
▲
⟩⟩
DuncanP
EdW
hermank
jumpugly
📝 Day 17
9 months ago by 🇺🇸 Collie ( Petty Officer 1st Class)
Petty Officer 1st Class)✧ 49 Views · 4 Likes
Flag
💬 Add Comment
August 2, 2025
I haven't had much time until today to work on this unfortunately. I made up the main hatch and got all of the magnets glued into place today. Then I used some leftover veneer to plank the tops to match the deck and it turned out really nice in my opinion. The magnets hold the hatch on tight so hopefully it'll keep most of the water out.
Next I'm planning on coating the hatches inside and out with a thin layer of clear epoxy to waterproof them, then I'll varnish the veneer to make it really pretty when I do the deck.
▲
⟩⟩
hermank
EdW
jumpugly
RNinMunich
📝 Day 16
9 months ago by 🇺🇸 Collie ( Petty Officer 1st Class)
Petty Officer 1st Class)✧ 51 Views · 6 Likes
Flag
💬 Add Comment
July 25, 2025
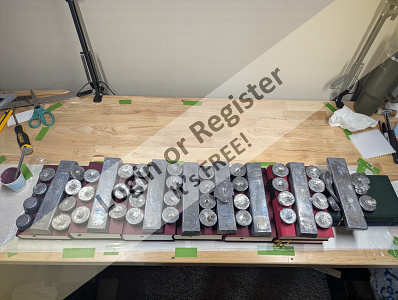
I really like the idea of using magnets to attach the hatches since it helps me keep them a really low profile. I got some neodymium magnets off Amazon to play with. I tried several different methods of placing the magnets but didn't like any of them until I tried just making the coaming slightly bigger and glued the magnets directly to the deck, then I used a shim to raise the matching magnets and glued them directly to the hatch ceiling. This was a nice way to do it in my mind because then the magnets line themselves up with their pairs perfectly on their own. I made sure to rough up the surface of all of the magnets with sandpaper for better adhesion and later on I'll go over all of them with a thin layer of epoxy to secure them into place better.
I used 10 magnet pairs for the rudder hatch and it holds it on there very securely, but I guess we won't know just how good it is until it sails.
▲
⟩⟩
hermank
EdW
RNinMunich
jumpugly
AlessandroSPQR
Len1
📝 Day 15
10 months ago by 🇺🇸 Collie ( Petty Officer 1st Class)
Petty Officer 1st Class)✧ 58 Views · 5 Likes · 1 Comment
Flag
💬 Add Comment
July 22, 2025
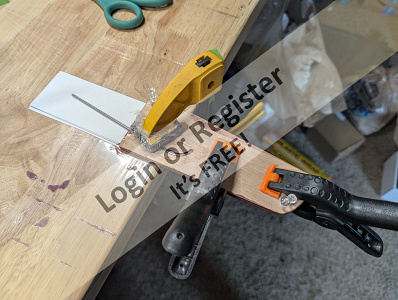
I had hatches on the mind today at work so I mocked something up when I got home with some scrap plywood. It's not pretty by any means, but it gives me an idea of what I'm working with. Even with just throwing this together, it's still a very nice fit that stays together almost with friction. Now I just need to find a way to embed some magnets when they arrive tomorrow and I think I'll have a good solution. Thanks for all of the suggestions everyone.


I had hatches on the mind today at work so I mocked something up when I got home with some scrap plywood. It's not pretty by any means, but it gives me an idea of what I'm working with. Even with just throwing this together, it's still a very nice fit that stays together almost with friction. Now I just need to find a way to embed some magnets when they arrive tomorrow and I think I'll have a good solution. Thanks for all of the suggestions everyone.
▲
⟩⟩
AlessandroSPQR
Len1
DuncanP
hermank
EdW
📝 Day 14
10 months ago by 🇺🇸 Collie ( Petty Officer 1st Class)
Petty Officer 1st Class)✧ 67 Views · 8 Likes · 2 Comments
Flag
💬 Add Comment
July 21, 2025
The mast post set up perfectly level with a slight rake and the rudder post is lined up nicely with the keel without the rudder being epoxied into place now. I'm very happy with how this build is going, it's nice to be able to see the full height and length at last.
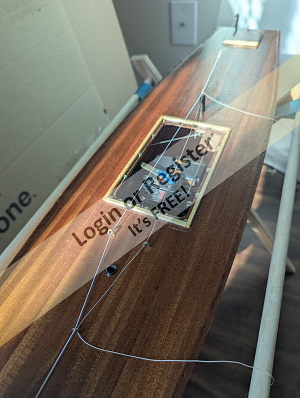
Now I'm on to deciding what to do for the hatches. The problem is I don't have a whole lot of clearance because the main sheet will run from a barney post aft of the hatch over the top and to a brass U in the deck. I mocked everything up with some thread before I start gluing anything down to get an idea of what I have to work with. The kit plans call for a mylar sheet over the hatch so clearance isn't really a problem, but I have a lot of leftover veneer planks so I think it would be nice to build a custom hatch.
I made a sort of cross section with basswood and it looks like I'll have room for a 1/8" basswood coaming with a scrap piece of 1/8" plywood on top. I was planning on basically following Gary Webb's video linked below, but with the hatch being so low profile I won't have enough clearance to use the pins that he does. Does anyone have any ideas on a good way to attach the hatches so they stay secured to the deck while underway?


The mast post set up perfectly level with a slight rake and the rudder post is lined up nicely with the keel without the rudder being epoxied into place now. I'm very happy with how this build is going, it's nice to be able to see the full height and length at last.
Now I'm on to deciding what to do for the hatches. The problem is I don't have a whole lot of clearance because the main sheet will run from a barney post aft of the hatch over the top and to a brass U in the deck. I mocked everything up with some thread before I start gluing anything down to get an idea of what I have to work with. The kit plans call for a mylar sheet over the hatch so clearance isn't really a problem, but I have a lot of leftover veneer planks so I think it would be nice to build a custom hatch.
I made a sort of cross section with basswood and it looks like I'll have room for a 1/8" basswood coaming with a scrap piece of 1/8" plywood on top. I was planning on basically following Gary Webb's video linked below, but with the hatch being so low profile I won't have enough clearance to use the pins that he does. Does anyone have any ideas on a good way to attach the hatches so they stay secured to the deck while underway?
▲
⟩⟩
Len1
EdW
hermank
peterd
Ronald
GaryLC
RNinMunich
jumpugly
Login To
Remove Ads
Remove Ads
📝 Day 13
10 months ago by 🇺🇸 Collie ( Petty Officer 1st Class)
Petty Officer 1st Class)✧ 89 Views · 5 Likes · 1 Comment
Flag
💬 Add Comment
July 20, 2025
Now we're caught up to present day for the build log. I'll try to keep posting as I progress still.
Two items on the agenda today: the rudder post and the mast post.
I started with the rudder post. I used a spare piece of plywood to make a holder for the rudder shaft while I epoxied in the rudder shaft. The shaft is a carbon fiber tube with a rubber gasket to help waterproof. Just like with the keel, I made sure the boat was level on my workbench before starting. I also waxed the rudder shaft so it hopefully won't stick if any epoxy gets on it. Using both the makeshift plumb bob and the keel, I lined up the rudder so it was perfectly in line with the keel and then epoxied it into place.
After letting that sit for a few hours, I came back and started on the mast post. The T37 has a larger 4" carbon fiber tube that goes into the boat for the mast to slide in to. I shortened the mast post so it would only stick up about 1/16" from the deck when glued into place. With a couple of levels and a bevel tool I did a trial run of gluing the post down. I made sure the mast would end up perfectly vertical with a slight tilt aft. Then I put a blob of thickened epoxy on the bottom of the hull for the post to sit on. I roughened up the post a little so the epoxy would adhere better before all of this.
▲
⟩⟩
IanL1
Len1
hermank
EdW
RNinMunich
📝 Day 12
10 months ago by 🇺🇸 Collie ( Petty Officer 1st Class)
Petty Officer 1st Class)✧ 85 Views · 5 Likes
Flag
💬 Add Comment
July 13, 2025
I started the day by pulling all of the pins out of the veneer and it looked like everything set up nicely overnight. The front edge of the strips meet up nicely with the bow veneer. I forgot to take pictures, but I epoxied a veneer strip to the transom so the stern should have a nice varnished mahogany look to it when done.
In the afternoon I set up my workbench to epoxy the keel into place in the hull. I got two large boxes that were tall enough for the keel to fit between them. I made sure the deck was level front to back and side to side by using some index cards as shims. I did a couple trial fits to make sure everything lined up correctly. I had to sand the top of the keel down some to be level with the side struts. The musket minie ball made another appearance as a makeshift plumb bob to help me keep the keel nice and straight.
Next I mixed up another batch of clear epoxy to clear coat around the keel in the hull and then a batch of thickened epoxy to glue the keel into place. I slid the keel into the slot and lined up the support webs then attempted to do nice fillets around them. I probably used more epoxy than I needed, but this is fine since I probably won't ever be racing this boat. On top of the keel and supports goes the RC deck with some more epoxy and a few lead weights. This forms a nice strong box so the keel is very sturdy.
I checked the keel with the plumb bob to make sure it was straight several times before leaving it to set over night.
▲
⟩⟩
IanL1
Len1
hermank
EdW
RNinMunich
📝 Day 11
10 months ago by 🇺🇸 Collie ( Petty Officer 1st Class)
Petty Officer 1st Class)✧ 73 Views · 6 Likes
Flag
💬 Add Comment
July 12, 2025
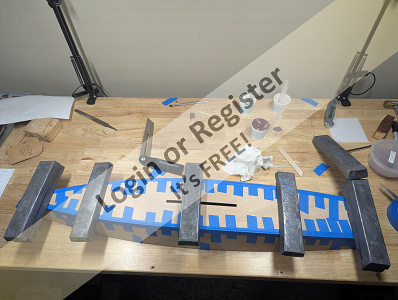
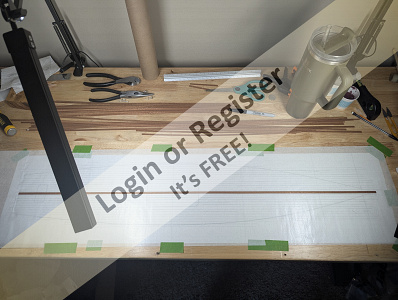
This is a part I've been kind of dreading if I'm honest. The edge veneer strips are very thin and fragile and have a tendency to split when pinning them to the hull. I started by steaming them in a pot for about 30 minutes until they were softened up quite a bit. Then I laid them up on the paper where I traced the outline of the hull on day 2. I used glass cups and lead weights to hold them down until they were dry a couple hours later and they had taken on a bit of a curve. I sanded the front edge of both strips to they'd be at an angle to mate properly with the bow veneer. After spreading thickened epoxy all along the edges, I moved on to the pain staking process of pinning down the strips. This was the most challenging part of the build so far because the thin veneer strips would split along the grain and they kept trying to lift up in some places. After a lot of patience and lots of double checking they were all pinned down and ready to set up over night.


This is a part I've been kind of dreading if I'm honest. The edge veneer strips are very thin and fragile and have a tendency to split when pinning them to the hull. I started by steaming them in a pot for about 30 minutes until they were softened up quite a bit. Then I laid them up on the paper where I traced the outline of the hull on day 2. I used glass cups and lead weights to hold them down until they were dry a couple hours later and they had taken on a bit of a curve. I sanded the front edge of both strips to they'd be at an angle to mate properly with the bow veneer. After spreading thickened epoxy all along the edges, I moved on to the pain staking process of pinning down the strips. This was the most challenging part of the build so far because the thin veneer strips would split along the grain and they kept trying to lift up in some places. After a lot of patience and lots of double checking they were all pinned down and ready to set up over night.
▲
⟩⟩
peterd
IanL1
Len1
hermank
EdW
RNinMunich
📝 Day 10
10 months ago by 🇺🇸 Collie ( Petty Officer 1st Class)
Petty Officer 1st Class)✧ 73 Views · 4 Likes
Flag
💬 Add Comment
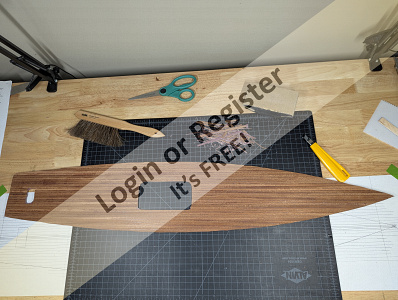
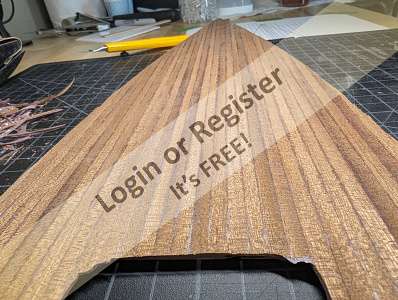
July 6, 2025
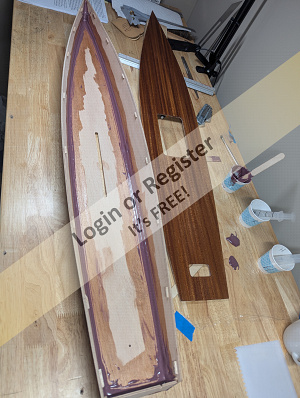
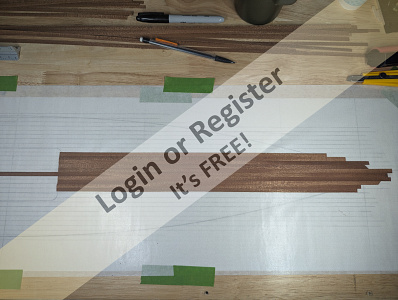
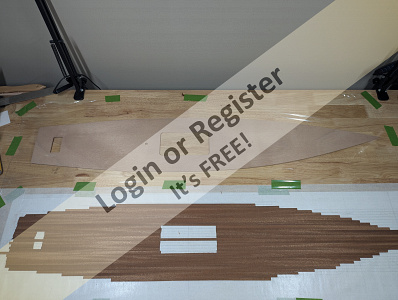
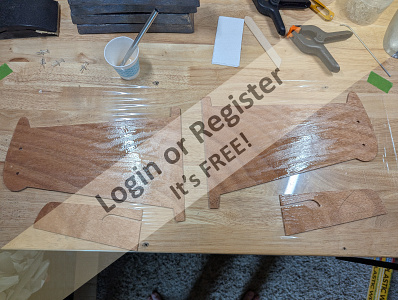
Today is dedicated to the bow. This kit comes with a mahogany wedge and a veneer strip to shape the bow. First I sand the bow flush where the hull side pieces meet so the wedge has a place to glue. I chose to cut a circle out at the back of the veneer so it looks a little nicer where the planks will meet up later. I did this by tracing the circular base of a musket minie ball (it was the closest round object I had that was the right size) and cutting with an exacto knife. Then I epoxied the veneer on top after also shaping the sides down a little to be closer to flush.
Next I flipped the whole thing over and epoxied on the bow wedge. This wedge is a little oversized and will get shaped down later.
I also taped around the edge of the sides where the deck meets in preparation for epoxying the veneer strips around the edges.
▲
⟩⟩
IanL1
Len1
hermank
EdW
📝 Day 9
10 months ago by 🇺🇸 Collie ( Petty Officer 1st Class)
Petty Officer 1st Class)✧ 71 Views · 5 Likes
Flag
💬 Add Comment
July 4, 2025
The doctor said it takes 4-6 weeks for a broken toe to heal so I'll be limping for a while, but minor injuries can't stand in the way of me getting this kit put together!
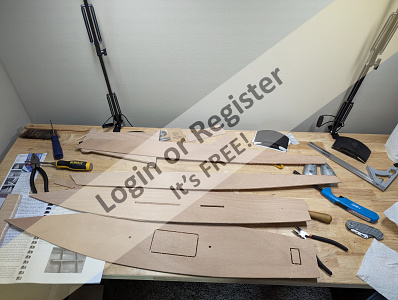
The epoxy for the deck set up just fine and now I have a fully assembled hull! (sort of) I sanded down the edges so the side pieces and deck would be flush. The joint will be covered by veneer strips later to make it look nice. It was sad to see the beautiful varnish get scuffed up, but this will all be sanded and made pretty again later.
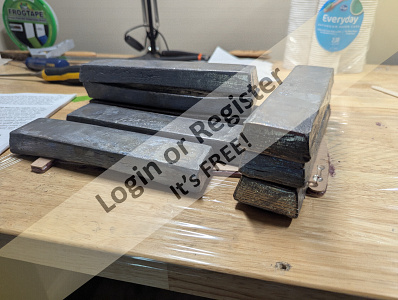
I forgot to take pictures, but I used a belt sander to shape the keel piece similar to the rudder. Then I attached the ballast castings with epoxy and two bolts. First I wet sanded some clear epoxy into the zinc to get rid of the oxidation layer, then I spread thickened epoxy on the halves and glued them to the keel. Two bolts tighten everything together and the holes are covered with some leftover thickened epoxy to fill them. This will all get sanded down nice and smooth later.


The doctor said it takes 4-6 weeks for a broken toe to heal so I'll be limping for a while, but minor injuries can't stand in the way of me getting this kit put together!
The epoxy for the deck set up just fine and now I have a fully assembled hull! (sort of) I sanded down the edges so the side pieces and deck would be flush. The joint will be covered by veneer strips later to make it look nice. It was sad to see the beautiful varnish get scuffed up, but this will all be sanded and made pretty again later.
I forgot to take pictures, but I used a belt sander to shape the keel piece similar to the rudder. Then I attached the ballast castings with epoxy and two bolts. First I wet sanded some clear epoxy into the zinc to get rid of the oxidation layer, then I spread thickened epoxy on the halves and glued them to the keel. Two bolts tighten everything together and the holes are covered with some leftover thickened epoxy to fill them. This will all get sanded down nice and smooth later.
▲
⟩⟩
IanL1
Len1
hermank
EdW
RNinMunich
📝 Day 8
10 months ago by 🇺🇸 Collie ( Petty Officer 1st Class)
Petty Officer 1st Class)✧ 71 Views · 5 Likes
Flag
💬 Add Comment
June 30, 2025
I got the deck epoxied into place today. I did this by making some extra thick epoxy and spreading it all along the top inside edge of the side pieces, the sliding the deck into place. I started with the hull upside down in case the epoxy sagged a little, then I flipped it over to weigh down the deck directly. This formed a decent fillet all along the inside edge for the deck. I also had some leftover clear epoxy so I went ahead and clear coated the rudder.
Shortly after taking these pictures I dropped one of the weights and broke my toe, so maybe shoes are a good idea moving forward...
▲
⟩⟩
IanL1
Len1
hermank
EdW
RNinMunich
📝 Day 7
10 months ago by 🇺🇸 Collie ( Petty Officer 1st Class)
Petty Officer 1st Class)✧ 69 Views · 4 Likes
Flag
💬 Add Comment
June 15, 2025
I didn't have too much time to work on this boat today. The hull came out nice and strong and all of the warping in the wood went away after being epoxied. I guess it helped that I kept meticulously checking the angles with a bevel tool while it set up.
I went through and added the balsa wood tabs to the top edge of the side pieces for the deck to sit on when I epoxy it later. I shaved these tabs down later so they were only big enough to hold the deck in place and the epoxy could be spread over them later.
This is my first time ever using epoxy so the fillets didn't come out the cleanest, but I'm still overall very happy with how it's going.
▲
⟩⟩
Len1
hermank
EdW
RNinMunich
📝 Day 6
10 months ago by 🇺🇸 Collie ( Petty Officer 1st Class)
Petty Officer 1st Class)✧ 68 Views · 5 Likes
Flag
💬 Add Comment
June 14, 2025
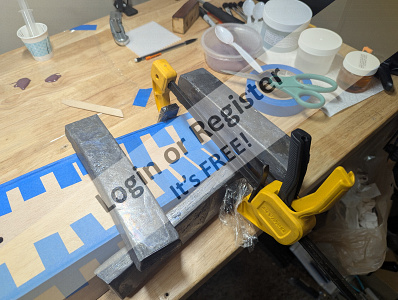
Today was a big day, putting the hull together. I started by taking a combination square and drawing a line on the inside of the side pieces about 1/8" for where the bottom hull piece will sit inside. Then I CA glued some small balsa wood tabs along this line so when the hull is setting up the pieces will rest on these tabs and won't shift too far inwards. I did the same for the small transom piece at the stern.
First, I taped the two side pieces together at the bow so they would be perfectly lined up. Then I went down the sides and added more tape until the sides were secured to the bottom. I did the same for the transom as well. When everything was taped up, I clear coated the inside with a thin layer of clear epoxy with a paper towel to soak into the grain except where the keel, rudder and mast step will be glued in later. Then I mixed a large batch of clear epoxy and added fillets all along the inside edges.
I placed some weights on top and used a bevel tool to make sure both sides had the same angle and the hull wouldn't end up with a twist. I had to use a clamp to add a small torque towards the stern to straighten things out. Then everything set overnight.
▲
⟩⟩
IanL1
Len1
hermank
EdW
RNinMunich
📝 Day 5
10 months ago by 🇺🇸 Collie ( Petty Officer 1st Class)
Petty Officer 1st Class)✧ 65 Views · 7 Likes
Flag
💬 Add Comment
June 13, 2025
Today I sanded the rudder down into shape. You can see the rudder post is epoxied into the "J" shaped cut at the top already from day 1. I also took a picture of the deck outside to see how it looked in the sun. So far, I'm very pleased with how it looks.
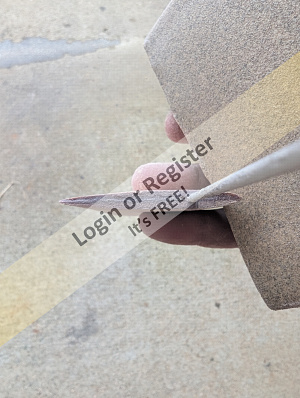
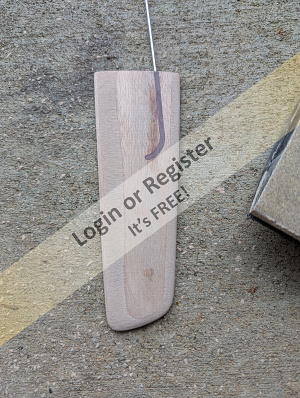
Today I sanded the rudder down into shape. You can see the rudder post is epoxied into the "J" shaped cut at the top already from day 1. I also took a picture of the deck outside to see how it looked in the sun. So far, I'm very pleased with how it looks.
▲
⟩⟩
IanL1
Len1
jumpugly
hermank
EdW
SimpleSailor
Mike Stoney
📝 Day 4
10 months ago by 🇺🇸 Collie ( Petty Officer 1st Class)
Petty Officer 1st Class)✧ 61 Views · 7 Likes
Flag
💬 Add Comment
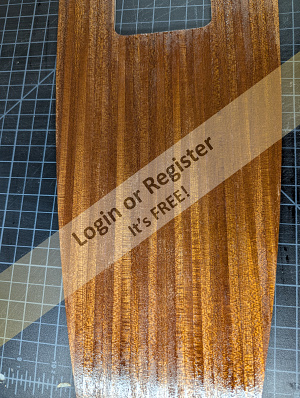
June 12, 2025
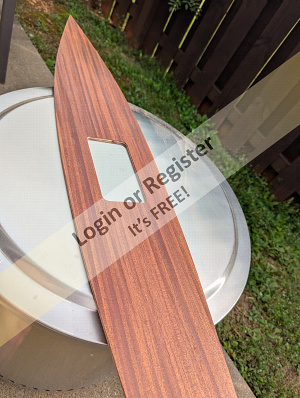
I cleaned up the edges of the planks that were hanging off with a sanding block and went ahead and put a coat of varnish on. The varnish will get sanded down for the final finish later, it's only there right now to help protect the wood some from epoxy fingerprints in later steps and to keep excess epoxy off when I put the hull together later. It also gave me a good idea of what the deck will look like on the finished product.
I cleaned up the edges of the planks that were hanging off with a sanding block and went ahead and put a coat of varnish on. The varnish will get sanded down for the final finish later, it's only there right now to help protect the wood some from epoxy fingerprints in later steps and to keep excess epoxy off when I put the hull together later. It also gave me a good idea of what the deck will look like on the finished product.
▲
⟩⟩
IanL1
Len1
jumpugly
hermank
EdW
RNinMunich
Mike Stoney
Login To
Remove Ads
Remove Ads
📝 Day 3
10 months ago by 🇺🇸 Collie ( Petty Officer 1st Class)
Petty Officer 1st Class)✧ 56 Views · 7 Likes
Flag
💬 Add Comment
June 9, 2025
I took all of the weights off of the deck the next morning and was pleased to see that the warp in the wood was completely gone and I had a nicely planked deck. A little bit of the epoxy seeped through the cracks between the planks, but this sanded down and was barely noticeable later on.
I took all of the weights off of the deck the next morning and was pleased to see that the warp in the wood was completely gone and I had a nicely planked deck. A little bit of the epoxy seeped through the cracks between the planks, but this sanded down and was barely noticeable later on.
▲
⟩⟩
IanL1
Len1
DuncanP
jumpugly
hermank
RNinMunich
Mike Stoney
📝 Day 2
10 months ago by 🇺🇸 Collie ( Petty Officer 1st Class)
Petty Officer 1st Class)✧ 56 Views · 6 Likes
Flag
💬 Add Comment
June 8, 2025
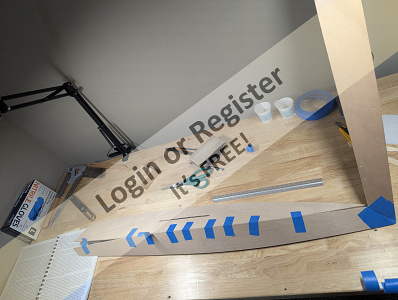
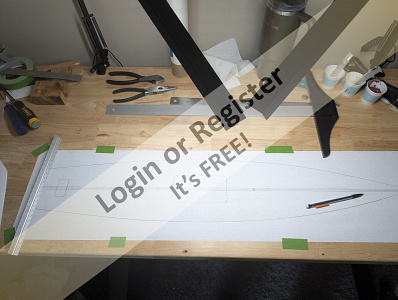
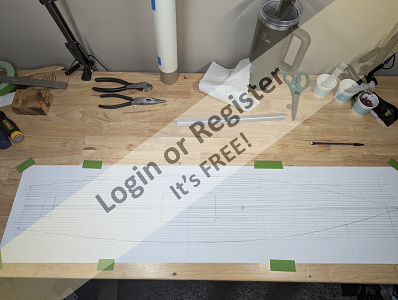
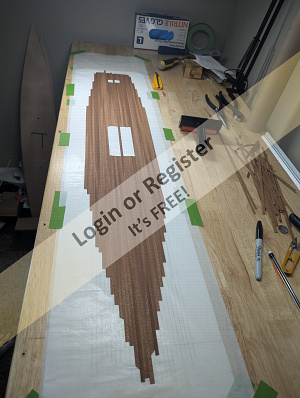
Next I decided to go ahead and plank the deck with their veneer deck kit, they make this surprisingly easy if you have some patience to do it. You start by tracing the outline of the deck onto a sheet of paper, then you draw parallel lines along the length of the deck to act as guides when laying up the strips. Then I laid a sheet of transfer paper over the outline and stuck the center kingplank down. From there I just carefully stuck down the planks out from the center until the whole deck shape had planks tightly stuck down.
When all of the planks were stuck to the transfer paper, I covered them in epoxy and flipped the deck hull piece over on top. I wrapped it in cling wrap and put lots of books and weights went on top to make sure there was even contact with the epoxy on the whole deck then I left it to sit overnight.
▲
⟩⟩
EdW
Len1
jumpugly
hermank
RNinMunich
Mike Stoney
📝 Day 1
10 months ago by 🇺🇸 Collie ( Petty Officer 1st Class)
Petty Officer 1st Class)✧ 56 Views · 4 Likes
Flag
💬 Add Comment
June 6, 2025
Getting started I first sanded down all of the wood and got rid of any tabs leftover from the cutting process. The hull pieces got a little warped in shipping, but once the hull went together this wasn't a problem at all. This was also my first chance to read through the very thorough instructions that came with this kit.
I went a little bit out of sequence and started by assembling the keel and rudder halves that would later be shaped to the nice airfoil shape they need. I started this by spreading epoxy to saturate the grain, then spreading thickened epoxy to glue them together. Some clamps and weights held the halves together while the epoxy cured overnight.
▲
⟩⟩
EdW
Len1
hermank
Mike Stoney
📝 Tippecanoe T37 Build
10 months ago by 🇺🇸 Collie ( Petty Officer 1st Class)
Petty Officer 1st Class)✧ 56 Views · 7 Likes · 2 Comments
Flag
💬 Add Comment
Hi everyone, this will be a log of me building a Tippecanoe T37 kit, the first build I have ever done. I'm already pretty far into the build by now, but I figured it would be nice to start a log in case anyone else wants some pictures of the build process.
My first impressions with this kit are very impressive. The folks over at Tippecanoe look like they've done a great job of including everything you need to build a nice RC sailboat. I purchased the racing upgrade version and also got the mahogany veneer deck kit.
My first impressions with this kit are very impressive. The folks over at Tippecanoe look like they've done a great job of including everything you need to build a nice RC sailboat. I purchased the racing upgrade version and also got the mahogany veneer deck kit.
▲
⟩⟩
PhilH
Len1
DuncanP
AlessandroSPQR
jumpugly
hermank
RNinMunich
Login To
Remove Ads
Remove Ads