Join Us On Social Media!

|

|

|
Download The App!
Login To
Remove Ads
Remove Ads
Login To
Remove Ads
Remove Ads
Model Boats Website
 Recruit)

 Commodore)
 Lieutenant Commander)

 Vice Admiral)
 Rear Admiral)

 Warrant Officer)

 Fleet Admiral)
 Leading Seaman)


United States


Recent Posts
📝 A new naval project. What to do now?
2 hours ago by 🇺🇸 LewZ ( Admiral)
Admiral)✧ 11 Views · 1 Like
Flag
📝 Reply
Chug, those mid size US towboats are great looking! Good luck on your build. (You might inspire me to get going on mine, the M/V Arne Christiansen) ahead of the queue I have.
Lew
Lew
▲
⟩⟩
hermank
Login To
Remove Ads
Remove Ads
📝 Suncoast Scale Model boat Club meet on April 19, 2024
2 hours ago by 🇺🇸 LewZ ( Admiral)
Admiral)✧ 3 Views · 1 Like
Flag
💬 Add Comment
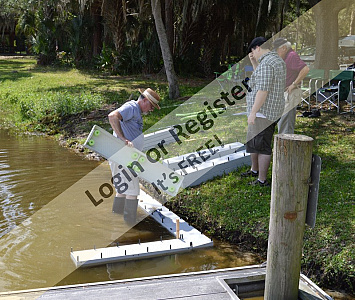
A light turn out and heavier that normal winds limited the number of boats in the water at this meet. Got some video and for the boats that did not "go for it" I have some video of them on the tables. On top of that we had to make two "rescues".
Lew

Lew
▲
⟩⟩
hermank
📝 Boat Identification
3 days ago by 🇺🇸 LewZ ( Admiral)
Admiral)✧ 36 Views · 2 Likes
Flag
📝 Reply
Depends... old vs. modern. When I ran by rc sailboats (three 50/800 class) 50 +years ago, I made them for racing and not scale. Totally different look. Just one example would be the masts with captured lufts for the main sail.
Lew
Lew
▲
⟩⟩
Hsailer
hermank
📝 Boat Identification
4 days ago by 🇺🇸 LewZ ( Admiral)
Admiral)✧ 39 Views · 3 Likes
Flag
📝 Reply
Correct, but not just the boom construction. All of the rigging and sails are not what one finds on rc competition sailboats that rely on smooth air flow.
Lew
Lew
▲
⟩⟩
Hsailer
Ronald
hermank
📝 Boat Identification
4 days ago by 🇺🇸 LewZ ( Admiral)
Admiral)✧ 42 Views · 3 Likes
Flag
📝 Reply
The model does not look like anything that would fit into the RC classes. The 50/800, aka "Marblehead" class's rule is 50 inches so you need a more accurate measurement than "close to". Who suggested a "Soling"? (I have a 50/800 Soling from the early 1970's.) It is not an EC-12 which should be 59 inches.
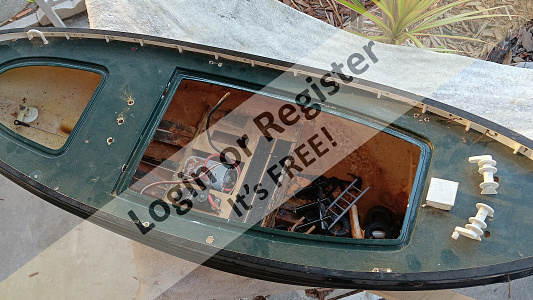
From the rigging the boat looks like it was built as a scale model rather than competition. I think I see horizontal lines, possibly a bread and butter build?
As for the value, that can vary from zero to expensive. If the seller says "My dad built it" doesn't make it expensive or even sellable. The design is too modern (less than ~60 years old) to be classified as an antique. People often have a misconception about the value of model boats. I have been GIVEN numerous model boats, kits, accessories. It was difficult for me to pass them on (free). One boat I estimated the builder spent $1500 US on even came with a quality radio. Even was given a $2,000 US kit for free.
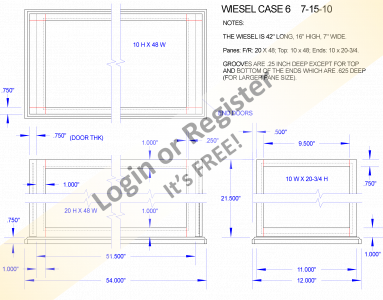
One of the last ones was a Graupner Wiesel schnellboot kit untouched in the original box. I could get only $25 US for it.
I don't mean to disappoint you about the value of model boats, but I have seen more than my share of good models that are virtually worthless to others.
From the rigging the boat looks like it was built as a scale model rather than competition. I think I see horizontal lines, possibly a bread and butter build?
As for the value, that can vary from zero to expensive. If the seller says "My dad built it" doesn't make it expensive or even sellable. The design is too modern (less than ~60 years old) to be classified as an antique. People often have a misconception about the value of model boats. I have been GIVEN numerous model boats, kits, accessories. It was difficult for me to pass them on (free). One boat I estimated the builder spent $1500 US on even came with a quality radio. Even was given a $2,000 US kit for free.
One of the last ones was a Graupner Wiesel schnellboot kit untouched in the original box. I could get only $25 US for it.
I don't mean to disappoint you about the value of model boats, but I have seen more than my share of good models that are virtually worthless to others.
▲
⟩⟩
Hsailer
jumpugly
hermank
📝 U.S. Easter Rivers - Towboats
5 days ago by 🇺🇸 LewZ ( Admiral)
Admiral)✧ 27 Views · 5 Likes
Flag
📝 Reply
Correct Blackshoe! Properly operating diesel engines usually emit very low smoke when running. However, when a tow boat is starting to accelerate with heavy load (just like trucks) if they give it too much throttle there will be some thick black smoke due to an older rich mixture going to the engine.
So in reality a smoke generator for "diesel engines" in a model would not have to run all the time. Steam, however is a different situation.
Lew
So in reality a smoke generator for "diesel engines" in a model would not have to run all the time. Steam, however is a different situation.
Lew
▲
⟩⟩
chugalone100
hermank
Ronald
Black Shoe
pressonreguardless
📝 two motors one esc
5 days ago by 🇺🇸 LewZ ( Admiral)
Admiral)✧ 36 Views · 3 Likes
Flag
📝 Reply
Not everyone copies from the internet, especially lengthy posts filled with data nobody cares about. Just a few (maybe one?) that try to emulate AI. The vast majority on this site are wonderful, talented, and give great advice. They are the real "model boaters". Get a life!
Lew
Lew
▲
⟩⟩
roycv
GregHiltz
hermank
📝 U.S. Easter Rivers - Towboats
5 days ago by 🇺🇸 LewZ ( Admiral)
Admiral)✧ 28 Views · 7 Likes
Flag
📝 Reply
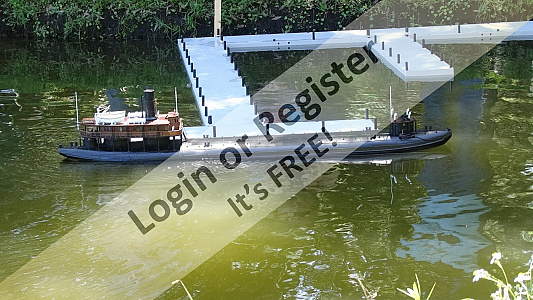
Here are some videos. The first is two model American Beauty towboats at one of our meets:
1. A "Push-off" between two model American Beauties.
2. A real towboat push-off.
3. The American Beauty at work. (Drone Flyover.)
Enjoy!
Lew
(As I write this the M/V American Beauty is northbound on the Illinois River, heading toward Peoria, Ill, USA. She is pushing a "Tow" (string of barges) at 2.7 knots.)


▲
⟩⟩
roycv
stevedownunder
pressonreguardless
chugalone100
Ronald
Black Shoe
hermank
📝 U.S. Easter Rivers - Towboats
6 days ago by 🇺🇸 LewZ ( Admiral)
Admiral)✧ 30 Views · 5 Likes
Flag
📝 Reply
Steamrod, if it was me I would try to replicate what the real towboat (still operating) has for drives. For me "scale" is very desirable.
Lew
Lew
▲
⟩⟩
RodC
hermank
chugalone100
pressonreguardless
Black Shoe
📝 U.S. Easter Rivers - Towboats
6 days ago by 🇺🇸 LewZ ( Admiral)
Admiral)✧ 24 Views · 4 Likes
Flag
📝 Reply
Steamrod, did you mean American Beauty?
Lew
Lew
▲
⟩⟩
chugalone100
pressonreguardless
hermank
Black Shoe
📝 Sealing a horizontal prop shaft
6 days ago by 🇺🇸 LewZ ( Admiral)
Admiral)✧ 30 Views · 1 Like
Flag
📝 Reply
Thanks Tora! The drawing however, is not mine (internet). My drawings are on my PC. Anyone looking for ideas for stopping boxes you can search the internet. They're even drawings to help make a short stuffing box to retrofit a boat that doesn't have one.
Lew
Lew
▲
⟩⟩
hermank
Login To
Remove Ads
Remove Ads
📝 two motors one esc
6 days ago by 🇺🇸 LewZ ( Admiral)
Admiral)✧ 42 Views · 3 Likes
Flag
📝 Reply
Mr. Shoe, I agree with everything you said, right down to the paint. Advice from those who have real experience is valuable. Useless banter copied from the internet is just an annoying and has no real value.
Lew
Lew
▲
⟩⟩
hermank
roycv
Black Shoe
📝 Sealing a horizontal prop shaft
6 days ago by 🇺🇸 LewZ ( Admiral)
Admiral)✧ 38 Views · 3 Likes
Flag
📝 Reply
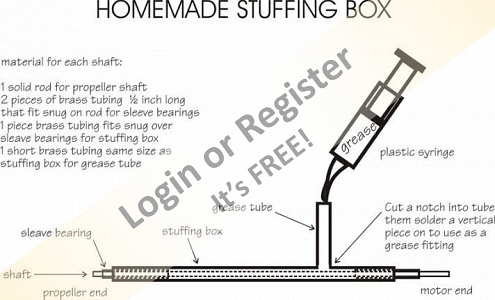
I make my stuffing boxes this way:
1. Start with the prop shaft, from where the motor is connected to it out to where the propeller is mounted.
2. Make two short pieces of copper tubing, that will slip over the prop shaft and into the outer tube. (Sleeve bearing in drawing.)
3. Make the outer tube a little shorter than the propeller shaft.
4. Solder the short pieces of copper tubing inside each end of the outer tube.
5. Make a "T" connection by soldering a short piece of copper tubing vertically to the outer tubing, inside the hull. (First drill a hole into the outer tubing.) This will be your filling tube.
Make sure you remove all of the burrs, and that the shafts are straight and true. The propeller shaft should now run freely inside the stuffing box. I usually fill my stuffing box with petroleum jelly.
Some people like to make short stuffing boxes, but I like to make them as long as possible, but not too long that the shaft may flex while running.
Lew
▲
⟩⟩
ToraDog
chugalone100
hermank
📝 two motors one esc
6 days ago by 🇺🇸 LewZ ( Admiral)
Admiral)✧ 43 Views · 3 Likes
Flag
📝 Reply
I don't worry about fuses. Only have one boat with fuses. Very frequently I have been running motorized RC boats for almost 20 years. (The last 10 includes RC tanks.) Only burnt out one ESC during that period. (BTW, one way to make smoke.) Also, I haven't seen fuses in RTR boats as well.
Lew
Lew
▲
⟩⟩
stevedownunder
Black Shoe
hermank
📝 Sealing a horizontal prop shaft
7 days ago by 🇺🇸 LewZ ( Admiral)
Admiral)✧ 32 Views · 2 Likes
Flag
📝 Reply
Tora, perhaps a sketch might help describe ideal seals for prop shafts. I have no issues as all my boats have stuffing boxes. However a sketch might help those with prop shaft leak issues.
Lew
Lew
▲
⟩⟩
EricMB
hermank
📝 Sealing a horizontal prop shaft
7 days ago by 🇺🇸 LewZ ( Admiral)
Admiral)✧ 41 Views · 2 Likes
Flag
📝 Reply
Correct Tora! I've even seen water creep up rudder posts where the top is above the water line. Likely due to pressure spun off the prop. The best way is a good designed stuffing box. Virtually maintenance free - add some lube every few years.
Lew
Lew
▲
⟩⟩
EricMB
hermank
📝 Sealing a horizontal prop shaft
7 days ago by 🇺🇸 LewZ ( Admiral)
Admiral)✧ 39 Views · 2 Likes
Flag
📝 Reply
First off is this just a straight shaft running through a straight tube? If not is it a shaft running through a stuffing box? Answer these questions before trying to proceed with a cure.
Lew
Lew
▲
⟩⟩
EricMB
hermank
📝 two motors one esc
7 days ago by 🇺🇸 LewZ ( Admiral)
Admiral)✧ 44 Views · 5 Likes
Flag
📝 Reply
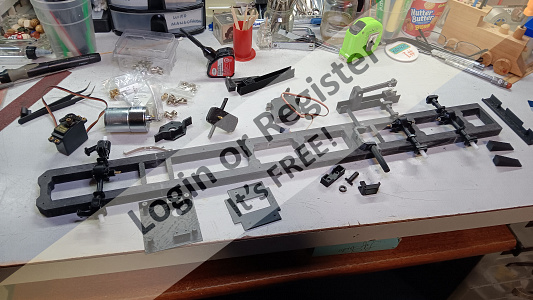
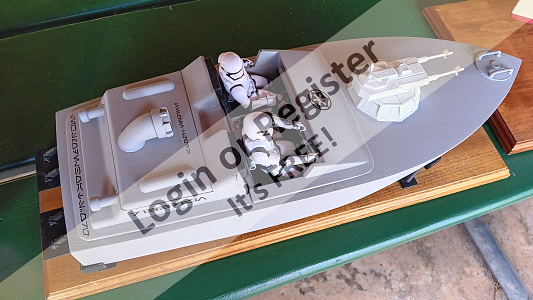
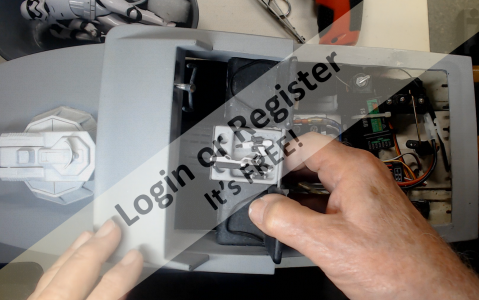
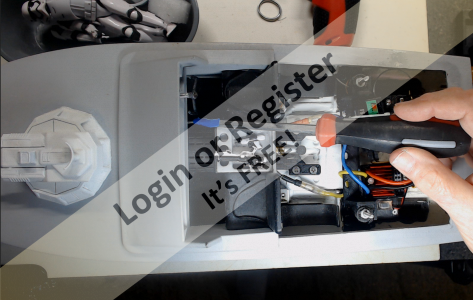
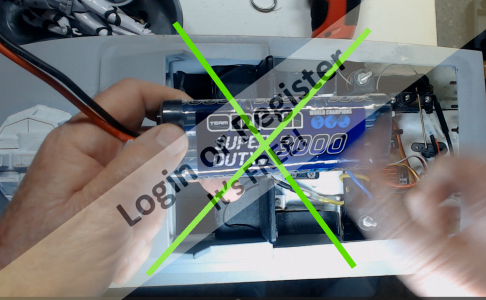
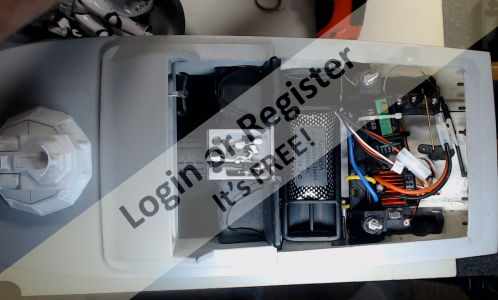
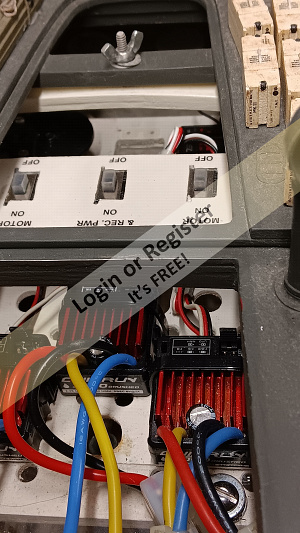
About 3/4 of my ESCs are Quickrun 1060 brushed units. Even have some spares! Photo shows three in my 1/20 scale PT boat. Going to install one in my 1/16 scale semi truck.
Lew
Lew
▲
⟩⟩
stevedownunder
chugalone100
SimpleSailor
hermank
RodC
📝 two motors one esc
7 days ago by 🇺🇸 LewZ ( Admiral)
Admiral)✧ 40 Views · 3 Likes
Flag
📝 Reply
StephenT, going back to your original question, "is it better to wire up two motors to each separate esc or can it be done with one 320 amp esc and to both motors they are brushed by the way"...
...it all depends on what you want to achieve and what RC system you are using. If you have a two channel RC system you will have to use one ESC. If you have multiple channels and a way to control two motors (like two joysticks) and want better maneuverability, especially when docking, I would go with two ESCs. They are not that expensive.
I pretty much have control over each motor independent of the others on all my boats.
(Never seen motors wired in series.)
Lew
▲
⟩⟩
stevedownunder
chugalone100
hermank
📝 FLAG MAKING TUTORIAL
8 days ago by 🇺🇸 LewZ ( Admiral)
Admiral)✧ 62 Views · 4 Likes
Flag
📝 Reply
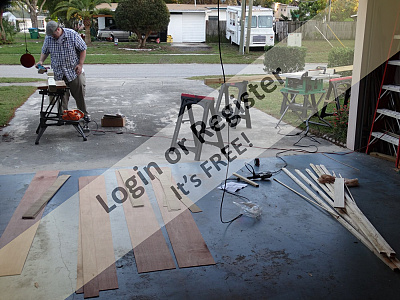
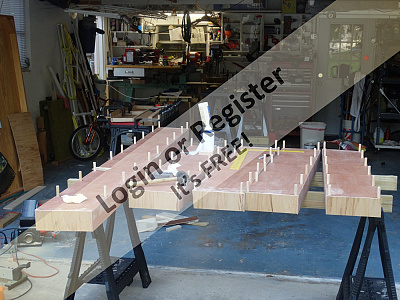
Very colorful Chug!
A few years ago I came up with a tutorial as well (attached here). Kind of an anti "stiff rectangular flag" look on some fantastic models got me going. This works well if you can print an already available picture that one has downloaded.
Lew

A few years ago I came up with a tutorial as well (attached here). Kind of an anti "stiff rectangular flag" look on some fantastic models got me going. This works well if you can print an already available picture that one has downloaded.
Lew
▲
⟩⟩
jumpugly
chugalone100
hermank
EdW
📝 U.S. Easter Rivers - Towboats
9 days ago by 🇺🇸 LewZ ( Admiral)
Admiral)✧ 51 Views · 11 Likes
Flag
📝 Reply
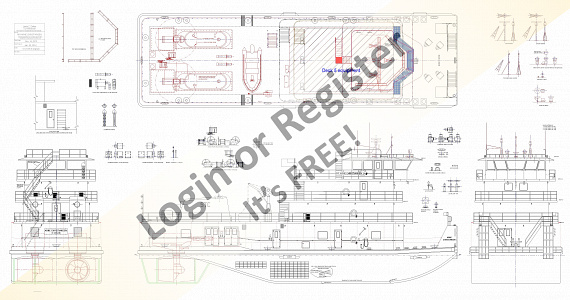
Actually Chum, if you look at the drawing in my last post under the Atlantic tug, you will see the Z-drive (Schottle) bottoms are aligned with the flat bottom of the hull. The bottom of the aft section of the hull is concave so the the Kort and propeller can be the largest diameter that would fit in there. I am adding a new drawing, zoomed in on the aft part of the boat.
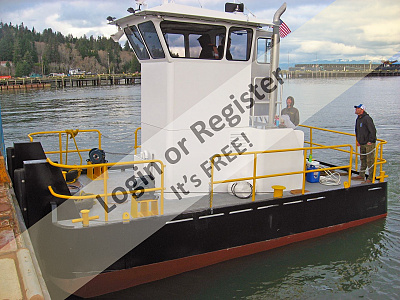
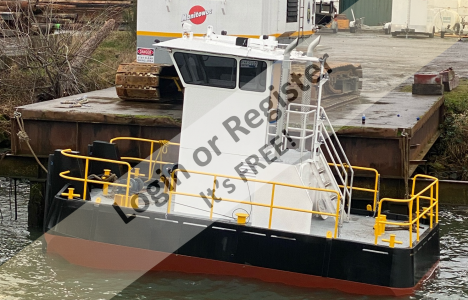
The Eastern rivers (Mississippi, Missouri, Red, Arkansas, etc.) in the U.S. are subject to changing depth depending on the climate (rain, winter snow, etc.). Even dams holding or releasing water can have a dramatic effect. It seems like 9 feet is a good depth for barges and towboats. The US Army Corps of Engineers maintains minimum water depth through dredging where it can.
I'm not an expert on this mater but am interested in this. Never been on a towboat. There are a few of them here in central Florida that I have seen. Non of these are anything like what is on the Mississippi. They are the most efficient way of moving a massive amount of goods.
Lew
▲
⟩⟩
pressonreguardless
ColinJ2
stevedownunder
Steamrod
RodC
jumpugly
chugalone100
Ronald
Black Shoe
Chum444
hermank
Login To
Remove Ads
Remove Ads
📝 Atlantic (Aquacraft) RTR tug info needed
9 days ago by 🇺🇸 LewZ ( Admiral)
Admiral)✧ 23 Views · 1 Like
Flag
📝 Reply
Chum, et. al., I'm continuing the discussion on US towboats over to a new topic: "US Towboats on the Eastern Rivers".
Lew
Lew
▲
⟩⟩
hermank
📝 Atlantic (Aquacraft) RTR tug info needed
10 days ago by 🇺🇸 LewZ ( Admiral)
Admiral)✧ 26 Views · 5 Likes
Flag
📝 Reply
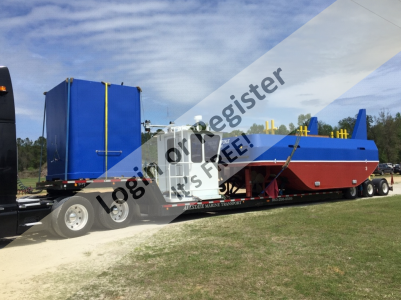
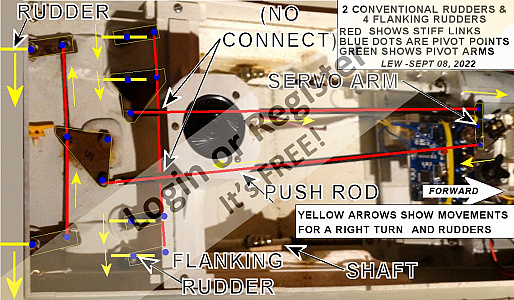
Most of the towboats operating on the Mississippi River have a maximum draft of 9 feet. With the flanking rudders there is no need for bow thrusters. Bow thruster were made for pivoting a sing boat not 1,000's of tons several 1,000 feet our in front of the towboat. (I'm back on my PC now so I can add more photos of the setup.) Steering is done via levers, no wheel.
In my model I have all the rudders connected together. On the real boats the flanking rudders are controlled separately.
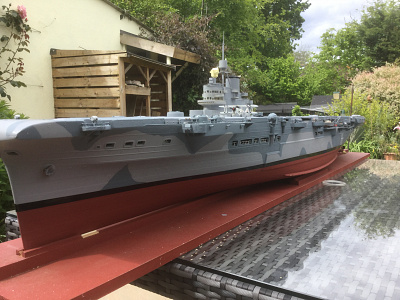
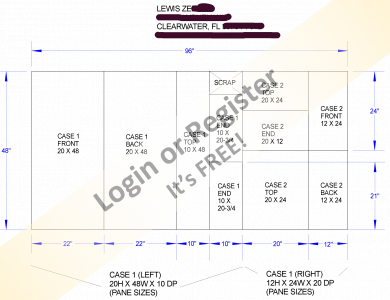
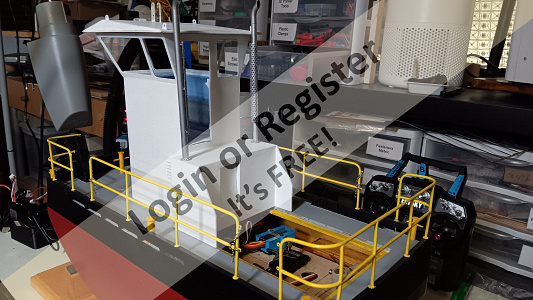
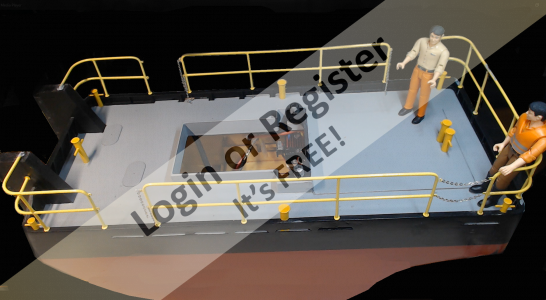
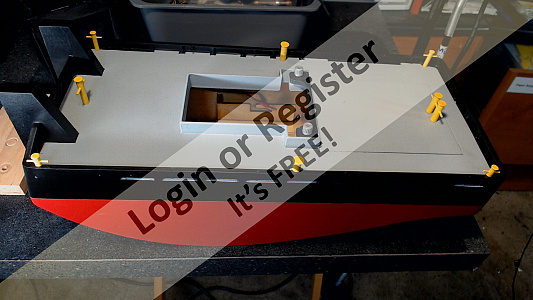
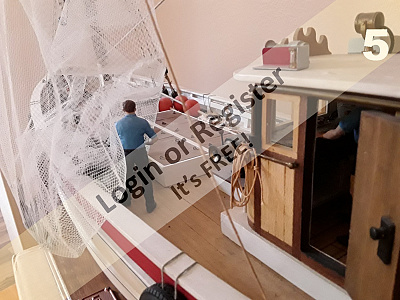
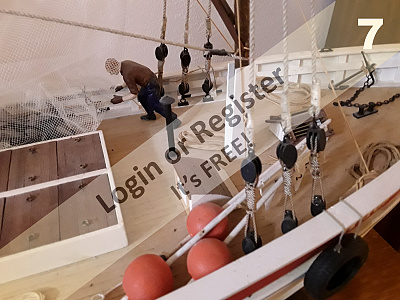
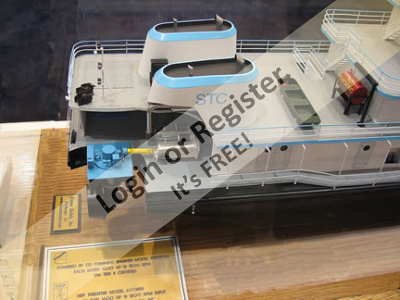
F.Y.I., I am attaching the drawing (one of many) that I made of the Arne Christiansen, a Schottle (or "Z") drive towboat. I have the drives and never the time to build it. Interestingly enough, the propellers turn in one direction only. There is no true reverse. The Schottles turns 360 degrees so they direct the boat in any direction and are independent of each other. I had a phone call from the captain and he told me how this boat was fantastic to operate. The last photo is the designers concept model.
Lew
Chum.. Not to worry about this thread (I started it). Most threads evolve in the same manner. Lew


In my model I have all the rudders connected together. On the real boats the flanking rudders are controlled separately.
F.Y.I., I am attaching the drawing (one of many) that I made of the Arne Christiansen, a Schottle (or "Z") drive towboat. I have the drives and never the time to build it. Interestingly enough, the propellers turn in one direction only. There is no true reverse. The Schottles turns 360 degrees so they direct the boat in any direction and are independent of each other. I had a phone call from the captain and he told me how this boat was fantastic to operate. The last photo is the designers concept model.
Lew
Chum.. Not to worry about this thread (I started it). Most threads evolve in the same manner. Lew
▲
⟩⟩
hermank
chugalone100
Ronald
RodC
Chum444
📝 Atlantic (Aquacraft) RTR tug info needed
10 days ago by 🇺🇸 LewZ ( Admiral)
Admiral)✧ 32 Views · 4 Likes
Flag
📝 Reply
Chum, no, it can't walk sideways. What this arrangement can do is pivot a "tow" (long string of barges) without moving in any direction.
Think of your arm a a tow and your shoulder as the towboat at the aft end of the tow. Point your arm straight ahead. Now swing your stiff arm left or right. Your shoulder or towboat turns the tow. You can also push or pull the tow forward and aft at the same time just like swing your arm as you step forward or backward.
You can see more on this towboat in my harbor, see link.
Also, check YouTube for "marktwained" for some real amazing US towboat videos taken by the captain himself with full explainations.
Lew
▲
⟩⟩
chugalone100
RodC
Chum444
hermank
📝 Atlantic (Aquacraft) RTR tug info needed
10 days ago by 🇺🇸 LewZ ( Admiral)
Admiral)✧ 34 Views · 4 Likes
Flag
📝 Reply
Ron, I believe that the real tug photo was that of a retro-fit. Still probably not as efficient as a true Kort with the propeller inside of it. Not finding much on the "Texas Nozzle". "Steerable Kort" is where the Kort is around the perimeter of the prop but turns from side to side for steering.
My towboat that I built years ago has two drives with fixed Korts, after rudders, and four flanking rudders. This is what a lot of towboats use here in the U.S. The boat can pretty much spin in its own length. (See video.)
I still have my pair of Graunpner Schottles for another towboat I never got around to building.
Lew

▲
⟩⟩
RodC
hermank
Chum444
chugalone100
📝 Smoke generator - question
10 days ago by 🇺🇸 LewZ ( Admiral)
Admiral)✧ 59 Views · 2 Likes
Flag
📝 Reply
Dick Tracy in 2/16 scale?
Lew
Lew
▲
⟩⟩
hermank
chugalone100
📝 Smoke generator - question
11 days ago by 🇺🇸 LewZ ( Admiral)
Admiral)✧ 60 Views · 3 Likes
Flag
📝 Reply
Liar, liar, pants on fire!
I got the vapor mister (in the video I recently posted) from Amazon. The mist is barely visible indoors, not even about 10% of that burst of "smoke" seen in the video.
So, I will give it a very bad review for a deciptive ad. However, I plan to keep it for the upcoming "Florida" hot summer days for which it should work.
Lew
▲
⟩⟩
chugalone100
stevedownunder
hermank
📝 Atlantic (Aquacraft) RTR tug info needed
11 days ago by 🇺🇸 LewZ ( Admiral)
Admiral)✧ 39 Views · 5 Likes
Flag
📝 Reply
Thanks all. Not worried about the performance. My son said his works fine and is surprisingly fast for a boat with such a small, small propeller. (I have made several Kort nozzles, two for my tow boat made from PVC couplings and a 3D printed one for my rescue boat that has a five bladed 3D printed propeller.)
The issue is I have never seen a tug with a bow so prominent as this model. Didn't know if I missed something in my research.
Ronald, those photos look like an unusual setup for a Kort nozzle. I don't think I've ever seen a setup where the propeller is so much forward from the nozzle. Perhaps some new radical idea? The purpose of the nozzle is supposed to be for redirecting the radial thrust rearward which would not be that effective in this design.
Lew
▲
⟩⟩
RodC
hermank
Wolle
chugalone100
Mike Stoney
📝 Atlantic (Aquacraft) RTR tug info needed
11 days ago by 🇺🇸 LewZ ( Admiral)
Admiral)✧ 55 Views · 7 Likes
Flag
📝 Reply
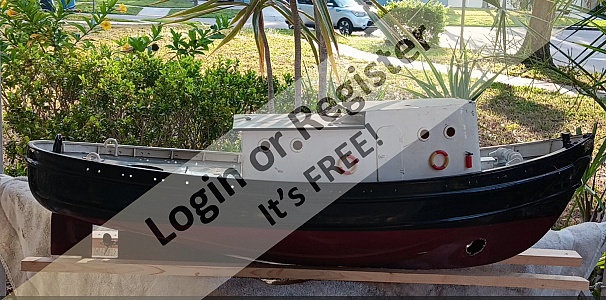
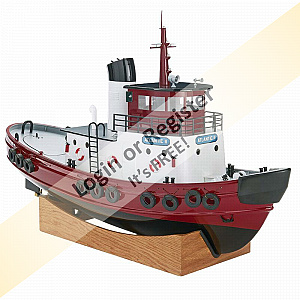
A while back I was giving two Aquacraft "Atlantic" ready to run tugs, one in pretty good condition but the old radio had to be replaced. The other one is pretty pathetic but has a good strong fiberglass hull.
I passed the good one on to my son who's currently reworking it. Is anyone familiar with the style of this boat, i.e, the high-rise gunwhale curving up to the bow? I can't seem to find any tug that looks like that.
He would like to modify the tug to make it look like a late 1900's U.S. tug but that would take too much work.
Does anyone know if this talk was designed after something real or is it too toyish looking?
Lew
▲
⟩⟩
Wolle
EdW
Mike Stoney
RodC
DWBrinkman
chugalone100
hermank
📝 Smoke generator - question
11 days ago by 🇺🇸 LewZ ( Admiral)
Admiral)✧ 49 Views · 3 Likes
Flag
📝 Reply
Yab, do you use a 24V battery for the humidifier element or run it at a lower voltage?
Lew
Lew
▲
⟩⟩
stevedownunder
chugalone100
hermank
Login To
Remove Ads
Remove Ads