Join Us On Social Media!

|

|

|
Download The App!
Login To
Remove Ads
Remove Ads
Login To
Remove Ads
Remove Ads
Model Boats Website


United Kingdom
Recent Posts
💬 Tow hook
15 years ago by 🇬🇧 Toesup ( Leading Seaman)
Leading Seaman)✧ 2 Views · 0 Likes
Flag
💬 Add Comment
I have a plan for the Sea Rover.. but its a ways down the 'build list'.
▲
⟩⟩
No likes yet
This member will receive 1 point
for every like received
This member will receive 1 point
for every like received
Login To
Remove Ads
Remove Ads
📝 Aerokits Sea Hornet
16 years ago by 🇬🇧 Toesup ( Leading Seaman)
Leading Seaman)✧ 5 Views · 0 Likes
Flag
💬 Add Comment
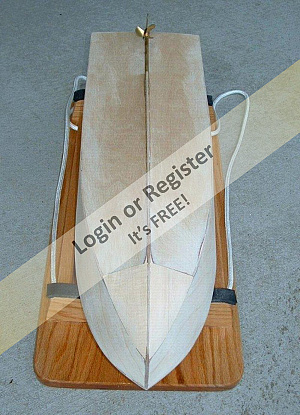
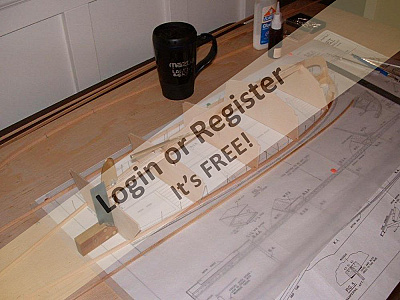
.. and after much gnashing of teeth and carefull sanding I end up with something like this...
1/4" wide mahogany planks and strips of black plastic as 'caulking'..
Why didnt I just draw It on the ply with a sharpie?...
1/4" wide mahogany planks and strips of black plastic as 'caulking'..
Why didnt I just draw It on the ply with a sharpie?...
▲
⟩⟩
No likes yet
This member will receive 1 point
for every like received
This member will receive 1 point
for every like received
📝 Part seven
16 years ago by 🇬🇧 Toesup ( Leading Seaman)
Leading Seaman)✧ 6 Views · 1 Like
Flag
💬 Add Comment
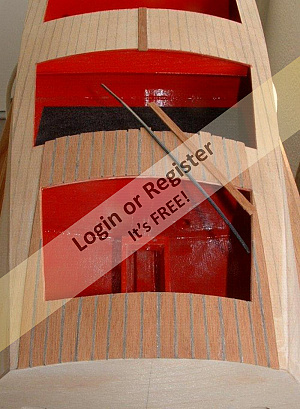
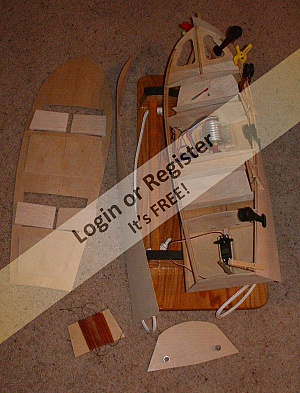
I managed to spray inside each compartment and the undersides of the hatches.
The forward cockpit floor has had its antI slip flooring added and the 'forward / reverse' lever.
I've started on the veneer planking.....
The forward cockpit floor has had its antI slip flooring added and the 'forward / reverse' lever.
I've started on the veneer planking.....
▲
⟩⟩
Jim
📝 Part six
16 years ago by 🇬🇧 Toesup ( Leading Seaman)
Leading Seaman)✧ 5 Views · 0 Likes
Flag
💬 Add Comment
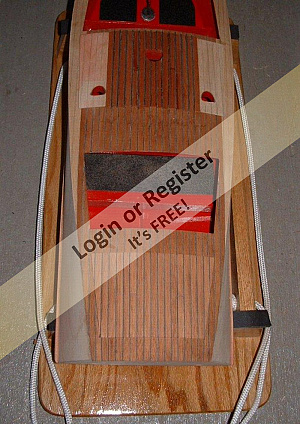
The hatches have been made and fitted, both for the engine compartment and the rudder / servo compartment. The engine compartment hatch still needs the air scoops / air outlets made up...
The spray rails have been added...
I have started on the seats with some balsa....
The spray rails have been added...
I have started on the seats with some balsa....
▲
⟩⟩
No likes yet
This member will receive 1 point
for every like received
This member will receive 1 point
for every like received
📝 Part five
16 years ago by 🇬🇧 Toesup ( Leading Seaman)
Leading Seaman)✧ 5 Views · 0 Likes
Flag
💬 Add Comment
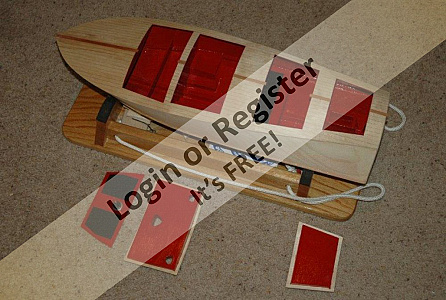
The sides are on, as is the bow blocks which have been carved and sanded to shape.
With the invaluable assistance of Mrs Toes, the deck was also stuck down and shaped..
With the invaluable assistance of Mrs Toes, the deck was also stuck down and shaped..
▲
⟩⟩
No likes yet
This member will receive 1 point
for every like received
This member will receive 1 point
for every like received
📝 Part four
16 years ago by 🇬🇧 Toesup ( Leading Seaman)
Leading Seaman)✧ 5 Views · 0 Likes
Flag
💬 Add Comment
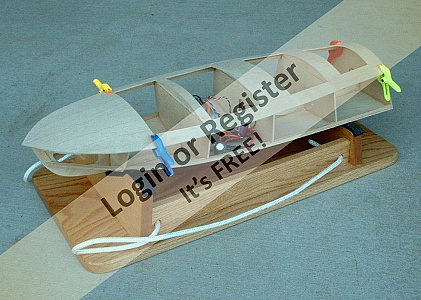
Its the little things that take the time on these builds.
I've made up the motor cooling coil from 3/16" bore AlI tube.
The seats and floor (especially in the rear cockpit) would be a real pain to get in when the sides and deck were fitted, so I've had to make up some of them and fit the rear Cockpit floor. The front cockpit floor I can make removable (by a devious 'handle' 😉 , in case I need any ballast added in that area.
The seat 'squabs' have been cut ready for carving and covering.
I've also cut the hatches and bent them ready for when I need them.
"This piece of 1/16" ply you sold me is warped"
One of the sides has been bent and the other side is currently 'under pressure' so it takes on the shape of the hull.
The rear hull panel has been cut and the exhaust pipes made up to fit.. so they dont conflict with the 'graphic'..
I've also decided where the best place for the servo will be, made up the mount and fitted that.
▲
⟩⟩
No likes yet
This member will receive 1 point
for every like received
This member will receive 1 point
for every like received
📝 Part three
16 years ago by 🇬🇧 Toesup ( Leading Seaman)
Leading Seaman)✧ 5 Views · 0 Likes
Flag
💬 Add Comment
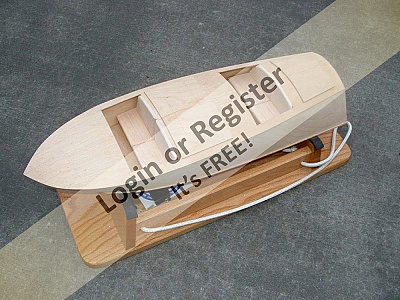
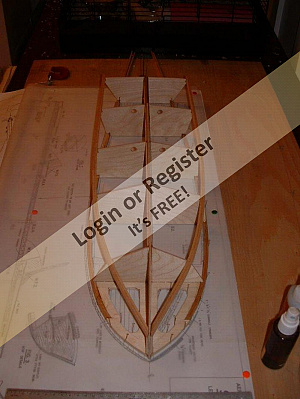
The lower chine 1/8" x 1/4" (x2) spruce have all been added and I think the shape is begining to appear.
... and..
The hull has been released from the board and the bottom skins added.
I've also made up the motor mounting blocks and installed them in the hull.. the motor mount has been made up and installed after some adjusting the mount to get the motor shaft and prop shaft to line up.
The upper parts of the bulkheads have been fitted as has the angled piece over the breasthook to support the deck.
The deck has been roughed out and soaked in the bath for 1/2hour and clamped down in place to dry, that should make it hold its shape and be easier to stick down when the time comes.
Oh, and I made up a stand from some scrap wood.. and 3 coats of varnish.
By the way, the Sea Hornet now has a name and shall be known as 'Bournville Plain'.
▲
⟩⟩
No likes yet
This member will receive 1 point
for every like received
This member will receive 1 point
for every like received
📝 Part two
16 years ago by 🇬🇧 Toesup ( Leading Seaman)
Leading Seaman)✧ 5 Views · 0 Likes
Flag
💬 Add Comment
I've spent the last few days wetting and bending the spruce chine stringers so they take on the form of the boat and make the construction easier.
All I did was trace out the rough line of the stringers and transfer the line to the building board... a few nails on the line and I had a 'form' to work with.
The bulkheads have gone in tonight, and the keel... The transom bulkhead was the only one that needed some 'easing' (I was expecting at least one) as I've had to draw them from the plan and side view.
▲
⟩⟩
No likes yet
This member will receive 1 point
for every like received
This member will receive 1 point
for every like received
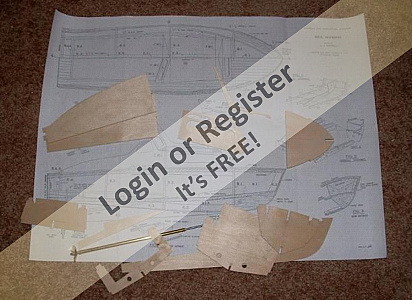
📝 Part one
16 years ago by 🇬🇧 Toesup ( Leading Seaman)
Leading Seaman)✧ 5 Views · 0 Likes
Flag
💬 Add Comment
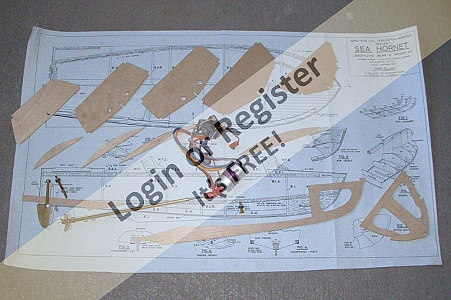
Some time ago I started a build thread about the Aerokits Sea Hornet I had received the plan for from Great Britain. At the time I was too involved in 'other' things to do much building... but now I have a 'space' in the build schedule to fit this one in.
Some background:
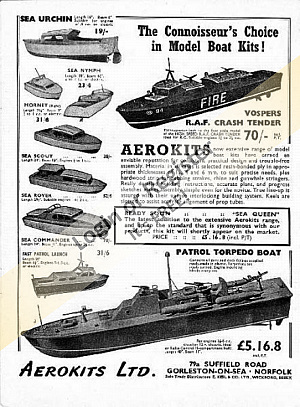
The Aerokits Sea Hornet was designed by L.J. Rowell and first produced in the late 1950' / early 1960's by Aerokits of Norfolk, Great Britain. it was distributed by Keil Kraft (of the free flight plane models fame) of Essex, Great Britain.
Many years ago, back in the mid 1960's my Father had an operation on his back and for some occupational threapy (to keep his mind occupied, too) while he had very little mobility he built the Sea Hornet as a present to me. We had some memorable days at the local pond free running the 'Hornet' with a small watercooled diesel motor.
When I moved to the USA from Great Britain, space for the move was at a premium so the Hornet had to be sold... unfortunatly... A decision I have regretted since.
The build part:
When the plan arrived, I realised that as this plan came originally from a kit, it didnt have the bulkheads drawn, so I have had to develop these before I started to cut wood.
Over the last few days, I have started to gather the parts to put a replacement Sea Hornet together. The brushless motor and ESC has been 'donated' from one of my 1/10th cars rather than go to a diesel... I've got a suitable prop tube and prop (Mr Harbor Models is AMAZING!)... and I have started to cut the keel and bulkheads.
This is to become a British version of a Mahogany Runabout.
Some background:
The Aerokits Sea Hornet was designed by L.J. Rowell and first produced in the late 1950' / early 1960's by Aerokits of Norfolk, Great Britain. it was distributed by Keil Kraft (of the free flight plane models fame) of Essex, Great Britain.
Many years ago, back in the mid 1960's my Father had an operation on his back and for some occupational threapy (to keep his mind occupied, too) while he had very little mobility he built the Sea Hornet as a present to me. We had some memorable days at the local pond free running the 'Hornet' with a small watercooled diesel motor.
When I moved to the USA from Great Britain, space for the move was at a premium so the Hornet had to be sold... unfortunatly... A decision I have regretted since.
The build part:
When the plan arrived, I realised that as this plan came originally from a kit, it didnt have the bulkheads drawn, so I have had to develop these before I started to cut wood.
Over the last few days, I have started to gather the parts to put a replacement Sea Hornet together. The brushless motor and ESC has been 'donated' from one of my 1/10th cars rather than go to a diesel... I've got a suitable prop tube and prop (Mr Harbor Models is AMAZING!)... and I have started to cut the keel and bulkheads.
This is to become a British version of a Mahogany Runabout.
▲
⟩⟩
No likes yet
This member will receive 1 point
for every like received
This member will receive 1 point
for every like received
📝 Aerokits Sea Nymph
16 years ago by 🇬🇧 Toesup ( Leading Seaman)
Leading Seaman)✧ 5 Views · 0 Likes
Flag
💬 Add Comment
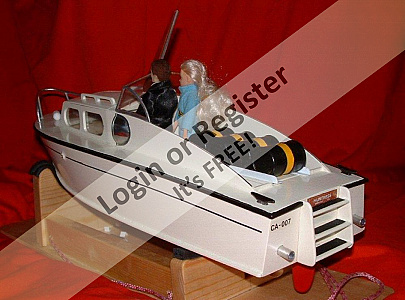
The Sea Nymph Is now finished and tested..
Despite a few overheating problems, that a re routing of the cooling pipework solved, she runs very well and looks the part.
Next project Is the Sea Hornet.


Despite a few overheating problems, that a re routing of the cooling pipework solved, she runs very well and looks the part.
Next project Is the Sea Hornet.
▲
⟩⟩
No likes yet
This member will receive 1 point
for every like received
This member will receive 1 point
for every like received
📝 Update
16 years ago by 🇬🇧 Toesup ( Leading Seaman)
Leading Seaman)✧ 5 Views · 0 Likes
Flag
💬 Add Comment
The last few updated pics...


▲
⟩⟩
No likes yet
This member will receive 1 point
for every like received
This member will receive 1 point
for every like received
Login To
Remove Ads
Remove Ads
📝 The history
16 years ago by 🇬🇧 Toesup ( Leading Seaman)
Leading Seaman)✧ 5 Views · 0 Likes
Flag
💬 Add Comment
Many years ago, back in the mid 1960's my Father had an operation on his back and for some occupational therapy (to keep his mind occupied,too) while he had very little mobility he built an Aerokits Sea Hornet (a build thread for that will be coming ) as a present to me.
When I moved to the USA from Great Britain, space for the removal was at a premium so the Hornet had to be sold... unfortunatly... A decision I have regretted since.
During my enquiries about a plan for the Sea Hornet I was asked if I could provide a copy of the plan in exchange for another Aerokits plan, a Sea Nymph. The deed was done and the plan has been sitting in the 'filing system' waiting for other builds to come to a close so it can get to the building board.
The Sea Nymph is 18" long by 6 1/4" beam and was originally designed for a .5 - 1cc diesel... I shall be going electric..
The plan seems to follow most of the Aerokits way of construction, soit should be a fairly fast and easy build. I'm altering the cabin area slightly to give a more scale like appearance.. to make it look a little more like a Fairey Huntress... just like the one used by JB in 'From Russia with Love'. .. and complete with the extra fuel barrels.
As the plan was from a kit, the plan doesnt show bulkhead forms, so I've had to develop the bulkheads from the side and top view. now I've cut some of the main parts from some decent 1/8" ply I had left over from a recent project.
▲
⟩⟩
No likes yet
This member will receive 1 point
for every like received
This member will receive 1 point
for every like received
📝 So far...
16 years ago by 🇬🇧 Toesup ( Leading Seaman)
Leading Seaman)✧ 5 Views · 0 Likes
Flag
💬 Add Comment
The bottom 1/16th ply skins are on and shaped..
There is a cabin floor and 'box' to mount the fuel drums on.... this also has the advantage of being able to hide the rudder servo under thedeck..
The fore deck has been added and shaped..
The windshield to the fore cabin has been cut out and attached..
.. oh, and I made a stand for 'Huntress'..


There is a cabin floor and 'box' to mount the fuel drums on.... this also has the advantage of being able to hide the rudder servo under thedeck..
The fore deck has been added and shaped..
The windshield to the fore cabin has been cut out and attached..
.. oh, and I made a stand for 'Huntress'..
▲
⟩⟩
No likes yet
This member will receive 1 point
for every like received
This member will receive 1 point
for every like received
📝 Stringers
16 years ago by 🇬🇧 Toesup ( Leading Seaman)
Leading Seaman)✧ 5 Views · 0 Likes
Flag
💬 Add Comment
After much wetting, clamping, drying... wetting, clamping and drying... and then shaping, the stringers are now in place.
I've also added the deck supports next to the cabin... that was the easy bit.
Its begining to take the shape of a boat...
I'm in the process now of wetting the ply for the bottom skins...


I've also added the deck supports next to the cabin... that was the easy bit.
Its begining to take the shape of a boat...
I'm in the process now of wetting the ply for the bottom skins...
▲
⟩⟩
No likes yet
This member will receive 1 point
for every like received
This member will receive 1 point
for every like received
📝 Keel doublers and rudder
16 years ago by 🇬🇧 Toesup ( Leading Seaman)
Leading Seaman)✧ 5 Views · 0 Likes
Flag
💬 Add Comment
The Nymph has started to go together. Adding the keel doublers added a LOT of strength to the 1/8" keel form. I thought it felt very flexibleuntil I added the doublers.
I've made up a jig to sit the 'hull' in whilst I put it together as youcant build this one upside down like the other Aerokits 'kits' due tothe cabin shape.
Most of the construction is straightforward as there are 'keys' cut into the major components so they line up with other parts very easily.
I've also made up the rudder from some parts out of the scrap bin.
▲
⟩⟩
No likes yet
This member will receive 1 point
for every like received
This member will receive 1 point
for every like received
Login To
Remove Ads
Remove Ads