Join Us On Social Media!

|

|

|
Download The App!
Login To
Remove Ads
Remove Ads
Login To
Remove Ads
Remove Ads
Model Boats Website
JUANITA STERN WHEELER
60 Posts · 12 Followers · 371 Photos · 300 Likes
Began 2 months ago by
 United States
Follow This Thread
Not currently following
> Click to follow
> Click to follow
Latest Post 10 days ago by
| Most recent posts shown first (Show Oldest First) | (Print Booklet) |
📝 JUANITA STERN WHEELER
10 days ago by 🇺🇸 chugalone100 ( Commodore)
Commodore)✧ 25 Views · 2 Likes
Flag
💬 Add Comment
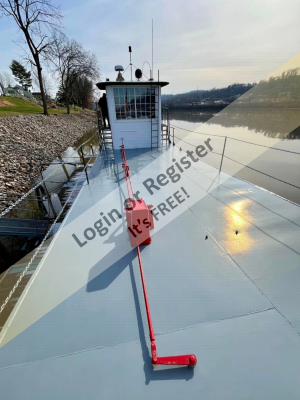
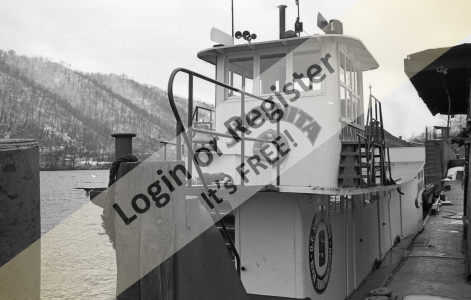
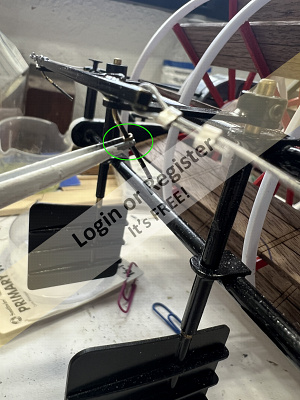
THE POWER OF IMAGINATION
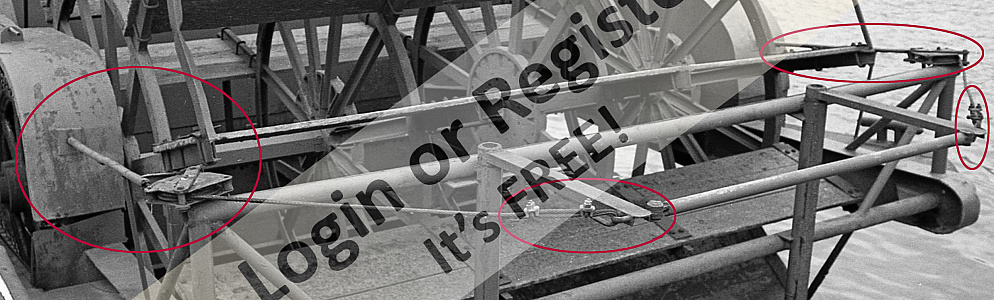
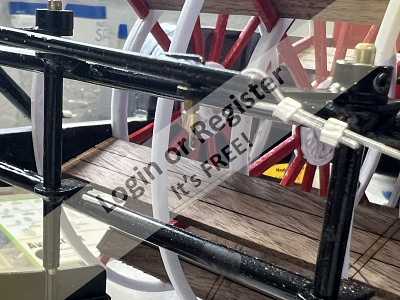
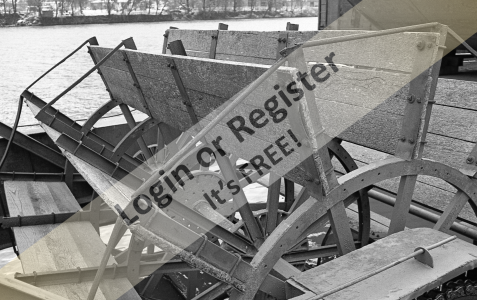
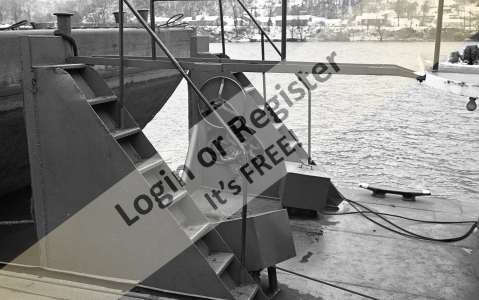
Today, while going through the black and white reference photos with a fine-tooth comb, I came across one showing the rear steering tubes, cables, and cable clamps.
Not fully knowing how this assembly was arranged in real life, I took my best guess—and it turns out I came pretty close to the actual setup.
First, the original black & white reference… and then what I came up with.
😎
▲
⟩⟩
Chuck
jumpugly
Login To
Remove Ads
Remove Ads
📝 JUANITA STERN WHEELER
10 days ago by 🇺🇸 chugalone100 ( Commodore)
Commodore)✧ 26 Views · 5 Likes · 2 Comments
Flag
💬 Add Comment
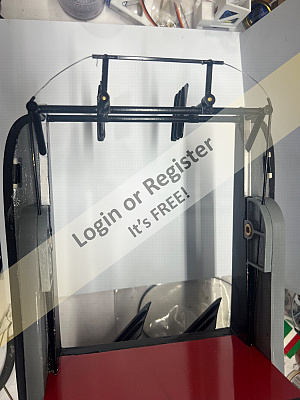
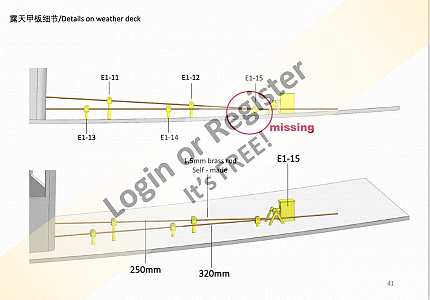
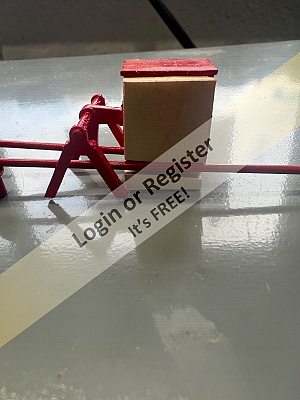
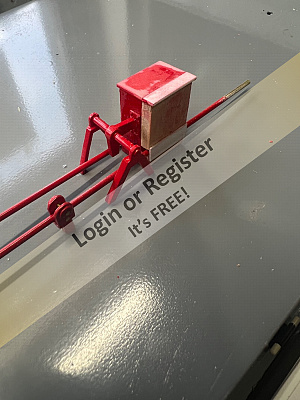
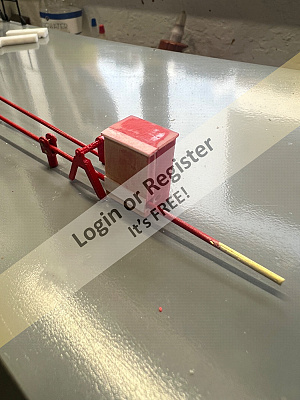
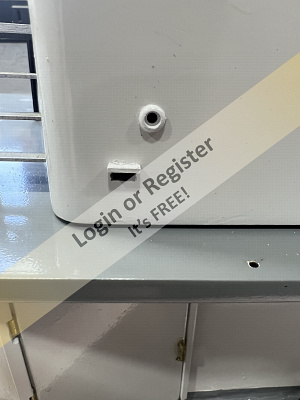
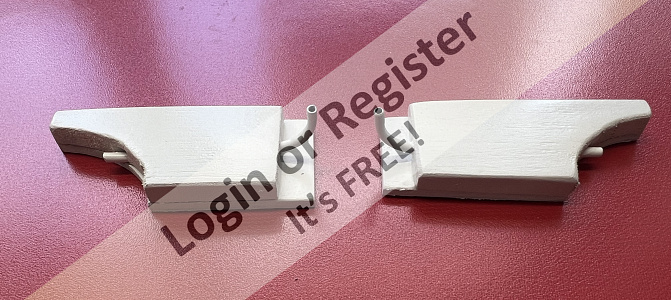
THE TILLER ACCESS DOOR AND MECHANISM.
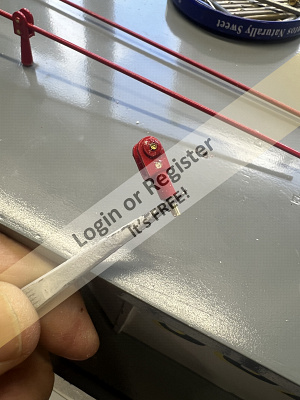
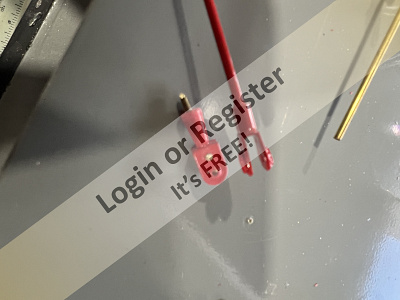
While building this section, I noticed that my kit didn’t include part E1-15—the smaller of the five rollers needed for the tiller rods.
So I went ahead and soldered one myself, and it turned out quite acceptable.
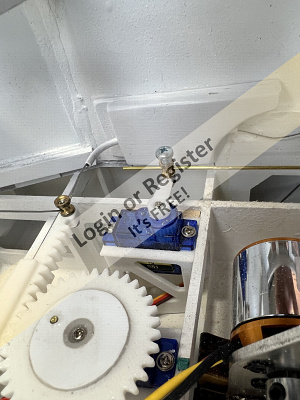
Then, while studying the reference photos and comparing them with the schematic provided in the kit, I spotted a discrepancy.
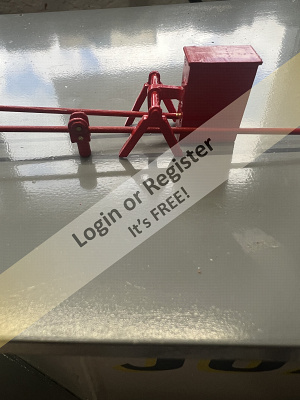
The plans show the port-side rod passing along the side of the gearbox at the rear. However, in the actual photos, the rod clearly passes through the box.
To correct this, I added material to the sides and top of the gearbox, reshaped it, and repainted it. That solved the issue and brought it closer to the real thing.
I also shared this information with Mr. Zhou, one of the Juanita distributors.
By the way, if you’re considering buying this model on eBay from this vendor, you won’t be disappointed—he really stands behind the product and responds to customer messages, as he did with me.
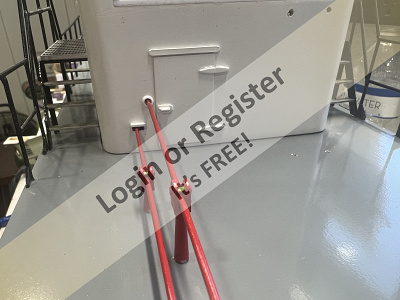
Continuing with the build, For the rod positioning, I first applied a bit of paint to a piece of scrap wood and then transferred that paint onto both tiller rods. By gently bringing them into contact with the pilot house, I was able to mark the exact spot for proper alignment.
To build the door, I used very thin styrene to fabricate the door.
I hope my obsession with authenticity is something you can appreciate!
😎


While building this section, I noticed that my kit didn’t include part E1-15—the smaller of the five rollers needed for the tiller rods.
So I went ahead and soldered one myself, and it turned out quite acceptable.
Then, while studying the reference photos and comparing them with the schematic provided in the kit, I spotted a discrepancy.
The plans show the port-side rod passing along the side of the gearbox at the rear. However, in the actual photos, the rod clearly passes through the box.
To correct this, I added material to the sides and top of the gearbox, reshaped it, and repainted it. That solved the issue and brought it closer to the real thing.
I also shared this information with Mr. Zhou, one of the Juanita distributors.
By the way, if you’re considering buying this model on eBay from this vendor, you won’t be disappointed—he really stands behind the product and responds to customer messages, as he did with me.
Continuing with the build, For the rod positioning, I first applied a bit of paint to a piece of scrap wood and then transferred that paint onto both tiller rods. By gently bringing them into contact with the pilot house, I was able to mark the exact spot for proper alignment.
To build the door, I used very thin styrene to fabricate the door.
I hope my obsession with authenticity is something you can appreciate!
😎
▲
⟩⟩
jumpugly
DWBrinkman
Wolle
PhilH
AlessandroSPQR
|
💬 Re: JUANITA STERN WHEELER
10 days ago by 🇮🇹 AlessandroSPQR (
 Fleet Admiral) Fleet Admiral)✧ 21 Views · 2 Likes
Flag
Hey Chugalone, besides being brilliant, you're a train and you go incredibly fast. You can build faster than I can read. Keep it up, I admire you.
▲
⟩⟩
jumpugly
chugalone100
|
|
💬 Re: JUANITA STERN WHEELER
10 days ago by 🇬🇧 PhilH (
 Lieutenant Commander) Lieutenant Commander)✧ 18 Views · 3 Likes
Flag
I love your build quality and attentionto detail keep up the work
Philuk👍 ▲
⟩⟩
jumpugly
AlessandroSPQR
chugalone100
|
📝 JUANITA STERN WHEELER
11 days ago by 🇺🇸 chugalone100 ( Commodore)
Commodore)✧ 28 Views · 3 Likes · 2 Comments
Flag
💬 Add Comment
Hi guys,
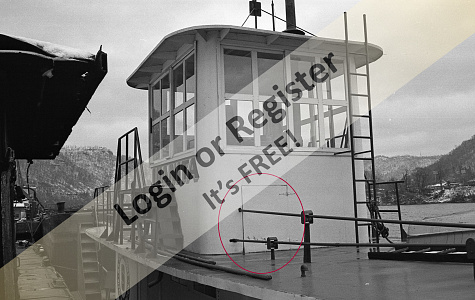
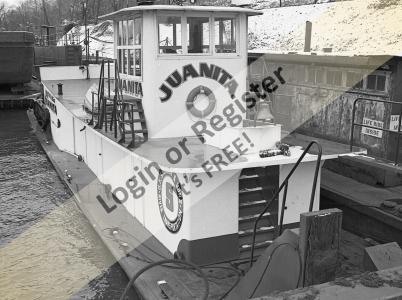
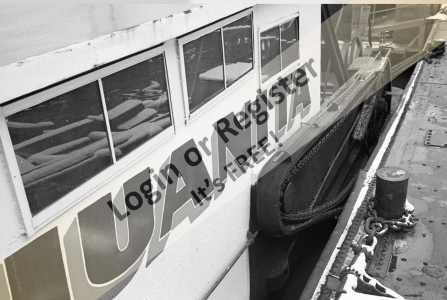
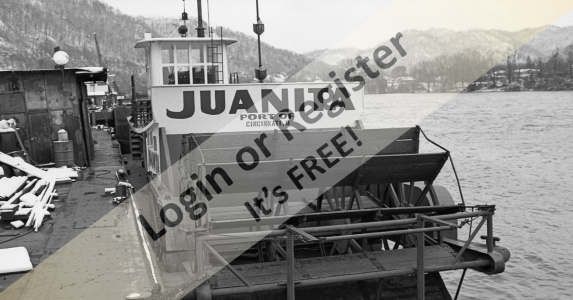
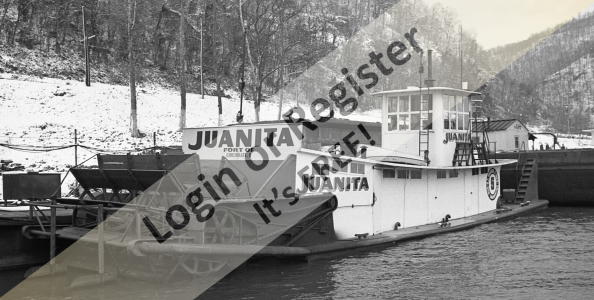
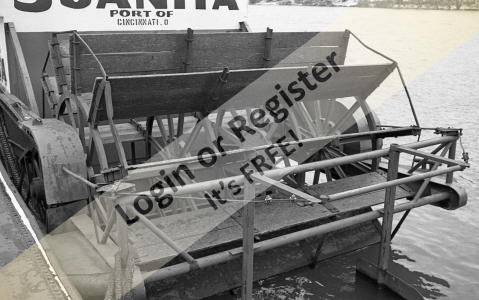
Take a look at these black and white photos I found online from 1966—they’re absolutely amazing. There’s a huge amount of detail in them, and the more you study them, the more little features start to stand out that I can incorporate into the build.
Have a look and let me know what catches your eye—always good to get another set of eyes on these 👍
😎
▲
⟩⟩
AlessandroSPQR
Ronald
jumpugly
|
💬 Re: JUANITA STERN WHEELER
10 days ago by 🇺🇸 chugalone100 (
Commodore)✧ 28 Views · 1 Like
Flag
Thanks, Jumpugly.
At the moment, I’m working on this small door behind the pilot house. I believe it’s a hatch to access the tiller mechanism. Whatever it is, I’m almost finished recreating it. 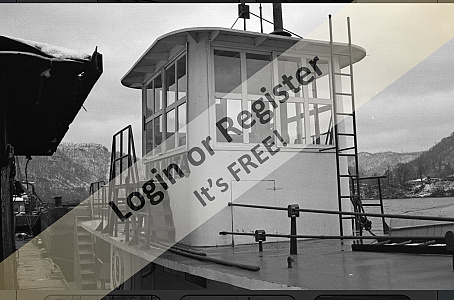
▲
⟩⟩
AlessandroSPQR
|
|
💬 Re: JUANITA STERN WHEELER
10 days ago by 🇺🇸 jumpugly (
 Admiral) Admiral)✧ 22 Views · 2 Likes
Flag
Whoa! Chug!!!!!!!
These are amazing! Good digging! I dunno Chug, but you may have out-scaled the real thing! Great workmanship! 👍😂😂😂 ▲
⟩⟩
AlessandroSPQR
chugalone100
|
📝 JUANITA STERN WHEELER
16 days ago by 🇺🇸 chugalone100 ( Commodore)
Commodore)✧ 38 Views · 4 Likes
Flag
💬 Add Comment
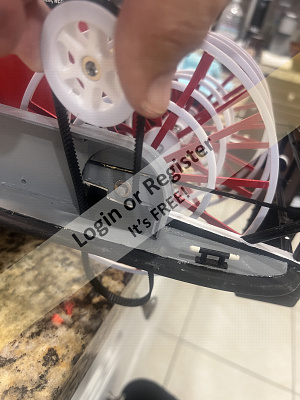
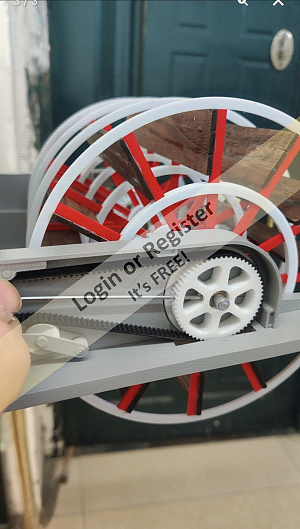
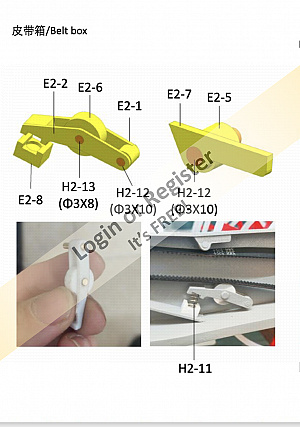
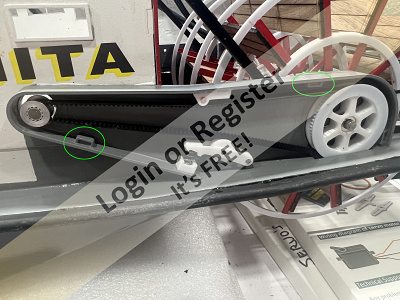
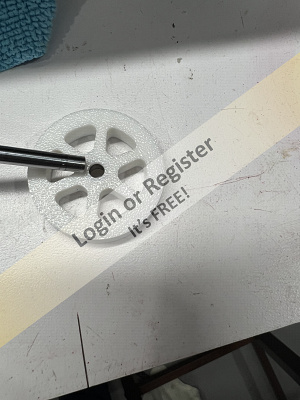
BELT DRIVE AND COVER INSTALLATION
Moving on to the belt drive system, here’s how I approached the installation step by step.
Step 1 – Install the main belt
Loosen the main wheel cog, pull it out slightly, and install the belt. Once in place, return the cog to its position and tighten the set screw.
Step 2 – Install the motor belt
Loosen the small motor cog and fit the belt. You may need to gently tap it into position using a small hammer to seat it properly.
Step 3 – Adjust the tension system
Install all the components responsible for keeping the belt tight and properly aligned. This will prevent the belt from slipping or jumping during operation.
Step 4 – Install the magnets
Insert the small rectangular magnets supplied with the kit.
You may need to clean out any paint residue, as the magnets fit very tightly. In my case, I had to carefully tap them in using a piece of hardwood.
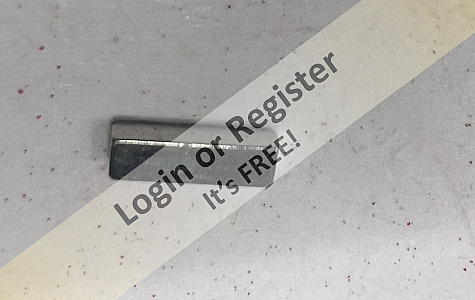
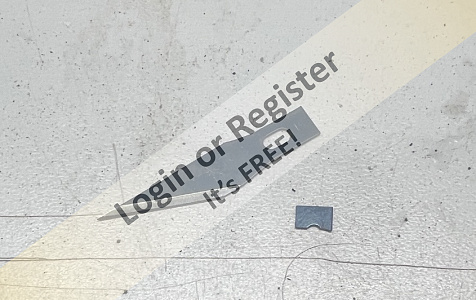
Step 5 – Prepare the belt cover mounts
To secure the cover, I broke off small sections from old X-Acto blades and used them as metal contact points.
After marking where the magnets would meet, I applied a small drop of CA glue to fix them in place.
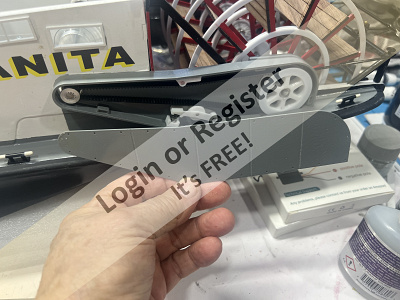
Step 6 – Fit the belt cover
Test fit the cover and lightly sand the edges where needed.
After a bit of adjustment, the cover fit perfectly—like a glove.
Final note
Take your time aligning everything properly—once done, the whole system looks clean, tight, and very satisfying.
😎


Moving on to the belt drive system, here’s how I approached the installation step by step.
Step 1 – Install the main belt
Loosen the main wheel cog, pull it out slightly, and install the belt. Once in place, return the cog to its position and tighten the set screw.
Step 2 – Install the motor belt
Loosen the small motor cog and fit the belt. You may need to gently tap it into position using a small hammer to seat it properly.
Step 3 – Adjust the tension system
Install all the components responsible for keeping the belt tight and properly aligned. This will prevent the belt from slipping or jumping during operation.
Step 4 – Install the magnets
Insert the small rectangular magnets supplied with the kit.
You may need to clean out any paint residue, as the magnets fit very tightly. In my case, I had to carefully tap them in using a piece of hardwood.
Step 5 – Prepare the belt cover mounts
To secure the cover, I broke off small sections from old X-Acto blades and used them as metal contact points.
After marking where the magnets would meet, I applied a small drop of CA glue to fix them in place.
Step 6 – Fit the belt cover
Test fit the cover and lightly sand the edges where needed.
After a bit of adjustment, the cover fit perfectly—like a glove.
Final note
Take your time aligning everything properly—once done, the whole system looks clean, tight, and very satisfying.
😎
▲
⟩⟩
jumpugly
PhilH
Wolle
AlessandroSPQR
📝 JUANITA STERN WHEELER
17 days ago by 🇺🇸 chugalone100 ( Commodore)
Commodore)✧ 39 Views · 1 Like
Flag
💬 Add Comment
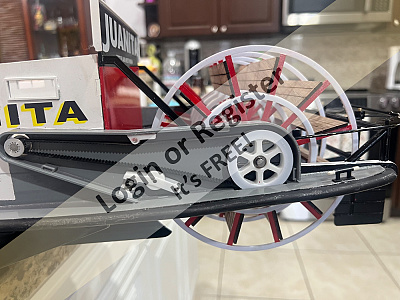
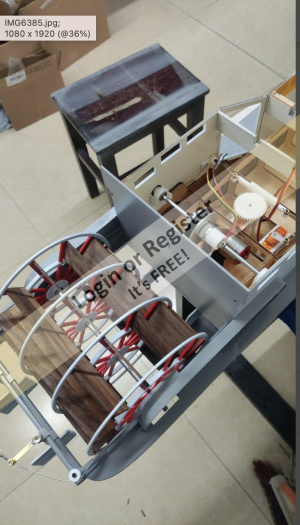
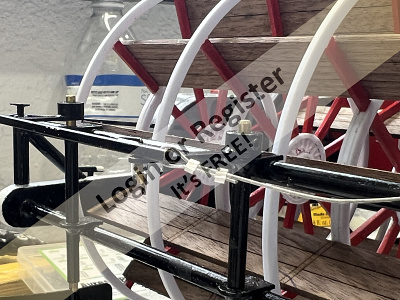
PADDLE BOARDS INSTALLATION
Step 1 – Locking the wheels in position
First, you will need a piece of wood (a small block or strip) to lock all the wheels in one fixed position.
This will:
Keep all wheels aligned
Prevent movement while installing the first boards.
Step 2 – Setting the outer wheels
Tighten the shaft collar bolts on the outer wheels only.
Leave just a slight clearance from the sides
Make sure nothing is rubbing.
Step 3 – Installing the first paddle board
Start by installing your first board:
Apply glue only to the outer wheels
Position the board carefully. (I used cloth pins because they apply just enough pressure for the glue to settle without distorting the parts).
Good thing is the boards come with laser markings, which guide you exactly where each wheel should sit.
Once the outer wheels are glued and secured:
Glue the two inner wheels using the alignment markings.
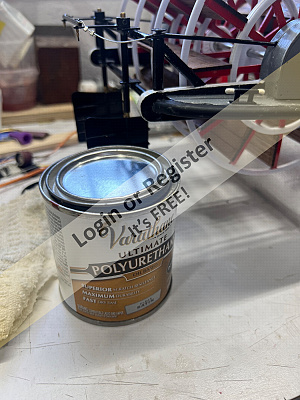
Final Step
Once all boards are installed and everything is aligned, give the assembly a final check for smooth rotation…
👉 and finally I brushed two coats of varnish.
😎

Step 1 – Locking the wheels in position
First, you will need a piece of wood (a small block or strip) to lock all the wheels in one fixed position.
This will:
Keep all wheels aligned
Prevent movement while installing the first boards.
Step 2 – Setting the outer wheels
Tighten the shaft collar bolts on the outer wheels only.
Leave just a slight clearance from the sides
Make sure nothing is rubbing.
Step 3 – Installing the first paddle board
Start by installing your first board:
Apply glue only to the outer wheels
Position the board carefully. (I used cloth pins because they apply just enough pressure for the glue to settle without distorting the parts).
Good thing is the boards come with laser markings, which guide you exactly where each wheel should sit.
Once the outer wheels are glued and secured:
Glue the two inner wheels using the alignment markings.
Final Step
Once all boards are installed and everything is aligned, give the assembly a final check for smooth rotation…
👉 and finally I brushed two coats of varnish.
😎
▲
⟩⟩
AlessandroSPQR
📝 JUANITA STERN WHEELER
17 days ago by 🇺🇸 chugalone100 ( Commodore)
Commodore)✧ 38 Views · 2 Likes
Flag
💬 Add Comment
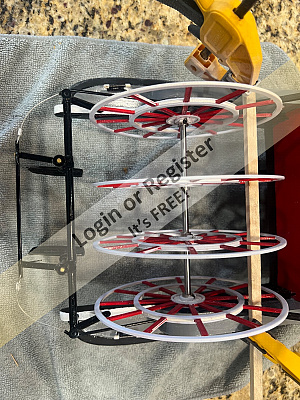
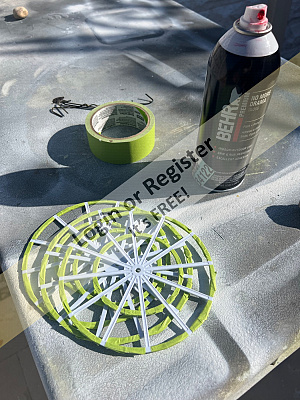
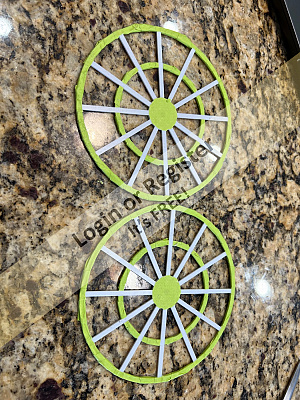
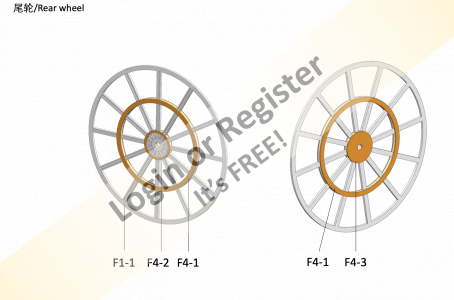
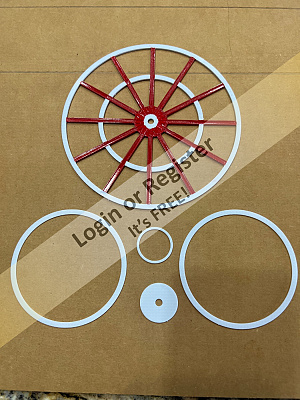
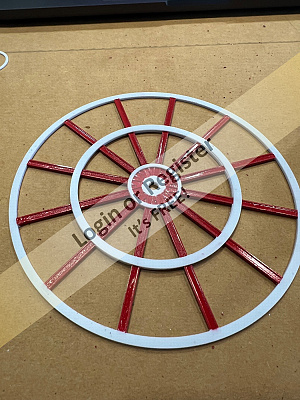
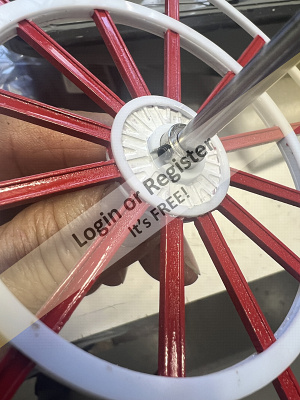
Step 1 – MASKING THE WHEELS
First and foremost is masking the four wheels.
This is a very fastidious task, as you need to carefully cover all the white areas in order to paint the red sections cleanly.
Take your time here—good masking will make a big difference in the final look.
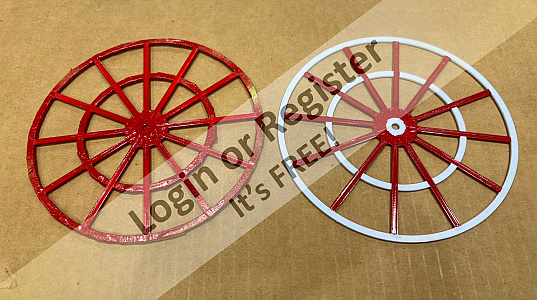
Step 2 – Adding the side rings (F4-1)
Once the paint is complete and fully cured:
Install two F4-1 rings, one on each side of the main wheel
These are sandwiched onto the wheel to build up the correct thickness and detail
Step 3 – Installing F4-2 and F4-3
Next:
Add one F4-2 and one F4-3
Again, one set on each side of the wheel
At this point, each wheel should be fully built up with all its corresponding parts.
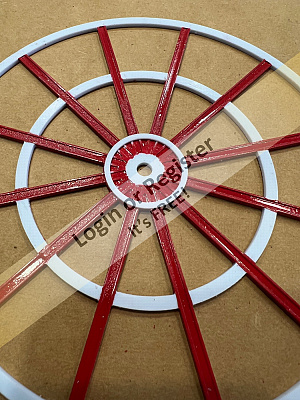
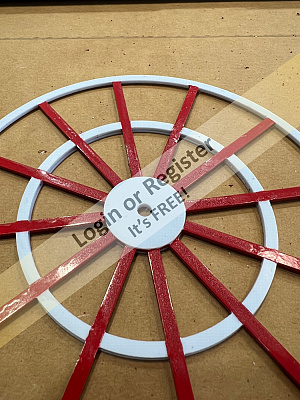
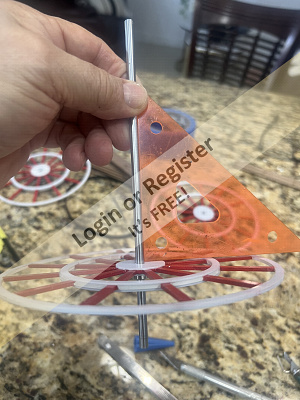
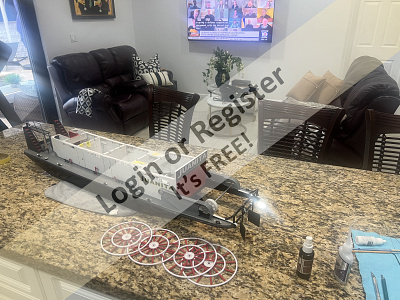
Step 4 – Preparing for shaft installation
With all wheels assembled, it’s time to mount them onto the shaft.
For this step, I moved from my workbench to the kitchen counter to have a more comfortable and stable working area—this helps a lot with alignment and handling.
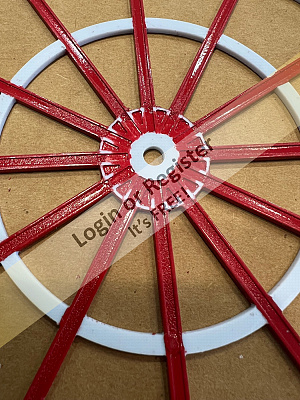
Step 5 – Installing the washer and collars
I started by gluing a small plastic washer with a cut-out.
This washer acts as a seat for the shaft collars
When tightening the collars, it helps keep the wheel centered and properly aligned
For the rest of the wheel setup, I moved the model from my workbench to the kitchen counter, where I felt more comfortable and had better space to handle the task ahead.
Take your time positioning this part, as it plays an important role in keeping everything running true.
Final check
Once everything is in place:
Make sure both wheels are aligned
Spin them by hand to check for smooth operation
Confirm there is no wobble or binding
This step really brings the model to life—once the wheels are in, it finally starts looking like a proper sternwheeler.
Next step is to add the add the PADDLE BOARDS.
😎
First and foremost is masking the four wheels.
This is a very fastidious task, as you need to carefully cover all the white areas in order to paint the red sections cleanly.
Take your time here—good masking will make a big difference in the final look.
Step 2 – Adding the side rings (F4-1)
Once the paint is complete and fully cured:
Install two F4-1 rings, one on each side of the main wheel
These are sandwiched onto the wheel to build up the correct thickness and detail
Step 3 – Installing F4-2 and F4-3
Next:
Add one F4-2 and one F4-3
Again, one set on each side of the wheel
At this point, each wheel should be fully built up with all its corresponding parts.
Step 4 – Preparing for shaft installation
With all wheels assembled, it’s time to mount them onto the shaft.
For this step, I moved from my workbench to the kitchen counter to have a more comfortable and stable working area—this helps a lot with alignment and handling.
Step 5 – Installing the washer and collars
I started by gluing a small plastic washer with a cut-out.
This washer acts as a seat for the shaft collars
When tightening the collars, it helps keep the wheel centered and properly aligned
For the rest of the wheel setup, I moved the model from my workbench to the kitchen counter, where I felt more comfortable and had better space to handle the task ahead.
Take your time positioning this part, as it plays an important role in keeping everything running true.
Final check
Once everything is in place:
Make sure both wheels are aligned
Spin them by hand to check for smooth operation
Confirm there is no wobble or binding
This step really brings the model to life—once the wheels are in, it finally starts looking like a proper sternwheeler.
Next step is to add the add the PADDLE BOARDS.
😎
▲
⟩⟩
Ronald
AlessandroSPQR
📝 JUANITA STERN WHEELER
17 days ago by 🇺🇸 chugalone100 ( Commodore)
Commodore)✧ 38 Views · 1 Like
Flag
💬 Add Comment
Hi Alessandro,
I used a 3mm tube instead of the 2mm that came with the kit.
To make the bending easier, I first annealed the tube by heating it until it turned a dull red and then letting it cool down naturally.
The reason this works is because heating the brass changes its internal crystal structure.
When brass is bent or worked, it becomes “work-hardened,” meaning it gets stiffer and more prone to cracking.
By heating it (annealing), the structure relaxes and resets, making the metal softer and much more ductile.
After that, I inserted a 1mm rod inside the tube—just up to the point where the bend would end. This helps prevent the tube from collapsing or kinking during the bend.
Then I carefully bent it by hand, taking it slow and applying gentle, even pressure. The result was a nice, clean bend with no deformation.
hope this helps.
😎
▲
⟩⟩
AlessandroSPQR
📝 JUANITA STERN WHEELER
17 days ago by 🇺🇸 chugalone100 ( Commodore)
Commodore)✧ 38 Views · 1 Like
Flag
💬 Add Comment
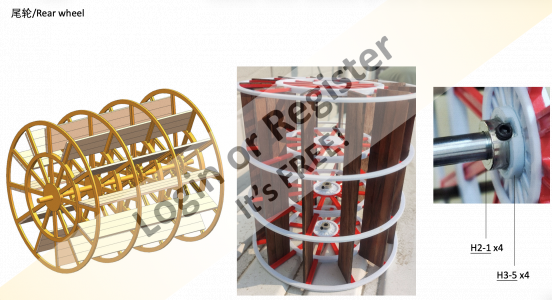
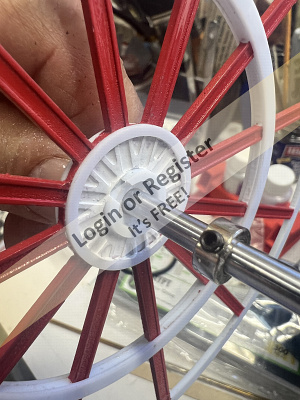
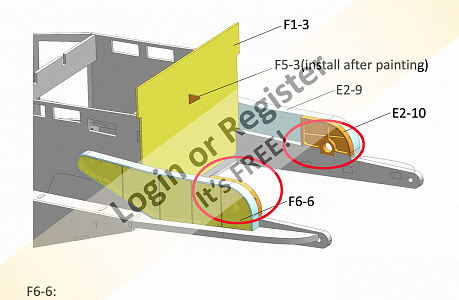
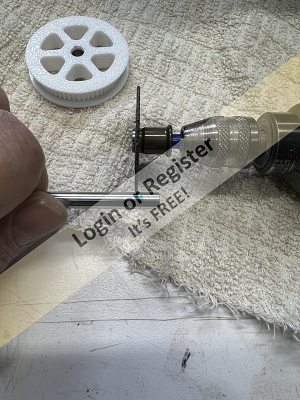
WHEEL SHAFT PREPARATION
This section I had to redo a few times due to one very important detail:
both E2-10 shaft holders must be perfectly aligned, otherwise the shaft will bind when turning.
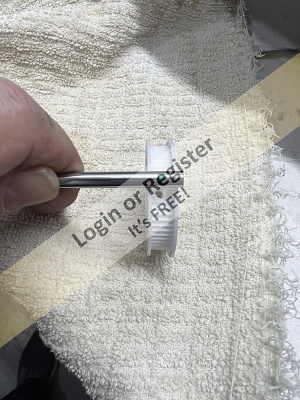
1.The first step is to slightly widen the opening on the plastic face of the wheel hub.
This part has two faces:
One is plain plastic
The other has a stainless steel washer embedded
👉 The washer side must face outwards.
2.Mark the location where the set screw will sit and grind a small notch (flat spot) on the shaft.
This will:
Prevent slipping
Ensure proper grip from the set screw
3. Slide the shaft into the E2-10 holders and test for free movement.
⚠️ This is the most critical step:
The shaft must spin freely
No binding or resistance
If it binds, adjust alignment before going any further.
4. At this stage, I simply positioned the E2-10 with the shaft in place and held everything using masking tape. After confirming smooth, free movement, I applied epoxy glue.
Important:
I did not use clamps—only the tape—to avoid adding any pressure that could misalign the shaft during curing.
Now that we know the E2-10’s are glued in perfect harmony with the shaft, it’s time to install the wheel.
😎

This section I had to redo a few times due to one very important detail:
both E2-10 shaft holders must be perfectly aligned, otherwise the shaft will bind when turning.
1.The first step is to slightly widen the opening on the plastic face of the wheel hub.
This part has two faces:
One is plain plastic
The other has a stainless steel washer embedded
👉 The washer side must face outwards.
2.Mark the location where the set screw will sit and grind a small notch (flat spot) on the shaft.
This will:
Prevent slipping
Ensure proper grip from the set screw
3. Slide the shaft into the E2-10 holders and test for free movement.
⚠️ This is the most critical step:
The shaft must spin freely
No binding or resistance
If it binds, adjust alignment before going any further.
4. At this stage, I simply positioned the E2-10 with the shaft in place and held everything using masking tape. After confirming smooth, free movement, I applied epoxy glue.
Important:
I did not use clamps—only the tape—to avoid adding any pressure that could misalign the shaft during curing.
Now that we know the E2-10’s are glued in perfect harmony with the shaft, it’s time to install the wheel.
😎
▲
⟩⟩
AlessandroSPQR
📝 JUANITA STERN WHEELER
17 days ago by 🇺🇸 chugalone100 ( Commodore)
Commodore)✧ 36 Views · 1 Like · 1 Comment
Flag
💬 Add Comment
Just wondering—has anyone else picked up this model since Chuck first introduced it to us?”
😎
😎
▲
⟩⟩
AlessandroSPQR
|
💬 Re: JUANITA STERN WHEELER
17 days ago by 🇮🇹 AlessandroSPQR (
Fleet Admiral)✧ 36 Views · 1 Like
Flag
Hi Chugalone, after heating the brass tubing, how did you bend it? What tool or tools did you use?
▲
⟩⟩
chugalone100
|
📝 JUANITA STERN WHEELER
17 days ago by 🇺🇸 chugalone100 ( Commodore)
Commodore)✧ 36 Views · 2 Likes · 1 Comment
Flag
💬 Add Comment
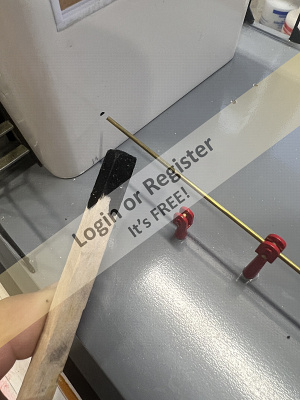
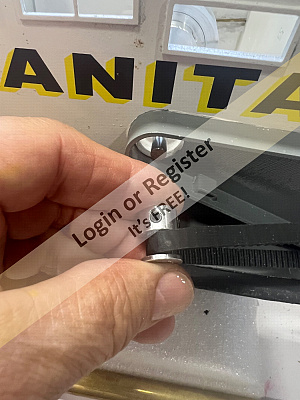
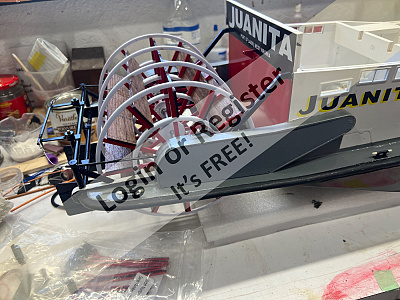
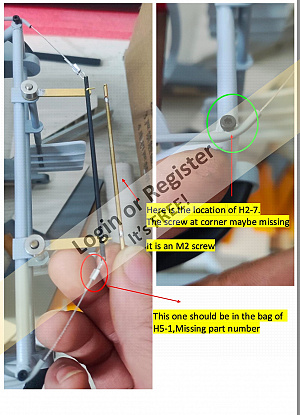
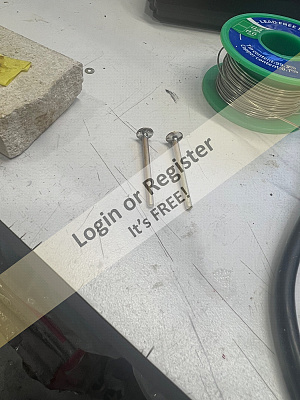
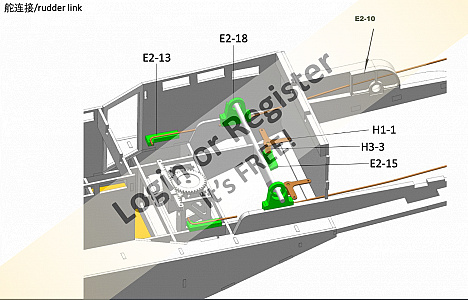
INSTALLATION OF THE STEERING CABLES MECHANISM
This part took a bit of improvisation and patience, but here’s how I approached it:
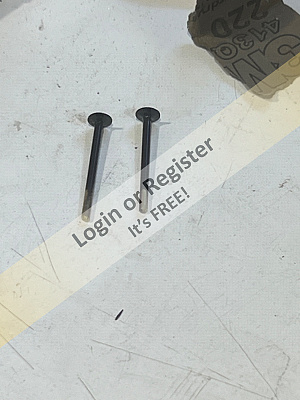
Step 1 – Making custom tube holders
The kit didn’t include the M2 screws for the tube supports, so I had to make my own.
I used some brass rod from my stash and soldered a small washer on top of each piece.
After painting them, they actually look better and provide a larger holding surface.
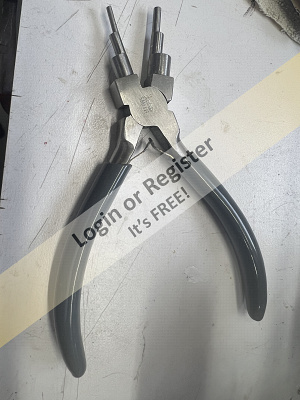
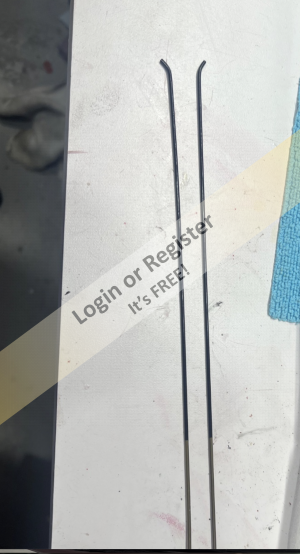
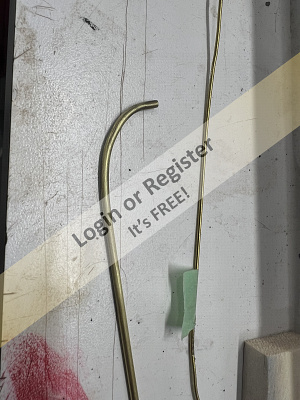
Step 2 – Preparing the brass tubes
Next came the tedious part—bending two pieces of 300mm brass tube
(2mm OD, 0.5mm wall thickness).
To make this easier, I annealed the tubes:
Heat the brass until it turns red
Let it cool naturally
This makes the material softer and easier to bend without kinking or cracking.
Step 3 – Bending the tubes
Once annealed, I carefully bent the tubes to shape.
Very delicate work considering how small the tubing is—take your time here.
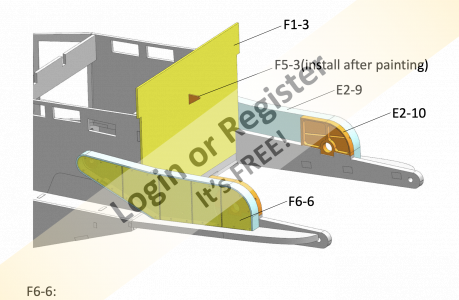
Step 4 – Painting and routing
After bending, I painted the tubes and routed them through:
The E2-10 horns
The back splash
The bottom of the motor shaft holder
Not an easy task, but doable with patience. (pictures 6-7)
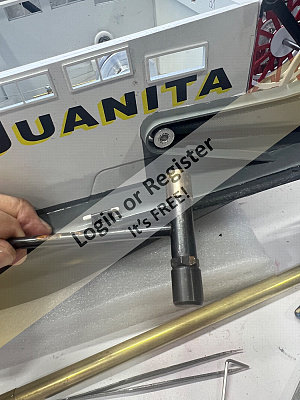
Step 5 – Securing the tubes
Once in place, I installed my custom hold-downs at the rear rudder assembly to secure everything.
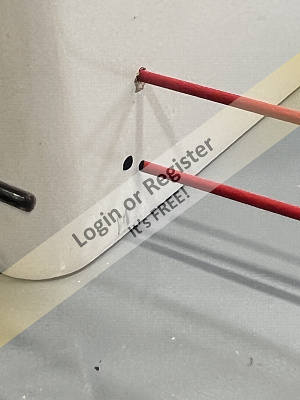
Step 6 – Creating the cable guide system (improved setup)
Now comes the good part.
You’ll need to bend two smaller tubes at a 90° angle so the cable can pass through and meet the servo cog tracking ends.
The kit includes small nylon guides for this, but honestly… that setup didn’t work well for me.
So I made my own:
Instead of 2mm tubing, I used 3mm brass tubing
Much easier to bend
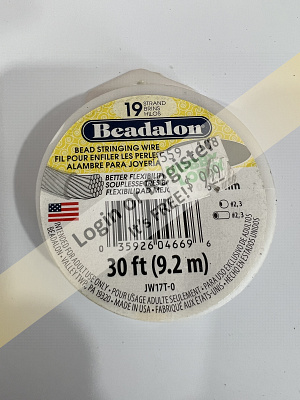
Allows the cable to pass more freely (here I use my own cable, just a bit thinner and runs very easy in all the bends.)
I then used some scrap wood to build a small support block and glued the whole assembly to the superstructure wall, making sure it aligned perfectly with the steering servo horn.
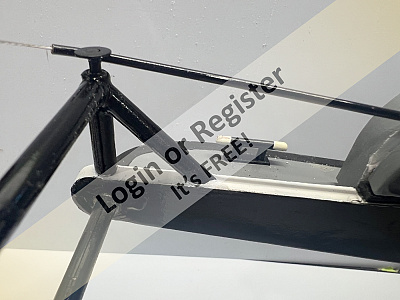
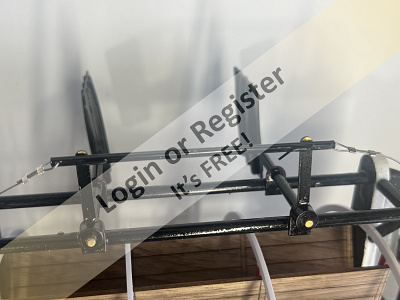
Step 7 – Reinforcing the rudder linkage bar
The bar that connects both small rudders didn’t look strong enough to me, so I scratch-built a new one using square brass tubing.
Much stronger and gives a more solid feel to the whole system.
Final thoughts
This whole setup required some trial and error, but in the end it works smoothly and feels much more robust than the stock configuration.
😎

This part took a bit of improvisation and patience, but here’s how I approached it:
Step 1 – Making custom tube holders
The kit didn’t include the M2 screws for the tube supports, so I had to make my own.
I used some brass rod from my stash and soldered a small washer on top of each piece.
After painting them, they actually look better and provide a larger holding surface.
Step 2 – Preparing the brass tubes
Next came the tedious part—bending two pieces of 300mm brass tube
(2mm OD, 0.5mm wall thickness).
To make this easier, I annealed the tubes:
Heat the brass until it turns red
Let it cool naturally
This makes the material softer and easier to bend without kinking or cracking.
Step 3 – Bending the tubes
Once annealed, I carefully bent the tubes to shape.
Very delicate work considering how small the tubing is—take your time here.
Step 4 – Painting and routing
After bending, I painted the tubes and routed them through:
The E2-10 horns
The back splash
The bottom of the motor shaft holder
Not an easy task, but doable with patience. (pictures 6-7)
Step 5 – Securing the tubes
Once in place, I installed my custom hold-downs at the rear rudder assembly to secure everything.
Step 6 – Creating the cable guide system (improved setup)
Now comes the good part.
You’ll need to bend two smaller tubes at a 90° angle so the cable can pass through and meet the servo cog tracking ends.
The kit includes small nylon guides for this, but honestly… that setup didn’t work well for me.
So I made my own:
Instead of 2mm tubing, I used 3mm brass tubing
Much easier to bend
Allows the cable to pass more freely (here I use my own cable, just a bit thinner and runs very easy in all the bends.)
I then used some scrap wood to build a small support block and glued the whole assembly to the superstructure wall, making sure it aligned perfectly with the steering servo horn.
Step 7 – Reinforcing the rudder linkage bar
The bar that connects both small rudders didn’t look strong enough to me, so I scratch-built a new one using square brass tubing.
Much stronger and gives a more solid feel to the whole system.
Final thoughts
This whole setup required some trial and error, but in the end it works smoothly and feels much more robust than the stock configuration.
😎
▲
⟩⟩
Mike Stoney
AlessandroSPQR
|
💬 Re: JUANITA STERN WHEELER
17 days ago by 🇮🇹 AlessandroSPQR (
Fleet Admiral)✧ 36 Views · 1 Like
Flag
Very high levels, Chugalone.
▲
⟩⟩
chugalone100
|


Login To
Remove Ads
Remove Ads