Join Us On Social Media!

|

|

|
Download The App!
Login To
Remove Ads
Remove Ads
Login To
Remove Ads
Remove Ads
Model Boats Website
Creating a Lifeboat crew Part 1.
3 Posts · 7 Followers · 32 Photos · 29 Likes
Began 2 years ago by
 United Kingdom
Follow This Thread
Not currently following
> Click to follow
> Click to follow
Latest Post 2 years ago by
| Most recent posts shown first (Show Oldest First) | (Print Booklet) |
📝 Lifeboat crewman “AL” part 3, jacket, life jacket, Harness
2 years ago by 🇬🇧 Rogal118 ( Captain)
Captain)✧ 46 Views · 8 Likes
Flag
💬 Add Comment
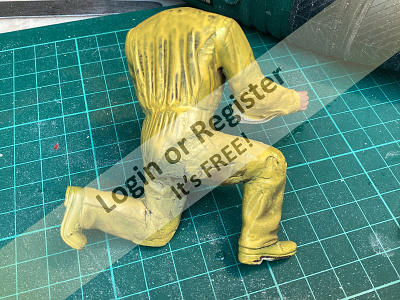
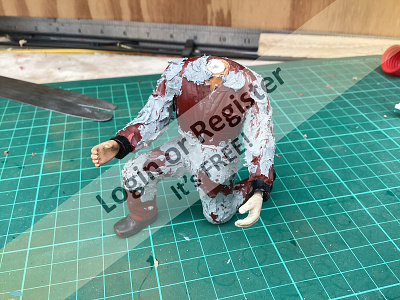
Once the collar was complete I set about lengthening the outer jacket, the original figure had a boiler suit type outer garment. I started from the shoulders and applied yellow paint then added tissue down his back to a length about thigh high. Again as with the cuffs I doubled the bottom over to create a straight hem. Once more adding extra yellow paint in a stippling motion. This way it blends the tissue around the figure creating folds and creases as you go.photo 2.
By the way the paint I used was an acrylic Matt yellow, as I find the gloss is a little unrealistic.
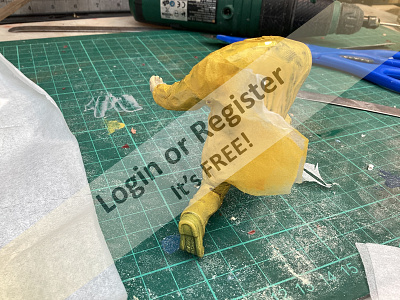
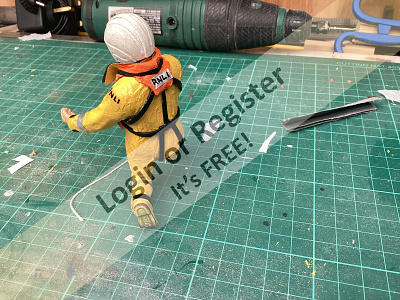
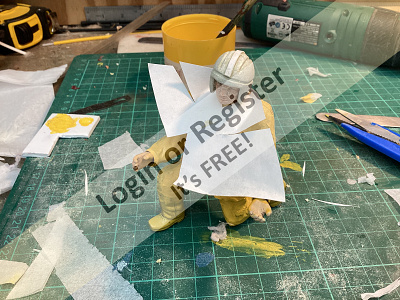
So then to the front, same method only this time I used 2 pieces of tissue with 2 edges folded so as to form a bottom and zip type hem, and as he was kneeling the jacket was split at the front bottom. This also helped later when adding the safety harness, photo 3.
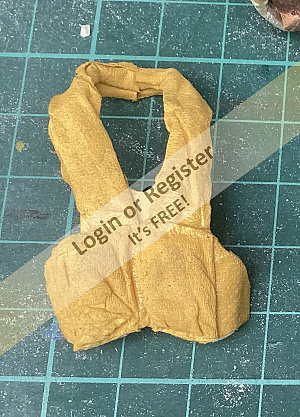
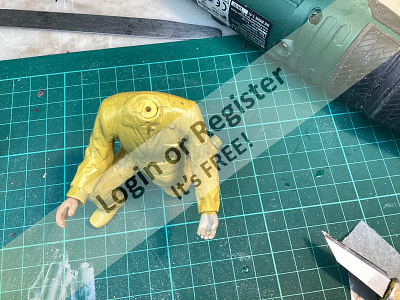
Now to the life jacket. I rolled some tissue pre glued with diluted PVA into a loose tube approx 7 mm dia. x 150mm long and left to nearly set. When still semi pliable I flattened it loosely and wrapped it around the figures collar and shoulders blending it to his contours then down his chest until meeting at waist level. this was left to completely dry overnight in situ so as to take the correct form. Next day I removed this from the figure and added the waist buoyancy sacks and trimmed to shape, again using glued tissue. Photo 4.
I then carefully refitted it to the figure and again gently moulded it against the waist area. When dry I removed from the figure and gave a couple of coats of Matt orange, at the same time adding a small fillet of paper to the inside front just to give a curve to the neck line rather than a “V” finish. This can be seen in photo 4 as well.
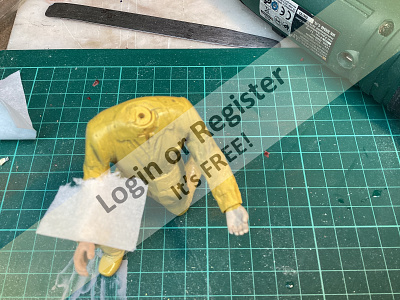
When dry I then refitted to the figure and tack glued into position. Photo 5.
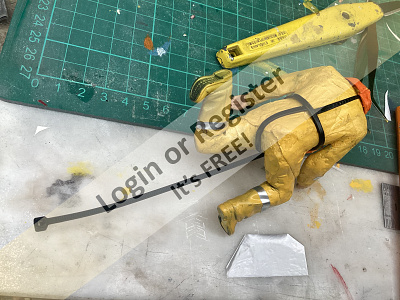
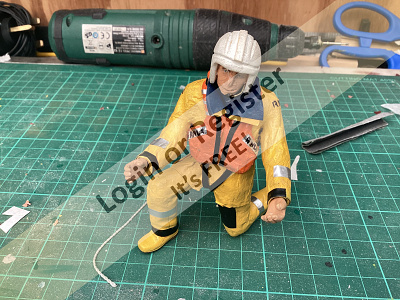
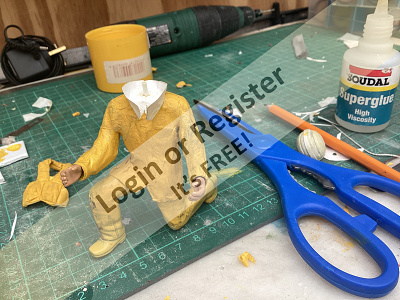
Rather than paint the harness on, which was a no-no from the start. I decided to use small electrical black tie-wraps as these would leave a much sharper, neater look than paint.
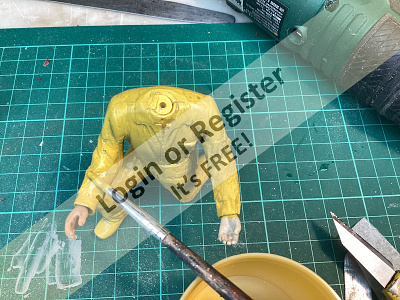
Starting at the waist strap I glued one end under the life jacket and gently curved it to form around the waist until reaching around to the other side of the life jacket and glueing in tightly. Same again from the front starting at the waistband then between the legs and up to the waist band at the back. I found if a curve was pre bent to the tie wrap it helped greatly to fit into the correct position on the figure. What helped also in fitting this harness was the use of photos from RNLI websites.photo 6 and 7
At this stage I also realised from the web photos that the life jacket had an extra buoyancy pad down from the neck to between the shoulder blades, so using the same method as before I made a pad up, painted it and glued it in position. Photo 8.
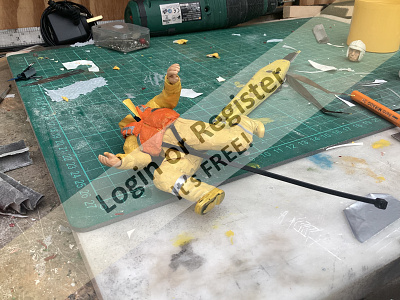
This then enabled me to finish the harnessing to a near enough realistic manner. ( well if you squinted and viewed from a few feet away ) I’m pleased with the result any way.photo 9.
#I’D WALK A MILLION MILES FOR ONE OF YOUR SMILES, MY MAMMY.#
Just for you NickD.


By the way the paint I used was an acrylic Matt yellow, as I find the gloss is a little unrealistic.
So then to the front, same method only this time I used 2 pieces of tissue with 2 edges folded so as to form a bottom and zip type hem, and as he was kneeling the jacket was split at the front bottom. This also helped later when adding the safety harness, photo 3.
Now to the life jacket. I rolled some tissue pre glued with diluted PVA into a loose tube approx 7 mm dia. x 150mm long and left to nearly set. When still semi pliable I flattened it loosely and wrapped it around the figures collar and shoulders blending it to his contours then down his chest until meeting at waist level. this was left to completely dry overnight in situ so as to take the correct form. Next day I removed this from the figure and added the waist buoyancy sacks and trimmed to shape, again using glued tissue. Photo 4.
I then carefully refitted it to the figure and again gently moulded it against the waist area. When dry I removed from the figure and gave a couple of coats of Matt orange, at the same time adding a small fillet of paper to the inside front just to give a curve to the neck line rather than a “V” finish. This can be seen in photo 4 as well.
When dry I then refitted to the figure and tack glued into position. Photo 5.
Rather than paint the harness on, which was a no-no from the start. I decided to use small electrical black tie-wraps as these would leave a much sharper, neater look than paint.
Starting at the waist strap I glued one end under the life jacket and gently curved it to form around the waist until reaching around to the other side of the life jacket and glueing in tightly. Same again from the front starting at the waistband then between the legs and up to the waist band at the back. I found if a curve was pre bent to the tie wrap it helped greatly to fit into the correct position on the figure. What helped also in fitting this harness was the use of photos from RNLI websites.photo 6 and 7
At this stage I also realised from the web photos that the life jacket had an extra buoyancy pad down from the neck to between the shoulder blades, so using the same method as before I made a pad up, painted it and glued it in position. Photo 8.
This then enabled me to finish the harnessing to a near enough realistic manner. ( well if you squinted and viewed from a few feet away ) I’m pleased with the result any way.photo 9.
#I’D WALK A MILLION MILES FOR ONE OF YOUR SMILES, MY MAMMY.#
Just for you NickD.
▲
⟩⟩
Graham93
boatmam
Len1
roycv
hermank
RNinMunich
Scratchbuilder
mturpin013
Login To
Remove Ads
Remove Ads
📝 Lifeboat crew Part 2, helmet, arms and collar.
2 years ago by 🇬🇧 Rogal118 ( Captain)
Captain)✧ 59 Views · 10 Likes · 3 Comments
Flag
💬 Add Comment
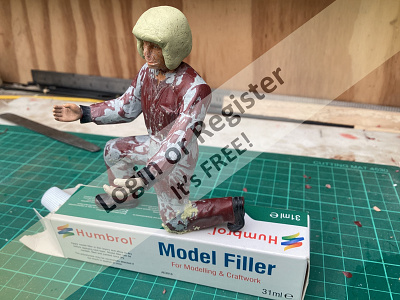
Now to finish this kneeling crew person down. Once the filler had set it was sanded down and blended in. Any parts needing extra filler was added and left to set again. Then to hide all the articulated pivot joints I added a thin coat of tissue over these joints, it hid them very well. At this point I mixed some 2 part filler and moulded it over the head in the rough shape of a safety helmet and left to set.photo 2. When set hard I trimmed to shape the outer edges with a craft knife, then sanded the helmet to the desired contours looking at the side and front views of photos viewed on the RNLI web sites. Using a pencil I then drew the contours on the helmet. When satisfied they were symmetrical both sides I used my cordless grinder with a 1 mm drill bit to grind the grooves into position. At this time also adding the raised central protrusion with 1mm x 2mm plastic strip, photo 3.
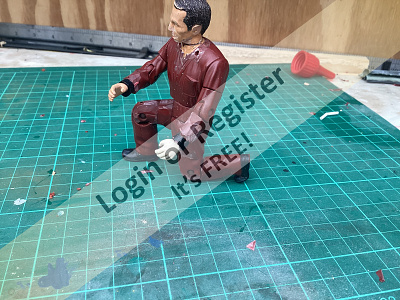
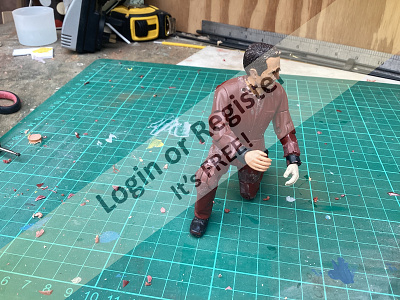
Once happy with the general filling of the figure and the head and helmet removed, I gave the figure a couple of coats of yellow spray paint photo 4. Starting with the arms I added tissue to hide what looked like elasticated cuffs.this was done by folding a small piece of tissue in two to give a sharp edge for the end of the sleeve, the other edges were left torn wragged, as this I found blended in easier. As seen in photo 5 I had completed the left arm, so added paint to the right and applied the tissue.photo 6. Once happy with the positioning I stippled more paint into the tissue with a brush and left to dry.photo 7.
Next stage was to make the double collar for the jacket. From photos of the crews kit the collar is lined with a blue fleecy material. I first roughly cut some inkjet paper to get the desired effect photo 8. Then I gradually trimmed to size leaving the collar to stand proud rather than lay flat.photo 9. Whilst doing this I kept refitting the head and helmet to give a snug tight fit. When happy I gave the collar a coat of yellow paint. I then cut the inner collar slightly larger around the top edge but shorter at the front and then painted this dark blue, best seen on the finished figure photo 1
▲
⟩⟩
mturpin013
Len1
flaxbybuck
boatmam
hermank
BarryS
roycv
Fred
Scratchbuilder
RNinMunich
|
💬 Re: Lifeboat crew Part 2, helmet, arms and collar.
2 years ago by 🇺🇸 Len1 (
 Lieutenant Commander) Lieutenant Commander)✧ 45 Views · 1 Like
Flag
you are incredible. thanks for sharing and inspiring me.
▲
⟩⟩
Rogal118
|
|
Login To
Remove Ads 💬 Re: Lifeboat crew Part 2, helmet, arms and collar.
2 years ago by 🇬🇧 flaxbybuck (
Captain)✧ 39 Views · 2 Likes
Flag
Me too Barry. You obviously have a good deal of patience Rogal, but I have to say the finished results are well worth the effort 😉
▲
⟩⟩
Rogal118
RNinMunich
|
|
💬 Re: Lifeboat crew Part 2, helmet, arms and collar.
2 years ago by 🇺🇸 BarryS (
 Warrant Officer) Warrant Officer)✧ 41 Views · 5 Likes
Flag
I am really enjoying your tutorial of the process you are using. It certainly gives me some more ideas for modifying figures.
Keep up the good work! Barry ▲
⟩⟩
PemyslJ
RNinMunich
flaxbybuck
Rogal118
hermank
|
📝 Creating a Lifeboat crew Part 1.
2 years ago by 🇬🇧 Rogal118 ( Captain)
Captain)✧ 89 Views · 11 Likes · 3 Comments
Flag
💬 Add Comment
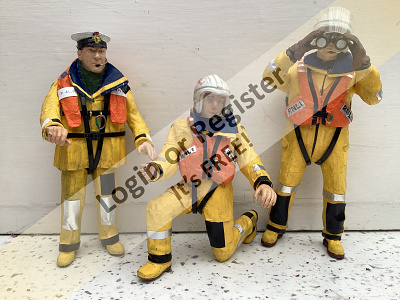
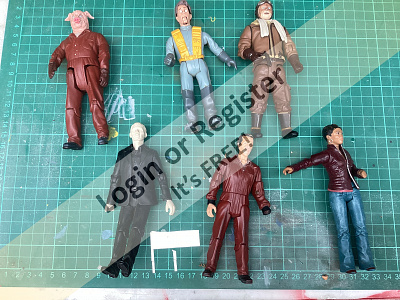
Having had some pleasing success remodelling figures for my Orca crew, I set about producing a crew for my Trent lifeboat.photo 1, I had for the last year tried to purchase ready made but they were always out of stock/ in production,etc,etc.
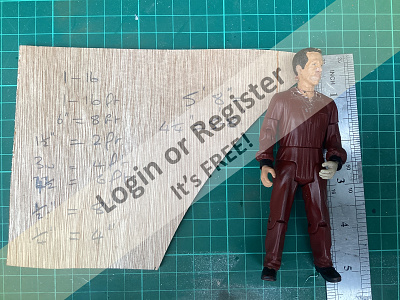
The Trent is a slipways model of 1/16th scale. Equivalent to 1inch to 16 inch or 2” to 32”— 4” to 64” which equates to 5’-4” around average for a shortish person. Another 1/4” on the model figure would add 4” equalling 5’-8” so 4 and 1/2” would be equal to a 6 foot tall person. My rough calcs. here in photo 2,
The reason for these calculations was to set in my mind the proportions for the figures required. With this in mind I scoured the toy shops, junk, charity outlets and finally car boot sales. Purchasing eventually the selection in the photo 3, costing around £1 each,
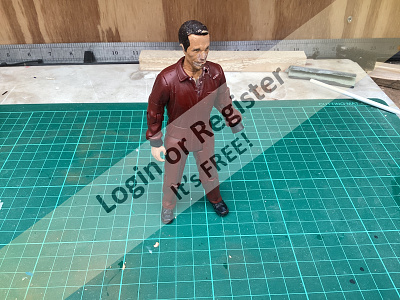
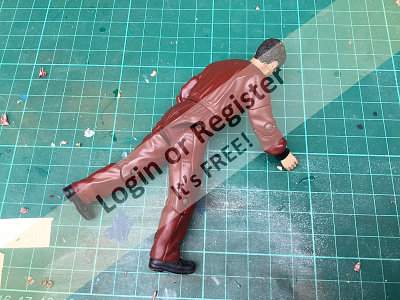
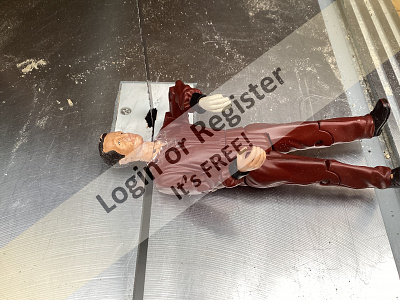
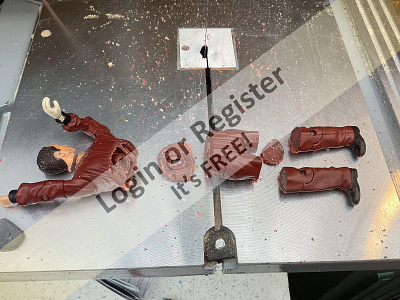
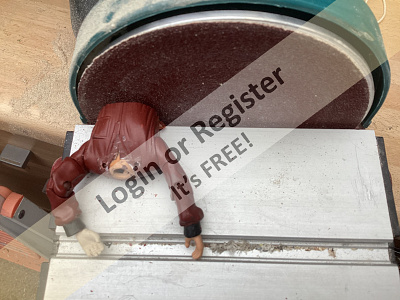
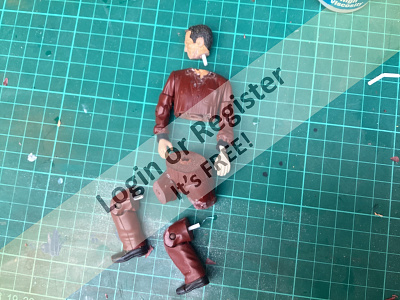
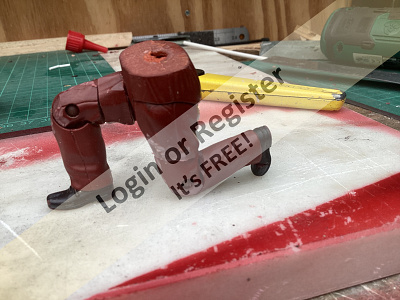
Having already finished the coxswain, I decided to take photos of the modelling stages. the next crew was to be a kneeling person so chose the model with the brown overalls photo 4,5, As can be seen in photo 2 the figure is 5” tall equivalent to a person 6’-8” tall. I needed to loose at least 1/2” to make the scale about right. What was done is rather brutal but has to be. Starting with the neck I cut a slither out, next the waist area then finally the thigh area, photos 6,7. I then flattened the surfaces on my mini sander, to make a good mating surface. photo 8.
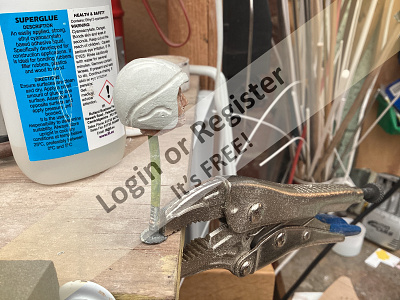
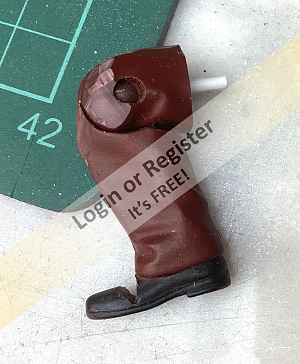
The next stage is to pose the limbs into the position required, Starting with the legs, the figures all have articulated joints which help but, don’t always bend as much as needed. A little work with a sharp craft knife eases the joints and gives a bit more movement.( pity it won’t work on my joints). At this stage I usually drill a hole in the sawn thigh joints to insert a plastic dowel of 1/16” dia. The depth goes as far as the articulated knee joint so when the dowel is inserted it also locks the joint together. This helps keep the pose. Photo 9, To add a little realism and stability I found that the kneeling leg was better if the boot was bent forward as your foot naturally bends when you kneel down. So I cut a “V” notch out of the figures foot top and supa- glued it in position, photo10.
Dowel holes are also drilled into the waist and neck and tried out for fit, usually with removing the slithers of body to shorten the height the parts will not match so a little dressing in is needed, once again with a sharp craft knife.
Once happy and blended in I glue the thighs and waist in the desired pose position. The head is not fixed in place until the figure is complete, there is as much work on the head as the rest of the body so I find it best to keep separated.
I now at this stage fill all the joints with modelling filler and leave to harden over night, photo 14.
The Trent is a slipways model of 1/16th scale. Equivalent to 1inch to 16 inch or 2” to 32”— 4” to 64” which equates to 5’-4” around average for a shortish person. Another 1/4” on the model figure would add 4” equalling 5’-8” so 4 and 1/2” would be equal to a 6 foot tall person. My rough calcs. here in photo 2,
The reason for these calculations was to set in my mind the proportions for the figures required. With this in mind I scoured the toy shops, junk, charity outlets and finally car boot sales. Purchasing eventually the selection in the photo 3, costing around £1 each,
Having already finished the coxswain, I decided to take photos of the modelling stages. the next crew was to be a kneeling person so chose the model with the brown overalls photo 4,5, As can be seen in photo 2 the figure is 5” tall equivalent to a person 6’-8” tall. I needed to loose at least 1/2” to make the scale about right. What was done is rather brutal but has to be. Starting with the neck I cut a slither out, next the waist area then finally the thigh area, photos 6,7. I then flattened the surfaces on my mini sander, to make a good mating surface. photo 8.
The next stage is to pose the limbs into the position required, Starting with the legs, the figures all have articulated joints which help but, don’t always bend as much as needed. A little work with a sharp craft knife eases the joints and gives a bit more movement.( pity it won’t work on my joints). At this stage I usually drill a hole in the sawn thigh joints to insert a plastic dowel of 1/16” dia. The depth goes as far as the articulated knee joint so when the dowel is inserted it also locks the joint together. This helps keep the pose. Photo 9, To add a little realism and stability I found that the kneeling leg was better if the boot was bent forward as your foot naturally bends when you kneel down. So I cut a “V” notch out of the figures foot top and supa- glued it in position, photo10.
Dowel holes are also drilled into the waist and neck and tried out for fit, usually with removing the slithers of body to shorten the height the parts will not match so a little dressing in is needed, once again with a sharp craft knife.
Once happy and blended in I glue the thighs and waist in the desired pose position. The head is not fixed in place until the figure is complete, there is as much work on the head as the rest of the body so I find it best to keep separated.
I now at this stage fill all the joints with modelling filler and leave to harden over night, photo 14.
▲
⟩⟩
PemyslJ
MouldBuilder
Julio
AustinG
Colin H
roycv
Doogle
Len1
flaxbybuck
RNinMunich
hermank
|
💬 Re: Creating a Lifeboat crew Part 1.
2 years ago by 🇬🇧 roycv (
 Fleet Admiral) Fleet Admiral)✧ 70 Views · 1 Like
Flag
Hi they look very good especially after you have worked on them.
What are these characters? I usually check the toys but never seen these ones before. Roy ▲
⟩⟩
Rogal118
|
|
Login To
Remove Ads 💬 Re: Creating a Lifeboat crew Part 1.
2 years ago by 🇺🇸 Len1 (
Lieutenant Commander)✧ 84 Views · 1 Like
Flag
Ouch
▲
⟩⟩
Rogal118
|
|
💬 Re: Creating a Lifeboat crew Part 1.
2 years ago by 🇬🇧 flaxbybuck (
Captain)✧ 78 Views · 3 Likes
Flag
I can see that I need to get out more, especially to charity shops, junk shops, car boot sales etc. Going up-market like this is not going to be easy for an old codger like me ! 😉
▲
⟩⟩
Colin H
Rogal118
Doogle
|


Login To
Remove Ads
Remove Ads