Join Us On Social Media!

|

|

|
Download The App!
Login To
Remove Ads
Remove Ads
Login To
Remove Ads
Remove Ads
Model Boats Website
Veron Vosper RTTL 28"
15 Posts · 4 Followers · 63 Photos · 43 Likes
Began 8 years ago by
 United Kingdom
Follow This Thread
Not currently following
> Click to follow
> Click to follow
Latest Post 8 years ago by
| Most recent posts shown first (Show Oldest First) | (Print Booklet) |
📝 Veron Vosper RTTL 28"
8 years ago by 🇬🇧 Skydive130 ( Rear Admiral)
Rear Admiral)✧ 23 Views · 0 Likes · 3 Comments
Flag
💬 Add Comment
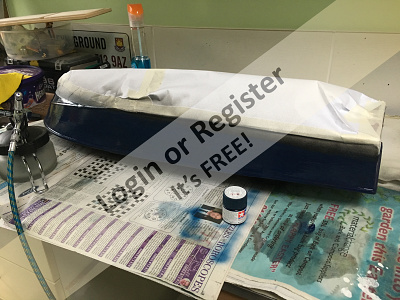
That’s it for today apart from a coat of varnish on the deck, vinyl numbers from eBay added.

▲
⟩⟩
No likes yet
This member will receive 1 point
for every like received
This member will receive 1 point
for every like received
|
💬 Hull numbers
8 years ago by 🇬🇧 big-tone (
 Able Seaman) Able Seaman)✧ 24 Views · 1 Like
Flag
Thanks will take a look
▲
⟩⟩
SelwynWilliams
|
|
Login To
Remove Ads 💬 Hull numbers
8 years ago by 🇬🇧 Skydive130 (
Rear Admiral)✧ 23 Views · 0 Likes
Flag
If you look on eBay for custom vinyl letters and the seller is davidmills02. He’s very good and I have no hesitation recommending him, they cost about £2.95 inc pistage
▲
⟩⟩
No likes yet
This member will receive 1 point for every like received |
|
💬 Hull numbers
8 years ago by 🇬🇧 big-tone (
Able Seaman)✧ 24 Views · 1 Like
Flag
Looking good numbers finish it off.where did you find them please
▲
⟩⟩
SelwynWilliams
|
Login To
Remove Ads
Remove Ads
📝 Painting starts-radio gear in!
8 years ago by 🇬🇧 Skydive130 ( Rear Admiral)
Rear Admiral)✧ 27 Views · 4 Likes · 3 Comments
Flag
💬 Add Comment
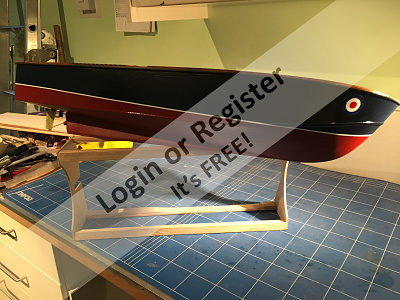
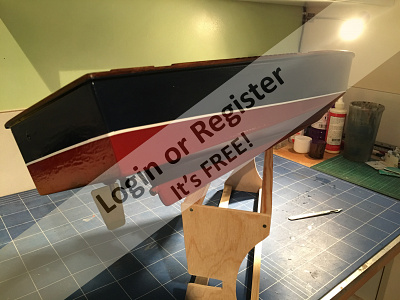
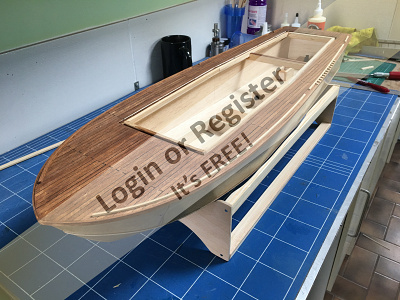
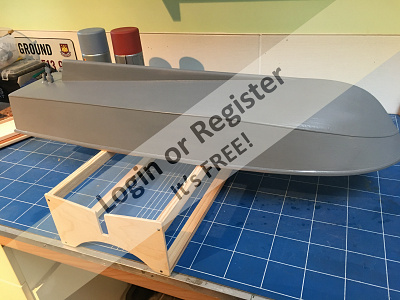
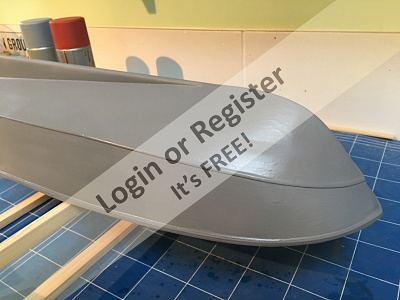
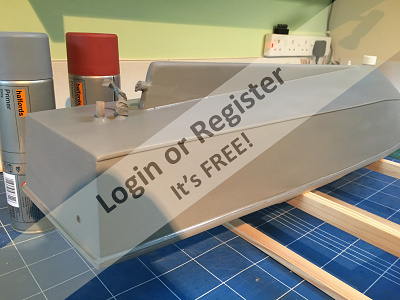
This day has seen the midnight blue airbrushed on followed by a thin coat of lacquer to give the roundel and trimline a good surface to stick too. Numbers to go on when they arrive from eBay.
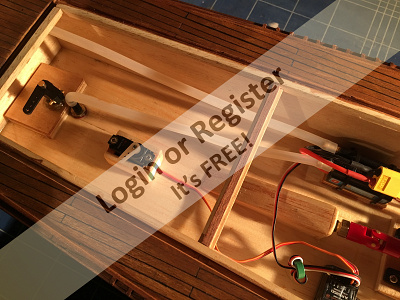
Having given the inside of the hull 2 coats of resin to waterproof it, I’ve now installed all
The electronics, just the rudder pushrod to make and add.
Next few days will see little progress as starting nights tonight!
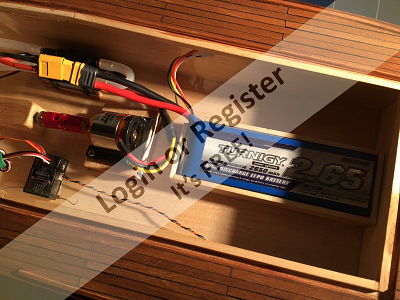
Having given the inside of the hull 2 coats of resin to waterproof it, I’ve now installed all
The electronics, just the rudder pushrod to make and add.
Next few days will see little progress as starting nights tonight!
▲
⟩⟩
BOATSHED
caproni
RNinMunich
robbob
|
💬 Painting starts-radio gear in!
8 years ago by 🇬🇧 robbob (
 Fleet Admiral) Fleet Admiral)✧ 25 Views · 2 Likes
Flag
I can't do fast but I can do fastidious 😜
At best I can do a few hours one or two evenings a week and perhaps a whole day at the weekend. Work - life - hobby balance and all that, gotta keep swmbo happy 😉. ▲
⟩⟩
boaty
RNinMunich
|
|
Login To
Remove Ads 💬 Painting starts-radio gear in!
8 years ago by 🇬🇧 Skydive130 (
Rear Admiral)✧ 24 Views · 1 Like
Flag
Hi robbob, thank you for your compliments! I can be a faster builder, especially on straight forward stuff, this particular model not being a major challenge so far! The upper deck detailing will take longer though! The other perk is working 4 days on, 4 days off, meaning if my wife is at work I’ve plenty of “me” time ha ha! Kind regards simon
▲
⟩⟩
Inkoust
|
|
💬 Painting starts-radio gear in!
8 years ago by 🇬🇧 robbob (
Fleet Admiral)✧ 24 Views · 1 Like
Flag
I'm very impressed by your work and the speed that you are doing it, you've certainly a fast worker.
It would take me about 3 months to do what you have accomplished in 30 days. Keep up the good work.👍 Robbob ▲
⟩⟩
Skydive130
|
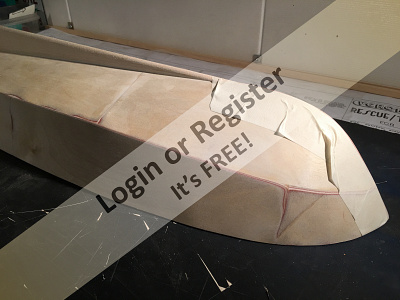
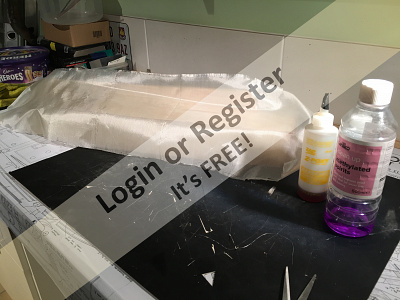
📝 Hull ready to paint!
8 years ago by 🇬🇧 Skydive130 ( Rear Admiral)
Rear Admiral)✧ 26 Views · 3 Likes
Flag
💬 Add Comment
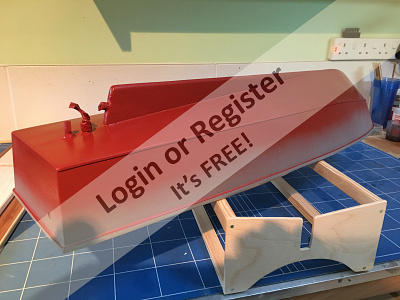
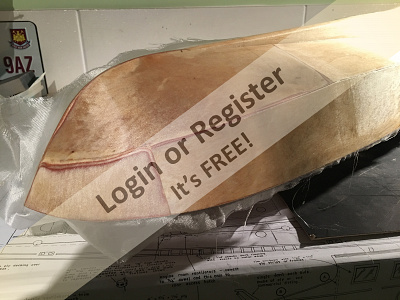
Planking done, deck stained, some deck detail added (most detailing will follow painting and varnishing). Hull has had a good sanding with wet n dry and has had the grey primer added. Have also given the bottom of the hull a coat of red oxide primer.
Following this and any blemish removal, I will get the airbrush fired up for Tamiya hull red for the bottom and then humbrol midnight blue for the upper hull sides. This will be separated with a strip of white trimline before adding rounders and lettering prior to laquer.
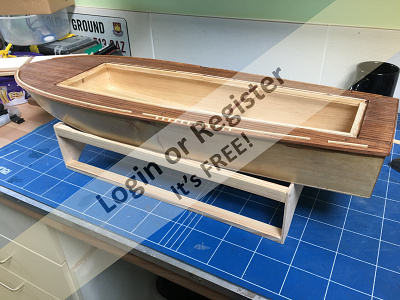
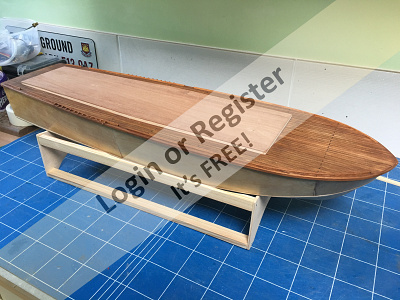
Following this and any blemish removal, I will get the airbrush fired up for Tamiya hull red for the bottom and then humbrol midnight blue for the upper hull sides. This will be separated with a strip of white trimline before adding rounders and lettering prior to laquer.
▲
⟩⟩
BOATSHED
robbob
marky
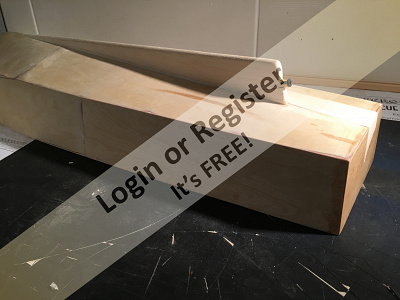
📝 Planking complete!
8 years ago by 🇬🇧 Skydive130 ( Rear Admiral)
Rear Admiral)✧ 26 Views · 3 Likes · 2 Comments
Flag
💬 Add Comment
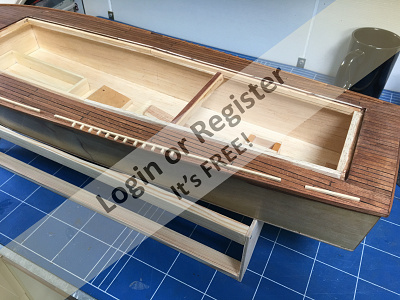
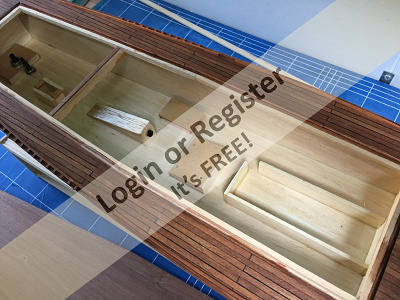
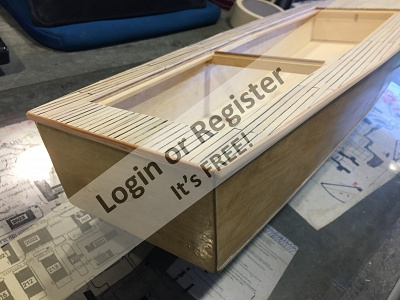
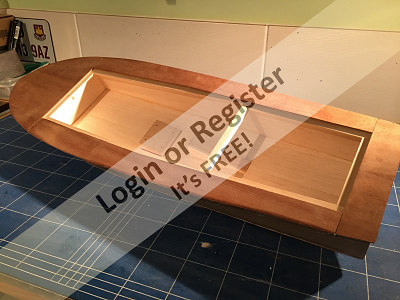
Finished “Costa” planking today and have put in most of the edge strip (need more strip, model shop Friday!).
Jobs to do before I start the superstructure, finish laying out the RC components, fit rudder parts, make battery tray etc. Put in a 1/4 square strip around deck opening to prevent water ingress. Couple of coats of resin inside radio bay, 1 more outside, sand and prime. Sand, stain and yacht varnish deck.
One question on a water pick-up as using a water cooled ESC! Outlet will be in the transom, does it matter where the pick-up is located?
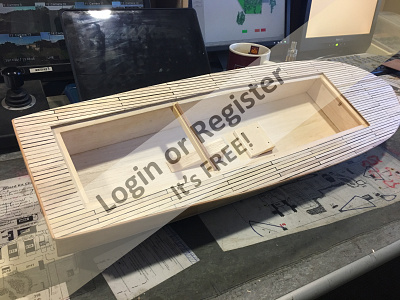
▲
⟩⟩
BOATSHED
marky
robbob
|
💬 Planking complete!
8 years ago by 🇬🇧 Skydive130 (
Rear Admiral)✧ 23 Views · 0 Likes
Flag
Many thanks for the good sound advice.
▲
⟩⟩
No likes yet
This member will receive 1 point for every like received |
|
💬 Planking complete!
8 years ago by 🇵🇹 Wingcoax (
 Petty Officer 2nd Class) Petty Officer 2nd Class)✧ 24 Views · 1 Like
Flag
Pick-up usually located just to rear of prop and offset to one side so prop pushes water through.
▲
⟩⟩
Skydive130
|
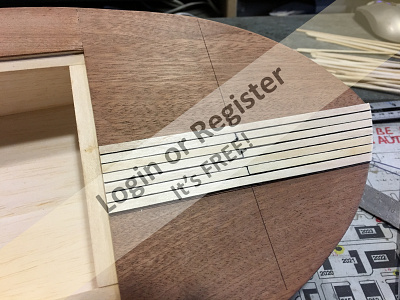
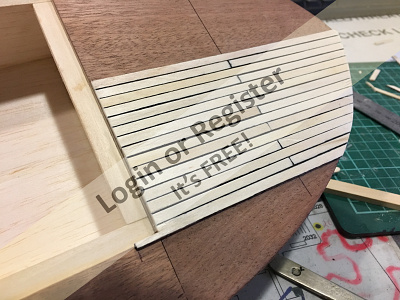
📝 Costa coffee planking!
8 years ago by 🇬🇧 Skydive130 ( Rear Admiral)
Rear Admiral)✧ 26 Views · 3 Likes · 6 Comments
Flag
💬 Add Comment
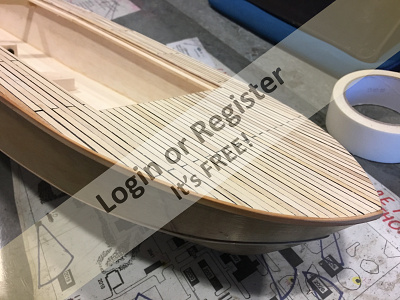
A big shout out to the generous staff in my local NAAFI/Costa shop who where able to supply me with what seemed like a lifetimes supply of coffee stirrers! Let planking commence! I did see on another build forum that possibly the Vosper had planks running the lenght of the deck, however ive decided to go 16cm lengths of Costa stirers instead of cutting full length planks from another wood source.
This model is nowhere near acurate in scale, therfore I am happy to do staggered planks.
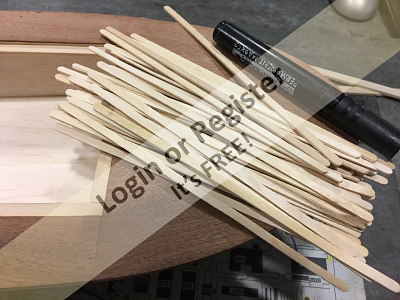

This model is nowhere near acurate in scale, therfore I am happy to do staggered planks.
▲
⟩⟩
BOATSHED
Imcc
robbob
|
💬 Costa coffee planking!
8 years ago by 🇩🇪 RNinMunich (
Fleet Admiral)✧ 24 Views · 1 Like
Flag
Good thinking Batman! 👍 Then all is Ship shape and Bristol fashion. 😉
▲
⟩⟩
Skydive130
|
|
Login To
Remove Ads 💬 Costa coffee planking!
8 years ago by 🇬🇧 Skydive130 (
Rear Admiral)✧ 24 Views · 1 Like
Flag
Hear that Doug, but I’ve already addressed that, there is a obechi strip going round the whole edge which will seal it all in especially after a few coats of varnish. Next photos will show!
▲
⟩⟩
RNinMunich
|
|
💬 Costa coffee planking!
8 years ago by 🇩🇪 RNinMunich (
Fleet Admiral)✧ 24 Views · 1 Like
Flag
Hmm! So far so good. Up to the standard we have come to expect 👍
But won't plank ends flush to the deck edge invite water ingress to the end grain? 🤔 Surely the originals were joggled into a rim board!? Just a thought😉 Doug 😎 ▲
⟩⟩
Skydive130
|
|
💬 Costa coffee planking!
8 years ago by 🇬🇧 jarvo (
 Lieutenant) Lieutenant)✧ 24 Views · 1 Like
Flag
Hi mate, bit late now but if you mix some black powder paint or artists acrylic paint into the pva, the glue dries black and simply sand the excess away to leave the caulk lines, no chance of wonky or lines that have soaked in too far.
Mark ▲
⟩⟩
Skydive130
|
|
💬 Costa coffee planking!
8 years ago by 🇬🇧 Skydive130 (
Rear Admiral)✧ 23 Views · 0 Likes
Flag
Hi mark, I’ve simulated calked edges with a permi marker and will stain the planks with a nice walnut stain I have before I varnish with yacht varnish
▲
⟩⟩
No likes yet
This member will receive 1 point for every like received |
|
💬 Costa coffee planking!
8 years ago by 🇬🇧 jarvo (
Lieutenant)✧ 24 Views · 1 Like
Flag
Had a word with my local coffee shop about the used stirrers, they must think i am barmy!!!! but over a couple of days the sorted me with thousands of the damn things, on another site a tip for staining the planks was cold tea, soaked for a few hours the planks take on the tannin colour and just need drying ready for use.
Mark ▲
⟩⟩
Skydive130
|
📝 Deck on and that’s it!
8 years ago by 🇬🇧 Skydive130 ( Rear Admiral)
Rear Admiral)✧ 25 Views · 2 Likes
Flag
💬 Add Comment
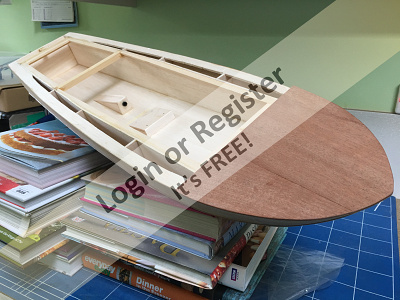
Slow weekend due to family commitments unfortunately! Managed to get the deck pieces fitted and that’s it! I’ve bought the model number not work today, so will apply another couple of coats of resin to the hull today and tomorrow’s lunch hour!
▲
⟩⟩
BOATSHED
RNinMunich
📝 Decking
8 years ago by 🇬🇧 Skydive130 ( Rear Admiral)
Rear Admiral)✧ 25 Views · 2 Likes
Flag
💬 Add Comment
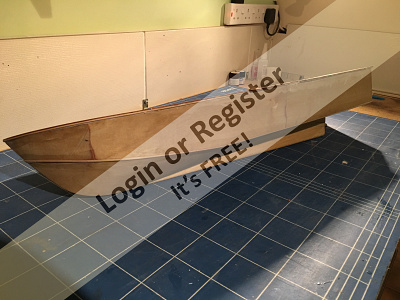
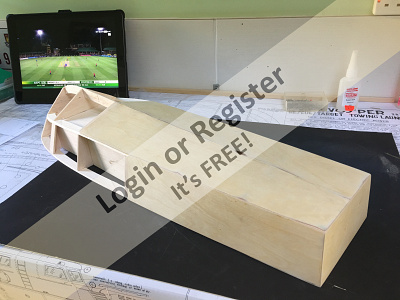
First piece of decking added at the bow. I’ve used a lamination of 1.5mm mahogany and 1.5mm obechi, this will be stained and varnished at the end.
I’ve also added the mid chine rubbing strake from 1/32 x 2/16 ply, blended, filled and primed and sanded with sanding sealer. Hull exterior finished apart from 2 thin coats of resin.
Next job is the fit remaining deck pieces which are currently glued and laminating under some heavy books!

I’ve also added the mid chine rubbing strake from 1/32 x 2/16 ply, blended, filled and primed and sanded with sanding sealer. Hull exterior finished apart from 2 thin coats of resin.
Next job is the fit remaining deck pieces which are currently glued and laminating under some heavy books!
▲
⟩⟩
BOATSHED
RNinMunich
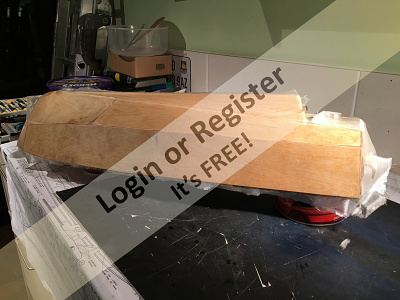
📝 Clothing finished, motor mounted
8 years ago by 🇬🇧 Skydive130 ( Rear Admiral)
Rear Admiral)✧ 23 Views · 0 Likes
Flag
💬 Add Comment
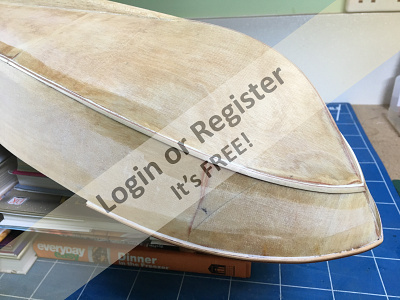
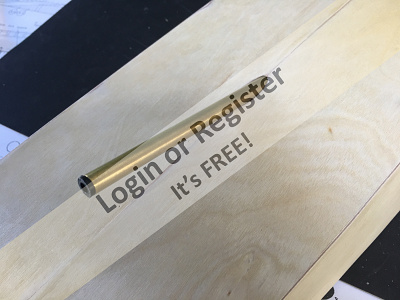
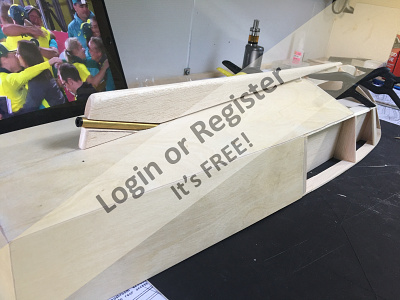
So, have mounted the motor having set it all up nice and straight, result is nice smooth prop shaft no binding.
Have finished the obechi deck surround and finished the day glass clothing the other side of the hull. Next job is a couple of coats of thinned resin to finish the hull then it’s on with the deck pieces.

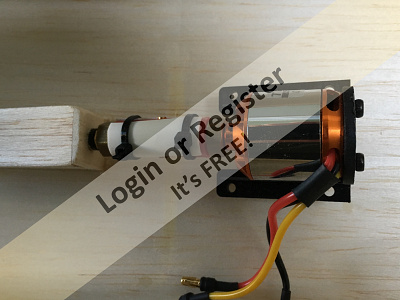
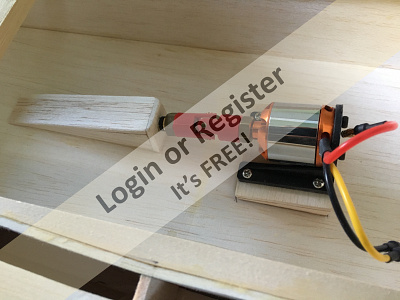
Have finished the obechi deck surround and finished the day glass clothing the other side of the hull. Next job is a couple of coats of thinned resin to finish the hull then it’s on with the deck pieces.
▲
⟩⟩
No likes yet
This member will receive 1 point
for every like received
This member will receive 1 point
for every like received
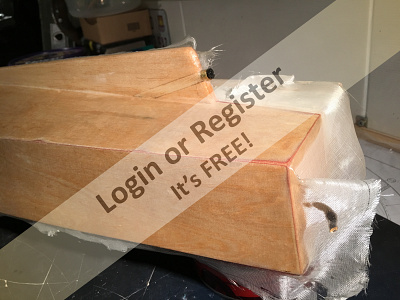
📝 Sheeting finished clothing begins!
8 years ago by 🇬🇧 Skydive130 ( Rear Admiral)
Rear Admiral)✧ 25 Views · 2 Likes · 1 Comment
Flag
💬 Add Comment
So, slow week due to work! However, sheeting is now finished, sanded and a tiny bit of filler where needed. Keel has been fitted, prop shaft is in.
Have now glass clothed the transom and one side of the hull. Very pleased how well the hull side clothing went, managed to do it in one piece so no seem to sand out. Other side tomorrow.
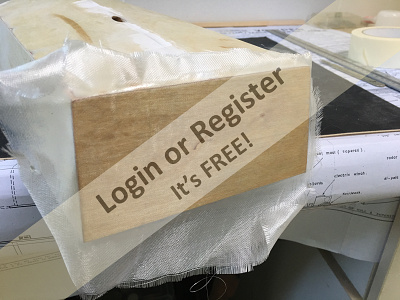
Have now glass clothed the transom and one side of the hull. Very pleased how well the hull side clothing went, managed to do it in one piece so no seem to sand out. Other side tomorrow.
▲
⟩⟩
Colin H
robbob
|
💬 Sheeting finished clothing begins!
8 years ago by 🇬🇧 marky (
 Commodore) Commodore)✧ 24 Views · 1 Like
Flag
its murder when work gets in the way of real work more power to your laminating roller 👍 cheers Marky
▲
⟩⟩
Skydive130
|
📝 Some more hull sheeting and keel
8 years ago by 🇬🇧 Skydive130 ( Rear Admiral)
Rear Admiral)✧ 25 Views · 3 Likes
Flag
💬 Add Comment
This morning has seen an hour or so adding some more hull sheeting, tidying up the hole for the prop shaft and making the keel.
Next decision is whether to add the keel prior to glass clothing the hull or after? My thinking is add before clothing, also fitting the prop shaft, done balsa infil between the 2 keep parts then glass cloth the whole hull for a good neat strong finish. Will add some more sheeting later once this lot has set and has been trimmed to accept next pieces.
Next decision is whether to add the keel prior to glass clothing the hull or after? My thinking is add before clothing, also fitting the prop shaft, done balsa infil between the 2 keep parts then glass cloth the whole hull for a good neat strong finish. Will add some more sheeting later once this lot has set and has been trimmed to accept next pieces.
▲
⟩⟩
BOATSHED
cenbeth
rolfman2000


Login To
Remove Ads
Remove Ads