Join Us On Social Media!

|

|

|
Download The App!
Login To
Remove Ads
Remove Ads
Login To
Remove Ads
Remove Ads
Model Boats Website
Lorraine 2
23 Posts · 7 Followers · 232 Photos · 126 Likes
Began 4 years ago by
 United Kingdom
Follow This Thread
Not currently following
> Click to follow
> Click to follow
Latest Post 4 years ago by
| Oldest posts shown first (Show Newest First) | (Print Booklet) |
📝 Lorraine 2
4 years ago by 🇬🇧 muddy ( Sub-Lieutenant)
Sub-Lieutenant)✧ 10 Views · 7 Likes · 2 Comments
Flag
💬 Add Comment
After the first attempt at Lorraine (1) from the Model Boats Plan MM 512, which ended in a disaster, the main frame/hull warped, I did not clamp the keel down on the assembly with glue, think the expression is " Like a dogs hind leg". I did drop it into the water butt and let it soak, then clamped it all up, but after the dry-out period it all went back to a disaster, so it was scapped.
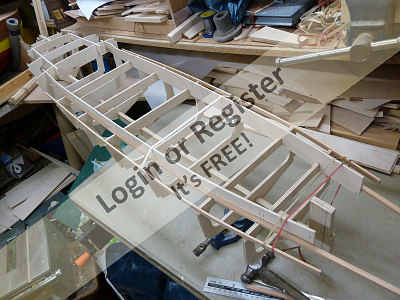
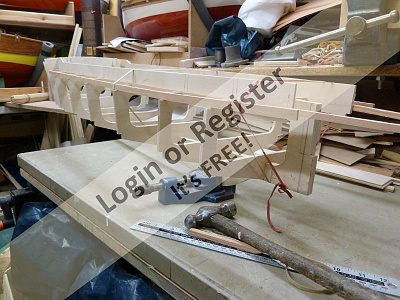
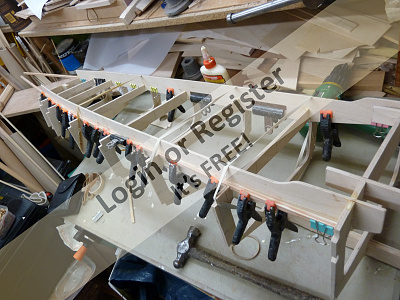
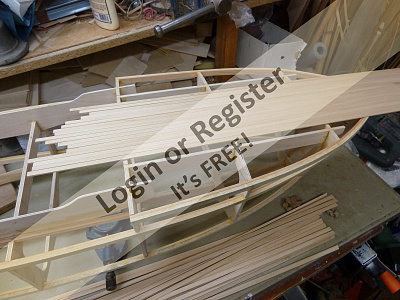
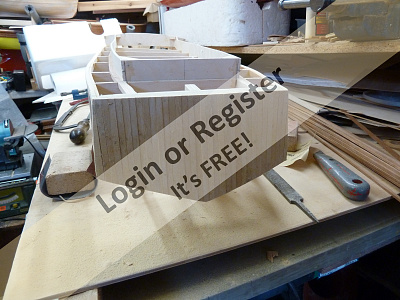
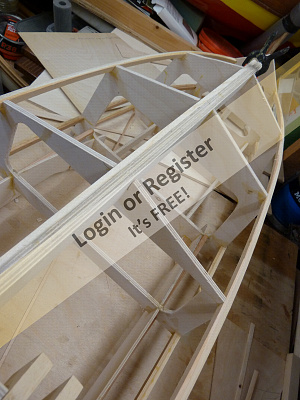
Lorraine 1 was a Round Bilge type hull, then while pondering the drawing i noticed there was a second set of illustrations showing a Hard Chine construction, and as had not indulged in a hard chine unit for some time, decided to give it a go. Some 5mm ply was obtained from the local emporium ( JotiKa ) and we set off, tracing from the plan, and then transfering to the timber. I was asked why i over drew or extended the profile lines of the bulkheads/formers, this is if one uses a circular saw, it's far easier to pick up on the extended line's than guess the ailignement to the saw blade, this can apply to hand saws of course. The Keel was fabricated from 2 x 5mm layers of ply. Tend to cut one out layer out first then locate and bond them together, using the original cut out as a templet, they were bonded with Alphatic glue and brass pins, then left under pressure on a flat surface over night, using any old bits of weight that could be found, ie: old Lead Acid battery's keel weights etc: ..


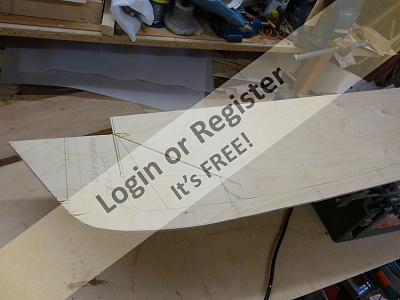

Lorraine 1 was a Round Bilge type hull, then while pondering the drawing i noticed there was a second set of illustrations showing a Hard Chine construction, and as had not indulged in a hard chine unit for some time, decided to give it a go. Some 5mm ply was obtained from the local emporium ( JotiKa ) and we set off, tracing from the plan, and then transfering to the timber. I was asked why i over drew or extended the profile lines of the bulkheads/formers, this is if one uses a circular saw, it's far easier to pick up on the extended line's than guess the ailignement to the saw blade, this can apply to hand saws of course. The Keel was fabricated from 2 x 5mm layers of ply. Tend to cut one out layer out first then locate and bond them together, using the original cut out as a templet, they were bonded with Alphatic glue and brass pins, then left under pressure on a flat surface over night, using any old bits of weight that could be found, ie: old Lead Acid battery's keel weights etc: ..
▲
⟩⟩
jbkiwi
ianed57
RonH
Colin H
Martin555
Joe727
Skydive130
|
💬 Re: Lorraine 2
4 years ago by 🇬🇧 muddy (
Sub-Lieutenant)✧ 8 Views · 5 Likes
Flag
OK Joe, in the late 1950's and started under supervision to build model aircraft, i was given a piece of advice from a very good modeller, which was , " to build/buy as big a model as one could afford or fit on the table/building surface", the reason was it will fly better and be more stable. Plus one will be able to gat at things more easily, more room inside etc: ..
This was in the days of valve receivers and weighty batteries, although my first set of radio was a Macregor Terrytone unit single channel Bang Bang rudder, rubber escapment , A valve Transmitter and a transistor Receceiver, sorry i degress, but building big in model boats is maybe not the same .. Definatly more costly in construction materials and Drive units.. And they hurt when you drop em' on your toes ! .. Attempted a Via City a couple of years ago, that was scrapped as was the Lorraine 1 , plus the fact that one has to go a notch with the tools used, from scapel's and fretsaws to stanley knives and wood planes and tennon saws.. But at least building big one can use modellers license, and giggery pokery things about, shimming up, and making the bits fit.. Must admit two models from plans did not work out very good, and it was plan, one could see where the copy had slipped in the copier, and i did not notice this untill the dry assembly started, but when things like this happen, one tends to loose interest quickly, because as stated in earlier posts once one diverts from the plan/drawing/information, then one opens up a can of worms, and near disaster's strike, some fatal. So dont loose hart, get in there, join the sawdust gang, it's also good anger management. Regards Muddy.. ▲
⟩⟩
RonH
Joe727
Donnieboy
Colin H
Martin555
|
|
💬 Re: Lorraine 2
4 years ago by 🇺🇸 Joe727 (
 Commander) Commander)✧ 6 Views · 3 Likes
Flag
Muddy,
Looking good. I too have struggled with some hull builds but I'm not going to give up either. Your approach looks good, keep it up. 👍 Joe ▲
⟩⟩
RonH
Martin555
muddy
|
Login To
Remove Ads
Remove Ads
📝 Lorraine 2
4 years ago by 🇬🇧 muddy ( Sub-Lieutenant)
Sub-Lieutenant)✧ 10 Views · 7 Likes
Flag
💬 Add Comment
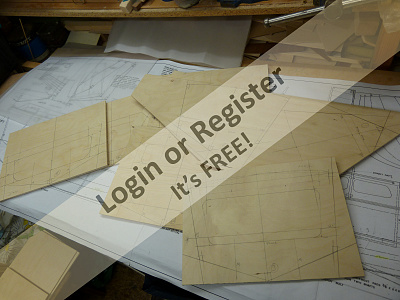
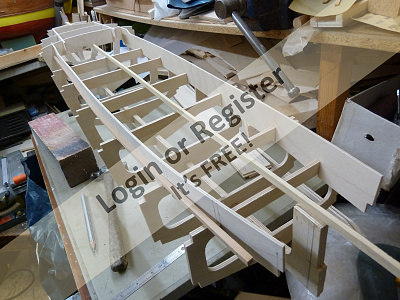
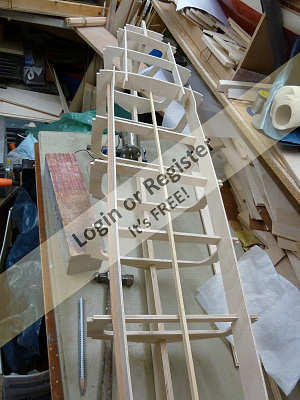
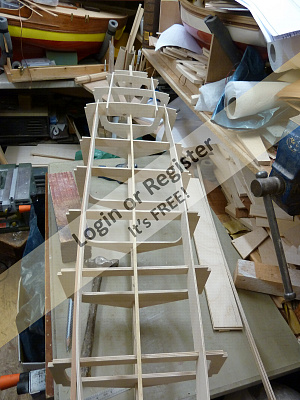
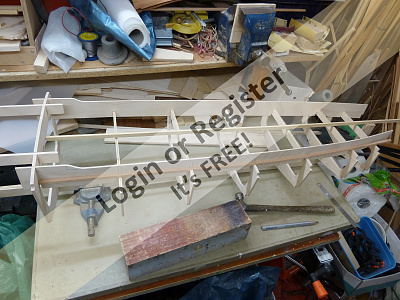
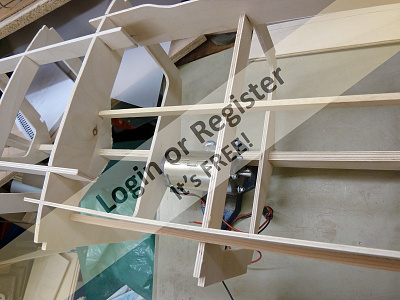
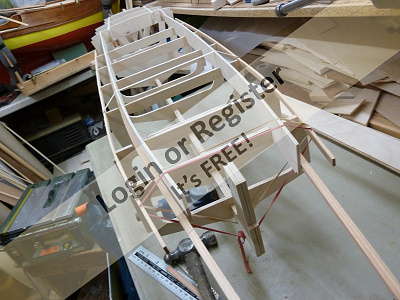
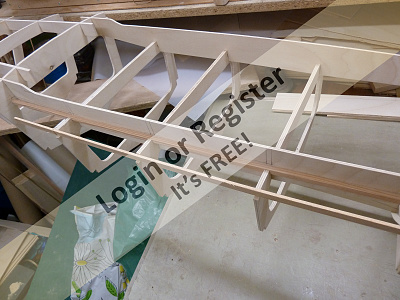
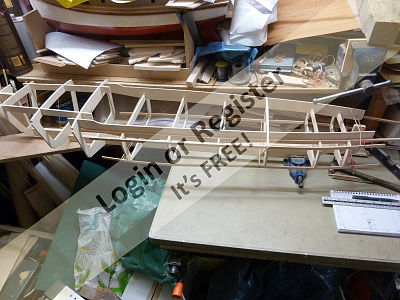
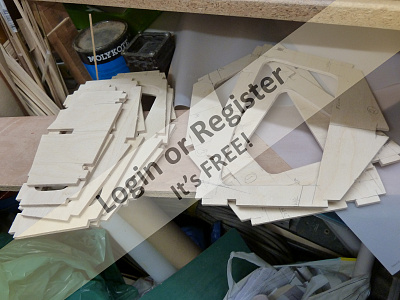
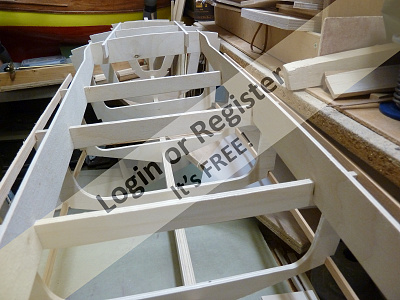
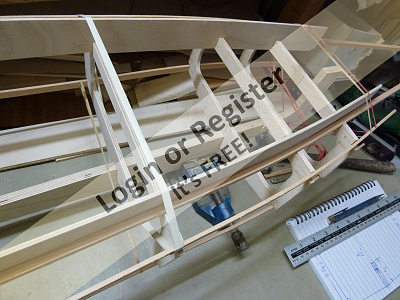
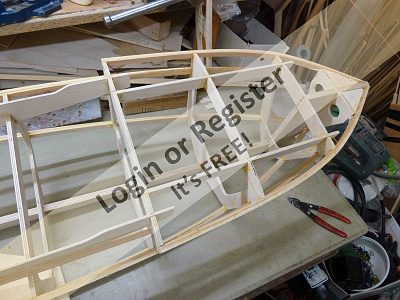
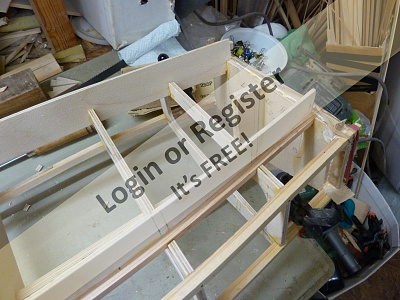
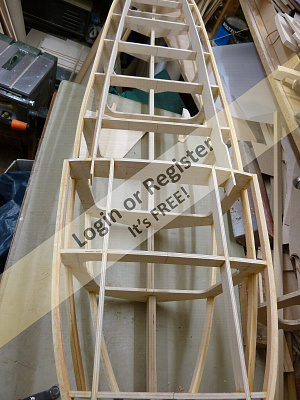
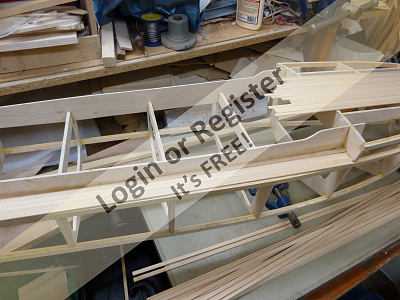
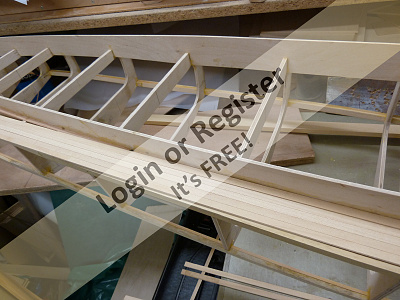
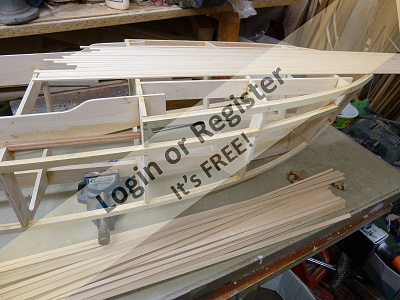
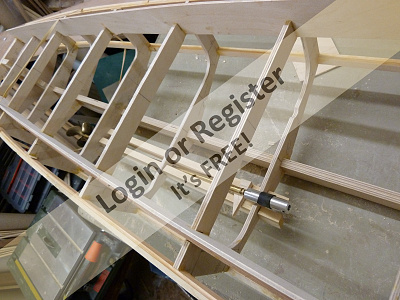
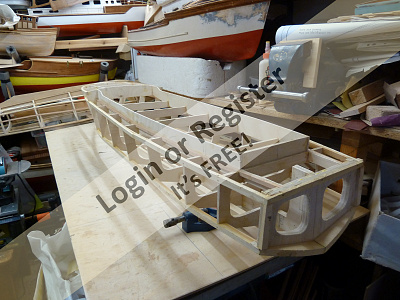
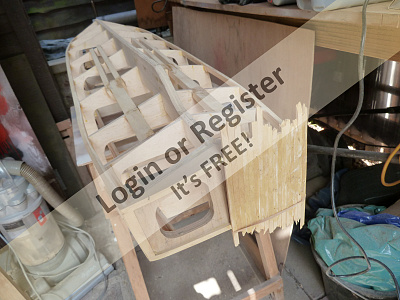
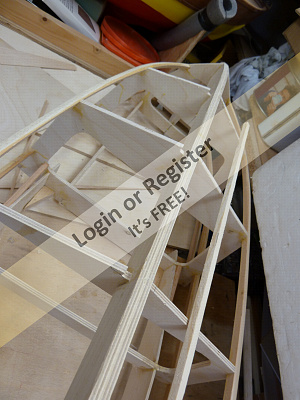
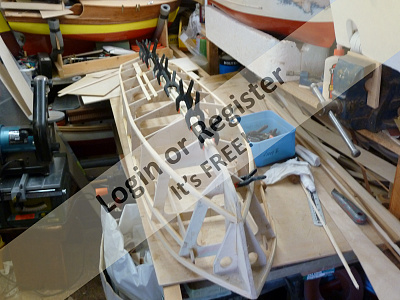
Continuing on with the hull, marking out , cutting out and lightening the formers/bulkheads. Tend to use a ring saw in the inner corners think the radus was a 2p coin, then with the jigsaw inverted into the workmate and a metal cutting blade, why metal cutting blade it is of a thinner section and finer toothed, it tends to go around tight corners more easily. A lot of pics with this entry, trying to show the interlocking of the bulkheads and combing edges. Muddy ..


▲
⟩⟩
jbkiwi
ianed57
Colin H
Martin555
RNinMunich
Joe727
Skydive130
📝 Lorraine 2
4 years ago by 🇬🇧 muddy ( Sub-Lieutenant)
Sub-Lieutenant)✧ 8 Views · 5 Likes · 3 Comments
Flag
💬 Add Comment
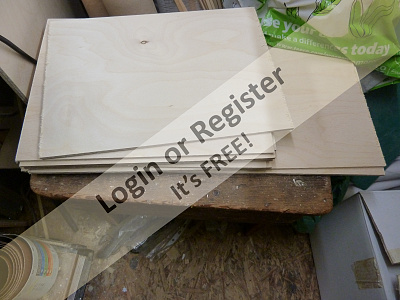
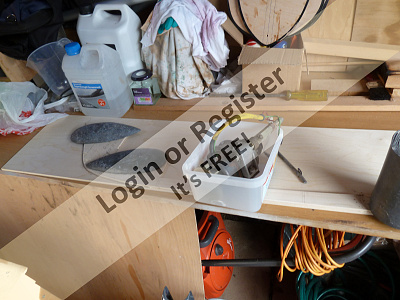
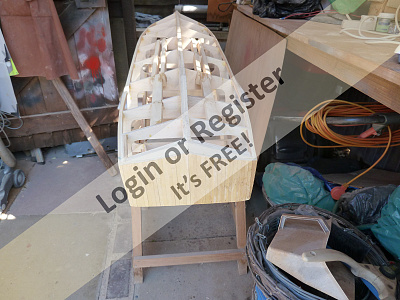
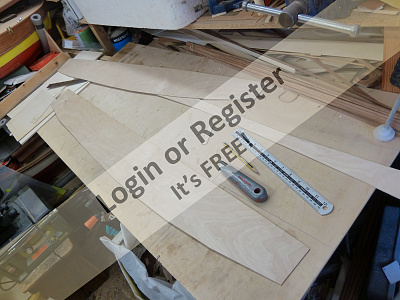
Thinking about the deck, having used Walnut and Mahogany was looking for a light coloured timber and i think I have found one, this is just sizing-up the job.. Muddy ..
▲
⟩⟩
Colin H
Martin555
RNinMunich
Joe727
Skydive130
|
💬 Re: Lorraine 2
4 years ago by 🇬🇧 muddy (
Sub-Lieutenant)✧ 17 Views · 0 Likes
Flag
Joe, I understand that the timber planking is Lime, i was also told it was good for hull planking as it is a very flexible wood ! as a scale plank.
Muddy .. ▲
⟩⟩
No likes yet
This member will receive 1 point for every like received |
|
Login To
Remove Ads 💬 Re: Lorraine 2
4 years ago by 🇬🇧 muddy (
Sub-Lieutenant)✧ 5 Views · 2 Likes
Flag
Sorry Joe, at the moment i dont know or cannot remember. BUT i will find out on my next visit
to the imporium, as more of this type of wood is required for the lower deck's. It was used on the "Shelduck" deck's, with a .5mm Mahogany spacer mounted vertically to "look like" caulking. Muddy .. ▲
⟩⟩
Joe727
Martin555
|
|
💬 Re: Lorraine 2
4 years ago by 🇺🇸 Joe727 (
Commander)✧ 5 Views · 2 Likes
Flag
Muddy,
What wood is the planking? Joe😎 ▲
⟩⟩
Martin555
muddy
|
📝 Lorraine 2
4 years ago by 🇬🇧 muddy ( Sub-Lieutenant)
Sub-Lieutenant)✧ 9 Views · 6 Likes
Flag
💬 Add Comment
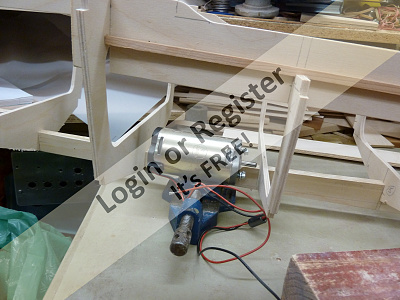
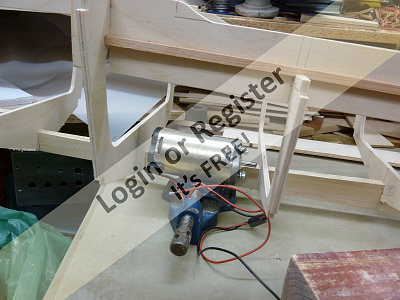
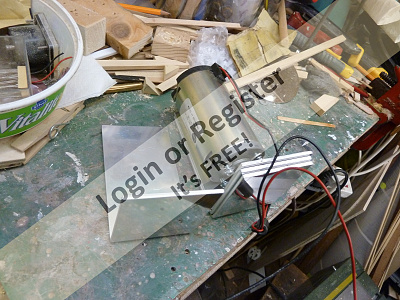
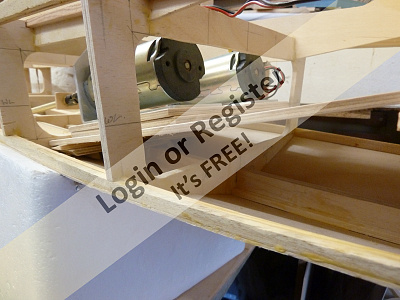
Drive assembly, decided on a twin screw approarch, again. Came across some large Buhler Motors, ( Tnx Jon ) slow rpm and judging by the attatched wiring to the motors, the current drain could be low, i did a run up with meters at different voltages and the idle current at 6 volts was about 600ma, thought these may be worth a try, more on these after running trials and wet bottom time.
Had the motor mounting brackets folded up/made locally, but all the drilling/holes are in house.
Because the motor ouput shaft is 6mm, went for some 5mm propshafts/tubes..
Could not make up my mind about the couplings, so invested in some rubber flexible couplings, but as a standby have also the standard UJ Type with brass inserts. Muddy ..
▲
⟩⟩
ianed57
Colin H
Martin555
RNinMunich
Joe727
Skydive130
📝 Lorraine 2
4 years ago by 🇬🇧 muddy ( Sub-Lieutenant)
Sub-Lieutenant)✧ 5 Views · 2 Likes
Flag
💬 Add Comment
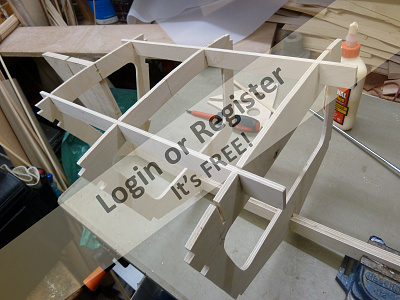
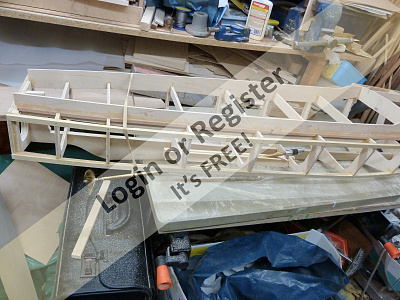
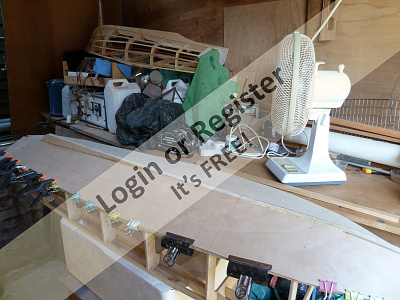
Most of the previous posts to Lorainne 2 are about two years old, she was shelved because mainly of a mistake i had made at the Transom. Which i thought of covering up with a added piece of ply 1/8", but during my enthusiasm to get going or crack on, i fitted a piece of 1/4" ply, now this made the transom 1/2" thick and presumably a lot heavier than expected. Hence the selving. But this last week , running out of job's/projects, i re-looked at this stored half built hull. Decision was made to try and lighten this Transom by removing some of the timber ( 1/2" ply ), by drilling holes into it, but they turned into apetures, then to add some planking for the finish, this was done. Muddy ..
▲
⟩⟩
Colin H
Joe727
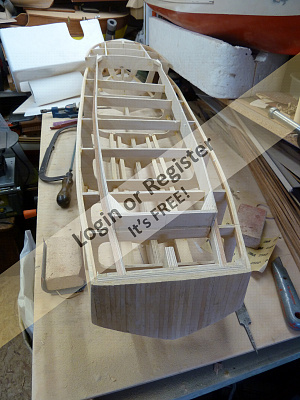
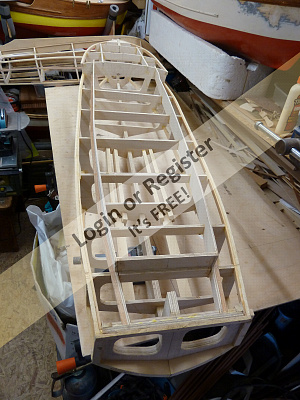
📝 Lorraine 2
4 years ago by 🇬🇧 muddy ( Sub-Lieutenant)
Sub-Lieutenant)✧ 8 Views · 5 Likes · 2 Comments
Flag
💬 Add Comment
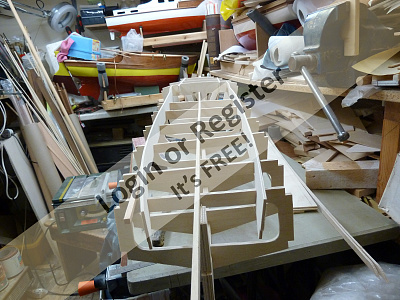
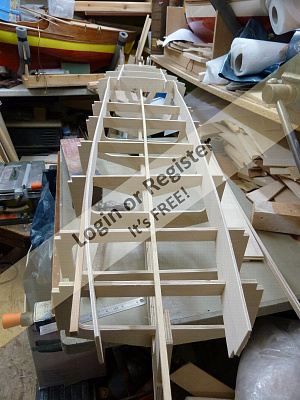
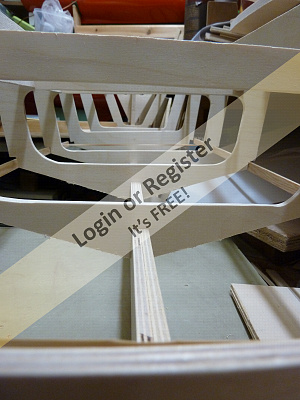
Once the transom was sorted, the next job was the bottom skins, but on further inspection i had forgotten to place some spruce stringers along the keel length for the skins to sit on, I,m now begining to look for the large hat/cap with a capital letter D on it, ohh deary me ! ..
Bulkhead No 2 to the Transom had a 1/4" x 1/4" slot cut into it, alongside the keel.
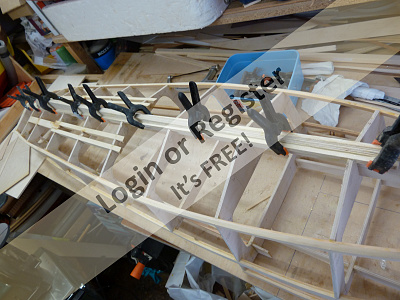
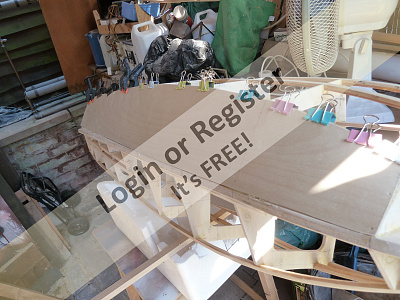
I,ve had this happen before, getting over enthusiastic, and had to cut the slots, its not an easy job, tend to use a Razor saw and a Hacksaw blade, held within a padsaw blade handle, or loads of tissue wrapped around the blade to make up a soft handle, the other "secret" is to use the blade on a pulling stroke and not as usual mounted to cut on a pushing stroke, if you use the blade on a pushing stroke be prepared with a box of plasters, things can get nasty if the blade jams ! ! ! and the wood changes colour , to red.. Once this pair of stringers have been glued and fixed, the its time to start marking out the skins. A lot of trial and error with the help of a coarse sandpaper will help to make them fit, And as the bow section, former 1 to Stem, is a very tight curve then i decided to infill with block, not sure at the moment what wood is available for this task. Muddy ..
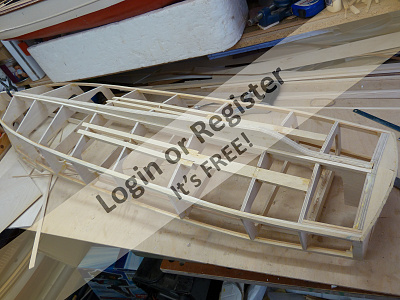
Bulkhead No 2 to the Transom had a 1/4" x 1/4" slot cut into it, alongside the keel.
I,ve had this happen before, getting over enthusiastic, and had to cut the slots, its not an easy job, tend to use a Razor saw and a Hacksaw blade, held within a padsaw blade handle, or loads of tissue wrapped around the blade to make up a soft handle, the other "secret" is to use the blade on a pulling stroke and not as usual mounted to cut on a pushing stroke, if you use the blade on a pushing stroke be prepared with a box of plasters, things can get nasty if the blade jams ! ! ! and the wood changes colour , to red.. Once this pair of stringers have been glued and fixed, the its time to start marking out the skins. A lot of trial and error with the help of a coarse sandpaper will help to make them fit, And as the bow section, former 1 to Stem, is a very tight curve then i decided to infill with block, not sure at the moment what wood is available for this task. Muddy ..
▲
⟩⟩
jbkiwi
Colin H
Joe727
ianed57
Martin555
|
💬 Re: Lorraine 2
4 years ago by 🇬🇧 muddy (
Sub-Lieutenant)✧ 4 Views · 1 Like
Flag
OK Ian, yes to true, my left toe will definatly second that.. ! Muddy
▲
⟩⟩
ianed57
|
|
💬 Re: Lorraine 2
4 years ago by 🇬🇧 ianed57 (
Sub-Lieutenant)✧ 4 Views · 1 Like
Flag
Another classic Vic Smeed design, Muddy. Looking forward to seeing how the hard chine version turns out. Big boat!
Ian ▲
⟩⟩
Martin555
|
📝 Lorraine 2
4 years ago by 🇬🇧 muddy ( Sub-Lieutenant)
Sub-Lieutenant)✧ 8 Views · 5 Likes · 4 Comments
Flag
💬 Add Comment
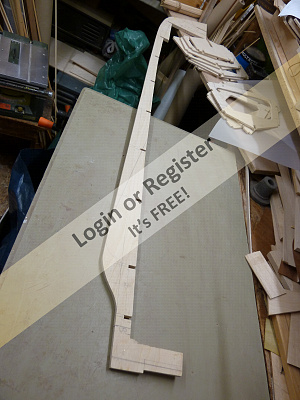
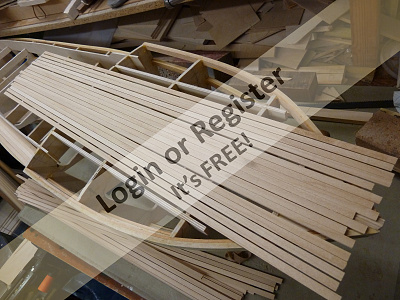
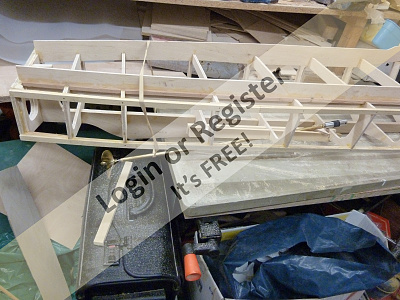
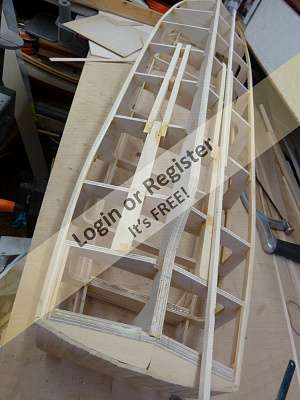
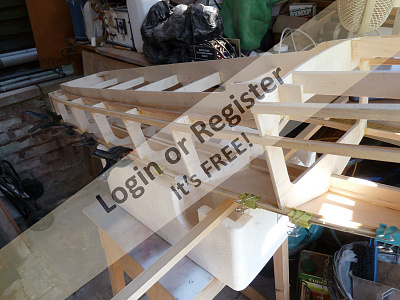
Once the bottom skins have been marked out, roughly and oversize, they can be cut and trimmed to fit along the keel edge. I tend to lay glue on every edge the skin will touch and marking the centre line of the bulkheads across the outer edge of the skin will assist in the pin fixing, ot nails, always use barass pins, 7mm long and .7mm diameter, flat head. Bradawl the skin whilst in alignement of the bulkhead and hammer home the pin, , usually place one pin between the bulkheads along the keel/keel stringer and the span of the bulkhead, not forgetting the chine edge's also. Again using the one skin as a pattern for the second bottom skin, once your satisfied with the skin placement, then start and finish the second skin pinning and glue the same way, same methode. Once the glue has dryed off, usually overnight with me, then things start to look something like and the boat starts to take on some sort of profile instead of just an armature or frame.
Muddy ..

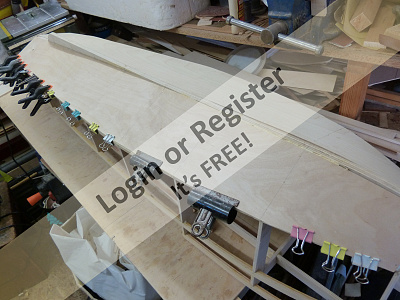
Muddy ..
▲
⟩⟩
Colin H
Inkoust
Joe727
Martin555
ianed57
|
💬 Re: Lorraine 2
4 years ago by 🇬🇧 muddy (
Sub-Lieutenant)✧ 3 Views · 0 Likes
Flag
OK Joe, I used Titebond 3 ? the brown one, if i,m useing brown timber, but found i liked the standard Titebond and its grabbing time, appears to do a better job, for me that is ! Keep mucky with glue and make sawdust.. Muddy ..
▲
⟩⟩
No likes yet
This member will receive 1 point for every like received |
|
Login To
Remove Ads 💬 Re: Lorraine 2
4 years ago by 🇺🇸 Joe727 (
Commander)✧ 4 Views · 1 Like
Flag
Muddy,
I use Titebond lll Ultimate which claims to be waterproof, however, I'm with you, I alway rely on fiberglass resins, paints or varnishes to coat it with. Joe ▲
⟩⟩
muddy
|
|
💬 Re: Lorraine 2
4 years ago by 🇬🇧 muddy (
Sub-Lieutenant)✧ 4 Views · 1 Like
Flag
Hello Joe, Yes Titebond. It's not waterproof, so make sure you paint it well and hide all the joints.
Muddy .. ▲
⟩⟩
Joe727
|
|
💬 Re: Lorraine 2
4 years ago by 🇺🇸 Joe727 (
Commander)✧ 4 Views · 1 Like
Flag
Muddy,
What type of glue are you using to adhere the sheets of wood? Is it a carpenter's yellow glue, like titebond? Joe ▲
⟩⟩
muddy
|
📝 Lorraine 2
4 years ago by 🇬🇧 muddy ( Sub-Lieutenant)
Sub-Lieutenant)✧ 8 Views · 5 Likes
Flag
💬 Add Comment
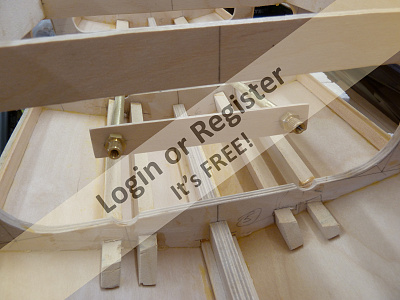
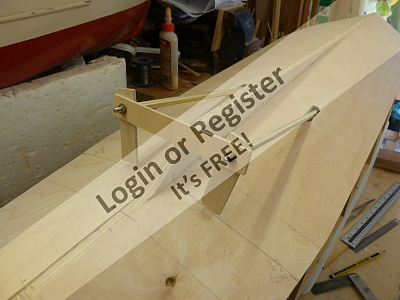
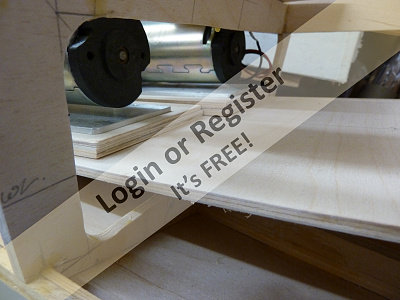
Propshafts, if fitting twin screws, it is advisable to get the shafts aligned. Parallel to each other and the same dimentions under the hull from the skin to the prop centre boss. Always make up a sim ple jig in the form of a pair of spacer bars drilled as a pair, together to make them identical for the shaft spacing, also make up a spacer(s) from the shaft(s) to the bottom of the skin(s), at this stage of the process i,m inclined to dry fit many times, especially when your satisfied with the shaft setup and move on to the motors and their fixings.
Muddy ..


Muddy ..
▲
⟩⟩
nasraf
Colin H
Joe727
Martin555
ianed57
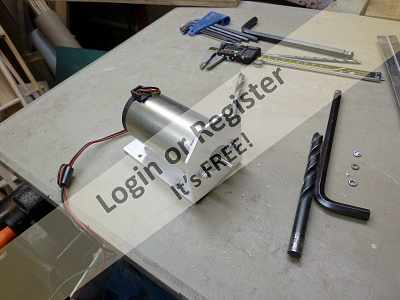
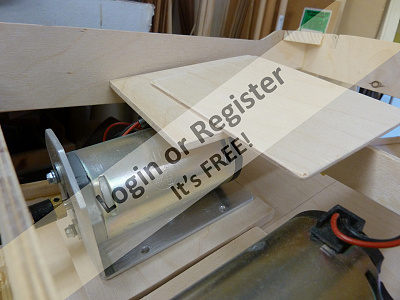
📝 Lorraine 2
4 years ago by 🇬🇧 muddy ( Sub-Lieutenant)
Sub-Lieutenant)✧ 11 Views · 8 Likes
Flag
💬 Add Comment
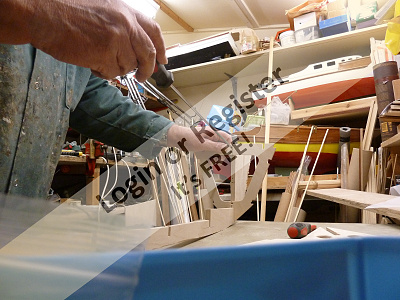
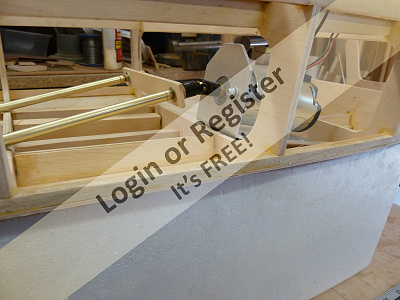
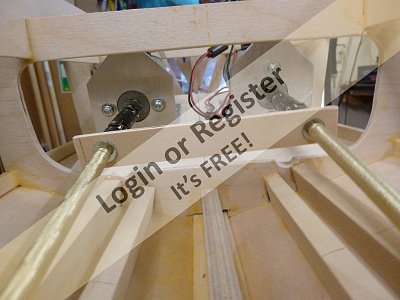
Engine Room, or motor mountings/fixings. Once satisfied with shaft ailignement, time to locate the drive motors, making sure the shafts are held well and truly in place, ( using some old Aero Modelling wing bands ) plenty of them, but being carefull not to distort the shaft alignement.
Connect up the motors and start to manufacture a mounting tray of some sorts. Several attempts were made at this, hence the quantity of pictures.
Muddy ..

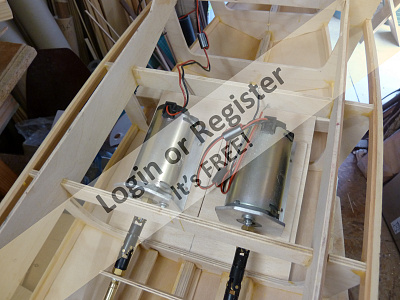


Connect up the motors and start to manufacture a mounting tray of some sorts. Several attempts were made at this, hence the quantity of pictures.
Muddy ..
▲
⟩⟩
jbkiwi
nasraf
Colin H
Inkoust
Joe727
Martin555
Skydive130
ianed57
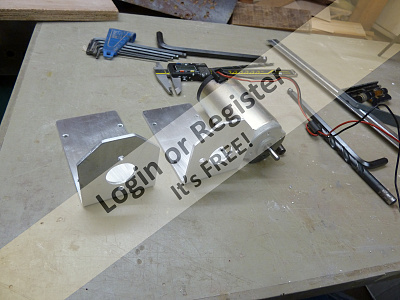
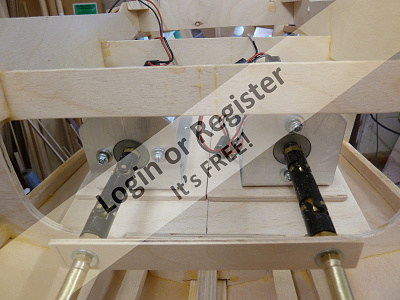
📝 Lorraine 2
4 years ago by 🇬🇧 muddy ( Sub-Lieutenant)
Sub-Lieutenant)✧ 9 Views · 6 Likes
Flag
💬 Add Comment
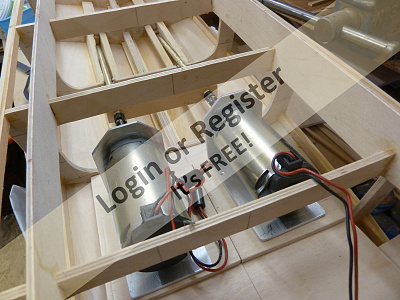
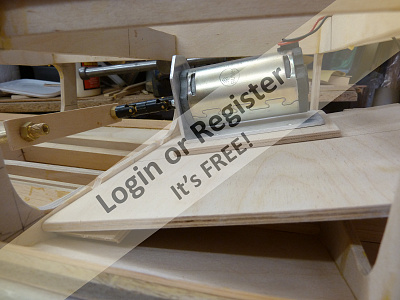
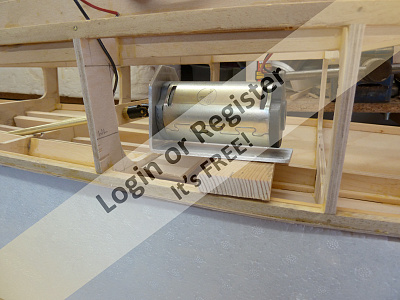
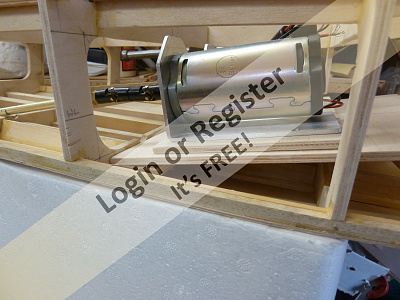
Shafts Motors and Couplings. Once the prop shafts are located and made reasonably secure, one can start on the other end, the motor end. Making up a substantial motor platform, mostly in 5mm ply, thinking about removal of the motors for exchangeability from vessel to vessel, some sort of platform was concocted, with wood shims under the ally mounting plate, also there may be a different type of flexible coupling employed this was also being thought of.
Muddy ..


Muddy ..
▲
⟩⟩
nasraf
Colin H
Dibdawg
Joe727
ianed57
Martin555


Login To
Remove Ads
Remove Ads