Join Us On Social Media!

|

|

|
Download The App!
Login To
Remove Ads
Remove Ads
Login To
Remove Ads
Remove Ads
Model Boats Website
Huntsman restoration project.(Kathy's Clown)
9 Posts · 0 Followers · 31 Photos · 5 Likes
Began 12 years ago by
 United Kingdom
Follow This Thread
Not currently following
> Click to follow
> Click to follow
Latest Post 11 years ago by
| Oldest posts shown first (Show Newest First) | (Print Booklet) |
📝 Huntsman restoration project.(Kathy's Clown)
12 years ago by 🇬🇧 Colin H ( Fleet Admiral)
Fleet Admiral)✧ 12 Views · 1 Like · 5 Comments
Flag
💬 Add Comment
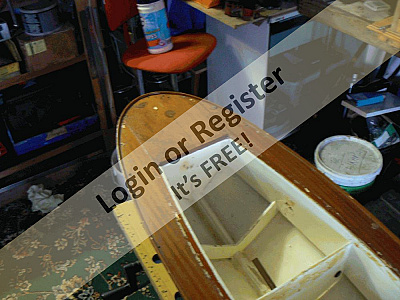
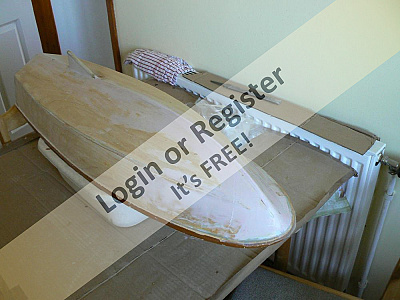
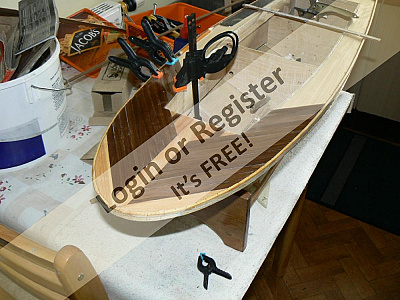
After inspecting my new acquisition thoroughly, I found numerous cracks in the paint and some flaking, so investigated further and found almost all the seems had sprung.
Over the next few weeks I intend to restore her to a seaworthy and long lasting model I can enjoy.
The sequence of pictures and notes will help understand what I'm doing at each stage.
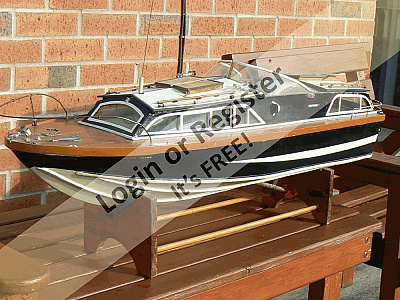
Picture;- 1 is what it looked like when I got her.
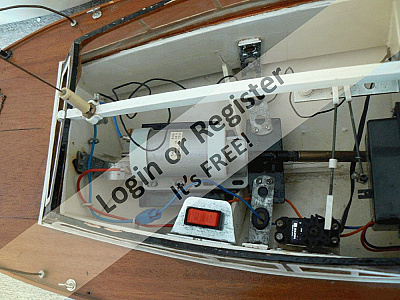
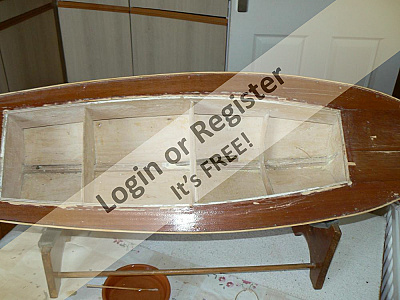
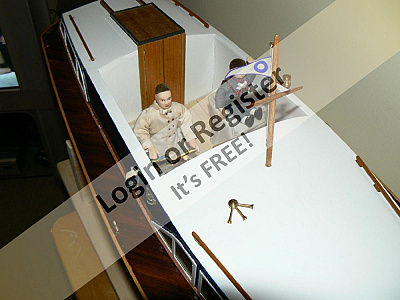
2 is the inner workings,
3 is cabin and electrics removed.
4 visible cracks.
Next step is to clean away the old paint and see whats underneath hopefully nothing too disastrous as I don't want to scrap her.
Well I'll leave it at that and start work now, hope I'm not boring all you experts, as this is only my second restoration.Don't hesitate to but in and tell me I'm doing it wrong. By the way this is my first ever blog.Thanks Colin.

Over the next few weeks I intend to restore her to a seaworthy and long lasting model I can enjoy.
The sequence of pictures and notes will help understand what I'm doing at each stage.
Picture;- 1 is what it looked like when I got her.
2 is the inner workings,
3 is cabin and electrics removed.
4 visible cracks.
Next step is to clean away the old paint and see whats underneath hopefully nothing too disastrous as I don't want to scrap her.
Well I'll leave it at that and start work now, hope I'm not boring all you experts, as this is only my second restoration.Don't hesitate to but in and tell me I'm doing it wrong. By the way this is my first ever blog.Thanks Colin.
▲
⟩⟩
nevmeek
|
💬 Huntsman restoration project.(Kathy's Clown)
12 years ago by 🇬🇧 Colin H (
Fleet Admiral)✧ 11 Views · 0 Likes
Flag
HI guy's,
Didn't expect such rapid replies, but thanks for info, the boat is actually 34 3/8 inches long. it's a shame that the builder didn't use a one piece lift off upper only small individual roof sections. But I was able to separate the cabin structure using a shortened modeling knife and great care. the paint was removed using a heat gun and small scraper took me about 25 minutes. Thanks Colin. ▲
⟩⟩
No likes yet
This member will receive 1 point for every like received |
|
Login To
Remove Ads 💬 Huntsman restoration project.(Kathy's Clown)
12 years ago by 🇬🇧 Gregg (
 Sub-Lieutenant) Sub-Lieutenant)✧ 11 Views · 0 Likes
Flag
2 items I find very useful for stripping paint off model boats, especially if they contain plastic/abs parts.
1/ "Fairy power spray" oven cleaner - spray on, leave for about 5 - 10 mins, then brush off with a firm bristled brush and warm water. OR 2/ there is a marine stripper called "safe stripper", used by the full size craft people, its a green coloured gel like substance, works like a normal paint stripper, but again safe for models with any plastic or abs content. ive tried and tested both and both work well, of course, the "household [1] is easily available from your local store too! ▲
⟩⟩
No likes yet
This member will receive 1 point for every like received |
|
💬 Huntsman restoration project.(Kathy's Clown)
12 years ago by 🇬🇧 Dave M (
 Vice Admiral) Vice Admiral)✧ 11 Views · 0 Likes
Flag
HI Colin
Really nostalgic looking model. Typical construction for its age and all the inside of the hull hidden behind the false sides. As Gregg says the cracking and splitting is clearly visible and I suspect you will find even more as you remove the paint. Have you decided what to use to remove the paint? ▲
⟩⟩
No likes yet
This member will receive 1 point for every like received |
|
💬 Huntsman restoration project.(Kathy's Clown)
12 years ago by 🇬🇧 jelley_baby (
 Chief Petty Officer 1st Class) Chief Petty Officer 1st Class)✧ 11 Views · 0 Likes
Flag
HI Ihave a 34 inch one is this one 34 or 46 she looks quite large in the photos, will be watching with interest the refitting will you be keeping the same motor. Graham
▲
⟩⟩
No likes yet
This member will receive 1 point for every like received |
|
💬 Huntsman restoration project.(Kathy's Clown)
12 years ago by 🇬🇧 Gregg (
Sub-Lieutenant)✧ 11 Views · 0 Likes
Flag
Always better to remove as much of the old paint coating f there are any signs of it cracking/splitting. far better to make sure the base framework is solid .
best of luck with the restoration and look forward to the indepth details "as it goes". ▲
⟩⟩
No likes yet
This member will receive 1 point for every like received |
Login To
Remove Ads
Remove Ads
📝 Part 2, huntsman restoration
12 years ago by 🇬🇧 Colin H ( Fleet Admiral)
Fleet Admiral)✧ 11 Views · 0 Likes · 11 Comments
Flag
💬 Add Comment
Well an afternoon in workshop has give me a clean outer, and as suspected all joints showing signs of opening. Think one of main problems caused by the use of steel pins, they have all rusted and only the paint was keeping it all together. So I've replaced pins with brass ones and used a syringe to put epoxy glue into joints, have removed paint using hot air gun and scraper, followed by a light sanding with small orbital sander which has given me a pretty good surface, which will only need minor filling.
Will add more info after supper.
Thanks Colin.


Will add more info after supper.
Thanks Colin.
▲
⟩⟩
No likes yet
This member will receive 1 point
for every like received
This member will receive 1 point
for every like received
|
💬 Part 2, huntsman restoration
12 years ago by 🇬🇧 Colin H (
Fleet Admiral)✧ 11 Views · 0 Likes
Flag
HI Dave and Graham,
Yes the original build glue does seem like cascamite, but the shaft tube has been fitted using what I believe to be a polyester resin, as it softens with a little cellulose thinners and then scrapes away quite easily using a dentist's pick (which I find very useful modelling tools). Just a bit slow but wont damage structure this way as there is about 3 inches by about 1 inch of it to remove. Once out I will check shaft length and alignment and refit shaft tube with new bearings and make a new stainless shaft if needed. But won't be able to do anymore work on boat till Monday as this weekend I will be away collecting our new puppy from my sisters near Bath, Won't be back till late Sunday. Will add more pictures and news as it happens next week. By for now Thanks Colin. ▲
⟩⟩
No likes yet
This member will receive 1 point for every like received |
|
Login To
Remove Ads 💬 Part 2, huntsman restoration
12 years ago by 🇬🇧 Dave M (
Vice Admiral)✧ 11 Views · 0 Likes
Flag
HI Colin
Whilst I would agree that gentle heat will help with some resins I suspect your boat was built with Cascamite, an aliphatic resin. This dries rock hard and unlike some two part resins will not soften with heat. ▲
⟩⟩
No likes yet
This member will receive 1 point for every like received |
|
💬 Part 2, huntsman restoration
12 years ago by 🇬🇧 jelley_baby (
Chief Petty Officer 1st Class)✧ 11 Views · 0 Likes
Flag
HI Colin Congrats on new arrival, and was sorry to hear of your loss, Looking forward to seeing the finished boat at Cwmbran, and following your building work. Graham
▲
⟩⟩
No likes yet
This member will receive 1 point for every like received |
|
💬 Part 2, huntsman restoration
12 years ago by 🇬🇧 Colin H (
Fleet Admiral)✧ 11 Views · 0 Likes
Flag
Thanks Graham,
I'll give it a go as soon as I can get back in my workshop, lot going on at home at moment new puppy arriving tomorrow. Will let you know how it goes. Thanks Colin. ▲
⟩⟩
No likes yet
This member will receive 1 point for every like received |
|
💬 Part 2, huntsman restoration
12 years ago by 🇬🇧 jelley_baby (
Chief Petty Officer 1st Class)✧ 11 Views · 0 Likes
Flag
HI Colin, While twisting with the pliers I would add some hot air from an old hair drier or you could apply some heat from a hot air stripper, but be careful with the second choice they can be very hot. This will soften the glue around the shaft and make it easier to remove. Graham
▲
⟩⟩
No likes yet
This member will receive 1 point for every like received |
|
💬 Part 2, huntsman restoration
12 years ago by 🇬🇧 Dave M (
Vice Admiral)✧ 11 Views · 0 Likes
Flag
Grip the shaft in a pair of pliers and twist firmly from side to side to loosen the glue. With any luck the glue will break and you will then be able to remove. I would not recommend a blow lamp but you may be able to chip away the glue where it forms a fillet. I have used a small Dremel type drill with a permagrit arbor to remove some of the wood and fixing. Being wood you can easily replace what you remove with new wood.
▲
⟩⟩
No likes yet
This member will receive 1 point for every like received |
|
💬 Part 2, huntsman restoration
12 years ago by 🇬🇧 Colin H (
Fleet Admiral)✧ 11 Views · 0 Likes
Flag
HI Dave M and Graham,
Thanks for your input, its much appreciated. How would you suggest I remove the prop shaft tube, it seems to be well and truly fixed in some kind of resin or fiber glass, my small files don't seem to make much Impact and the small power tools that I have seem to have a mind of their own, quite uncontrollable. would a minI blow lamp applied to shaft tube soften the resin or would it damage shaft tube. and GRAHAM, yes I remember you from Cwmbran. I don't know if you'd remember my old dog that was with us, he was very Ill shortly after and died 2 weeks ago, that's why we haven't been over lately. He's in my avatar picture. Thanks again Colin. ▲
⟩⟩
No likes yet
This member will receive 1 point for every like received |
|
💬 Part 2, huntsman restoration
12 years ago by 🇬🇧 jelley_baby (
Chief Petty Officer 1st Class)✧ 11 Views · 0 Likes
Flag
HI Colin, its Graham from Cwmbran club your son saved my Sea Commander, when I last saw you. I concur with Dave my Huntsman was built by me in the 70's and the positioning of the prop shaft was for an IC installation. The Lead at the rear was certainly to balast the heavy front motor. I shortened my Prop shaft and adjusted the inner accordingly, this has brought my motor about 2inches nearer the middle of the boat but it still seems nose heavy, when not running but it will lift under power there are some pictures of mine on the site somewhere and she looks good I think. The original construction has quite a solid block at the front carved to the match the hull shape, which does not help. As you have done such a large amount of preparation on the hull I think that it would pay you to repostition a shorter shaft so as to bring you motor more to the middle and help the boat float in a more level static position. I hope that my comments are useful to you and look forward to seeing finished result at Cwmbran. All the very best with the rebuild Graham
▲
⟩⟩
No likes yet
This member will receive 1 point for every like received |
|
💬 Part 2, huntsman restoration
12 years ago by 🇬🇧 Dave M (
Vice Admiral)✧ 11 Views · 0 Likes
Flag
HI Colin
Hull wise you are doing a great job. Regarding the propshaft I suspect this was possibly originally positioned to allow for an IC engine. Even the present motor requires quite a high mount. As you have easy access I would remove the present shaft and reposition with your motor and prop of choice so that the angle to the hull was less acute. Ideally your heavy motor is best placed near the middle of the model to allow easy planing of the hull. The lump of lead at the rear indicates the present motor is too far forward. You may need to shorten the shaft in the process. Do remember to allow for placement of batteries etc but I'm sure you will have already considered this. 😀 ▲
⟩⟩
No likes yet
This member will receive 1 point for every like received |
|
💬 Part 2, huntsman restoration
12 years ago by 🇬🇧 Colin H (
Fleet Admiral)✧ 11 Views · 0 Likes
Flag
Firstly I must make sure that all minor filling done, then I will be coating in glass cloth and EEZE KOTE resin, Before refitting the running strakes. And yes the stuffing tube , bearings and shaft are all good, although I'm not sure about position, had thought about using a flexi-shaft to move the prop a bit further back and parallel to keel, any comments on this idea. When striping I had to remove 468 grams of lead from stern well behind the rudder post. This made me think that angle of prop was trying to lift the stern out of water and forcing bow down.
Thanks Colin. ▲
⟩⟩
No likes yet
This member will receive 1 point for every like received |
|
💬 Part 2, huntsman restoration
12 years ago by 🇬🇧 Dave M (
Vice Admiral)✧ 11 Views · 0 Likes
Flag
HI Colin
Looks nice and clean. Are you going to cover the hull with some cloth/matting and fibreglass? Looks like the running strakes have been removed so the hull is now smooth. I assume you have checked the propshaft and bearings? ▲
⟩⟩
No likes yet
This member will receive 1 point for every like received |
📝 Resin and Glass Cloth
11 years ago by 🇬🇧 Colin H ( Fleet Admiral)
Fleet Admiral)✧ 12 Views · 1 Like · 5 Comments
Flag
💬 Add Comment
HI all,
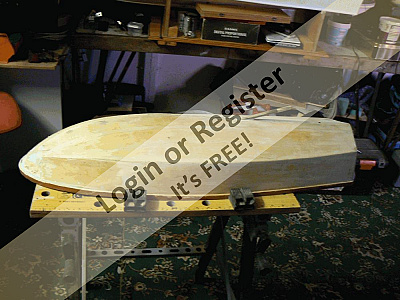
At last I'm able to continue rebuild thanks to wife letting me use kitchen.
The pictures show my next step, I've coated hull in sanding sealer followed by sanding to a reasonable finish. Then coated with Eze-Kote resin from Delux Materials, then sanded back lightly. I then covered with 24gsm glass cloth using Eze-Kote, which is very easy to use, I think that another resin coat will make it ready for priming with a filler primer from Halfords car paint range.
I'm doing this work at the same time as going through the same operations on my wife's Fairey Swordsman restoration.
Just off to rub down for last resin coat, will update in a couple of days.
▲
⟩⟩
emrys
|
💬 Resin and Glass Cloth
11 years ago by 🇬🇧 Colin H (
Fleet Admiral)✧ 11 Views · 0 Likes
Flag
HI Ian,
I got mine on eBay £13 and free p&p. Eze-dope is not the same, that's for using over tissue paper on planes. And you don't need to worry about clean up (even fingers) just soap and water and its gone. Colin. ▲
⟩⟩
No likes yet
This member will receive 1 point for every like received |
|
Login To
Remove Ads 💬 Resin and Glass Cloth
11 years ago by 🇬🇧 ianed57 (
Sub-Lieutenant)✧ 11 Views · 0 Likes
Flag
Thanks for the information Colin. I have always used epoxy up until now but Eze Kote certainly sounds...eze-er! my main problem is getting some. I can order it but will pay about £3 postage. A local shop has Eze Dope and says it's the same thing- but I'm doubtful. I will have to wait until I can order several bits from a supplier who keeps it.
I know you have been involved with full size craft as have I- but I did have a nasty reaction to epoxy once (stupidly using a bare digit as a handy smoothing tool) so am very wary of it now. Ian ▲
⟩⟩
No likes yet
This member will receive 1 point for every like received |
|
💬 Resin and Glass Cloth
11 years ago by 🇬🇧 Colin H (
Fleet Admiral)✧ 11 Views · 0 Likes
Flag
HI Ian,
Thanks for your comments, the use of Eze-Kote is far simpler than epoxy or polyester resin, as there is no odor so you wont upset the family if you need to work in your home, and at normal room temperature dries quite quickly. You can use almost any type of finishing fillers or filler primers on it or if your cloth is fine enough you can prime directly onto it. I've used Humbrol enamels and acrylics also car paints in aerosols from Halfords, and had colours mixed at local car paint suppliers. I haven't had any problems with any so far, so good luck, use a glass cloth of 24gsm or less. Thanks Colin. ▲
⟩⟩
No likes yet
This member will receive 1 point for every like received |
|
💬 Resin and Glass Cloth
11 years ago by 🇬🇧 ianed57 (
Sub-Lieutenant)✧ 11 Views · 0 Likes
Flag
It's looking good Colin. I'm just on the cusp of buying some Eze Kote so I was interested to read your positive comments about it. Look forward to seeing your restoration progress.
Ian ▲
⟩⟩
No likes yet
This member will receive 1 point for every like received |
|
💬 Resin and Glass Cloth
11 years ago by 🇬🇧 sharpy1071 (
 Chief Petty Officer 2nd Class) Chief Petty Officer 2nd Class)✧ 11 Views · 0 Likes
Flag
HI Colin, Looking good, II will try to pm you
Brian ▲
⟩⟩
No likes yet
This member will receive 1 point for every like received |
📝 Running strakes
11 years ago by 🇬🇧 Colin H ( Fleet Admiral)
Fleet Admiral)✧ 13 Views · 2 Likes
Flag
💬 Add Comment
Have now re-fitted the running strakes, using c/sunk brass screws and gorilla glue. And am now trying to remove as much of the old paint from inside, so that I can try and re-seal the keel joints and bulkhead joints. When stripped out will probably use a liquid resin to re-seal before adding motor and servo mounts. then it'll be painted white inside before working on re-decking using mahogany planks.


▲
⟩⟩
nevmeek
emrys
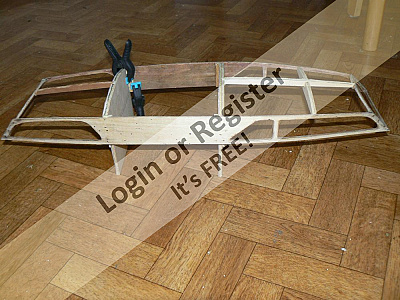
📝 Stripping and repairing cabins
11 years ago by 🇬🇧 Colin H ( Fleet Admiral)
Fleet Admiral)✧ 12 Views · 1 Like
Flag
💬 Add Comment
Have now finished stripping inside of hull and deck. Stripped and cleaned cabin frames and replaced rotten frame wood ready for new roof, have started to rebuild cockpit well, using some salvaged ply from my spare wood box, (wife say's trash box). The roof is being made from 1/16th marine ply. As I'm working on hull at same time, I tend to do 1 thing on hull, then while glue is setting I do a part of cabin/cockpit unit, I've just put the first 2 planks on deck, so doing write up while glue is setting.
Right now its time for a nice cuppa tea while I trim the next few planks.


Right now its time for a nice cuppa tea while I trim the next few planks.
▲
⟩⟩
emrys
📝 Decking
11 years ago by 🇬🇧 Colin H ( Fleet Admiral)
Fleet Admiral)✧ 11 Views · 0 Likes · 4 Comments
Flag
💬 Add Comment
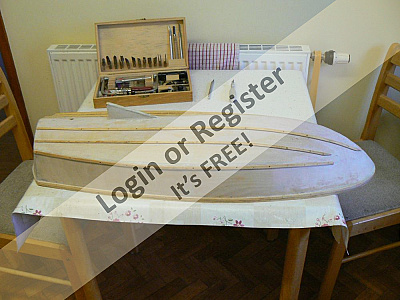
Well 5 hours work done on deck planking, hope you like my contrasting grain scheme, I think it will look good when finished with about 6 coats of varnish.
The planks have not been sanded yet. I just wiped with damp cloth to show grain for photos. The planking is 9mm x 2mm which was left over from my wife's dolls house project.
The light planks are hand cut pine. I' sticking them down with Evostick wood glue.


The planks have not been sanded yet. I just wiped with damp cloth to show grain for photos. The planking is 9mm x 2mm which was left over from my wife's dolls house project.
The light planks are hand cut pine. I' sticking them down with Evostick wood glue.
▲
⟩⟩
No likes yet
This member will receive 1 point
for every like received
This member will receive 1 point
for every like received
|
💬 Decking
11 years ago by 🇬🇧 ianed57 (
Sub-Lieutenant)✧ 11 Views · 0 Likes
Flag
Thanks for that. I will try this next time I build a hull- just felt a bit anxious about having an unmanageable mess on my hands- I'll have a bit more courage next time!
Ian ▲
⟩⟩
No likes yet
This member will receive 1 point for every like received |
|
Login To
Remove Ads 💬 Decking
11 years ago by 🇬🇧 Dave M (
Vice Admiral)✧ 11 Views · 0 Likes
Flag
You can buy glass cloth in a fine weave for about £5 a sq Metre. Will give a superb glass finish and sands beautifully.
Regarding laminating round bilge keels you cut the cloth oversize, place on the hull and then cut from the edge into the cloth where the hull is curved. This will allow the cloth to follow the curve with an overlay which will strengthen the join. Make sure you work the resin into the cloth underneath before covering with the overlay. Once dry fine wet and dry will smooth the overlay. A final coat of resin will give you a glass like finish. 😀 ▲
⟩⟩
No likes yet
This member will receive 1 point for every like received |
|
💬 Decking
11 years ago by 🇬🇧 ianed57 (
Sub-Lieutenant)✧ 11 Views · 0 Likes
Flag
By the way, I forgot to mention I have found a product called Poly-C which is supposed to be the same as Eze Kote but cheaper. it is excellent.
I have just skinned a balsa and plywood hull with the leg of some nylon tights and found it works very well. The main problem is finding a pair of tights big enough- my wife is fairly petite and I found I just couldn't bring myself to stand for long browsing the tights section in my local Morrisons! One leg only came 2/3rds along the hull and I had to overlap from each end which wasn't ideal but with a bit of wet and dry and P38 I think I've got away with it. I wasn't sure how a piece of laminating cloth would drape round a round bilged hull- and still don't know! Looking forward eventually to seeing shots of this in action, Colin ▲
⟩⟩
No likes yet
This member will receive 1 point for every like received |
|
💬 Decking
11 years ago by 🇬🇧 ianed57 (
Sub-Lieutenant)✧ 11 Views · 0 Likes
Flag
Nice neat job Colin- coming along well.
▲
⟩⟩
No likes yet
This member will receive 1 point for every like received |
📝 Decking Completed
11 years ago by 🇬🇧 Colin H ( Fleet Admiral)
Fleet Admiral)✧ 11 Views · 0 Likes · 1 Comment
Flag
💬 Add Comment
After about 10 hours more the decking is all in place and rubbed down ready for varnishing. So hope to finish hull prep in the next few days, then on to the painting and varnishing.
I will also be fitting the cabin roof's before commencing with the painting, as I like everything prepared before the painting starts.


I will also be fitting the cabin roof's before commencing with the painting, as I like everything prepared before the painting starts.
▲
⟩⟩
No likes yet
This member will receive 1 point
for every like received
This member will receive 1 point
for every like received
|
💬 Decking Completed
6 years ago by 🇬🇧 Colin H (
Fleet Admiral)✧ 11 Views · 0 Likes
Flag
Deck planking using mahogany and pine.
▲
⟩⟩
No likes yet
This member will receive 1 point for every like received |
📝 Nearly There
11 years ago by 🇬🇧 Colin H ( Fleet Admiral)
Fleet Admiral)✧ 11 Views · 0 Likes
Flag
💬 Add Comment
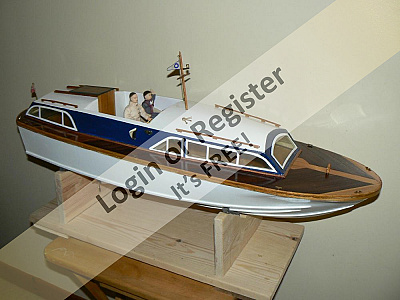
Well fellow modellers I've been so busy this last 2 weeks that I forgot to post progress report.
As you will see from the attached photos, the deck has had 3 coats of varnish, it should have been 8 or 10 by now, but the air temp and humidity has slowed it's drying time. Have painted and fitted out the roof and cabin section, then made some new doors and control center and chart table.
The wife made 2 seats using a wire frame and upholstered in real leather ( an old handbag.) Then gave me 2 figures for the family crew.
Made the new mast from a chopstick, made all new Brass Deck Fittings. The wife is making Fenders at present.
No wind screen at present as it shattered as I was trying to re-fit it.
Well that's all for now, this boat and my others will be on display at Abbergavenny show this weekend.
▲
⟩⟩
No likes yet
This member will receive 1 point
for every like received
This member will receive 1 point
for every like received
📝 Huntsman restoration project.(Kathy's Clown)
11 years ago by 🇬🇧 Colin H ( Fleet Admiral)
Fleet Admiral)✧ 11 Views · 0 Likes · 3 Comments
Flag
💬 Add Comment
Sorry for delay, but here are the photo's that wouldn't upload yesterday.
Anyone out In the Abergavenny area on Sunday or Monday, please look In on the steam and vintage show, where you can find me In the model tent.


Anyone out In the Abergavenny area on Sunday or Monday, please look In on the steam and vintage show, where you can find me In the model tent.
▲
⟩⟩
No likes yet
This member will receive 1 point
for every like received
This member will receive 1 point
for every like received
|
💬 missing pictures
11 years ago by 🇬🇧 gooner68 (
 Master Seaman) Master Seaman)✧ 12 Views · 0 Likes
Flag
HI Colin
Your models look great, they are a credit to you and your wife, regards martin ▲
⟩⟩
No likes yet
This member will receive 1 point for every like received |
|
Login To
Remove Ads 💬 missing pictures
11 years ago by 🇬🇧 Colin H (
Fleet Admiral)✧ 11 Views · 0 Likes
Flag
HI Brian,
The figures are from the wife's collection, it was her idea to add them, and it got a lot of interest at the Abbergavenny vintage show at the weekend. Only 3 coats of varnish so far as time ran out for the show, so will be doing more in the next week or so, still need to make a new windscreen as the old one shattered when it was removed, but managed to re-use all the other windows. I also need to finish the hull paintwork, and fit door handles to cabin doors (will be making my own, as I did with the other deck fittings, cleats and fair-leads Found that old 3 pin 13 amp plugs are a good supply of small brass for making small parts). Hope the weather picks up soon as can't paint or varnish with the damp air. Thanks for comments, Colin. ▲
⟩⟩
No likes yet
This member will receive 1 point for every like received |
|
💬 missing pictures
11 years ago by 🇬🇧 sharpy1071 (
Chief Petty Officer 2nd Class)✧ 11 Views · 0 Likes
Flag
HI Colin, looking good like the figures, have you been robbing your wife's dolls houses!! The gloss on the deck looks very deep, Impressive, Brian.
▲
⟩⟩
No likes yet
This member will receive 1 point for every like received |


Login To
Remove Ads
Remove Ads