Join Us On Social Media!

|

|

|
Download The App!
Login To
Remove Ads
Remove Ads
Login To
Remove Ads
Remove Ads
Model Boats Website
Aeronaut's Cabin Cruiser Diva - My First Build of an RC Boat
19 Posts · 8 Followers · 66 Photos · 82 Likes
Began 3 years ago by
 United Kingdom
Follow This Thread
Not currently following
> Click to follow
> Click to follow
Latest Post 3 years ago by
| Most recent posts shown first (Show Oldest First) | (Print Booklet) |
📝 Aeronaut's Cabin Cruiser Diva - My First Build of an RC Boat - Part VII - Final Part
3 years ago by 🇬🇧 firefighter ( Lieutenant)
Lieutenant)✧ 38 Views · 3 Likes
Flag
💬 Add Comment
Hello Hermank,
thank you. It is my first attempt at installing the electrics on an RC model boat. After much research and help from forum members I was able to complete the installation. Having said that, I suppose I had a slight head start as I am also experienced in model railway layout modelling and the subsequent electrics involved with that hobby.
Greg 👍
▲
⟩⟩
dave976
Colin H
hermank
Login To
Remove Ads
Remove Ads
📝 Aeronaut's Cabin Cruiser Diva - My First Build of an RC Boat - Part VII - Final Part
3 years ago by 🇬🇧 firefighter ( Lieutenant)
Lieutenant)✧ 39 Views · 3 Likes
Flag
💬 Add Comment
Hello Chris,
A very good point. The fuse was planned and then became an oversight. Not sure why! When I realised that I had overlooked the fuse it was a bit late as the hospital was beckoning. I do plan to add the fuse when able.
Greg 👍
A very good point. The fuse was planned and then became an oversight. Not sure why! When I realised that I had overlooked the fuse it was a bit late as the hospital was beckoning. I do plan to add the fuse when able.
Greg 👍
▲
⟩⟩
hermank
ChrisG
Colin H
📝 Aeronaut's Cabin Cruiser Diva - My First Build of an RC Boat - Part VII - Final Part
3 years ago by 🇬🇧 firefighter ( Lieutenant)
Lieutenant)✧ 39 Views · 3 Likes · 2 Comments
Flag
💬 Add Comment
Hello Hermank,
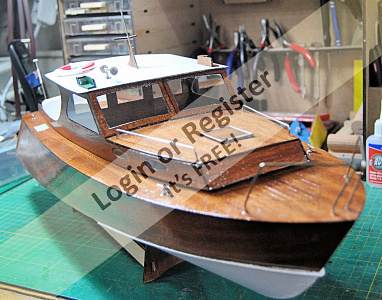
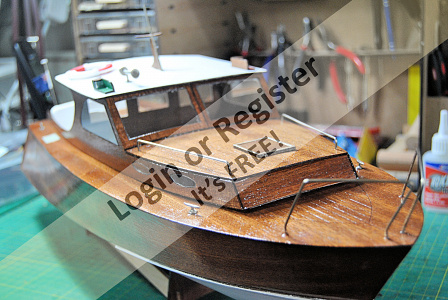
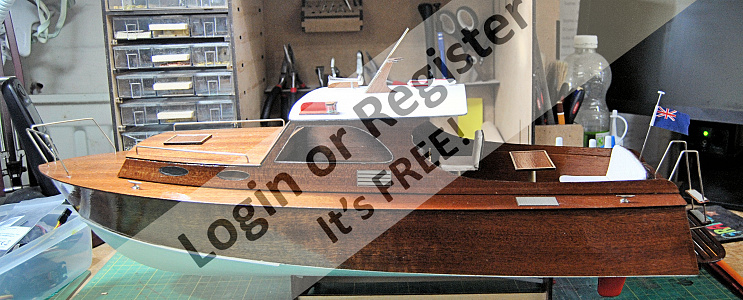
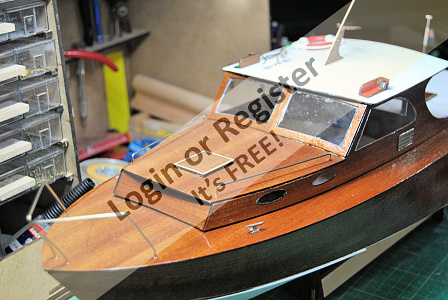
Thank you for your comments. I do often use an airbrush but on this occasion I decided to hand paint the model. Once assembled all wooden parts were painted with two coats of sander sealer with each coat being rubbed down with fine paper after drying. The upper part of the hull was first masked off and the white under side of the hull received two coats of acrylic paint being rubbed down between coats. After carefully rubbing down the upper part of the hull and superstructure they were painted with one coat of yacht varnish. The legs of the table and the helmsman's seat were first primed with a metal primer and then painted in an acrylic Ochre coloured finish. I was going to apply another coat of varnish but decided to leave it at one coat as I liked the finish. The roof was painted in the same way as the lower hull. I was thinking of putting a white or blue stripe on the upper hull just below deck level but changed my mind.
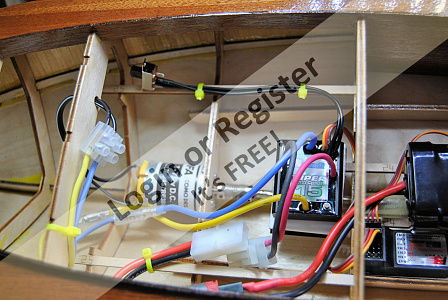
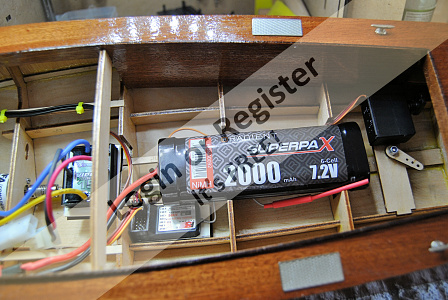
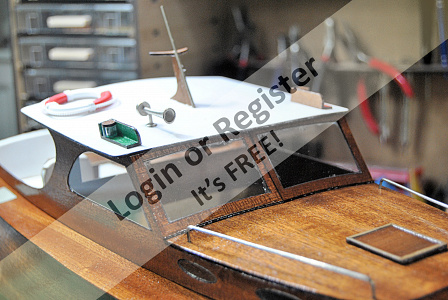
For anyone who may be interest in my positioning of the radio gear in the boat I have added some photographs.
Greg 👍

Thank you for your comments. I do often use an airbrush but on this occasion I decided to hand paint the model. Once assembled all wooden parts were painted with two coats of sander sealer with each coat being rubbed down with fine paper after drying. The upper part of the hull was first masked off and the white under side of the hull received two coats of acrylic paint being rubbed down between coats. After carefully rubbing down the upper part of the hull and superstructure they were painted with one coat of yacht varnish. The legs of the table and the helmsman's seat were first primed with a metal primer and then painted in an acrylic Ochre coloured finish. I was going to apply another coat of varnish but decided to leave it at one coat as I liked the finish. The roof was painted in the same way as the lower hull. I was thinking of putting a white or blue stripe on the upper hull just below deck level but changed my mind.
For anyone who may be interest in my positioning of the radio gear in the boat I have added some photographs.
Greg 👍
▲
⟩⟩
ChrisG
hermank
Colin H
|
💬 Re: Aeronaut's Cabin Cruiser Diva - My First Build of an RC Boat - Part VII - Final Part
3 years ago by 🇧🇪 hermank (
 Rear Admiral) Rear Admiral)✧ 34 Views · 1 Like
Flag
Firefighter à good afternoon
Clean and nice cabling, i doubt that this is your First Model 👍👏 ▲
⟩⟩
firefighter
|
|
💬 Re: Aeronaut's Cabin Cruiser Diva - My First Build of an RC Boat - Part VII - Final Part
3 years ago by 🇬🇧 ChrisG (
 Commander) Commander)✧ 43 Views · 2 Likes
Flag
Might I suggest that unless I hav`nt seen it an inline fuse is a good idea, it could save the esc or worse case scenario save the whole boat in the event of a circuit problem.
Worth a thought ChrisG ▲
⟩⟩
hermank
firefighter
|
📝 Aeronaut's Cabin Cruiser Diva - My First Build of an RC Boat - Part VII - Final Part
3 years ago by 🇬🇧 firefighter ( Lieutenant)
Lieutenant)✧ 41 Views · 1 Like
Flag
💬 Add Comment
Hello Colin,
Thank you also for your kind comments. I am very pleased with what I have achieved and can't wait to take it to the pond which should be in May.
I am told by my occupational therapist that some model building will be good in exercising the new knuckle joint so I plan ( with permission) to start as soon as I can. But, unfortunately, I do know from previous experience that the hand will take at least six months before it is back to full use.
Greg 👍
▲
⟩⟩
Colin H
📝 Aeronaut's Cabin Cruiser Diva - My First Build of an RC Boat - Part VII - Final Part
3 years ago by 🇬🇧 firefighter ( Lieutenant)
Lieutenant)✧ 41 Views · 3 Likes · 1 Comment
Flag
💬 Add Comment
Hello Chris,
Thank you for your kind comments. Yes, I am very pleased with the boat and how fine she looks. As a beginner the kit was recommended to me by Cornwall Model Boats and on their advice I purchased the kit. It seems to me that Aeronaut make some very good kits which come with very comprehensive instructions. If there is anything you are not sure of, contacting them by email, they are very keen to help you with any problems you may have.
I have to say that not being able to use my right hand at the moment is frustrating . But life dealt me the blow of having Arthritis in both hands. So it is something I have to put up with. The recent surgery is my third and there is no doubt that further surgery will be needed. I have a great deal of respect for anybody suffering from the complaint.
Greg 👍
▲
⟩⟩
Colin H
hermank
ChrisG
|
💬 Re: Aeronaut's Cabin Cruiser Diva - My First Build of an RC Boat - Part VII - Final Part
3 years ago by 🇬🇧 ChrisG (
Commander)✧ 46 Views · 3 Likes
Flag
I concur, Cornwall Model Boats is excellent and their advice to go with Aeronaut kits is in my opinion sound, they do produce some good and reasonably priced kits. Keep up the good work regards ChrisG
▲
⟩⟩
Colin H
hermank
firefighter
|
📝 Aeronaut's Cabin Cruiser Diva - My First Build of an RC Boat - Part VII - Final Part
3 years ago by 🇬🇧 firefighter ( Lieutenant)
Lieutenant)✧ 42 Views · 3 Likes · 4 Comments
Flag
💬 Add Comment
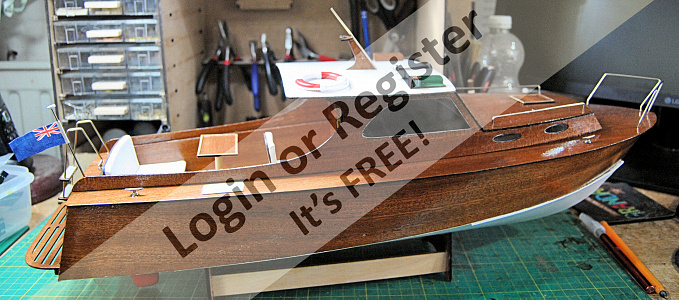
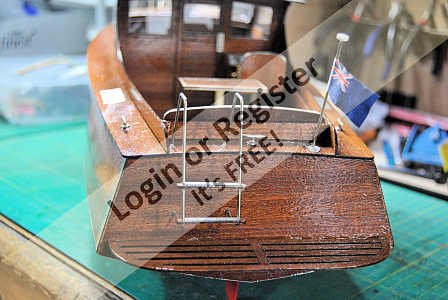
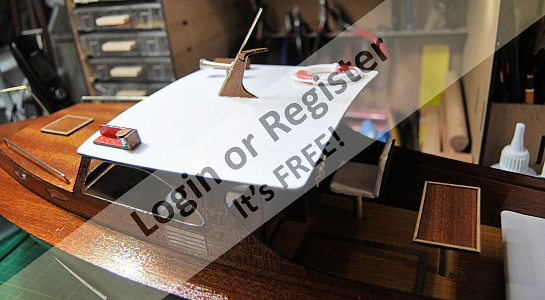
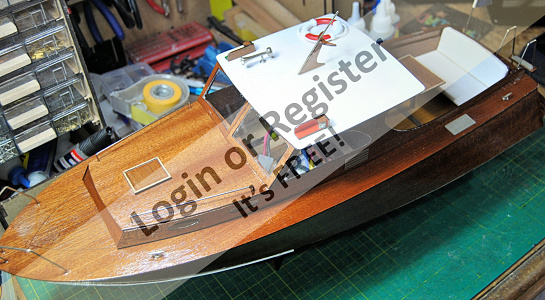
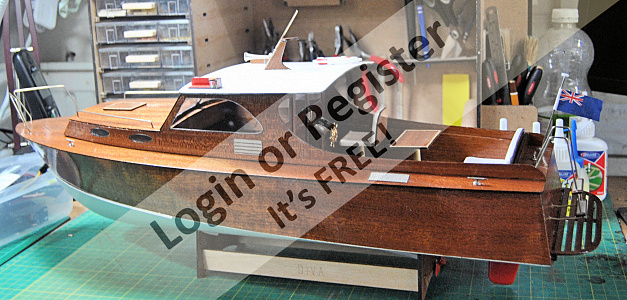
First of all please let me apologize for not posting the completion of the build of the Diva sooner. The delay has been due to my recent surgery.
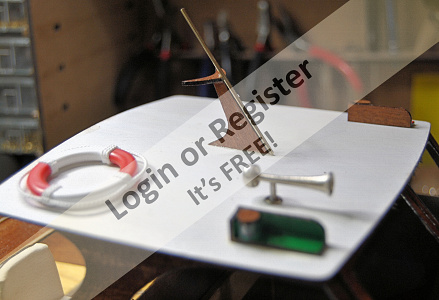
Before I had the surgery I was able to complete the model. Everything is now in position. The hull and superstructure has had it's final coats. The electrics have been completed and tested. what is still to do is float the model in water (probably the bath) and see how she floats making any adjustments.
Then when the hand is better and the 24/7 splint has been removed which I am hoping will be sometime this coming April it is off to the pond for the maiden voyage.
This first RC boat build of mine has been a great learning curve and very satisfying which has spurred me on to build other boats.
The other boats I have in the yard are the Footy Bob-A-Bout sailboat which I have to admit I have had problems building from the start. Unfortunately the instructions that come with the kit are very limited in detail and as a novice I found them very hard to understand. So that kit was put to one side to be started again when the enthusiasm and the use of my hand return. Another boat that I started is the The Wooden Model Boat Company Police Launch. This has also been put on hold as I made an error in the first part of building the hull and won't be able to correct it until the dreaded hand is back in service. Moving on, I also have yet to start the Wee Nip and Aeronaut's sailboat Bella both of which I recently purchased.
Also, in addition to the above, I am in the process of building some RC model aircraft so all in all I have so much building to do I don't know whether I will ever have time to sail or fly 😁.
I really enjoyed building the Diva and would certainly recommend the kit. I will be looking at more Aeronaut kits in the future but I have my eye on some Billing Boat kits as well 😀.
Oh, I nearly forgot. Apart from the builds I have mentioned above. I also got three static display wooden period ships to finish. Happy Days!!
Greg 👍
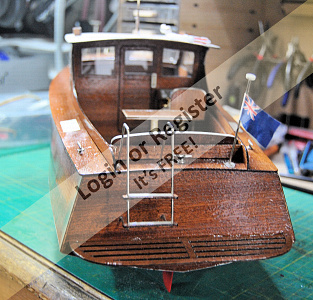
▲
⟩⟩
Graham93
ChrisG
Colin H
|
💬 Re: Aeronaut's Cabin Cruiser Diva - My First Build of an RC Boat - Part VII - Final Part
3 years ago by 🇬🇧 flaxbybuck (
 Captain) Captain)✧ 20 Views · 1 Like
Flag
Congratulations on completing a lovely boat, and good luck with the maiden voyage. As your first build I expect this boat will always be your No.1 and bring you hours of pleasure.
Best wishes😉 ▲
⟩⟩
firefighter
|
|
Login To
Remove Ads 💬 Re: Aeronaut's Cabin Cruiser Diva - My First Build of an RC Boat - Part VII - Final Part
3 years ago by 🇧🇪 hermank (
Rear Admiral)✧ 38 Views · 1 Like
Flag
Very Nice modelboat and well finished and painted. Have you done the painting by brush or spray. Hope your hands will heal quickly so you can have the First maidentrip on the lake. Keep on posting pictures👍
▲
⟩⟩
firefighter
|
|
💬 Re: Aeronaut's Cabin Cruiser Diva - My First Build of an RC Boat - Part VII - Final Part
3 years ago by 🇬🇧 Colin H (
 Fleet Admiral) Fleet Admiral)✧ 49 Views · 1 Like
Flag
No need for the apologies, your model looks great, be proud of your achievement.
Looking forward to seeing it on the water. Hopefully your hand will be OK soon and you can get back to modelling. Well done shipmate, cheers Colin. ▲
⟩⟩
firefighter
|
|
💬 Re: Aeronaut's Cabin Cruiser Diva - My First Build of an RC Boat - Part VII - Final Part
3 years ago by 🇬🇧 ChrisG (
Commander)✧ 47 Views · 2 Likes
Flag
You should be very proud, lovely looking boat. I hope the hand recovers fully allowing you to get stuck in again.
Regards ChrisG ▲
⟩⟩
Colin H
firefighter
|
📝 Aeronaut's Cabin Cruiser Diva - My First Build of an RC Boat
3 years ago by 🇬🇧 firefighter ( Lieutenant)
Lieutenant)✧ 55 Views · 1 Like
Flag
💬 Add Comment
Thank you Ron and Colin.
I like the pictures of the firemen. They are dressed in the same as we were back in the day except our coats were black. Happy Days!!
Greg 👍
I like the pictures of the firemen. They are dressed in the same as we were back in the day except our coats were black. Happy Days!!
Greg 👍
▲
⟩⟩
Colin H
📝 Aeronaut's Cabin Cruiser Diva - My First Build of an RC Boat
3 years ago by 🇬🇧 firefighter ( Lieutenant)
Lieutenant)✧ 64 Views · 2 Likes · 1 Comment
Flag
💬 Add Comment
The receiver does not show any abbreviations only Batt which I knew anyway. the remaining sockets are numbered CH1 through to CH6 which is no help to me. If the sockets had been marked Aileron or Aile etc I would not have needed to ask the question. Don't forget I am a complete beginner when it comes to RC and have a lot of learning to do so abbreviated RC terminology may as well be a new language to me.
▲
⟩⟩
hermank
Colin H
|
💬 Re: Aeronaut's Cabin Cruiser Diva - My First Build of an RC Boat
3 years ago by 🇨🇦 Ronald (
Fleet Admiral)✧ 67 Views · 5 Likes
Flag
CH1 is your Rudder said Collin
CH2 or CH3 is your esc (speed control) Leave the rest empty Collin and Ron 🇨🇦 

▲
⟩⟩
Len1
Colin H
firefighter
hermank
Peejay
|
📝 Aeronaut's Cabin Cruiser Diva - My First Build of an RC Boat
3 years ago by 🇬🇧 firefighter ( Lieutenant)
Lieutenant)✧ 66 Views · 2 Likes · 1 Comment
Flag
💬 Add Comment
Hello Ron,
You wrote "The Rudder servo is connected to the Aile"
Sorry to sound so stupid but what is 'Aile' suppose to mean?
Greg
You wrote "The Rudder servo is connected to the Aile"
Sorry to sound so stupid but what is 'Aile' suppose to mean?
Greg
▲
⟩⟩
hermank
Colin H
|
💬 Re: Aeronaut's Cabin Cruiser Diva - My First Build of an RC Boat
3 years ago by 🇨🇦 Ronald (
Fleet Admiral)✧ 68 Views · 3 Likes
Flag
(Aile) is short for Aileron on the Receiver they use short form of a word as the space is limited for text. (Batt) is Battery
Hope this clears up the sometimes muddy waters of rc terminology. ▲
⟩⟩
hermank
Peejay
Colin H
|
📝 Aeronaut's Cabin Cruiser Diva - My First Build of an RC Boat
3 years ago by 🇬🇧 firefighter ( Lieutenant)
Lieutenant)✧ 67 Views · 2 Likes
Flag
💬 Add Comment
Yes I was lucky to get the date. I was certainly not going to turn it down. I've been waiting a long time.
Greg 👍
Greg 👍
▲
⟩⟩
hermank
Colin H


Login To
Remove Ads
Remove Ads