Join Us On Social Media!

|

|

|
Download The App!
Login To
Remove Ads
Remove Ads
Login To
Remove Ads
Remove Ads
Model Boats Website
Aerokit Sea Scout 'Jessica' Renovation
19 Posts · 3 Followers · 131 Photos · 81 Likes
Began 7 years ago by
 Germany
Follow This Thread
Not currently following
> Click to follow
> Click to follow
Latest Post 6 years ago by
| Oldest posts shown first (Show Newest First) | (Print Booklet) |
📝 Aerokit Sea Scout 'Jessica' Renovation
7 years ago by 🇩🇪 RNinMunich ( Fleet Admiral)
Fleet Admiral)✧ 9 Views · 2 Likes
Flag
💬 Add Comment
Some of you may already know part of the story but, spurred on by Martin 'Westquay' and commanded 😉 by Admiral 'Dave' here goes 😎
Dad built her originally when I was about 12, so ca 53-54 years ago. (As at 2017!)
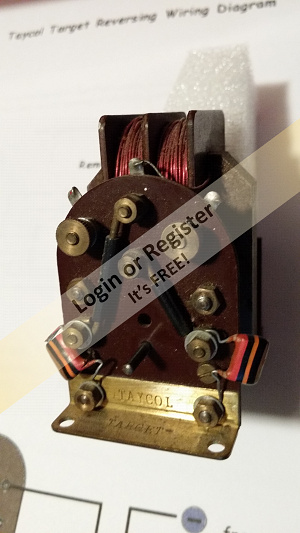
She was 'No name' and free running with a Taycol Target, ahead only, and a 6V (very) wet cell lead acid. (Down to the garage again for a 'top up!)
Anyway, to cut a long story slightly sideways 😉
MY daughter Jessica found the boat in the cellar when she was about 12!
And immediately wanted to run it on the local lake in Munich, as I was doing with my HMS Hotspur (but that's another shaggy model story!).
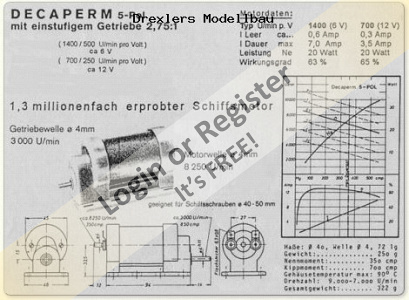
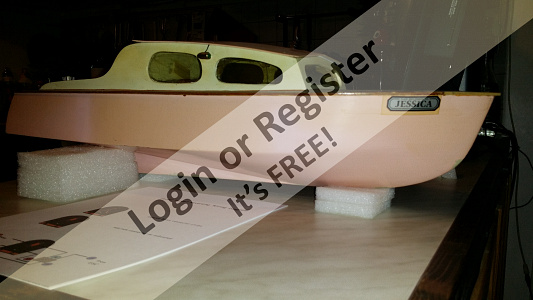
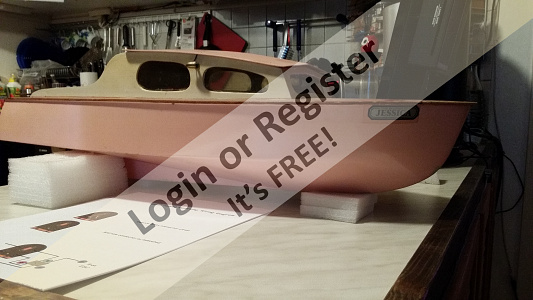
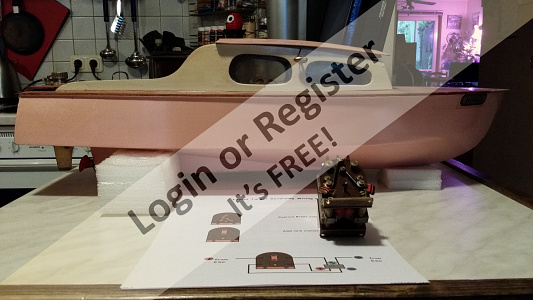
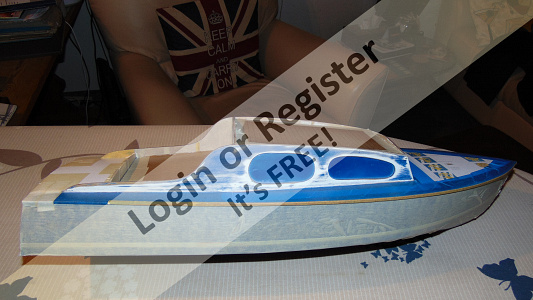
Sooooooo, she was cleaned up, resprayed pink (😡!) and white, Taycol Target field motor (no reverse) removed and replaced with a Decaperm 6V 7A with 2.75:1 gearbox. 6V 4000mAH SLA (weight half ton or so) Performance was rather sedate. Well it seemed like a good idea at the time!
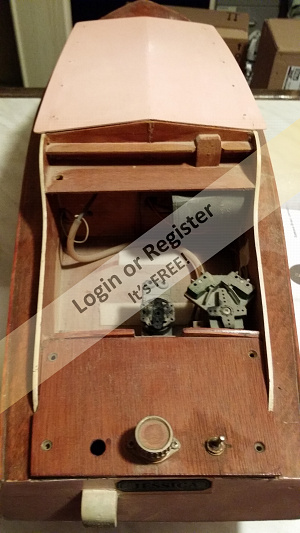
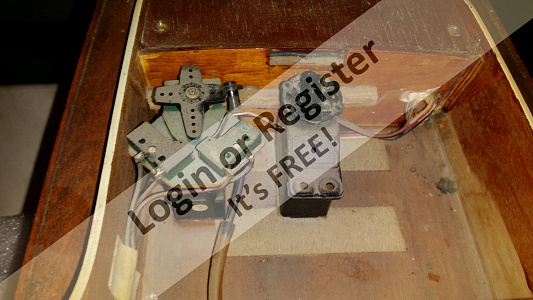
RX, battery and rudder servo were shoehorned into the aft compartment, Jessica nameplates stuck on and off we went. Jessie was happy with the boat and I was happy with the Biergarten. Can't remember where 'the management' was 😉
Jessie soon lost interest so I used the boat as a test bed for a while.
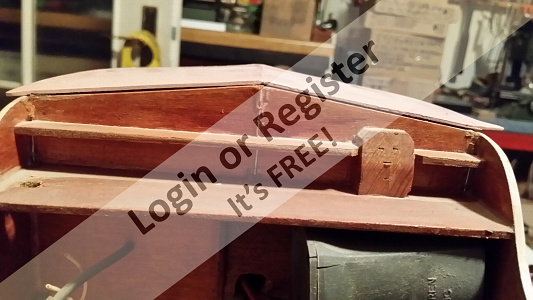
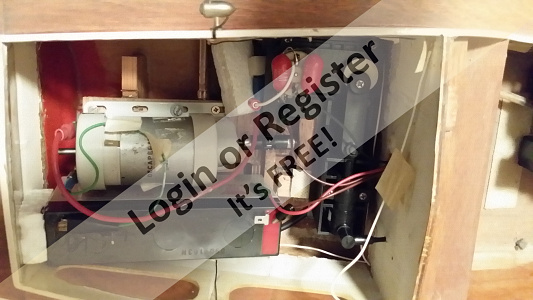
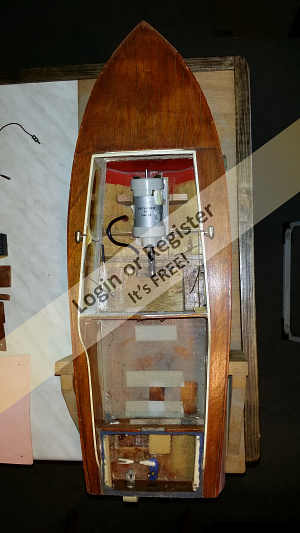
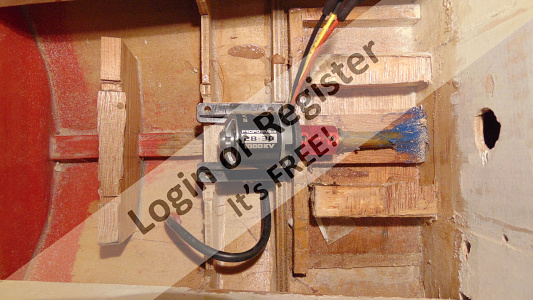
So now, 25-26 years on; prompted by Martin, I took the old lady down off the shelf (I TOLD her not climb up there!😉) and started inspecting the damage. Photos attached. (Yes I know 35Megs is not for boats but I didn't have nowt else then🤐) The ancient DIN Audio socket was for charging the RX bat, double throw switch on starboard quarter. The big 'ole was for the telescopic antenna borrowed from an old radio. Needs must when ...
The funny looking 'thing' hanging out the transom is a dummy exhaust hiding the bolt holding the antenna bracket inside!
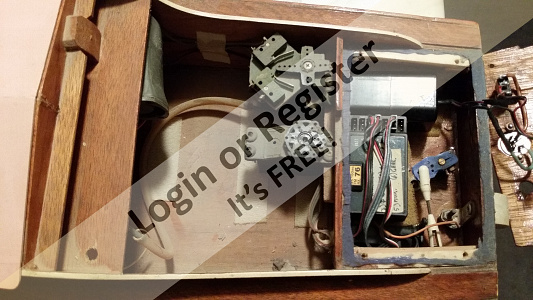
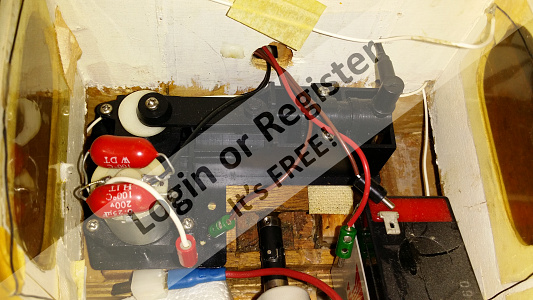
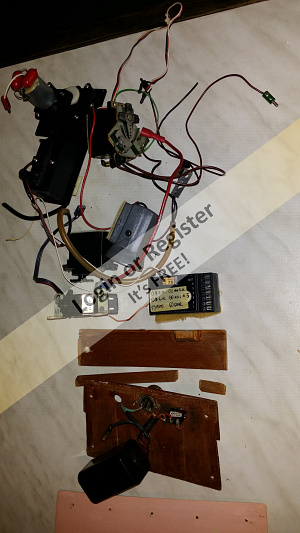
Have also started dismantling and renovating the Taycol, which I want to put back in with a reversing circuit and a 2S or maybe 4S LiPo. That was day before yesterday. Yesterday I took out the junk (siren, water pump, servos & micro switches to operate them and the running lights) and wiped the dust off - last two photos, incl. THE JUNK.
Stripped of all the junk & Decaperm she weighs 1214gm (about 2lb 11oz).
Also tested (cautiously!) the Taycol with a regulated / current limiting PSU. She rattled and protested but ran 😊 Now being dismantled, cleaned up and brush gear refurbished. Might also fit proper bearings!
Next step: clean up the old gal, check for leaks and load capacity.
I will probably use the 4S LiPo ca 310gm, the SLA was 660gm, so lots of spare capacity, or maybe I can get her nose out of the water for once
More soon Cheers from Munich 😎
PS to Dave and Martin: NO! I don't propose to go full authentic nostalgia with a wet cell accu 😉


Dad built her originally when I was about 12, so ca 53-54 years ago. (As at 2017!)
She was 'No name' and free running with a Taycol Target, ahead only, and a 6V (very) wet cell lead acid. (Down to the garage again for a 'top up!)
Anyway, to cut a long story slightly sideways 😉
MY daughter Jessica found the boat in the cellar when she was about 12!
And immediately wanted to run it on the local lake in Munich, as I was doing with my HMS Hotspur (but that's another shaggy model story!).
Sooooooo, she was cleaned up, resprayed pink (😡!) and white, Taycol Target field motor (no reverse) removed and replaced with a Decaperm 6V 7A with 2.75:1 gearbox. 6V 4000mAH SLA (weight half ton or so) Performance was rather sedate. Well it seemed like a good idea at the time!
RX, battery and rudder servo were shoehorned into the aft compartment, Jessica nameplates stuck on and off we went. Jessie was happy with the boat and I was happy with the Biergarten. Can't remember where 'the management' was 😉
Jessie soon lost interest so I used the boat as a test bed for a while.
So now, 25-26 years on; prompted by Martin, I took the old lady down off the shelf (I TOLD her not climb up there!😉) and started inspecting the damage. Photos attached. (Yes I know 35Megs is not for boats but I didn't have nowt else then🤐) The ancient DIN Audio socket was for charging the RX bat, double throw switch on starboard quarter. The big 'ole was for the telescopic antenna borrowed from an old radio. Needs must when ...
The funny looking 'thing' hanging out the transom is a dummy exhaust hiding the bolt holding the antenna bracket inside!
Have also started dismantling and renovating the Taycol, which I want to put back in with a reversing circuit and a 2S or maybe 4S LiPo. That was day before yesterday. Yesterday I took out the junk (siren, water pump, servos & micro switches to operate them and the running lights) and wiped the dust off - last two photos, incl. THE JUNK.
Stripped of all the junk & Decaperm she weighs 1214gm (about 2lb 11oz).
Also tested (cautiously!) the Taycol with a regulated / current limiting PSU. She rattled and protested but ran 😊 Now being dismantled, cleaned up and brush gear refurbished. Might also fit proper bearings!
Next step: clean up the old gal, check for leaks and load capacity.
I will probably use the 4S LiPo ca 310gm, the SLA was 660gm, so lots of spare capacity, or maybe I can get her nose out of the water for once
More soon Cheers from Munich 😎
PS to Dave and Martin: NO! I don't propose to go full authentic nostalgia with a wet cell accu 😉
▲
⟩⟩
RichardE
Martin555
Login To
Remove Ads
Remove Ads
📝 The Taycol Target Renovation
7 years ago by 🇩🇪 RNinMunich ( Fleet Admiral)
Fleet Admiral)✧ 11 Views · 3 Likes · 30 Comments
Flag
💬 Add Comment
Progress 😉
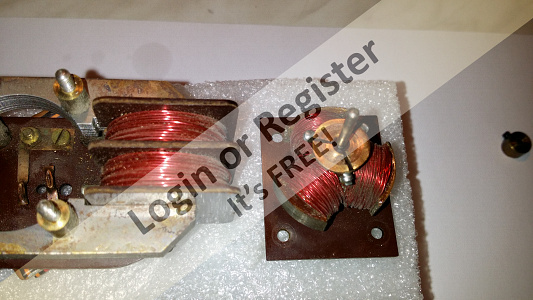
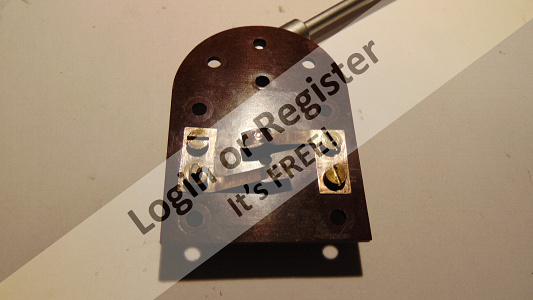
Dismantled and armature / field coils separated to inspect the damge-
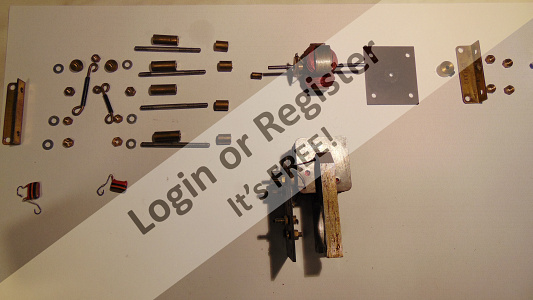
Pic 1: 'Les Bits' or Oh gawd! How am I ever goin' to get this back together?
Pics 2 & 3: it's actually in better nick than I expected 😊 Didn't get much use as I recall.
Commutator is meatier than I expected pic 3, brushes not so good, pic 2. More to that later!
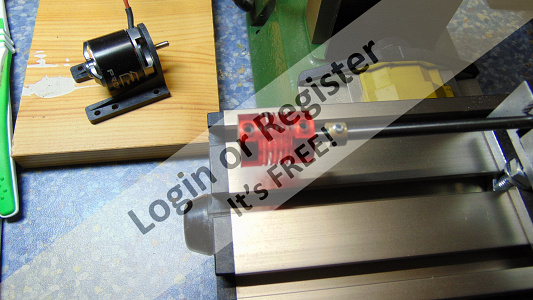
Pic 4: Cleaning up the commutator on 'the lathe'! Good enough for this job, not worth starting up the Proxon. The stand is an ancient Black & Decker accessory, the drill is an also ancient Buffalo. Think it was an AA special offer when I still lived in UK about 35 years ago. Automobile Association not what you were thinking😉
Pic 5: Commutator cleaned up a bit. Can heartily recommend the ladies nail polishing boards for this sort of job. See pic 6 & 7 . NOT nail files, they're much too coarse. The boards are a handy size for our big mitts come in packs for peanuts and have three 'grits': fine, super fine and ultra super fine👍 So I started with a nearly knackered piece of 600 wet&dry and finished off with the board.
Damn! Samsung Stupidphone won't connect to the PC😡 have to go and dig out a real camera, more soon 😎


Dismantled and armature / field coils separated to inspect the damge-
Pic 1: 'Les Bits' or Oh gawd! How am I ever goin' to get this back together?
Pics 2 & 3: it's actually in better nick than I expected 😊 Didn't get much use as I recall.
Commutator is meatier than I expected pic 3, brushes not so good, pic 2. More to that later!
Pic 4: Cleaning up the commutator on 'the lathe'! Good enough for this job, not worth starting up the Proxon. The stand is an ancient Black & Decker accessory, the drill is an also ancient Buffalo. Think it was an AA special offer when I still lived in UK about 35 years ago. Automobile Association not what you were thinking😉
Pic 5: Commutator cleaned up a bit. Can heartily recommend the ladies nail polishing boards for this sort of job. See pic 6 & 7 . NOT nail files, they're much too coarse. The boards are a handy size for our big mitts come in packs for peanuts and have three 'grits': fine, super fine and ultra super fine👍 So I started with a nearly knackered piece of 600 wet&dry and finished off with the board.
Damn! Samsung Stupidphone won't connect to the PC😡 have to go and dig out a real camera, more soon 😎
▲
⟩⟩
Martin555
BOATSHED
Colin H
|
💬 The Taycol Target Renovation
7 years ago by 🇩🇪 RNinMunich (
Fleet Admiral)✧ 9 Views · 0 Likes
Flag
Great Minds👍 Guten Appetit
I'm making some fish n chips 😜 😎 ▲
⟩⟩
No likes yet
This member will receive 1 point for every like received |
|
Login To
Remove Ads 💬 The Taycol Target Renovation
7 years ago by 🇬🇧 Westquay (
 Commander) Commander)✧ 9 Views · 0 Likes
Flag
We had started throwing the Chinese pots away again as I was getting too big a pile, but tonight's meal came in an extra deep one, so they will be looked for in future. Something like a Mini won't fit in a normal one.
Martin ▲
⟩⟩
No likes yet
This member will receive 1 point for every like received |
|
💬 The Taycol Target Renovation
7 years ago by 🇩🇪 RNinMunich (
Fleet Admiral)✧ 9 Views · 0 Likes
Flag
Yep, inside the box is a little 'Caviar' 😉 glass for the remaining nuts, screws and washers! 😎
▲
⟩⟩
No likes yet
This member will receive 1 point for every like received |
|
💬 The Taycol Target Renovation
7 years ago by 🇬🇧 Westquay (
Commander)✧ 9 Views · 0 Likes
Flag
Chinese takeaways come in those now, Doug, so they get washed up and every job that'll fit goes in one with a bit of tape on the side, written on on felt pen so I can see it at a glance in the pile. They stack well too.
Small bits go in those nice little pots that a certain doggy food comes in. I have spent too long looking for stuff on hands and knees! Martin ▲
⟩⟩
No likes yet
This member will receive 1 point for every like received |
|
💬 The Taycol Target Renovation
7 years ago by 🇩🇪 RNinMunich (
Fleet Admiral)✧ 9 Views · 0 Likes
Flag
Collectors items? E-bay 'em.
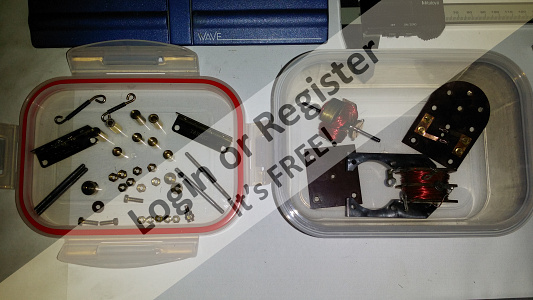
Attached pic of Target 'Project Box', nutt'n gets lost😊 'Not intended For Human Consumption' 😉😎 
▲
⟩⟩
No likes yet
This member will receive 1 point for every like received |
|
💬 The Taycol Target Renovation
7 years ago by 🇬🇧 Westquay (
Commander)✧ 9 Views · 0 Likes
Flag
I have a couple of old Avos that were my Dad's, both in nice leather cases, but what to do with them? The batteries are no longer available!
M ▲
⟩⟩
No likes yet
This member will receive 1 point for every like received |
|
💬 The Taycol Target Renovation
7 years ago by 🇩🇪 RNinMunich (
Fleet Admiral)✧ 9 Views · 0 Likes
Flag
Hi Martin,
Roger Wilco wine! Thanks for the drill offer, gratefully accepted, have no idea what state Dad's old drills are in. Most of the tools I found in shed when he died were rusted 🤔 But I did find a big old Avo-Meter, dirty but working. A museum piece! Address coming per e-mail. Thanks again 👍 ▲
⟩⟩
No likes yet
This member will receive 1 point for every like received |
|
💬 The Taycol Target Renovation
7 years ago by 🇬🇧 Westquay (
Commander)✧ 9 Views · 0 Likes
Flag
See if the wine person knows of my Erben Merlot Spatburgunder?
Ta, Martin ▲
⟩⟩
No likes yet
This member will receive 1 point for every like received |
|
💬 The Taycol Target Renovation
7 years ago by 🇬🇧 Westquay (
Commander)✧ 9 Views · 1 Like
Flag
No!! you don't need to change the shaft. I have 3.32" drills because modern sot cars are almost universally 3/32", even most of the foreign ones. Natch, with a small lathe I make my own bearings and a 3/32" drill is part of the kit I use. Holler if you want one anyway.
Martin ▲
⟩⟩
RNinMunich
|
|
💬 The Taycol Target Renovation
7 years ago by 🇩🇪 RNinMunich (
Fleet Admiral)✧ 9 Views · 0 Likes
Flag
What ho! Just been invited to a wine tasting on Friday 😋
"Normal service will be resumed as soon as possible!" 😎 ▲
⟩⟩
No likes yet
This member will receive 1 point for every like received |
|
💬 The Taycol Target Renovation
7 years ago by 🇩🇪 RNinMunich (
Fleet Admiral)✧ 9 Views · 0 Likes
Flag
Hi Martin, many thanks for your generous offer 👍 But do you mean changing the shaft? Oiweh! But thanks also for the tip, of course that's 3/32. Shows that he shaft is barely worn😊 I'm sure I've still got Dad's old drill set around somewhere. Down to the cellar again!
That's my problem after 30 odd years here. When I run into a job like this nothing fits quite right 🤔 I even had to improvise the Allen key to get the setting ring off the output end of the shaft! Not the first time I've ground a tool down to fit something! Wasn't Napoleon also the berk that started everyone else riding / driving on the right ? Originally knights and co rode on the left so they could use their right arm to to draw sword and fight if necessary, or so the legend😉 ▲
⟩⟩
No likes yet
This member will receive 1 point for every like received |
|
Login To
Remove Ads 💬 The Taycol Target Renovation
7 years ago by 🇬🇧 Westquay (
Commander)✧ 9 Views · 0 Likes
Flag
Looks as good as my NOS, unused one! No, 2, sorry, hehe!
Royal blue as in Bluebottle or Bloodhound? Just not navy blue, Ughh!!! You'll know when you find it. Martin ▲
⟩⟩
No likes yet
This member will receive 1 point for every like received |
|
💬 The Taycol Target Renovation
7 years ago by 🇬🇧 Westquay (
Commander)✧ 9 Views · 0 Likes
Flag
My Standard is the more usual 3/16", but the Meteor is also 3/32", but my SEL, a very similar motor is 1/8". Ah such splendid Queenly measurements instead of your annoying Napoleonics.
Cheers, Martin ▲
⟩⟩
No likes yet
This member will receive 1 point for every like received |
|
💬 The Taycol Target Renovation
7 years ago by 🇬🇧 Westquay (
Commander)✧ 9 Views · 2 Likes
Flag
Doug, as a slot racer I know 2.38mm is 3/32, the size of my axles. if you send me your address by e-mail, I'll send you a coupe as I have a pack of ten.
Cheers, Martin ▲
⟩⟩
Martin555
RNinMunich
|
|
💬 The Taycol Target Renovation
7 years ago by 🇩🇪 RNinMunich (
Fleet Admiral)✧ 9 Views · 0 Likes
Flag
PS When I reassembled it, and properly aligned everything on a flat board while tightening the nuts, I was astounded and happy to find that there was practically no slop in the so called bearings. I'm still considering fitting sintered PB (that metal again!) though! For longer life. Nearest bearing I have is 2.0mm ID.
Anyone got a 2.4mm drill? According to my micrometer the shaft is 2.38mm. Nearest I got is 2.5, too sloppy, worse than the paxolin is 🤔 😎 ▲
⟩⟩
No likes yet
This member will receive 1 point for every like received |
|
💬 The Taycol Target Renovation
7 years ago by 🇩🇪 RNinMunich (
Fleet Admiral)✧ 9 Views · 1 Like
Flag
Flippin' 'eck! Which of the 17 million Royal Blues did you mean???
I assume you mean the original darker version with a hint of red/purple? Might start with primary blue and add a dollop or two of maroon or burgundy! Yep, you're right navy blue knickers were rather boring, but the contents generally not so 😉 Don't know when you were last in Munich but Conrad now has two stores here, a small overcrowded one in Tal in the city and a newer huge superstore opposite the Olympia Einkauf Zentrum in the north of the city. That's right, where that nutter started shooting at people last year! if they ain't got it it probably ain't made😉 'Qual der Wahl' as they say round here. Wanted to see what the Target was going to look like, so here a couple of impressions. I'm rather pleased with it and myself 😁 Can't wait for the PB to arrive. Just discovered another use for it - thrust washers😲 Cheers 😎 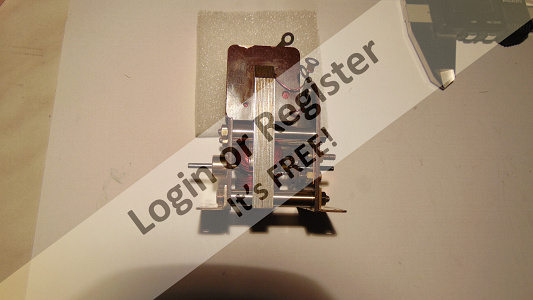

▲
⟩⟩
Martin555
|
|
💬 The Taycol Target Renovation
7 years ago by 🇬🇧 Westquay (
Commander)✧ 9 Views · 1 Like
Flag
Ah, Conrad! Fantastic shop. Went there when I was in Munich. Amazing stock.
You're going for Royal Blue? Great, make sure it ain't navy blue. it might have been the colour of knickers, but it's still 'orrible. Glad you got some PB. Sheet's good. M ▲
⟩⟩
RNinMunich
|
|
💬 The Taycol Target Renovation
7 years ago by 🇩🇪 RNinMunich (
Fleet Admiral)✧ 9 Views · 0 Likes
Flag
Soooo, everything ordered, including the bridge rectifier for the reversing circuit 😊 So next weekend is brush-making weekend. Which is good cos the weather here is going to be stinky again 🤔
▲
⟩⟩
No likes yet
This member will receive 1 point for every like received |
|
💬 The Taycol Target Renovation
7 years ago by 🇩🇪 RNinMunich (
Fleet Admiral)✧ 9 Views · 0 Likes
Flag
PS I think Royal Blue is a great idea👍 Off to the paint shop tomorrow. Some things you DON'T buy on-line - unless you already know them well! 😎
▲
⟩⟩
No likes yet
This member will receive 1 point for every like received |
|
💬 The Taycol Target Renovation
7 years ago by 🇩🇪 RNinMunich (
Fleet Admiral)✧ 9 Views · 0 Likes
Flag
What do you mean by width? The site you mention only seems to have flat bars down to 1/8th thick and 1/2" wide! How many tons do I have to buy? 😉 The stuff I found, and am about to order, comes in 200x150mm sheets 0.2mm thick. €6.99. Can't grumble Grimble! I'll order some other bits and pieces I need as well - so I can use my discount code 👍 Good ol' Conrad 😎 What was the old TV series "Never mind the quality - feel the width" 😁
▲
⟩⟩
No likes yet
This member will receive 1 point for every like received |
|
💬 The Taycol Target Renovation
7 years ago by 🇬🇧 Westquay (
Commander)✧ 9 Views · 0 Likes
Flag
Ha!, we crossed posts. Does yours have any width though?
M ▲
⟩⟩
No likes yet
This member will receive 1 point for every like received |
|
Login To
Remove Ads 💬 The Taycol Target Renovation
7 years ago by 🇬🇧 Westquay (
Commander)✧ 9 Views · 1 Like
Flag
Found these. You'd have to make the brushes. No flat strip of any width on ebay.
▲
⟩⟩
Martin555
|

|
💬 The Taycol Target Renovation
7 years ago by 🇩🇪 RNinMunich (
Fleet Admiral)✧ 9 Views · 1 Like
Flag
Bingo! Got some, should come Thursday or Friday. Will have enough to go into production, but its useful for other stuff as well.
It's 0.2mm which is a shade under 8 thou, bit thicker than the original 5 thou but it'll have to do. Maybe it'll last longer 😎 ▲
⟩⟩
Martin555
|
|
💬 The Taycol Target Renovation
7 years ago by 🇩🇪 RNinMunich (
Fleet Admiral)✧ 9 Views · 1 Like
Flag
PS @ Dave-
I'm doin' my bit for the ozone layer! Green e-motors !! 😉 ▲
⟩⟩
Martin555
|
|
💬 The Taycol Target Renovation
7 years ago by 🇩🇪 RNinMunich (
Fleet Admiral)✧ 9 Views · 0 Likes
Flag
Thanks Martin😊
I've got my Researcher hat on me 'ead and a glass of Custoza on the desk 😉 Cheers 😎 ▲
⟩⟩
No likes yet
This member will receive 1 point for every like received |
|
💬 The Taycol Target Renovation
7 years ago by 🇬🇧 Westquay (
Commander)✧ 9 Views · 1 Like
Flag
Looks amazing, Doug. I didn't need to go that far with my Supermarine, but let's hope the motor performs when you try it out. Don't know about Germany, but I would think you can get PB from ebay. There are several model engineering suppliers who flog it.
Keep up the good work. Martin ▲
⟩⟩
RNinMunich
|
|
💬 The Taycol Target Renovation
7 years ago by 🇩🇪 RNinMunich (
Fleet Admiral)✧ 9 Views · 1 Like
Flag
Thanks, dats wot I tort!
Core checks out 0.2Ω every which way and no shorts to any windings 😊 Coil shellac looks fine no cracks or flakes. That's good cos I already ruined the oven once by baking bowling balls to get the oil out! Makes a hell of a difference to the hook shot. (Another man at fine leg please ;-) Am checking for p/b sources here, might take time, real model supplies shops are getting rare here as well, worse than in UK. in the meantime will plod on with reassembly. The running in info makes sense, like we used to have to do with new cars or new rings / bearings. Brush setting instruction also mentioned starting at around 2V. Ta for the support. 😎 ▲
⟩⟩
Martin555
|
|
💬 The Taycol Target Renovation
7 years ago by 🇬🇧 Dave M (
 Vice Admiral) Vice Admiral)✧ 9 Views · 1 Like
Flag
Hi Doug
Glad to hear the laminations were ok. They should be in close uninsulated contact and are usually packed tight when constructed. Old motors are renovated by dismantling then cleaning as you have done. Shellac can and does crack over time but can be restored by soaking in new solution then baking in an oven. Sorry was winding you up a bit on this, I'm sure the trusty Taycol will be ok for a good few years and you can check for any shorts to the laminations with a meter. Phossy bronze as per the original would be my choice. We have some good local suppliers so I can usually source without resorting to cannibalism!! It is a longtime lalglo but I seem to recali the instructions n running in suggested low power for some time with plenty of oil. That and the ozone will bring back fond memories. Dave ▲
⟩⟩
RNinMunich
|
|
💬 The Taycol Target Renovation
7 years ago by 🇩🇪 RNinMunich (
Fleet Admiral)✧ 9 Views · 1 Like
Flag
Hi Dave, Thanks😊
Bit of an adventure for me! Renovated / repaired many things in my time but never tried anything like this before 😲 Rust on the core was just surface and cleaned of nicely with a steel wire brush in the Buffalo. inside edges are nice and clean. See pics in part 2 and attached. On the outside edges it was mostly dirt and discolouration of the shellac, or whatever it is! Carefully splayed a few laminations under bright light using a jewellers glass and couldn't see any rust😊 Should they be insulated from one another?? Eddy currents was never my thing. Shellac: I sure don't propose to unwind the coils clean the laminations and then rewind! Life's too short to go that far for curiosity. What would you suggest? Brushes: see part 2 for my intentions. Since then I've also been considering cannibalising a redundant motor for some phosphor bronze. Don't want to use the whole carbon bit as well due to the power loss. What do you think? Commutator: Yep, I had luck there, brushes hadn't started chewing them up 😊 Crimps under pax disc also perfect. Didn't find any crimp connections on any coils! All soldered, and all coils measure 1.1 +/- 0.1 on the Ohmmeter (less 0.2 for the test leads). Seem OK 😊 Will repair the brushes this evening and then try to put everything together again. Thank God for digital cameras! Monitor on the bench to show me how I took it apart 😉 Cheers 😎 


▲
⟩⟩
Martin555
|
|
💬 The Taycol Target Renovation
7 years ago by 🇬🇧 Dave M (
Vice Admiral)✧ 9 Views · 1 Like
Flag
Hi Doug
Has come to bits nicely and yes generally looks restorable. The steel laminations look rusty and if this extends inside the stack the electro magnet will not be that efficient. Are you intending to rely on the original shellack? Interesting brushes. The comm has cleaned up better than many I have seen when new. Hopefully all the crimped coil connections will be good. I had to repair those on my double special. Look forward to hear how you progress Dave ▲
⟩⟩
RNinMunich
|
📝 Target Renovation Part 2
7 years ago by 🇩🇪 RNinMunich ( Fleet Admiral)
Fleet Admiral)✧ 12 Views · 4 Likes · 5 Comments
Flag
💬 Add Comment
Hurrah for the Cyber Shot ! Here are the missing pics 6 & 7 of the 'nail polishing boards' from last post!
So, last night I used this board to clean up the rest of the parts. Results in
pic 8. The bitza bazaar!😊
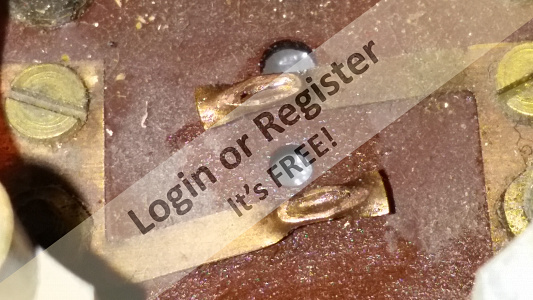
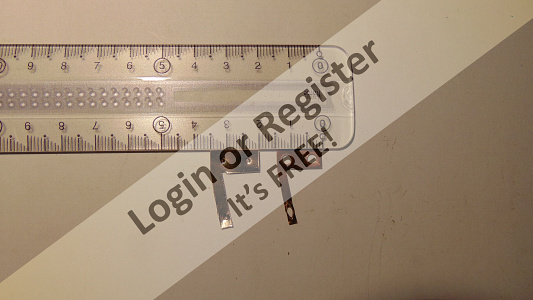
Back to the brushes 🤔 Caught them just in time before they fractured and started chewing up the commutator! Pic 9.
They are simple phosphor bronze strips with a dimple pressed in the end for the contact.
The crest of the dimple (the actual contact area) is burned / worn away but the rims are intact so, until I can get some phosphor bronze strip I will make a temporary repair by soldering a tiny piece of thick copper wire under the hole and polishing it to shape. Wish me luck 👍😎


So, last night I used this board to clean up the rest of the parts. Results in
pic 8. The bitza bazaar!😊
Back to the brushes 🤔 Caught them just in time before they fractured and started chewing up the commutator! Pic 9.
They are simple phosphor bronze strips with a dimple pressed in the end for the contact.
The crest of the dimple (the actual contact area) is burned / worn away but the rims are intact so, until I can get some phosphor bronze strip I will make a temporary repair by soldering a tiny piece of thick copper wire under the hole and polishing it to shape. Wish me luck 👍😎
▲
⟩⟩
Martin555
BOATSHED
Colin H
John2
|
💬 Target Renovation Part 2
7 years ago by 🇩🇪 RNinMunich (
Fleet Admiral)✧ 9 Views · 0 Likes
Flag
Caaarbon!! Aih Say Sir, Gadzooks! 😉
See Part 3; I just made new phosphor bronze brushes, about to reassemble and test! 😎 ▲
⟩⟩
No likes yet
This member will receive 1 point for every like received |
|
Login To
Remove Ads 💬 Target Renovation Part 2
7 years ago by 🇬🇧 Scratchbuilder (
Vice Admiral)✧ 9 Views · 0 Likes
Flag
Hi.
I had the same problem a couple of years ago with my Taycol Target.I removed the Existing brushes, flattened the worn segment ends and soldered new carbon handmade sections onto the old brass brushes.They have worked fine to this day.NOT original I know but effective. Bill. ▲
⟩⟩
No likes yet
This member will receive 1 point for every like received |
|
💬 Target Renovation Part 2
7 years ago by 🇩🇪 RNinMunich (
Fleet Admiral)✧ 9 Views · 0 Likes
Flag
Noggin the Nog ?? 😁
▲
⟩⟩
No likes yet
This member will receive 1 point for every like received |
|
💬 Target Renovation Part 2
7 years ago by 🇩🇪 RNinMunich (
Fleet Admiral)✧ 9 Views · 0 Likes
Flag
Thanks Martin, I'll check it out and compare prices (inc. postage!) / delivery. 😎
▲
⟩⟩
No likes yet
This member will receive 1 point for every like received |
|
💬 Target Renovation Part 2
7 years ago by 🇬🇧 Dave M (
Vice Admiral)✧ 9 Views · 1 Like
Flag
Hi Doug
I know you may have sourced some but I find Noggin End a good supplier of metals to model makers and all to full spec, not offcuts. ▲
⟩⟩
RNinMunich
|

📝 Taycol Pt 3. New Brushes Pt1
7 years ago by 🇩🇪 RNinMunich ( Fleet Admiral)
Fleet Admiral)✧ 12 Views · 4 Likes · 28 Comments
Flag
💬 Add Comment
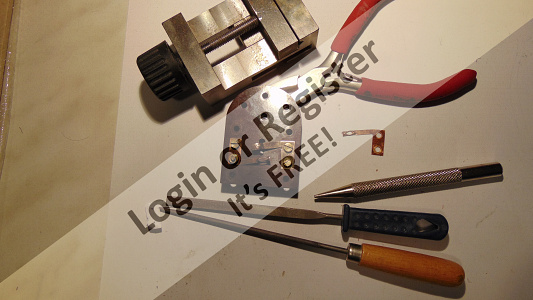
1) Carefully flattened first old brush with flat jaw pliers and traced it and stick-glued to the fozzy sheet,
2) Raw cut of blank. I use tin snips with fine serrations on one blade.
stops the snips skidding and minimises curling 😉
3) First raw blank next to original after careful flattening with tack hammer and anvil and removing minor twist. For the next one I think I'll drill it in stage 1 🤔
😎

2) Raw cut of blank. I use tin snips with fine serrations on one blade.
stops the snips skidding and minimises curling 😉
3) First raw blank next to original after careful flattening with tack hammer and anvil and removing minor twist. For the next one I think I'll drill it in stage 1 🤔
😎
▲
⟩⟩
Martin555
BOATSHED
Colin H
Brucef102
|
💬 Taycol Pt 3. New Brushes Pt1
7 years ago by 🇩🇪 RNinMunich (
Fleet Admiral)✧ 9 Views · 0 Likes
Flag
Sometimes (often!) takes me a while to get started, but then -
Don't get in the way! Since working outside (sanding etc) has just been nixed by the weather think I'll start on the reversing circuit. Cheers Doug 😎 ▲
⟩⟩
No likes yet
This member will receive 1 point for every like received |
|
Login To
Remove Ads 💬 Taycol Pt 3. New Brushes Pt1
7 years ago by 🇬🇧 Westquay (
Commander)✧ 9 Views · 1 Like
Flag
Excellent. So now it's all up and running.
That was a quick restoration too. Martin ▲
⟩⟩
RNinMunich
|
|
💬 Taycol Pt 3. New Brushes Pt1
7 years ago by 🇩🇪 RNinMunich (
Fleet Admiral)✧ 9 Views · 0 Likes
Flag
Yep, or 5.6mm! My micro is metric! Checked the thread as well ~ 3.2mm or 0.126" 👍 Hmm, just started peeing down - again 😆
So, onward and upward, will start on he actual boat after lunch. Ciao for now 😎 Many thanks all for the offers of help with the nuts😊 ▲
⟩⟩
No likes yet
This member will receive 1 point for every like received |
|
💬 Taycol Pt 3. New Brushes Pt1
7 years ago by 🇬🇧 Westquay (
Commander)✧ 9 Views · 0 Likes
Flag
Brilliant! Yes they too use odd number threads.
Martin ▲
⟩⟩
No likes yet
This member will receive 1 point for every like received |
|
💬 Taycol Pt 3. New Brushes Pt1
7 years ago by 🇬🇧 Westquay (
Commander)✧ 9 Views · 0 Likes
Flag
Apparently, across the flats of 5BA should be 0.220".
Martin ▲
⟩⟩
No likes yet
This member will receive 1 point for every like received |
|
💬 Taycol Pt 3. New Brushes Pt1
7 years ago by 🇩🇪 RNinMunich (
Fleet Admiral)✧ 9 Views · 0 Likes
Flag
Checking the thread and nuts with a micrometer they would seem to be 5BA. 😎
▲
⟩⟩
No likes yet
This member will receive 1 point for every like received |
|
💬 Taycol Pt 3. New Brushes Pt1
7 years ago by 🇩🇪 RNinMunich (
Fleet Admiral)✧ 9 Views · 0 Likes
Flag
Nope, Meccano can't cut the mustard, one size too big. BUT, had a brainwave and took apart an old 13A plug, wire clamp nuts are perfect fit! For symmetry I changed both sides.😎
What do we learn from this (apart from being more careful with small parts!) Never throw anything away, unless it starts to stink! 🤔 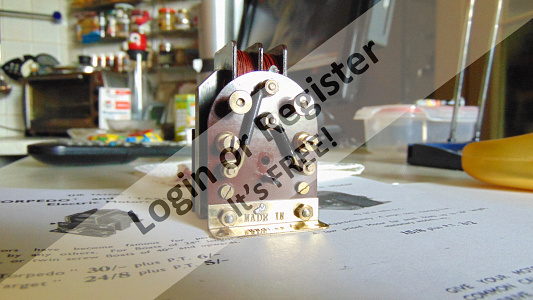
▲
⟩⟩
No likes yet
This member will receive 1 point for every like received |
|
💬 Taycol Pt 3. New Brushes Pt1
7 years ago by 🇩🇪 RNinMunich (
Fleet Admiral)✧ 9 Views · 0 Likes
Flag
Thanks Martin, meanwhile I'll see if I can find my old imperial taps & dies.
Haven't used 'em for yonks! Gisela has a separate flat so that's one problem I don't have! 😎 ▲
⟩⟩
No likes yet
This member will receive 1 point for every like received |
|
💬 Taycol Pt 3. New Brushes Pt1
7 years ago by 🇬🇧 Westquay (
Commander)✧ 9 Views · 1 Like
Flag
I'll have a good look at my ones later and see what they measure up to, Doug. Wife's still sleeping so I can't make any noise for a while.
Martin ▲
⟩⟩
RNinMunich
|
|
💬 Taycol Pt 3. New Brushes Pt1
7 years ago by 🇩🇪 RNinMunich (
Fleet Admiral)✧ 9 Views · 0 Likes
Flag
Hi Dave, Martin, from eyeballing 4BA looks about right. A 5.5mm nut spinner just about fits! Meccano is a good tip, I've got an ancient set kicking around somewhere. I'll go exploring in the cellar. if I don't report back within a week please send search party! 😉
Maybe she growls and protests more at higher voltages, at the moment it's just a quiet hum. Haven't pushed my luck yet! Cheers Doug. 😎 Good luck with Proxxon Dave. I was wondering how you ended up with 120V coils!? Bought in USA ?? ▲
⟩⟩
No likes yet
This member will receive 1 point for every like received |
|
💬 Taycol Pt 3. New Brushes Pt1
7 years ago by 🇬🇧 Westquay (
Commander)✧ 9 Views · 1 Like
Flag
Oh dear, you don't. I suspect I'll have to find out what BA they are and send you some. Unless you know what size it is, in which case I can recommend a company called BA Nuts and bolts .co.uk
I just got some 9BA nuts, bolts and a tap from them to suit the 1/16th" pivots I've made for the Vanity model. if youever wondered what used the odd number BAthreads, it's Meccano (3BA), Stuart Turner steam engines(7BA) and anything with a nice round 1/16th" (9BA). I have taps and dies for them all now! Do you mean to say that she doesn't have a growl when running. Maybe it's just the bigger ones. Martin ▲
⟩⟩
RNinMunich
|
|
Login To
Remove Ads 💬 Taycol Pt 3. New Brushes Pt1
7 years ago by 🇬🇧 Dave M (
Vice Admiral)✧ 9 Views · 1 Like
Flag
Hi Doug
Good to hear it is working well. Many thanks for the Proxxon details. I will contact the UK agent. You will have to ask Stephen (Fireboat) about MP4 files. If you want to share video U-tube is easy to use does all the hard work for you and you can restrict who has access. Hope you can find a way to post the motor video. Are the nuts 4BA? Dave ▲
⟩⟩
RNinMunich
|
|
💬 Taycol Pt 3. New Brushes Pt1
7 years ago by 🇩🇪 RNinMunich (
Fleet Admiral)✧ 9 Views · 0 Likes
Flag
So, motor works - tomorrow on with the boat renovation; hull clean up, inside and out. Goodnight from Munich, Schlaf gut! 😎
▲
⟩⟩
No likes yet
This member will receive 1 point for every like received |
|
💬 Taycol Pt 3. New Brushes Pt1
7 years ago by 🇩🇪 RNinMunich (
Fleet Admiral)✧ 9 Views · 0 Likes
Flag
Hi Martin, yep I'm rather chuffed! 😊
Not so much noise or sparking as I remember 😁 Done some tests, all OFF LOAD at the moment of course. Current drain hovers around 250 to 300mA at any voltage up to 4V haven't gone any further yet, she stalls at around 0.5V, restart alone at 0.6V. she's chuntering along at 3V, stage 2, at the moment but shows no signs of distress. The beast just threw oil on to me goggles 😡 Stall current at higher voltages 0.95A. I'd set the PSU to limit at 2A, just in case! Have made video but have 'keine Lust' to go via You Tube!! I still intend to fit sintered bearings tho. Soon as your bits arrive. Ta much 👍 Only one snag: I've managed to lose one of the brass nuts securing the end frames 😭 Where the H--l do I get imperial brass nuts over here??? Cheers Doug 😎 ▲
⟩⟩
No likes yet
This member will receive 1 point for every like received |
|
💬 Taycol Pt 3. New Brushes Pt1
7 years ago by 🇬🇧 Westquay (
Commander)✧ 9 Views · 2 Likes
Flag
Fantastic result, Doug, well done. I look forward to hearing that Taycol noise. I love it!
Martin ▲
⟩⟩
Martin555
RNinMunich
|
|
💬 Taycol Pt 3. New Brushes Pt1
7 years ago by 🇩🇪 RNinMunich (
Fleet Admiral)✧ 9 Views · 0 Likes
Flag
Hi Dave, Address and link (English!) to German Service centre
PROXXON GmbH Service Centre Industriepark Region Trier Dieselstraße 3-7 D-54343 Föhren / Germany ▲
⟩⟩
No likes yet
This member will receive 1 point for every like received |

|
💬 Taycol Pt 3. New Brushes Pt1
7 years ago by 🇩🇪 RNinMunich (
Fleet Admiral)✧ 9 Views · 0 Likes
Flag
PPS @ Dave, I don't You Tube! 🤔
Can't I upload an MP4 file ? 😎 ▲
⟩⟩
No likes yet
This member will receive 1 point for every like received |
|
💬 Taycol Pt 3. New Brushes Pt1
7 years ago by 🇩🇪 RNinMunich (
Fleet Admiral)✧ 9 Views · 0 Likes
Flag
PS re Proxxon service centre / spares let me know what you need and I'll track 'em down. Cheers Doug 😎
▲
⟩⟩
No likes yet
This member will receive 1 point for every like received |
|
💬 Taycol Pt 3. New Brushes Pt1
7 years ago by 🇩🇪 RNinMunich (
Fleet Admiral)✧ 9 Views · 1 Like
Flag
Hi All, I'm 'Chuffed to little mint balls!' 😁
She runs sweet as a nut, draws 0.25 to 0.3A from 2 to 3.5V. Haven't pushed any further yet. She's chuntering along at 2V 0.26A running in at the moment, but anticlockwise seen from the output end!? Much less sparking than I remember, but OH that smell! I'm doing my bit for the ozone layer 😊 Here coupla pics, I've made a short vid of the sparks. How do I upload it here?? 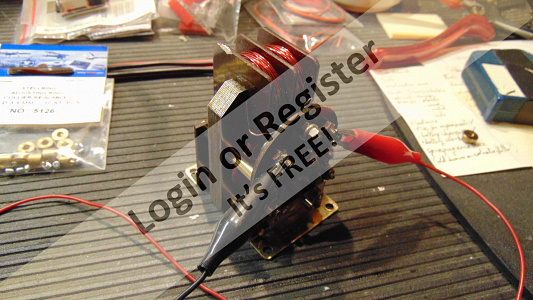

▲
⟩⟩
Martin555
|
|
💬 Taycol Pt 3. New Brushes Pt1
7 years ago by 🇬🇧 Westquay (
Commander)✧ 9 Views · 0 Likes
Flag
I have no luck drilling holes anywhere I want them. I bought a minidrill stand and find it only fits a square block Bohler drill, but with a little gizmo I made I can hold the hand piece of my pendant flexible drive. I went halves with my son on a pillar drill. it's at his place! I have an electric drill stand which does at least work well, but won't hold tiny drills. So.....I use a model railway rivetting machine on thin sheet metal and then file the pip off the back and open up the hole that's left with tapered broaches and then if necessary, a fine rat tail Swiss file. Silly, innit? But it's all that works for me. I have never made a wire wheel yet and never shall unless it's with photo-etched parts.
Martin ▲
⟩⟩
No likes yet
This member will receive 1 point for every like received |
|
💬 Taycol Pt 3. New Brushes Pt1
7 years ago by 🇬🇧 Dave M (
Vice Admiral)✧ 9 Views · 1 Like
Flag
Looks pretty good Doug. Brass & Bronze are always difficult to drill. Centre punch is essential and your miller would make a good drill press. I have a small drill press designed for printed circuit board drilling that I use for smaller jobs.
I have a Proxxon detail sander that stopped working. The coils are 120v but I cannot find a UK repair centre, is there one in Germany? Will you video so we can share the sparks !*! Dave ▲
⟩⟩
RNinMunich
|
|
Login To
Remove Ads 💬 Taycol Pt 3. New Brushes Pt1
7 years ago by 🇬🇧 Westquay (
Commander)✧ 9 Views · 0 Likes
Flag
I lost four customers to 3D printing and that was when it was seriously shite! These days it can be quite good, so I'm waiting for the day when, having taken my newest trade of clay modelling and then technical illustration, the pootah will finally take even that simple relatively cheap work I used to do on slot car patterns. But it can't take wood away, so there's always that left I suppose.
Martin ▲
⟩⟩
No likes yet
This member will receive 1 point for every like received |
|
💬 Taycol Pt 3. New Brushes Pt1
7 years ago by 🇩🇪 RNinMunich (
Fleet Admiral)✧ 10 Views · 2 Likes
Flag
Yep, I got the printer, ain't dun nuffin wiv it yet!
It's one of a number of things I collected, tools and parts, books etc, while I was still earning a full decent wage. Planning ahead 😉 When I've got nothing better to do I'll calibrate it and start learning. Attached pics of new brushes assembled. 3rd pic one new one old. About to put it all back together and test. if you hear LOUD cursing from the SSE you'll know who 😁 😎 
▲
⟩⟩
Martin555
Scratchbuilder
|
|
💬 Taycol Pt 3. New Brushes Pt1
7 years ago by 🇬🇧 Westquay (
Commander)✧ 9 Views · 0 Likes
Flag
Ain't nuttn cheap about Proxxon. I only got my Proxxon drill and transformer in a once in a lifetime deal! You have a 3D printer? Can you do the CAD for it? My son also has a 3D machine and does some good stuff using free files, but he's having luck with a thing called TinkerCAD.
Martin ▲
⟩⟩
No likes yet
This member will receive 1 point for every like received |
|
💬 Taycol Pt 3. New Brushes Pt1
7 years ago by 🇩🇪 RNinMunich (
Fleet Admiral)✧ 9 Views · 0 Likes
Flag
I's nothin' fancy, only a 'cheap' Proxxon no PC control etc. But it come in handy when you need a little precision, or for cutting tracks on PC boards.
There's supposed to be an Add On for the latter for my 3D Printer, but that hasn't even been tried out yet. First things first! I'm now happy with the first brush, sits well on the comm. Starting on the 2nd. Test run tonight - maybe 😎 ▲
⟩⟩
No likes yet
This member will receive 1 point for every like received |
|
💬 Taycol Pt 3. New Brushes Pt1
7 years ago by 🇬🇧 Westquay (
Commander)✧ 9 Views · 0 Likes
Flag
Oh, I don't have any luck with milling machines. if I did and could ever have afforded one I'd have made working model IC engines.
Looks like the brushes are in good hands there. Martin ▲
⟩⟩
No likes yet
This member will receive 1 point for every like received |
|
💬 Taycol Pt 3. New Brushes Pt1
7 years ago by 🇩🇪 RNinMunich (
Fleet Admiral)✧ 10 Views · 2 Likes
Flag
Yep! Just had to relearn that! Would you believe I did production eng. as a sideline at college!? Many moons ago 😲
So, Managed the drilling by misusing the milling mach. as mini drill press! De-burred and polished up in the mach. vice from the milling mach. and trial fitted. Minor adjustment to the angle and trimming the inside edge and I'll start on the 2nd. BTW, sorry no Erben Merlot at tasting, mostly French, a few German whites. Didn't stay long. Cheers Doug 😎 
▲
⟩⟩
Martin555
Brucef102
|
|
💬 Taycol Pt 3. New Brushes Pt1
7 years ago by 🇬🇧 Westquay (
Commander)✧ 9 Views · 0 Likes
Flag
Always best to drill the uncut metal in case it goes awry and because drill rarely go where we want them to, so drill first cut second, file against vice jaws to final shape/size. Good progress so far, mate.
Martin ▲
⟩⟩
No likes yet
This member will receive 1 point for every like received |
📝 Taycol First test with ESC.
7 years ago by 🇩🇪 RNinMunich ( Fleet Admiral)
Fleet Admiral)✧ 12 Views · 3 Likes · 3 Comments
Flag
💬 Add Comment
Taycol Target test 1, with Graupner V30R brushed ESC. Running on 6V.
As expected full speed control with ESC connected to field terminals as usual but no reverse. Now about to try the 'lecktrickery'. More soon. 😎
As expected full speed control with ESC connected to field terminals as usual but no reverse. Now about to try the 'lecktrickery'. More soon. 😎
▲
⟩⟩
Mataroa
BOATSHED
Colin H
|
💬 Taycol First test with ESC.
7 years ago by 🇩🇪 RNinMunich (
Fleet Admiral)✧ 9 Views · 0 Likes
Flag
Yep, I can hear the tone, now the motor growls!
Not the Beatles Lucy! I meant the little guy with the German helmet who always appeared at the end of the Rowan & Martin Laugh-In on Saturday nights! Many many moons ago 🤔 Cheers Doug 😎 ▲
⟩⟩
No likes yet
This member will receive 1 point for every like received |
|
Login To
Remove Ads 💬 Taycol First test with ESC.
7 years ago by 🇬🇧 Dave M (
Vice Admiral)✧ 9 Views · 0 Likes
Flag
Hi Doug
The sparks are being controlled by the diodes as you suspected and as shown on the skope. The frequency will be a factor. I suspect you can probably hear the tone through the coils, depending on your hearing. Last I heard Lucy was still up there with the sparklers! Be interesting to see more skope pics once you have tidied up the wiring. Dave ▲
⟩⟩
No likes yet
This member will receive 1 point for every like received |
|
💬 Taycol First test with ESC.
7 years ago by 🇩🇪 RNinMunich (
Fleet Admiral)✧ 9 Views · 0 Likes
Flag
PS to Taycol Target / ESC tests: interesting side effect! The sparks have gone 😊 Sorry Dave 🤔
Presumably they are damped by the diodes. The 800Hz switching frequency, as opposed to constant DC, may also play a role. "Veeery interestink, but don't forget to tell Lucy!!". Showing my age again! Cheers Doug. 😎 BTW copying expressly desired! ▲
⟩⟩
No likes yet
This member will receive 1 point for every like received |
📝 Taycol Test 2 with reverse :-))
7 years ago by 🇩🇪 RNinMunich ( Fleet Admiral)
Fleet Admiral)✧ 13 Views · 5 Likes · 2 Comments
Flag
💬 Add Comment
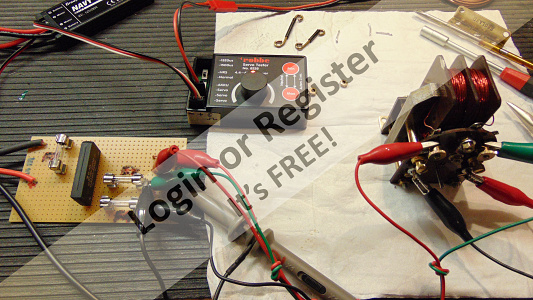
Success 😊 First attempt as per cct with + &- from bridge connected to field --> Zilch 🤔
With + & - outputs connected to brushes and the two ~ to the field coil --> perfect, Full power F and R 😊 Confirmed my suspicions!
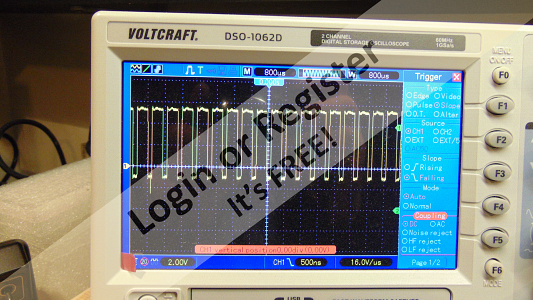
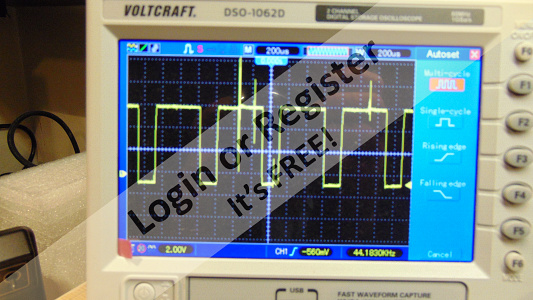
Pic 1 shows the breadboard lash-up.
Pic 2 input waveform to brushes forward power, average 'DC' positive.
Pic 3 input with reverse power, average 'DC' negative.
Pic 4 typical current drawn near full power @ 6V. Well within Taycol spec.
Pic 5 shows the waveform with the motor in standard 'out of the box' setup, complete with sparks! Have also videoed the change in waveform with 'stick' movement.
😊 I'm happy with that. Will now tidy up the layout and make a compact board for boat installation. Tomorrow is another day 😉 Cheers all 😎


With + & - outputs connected to brushes and the two ~ to the field coil --> perfect, Full power F and R 😊 Confirmed my suspicions!
Pic 1 shows the breadboard lash-up.
Pic 2 input waveform to brushes forward power, average 'DC' positive.
Pic 3 input with reverse power, average 'DC' negative.
Pic 4 typical current drawn near full power @ 6V. Well within Taycol spec.
Pic 5 shows the waveform with the motor in standard 'out of the box' setup, complete with sparks! Have also videoed the change in waveform with 'stick' movement.
😊 I'm happy with that. Will now tidy up the layout and make a compact board for boat installation. Tomorrow is another day 😉 Cheers all 😎
▲
⟩⟩
Martin555
Mataroa
BOATSHED
Colin H
Brucef102
|
💬 Taycol Test 2 with reverse :-))
7 years ago by 🇩🇪 RNinMunich (
Fleet Admiral)✧ 9 Views · 0 Likes
Flag
Yep! I remember the snow and prancing round the room with loop antennas trying to get a half decent picture!
Marconi transatlantic tests!! Will update as appropriate. Missing the ozone scent 🤔 Oh well, you can't have everything I suppose. Cheers Doug 😎 PS the 'secret' was clear! ▲
⟩⟩
No likes yet
This member will receive 1 point for every like received |
|
💬 Taycol Test 2 with reverse :-))
7 years ago by 🇬🇧 Dave M (
Vice Admiral)✧ 9 Views · 0 Likes
Flag
Glad you got it working. The secret is to change the polarity to just one set of coils otherwise you reverse both magnetic fields. The bridge rectifier achieves this.
Current draw is as you say well within spec. Pic 5 says it all really. Those spikes are nearly full voltage and will defo be a problem for any ESC that doesn't have fast protection diodes. They are acting as spark transmitters and explain why early TV sets were so vulnerable to interference. Modern Rx are much more sensitive and ESC's will react to this high pulse, so it is not surprising they suffer from interference if no suppression is in place Hope you do an update when you have completed the wiring Dave ▲
⟩⟩
No likes yet
This member will receive 1 point for every like received |
📝 Progress on the hull - At Last!
7 years ago by 🇩🇪 RNinMunich ( Fleet Admiral)
Fleet Admiral)✧ 17 Views · 9 Likes · 4 Comments
Flag
💬 Add Comment
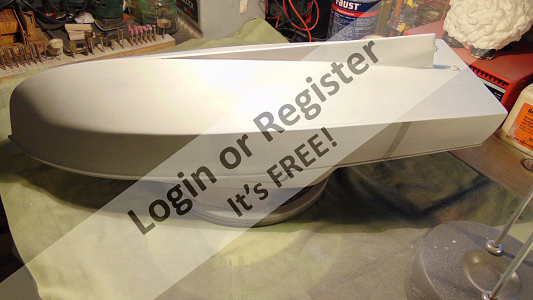
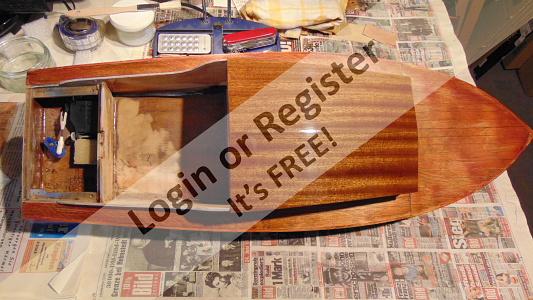
After many distractions and accumulating 'stuff' to go in and on the boat I finally got around to tidying up the hull this week.
After flattening with 180 / 240 wet and dry I sealed with Ezekote flattened again then sprayed with a professional grade primer / filler from the auto branch.
As usual this showed up all the pits so I filled them with Revell Plasto and primed again. After going round this loop a few times I was (reasonably) happy and flattened with 600 W&D.
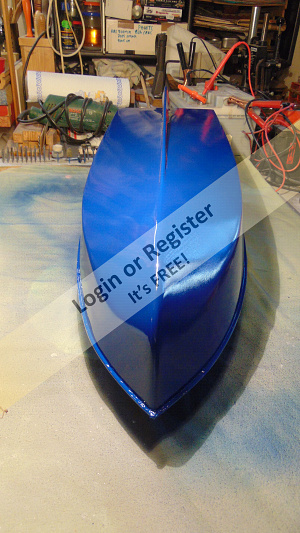
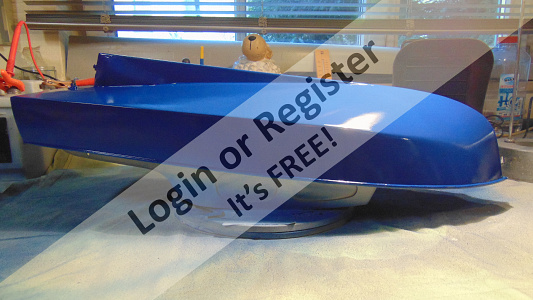
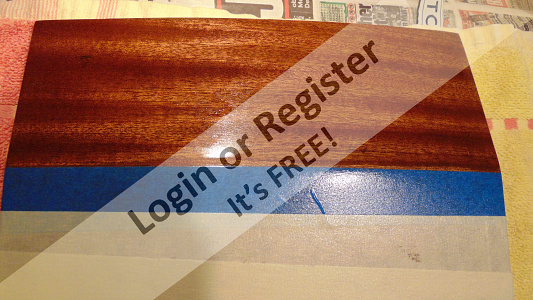
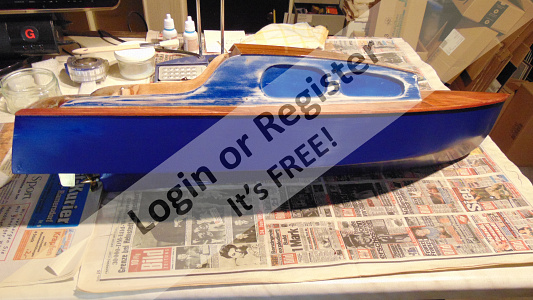
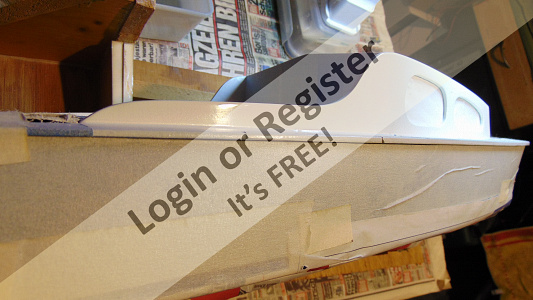
Then sprayed on Royal Blue from a giant rattle can, also from the auto pro market. Flattened off with 1200 W&D between coats. I have Tamiya Royal Blue acrylic for my air brush as well but couldn't be bothered to set up the compressor🤔 Can worked pretty well though. 👍
Last pic shows the 'Before'!
Will leave the final finishing, nameplate and lacquer coat until I have finished the internal fitting out and the cabin. Have decided to plank the cockpit with mahogany😲 just ordered from Krick! First attempt at planking - Wish me luck!
I like the blue hull so much I think I will just mark the waterline with a red (or white?) boot topping stripe. Comments welcome.
Cabin will be white with a blue roof.
Now to continue with the new prop shaft, old one is showing signs of wear at both ends and rust at the wet end 🤔 Anyway it's got an imperial thread which is useless when all my brass props are metric.
More soon, I hope 😉 Cheers Doug 😎


After flattening with 180 / 240 wet and dry I sealed with Ezekote flattened again then sprayed with a professional grade primer / filler from the auto branch.
As usual this showed up all the pits so I filled them with Revell Plasto and primed again. After going round this loop a few times I was (reasonably) happy and flattened with 600 W&D.
Then sprayed on Royal Blue from a giant rattle can, also from the auto pro market. Flattened off with 1200 W&D between coats. I have Tamiya Royal Blue acrylic for my air brush as well but couldn't be bothered to set up the compressor🤔 Can worked pretty well though. 👍
Last pic shows the 'Before'!
Will leave the final finishing, nameplate and lacquer coat until I have finished the internal fitting out and the cabin. Have decided to plank the cockpit with mahogany😲 just ordered from Krick! First attempt at planking - Wish me luck!
I like the blue hull so much I think I will just mark the waterline with a red (or white?) boot topping stripe. Comments welcome.
Cabin will be white with a blue roof.
Now to continue with the new prop shaft, old one is showing signs of wear at both ends and rust at the wet end 🤔 Anyway it's got an imperial thread which is useless when all my brass props are metric.
More soon, I hope 😉 Cheers Doug 😎
▲
⟩⟩
MouldBuilder
Mataroa
BOATSHED
Colin H
figtree7nts
mturpin013
marky
AllenA
Brucef102
|
💬 Progress on the hull - At Last!
6 years ago by 🇨🇦 Donnieboy (
 Warrant Officer) Warrant Officer)✧ 10 Views · 2 Likes
Flag
Gold sounds good.What about a cream colour.Beautiful job on the boat.
▲
⟩⟩
RNinMunich
BOATSHED
|
|
Login To
Remove Ads 💬 Progress on the hull - At Last!
6 years ago by 🇩🇪 RNinMunich (
Fleet Admiral)✧ 9 Views · 0 Likes
Flag
Mornin' Donnieboy, Thankyou😊
That was just the first phase of the hull job, see above for the latest instalment! You might be right about the white 👍 Light blue may not stand out enough though? Have been pondering gold? Ciao, Doug 😎 ▲
⟩⟩
No likes yet
This member will receive 1 point for every like received |
|
💬 Progress on the hull - At Last!
6 years ago by 🇨🇦 Donnieboy (
Warrant Officer)✧ 10 Views · 1 Like
Flag
Nice paint job.What about using a light blue pinstripe.The white I feel will overpower the blue.Just a thought.
▲
⟩⟩
BOATSHED
|
|
💬 Progress on the hull - At Last!
6 years ago by 🇺🇸 figtree7nts (
 Admiral) Admiral)✧ 9 Views · 1 Like
Flag
I like the Blue, Very nice shade of Blue!👍👍👍
▲
⟩⟩
RNinMunich
|
📝 New drive Train and Oiler
6 years ago by 🇩🇪 RNinMunich ( Fleet Admiral)
Fleet Admiral)✧ 14 Views · 6 Likes · 2 Comments
Flag
💬 Add Comment
Most of this actually took place last August / July!
Regular readers may have seen that when Dad built this boat in the 60s he put a Taycol Target field motor in it. About 25 years ago I put a Decaperm and 'modern' transistor ESC in her to provide forward and reverse. Performance was sedate to say the least.
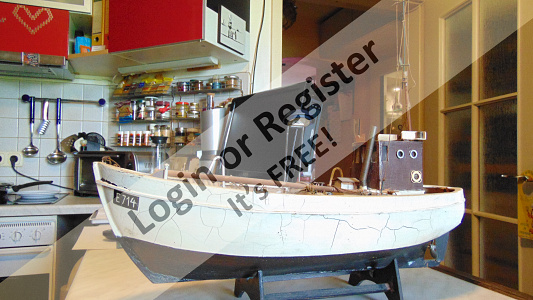
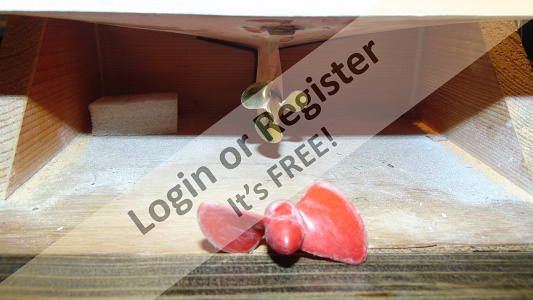
I have since modified the Taycol (see below) so it can be run forward and reverse and decided to put it in an ancient Billings Boats Danish fish cutter (Gina) that I inherited from an Aunt. The cutter is badly in need of renovation (see pic 1) and the Taycol will be more suited to her performance requirement!
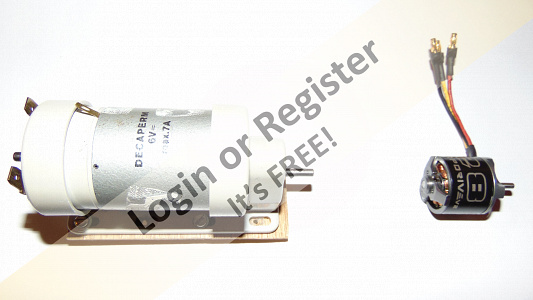
On advice from Canabus in Hobart I obtained a Propdrive 2830 1000kV brushless motor, appropriate ESC and a 35mm 3 blade prop from Raboesch. Pic 2 shows the old and new motors. Next step was to trial fit new motor mount, coupling and prop. Pics 3 &4.
While doing this it became obvious that a new shaft was in order, as mentioned in last update. Soooo, -
appropriate stainless steel rod, thrust washers and set ring were acquired and back to the workshop.
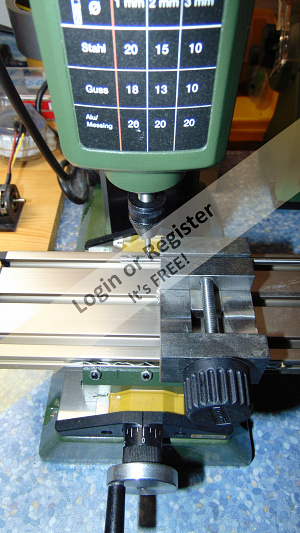
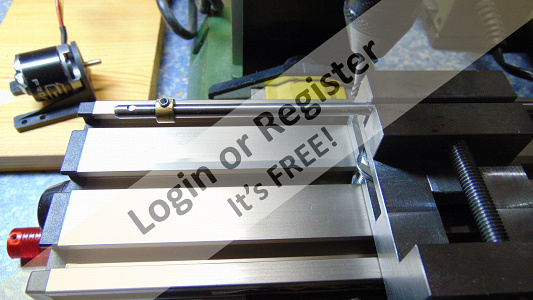
After cutting to length to accommodate the new coupling type a 3mm thread was cut a the prop end. At the inboard end I milled recesses for the grub screws in the set ring and the coupling, pics 5 - 7.
I don't like to just file(or even mill) flats for the screws cos they have a tendency to slip and work loose😡 Trial fitted the new shaft and found I'd boobed a bit with the measurements and need extra thrust washers to make up the difference. 😲 Pic 8. No sweat, they came in a pack of 50 anyway😊 You can also see in this pic that I decided to fit an oiler pipe while everything was in bits anyway.😉
To solder it on in a cramped space without setting the boat on fire 😡 I packed a wet rag underneath and used a gas Kitchen Torch! Known as a 'Gas Gourmet Burner'. Yep, those handy little gas torches like your Missus uses to melt the brown sugar on her Crème Brûlée!! So do I, delicious 😜😉
The torches are not expensive, small, very handy, refillable with lighter gas and can be adjusted to a very small hot flame. ideal for this job. See pics 9 & 10.
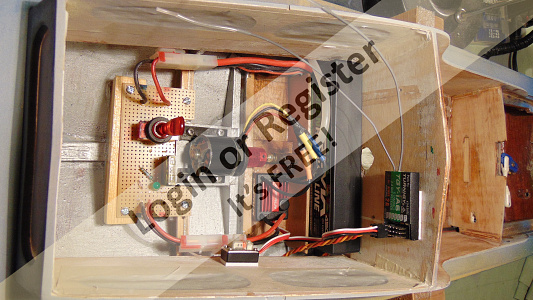
Pic 11 shows the new motor & mount, shaft and coupling all trial fitted after using a brass alignment tool I quickly made up on the lathe. Pic also shows the trial electrical installation after cleaning up the 'machinery compartment' a little and painting with silver Hammerite.
A Quickrun BL ESC is sitting in the bottom in one of the trays my Dad originally fitted for the 2 wet cell (very wet!) 6V lead acid batteries.
The home made board on the left carries the battery and ESC connectors, main ON/OFF switch with LED, blade fuse holder with a 20A fuse and a green LED which tells me if the fuse is blown! Stuck on the walls (OK Bulkheads!) with so called Servo Tape are a 6 ch Turnigy iA6 2.4Gig RX and the arming switch for the ESC. Battery compartment is sized to fit 2S and 3S hard case LiPos. For trials I can fit my Wattmeter forward of the switchboard and splice it into the battery supply using Tamiya connectors.
Might change these to XT60s later if current drain is more than 12 to 15A.
All for now, all this was pulled out again preparatory to cosmetics on the hull, decks, cabin roof and walls inside and out.
But that's another chapter so, 'Tune in next week, same time same channel when once again it's time for
'WHAT DO YOU MEAN BUCK RODGERS IS APPROACHING!? 😁
Or 'The Saga of the Cabin Roof' 😉
Cheers Doug 😎
BTW: After drilling the shaft tube for the oiler pipe I flushed it out with light machine oil (pumped in from a big syringe)
and shoved a few pipe cleaners through (rotating them on the way) to remove any remaining drill swarf!!


Regular readers may have seen that when Dad built this boat in the 60s he put a Taycol Target field motor in it. About 25 years ago I put a Decaperm and 'modern' transistor ESC in her to provide forward and reverse. Performance was sedate to say the least.
I have since modified the Taycol (see below) so it can be run forward and reverse and decided to put it in an ancient Billings Boats Danish fish cutter (Gina) that I inherited from an Aunt. The cutter is badly in need of renovation (see pic 1) and the Taycol will be more suited to her performance requirement!
On advice from Canabus in Hobart I obtained a Propdrive 2830 1000kV brushless motor, appropriate ESC and a 35mm 3 blade prop from Raboesch. Pic 2 shows the old and new motors. Next step was to trial fit new motor mount, coupling and prop. Pics 3 &4.
While doing this it became obvious that a new shaft was in order, as mentioned in last update. Soooo, -
appropriate stainless steel rod, thrust washers and set ring were acquired and back to the workshop.
After cutting to length to accommodate the new coupling type a 3mm thread was cut a the prop end. At the inboard end I milled recesses for the grub screws in the set ring and the coupling, pics 5 - 7.
I don't like to just file(or even mill) flats for the screws cos they have a tendency to slip and work loose😡 Trial fitted the new shaft and found I'd boobed a bit with the measurements and need extra thrust washers to make up the difference. 😲 Pic 8. No sweat, they came in a pack of 50 anyway😊 You can also see in this pic that I decided to fit an oiler pipe while everything was in bits anyway.😉
To solder it on in a cramped space without setting the boat on fire 😡 I packed a wet rag underneath and used a gas Kitchen Torch! Known as a 'Gas Gourmet Burner'. Yep, those handy little gas torches like your Missus uses to melt the brown sugar on her Crème Brûlée!! So do I, delicious 😜😉
The torches are not expensive, small, very handy, refillable with lighter gas and can be adjusted to a very small hot flame. ideal for this job. See pics 9 & 10.
Pic 11 shows the new motor & mount, shaft and coupling all trial fitted after using a brass alignment tool I quickly made up on the lathe. Pic also shows the trial electrical installation after cleaning up the 'machinery compartment' a little and painting with silver Hammerite.
A Quickrun BL ESC is sitting in the bottom in one of the trays my Dad originally fitted for the 2 wet cell (very wet!) 6V lead acid batteries.
The home made board on the left carries the battery and ESC connectors, main ON/OFF switch with LED, blade fuse holder with a 20A fuse and a green LED which tells me if the fuse is blown! Stuck on the walls (OK Bulkheads!) with so called Servo Tape are a 6 ch Turnigy iA6 2.4Gig RX and the arming switch for the ESC. Battery compartment is sized to fit 2S and 3S hard case LiPos. For trials I can fit my Wattmeter forward of the switchboard and splice it into the battery supply using Tamiya connectors.
Might change these to XT60s later if current drain is more than 12 to 15A.
All for now, all this was pulled out again preparatory to cosmetics on the hull, decks, cabin roof and walls inside and out.
But that's another chapter so, 'Tune in next week, same time same channel when once again it's time for
'WHAT DO YOU MEAN BUCK RODGERS IS APPROACHING!? 😁
Or 'The Saga of the Cabin Roof' 😉
Cheers Doug 😎
BTW: After drilling the shaft tube for the oiler pipe I flushed it out with light machine oil (pumped in from a big syringe)
and shoved a few pipe cleaners through (rotating them on the way) to remove any remaining drill swarf!!
▲
⟩⟩
Mataroa
BOATSHED
mturpin013
Donnieboy
Colin H
figtree7nts
|
💬 New drive Train and Oiler
6 years ago by 🇩🇪 RNinMunich (
Fleet Admiral)✧ 10 Views · 1 Like
Flag
Cross my palm with silver!!! (Just call me Fagin😉)
Labour and materials free of charge. Travel expense only will be charged: 'At Cost'! Business Class of course😁😁 Before I started on that little exercise I spent an hour or so cleaning, oiling and adjusting the set screws! The actual work only took about 15 or 20 minutes😲 ▲
⟩⟩
Donnieboy
|
|
💬 New drive Train and Oiler
6 years ago by 🇬🇧 mturpin013 (
Admiral)✧ 11 Views · 3 Likes
Flag
your milling machine looks so clean can you come round and clean mine
▲
⟩⟩
RNinMunich
Donnieboy
BOATSHED
|
📝 The Saga of the Cabin Roof or - Arrrgh!
6 years ago by 🇩🇪 RNinMunich ( Fleet Admiral)
Fleet Admiral)✧ 13 Views · 4 Likes · 4 Comments
Flag
💬 Add Comment
Typical of Aeorokits the cabin roof skin was made of two thin pieces of ply < 1mm. Over the 50 years or so the overhang corners had started to curl up and crack 😲 Pics 1 & 2 show the 'off the shelf' condition after 25 years of neglect 🤔.
First I tried to correct this by soaking in hot water and flattening under a car battery (flattens most things😉). So far so good. Then some super glue in the cracks and back under the battery. After a day or two it just curled up again. Ho hum! Pour a glass of wine and back to the thinking board.
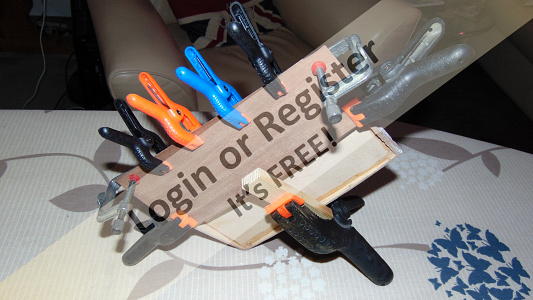
Seconds Out - Round Two! Thought, OK make new pieces from the 0.6mm ply I still have and paint it - then my eye fell on some 1mm mahogany sheet (Ouch 😭). Tried to make the whole roof skin in one piece of this but the compound curve defeated me. The skin was steamed and soaked in hot water and clamped across the roof frame. Next morning - Arrrgh! Had started to crack along the centre line 😭 More thinks!!
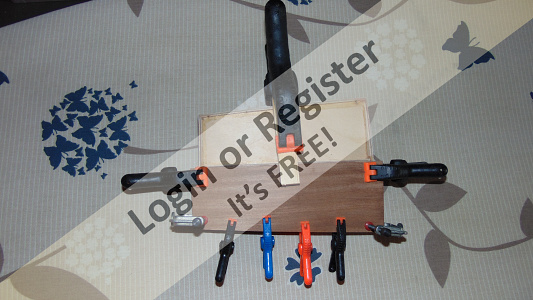
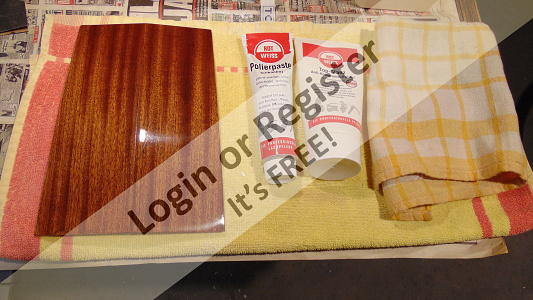
Carefully cut down the middle and glued and clamped the separate pieces; pics 3&4. Getting the two pieces to match in the middle was a tedious ***!!! Pic 5. Then mucho sanding. followed by 2 coats of Lord Nelson sealer, sand back with 600 grit sanding sponge. Then two coats of Lord Nelson matt varnish, sanding with 1000 grit in between.
then two coats of Lord Nelson gloss varnish, sanding with 2000 grit in between. Pic 6. So far so good, pic 6.
3rd coat of varnish and - Arrrgh 2! 😡 Pic 7. No idea why!
Sand off and start again, pic 8 😭
Treated each side separately, pics 9 & 10 and flatted off with 2000 grit. Then applied three coats of clear protective lacquer, sanding with 3000 grit between coats.
Finally cutting back with auto paint restorer / cutting polish and finally polishing with anti-hologram finishing polish. Pic 11.
Now I'm happy 😊 Pic 12. Only took a week 😉
Next week in this theatre -
"I love you too Flash but we've only got 15 minutes to save the world"!
or
'Will I ever get this hull finished?"
😎


First I tried to correct this by soaking in hot water and flattening under a car battery (flattens most things😉). So far so good. Then some super glue in the cracks and back under the battery. After a day or two it just curled up again. Ho hum! Pour a glass of wine and back to the thinking board.
Seconds Out - Round Two! Thought, OK make new pieces from the 0.6mm ply I still have and paint it - then my eye fell on some 1mm mahogany sheet (Ouch 😭). Tried to make the whole roof skin in one piece of this but the compound curve defeated me. The skin was steamed and soaked in hot water and clamped across the roof frame. Next morning - Arrrgh! Had started to crack along the centre line 😭 More thinks!!
Carefully cut down the middle and glued and clamped the separate pieces; pics 3&4. Getting the two pieces to match in the middle was a tedious ***!!! Pic 5. Then mucho sanding. followed by 2 coats of Lord Nelson sealer, sand back with 600 grit sanding sponge. Then two coats of Lord Nelson matt varnish, sanding with 1000 grit in between.
then two coats of Lord Nelson gloss varnish, sanding with 2000 grit in between. Pic 6. So far so good, pic 6.
3rd coat of varnish and - Arrrgh 2! 😡 Pic 7. No idea why!
Sand off and start again, pic 8 😭
Treated each side separately, pics 9 & 10 and flatted off with 2000 grit. Then applied three coats of clear protective lacquer, sanding with 3000 grit between coats.
Finally cutting back with auto paint restorer / cutting polish and finally polishing with anti-hologram finishing polish. Pic 11.
Now I'm happy 😊 Pic 12. Only took a week 😉
Next week in this theatre -
"I love you too Flash but we've only got 15 minutes to save the world"!
or
'Will I ever get this hull finished?"
😎
▲
⟩⟩
Mataroa
BOATSHED
Colin H
figtree7nts
|
💬 The Saga of the Cabin Roof or - Arrrgh!
6 years ago by 🇩🇪 RNinMunich (
Fleet Admiral)✧ 9 Views · 0 Likes
Flag
Did you mean me John? Or Mike?
I had considered planking but my mahogany planks are very very thin about 0.5mm x 5mm wide, and I would still have had the problem of 'warping on' a plywood base skin. So I persevered with the mahogany veneer and I'm happy now with the result of making it in two pieces. matching the edges for the centre line joint took the most time 🤔 More power to your plank cutters Gents👍 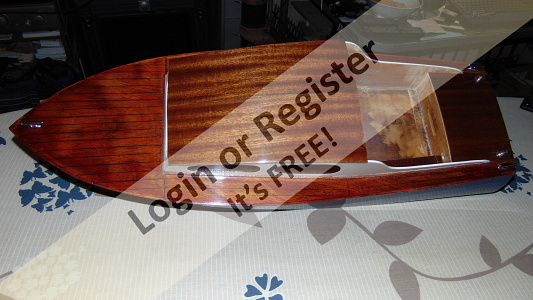
▲
⟩⟩
No likes yet
This member will receive 1 point for every like received |
|
Login To
Remove Ads 💬 The Saga of the Cabin Roof or - Arrrgh!
6 years ago by 🇬🇧 onetenor (
 Sub-Lieutenant) Sub-Lieutenant)✧ 9 Views · 0 Likes
Flag
Could you plank it or would matching the joints be hard to do?🤔. I suppose they could be veed to disguise them?🤔👍
▲
⟩⟩
No likes yet
This member will receive 1 point for every like received |
|
💬 The Saga of the Cabin Roof or - Arrrgh!
6 years ago by 🇩🇪 RNinMunich (
Fleet Admiral)✧ 12 Views · 3 Likes
Flag
Evenin' MT, Thanks👍
Yep I know blooming from my car restoration days. Causes a dull satin effect with some whitish fogging 😡 That's not what happened here, suddenly a patch of yellowish spots appeared under the gloss!😭 Only thing I can think of is that with the last flattening with 3000 grit I used a drop of liquid soap to lubricate the sanding sponge, gives that almost glass finish. Maybe some soap residue was still there and the next lacquer coat reacted with it? The soap is a trick I learned during car repairs. Of course then I could wash it all off with a big sponge and chuck a bucket of water over it! Not such a good idea with a model wooden boat🤔 Re 'Your skins' 😲 I used mahogany 'because it was there' and I suddenly had a picture in my mind what it could look like (Riva style😉) if I could do the job right! I'm pretty happy with how it eventually worked out 😊 Not sure that a mahog roof fits the image of an RAF boat? and painting it would be a shame 🤔 But if you do decide to use it you may have more luck with 0.5mm, mine was 1mm+. What are the 'existing skins'? Re clothing: I didn't do that, didn't want to risk obscuring the wood grain on the outside and the inside I had sealed with two coats of EzeKote anyway. Cloth would have been superfluous. But if you're going to paint the roof anyway then - why not? Would give strength and rigidity. Thicker ply? More than 0.5 / 0.6mm and you may have the problem I had with the compound curve!!! Cheers Doug 😎 ▲
⟩⟩
marky
Donnieboy
Colin H
|
|
💬 The Saga of the Cabin Roof or - Arrrgh!
6 years ago by 🇬🇧 mturpin013 (
Admiral)✧ 12 Views · 4 Likes
Flag
Hi there, Patience is a virtue, of which you appear to have a lot. AS for your slight "blooming /blushing my only answer is (raining or exceptionally cold or humid weather which often occurs when rapid evaporation of solvent cools the air over the coating below the dew point.) (internet is brilliant) however
you've set me thinking now as as you will have seen in my blog having got the roof mechanism working I have yet to apply the skins. I appreciate any thoughts on - 1 Using existing skins? 2 Using existing skins and then f/glass and cloth both sides? 3 I have a quantity of mahogany veneer 0.5mm from memory, three sheets cross grain and glue whilst the held in the compound curve? 4 use thicker ply? ▲
⟩⟩
RNinMunich
BOATSHED
Colin H
Donnieboy
|
📝 Main deck and cabin walls
6 years ago by 🇩🇪 RNinMunich ( Fleet Admiral)
Fleet Admiral)✧ 70 Views · 8 Likes · 2 Comments
Flag
💬 Add Comment
Sorry the advertised Flash Gordon reel has gone 'walkies' so you'll have to make do with this boring description of how to occupy a day or three and stink out the house!😁
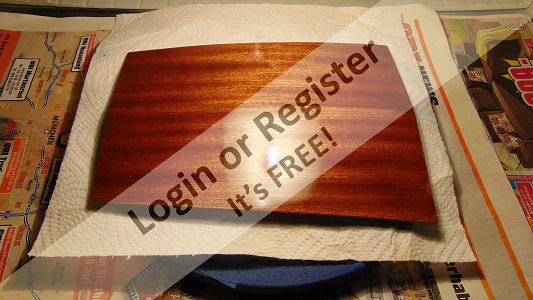
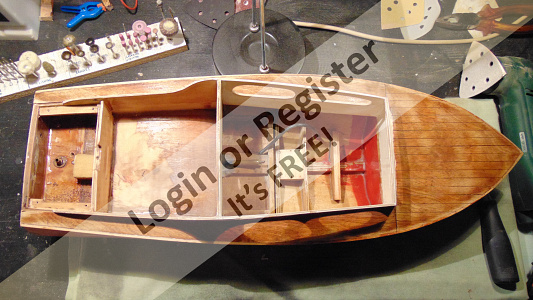
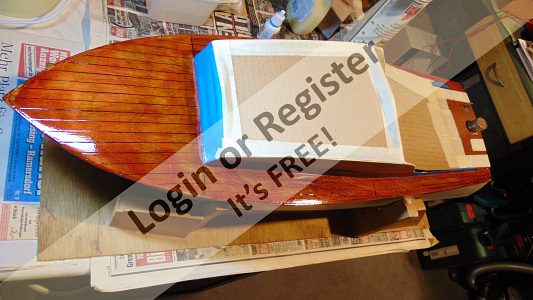
After the eventual success with the cabin roof I continued with the main deck using essentially the same process. First I had to extend the planking (engraving) from cabin leading edge back to the transom. Dad had only done the foredeck. Pic 1 shows starting point. AKA Square One!
Pic 2 after initial staining, pseudo planking and sealing. Plank engraving was done with a fine hardened steel scriber / centre punch and a steel rule clamped at 7mm centres. Rule was aligned so that the wood grain pushed the scriber against it. Don't ask how I realised that that was the way to do it (minor Arrrgh!)😡 Anyway, worked out in the end.
I had started with cherry wood stain but it came out too bright red so from Krick I obtained some Jotica mahogany stain (also some Oak stain for the decks of my Prince of Wales and Bismarck - but that's another pair of Sagas to be.)
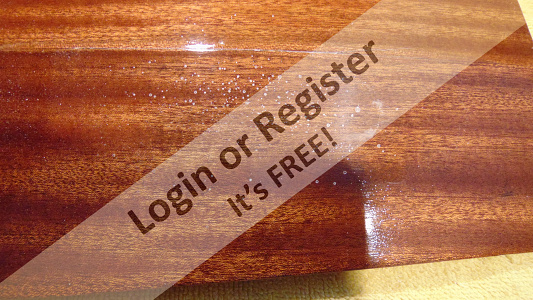
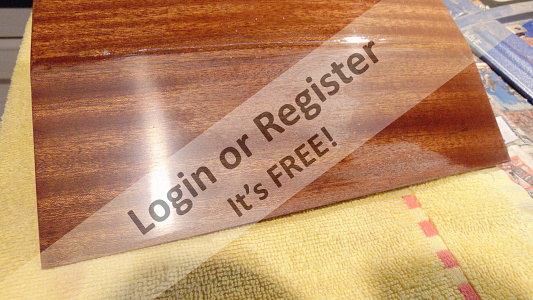
Using basically the same process as for the cabin roof: two sealing coats, two matt varnish primer coats, two gloss varnish coats, two protective lacquer coats, polishing with cutting polish and top gloss polish, and lots of patience and elbow grease (this time an italian Lugana😉) pics 3 to 5 show the result. I'm 'appy with that 😊 Note: to remove build up of sanding residue from the 'planking caulking' I had to resort to an old toothbrush or nail-brush from time to time. The sponge couldn't hack it.
The aft deck 'hatch' is still the temporary bodge-up I made 25 years ago to quickly get the boat going for my daughter. Think the ply (ca 4mm) came from the back of an old bureaux!
Haven't decided yet whether to make the new one from the same mahogany as the roof or thin ply and stain like the main deck.
Suggestions welcome please.
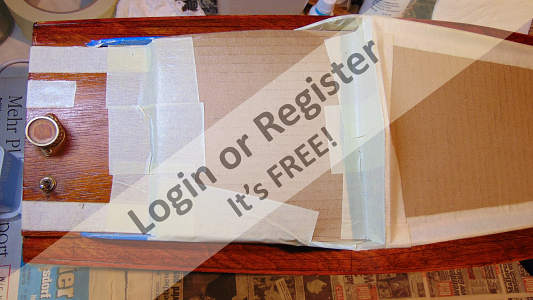
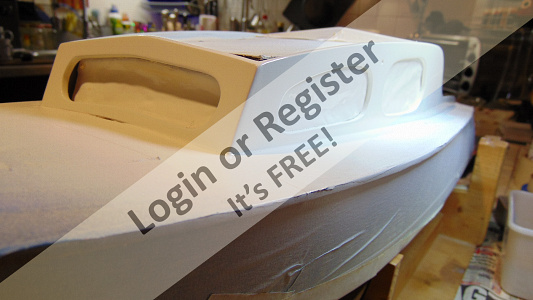
After the deck time to turn my attention to the cabin walls, looking pretty shabby and full of over-spray - pic 6 😲
Step 0: masking off, pics 7 & 8 'All Dressed Up and Nowhere To Go'🤔
Step 1: mucho sanding starting with 180 grit and working through to 600 ensuring removal of all traces of blue as I wanted the final finish to be Arctic White (not Ice Blue!)
Step 2: two sealing coats, flattening with 600 grit.
Step 3: spraying with Revell white primer, not impressed, gave a rough dusty finish🤔
Step 4: sand off Revell muck, flat back with 1000 and 1500 grit sponges, respray with two coats of pro white primer, flattening with 1500 and 2000+ soap respectively. Much better 😊 like the proverbial baby's ...!
Step 5: two coats of gloss white, same make as the primer!!!, flattening with 3000 grit sponge, wet + a drop of liquid soap.
Step 6: two coats of protective lacquer as with the varnish. Flattening with 3000 and soap between coats only.
Interesting effect with this lacquer and the paint (as opposed to the varnish); it seemed to 'melt and fuse' with the paint surface and smooth it out.😊 Just had to be careful not to apply too much at once in case it all ran down and took the paint with it!
Step 7: finishing with cutting polish and anti-hologram polish.
Results: pics 9 - 11. Final effect makes it look and feel like plastic or fibreglass, almost forgot that there is wood underneath😁
Next in this theatre "Hi Ho Silver Awaaaayyyy!" (Sponsored by KiOra!) or 'I'm gonna finish this hull if it kills me!'
(sorry Flash reels got lost in the post😡)
Cheers Doug 😎


After the eventual success with the cabin roof I continued with the main deck using essentially the same process. First I had to extend the planking (engraving) from cabin leading edge back to the transom. Dad had only done the foredeck. Pic 1 shows starting point. AKA Square One!
Pic 2 after initial staining, pseudo planking and sealing. Plank engraving was done with a fine hardened steel scriber / centre punch and a steel rule clamped at 7mm centres. Rule was aligned so that the wood grain pushed the scriber against it. Don't ask how I realised that that was the way to do it (minor Arrrgh!)😡 Anyway, worked out in the end.
I had started with cherry wood stain but it came out too bright red so from Krick I obtained some Jotica mahogany stain (also some Oak stain for the decks of my Prince of Wales and Bismarck - but that's another pair of Sagas to be.)
Using basically the same process as for the cabin roof: two sealing coats, two matt varnish primer coats, two gloss varnish coats, two protective lacquer coats, polishing with cutting polish and top gloss polish, and lots of patience and elbow grease (this time an italian Lugana😉) pics 3 to 5 show the result. I'm 'appy with that 😊 Note: to remove build up of sanding residue from the 'planking caulking' I had to resort to an old toothbrush or nail-brush from time to time. The sponge couldn't hack it.
The aft deck 'hatch' is still the temporary bodge-up I made 25 years ago to quickly get the boat going for my daughter. Think the ply (ca 4mm) came from the back of an old bureaux!
Haven't decided yet whether to make the new one from the same mahogany as the roof or thin ply and stain like the main deck.
Suggestions welcome please.
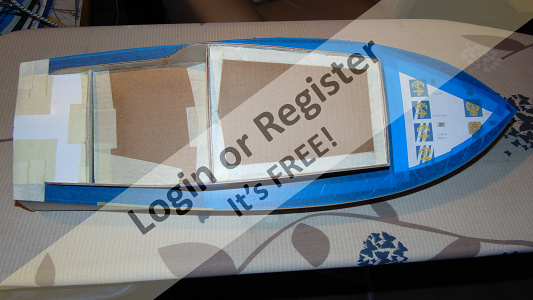
After the deck time to turn my attention to the cabin walls, looking pretty shabby and full of over-spray - pic 6 😲
Step 0: masking off, pics 7 & 8 'All Dressed Up and Nowhere To Go'🤔
Step 1: mucho sanding starting with 180 grit and working through to 600 ensuring removal of all traces of blue as I wanted the final finish to be Arctic White (not Ice Blue!)
Step 2: two sealing coats, flattening with 600 grit.
Step 3: spraying with Revell white primer, not impressed, gave a rough dusty finish🤔
Step 4: sand off Revell muck, flat back with 1000 and 1500 grit sponges, respray with two coats of pro white primer, flattening with 1500 and 2000+ soap respectively. Much better 😊 like the proverbial baby's ...!
Step 5: two coats of gloss white, same make as the primer!!!, flattening with 3000 grit sponge, wet + a drop of liquid soap.
Step 6: two coats of protective lacquer as with the varnish. Flattening with 3000 and soap between coats only.
Interesting effect with this lacquer and the paint (as opposed to the varnish); it seemed to 'melt and fuse' with the paint surface and smooth it out.😊 Just had to be careful not to apply too much at once in case it all ran down and took the paint with it!
Step 7: finishing with cutting polish and anti-hologram polish.
Results: pics 9 - 11. Final effect makes it look and feel like plastic or fibreglass, almost forgot that there is wood underneath😁
Next in this theatre "Hi Ho Silver Awaaaayyyy!" (Sponsored by KiOra!) or 'I'm gonna finish this hull if it kills me!'
(sorry Flash reels got lost in the post😡)
Cheers Doug 😎
▲
⟩⟩
Mataroa
kmbcsecretary
BOATSHED
Donnieboy
mturpin013
marky
MouldBuilder
John2
|
💬 Main deck and cabin walls
6 years ago by 🇩🇪 RNinMunich (
Fleet Admiral)✧ 65 Views · 2 Likes
Flag
Many Thanks MT, 👍
You're right! I've already marked out the 'hatch' on some 1.5mm mahogany to match the roof. Have to think about the surround, i.e. have a rummage through the bits box! But I reckon you're right again, it would look better with some sort of frame. Still haven't figured out what to do with the cockpit, or even what scale crew I should be looking for ... Help!😲 Re Cabin roof detail .. That's it for now, until I start fiddling with mast and lights an' such 😉 What did you want to know? I've got a ship's wheel ca 1", some chrome deck fittings and Skydive has given me some inspiration regarding the 'Pulpit' rail, apart from that ...... Ciao, Doug 😎 Just remembered; I've started cutting out some 1.5mm mahog strip to make the wooden handrails on the roof. More later 😊 ▲
⟩⟩
Krampus
BOATSHED
|
|
💬 Main deck and cabin walls
6 years ago by 🇬🇧 mturpin013 (
Admiral)✧ 65 Views · 3 Likes
Flag
looking good, as for the aft deck 'hatch' go for mahogany, and maybe a bit of surround in another wood round a hatch to break up the area. Anymore detail on the roof?
▲
⟩⟩
BOATSHED
RNinMunich
Donnieboy
|


Login To
Remove Ads
Remove Ads